alternator GEELY MK 2008 Workshop Manual
[x] Cancel search | Manufacturer: GEELY, Model Year: 2008, Model line: MK, Model: GEELY MK 2008Pages: 416, PDF Size: 25.19 MB
Page 43 of 416

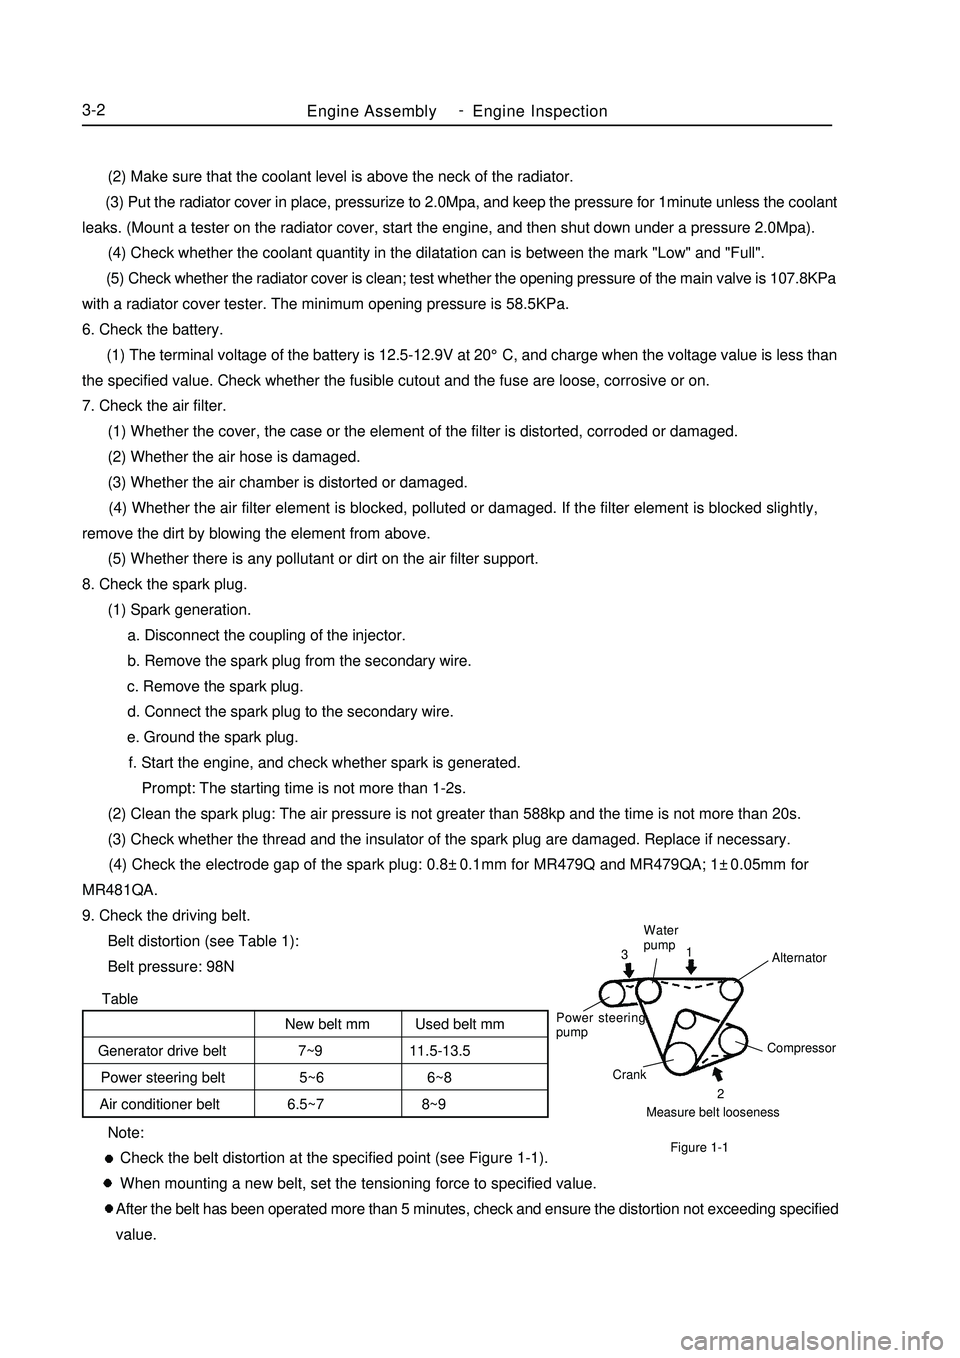
TableEngine AssemblyEngine Inspection3-2 Note:
Check the belt distortion at the specified point (see Figure 1-1).
When mounting a new belt, set the tensioning force to specified value.
After the belt has been operated more than 5 minutes, check and ensure the distortion not exceeding specified
value. (2) Make sure that the coolant level is above the neck of the radiator.
(3) Put the radiator cover in place, pressurize to 2.0Mpa, and keep the pressure for 1minute unless the coolant
leaks. (Mount a tester on the radiator cover, start the engine, and then shut down under a pressure 2.0Mpa).
(4) Check whether the coolant quantity in the dilatation can is between the mark "Low" and "Full".
(5) Check whether the radiator cover is clean; test whether the opening pressure of the main valve is 107.8KPa
with a radiator cover tester. The minimum opening pressure is 58.5KPa.
6. Check the battery.
(1) The terminal voltage of the battery is 12.5-12.9V at 20°C, and charge when the voltage value is less than
the specified value. Check whether the fusible cutout and the fuse are loose, corrosive or on.
7. Check the air filter.
(1) Whether the cover, the case or the element of the filter is distorted, corroded or damaged.
(2) Whether the air hose is damaged.
(3) Whether the air chamber is distorted or damaged.
(4) Whether the air filter element is blocked, polluted or damaged. If the filter element is blocked slightly,
remove the dirt by blowing the element from above.
(5) Whether there is any pollutant or dirt on the air filter support.
8. Check the spark plug.
(1) Spark generation.
a. Disconnect the coupling of the injector.
b. Remove the spark plug from the secondary wire.
c. Remove the spark plug.
d. Connect the spark plug to the secondary wire.
e. Ground the spark plug.
f. Start the engine, and check whether spark is generated.
Prompt: The starting time is not more than 1-2s.
(2) Clean the spark plug: The air pressure is not greater than 588kp and the time is not more than 20s.
(3) Check whether the thread and the insulator of the spark plug are damaged. Replace if necessary.
(4) Check the electrode gap of the spark plug: 0.8±0.1mm for MR479Q and MR479QA; 1±0.05mm for
MR481QA.
9. Check the driving belt.
Belt distortion (see Table 1):
Belt pressure: 98NMeasure belt loosenessCompressor
Crank Power steering
pumpWater
pump
Alternator2 1
3Figure 1-1New belt mm Used belt mm
Generator drive belt 7~9 11.5-13.5
Power steering belt 5~6 6~8
Air conditioner belt 6.5~7 8~9 -
Page 191 of 416

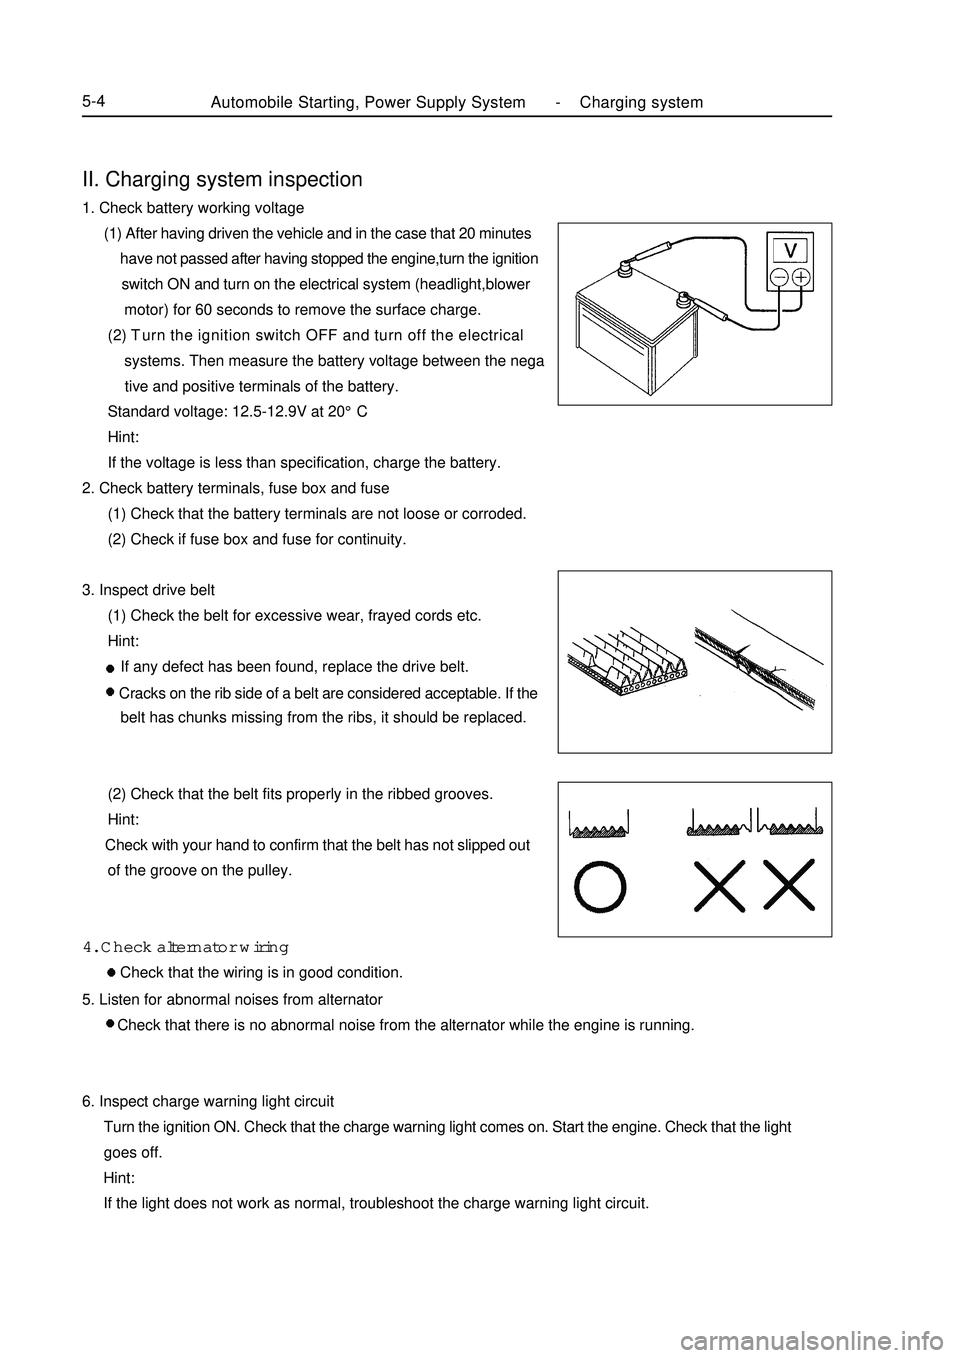
II. Charging system inspection1. Check battery working voltage
(1) After having driven the vehicle and in the case that 20 minutes
have not passed after having stopped the engine,turn the ignition
switch ON and turn on the electrical system (headlight,blower
motor) for 60 seconds to remove the surface charge.
(2) Turn the ignition switch OFF and turn off the electrical
systems. Then measure the battery voltage between the nega
tive and positive terminals of the battery.
Standard voltage: 12.5-12.9V at 20°C
Hint:
If the voltage is less than specification, charge the battery.
2. Check battery terminals, fuse box and fuse
(1) Check that the battery terminals are not loose or corroded.
(2) Check if fuse box and fuse for continuity.
3. Inspect drive belt
(1) Check the belt for excessive wear, frayed cords etc.
Hint:
If any defect has been found, replace the drive belt.
Cracks on the rib side of a belt are considered acceptable. If the
belt has chunks missing from the ribs, it should be replaced.
(2) Check that the belt fits properly in the ribbed grooves.
Hint:
Check with your hand to confirm that the belt has not slipped out
of the groove on the pulley.
4. Check alternator wiring
Check that the wiring is in good condition.Automobile Starting, Power Supply System -Charging system5-45. Listen for abnormal noises from alternator
Check that there is no abnormal noise from the alternator while the engine is running.
6. Inspect charge warning light circuit
Turn the ignition ON. Check that the charge warning light comes on. Start the engine. Check that the light
goes off.
Hint:
If the light does not work as normal, troubleshoot the charge warning light circuit.
Page 192 of 416

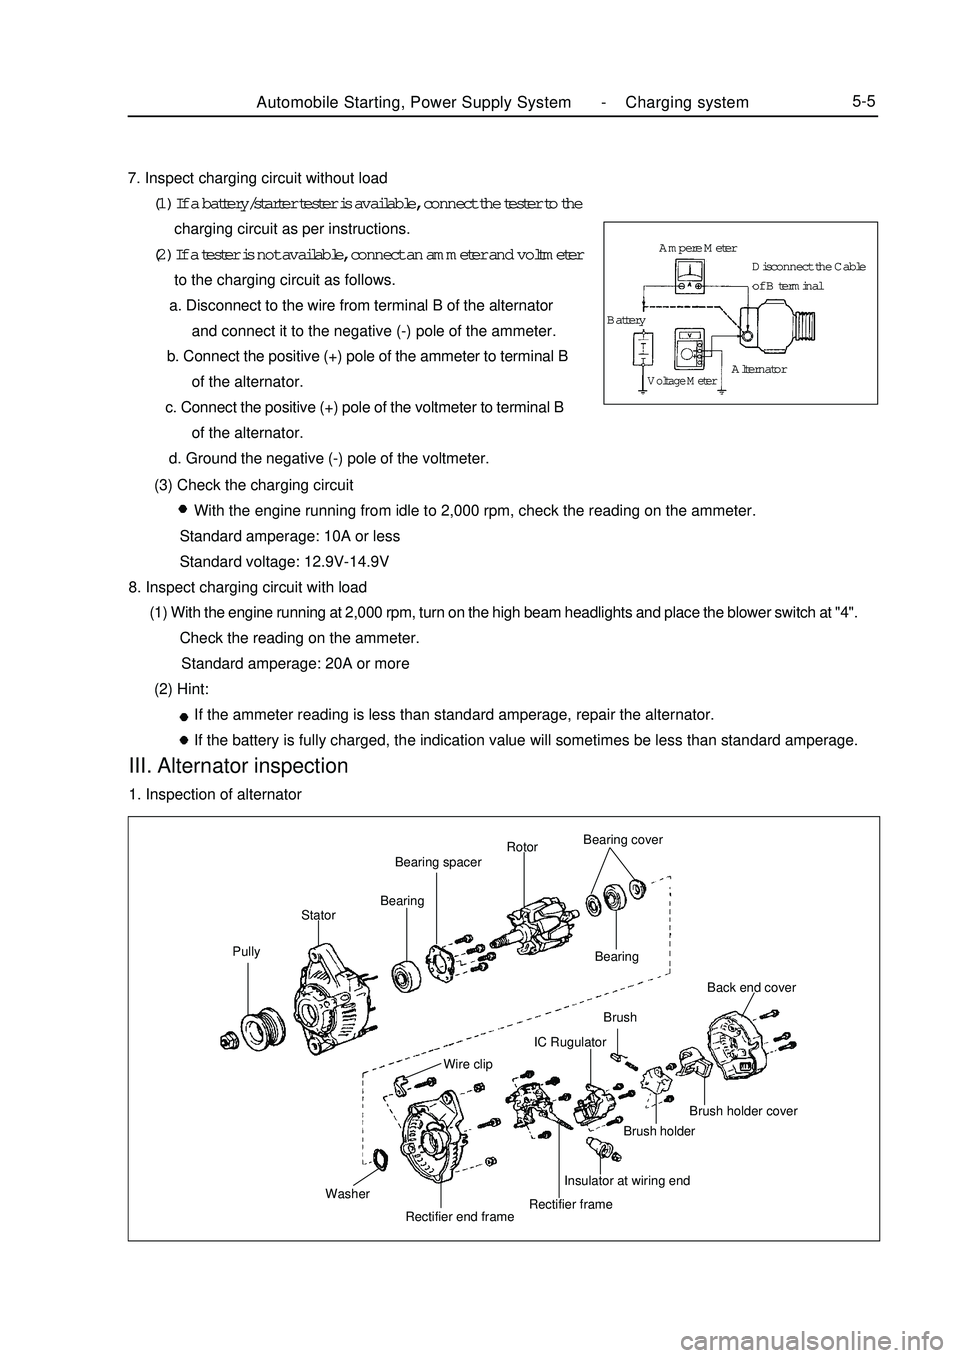
Automobile Starting, Power Supply System -Charging system5-57. Inspect charging circuit without load
(1) If a battery/starter tester is available, connect the tester to the
charging circuit as per instructions.
(2) If a tester is not available, connect an ammeter and voltmeter
to the charging circuit as follows.
a. Disconnect to the wire from terminal B of the alternator
and connect it to the negative (-) pole of the ammeter.
b. Connect the positive (+) pole of the ammeter to terminal B
of the alternator.
c. Connect the positive (+) pole of the voltmeter to terminal B
of the alternator.
d. Ground the negative (-) pole of the voltmeter.
(3) Check the charging circuit
With the engine running from idle to 2,000 rpm, check the reading on the ammeter.
Standard amperage: 10A or less
Standard voltage: 12.9V-14.9V
8. Inspect charging circuit with load
(1) With the engine running at 2,000 rpm, turn on the high beam headlights and place the blower switch at "4".
Check the reading on the ammeter.
Standard amperage: 20A or more
(2) Hint:
If the ammeter reading is less than standard amperage, repair the alternator.
If the battery is fully charged, the indication value will sometimes be less than standard amperage.III. Alternator inspection1. Inspection of alternatorPullyStatorBearingBearing spacerRotorBearing cover
Bearing
Wire clipBrush
Washer
Rectifier end frameRectifier frameInsulator at wiring endBrush holderBrush holder coverBack end coverIC RugulatorAmpere Meter
BatteryVoltage MeterAlternatorDisconnect the Cable
of B terminal
Page 193 of 416

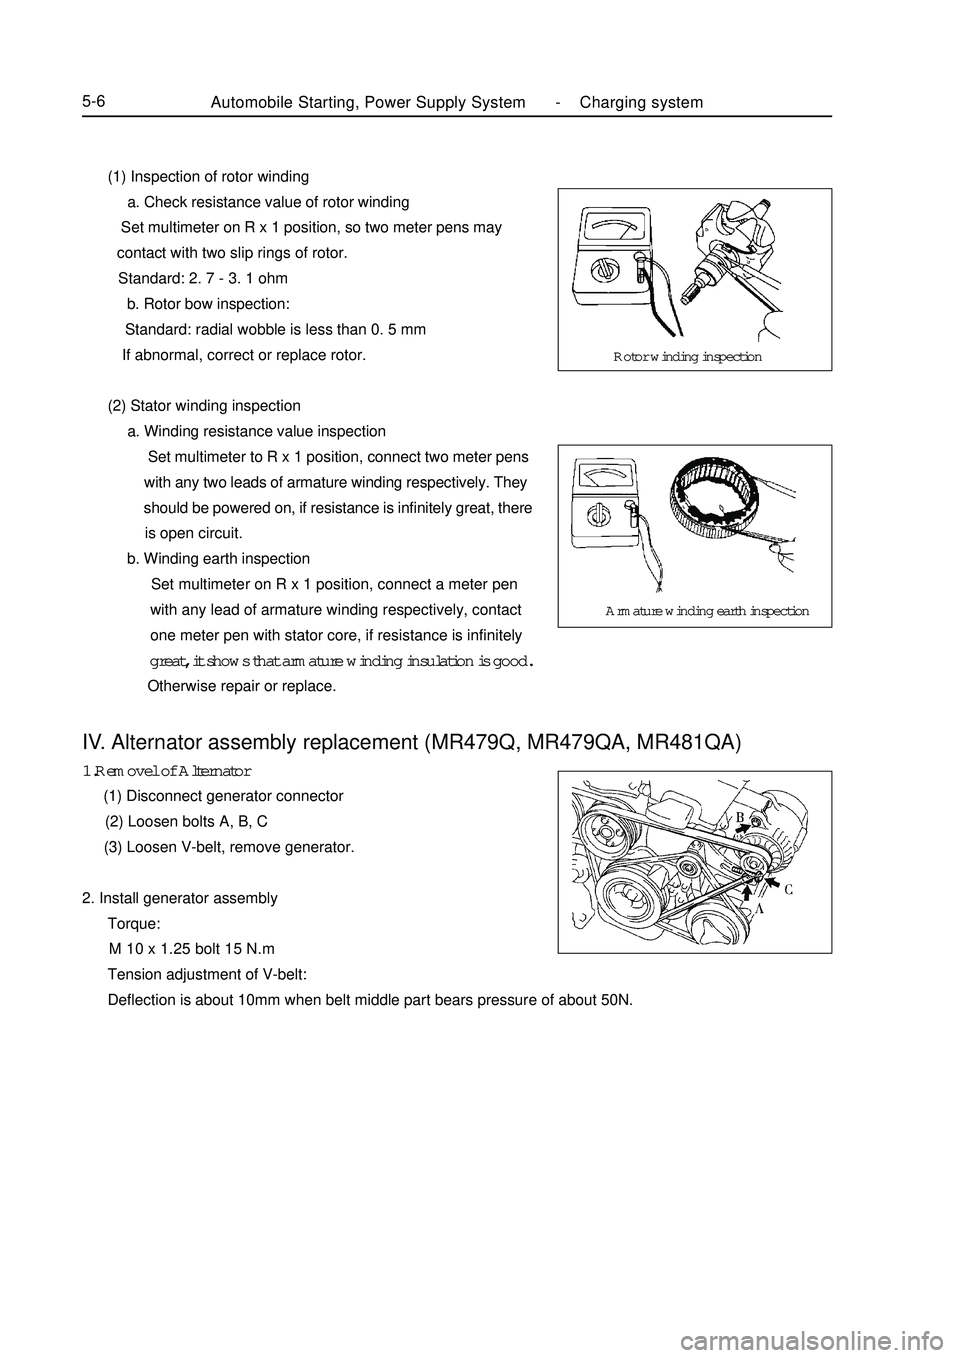
(1) Inspection of rotor winding
a. Check resistance value of rotor winding
Set multimeter on R x 1 position, so two meter pens may
contact with two slip rings of rotor.
Standard: 2. 7 - 3. 1 ohm
b. Rotor bow inspection:
Standard: radial wobble is less than 0. 5 mm
If abnormal, correct or replace rotor.
(2) Stator winding inspection
a. Winding resistance value inspection
Set multimeter to R x 1 position, connect two meter pens
with any two leads of armature winding respectively. They
should be powered on, if resistance is infinitely great, there
is open circuit.
b. Winding earth inspection
Set multimeter on R x 1 position, connect a meter pen
with any lead of armature winding respectively, contact
one meter pen with stator core, if resistance is infinitely
great, it shows that armature winding insulation is good.
Otherwise repair or replace.Automobile Starting, Power Supply System -Charging system5-6IV. Alternator assembly replacement (MR479Q, MR479QA, MR481QA)1.Removel of Alternator
(1) Disconnect generator connector
(2) Loosen bolts A, B, C
(3) Loosen V-belt, remove generator.
2. Install generator assembly
Torque:
M 10 x 1.25 bolt 15 N.m
Tension adjustment of V-belt:
Deflection is about 10mm when belt middle part bears pressure of about 50N.Rotor winding inspection
Armature winding earth inspection
Page 203 of 416

Suspected area
1. Wiring harness or connector
2. ECM
3. Combination instrument assy.
1. Wiring harness or connector
2. Alternator
3. Combination instrument assy.
1. Wiring harness or connector
2. Manual brake switch
3. Combination instrument assy.
1. Wiring harness or connector
2. Brake fluid level switch
3. Combination instrument assy.
1. Wiring harness or connector
2. ABS ECU or ABS warning lamp driving module
3. Combination instrument assy.
1. Wiring harness or connector
2. Airbag ECU controller
3. Combination instrument assy.
1. Wiring harness or connector
2. Airbag ECU controller
3. Combination instrument assy.
1. Wiring harness or connector
2. Front head light dimmer switch
3. Combination instrument assy.
1. Wiring harness or connector
2. Front head light dimmer switch
3. Combination instrument assy.
1. Wiring harness or connector
2. Rear defrost switch
3. Combination instrument assy. 8. Warning lamp fails
Symptom
Check that engine warning lamp does not
illuminate
Charge warning lamp does not illuminate
Park braking warning lamp does not
illuminate
Brake failure warning lamp does not
illuminate
ABS warning lamp does not illuminate
SRS warning lamp does not illuminate
Passenger's airbag indicator lamp does
not illuminate
High beam indicator lamp does not
illuminate
Rear foglight indicator lamp does not
illuminate
Rear defrost indicator lamp does not
illuminate5-16Combination Instrument System -Malfunction Symptom Table and Troubleshooting