stop start GEELY MK 2008 Workshop Manual
[x] Cancel search | Manufacturer: GEELY, Model Year: 2008, Model line: MK, Model: GEELY MK 2008Pages: 416, PDF Size: 25.19 MB
Page 7 of 416
Table of Contents IV Section 7 Rear Brake Drum ............................................................................................ 4-99
Section 8 Parking Brake System.......................................................................................4-106Part V Electric System & AccessoryChapter 1 Starting and Charging System......................................................................... 5-1
Section 1 Starting System (MR479Q, MR479QA, MR481QA) ...................................... 5-1
Section 2 Charging System (MR479Q, MR479QA, MR481QA) .................................... 5-3
Chapter 2 Combination Instrument System..................................................................... 5-7
Section 1 Wiring diagram of Combination Instrument and Location of Multi-pin Plug-in Terminal5-7
Section 2 Malfunction Symptom Table and Troubleshooting ......................................... 5-10
Chapter 3 Wiper and Washer System............................................................................... 5-21
Section 1 Wiper and Washer System Inspection ........................................................... 5-21
Section 2 Replacement and Adjustment ........................................................................ 5-23
Chapter 4 Light System...................................................................................................... 5-26
Section 1 Light System Introduction ............................................................................... 5-26
Section 2 Light System Malfunction Inspection ............................................................. 5-28
Section 3 Headlamp Replacement ................................................................................. 5-34
Section 4 Front Fog Lamp Replacement ...................................................................... 5-35
Section 5 Rear Combination Lamp Replacement .......................................................... 5-36
Section 6 High-mounted Stop light Replacement .......................................................... 5-36
Section 7 Front Reading Lamp Replacement ................................................................ 5-37
Section 8 Rear Reading Lamp Replacement ................................................................. 5-37
Section 9 License Plate Lamp Replacement ................................................................. 5-37
Chapter 5 Audio System..................................................................................................... 5-38
Section 1 Audio System Description .............................................................................. 5-38
Section 2 Audio System Connector Terminal Layout ..................................................... 5-40
Section 3 Audio System Inspection ................................................................................ 5-41
Section 4 Audio System Replacement ........................................................................... 5-52
Chapter 6 SRS (Supplemental Restraint System)............................................................ 5-54
Page 28 of 416
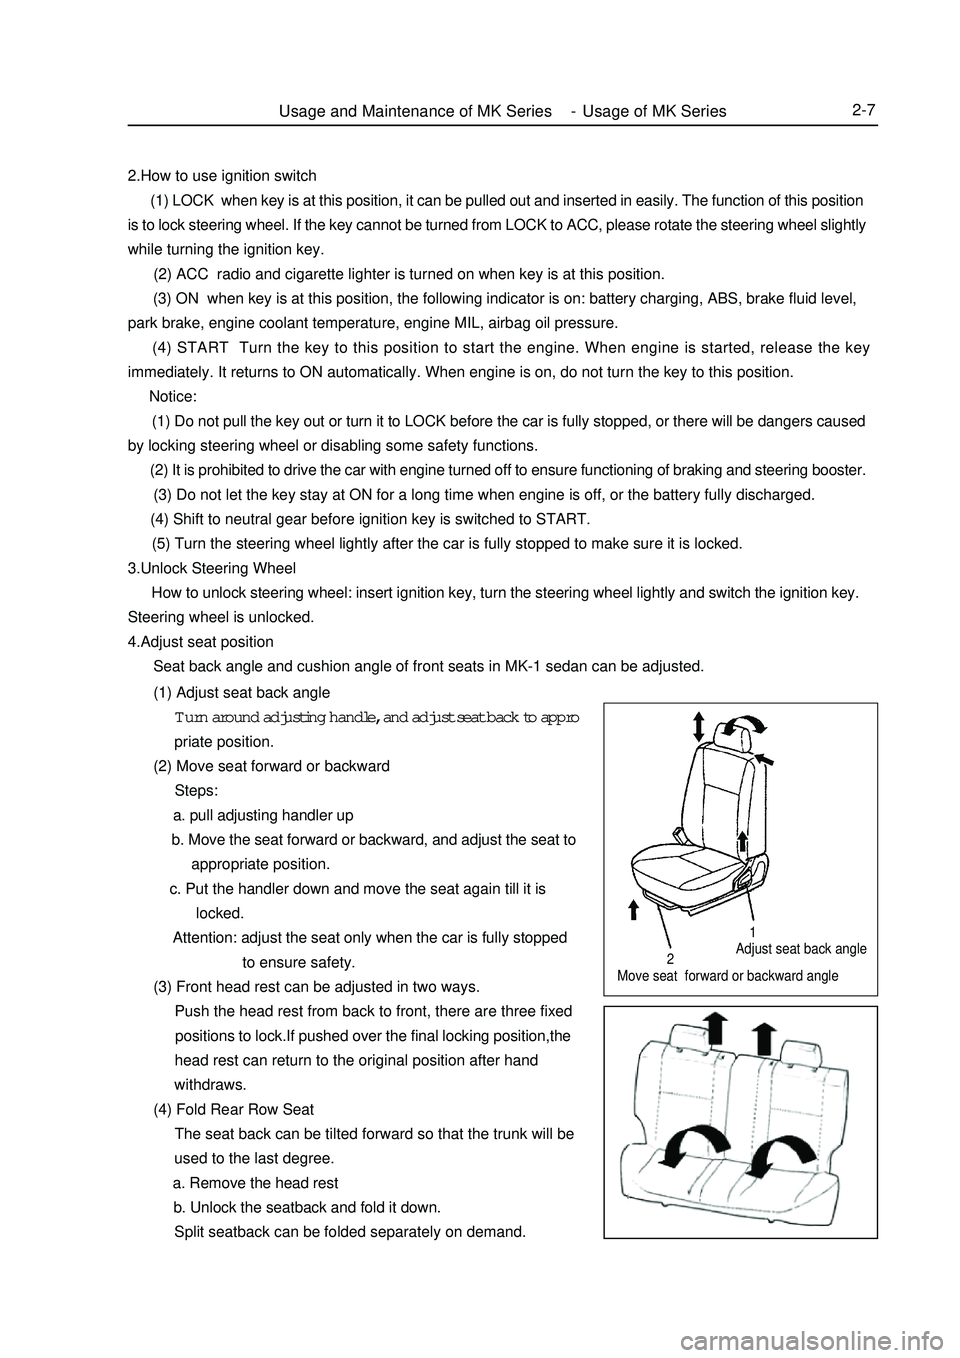
Adjust seat back angle
Move seat forward or backward angleUsage and Maintenance of MK Series - Usage of MK Series2-7212.How to use ignition switch
(1) LOCK when key is at this position, it can be pulled out and inserted in easily. The function of this position
is to lock steering wheel. If the key cannot be turned from LOCK to ACC, please rotate the steering wheel slightly
while turning the ignition key.
(2) ACC radio and cigarette lighter is turned on when key is at this position.
(3) ON when key is at this position, the following indicator is on: battery charging, ABS, brake fluid level,
park brake, engine coolant temperature, engine MIL, airbag oil pressure.
(4) START Turn the key to this position to start the engine. When engine is started, release the key
immediately. It returns to ON automatically. When engine is on, do not turn the key to this position.
Notice:
(1) Do not pull the key out or turn it to LOCK before the car is fully stopped, or there will be dangers caused
by locking steering wheel or disabling some safety functions.
(2) It is prohibited to drive the car with engine turned off to ensure functioning of braking and steering booster.
(3) Do not let the key stay at ON for a long time when engine is off, or the battery fully discharged.
(4) Shift to neutral gear before ignition key is switched to START.
(5) Turn the steering wheel lightly after the car is fully stopped to make sure it is locked.
3.Unlock Steering Wheel
How to unlock steering wheel: insert ignition key, turn the steering wheel lightly and switch the ignition key.
Steering wheel is unlocked.
4.Adjust seat position
Seat back angle and cushion angle of front seats in MK-1 sedan can be adjusted.
(1) Adjust seat back angle
Turn around adjusting handle, and adjust seat back to appro
priate position.
(2) Move seat forward or backward
Steps:
a. pull adjusting handler up
b. Move the seat forward or backward, and adjust the seat to
appropriate position.
c. Put the handler down and move the seat again till it is
locked.
Attention: adjust the seat only when the car is fully stopped
to ensure safety.
(3) Front head rest can be adjusted in two ways.
Push the head rest from back to front, there are three fixed
positions to lock.If pushed over the final locking position,the
head rest can return to the original position after hand
withdraws.
(4) Fold Rear Row Seat
The seat back can be tilted forward so that the trunk will be
used to the last degree.
a. Remove the head rest
b. Unlock the seatback and fold it down.
Split seatback can be folded separately on demand.
Page 59 of 416
Section 4 Fuel Emission Control SystemOn-board Inspection1. Check the operation when disconnecting the fuel supply.
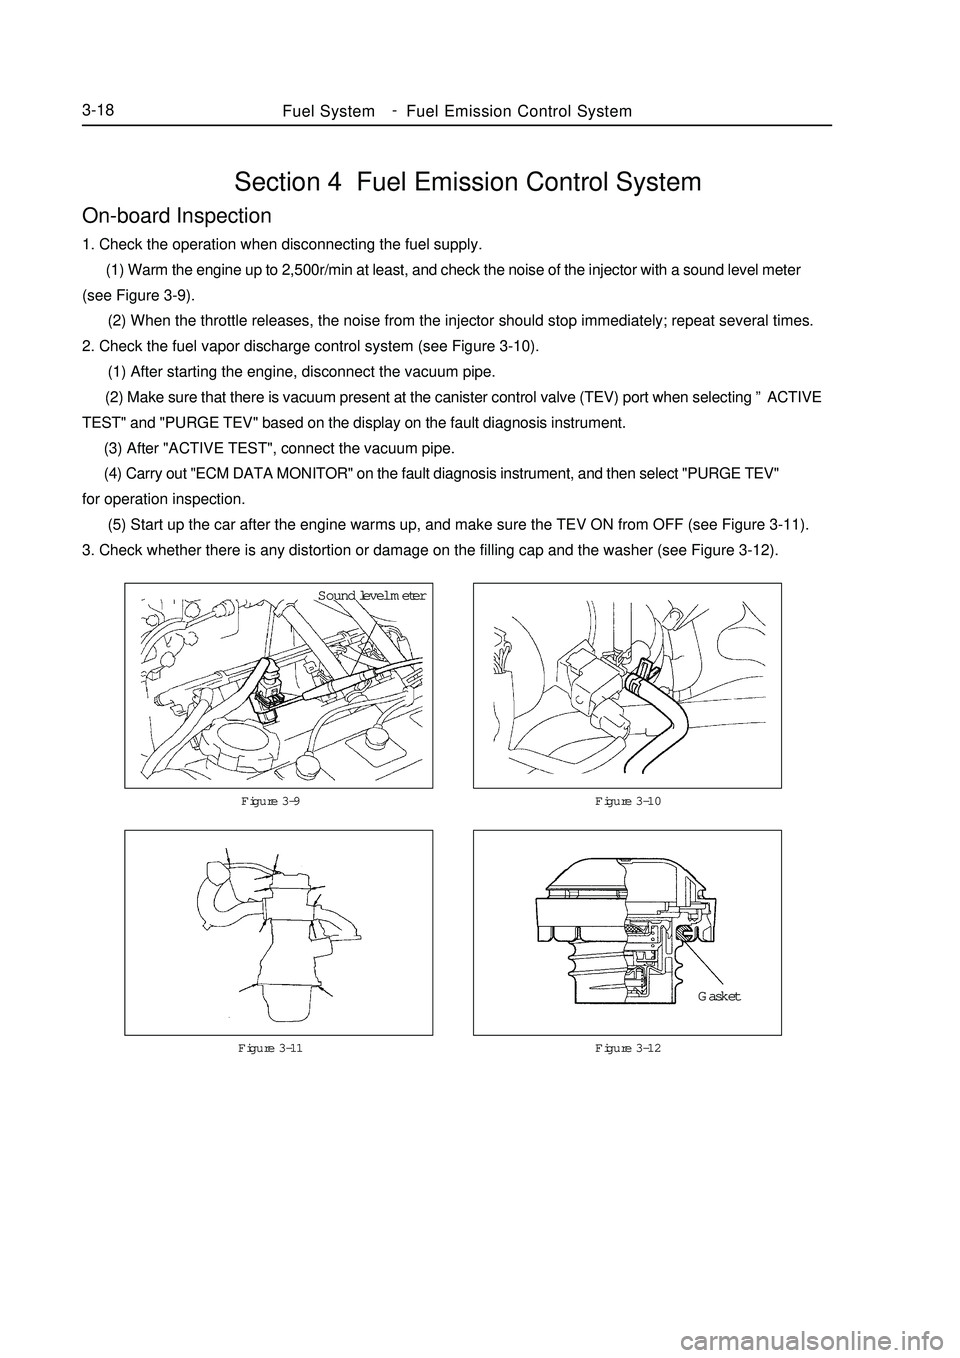
(1) Warm the engine up to 2,500r/min at least, and check the noise of the injector with a sound level meter
(see Figure 3-9).
(2) When the throttle releases, the noise from the injector should stop immediately; repeat several times.
2. Check the fuel vapor discharge control system (see Figure 3-10).
(1) After starting the engine, disconnect the vacuum pipe.
(2) Make sure that there is vacuum present at the canister control valve (TEV) port when selecting ”ACTIVE
TEST" and "PURGE TEV" based on the display on the fault diagnosis instrument.
(3) After "ACTIVE TEST", connect the vacuum pipe.
(4) Carry out "ECM DATA MONITOR" on the fault diagnosis instrument, and then select "PURGE TEV"
for operation inspection.
(5) Start up the car after the engine warms up, and make sure the TEV ON from OFF (see Figure 3-11).
3. Check whether there is any distortion or damage on the filling cap and the washer (see Figure 3-12).Figure 3-9 Figure 3-10Fuel SystemFuel Emission Control System3-18Figure 3-11 Figure 3-12Sound level meter
Gasket -
Page 64 of 416

Figure 5-6
Figure 5-7Above 93°CFigure 5-5Cooling SystemSystem Inspection3-235. Fan
(1) At low temperature (lower than 83°C), check the operation of
the cooling fan.
a. The ignition switch is set to ON.
b. The cooling fan should stop.
c. Disconnect the connector of the water temperature sensor.
(see Figure 5-5)
d.Touch the ground with a wire.
e.Check if the cooling fan rotates.
f. Re-connect the connector of the water temperature sensor.
(2) At high temperature (more than 93°C), check the operation of
the fan (see Figure 5-6).
a. Start the engine, and enable the coolant temperature higher
than 93°C.
b.Check whether the cooling fan rotates.
If not, replace the water temperature switch.
(3) Check the cooling fan (see Figure 5-7).
a. Disconnect the joint of the cooling fan.
b. Connect the battery and the ammeter with the connector.
c. The cooling fan should rotate stably and check the current
readings.
Standard current: 5.7-7.7A.
d. Connect the connector of the cooling fan.disconnectBattery Amper meter -
Page 71 of 416
The valve body fails.
12. The vehicle shifts before or after some gear points in the running status.
The vehicle switch or parking switch fails.
13. The vehicle has poor acceleration in running.
(1)The clutch or brake fails.
(2)The engine system fails.
14. The vehicle vibrates when it runs at a constant speed or accelerating speed.
(1)The hydraulic torque clutch pressure or hydraulic torque meter fails.
(2)The engine system or valve fails.
15. The acceleration switch system fails.
(1)The acceleration switch or ignition switch fails.
(2)The connector or automatic transmission control unit fails.I. Automatic transmissions Removal1. Put the select lever in "N" position
2. Remove 3 bolts of the flexibility plate (engine side)
3. Remove starter and 2 cooling hoses.
4. Disconnect neutral switch connector and odometer sensor.
5. Loosen the drain screw under the housing to bleed ATF and tighten the drain screw with sealing glue when
assembling. Tightening torque is 29~35N.m
6. Loosen the locking bolt for select lever cable.
7. Remove Drive Shaft LH&RH, using plastic stopper in the oil sealing of differential.
8. Detach suspension bolts.
9. Separate transmission from engine after bolts between engine and transmission remove.II. Automatic Transmission Installation1. Check whether torque converter of the transmission is in the right position, the methods as follows:
Check whether the distance from 3 anchor point of torque converter to front contact face of the transmission
box A 28mm , If the space A<28 mm, try install again. The way to install is that left hand catch hold of the
central anchor column of the converter and make it in alignment with input shaft as near as possible, push the torque
converter in rotating way by right hand until it gets to the bottom to meet the requirement of A 28 mm. (See
figure 7-1 and 2)
2. Install Flexibility plate and central plate on the crankshaft end face with 6 bolts in the direction of Figure 2.
Tightening torque is 45~55 N.m. Turn the longer hole of the Flexibility plate to the lowest of the engine position
in order to connect torque converter.Section 2 Hydraulic Torque Converter and TransaxleAutomatic Transaxle Assembly Hydraulic Torque Converter and Transaxle3-30 -
Page 91 of 416
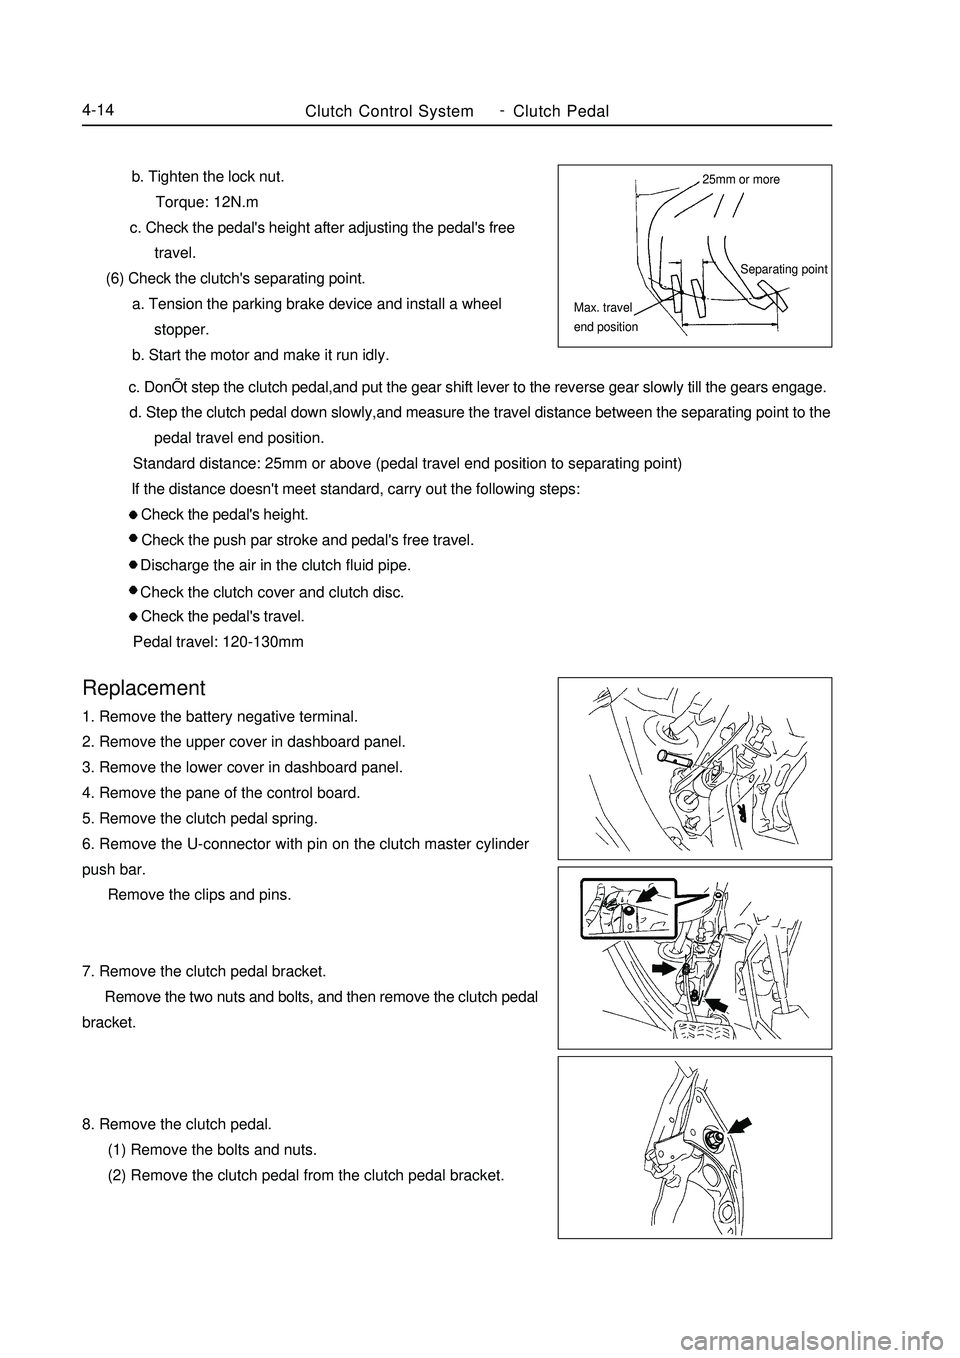
b. Tighten the lock nut.
Torque: 12N.m
c. Check the pedal's height after adjusting the pedal's free
travel.
(6) Check the clutch's separating point.
a. Tension the parking brake device and install a wheel
stopper.
b. Start the motor and make it run idly. c. DonÕt step the clutch pedal,and put the gear shift lever to the reverse gear slowly till the gears engage.
d. Step the clutch pedal down slowly,and measure the travel distance between the separating point to the
pedal travel end position.
Standard distance: 25mm or above (pedal travel end position to separating point)
If the distance doesn't meet standard, carry out the following steps:
Check the pedal's height.
Check the push par stroke and pedal's free travel.
Discharge the air in the clutch fluid pipe.
Check the clutch cover and clutch disc.
Check the pedal's travel.
Pedal travel: 120-130mmReplacement1. Remove the battery negative terminal.
2. Remove the upper cover in dashboard panel.
3. Remove the lower cover in dashboard panel.
4. Remove the pane of the control board.
5. Remove the clutch pedal spring.
6. Remove the U-connector with pin on the clutch master cylinder
push bar.
Remove the clips and pins.
7. Remove the clutch pedal bracket.
Remove the two nuts and bolts, and then remove the clutch pedal
bracket.
8. Remove the clutch pedal.
(1) Remove the bolts and nuts.
(2) Remove the clutch pedal from the clutch pedal bracket.Clutch Control SystemClutch Pedal4-1425mm or more
Separating point
Max. travel
end position -
Page 191 of 416
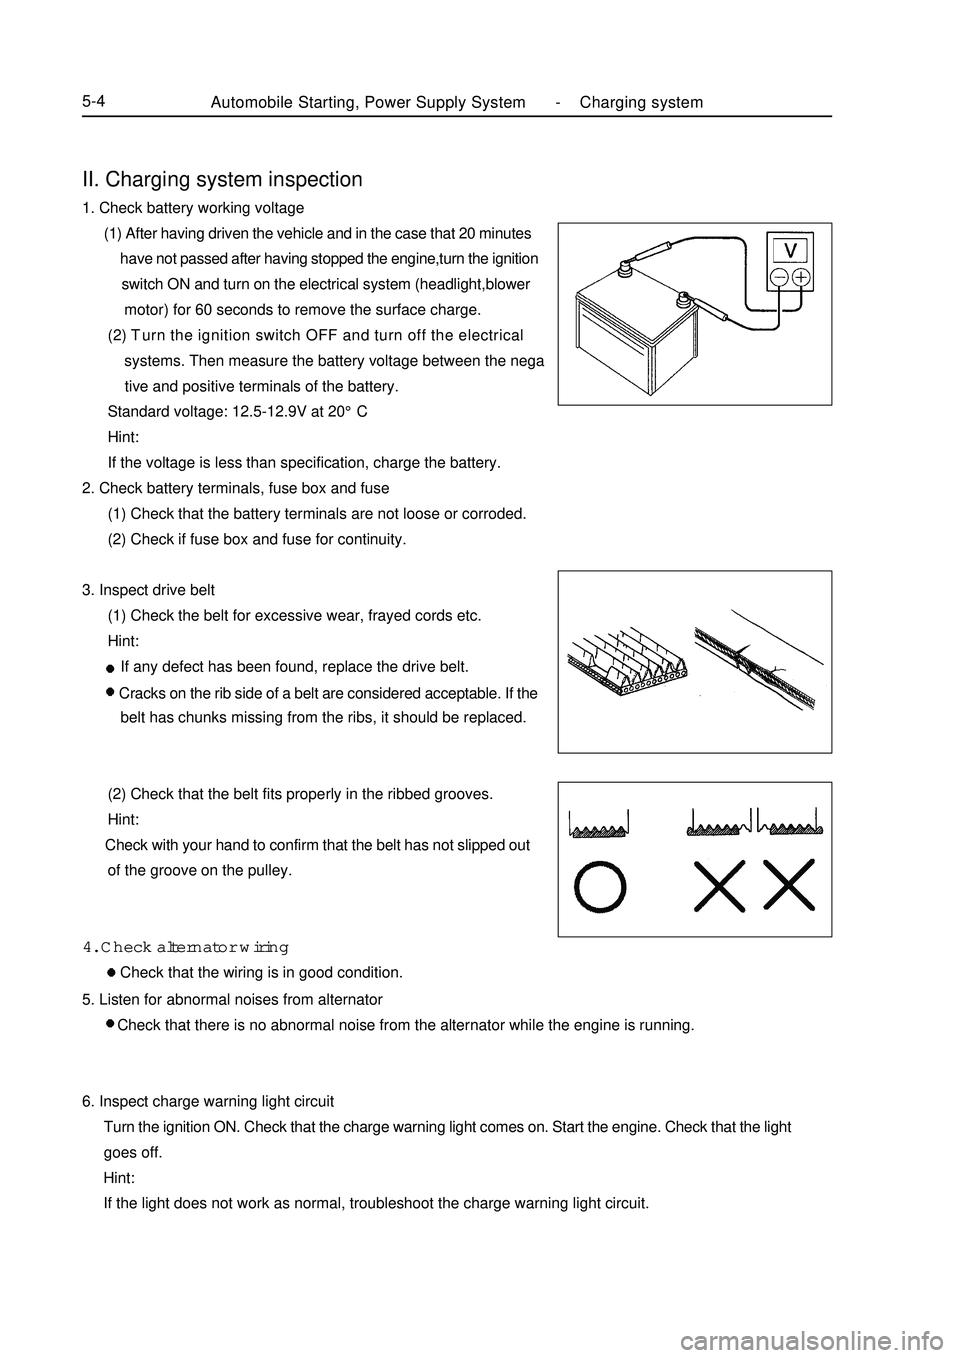
II. Charging system inspection1. Check battery working voltage
(1) After having driven the vehicle and in the case that 20 minutes
have not passed after having stopped the engine,turn the ignition
switch ON and turn on the electrical system (headlight,blower
motor) for 60 seconds to remove the surface charge.
(2) Turn the ignition switch OFF and turn off the electrical
systems. Then measure the battery voltage between the nega
tive and positive terminals of the battery.
Standard voltage: 12.5-12.9V at 20°C
Hint:
If the voltage is less than specification, charge the battery.
2. Check battery terminals, fuse box and fuse
(1) Check that the battery terminals are not loose or corroded.
(2) Check if fuse box and fuse for continuity.
3. Inspect drive belt
(1) Check the belt for excessive wear, frayed cords etc.
Hint:
If any defect has been found, replace the drive belt.
Cracks on the rib side of a belt are considered acceptable. If the
belt has chunks missing from the ribs, it should be replaced.
(2) Check that the belt fits properly in the ribbed grooves.
Hint:
Check with your hand to confirm that the belt has not slipped out
of the groove on the pulley.
4. Check alternator wiring
Check that the wiring is in good condition.Automobile Starting, Power Supply System -Charging system5-45. Listen for abnormal noises from alternator
Check that there is no abnormal noise from the alternator while the engine is running.
6. Inspect charge warning light circuit
Turn the ignition ON. Check that the charge warning light comes on. Start the engine. Check that the light
goes off.
Hint:
If the light does not work as normal, troubleshoot the charge warning light circuit.
Page 210 of 416
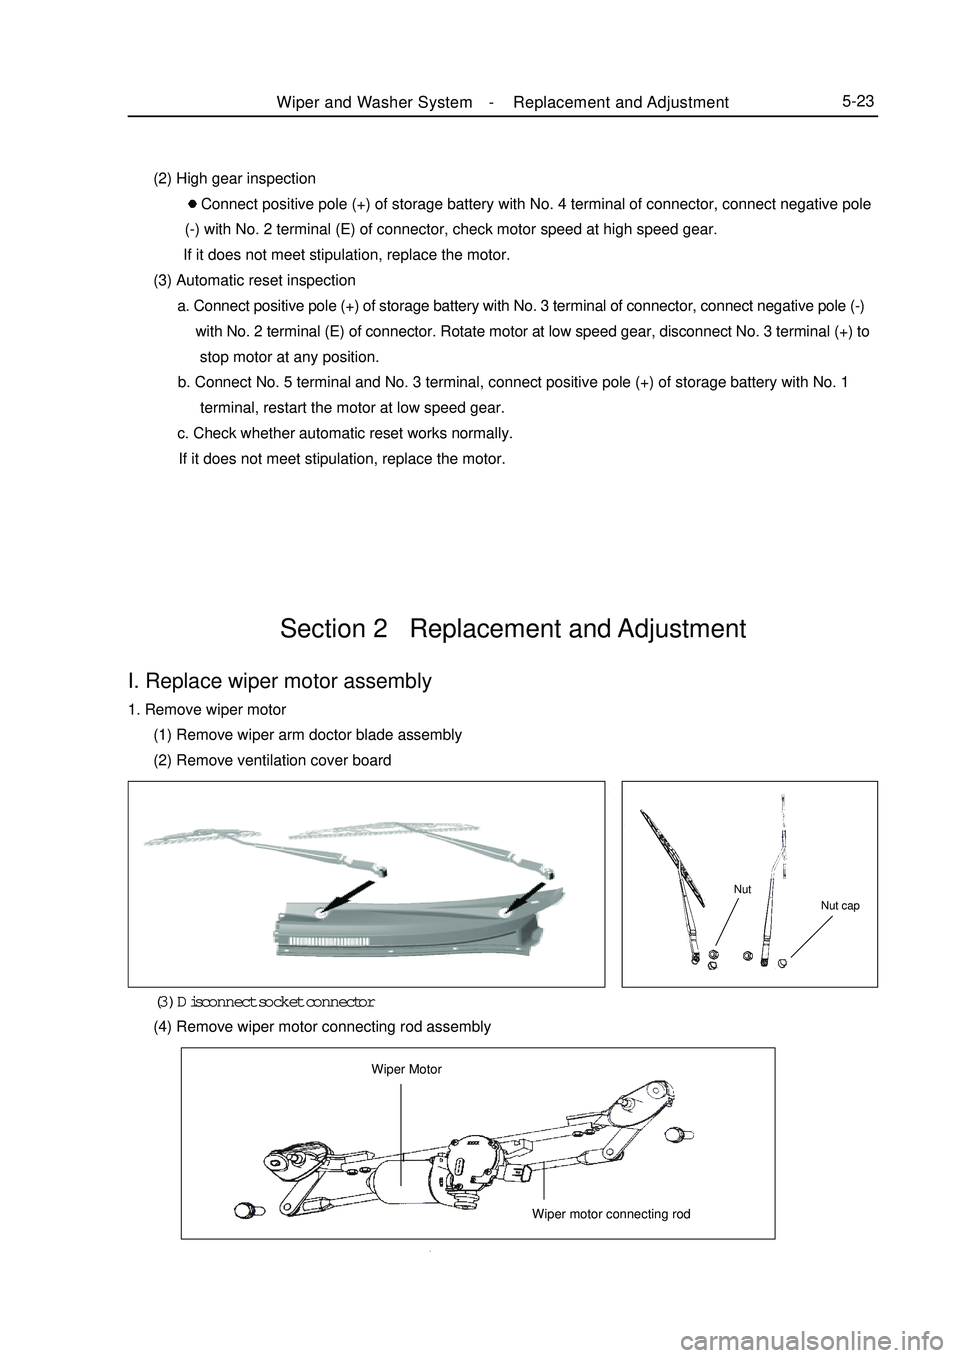
Section 2 Replacement and AdjustmentI. Replace wiper motor assembly1. Remove wiper motor
(1) Remove wiper arm doctor blade assembly
(2) Remove ventilation cover board
(3) Disconnect socket connector
(4) Remove wiper motor connecting rod assemblyNut capNutWiper MotorWiper motor connecting rodWiper and Washer System -Replacement and Adjustment5-23 (2) High gear inspection
Connect positive pole (+) of storage battery with No. 4 terminal of connector, connect negative pole
(-) with No. 2 terminal (E) of connector, check motor speed at high speed gear.
If it does not meet stipulation, replace the motor.
(3) Automatic reset inspection
a. Connect positive pole (+) of storage battery with No. 3 terminal of connector, connect negative pole (-)
with No. 2 terminal (E) of connector. Rotate motor at low speed gear, disconnect No. 3 terminal (+) to
stop motor at any position.
b. Connect No. 5 terminal and No. 3 terminal, connect positive pole (+) of storage battery with No. 1
terminal, restart the motor at low speed gear.
c. Check whether automatic reset works normally.
If it does not meet stipulation, replace the motor.
Page 311 of 416
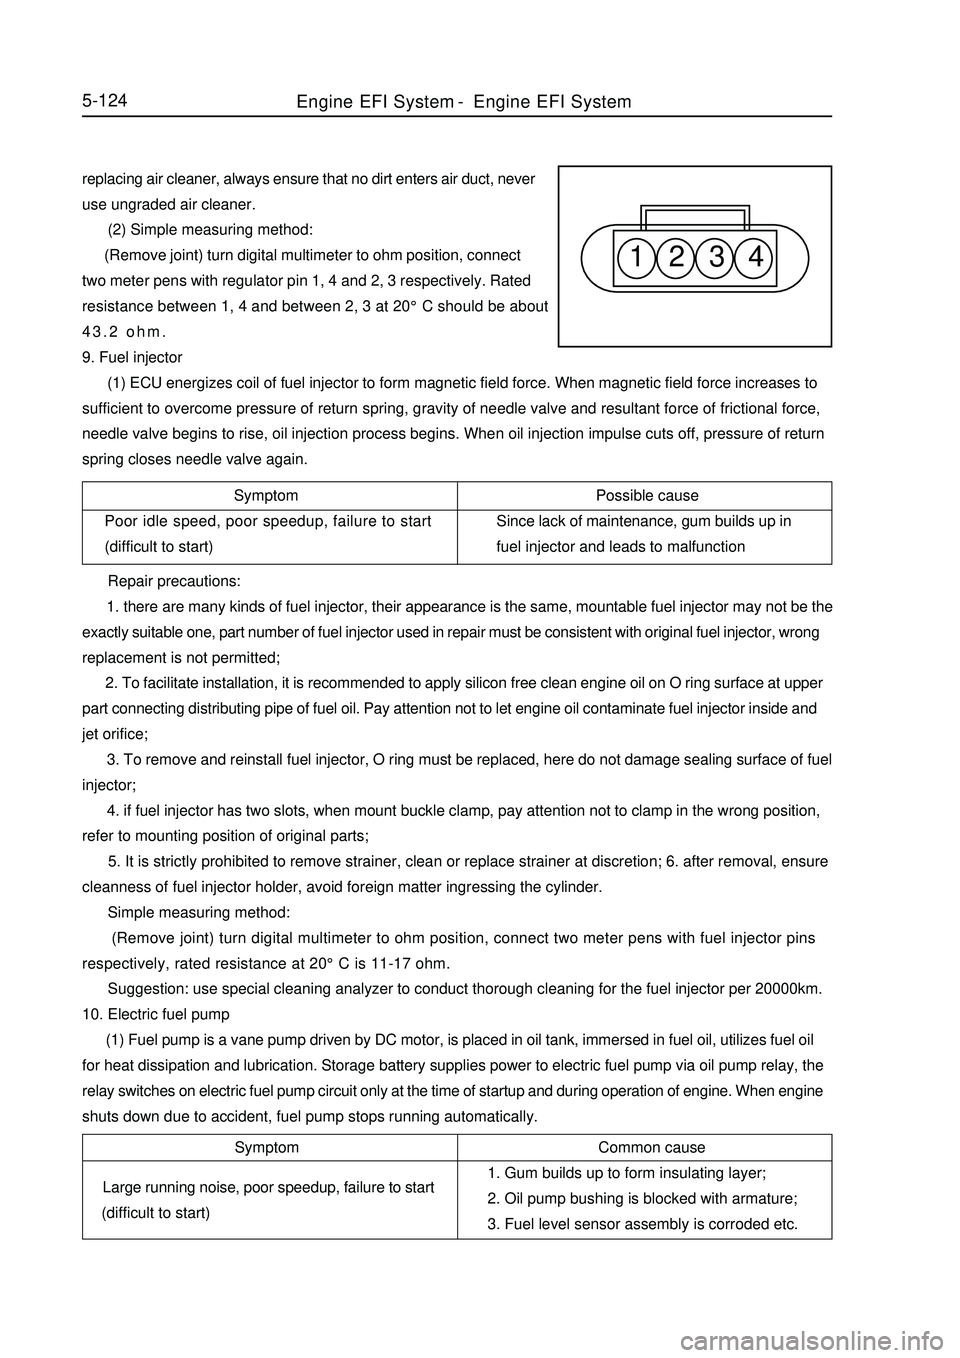
1 2 3 45-124replacing air cleaner, always ensure that no dirt enters air duct, never
use ungraded air cleaner.
(2) Simple measuring method:
(Remove joint) turn digital multimeter to ohm position, connect
two meter pens with regulator pin 1, 4 and 2, 3 respectively. Rated
resistance between 1, 4 and between 2, 3 at 20°C should be about
43.2 ohm.
9. Fuel injector
(1) ECU energizes coil of fuel injector to form magnetic field force. When magnetic field force increases to
sufficient to overcome pressure of return spring, gravity of needle valve and resultant force of frictional force,
needle valve begins to rise, oil injection process begins. When oil injection impulse cuts off, pressure of return
spring closes needle valve again.
Symptom
Poor idle speed, poor speedup, failure to start
(difficult to start)Possible cause
Since lack of maintenance, gum builds up in
fuel injector and leads to malfunction
Repair precautions:
1. there are many kinds of fuel injector, their appearance is the same, mountable fuel injector may not be the
exactly suitable one, part number of fuel injector used in repair must be consistent with original fuel injector, wrong
replacement is not permitted;
2. To facilitate installation, it is recommended to apply silicon free clean engine oil on O ring surface at upper
part connecting distributing pipe of fuel oil. Pay attention not to let engine oil contaminate fuel injector inside and
jet orifice;
3. To remove and reinstall fuel injector, O ring must be replaced, here do not damage sealing surface of fuel
injector;
4. if fuel injector has two slots, when mount buckle clamp, pay attention not to clamp in the wrong position,
refer to mounting position of original parts;
5. It is strictly prohibited to remove strainer, clean or replace strainer at discretion; 6. after removal, ensure
cleanness of fuel injector holder, avoid foreign matter ingressing the cylinder.
Simple measuring method:
(Remove joint) turn digital multimeter to ohm position, connect two meter pens with fuel injector pins
respectively, rated resistance at 20°C is 11-17 ohm.
Suggestion: use special cleaning analyzer to conduct thorough cleaning for the fuel injector per 20000km.
10. Electric fuel pump
(1) Fuel pump is a vane pump driven by DC motor, is placed in oil tank, immersed in fuel oil, utilizes fuel oil
for heat dissipation and lubrication. Storage battery supplies power to electric fuel pump via oil pump relay, the
relay switches on electric fuel pump circuit only at the time of startup and during operation of engine. When engine
shuts down due to accident, fuel pump stops running automatically.Symptom
Large running noise, poor speedup, failure to start
(difficult to start)Common cause
1. Gum builds up to form insulating layer;
2. Oil pump bushing is blocked with armature;
3. Fuel level sensor assembly is corroded etc.Engine EFI System-Engine EFI System
Page 312 of 416

Symptom
Poor idle speed, malfunction etc
Symptom
Fail to start5-125 Repair precautions:
1. according to engine requirement, electric fuel pumps with different flows are available, they have the same
appearance, mountable fuel pump may not be exactly suitable, during repair, part number of fuel pump used must
be consistent with original one, wrong replacement is not permitted;
2. in order to prevent fuel pump from damaging, please do not run it in dry state for a long time;
3. in case fuel pump needs to be replaced, please pay attention to clean fuel tank and pipeline and replace fuel
filter.
(2) Simple measuring method:
(Remove joint) turn digital multimeter to ohm position, connect two meter pens with fuel pump pins
respectively, measure internal resistance, it should not be zero or infinite (namely not in short circuit, open circuit
condition).
(Connect joint) connect fuel pressure gauge on sucker, start up engine, run the engine at idle speed, now fuel
pressure of engine should be about 260kPa; unplug fuel pressure regulator vacuum tube, now fuel pressure should
be about 300KPa.
11. Canister control valve
(1) Canister in fuel evaporation control system adsorbs oil vapor from oil tank until saturated. Electronic
control unit controls opening of canister control valve, fresh air and saturated fuel vapor in canister form
regeneration stream, which is led into engine intake pipe again. Electronic control unit changes duty ratio of pulsing
signal to canister control valve solenoid according to different operating conditions of engine, thus controls flow
of regeneration stream. In addition, this flow is also influenced by pressure difference at both ends.
Possible cause
Entering of foreign matter into valve inside results in
corrosion or poor leak tightness etc
Repair precautions:
1. To install, airflow direction must meet the specification;
2. when black granules inside valve body result in malfunction of control valve, and control valve needs to be
replaced, please check the condition of canister;
3. avoid water, oil etc liquids from entering valve as far as possible during repair;
4. in order to avoid transfer of solid-borne noise, it is recommended to install canister control valve suspending
on the hose or use soft rubber to fix.
(2) Simple measuring method:
(Remove joint) turn digital multimeter to ohm position, connect two meter pens with canister control valve pins
respectively, rated resistance at 20°C is 22 - 30 ohm.
12. Ignition coil
(1) When earthing channel of primary winding is connected, this primary winding is charged. Once ECU cut
off primary winding circuit, charging stops, high voltage is induced in secondary winding at the same time, so spark
plug discharges. Ignition coil ZSK 22 (both ends of 2 secondary windings are connected with a spark plug
respectively, so these two spark plugs ignite simultaneously.
Possible cause
Too heavy current leads to burnout, damaged by external force Repair precautions: it is prohibited to use "short circuit ignition testing method" to test ignition function, soEngine EFI System-
Engine EFI System