key GENESIS G70 2020 Quick Reference Guide
[x] Cancel search | Manufacturer: GENESIS, Model Year: 2020, Model line: G70, Model: GENESIS G70 2020Pages: 24, PDF Size: 6.85 MB
Page 3 of 24
CLIMATECLIMATE
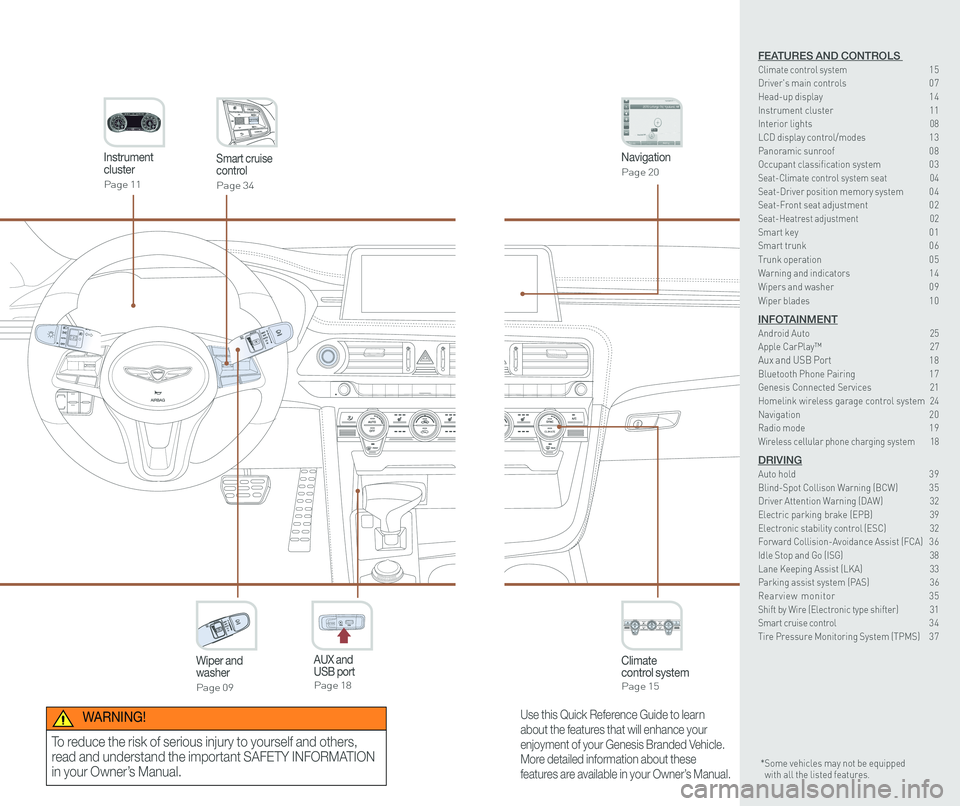
Instrument cluster
Page 11
Navigation
Page 20
Climate control systemPage 15
CLIMATE
Wiper and washer
Page 09
Smart cruise control
Page 34
GENESIS
AUX and USB portPage 18
12V180W
Use this Quick Reference Guide to learn
about the features that will enhance your
enjoyment of your Genesis Branded Vehicle.
More detailed information about these
features are available in your Owner’s Manual.
WARNING!
To reduce the risk of serious injury to yourself and others,
read and understand the important SAFETY INFORMATION
in your Owner’s Manual.* Some vehicles may not be equipped with all the listed features.
FEATURES AND CONTROLS Climate control system 15Driver's main controls 0 7Head-up display 1 4Instrument cluster 11Interior lights 08\
LCD display control/modes 1 3 Panoramic sunroof 0 8 Occupant classification system 0 3 Seat-Climate control system seat 04Seat-Driver position memory system 0 4Seat-Front seat adjustment 0 2Seat-Heatrest adjustment 02Smart key 0 1Smart trunk 0 6
Trunk operation 0 5Warning and indicators 1 4 Wipers and washer 0 9
Wiper blades 1 0
INFOTAINMENTAndroid Auto 25Apple CarPlay™ 27Aux and USB Port 18Bluetooth Phone Pairing 1 7Genesis Connected Services 21Homelink wireless garage control system 24Navigation 2 0Radio mode 1 9Wireless cellular phone charging system 18
DRIVINGAuto hold 3 9Blind-Spot Collison Warning (BCW) 3 5Driver Attention Warning (DAW) 32Electric parking brake (EPB) 39 Electronic stability control (ESC) 32Forward Collision-Avoidance Assist (FCA) 3 6Idle Stop and Go (ISG) 38\
Lane Keeping Assist (LKA) 33Parking assist system (PAS) 36Rearview monitor 35Shift by Wire (Electronic type shifter) 31Smart cruise control 3 4Tire Pressure Monitoring System (TPMS) 3 7
Page 4 of 24
Quick Reference Guide I 0201 I Quick Reference Guide
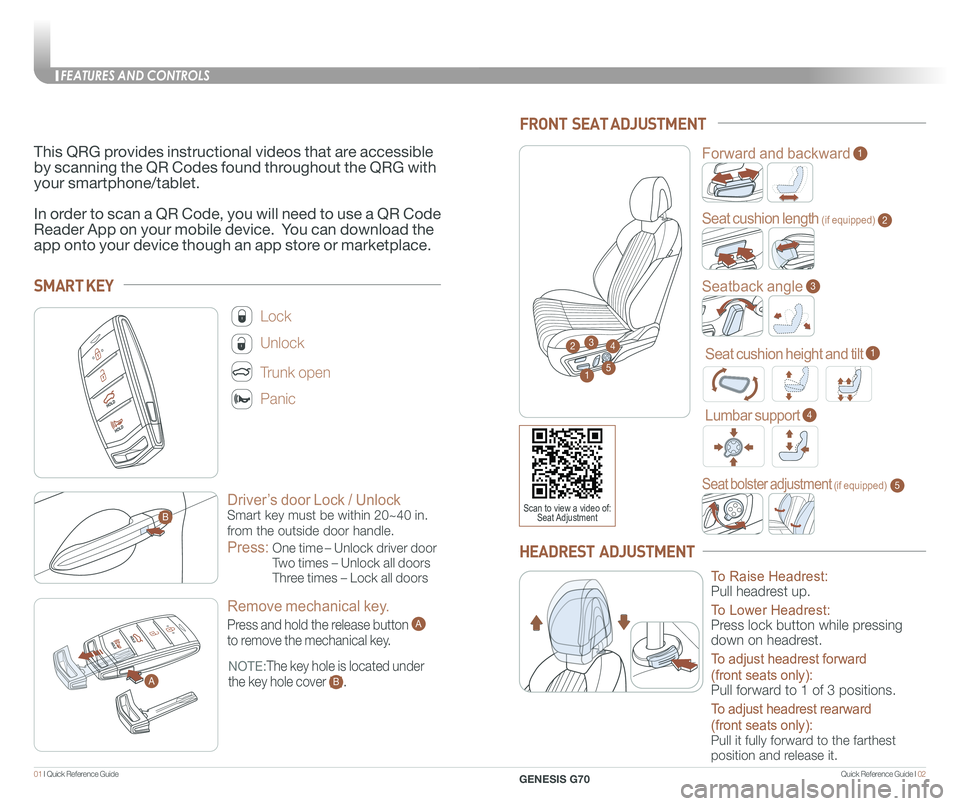
Driver’s door Lock / Unlock
Smart key must be within 20~40 in.
from the outside door handle.
Press:
One time – Unlock driver door
Two times – Unlock all doors
Three times – Lock all doors
Lock
Unlock
Trunk open
Panic
NOTE:The key hole is located under
the key hole cover B.
SMART KEY
A
B
Remove mechanical key.
Press and hold the release button A
to remove the mechanical key.
A
This QRG provides instructional videos that are accessible
by scanning the QR Codes found throughout the QRG with
your smartphone/tablet.
In order to scan a QR Code, you will need to use a QR Code
Reader App on your mobile device. You can download the
app onto your device though an app store or marketplace.
FRONT SEAT ADJUSTMENT
2
Forward and backward1
Seat cushion length (if equipped)2
Seatback angle3
Seat bolster adjustment (if equipped)5
1
34
5
Scan to view a video of: Seat Adjustment
Seat cushion height and tilt 1
Lumbar support 4
HEADREST ADJUSTMENT
To Raise Headrest:
Pull headrest up.
To Lower Headrest:
Press lock button while pressing
down on headrest.
To adjust headrest forward
(front seats only):
Pull forward to 1 of 3 positions.
To adjust headrest rearward
(front seats only):
Pull it fully forward to the farthest
position and release it.
FEATURES AND CONTROLS
GENESIS G70
Page 5 of 24
Quick Reference Guide I 0403 I Quick Reference Guide
Easy Access Function (Driver’s Seat)
Entering the vehicle
The driver’s seat and steering wheel will move back to its original
position when the Engine Start/Stop button is in the OFF position
and the driver’s door is closed with the smart key in possession.
Exiting the vehicle
The driver’s seat will move rearward and the steering wheel will
move upward when the driver’s door is opened and the Engine
Start/Stop button is in the OFF position with the gear in P (Park).
NOTE: The driver’s seat may not move rearward if there is not
enough space between the driver’s seat and the rear seat.
You can activate/deactivate this function from the User Settings
mode in the cluster LCD display:
Seat Easy Access:
Convenience > Seat Easy Access > Off/Normal/Extended
Steering Easy Access:
Convenience > Steering Easy Access > On/Off
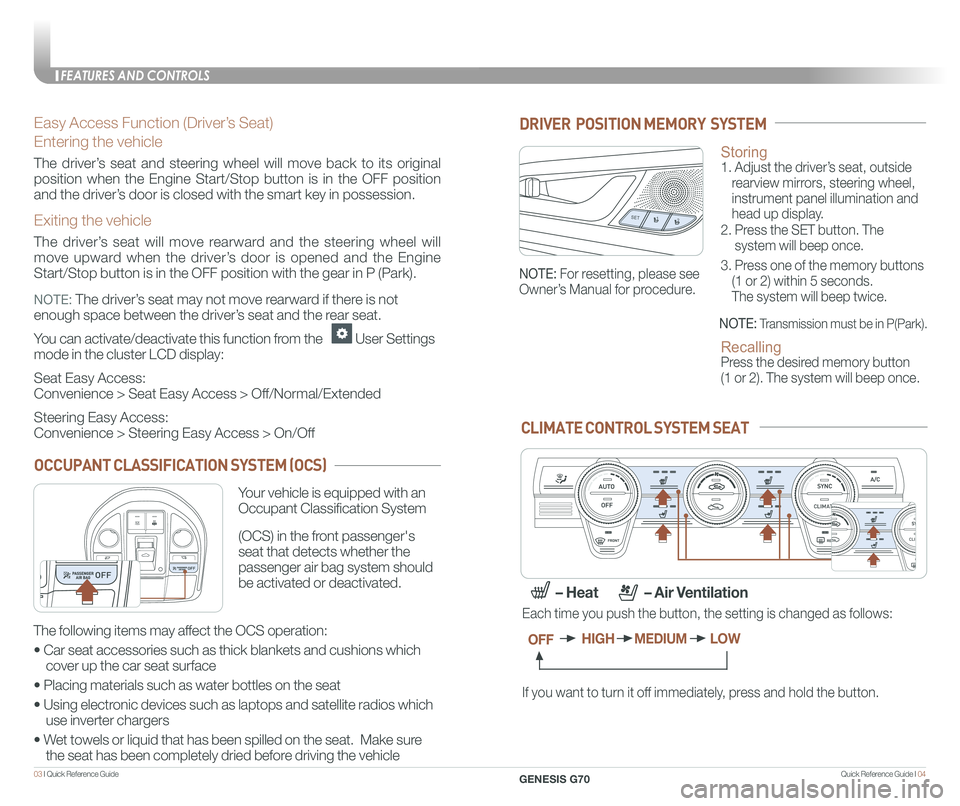
Storing 1. Adjust the driver’s seat, outside
rearview mirrors, steering wheel,
instrument panel illumination and
head up display.
2. Press the SET button. The
system will beep once.
3. Press one of the memory buttons
(1 or 2) within 5 seconds.
The system will beep twice.
Recalling Press the desired memory button
(1 or 2). The system will beep once.
SET1
2
DRIVER POSITION MEMORY SYSTEM
NOTE: Transmission must be in P(Park).
NOTE: For resetting, please see
Owner’s Manual for procedure.
CLIMATE CONTROL SYSTEM SEAT
If you want to turn it off immediately, press and hold the button.
Each time you push the button, the setting is changed as follows:
OFFHIGHMEDIUMLOW
– Heat – Air Ventilation
CLIMATE
CLIMATE
CLIMATE
CLIMATE
OCCUPANT CLASSIFICATION SYSTEM (OCS)
Your vehicle is equipped with an
Occupant Classification System
(OCS) in the front passenger's
seat that detects whether the
passenger air bag system should
be activated or deactivated.
The following items may affect the OCS operation:
• Car seat accessories such as thick blankets and cushions which
cover up the car seat surface
• Placing materials such as water bottles on the seat
• Using electronic devices such as laptops and satellite radios which
use inverter chargers
• Wet towels or liquid that has been spilled on the seat. Make sure
the seat has been completely dried before driving the vehicle
FEATURES AND CONTROLS
GENESIS G70
Page 6 of 24
Quick Reference Guide I 0605 I Quick Reference Guide
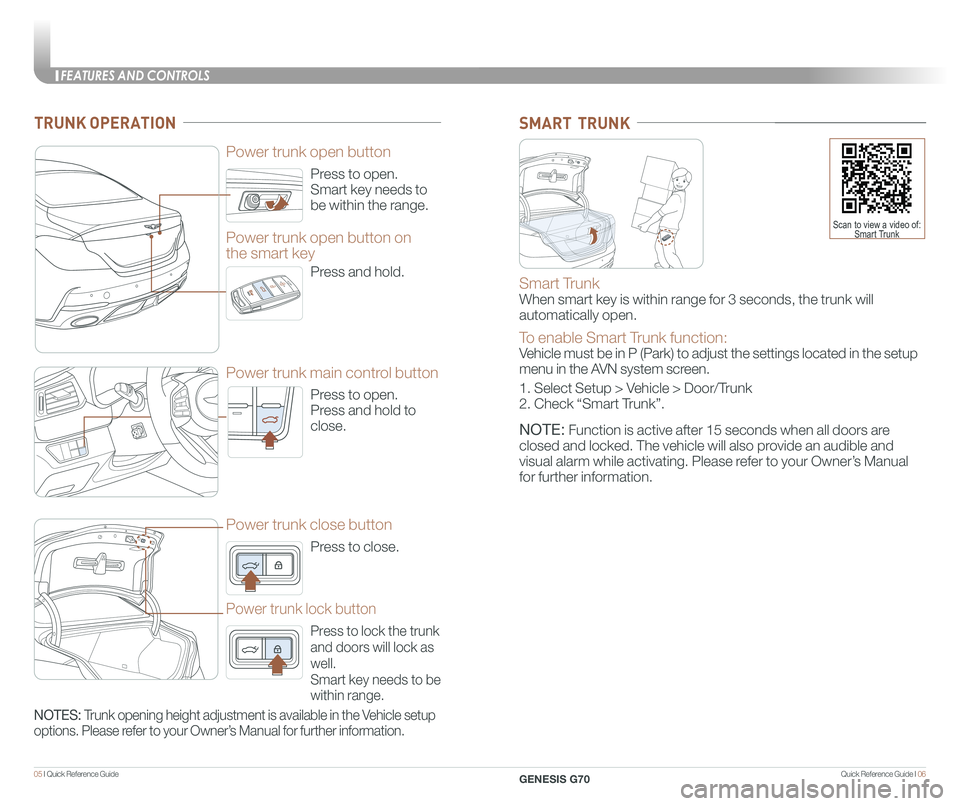
Press to open.
Smart key needs to
be within the range.
Power trunk open button
Press to open.
Press and hold to
close.
Power trunk main control button
Press to close.
Power trunk close button
Press to lock the trunk
and doors will lock as
well.
Smart key needs to be
within range.
Power trunk lock button
Press and hold.
Power trunk open button on
the smart key
TRUNK OPERATION
Smart Trunk
When smart key is within range for 3 seconds, the trunk will
automatically open.
To enable Smart Trunk function:
Vehicle must be in P (Park) to adjust the settings located in the setup\
menu in the AVN system screen.
1. Select Setup > Vehicle > Door/Trunk
2. Check “Smart Trunk”.
NOTE: Function is active after 15 seconds when all doors are
closed and locked. The vehicle will also provide an audible and
visual alarm while activating. Please refer to your Owner’s Manual
for further information.
SMART TRUNK
Scan to view a video of: Smart Trunk
NOTES: Trunk opening height adjustment is available in the Vehicle setup
options. Please refer to your Owner’s Manual for further information.
FEATURES AND CONTROLS
GENESIS G70
Page 7 of 24
Quick Reference Guide I 0807 I Quick Reference Guide
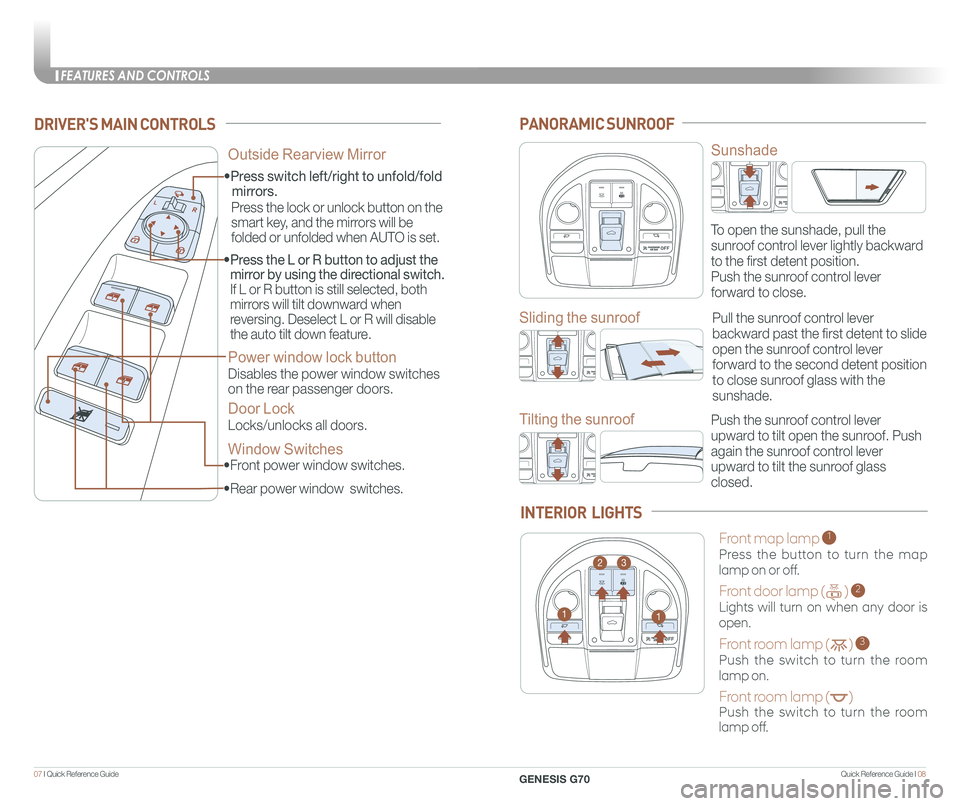
• Front power window switches.
•Press switch left/right to unfold/fold
mirrors.
• Rear power window switches.
• Press the L or R button to adjust the
mirror by using the directional switch.
If L or R button is still selected, both
mirrors will tilt downward when
reversing. Deselect L or R will disable
the auto tilt down feature.
DRIVER'S MAIN CONTROLS
Outside Rearview Mirror
Press the lock or unlock button on the
smart key, and the mirrors will be
folded or unfolded when AUTO is set.
Power window lock button
Disables the power window switches
on the rear passenger doors.
Door Lock
Locks/unlocks all doors.
Window Switches
PANORAMIC SUNROOF
Sunshade
Sliding the sunroof
Tilting the sunroof
To open the sunshade, pull the
sunroof control lever lightly backward
to the first detent position.
Push the sunroof control lever
forward to close.
Push the sunroof control lever
upward to tilt open the sunroof. Push
again the sunroof control lever
upward to tilt the sunroof glass
closed.
Pull the sunroof control lever
backward past the first detent to slide
open the sunroof control lever
forward to the second detent position
to close sunroof glass with the
sunshade.
Front map lamp 1
Press the button to turn the map
lamp on or off.
Front door lamp ( ) 2
Lights will turn on when any door is
open.
Front room lamp ( ) 3
Push the switch to turn the room
lamp on.
Front room lamp ( )
Push the switch to turn the room
lamp off.
INTERIOR LIGHTS
11
23
FEATURES AND CONTROLS
GENESIS G70
Page 12 of 24

Quick Reference Guide I 1817 I Quick Reference Guide
12V180W
AUX AND USB PORT
Use the input jack to connect an
external audio device and listen to it
through the audio system in your
vehicle.
12V180W
NOTE: To operate your smartphone through the vehicle's audio
system, connect your Apple supplied USB cable to the USB port.
WIRELESS CELLULAR PHONE CHARGING SYSTEM
The system operates when all doors are closed, and the Engine
Start/Stop button is in the ACC/ON position. When the charging
process is completed, the indicator light changes from green to
orange. If there is a malfunction, the indicator light turns orange and
blinks for 10 seconds. In this case, remove the phone from the
charging pad and then placing it back onto the pad. The wireless
charging function can be turned ON or OFF.
NOTE: The wireless cellular phone charging system supports only
the Qi-enabled cellular phones ().
BLUETOOTH PHONE PAIRING
Pairing a new device
2. Search for the device name as
displayed on your mobile phone
and pair.
3. Confirm the 6-digit passkey
displayed on the audio screen and
the Bluetooth device identical.
4. Press OK in your Bluetooth device.
5. Pairing is complete.
1.
Press the PHONE button in the head unit(or DIS navigation system)
or button in the steering wheel remote control.
HOME PHONE SETUPTUNE
FILE
NOTE: Vehicle must be in (P) Park to complete pairing process.
Scan to view a video of: Wireless Charging
INFOTAINMENT
GENESIS G70
INFOTAINMENT
Page 14 of 24

Quick Reference Guide I 2221 I Quick Reference Guide
GENESIS CONNECTED SERVICES
Genesis Connected Services subscription is required. To enroll,
please visit your dealership or MyGenesisUSA.com.
Press the button for access to the voice-response menu of services.
- You can say:
Roadside Assistance
Service Link
Account Assistance
Press the button for Destination Search by Voice.
Press the button for SOS Emergency Assistance.
Visit MyGenesisUSA.com for more information or refer to your
Genesis Connected Services User's Manual for detailed information
on system operation.
For immediate assistance with subscription services, please call
1-844-340-9741.
You can download the Genesis Intelligent Assistant
App to your compatible smart phone from the
following sites:
• iPhone® — Apple® App Store
• Android™ — Google Play™
Remote Start
Genesis Intelligent Assistant App
•
Remote Start will automatically shut off after 10 minutes or after
selected engine timer runs out in navigation vehicles.
•
While this feature is active, the parking lights will blink until the
vehicle is turned off or when vehicle is in operation.
•
To continue to operate the vehicle, the proximity key must be
inside the vehicle with the driver, prior to pressing the brake and
being able to move the gearshift from the P (Park) position.
Remember:
Remote Start enables you to remotely start your vehicle virtually
from anywhere. For vehicles equipped with full-automatic
temperature control, you can also enable climate control remotely
and turn on the front window defroster, ensuring a warm or cool
car is ready to go when you are.
• To use this feature, you must have a Genesis Connected
Services Personal Identification Number (PIN).
To create or change your PIN, log in to
MyGenesisUSA.com.
NOTE: Remote Start is only available for push button start
equipped vehicles with an Automatic Transmission or a Dual
Clutch Transmission (DCT).
HomeLink button
Genesis Connected Services
SOS
Navigation service
Telematics button
INFOTAINMENT
GENESIS G70
Page 15 of 24

Quick Reference Guide I 2423 I Quick Reference Guide
Preconditions:
• Ignition is OFF
•
Alarm is armed (i.e., vehicle locked by key fob or Remote Door Lock)
• Gearshift level is in the P (Park) position
• Brake pedal is not depressed
• Engine hood is securely closed
• All the doors are closed and locked
• The tailgate or trunk lid is closed
• The security / panic system is not activated
• The proximity key is not inside the vehicle
• The battery power is not low
• Vehicle is located in an open area
• It has been less than 4 days since last vehicle ignition off
• Vehicle located in area with good cell reception
Remote Start will terminate:
• After 10 minutes or after selected engine timer runs out in
navigation vehicles
• Brake is pressed without the proximity key inside the vehicle
• Alarm is triggered without the proximity key inside the vehicle
• Door / trunk is opened from inside the vehicle
Notice: Laws in some communities may restrict the use of the
features that remotely start the engine. For example, some laws may
require a person using the remote start feature to have the vehicle in
view when doing so, or limit the length of time a vehicle engine may
idle. Please check local and state regulations for any requirements
and restrictions on remote starting of vehicles and engine idling time.
WARNING!
Do not remote start vehicle in an enclosed environment (i.e., closed garage). Prolonged operation of a motor vehicle in an enclosed environment can cause a harmful build-up of carbon monoxide. Carbon monoxide is harmful to your health. Exposure to high levels of carbon monoxide can cause headaches, dizziness or in extreme cases unconsciousness and / or death. Do not leave children or animals unattended in a vehicle while using the remote start function.
CAUTION!
If the vehicle’s windshield wipers are left on when the vehicle was last driven, then the wipers will turn on if the remote start function is activated. To avoid damage to the wiper blades (i.e., due to heavy ice or snow accumulated on the windshield), please always turn the vehicle’s windshield wipers off when parking the vehicle.
HOMELINK WIRELESS GARAGE CONTROL SYSTEM
Standard Programming
1. For first time programming, press and hold the two outside
buttons ( , ) until the indicator light starts to flash. (to
reprogram buttons, skip this step)
2. Press and hold the desired button ( , or )and your
transmitter’s button at the same time until the Homelink
indicator light changes from a slow to a rapid blink.
(The transmitter has to be 1 to 3 inches away from the mirror)The
desired Homelink button is now programmed.
NOTE: If you have a rolling code garage door opener, complete
additional steps:
3. Locate the “Learn” or “Smart” button on your garage door
opener. Press and release the button and complete Step 4
within 30 seconds.
4. Return to the vehicle and press the programmed Homelink
button up to 4 times (or until the garaged door operates)
For more detailed information, please refer to your Owner’s manual
or visit www.homelink.com or call (800) 355-3515
FlashingFlashing
INFOTAINMENT
GENESIS G70
Page 24 of 24
41 I Quick Reference Guide
GENESIS BRAND OWNER RETAILER NAME
SALES CONSULTANT DATE
VIN PREVIOUS VEHICLE
GENESIS GUEST DELIVERY CHECKLIST
Guest Date
Quick Reference Guide I 42
Exclusions from Coverage
The following items, without limitations, are not covered :
• Gasoline and gasoline additives
• State inspections
• Wear and tear of soft trim, including seats, carpets, door casings, wood veneer, headliner, and all chrome trim
• Wear and tear or damage to exterior body panels, trim, and glass
• Damage due to poor fuel quality, misuse, abuse, neglect, fire, accident, flood, or installation of unapproved parts and accessories
• Vehicles used in competitive events
• Vehicles with an unreadable/tampered VIN, or where true mileage cannot be determined
• Repairs and maintenance not performed at at an Authorized retailer of Genesis.
• Repairs covered under the New Vehicle Limited Warranty
• Required maintenance and covered wear parts replacement on United States specification vehicles operating outside the United States\
Transfer of Coverage
The described coverage only applies to the original retail purchaser or original lessee of a Genesis Brand vehicle. The coverage is not transferable to s\
ubsequent owners, with the exception of immediate family members. Immediate family
members include the following:
• Spouses or registered domestic partners
• Parents
• Children or stepchildren
Dealerships will verify that the owner/customer is the original owner/le\
ssee. Certain limitations and exclusions apply to this program. Please refer to your New Vehicle Limited Warranty guide for warranty details.
COMPLIMENTARY MAINTENANCE COVERAGE (continued)
GENESIS SERVICE VALET PROGRAM TERMS AND CONDITIONS
GENESIS G70
BEFORE DELIVERY
☐ SET TIRE PRESURE LF RF RR LR
☐ VERIFY VEHICLE IS CLEAN, IN GOOD CONDITION, FREE OF CHIPS AND SCRATCHES · CLEAN WINDSHIELD AND BACK WINDOW
☐ ENSURE FLOORMATS ARE SNAPPED INTO PLACE
WALK THE CUSTOMER THROUGH EACH OF
THE FOLLOWING KEY DELIVERY FEATURES
☐ REVIEW QUICK REFERENCE GUIDE
☐ PAIR CUSTOMER'S PHONE TO THE BLUETOOTH SYSTEM
☐ OPERATION OF THE NAVIAGATION SYSTEM - page 20
☐ REVIEW AND TEAR OFF VOICE COMMAND / QUICK TIP CARD
☐ OPERATION OF THE AUDIO SYSTEM
We come to you and provide you with alternative transportation. While yo\
ur vehicle is being serviced under this program, qualified drivers will be provided\
a courtesy replacement Genesis brand vehicle at no additional cost. You must be at \
least 25 years of age (in most states) with a valid driver’s license to drive a loaner vehicle. Please provide your Service Advocate with the following information:
• Insurance company name, policy number, and expiration date
• Driver’s license number, state, expiration and birth date
• Credit card number and expiration date (standard requirement for rental car use)
• The above information for any additional drivers
Vehicle Eligibility
For original retail owners of the Genesis vehicle, all factory-recommended scheduled maintenance are covered for the first 3 years or 36,000 miles,\
whichever comes first. The Service Valet Program is applicable to all 2017 - 2019 \
model year Genesis brand vehicle United States specification vehicles purchased in \
the United States from authorized Genesis retailers. The program is not in effect o\
utside of the United States.
• Vehicle coverage begins on the date of first retail sale. Fleet vehicles are excluded from this program.
• If the vehicle becomes damaged (such as by accident, fire, act of natur\
e, etc.) and is subsequently titled salvaged, flooded, or reconstructed, it is no\
longer eligible for the benefits of the Genesis G80 complimentary maintenance Program.
Guidelines for Scheduling Maintenance
The Service Valet Program covers factory-recommended scheduled maintenan\
ce for the first 3 years or 36,000 miles, whichever comes first. Covered ma\
intenance costs include all labor and parts necessary to complete the factory reco\
mmended service. Having your vehicle serviced at the specified time/mile interva\
ls is critical in maintaining long-term durability. Failure to have your vehicle serviced at the specified interval may invalidate the warranty under certain circumstanc\
es.
If for any reason a service is missed, the authorized Genesis retailer w\
ill perform the next or missed major service.
Some owners may wish to have their oil changed more frequently. The cust\
omer must pay for any additional services performed on the vehicle. Service procedures not specifically referenced in the Genesis Customer Care Quick Reference\
Guide must be preauthorized by a Genesis District Parts and Service Manager.
COMPLIMENTARY LOANER VEHICLE
COMPLIMENTARY MAINTENANCE COVERAGE
GENESIS SERVICE VALET PROGRAM TERMS AND CONDITIONS
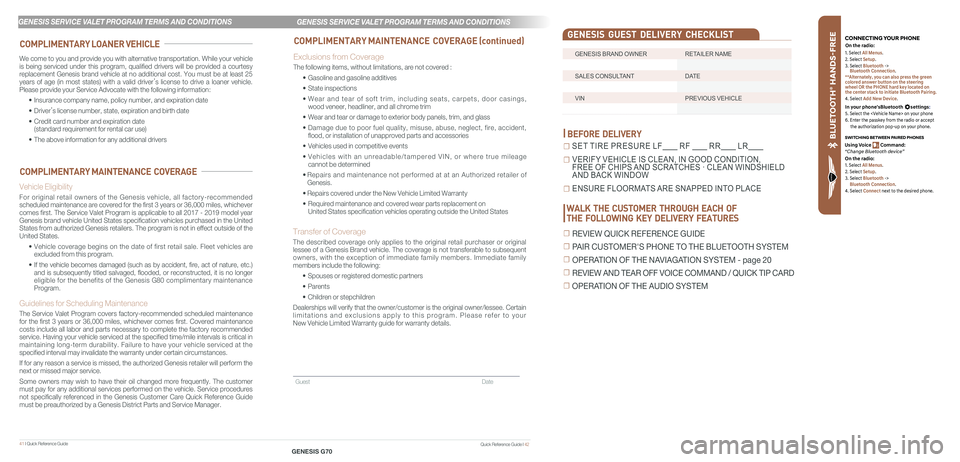
B LU ETO OTH
®
SWIT CHING BETWEEN P AIRED PHONES
On the r adio:
CONNE CTING \fOUR PHONEOn the r adio:
U sing Voic e Command:
“Change Blue too th de vice”1. Select All Menus.
2. Select Setup.
3. Select Bluetooth ->
Bluetooth Connection.
**Alternately, you can also press the green
colored answer button on the steering
wheel OR the PHONE hard key located on
the center stack to initiate Bluetooth Pairing.
4. Select Add New Device.
In your phone’sBluetooth settings:
5. Select the
6. Enter the passkey from the radio or accept
the authorization pop-up on your phone.
1. Select All Menus.
2. Select Setup.
3. Select Bluetooth ->
Bluetooth Connection.
4. Select Connect next to the desired phone.