Turn GENESIS G70 2021 Owner's Manual
[x] Cancel search | Manufacturer: GENESIS, Model Year: 2021, Model line: G70, Model: GENESIS G70 2021Pages: 516, PDF Size: 12.84 MB
Page 445 of 516

7-21
7
MaintenanceThe electric motor for the cooling fan
is controlled by engine coolant tem-
perature, refrigerant pressure and
vehicle speed. As the engine coolant
temperature decreases, the electric
motor will automatically shut off. This
is a normal condition.The electric motor for
the cooling fan may
continue to operate
or start up when the
engine is not running
and can cause serious injury.
Keep hands, clothing and tools
away from the rotating fan
blades of the cooling fan.
WARNING
Never remove the
engine coolant reser-
voir tank/radiator cap
or the drain plug
while the engine and
radiator are hot. Hot coolant
and steam may blow out under
pressure, causing serious
injury.
Turn the engine off and wait
until the engine cools down.
Use extreme care when remov-
ing the engine coolant reservoir
tank/radiator cap. Wrap a thick
towel around it, and turn it
counterclockwise slowly to the
first stop. Step back while the
pressure is released from the
cooling system. When you are
sure all the pressure has been
released, press down on the
cap, using a thick towel, and
continue turning counterclock-
wise to remove it.
WARNING
OIK077007
■Radiator
OIK077055L
■Engine coolant
Page 451 of 516

7-27
7
Maintenance
WIPER BLADES
Blade Inspection
Contamination of either the windshield
or the wiper blades with foreign matter
can reduce the effectiveness of the
windshield wiper functionality.
Common sources of contamination
are insects, tree sap, and hot wax
treatments used by some commercial
car washes. If the blades are not wip-
ing properly, clean both the window
and the blades with a clean cloth
dampened with washer fluid.
To prevent damage to the wiper
blades, arms or other compo-
nents, do not:
• Use gasoline, kerosene, paint
thinner, or other solvents on or
near them.
• Attempt to move the wipers
manually.
• Use non-specified wiper blades.
Information
Commercial hot waxes applied by auto-
matic car washes have been known to
make the windshield difficult to clean.
Blade Replacement
When the wipers no longer clean
adequately, the blades may be worn
or cracked, and require replacement.
To prevent damage to the wiper
arms or other components, do not
attempt to move the wipers manu-
ally.
The use of a non-specified wiper
blade could result in wiper mal-
function and failure.
• In order to prevent damage to
the hood and the wiper arms, the
wiper arms should only be lifted
when in the top wiping position.
• Always return the wiper arms to
the windshield before driving.
Front windshield wiper service
positions
1. Within 20 seconds of turning off
the engine, lift and hold the wiper
lever up to the MIST position for
about 2 seconds until the wipers
move to the top wipe position.
2. At this time you can lift the wipers
off the windshield.
3. Gently put the wipers back down
onto the windshield.
4. Turn the wipers to any ON position
to return the wipers to the bottom
resting position.
NOTICE
NOTICE
NOTICE
i
NOTICEOIK077022
Page 452 of 516

7-28
Maintenance
Front windshield wiper blade
replacement
1. Put the front windshield wipers
into the service position.
2. Lift up the wiper blade clip (1).
Then pull down the blade assem-
bly (2) and remove it.3. Install the new blade assembly.
4. Return the wiper arm on the wind-
shield.
OLF074018
OLF074019
Page 454 of 516

7-30
Maintenance
Battery Usage
Recommendations
• Keep the battery securely mount-
ed.
• Keep the battery top clean and dry.
• Keep the terminals and connec-
tions clean, tight, and coated with
petroleum jelly or terminal grease.
• Rinse any spilled acid from the bat-
tery immediately with a solution of
water and baking soda.
Battery Replacement
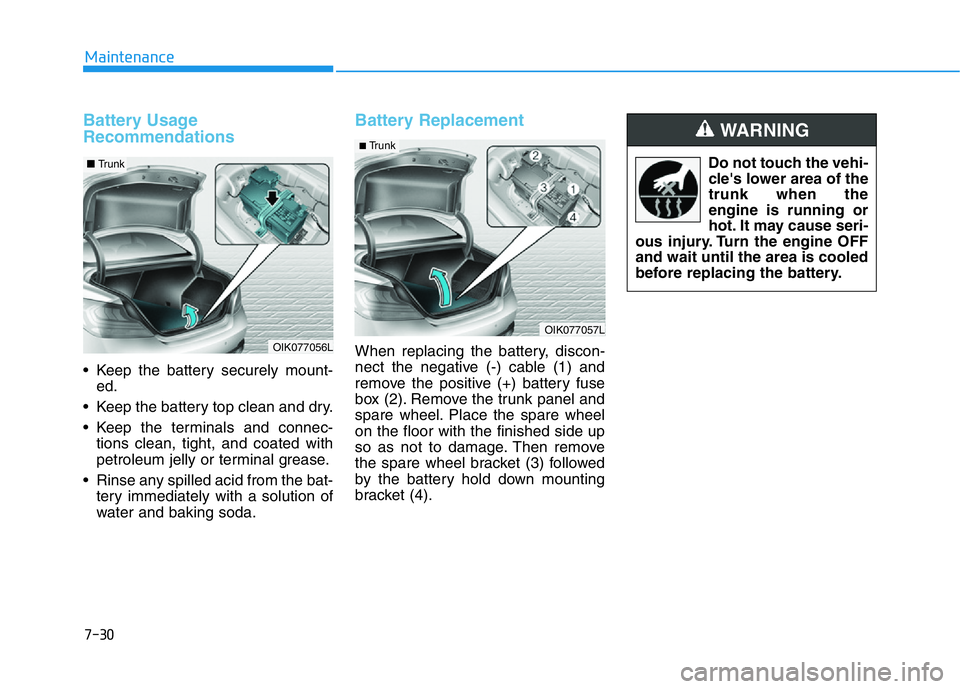
When replacing the battery, discon-
nect the negative (-) cable (1) and
remove the positive (+) battery fuse
box (2). Remove the trunk panel and
spare wheel. Place the spare wheel
on the floor with the finished side up
so as not to damage. Then remove
the spare wheel bracket (3) followed
by the battery hold down mounting
bracket (4).OIK077056L
■Trunk
OIK077057L
■ Trunk
Do not touch the vehi-
cle's lower area of the
trunk when the
engine is running or
hot. It may cause seri-
ous injury. Turn the engine OFF
and wait until the area is cooled
before replacing the battery.
WARNING
Page 455 of 516

7-31
7
Maintenance
Battery Recharging
AGM battery
• Absorbent Glass Matt (AGM)
batteries are maintenance-free
and we recommend that the
AGM battery be serviced by an
authorized retailer of Genesis
Branded products. For charging
your AGM battery, use only fully
automatic battery chargers that
are specially developed for AGM
batteries.
• When replacing the AGM bat-
tery, we recommend that you
use parts for replacement from
an authorized retailer of Genesis
Branded products.
• Do not open or remove the cap
on top of the battery. This may
cause leaks of internal elec-
trolyte that could result in
severe injury.
NOTICE•Watch the battery during
charging, and stop or reduce
the charging rate if the battery
cells begin boiling violently.
•The negative battery cable
must be removed first and
installed last when the battery
is disconnected. Disconnect
the battery charger in the fol-
lowing order:
(1) Turn off the battery charg-
er main switch.
(2) Unhook the negative
clamp from the negative
battery terminal.
(3) Unhook the positive clamp
from the positive battery
terminal.
•Always use a Genuine Genesis
approved battery when you
replace the battery.
Always follow these instruc-
tions when recharging your
vehicle's battery to avoid the
risk of SERIOUS INJURY or
DEATH from explosions or acid
burns:
•Before performing mainte-
nance or recharging the bat-
tery, turn off all accessories
and press the Engine
Start/Stop button to the OFF
position.
•Keep all flames, sparks, or
smoking materials away from
the battery.
•Always work outdoors or in an
area with plenty of ventilation.
•Wear eye protection when
checking the battery during
charging.
•The battery must be removed
from the vehicle and placed in
a well ventilated area.
WARNING
Page 472 of 516

7-48
Maintenance
FUSES
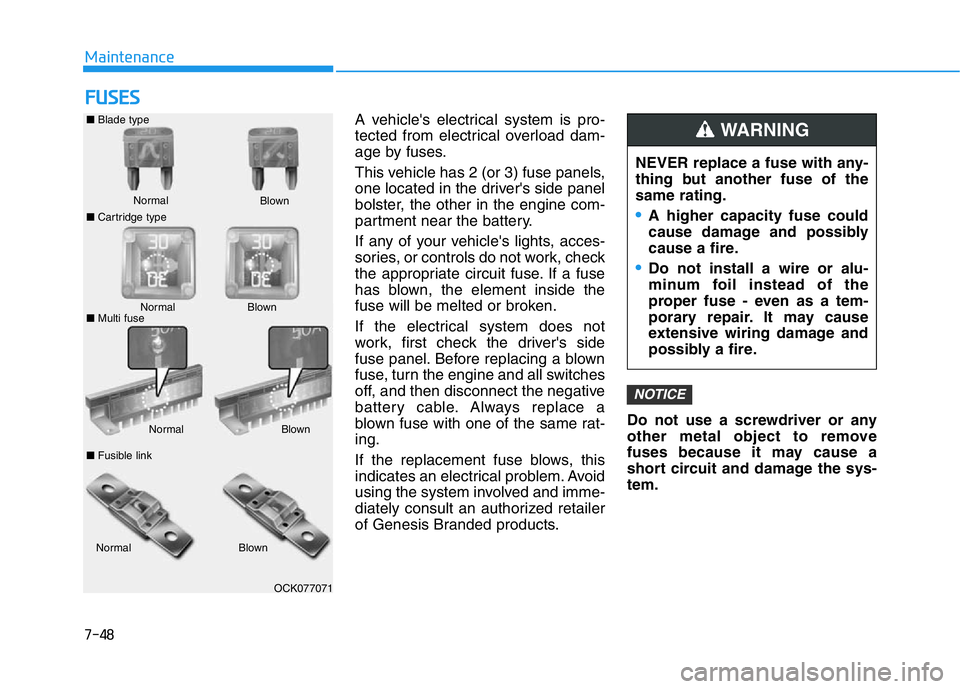
A vehicle's electrical system is pro-
tected from electrical overload dam-
age by fuses.
This vehicle has 2 (or 3) fuse panels,
one located in the driver's side panel
bolster, the other in the engine com-
partment near the battery.
If any of your vehicle's lights, acces-
sories, or controls do not work, check
the appropriate circuit fuse. If a fuse
has blown, the element inside the
fuse will be melted or broken.
If the electrical system does not
work, first check the driver's side
fuse panel. Before replacing a blown
fuse, turn the engine and all switches
off, and then disconnect the negative
battery cable. Always replace a
blown fuse with one of the same rat-
ing.
If the replacement fuse blows, this
indicates an electrical problem. Avoid
using the system involved and imme-
diately consult an authorized retailer
of Genesis Branded products.Do not use a screwdriver or any
other metal object to remove
fuses because it may cause a
short circuit and damage the sys-
tem.
NOTICE
NEVER replace a fuse with any-
thing but another fuse of the
same rating.
•A higher capacity fuse could
cause damage and possibly
cause a fire.
•Do not install a wire or alu-
minum foil instead of the
proper fuse - even as a tem-
porary repair. It may cause
extensive wiring damage and
possibly a fire.
WARNING
Normal ■Blade type
■Cartridge typeBlown
Normal Blown
Normal Blown
OCK077071
Normal Blown
■Multi fuse
■Fusible link
Page 473 of 516

7-49
7
Maintenance
Instrument Panel Fuse
Replacement
1. Turn the engine off.
2. Turn all other switches OFF.
3. Open the fuse panel cover.
4. Refer to the label on the inside of
the fuse panel cover to locate the
suspected fuse location.5. Pull the suspected fuse straight
out. Use the removal tool provided
in the engine compartment fuse
panel.
6. Check the removed fuse; replace it
if it is blown. Spare fuses are pro-
vided in the instrument panel fuse
panels (or in the engine compart-
ment fuse panel).
7. Push in a new fuse of the same
rating, and make sure it fits tightly
in the clips. If it fits loosely, consult
an authorized retailer of Genesis
Branded products.In an emergency, if you do not have
a spare fuse, use a fuse of the same
rating from a circuit you may not
need for operating the vehicle.
If the headlamps or other electrical
components do not work and the
fuses are undamaged, check the
fuse panel in the engine compart-
ment. If a fuse is blown, it must be
replaced with the same rating.
OIK077025
OIK077024
Page 474 of 516

7-50
Maintenance
Fuse switch
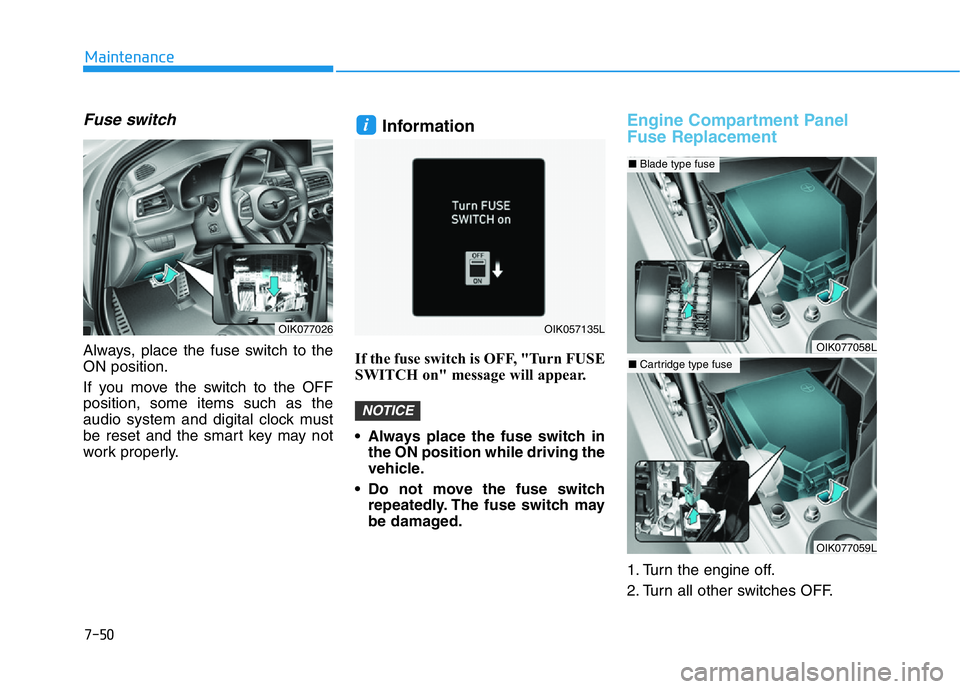
Always, place the fuse switch to the
ON position.
If you move the switch to the OFF
position, some items such as the
audio system and digital clock must
be reset and the smart key may not
work properly.
Information
If the fuse switch is OFF, "Turn FUSE
SWITCH on" message will appear.
• Always place the fuse switch in
the ON position while driving the
vehicle.
• Do not move the fuse switch
repeatedly. The fuse switch may
be damaged.
Engine Compartment Panel
Fuse Replacement
1. Turn the engine off.
2. Turn all other switches OFF.
NOTICE
i
OIK077058L
■Blade type fuse
OIK077059L
■Cartridge type fuse
OIK077026OIK057135L
Page 475 of 516

7-51
7
Maintenance
3. Remove the fuse panel cover by
pressing the tap and pulling up.
4. Check the removed fuse; replace it
if it is blown. To remove or insert
the fuse, use the fuse puller in the
engine compartment fuse panel.
5. Push in a new fuse of the same
rating, and make sure it fits tightly
in the clips. If it fits loosely, consult
an authorized retailer of Genesis
Branded products.
After checking the fuse box in the
engine compartment securely
close the fuse box cover inside
the engine compartment, until it
clicks.
If the fuse box is not closed prop-
erly, water may leak in side, possi-
bly causing a malfunction with the
electrical system.Main fuse
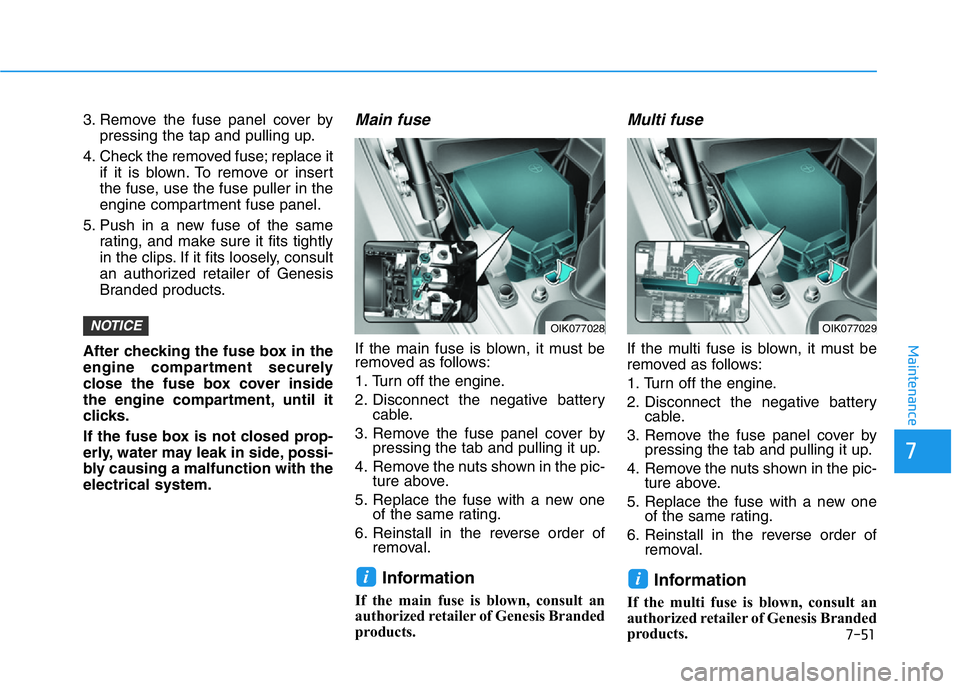
If the main fuse is blown, it must be
removed as follows:
1. Turn off the engine.
2. Disconnect the negative battery
cable.
3. Remove the fuse panel cover by
pressing the tab and pulling it up.
4. Remove the nuts shown in the pic-
ture above.
5. Replace the fuse with a new one
of the same rating.
6. Reinstall in the reverse order of
removal.
Information
If the main fuse is blown, consult an
authorized retailer of Genesis Branded
products.
Multi fuse
If the multi fuse is blown, it must be
removed as follows:
1. Turn off the engine.
2. Disconnect the negative battery
cable.
3. Remove the fuse panel cover by
pressing the tab and pulling it up.
4. Remove the nuts shown in the pic-
ture above.
5. Replace the fuse with a new one
of the same rating.
6. Reinstall in the reverse order of
removal.
Information
If the multi fuse is blown, consult an
authorized retailer of Genesis Branded
products.
ii
NOTICEOIK077028OIK077029
Page 480 of 516

7-56
Maintenance
LIGHT BULBS
Consult an authorized retailer of
Genesis Branded products to
replace most vehicle light bulbs. It is
difficult to replace vehicle light bulbs
because other parts of the vehicle
must be removed before you can get
to the bulb. This is especially true for
removing the headlamp assembly to
get to the bulb(s).
Removing/installing the headlamp
assembly can result in damage to
the vehicle.
Information
The headlamp and tail lamp lenses
could appear frosty if the vehicle is
washed after driving or the vehicle is
driven at night in wet weather. This
condition is caused by temperature
difference between the lamp inside
and outside and does not indicate a
problem with your vehicle. When
moisture condenses in the lamp, it will
be removed after driving with the
headlamp on. The removable level
may differ depending on lamp size,
lamp position and environmental con-
dition. However, if moisture is not
removed, we recommend that your
vehicle is inspected by an authorized
retailer of Genesis Branded products.Light replacement
Be sure to replace the burned out
bulb with one of the same wattage
rating. Otherwise, it may cause
damage to the fuse or electric
wiring system.Headlamp lens
To prevent damage, do not clean
the headlamp lens with chemical
solvents or strong detergents.
Information
• A normally functioning lamp may
flicker momentarily to stabilize the
vehicle's electrical control system.
However, if the lamp goes out after
flickering momentarily, or continues
to flicker, have the system checked
by an authorized retailer of Genesis
Branded products.
• The position lamp may not turn on
when the position lamp switch is
turned on, but the position lamp and
headlamp switch may turn on when
the headlamp switch is turned on.
This may be caused by network fail-
ure or vehicle electrical control sys-
tem malfunction. If this occurs, have
the system checked by an authorized
retailer of Genesis Branded prod-
ucts.
i
NOTICE
NOTICE
i
•Prior to replacing a lamp,
depress the brake pedal, shift
the gear into P (Park), apply
the parking brake, press the
Engine Start/Stop button to
the OFF position, and take the
key with you when leaving the
vehicle to avoid sudden
movement of the vehicle and
to prevent possible electric
shock.
•Be aware the bulbs may be
hot and may burn your fin-
gers.
WARNING