Chapter 5 GENESIS G70 2021 Service Manual
[x] Cancel search | Manufacturer: GENESIS, Model Year: 2021, Model line: G70, Model: GENESIS G70 2021Pages: 516, PDF Size: 12.84 MB
Page 194 of 516

3-109
Convenient features of your vehicle
3
Battery saver function
The purpose of this feature is to help
prevent the battery from being dis-
charged. The system automatically
turns off the parking lamp when the
driver turns the engine off and opens
the driver-side door.
With this feature, the parking lamps
will turn off automatically if the driver
parks on the side of road at night.
If necessary, to keep the lamps on
when the engine is turned off, perform
the following:
1) Open the driver-side door.
2) Turn the parking lamps OFF and
ON again using the light switch on
the steering column.
Headlamp delay function
(if equipped)
If you place the Engine Start/Stop
button to the ACC or OFF position
with the headlamps ON, the head-
lamps (and/or parking lamps) remain
on for about 5 minutes. However,
with the engine off if the driver’s door
is opened and closed, the head-
lamps (and/or parking lamps) are
turned off after 15 seconds.
The headlamps (and/or parking
lamps) can be turned off by pressing
the lock button on the smart key
twice or turning the light switch to the
OFF or AUTO position. However, if
you turn the light switch to the AUTO
position when it is dark outside, the
headlamps will not be turned off.
You can activate or deactivate the
Headlamp Delay function from the
User Settings mode in the cluster
LCD display.
For more details, refer to "LCD
Display" in this chapter.
Information
If the driver exits the vehicle through
another door besides the driver door,
the battery saver function does not
operate and the headlamp delay func-
tion does not turn OFF automatically.
i
Page 196 of 516

3-111
Convenient features of your vehicle
3
Headlamp leveling device
(if equipped)
It automatically adjusts the head-
lamp beam level according to the
number of passengers and loading
weight in the luggage area. It also
adjusts to the appropriate headlamp
beam level for various situations.
Welcome System (if equipped)
Welcome light
Puddle lamp (if equipped) and door
handle lamp
With all the doors (and trunk) closed
and locked, the puddle lamp and
door handle lamp will come on for
about 15 seconds if any of the below
is performed.
1. If 'Convenience →
Welcome mir-
ror/light →
On door unlock' is
selected in the User Settings
mode in the cluster LCD display,
• the lamps will turn on when the
door unlock button is pressed on
the smart key.• the lamps will turn on when the
button of the outside door handle
is pressed with the smart key in
possession.
2. If both 'Convenience →
Welcome
mirror/light →
On door unlock' and
'Convenience →
Welcome
mirror/light →
On driver approach'
is selected in the User Settings
mode in the cluster LCD display,
the lamps will turn on when the
vehicle is approached with the
smart key in possession.
You can activate or deactivate
Welcome Light function from the
User Settings mode in the cluster
LCD display.
For more details, refer to "LCD
Display" in this chapter.
OIK047054N
If the function does not work
properly, have the system be
inspected by an authorized
retailer of Genesis Branded
products. Do not attempt to
inspect or replace the wiring
yourself.
WARNING
Page 200 of 516

3-115
Convenient features of your vehicle
3
Puddle lamp (if equipped)
Welcome light
When all doors (and trunk) are
closed and locked, the puddle lamp
will come on for 15 seconds if the
door is unlocked by the smart key or
outside door handle button.
For more details, refer to "Welcome
System" in this chapter.
Escort light
When the Engine Start/Stop button
is in the OFF position and the driver's
door is opened, the puddle lamp will
come on for 30 seconds. If the dri-
ver's door is closed within the 30
seconds, the puddle lamp will turn off
after 15 seconds. If the driver's door
is closed and locked, the puddle
lamp will turn off immediately.
The Puddle Lamp Escort Light will
turn on only the first time the driver's
door is opened after the engine is
turned off.
OIK047058N
Page 232 of 516

3-147
Convenient features of your vehicle
3
To reactivate the auto defogging sys-
tem
1. Press the Engine Start/Stop button
to the ON position.
2. Press the front defroster button
over 3 seconds.
3. The front defroster button indicator
will blink 6 times and then ADS OFF
will go out on the climate control
information screen when the auto
defogging system is reactivated.
Information
• When the air conditioning is turned
on by Auto defogging system, if you
try to turn off the air conditioning, the
indicator will blink 3 times and the air
conditioning will not turn off.
• To maintain the effectiveness and
efficiency of the Auto Defogging
System, do not select recirculated
air position while the system is oper-
ating.
• When the Auto Defogging System is
operating, the fan speed adjustment
knob, the temperature adjustment
knob, and the air intake control but-
ton are all disabled.
Do not remove the sensor cover
located on the upper end of the
windshield glass.
Damage to system parts could
occur and may not be covered by
your vehicle warranty.
Rear Window Defroster
To prevent damage to the rear
window defroster conducting ele-
ments bonded to the inside sur-
face of the rear window, never use
sharp instruments or window
cleaners containing abrasives to
clean the window.
If you want to defrost and defog the
front windshield, refer to the
"Windshield Defrosting and
Defogging" section in this chapter.
NOTICE
NOTICE
i
Page 242 of 516

3-157
Convenient features of your vehicle
3
Wireless Cellular Phone
Charging System (if equipped)
On certain models, the vehicle
comes equipped with a wireless cel-
lular phone charger.
The system is available when all
doors are closed, and when the
Engine Start/Stop button is in the
ACC, ON or START position.
To use the wireless cellular phone
charging system, open the cover by
pushing it straight up.
After use, to close the cover, slightly
push up the cover again.
To charge a cellular phone
The wireless cellular phone charging
system charges only the Qi-enabled
cellular phones ( ). Read the label
on the cellular phone accessory
cover or visit your cellular phone
manufacturer's website to check
whether your cellular phone supports
the Qi technology.
The wireless charging process starts
when you put a Qi-enabled cellular
phone on the wireless charging unit.
1. Remove other items, including the
smart key, from the wireless charg-
ing unit. If not, the wireless charg-
ing process may be interrupted.
Place the cellular phone on the
center of the charging pad ( ).
2. The indicator light is orange when
the cellular phone is charging. The
indicator light turns green when
phone charging is complete.
3. You can turn ON or OFF the wire-
less charging function in the user
settings mode on the instrument
cluster. For further information,
refer to the "LCD Display Modes"
in this chapter.If your cellular phone is not charging:
- Slightly change the position of the
cellular phone on the charging pad.
- Make sure the indicator light is
orange.
Depending on the cellular phone type,
the indicator light may not turn green
even though the charging is complete.
The indicator light will blink orange for
10 seconds if there is a malfunction in
the wireless charging system.
In this case, temporarily stop the
charging process, and re-attempt to
charge your cellular phone again.
The system warns you with a mes-
sage on the LCD display if the cellular
phone is still on the wireless charging
unit after the engine is turned OFF
and the front door is opened.
Information
For some manufacturers' cellular
phones, the system may not warn you
even though the cellular phone is left
on the wireless charging unit. This is
due to the particular characteristic of
the cellular phone and not a malfunc-
tion of the wireless charging.
i
OIK047064
Page 254 of 516

5-5
Driving your vehicle
5
NEVER drink or take drugs and
drive.
Drinking or taking drugs and driv-
ing is dangerous and may result
in an accident and SERIOUS
INJURY or DEATH.
Drunk driving is the number
one contributor to the highway
death toll each year. Even a
small amount of alcohol will
affect your reflexes, percep-
tions and judgment. Just one
drink can reduce your ability to
respond to changing conditions
and emergencies and your reac-
tion time gets worse with each
additional drink.
Driving while under the influ-
ence of drugs is as dangerous
or more dangerous than driving
under the influence of alcohol.
WARNING You are much more likely to have
a serious accident if you drink or
take drugs and drive. If you are
drinking or taking drugs, don't
drive. Do not ride with a driver
who has been drinking or taking
drugs. Choose a designated driv-
er or call a taxi.
To reduce the risk of SERIOUS
INJURY or DEATH, take the fol-
lowing precautions:
•ALWAYS wear your seat belt.
All passengers must be prop-
erly belted whenever the vehi-
cle is moving. For more infor-
mation, refer to "Seat Belts" in
chapter 2.
•Always drive defensively.
Assume other drivers or pedes-
trians may be careless and
make mistakes.
•Stay focused on the task of
driving. Driver distraction can
cause accidents.
•Leave plenty of space between
you and the vehicle in front of
you.
WARNING
Page 269 of 516

5-20
Driving your vehicle
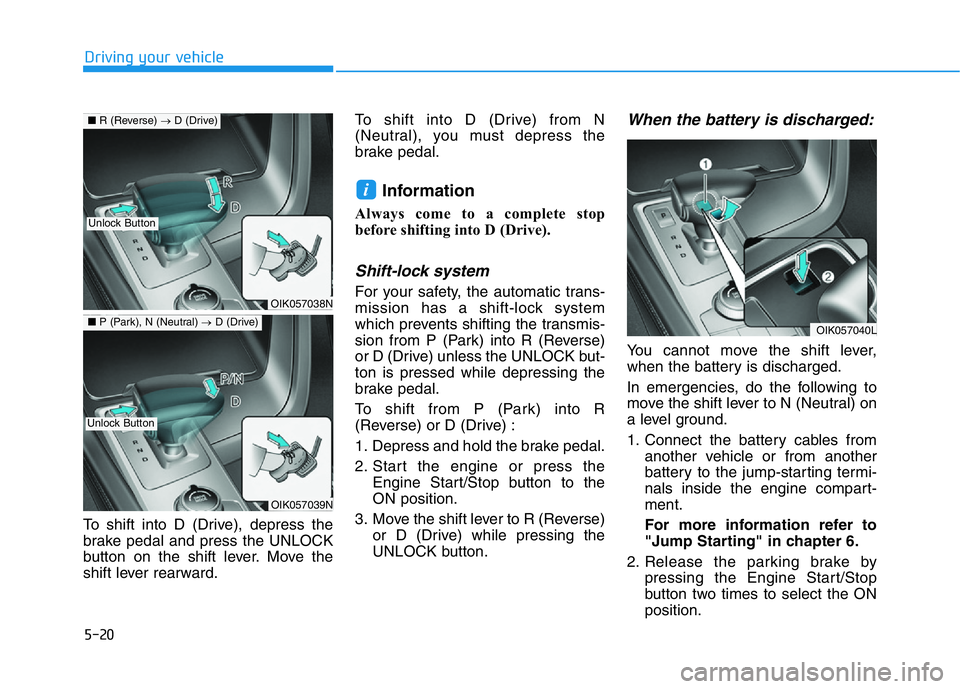
To shift into D (Drive), depress the
brake pedal and press the UNLOCK
button on the shift lever. Move the
shift lever rearward.To shift into D (Drive) from N
(Neutral), you must depress the
brake pedal.
Information
Always come to a complete stop
before shifting into D (Drive).
Shift-lock system
For your safety, the automatic trans-
mission has a shift-lock system
which prevents shifting the transmis-
sion from P (Park) into R (Reverse)
or D (Drive) unless the UNLOCK but-
ton is pressed while depressing the
brake pedal.
To shift from P (Park) into R
(Reverse) or D (Drive) :
1. Depress and hold the brake pedal.
2. Start the engine or press the
Engine Start/Stop button to the
ON position.
3. Move the shift lever to R (Reverse)
or D (Drive) while pressing the
UNLOCK button.
When the battery is discharged:
You cannot move the shift lever,
when the battery is discharged.
In emergencies, do the following to
move the shift lever to N (Neutral) on
a level ground.
1. Connect the battery cables from
another vehicle or from another
battery to the jump-starting termi-
nals inside the engine compart-
ment.
For more information refer to
"Jump Starting" in chapter 6.
2. Release the parking brake by
pressing the Engine Start/Stop
button two times to select the ON
position.
i
OIK057038N
OIK057039N
■R (Reverse) →D (Drive)
■P (Park), N (Neutral) →D (Drive)
Unlock Button
Unlock Button
OIK057040L
Page 293 of 516

5-44
Driving your vehicle
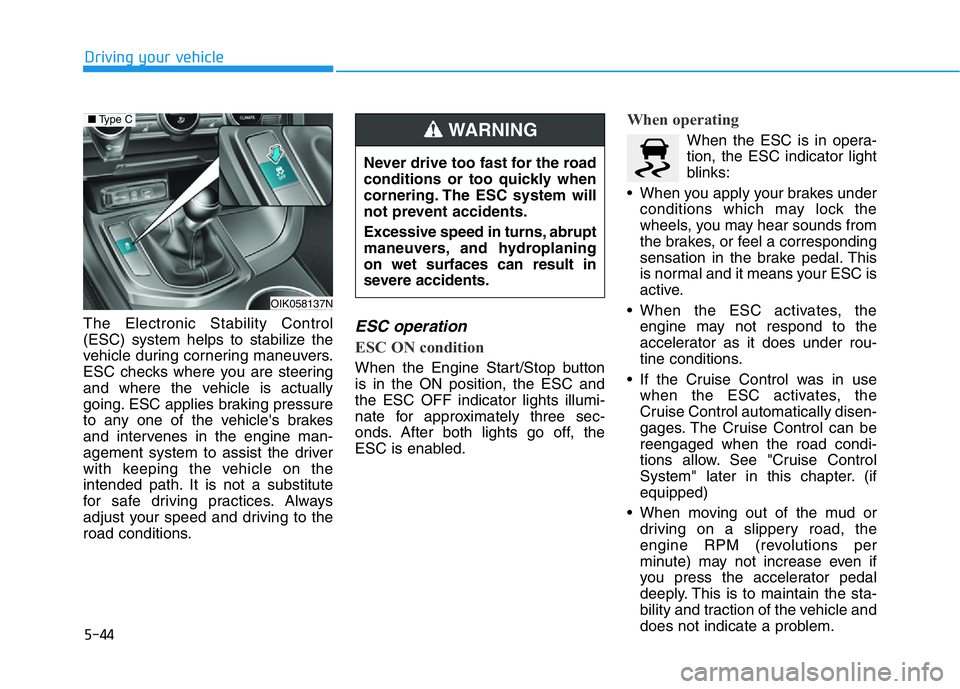
The Electronic Stability Control
(ESC) system helps to stabilize the
vehicle during cornering maneuvers.
ESC checks where you are steering
and where the vehicle is actually
going. ESC applies braking pressure
to any one of the vehicle's brakes
and intervenes in the engine man-
agement system to assist the driver
with keeping the vehicle on the
intended path. It is not a substitute
for safe driving practices. Always
adjust your speed and driving to the
road conditions.
ESC operation
ESC ON condition
When the Engine Start/Stop button
is in the ON position, the ESC and
the ESC OFF indicator lights illumi-
nate for approximately three sec-
onds. After both lights go off, the
ESC is enabled.
When operating
When the ESC is in opera-
tion, the ESC indicator light
blinks:
• When you apply your brakes under
conditions which may lock the
wheels, you may hear sounds from
the brakes, or feel a corresponding
sensation in the brake pedal. This
is normal and it means your ESC is
active.
• When the ESC activates, the
engine may not respond to the
accelerator as it does under rou-
tine conditions.
• If the Cruise Control was in use
when the ESC activates, the
Cruise Control automatically disen-
gages. The Cruise Control can be
reengaged when the road condi-
tions allow. See "Cruise Control
System" later in this chapter. (if
equipped)
• When moving out of the mud or
driving on a slippery road, the
engine RPM (revolutions per
minute) may not increase even if
you press the accelerator pedal
deeply. This is to maintain the sta-
bility and traction of the vehicle and
does not indicate a problem.
Never drive too fast for the road
conditions or too quickly when
cornering. The ESC system will
not prevent accidents.
Excessive speed in turns, abrupt
maneuvers, and hydroplaning
on wet surfaces can result in
severe accidents.
WARNING
OIK058137N
■Type C
Page 299 of 516

5-50
Driving your vehicle
Information
• Do not drive in water if the level is
higher than the bottom of the vehi-
cle.
• Check your brake condition once
you are out of mud or water.
Depress the brake pedal several
times as you move slowly until you
feel normal braking return.
• Shorten your scheduled mainte-
nance interval if you drive in off-
road conditions such as sand, mud
or water (see "Maintenance Under
Severe Usage Conditions" in chap-
ter 7).
• Make sure that an AWD vehicle is
towed by flatbed tow truck.
For safe AWD operation
Before driving
• Make sure all passengers are
wearing seat belts.
• Sit upright and adjust the steering
wheel to a position comfortable for
you to drive.
Driving on snow-covered or icy
roads
• Start off slowly by applying the
accelerator pedal gently.
• Use of snow tires is recommended.
For more information on Snow
Tires refer to "Winter Driving" in
this chapter.
• Keep sufficient distance between
your vehicle and the vehicle in front
of you.
• When approaching a stop sign or
stop light, release the accelerator
pedal to provide engine braking
during deceleration.
• Avoid speeding, rapid acceleration,
sudden brake applications, and
sharp turns to prevent skids.
Driving in sand or mud
• Maintain slow and constant speed.
• Keep sufficient distance between
your vehicle and the vehicle in front
of you.
• Reduce vehicle speed and always
check the road condition.
• Avoid speeding, rapid acceleration,
sudden brake applications, and
sharp turns to prevent getting
stuck.
When the vehicle is stuck in snow,
sand or mud, avoid running the
engine continuously at high rpm,
doing so may damage the tires,
transmission, differential or AWD
system.
NOTICE
i
Page 300 of 516

5-51
Driving your vehicle
5
Information
• When using Snow Tires, mount
them on all four wheels.
• When using tire chains, install them
on the rear tires.
• If tire chains must be used, use
AutoSock (fabric snow chain) and
install the tire chain after reviewing
the instructions provided with the
tire chains.
For more information on Snow Tires
and Tire Chains, refer to "Winter
Driving" in this chapter.
Driving up or down hills
• Driving uphill
- Before starting off, check if it is
possible to drive uphill.
- Drive as straight as possible.
• Driving downhill
- Do not change gear while driving
downhill. Select gear before driv-
ing downhill.
- Drive slowly and select Manual
Shift Mode to provide engine
braking while driving downhill.
- Drive straight as possible.
Emergency precautions
Tires
When replacing the tires, be sure to
equip all four tires with the same
size, type, tread, brand and load-car-
rying capacity.
In an emergency situation, a com-
pact spare tire may be used. But, do
not use the compact spare tire con-
tinuously. Repair or replace the origi-
nal tire as soon as possible to avoid
failure of the differential or AWD sys-
tem.
i
Exercise extreme caution driv-
ing up or down steep hills. The
vehicle may flip depending on
the grade, terrain and water/
mud conditions.
WARNING
Do not use tire and wheel with
different size and type from the
one originally installed on your
vehicle. It can affect the safety
and performance of your vehi-
cle, which could lead to steering
failure or rollover causing seri-
ous injury.
WARNING