high GENESIS G70 2021 Quick Reference Guide
[x] Cancel search | Manufacturer: GENESIS, Model Year: 2021, Model line: G70, Model: GENESIS G70 2021Pages: 24, PDF Size: 6.85 MB
Page 1 of 24
NP150-G92021(Rev 08/18/20)Printing 08/21/20
GENESIS
G70
QUICK REFERENCE GUIDE
Sales Consultant Date Sales Manager Date
New Owner Date
Email
@
Looking For more detailed information? This Quick Reference Guide does not replace your vehicle’sOwner’s Manual. If you require additional information or are unsure of a specific issue, we recommend that you always refer to the vehicle’s Owner’s Manual or contact your authorized retailer of Genesis Branded Products. The information contained in this Quick Reference Guide is correct at the time of printing; however, specifications and equipment can change without notice. No warranty or guarantee is being extended in this Quick Reference Guide, and Genesis Brand reserves the right to change product specifications and equipment at any time without incurring obligations. Some vehicles are shown with optional equipment.
MAINTENANCE
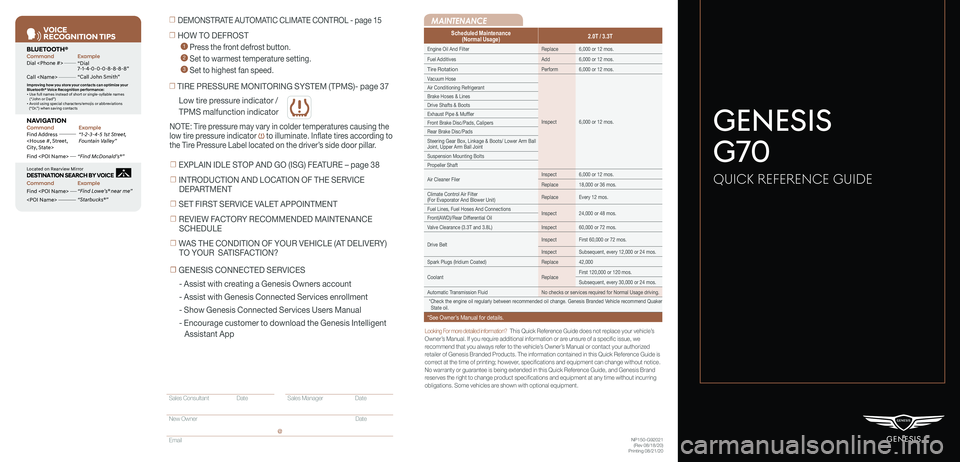
Scheduled Maintenance(Normal Usage)2.0T / 3.3T
Engine Oil And FilterReplace6,000 or 12 mos.
Fuel AdditivesAdd6,000 or 12 mos.
Tire RotationPerform6,000 or 12 mos.
Vacuum Hose
Inspect6,000 or 12 mos.
Air Conditioning Refrigerant
Brake Hoses & Lines
Drive Shafts & Boots
Exhaust Pipe & Muffler
Front Brake Disc/Pads, Calipers
Rear Brake Disc/Pads
Steering Gear Box, Linkage & Boots/ Lower Arm Ball Joint, Upper Arm Ball Joint
Suspension Mounting Bolts
Propeller Shaft
Air Cleaner FilerInspect6,000 or 12 mos.
Replace18,000 or 36 mos.
Climate Control Air Filter (For Evaporator And Blower Unit)ReplaceEvery 12 mos.
Fuel Lines, Fuel Hoses And ConnectionsInspect24,000 or 48 mos.Front(AWD)/Rear Differential Oil
Valve Clearance (3.3T and 3.8L)Inspect60,000 or 72 mos.
Drive BeltInspectFirst 60,000 or 72 mos.
InspectSubsequent, every 12,000 or 24 mos.
Spark Plugs (Iridium Coated)Replace42,000
CoolantReplaceFirst 120,000 or 120 mos.
Subsequent, every 30,000 or 24 mos.
Automatic Transmission FluidNo checks or services required for Normal Usage driving.
*Check the engine oil regularly between recommended oil change. Genesis Branded Vehicle recommend Quaker State oil.
*See Owner’s Manual for details.
Low tire pressure indicator /
TPMS malfunction indicator
☐ TIRE PRESSURE MONITORING SYSTEM (TPMS)- page 37
NOTE: Tire pressure may vary in colder temperatures causing the
low tire pressure indicator to illuminate. Inflate tires according to
the Tire Pressure Label located on the driver’s side door pillar.
☐ HOW TO DEFROST
1 Press the front defrost button.
2 Set to warmest temperature setting.
3 Set to highest fan speed.
☐ DEMONSTRATE AUTOMATIC CLIMATE CONTROL - page 15
☐ EXPLAIN IDLE STOP AND GO (ISG) FEATURE – page 38
☐ INTRODUCTION AND LOCATION OF THE SERVICE
DEPARTMENT
☐ SET FIRST SERVICE VALET APPOINTMENT
☐ REVIEW FACTORY RECOMMENDED MAINTENANCE
SCHEDULE
☐ WAS THE CONDITION OF YOUR VEHICLE (AT DELIVERY)
TO YOUR SATISFACTION?
☐ GENESIS CONNECTED SERVICES
- Assist with creating a Genesis Owners account
- Assist with Genesis Connected Services enrollment
- Show Genesis Connected Services Users Manual
- Encourage customer to download the Genesis Intelligent
Assistant App
VOICE
RE COGNITION TIPS
Command ExampleBL UET OOTH®
Dial
Call
7 -1-4- 0-0-0- 8-8-8-8”
“Call John Smith ”
Command ExampleNA VIG ATION
Find Addr ess
2-3-4-5 1s t Stree t,
F oun tain Valle y”
C ommand Example
Loca ted on R earview Mirr or DESTINATION SEARCH \DB\f VOICE
Find
ow e’s ® near me”
“S tarbuck s®”
Impr oving ho w you s tor e your con tacts can op timize your
Blue too th® Voic e R ecognition perf ormance:
• U se full names ins tead o f short or single-s yllable names
(“ John or Dad”)
• Avoid using special char acters/emojis or abbrevia tions
(“Dr .”) when sa ving contacts
Find
Page 5 of 24
Quick Reference Guide I 0403 I Quick Reference Guide
Easy Access Function (Driver’s Seat)
Entering the vehicle
The driver’s seat and steering wheel will move back to its original
position when the Engine Start/Stop button is in the OFF position
and the driver’s door is closed with the smart key in possession.
Exiting the vehicle
The driver’s seat will move rearward and the steering wheel will
move upward when the driver’s door is opened and the Engine
Start/Stop button is in the OFF position with the gear in P (Park).
NOTE: The driver’s seat may not move rearward if there is not
enough space between the driver’s seat and the rear seat.
You can activate/deactivate this function from the User Settings
mode in the cluster LCD display:
Seat Easy Access:
Convenience > Seat Easy Access > Off/Normal/Extended
Steering Easy Access:
Convenience > Steering Easy Access > On/Off
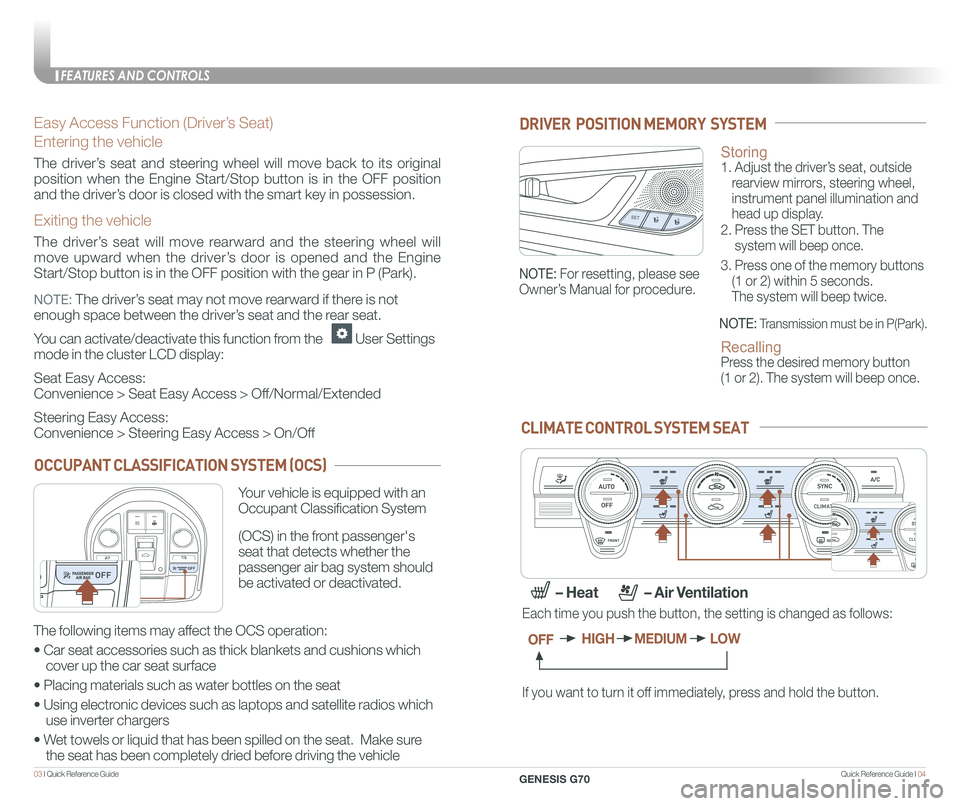
Storing 1. Adjust the driver’s seat, outside
rearview mirrors, steering wheel,
instrument panel illumination and
head up display.
2. Press the SET button. The
system will beep once.
3. Press one of the memory buttons
(1 or 2) within 5 seconds.
The system will beep twice.
Recalling Press the desired memory button
(1 or 2). The system will beep once.
SET1
2
DRIVER POSITION MEMORY SYSTEM
NOTE: Transmission must be in P(Park).
NOTE: For resetting, please see
Owner’s Manual for procedure.
CLIMATE CONTROL SYSTEM SEAT
If you want to turn it off immediately, press and hold the button.
Each time you push the button, the setting is changed as follows:
OFFHIGHMEDIUMLOW
– Heat – Air Ventilation
CLIMATE
CLIMATE
CLIMATE
CLIMATE
OCCUPANT CLASSIFICATION SYSTEM (OCS)
Your vehicle is equipped with an
Occupant Classification System
(OCS) in the front passenger's
seat that detects whether the
passenger air bag system should
be activated or deactivated.
The following items may affect the OCS operation:
• Car seat accessories such as thick blankets and cushions which
cover up the car seat surface
• Placing materials such as water bottles on the seat
• Using electronic devices such as laptops and satellite radios which
use inverter chargers
• Wet towels or liquid that has been spilled on the seat. Make sure
the seat has been completely dried before driving the vehicle
FEATURES AND CONTROLS
GENESIS G70
Page 8 of 24
Quick Reference Guide I 1009 I Quick Reference Guide
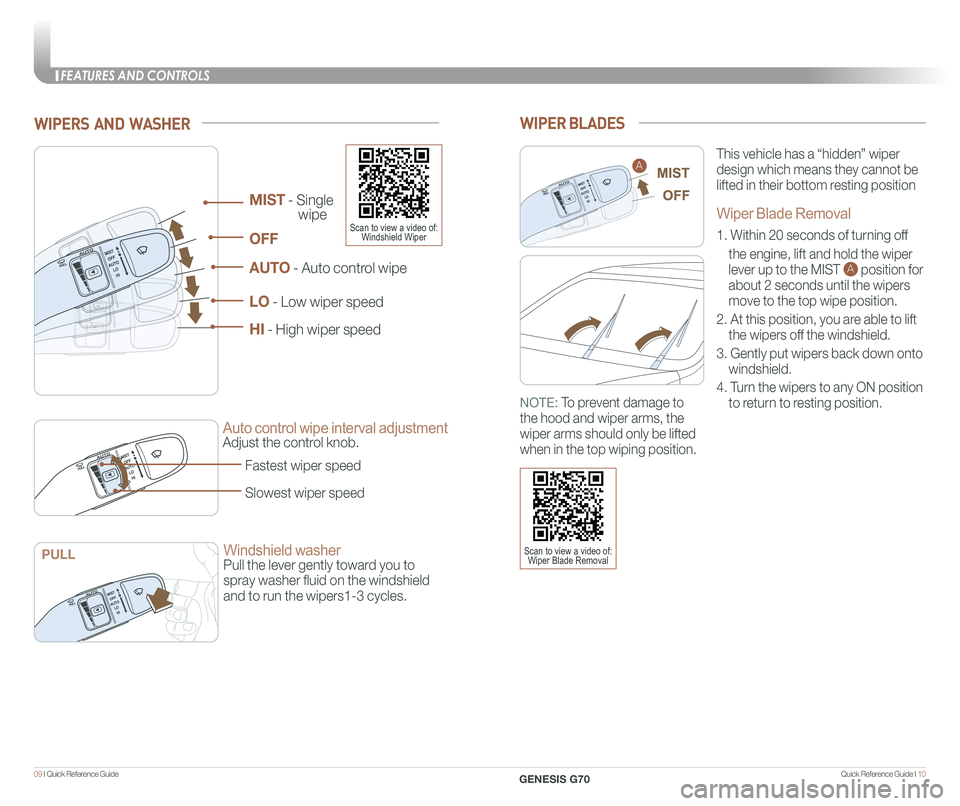
WIPERS AND WASHER
Auto control wipe interval adjustment
Adjust the control knob.
Windshield washer
Pull the lever gently toward you to
spray washer fluid on the windshield
and to run the wipers1-3 cycles.
Fastest wiper speed
Slowest wiper speed
MIST - Single
wipe
AUTO - Auto control wipe
LO - Low wiper speed
HI - High wiper speed
OFF
PULL
Scan to view a video of: Windshield Wiper
WIPER BLADES
This vehicle has a “hidden” wiper
design which means they cannot be
lifted in their bottom resting position
Wiper Blade Removal
1. Within 20 seconds of turning off
the engine, lift and hold the wiper
lever up to the MIST A position for
about 2 seconds until the wipers
move to the top wipe position.
2. At this position, you are able to lift
the wipers off the windshield.
3. Gently put wipers back down onto
windshield.
4. Turn the wipers to any ON position
to return to resting position.
A
NOTE: To prevent damage to
the hood and wiper arms, the
wiper arms should only be lifted
when in the top wiping position.
Scan to view a video of: Wiper Blade Removal
FEATURES AND CONTROLS
GENESIS G70
Page 10 of 24
Quick Reference Guide I 1413 I Quick Reference Guide
LCD DISPLAY MODES
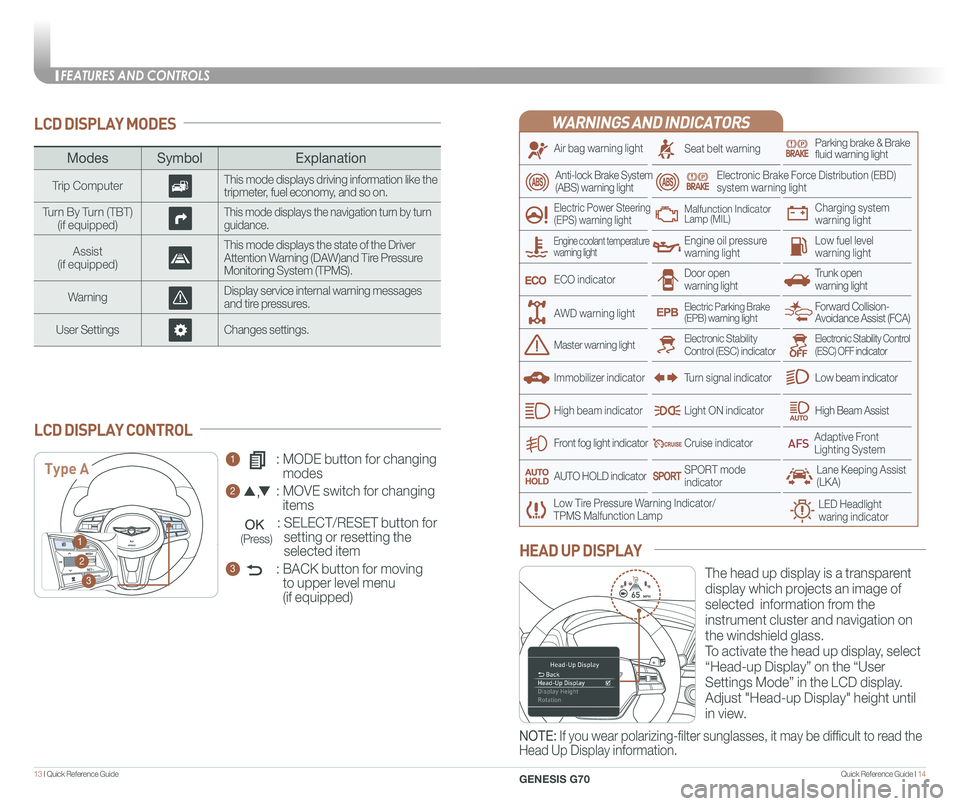
ModesSymbol Explanation
Trip ComputerThis mode displays driving information like the tripmeter, fuel economy, and so on.
Turn By Turn (TBT)(if equipped)This mode displays the navigation turn by turn guidance.
Assist(if equipped)
This mode displays the state of the Driver Attention Warning (DAW)and Tire Pressure Monitoring System (TPMS).
WarningDisplay service internal warning messages and tire pressures.
User SettingsChanges settings.
1 : MODE button for changing
modes
2 : MOVE switch for changing
items
: SELECT/RESET button for
setting or resetting the
selected item
3 : BACK button for moving
to upper level menu
(if equipped)
LCD DISPLAY CONTROL
Type A
1
2
3
(Press)
The head up display is a transparent
display which projects an image of
selected information from the
instrument cluster and navigation on
the windshield glass.
To activate the head up display, select
“Head-up Display” on the “User
Settings Mode” in the LCD display.
Adjust "Head-up Display" height until
in view.
HEAD UP DISPLAY
NOTE: If you wear polarizing-filter sunglasses, it may be difficult to read the
Head Up Display information.
WARNINGS AND INDICATORS
Air bag warning light
Electric Power Steering (EPS) warning light
Seat belt warningParking brake & Brake fluid warning light
Electronic Brake Force Distribution (EBD) system warning light
Low Tire Pressure Warning Indicator/TPMS Malfunction Lamp
Trunk open warning light
Low fuel level warning light
Front fog light indicator
Low beam indicator
High Beam AssistLight ON indicator
ECO indicator
SPORT modeindicator
Anti-lock Brake System(ABS) warning light
High beam indicator
Door open warning light
Electronic Stability Control (ESC) indicatorMaster warning light
Forward Collision- Avoidance Assist (FCA)Electric Parking Brake(EPB) warning light
Engine oil pressure warning light
Charging system warning light
Immobilizer indicator
Malfunction IndicatorLamp (MIL)
Electronic Stability Control (ESC) OFF indicator
Cruise indicator
Lane Keeping Assist (LKA)
Adaptive Front Lighting System
AUTO HOLD indicator
Turn signal indicator
Engine coolant temperature warning light
AWD warning light
LED Headlight waring indicator
FEATURES AND CONTROLS
GENESIS G70
Page 11 of 24
Quick Reference Guide I 1615 I Quick Reference Guide
CLIMATE
DEFOGGING / DEFROSTINGSYSTEM OFF
Pressing the OFF button will
place the system in the OFF mode.
• Front blower will turn off.
• Outside (fresh) air position
will be selected.
• Vented air will be at last set
temperature.
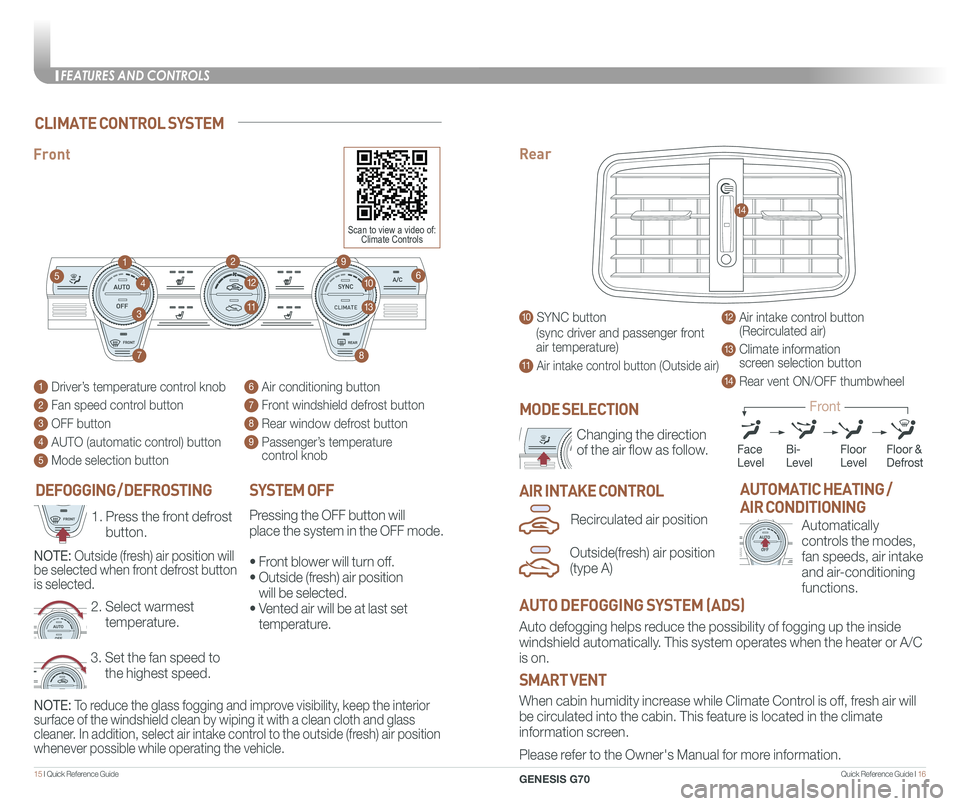
1 Driver’s temperature control knob
2 Fan speed control button
3 OFF button
4 AUTO (automatic control) button
5 Mode selection button
6 Air conditioning button
7 Front windshield defrost button
8 Rear window defrost button
9 Passenger’s temperature control knob
Front
1
10
9
8
12
7
11
46
3
2
5
13
CLIMATE
CLIMATE
Changing the direction
of the air flow as follow.
MODE SELECTION
NOTE: To reduce the glass fogging and improve visibility, keep the interior
surface of the windshield clean by wiping it with a clean cloth and glas\
s
cleaner. In addition, select air intake control to the outside (fresh) air position
whenever possible while operating the vehicle.
AIR INTAKE CONTROL
CLIMATE
CLIMATE
Automatically
controls the modes,
fan speeds, air intake
and air-conditioning
functions.
AUTOMATIC HEATING /
AIR CONDITIONING
10 SYNC button
(sync driver and passenger front
air temperature)
11 Air intake control button (Outside air)
12 Air intake control button (Recirculated air)
13 Climate information screen selection button
14 Rear vent ON/OFF thumbwheel
Rear
14
When cabin humidity increase while Climate Control is off, fresh air will
be circulated into the cabin. This feature is located in the climate
information screen.
Auto defogging helps reduce the possibility of fogging up the inside
windshield automatically. This system operates when the heater or A/C
is on.
Please refer to the Owner's Manual for more information.
SMART VENT
AUTO DEFOGGING SYSTEM (ADS)
Recirculated air position
Outside(fresh) air position
(type A)
CLIMATE CONTROL SYSTEM
3. Set the fan speed to
the highest speed.
2. Select warmest
temperature.
CLIMATE
CLIMATECLIMATE
CLIMATE
CLIMATE
CLIMATE
1. Press the front defrost
button.
NOTE: Outside (fresh) air position will
be selected when front defrost button
is selected.
FaceLevelFloorLevelFloor &Defrost
Front
Bi-Level
Scan to view a video of: Climate Controls
FEATURES AND CONTROLS
GENESIS G70
Page 15 of 24
Quick Reference Guide I 2423 I Quick Reference Guide
Preconditions:
• Ignition is OFF
•
Alarm is armed (i.e., vehicle locked by key fob or Remote Door Lock)
• Gearshift level is in the P (Park) position
• Brake pedal is not depressed
• Engine hood is securely closed
• All the doors are closed and locked
• The tailgate or trunk lid is closed
• The security / panic system is not activated
• The proximity key is not inside the vehicle
• The battery power is not low
• Vehicle is located in an open area
• It has been less than 4 days since last vehicle ignition off
• Vehicle located in area with good cell reception
Remote Start will terminate:
• After 10 minutes or after selected engine timer runs out in
navigation vehicles
• Brake is pressed without the proximity key inside the vehicle
• Alarm is triggered without the proximity key inside the vehicle
• Door / trunk is opened from inside the vehicle
Notice: Laws in some communities may restrict the use of the
features that remotely start the engine. For example, some laws may
require a person using the remote start feature to have the vehicle in
view when doing so, or limit the length of time a vehicle engine may
idle. Please check local and state regulations for any requirements
and restrictions on remote starting of vehicles and engine idling time.
WARNING!
Do not remote start vehicle in an enclosed environment (i.e., closed garage). Prolonged operation of a motor vehicle in an enclosed environment can cause a harmful build-up of carbon monoxide. Carbon monoxide is harmful to your health. Exposure to high levels of carbon monoxide can cause headaches, dizziness or in extreme cases unconsciousness and / or death. Do not leave children or animals unattended in a vehicle while using the remote start function.
CAUTION!
If the vehicle’s windshield wipers are left on when the vehicle was last driven, then the wipers will turn on if the remote start function is activated. To avoid damage to the wiper blades (i.e., due to heavy ice or snow accumulated on the windshield), please always turn the vehicle’s windshield wipers off when parking the vehicle.
HOMELINK WIRELESS GARAGE CONTROL SYSTEM
Standard Programming
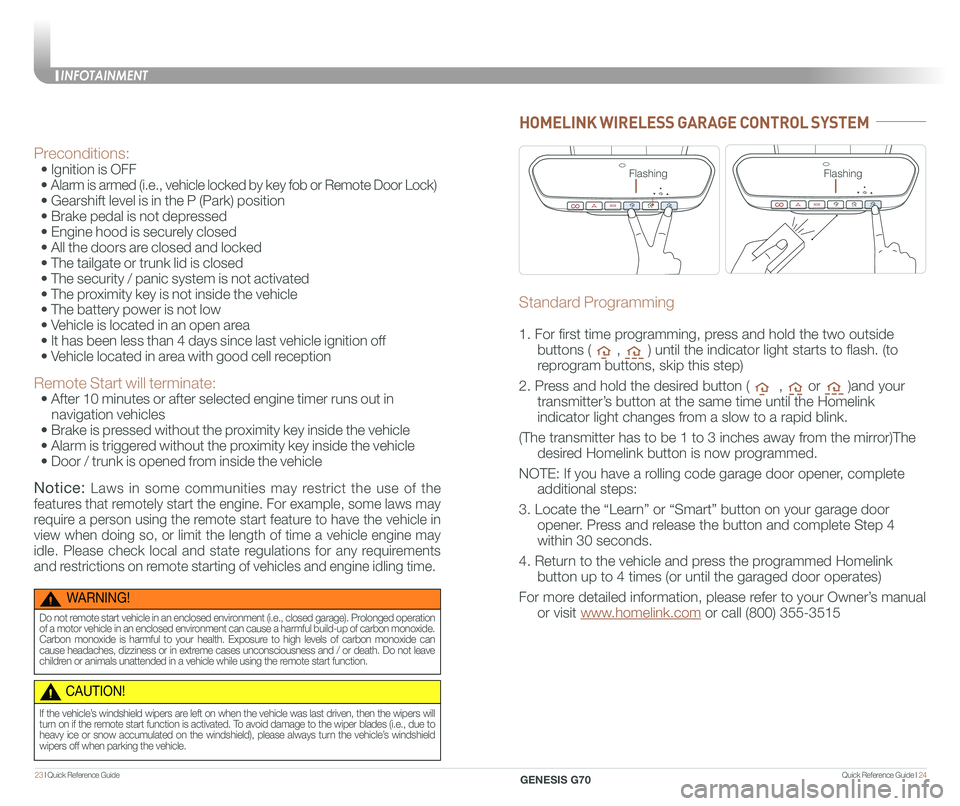
1. For first time programming, press and hold the two outside
buttons ( , ) until the indicator light starts to flash. (to
reprogram buttons, skip this step)
2. Press and hold the desired button ( , or )and your
transmitter’s button at the same time until the Homelink
indicator light changes from a slow to a rapid blink.
(The transmitter has to be 1 to 3 inches away from the mirror)The
desired Homelink button is now programmed.
NOTE: If you have a rolling code garage door opener, complete
additional steps:
3. Locate the “Learn” or “Smart” button on your garage door
opener. Press and release the button and complete Step 4
within 30 seconds.
4. Return to the vehicle and press the programmed Homelink
button up to 4 times (or until the garaged door operates)
For more detailed information, please refer to your Owner’s manual
or visit www.homelink.com or call (800) 355-3515
FlashingFlashing
INFOTAINMENT
GENESIS G70
Page 16 of 24
Quick Reference Guide I 2625 I Quick Reference Guide
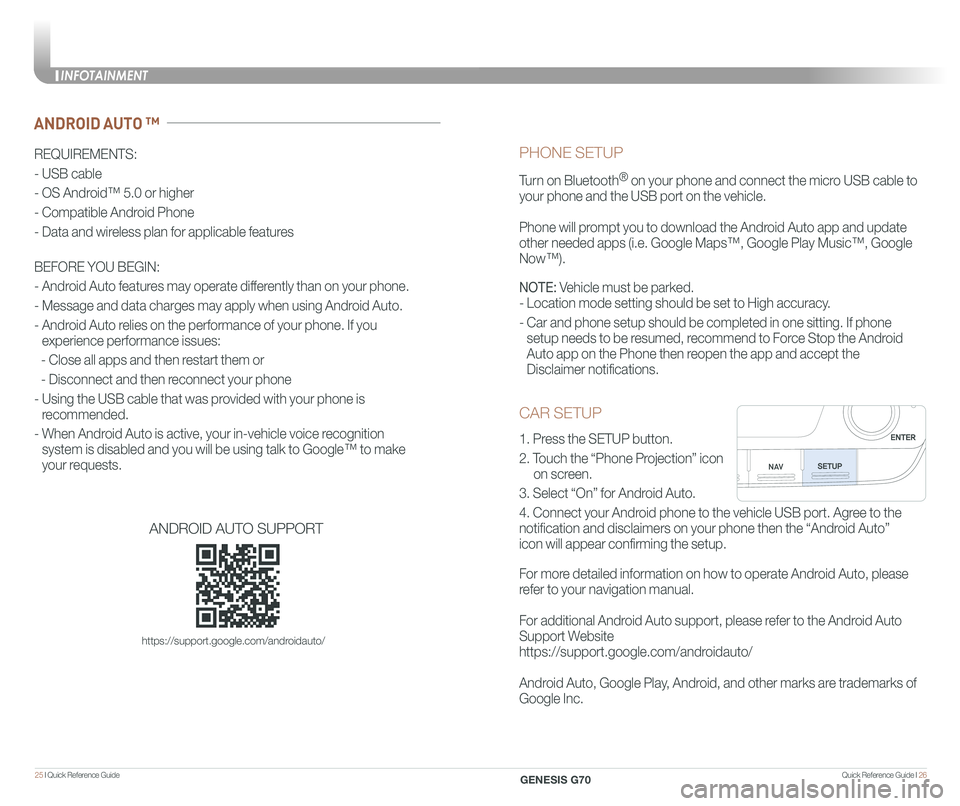
CAR SETUP
1. Press the SETUP button.
2. Touch the “Phone Projection” icon
on screen.
3. Select “On” for Android Auto.
4. Connect your Android phone to the vehicle USB port. Agree to the
notification and disclaimers on your phone then the “Android Auto”
icon will appear confirming the setup.
For more detailed information on how to operate Android Auto, please
refer to your navigation manual.
For additional Android Auto support, please refer to the Android Auto
Support Website
https://support.google.com/androidauto/
Android Auto, Google Play, Android, and other marks are trademarks of
Google Inc.
PHONE SETUP
Turn on Bluetooth® on your phone and connect the micro USB cable to
your phone and the USB port on the vehicle.
Phone will prompt you to download the Android Auto app and update
other needed apps (i.e. Google Maps™, Google Play Music™, Google \
Now™).
NOTE: Vehicle must be parked.
- Location mode setting should be set to High accuracy.
- Car and phone setup should be completed in one sitting. If phone
setup needs to be resumed, recommend to Force Stop the Android
Auto app on the Phone then reopen the app and accept the
Disclaimer notifications.
ANDROID AUTO ™
REQUIREMENTS:
- USB cable
- OS Android™ 5.0 or higher
- Compatible Android Phone
- Data and wireless plan for applicable features
BEFORE YOU BEGIN:
- Android Auto features may operate differently than on your phone.
- Message and data charges may apply when using Android Auto.
- Android Auto relies on the performance of your phone. If you
experience performance issues:
- Close all apps and then restart them or
- Disconnect and then reconnect your phone
- Using the USB cable that was provided with your phone is
recommended.
- When Android Auto is active, your in-vehicle voice recognition
system is disabled and you will be using talk to Google™ to make
your requests.
ANDROID AUTO SUPPORT
https://support.google.com/androidauto/
INFOTAINMENT
GENESIS G70
Page 19 of 24

Quick Reference Guide I 3231 I Quick Reference Guide
The Driver Attention Warning (DAW) system is designed as a safety
feature to help reduce drowsy or inattentive driving.
• To adjust the Driver Attention Alert sensitivity,
go to: User Settings > Driving Assist > Driver
Attention Warning > Normal or High in the
instrument cluster.
OFF - Driver Attention Warning system is
deactivated.
NORMAL - Driver Attention Warning system
alerts the driver of his/her fatigue level or
inattentive driving practices.
HIGH - Driver Attention Warning alerts the driver
of his/her fatigue level or inattentive driving
practices faster than Normal mode.
The Driver Attention Warning system is operable,
when driving speed is above 40 mph.
DRIVER ATTENTION WARNING (DAW)SHIFT BY WIRE (Electronic type shifter)
P (Park)
Always stop completely before
shifting into P (Park). To shift the
gear from R (Reverse), N (Neutral),
D (Drive) or Manual mode to P
(Park), press the [P] button while
depressing the brake pedal.
R (Reverse) / N (Neutral) / D
(Drive)
To select gear, press the
[UNLOCK] button while
depressing the brake pedal and
then move the shift lever forward (R
side) or backward (D side).
Paddle Shifter (Manual Shift Mode)
Press (-) to
downshift
Press (+) to
upshiftThe Paddle shifter is available
when the shift lever is in the D
position.
Press the [+] or [-] paddle shifter
once to shift up or down one gear.
Scan to view a video of: Shift by Wire
Scan to view a video of: Driver Attention Warning
ELECTRONIC STABILITY CONTROL (ESC)CLIMATE
The ESC system is an electronic
system designed to help the driver
maintain vehicle control under
adverse conditions.
Press to turn ESC on or off.
DRIVING
GENESIS G70