start stop button GENESIS G80 2018 User Guide
[x] Cancel search | Manufacturer: GENESIS, Model Year: 2018, Model line: G80, Model: GENESIS G80 2018Pages: 516, PDF Size: 81.01 MB
Page 92 of 516
3-4
Convenient features of your vehicle
Smart key
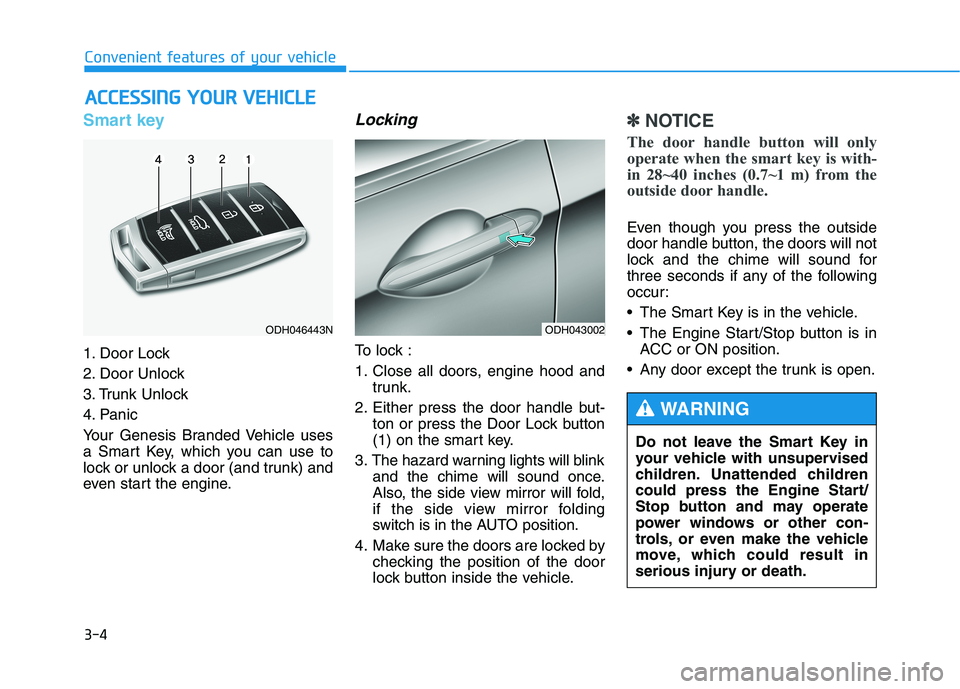
1. Door Lock
2. Door Unlock
3. Trunk Unlock
4. Panic
Your Genesis Branded Vehicle uses
a Smart Key, which you can use to
lock or unlock a door (and trunk) and
even start the engine.
Locking
To lock :
1. Close all doors, engine hood and
trunk.
2. Either press the door handle but-
ton or press the Door Lock button
(1) on the smart key.
3. The hazard warning lights will blink
and the chime will sound once.
Also, the side view mirror will fold,
if the side view mirror folding
switch is in the AUTO position.
4. Make sure the doors are locked by
checking the position of the door
lock button inside the vehicle.
✽ ✽
NOTICE
The door handle button will only
operate when the smart key is with-
in 28~40 inches (0.7~1 m) from the
outside door handle.
Even though you press the outside
door handle button, the doors will not
lock and the chime will sound for
three seconds if any of the following
occur:
• The Smart Key is in the vehicle.
The Engine Start/Stop button is in
ACC or ON position.
Any door except the trunk is open.
A AC
CC
CE
ES
SS
SI
IN
NG
G
Y
YO
OU
UR
R
V
VE
EH
HI
IC
CL
LE
E
ODH043002
Do not leave the Smart Key in
your vehicle with unsupervised
children. Unattended children
could press the Engine Start/
Stop button and may operate
power windows or other con-
trols, or even make the vehicle
move, which could result in
serious injury or death.
WARNING
ODH046443N
Page 94 of 516

3-6
Start-up
You can start the engine without
inserting the key.
For more information, refer to the
Engine Start/Stop button in chap-
ter 5.
✽ ✽
NOTICE
Always have the smart key with you
when leaving the vehicle. If the
smart key is left near the vehicle, the
vehicle battery may be discharged.
Mechanical key
If the Smart Key does not operate
normally, you can lock or unlock the
door by using the mechanical key.
Press and hold the release button (1)
and remove the mechanical key (2).
Insert the mechanical key into the
key hole on the door.
To reinstall the mechanical key, put
the key into the hole and push it until
a click sound is heard.
Convenient features of your vehicle
To prevent damaging the smart
key:
•Keep the smart key away from
water or any liquid and fire. If
the inside of the smart key
gets damp (due to drinks or
moisture), or is heated, inter-
nal circuit may malfunction,
excluding the car from the
warranty.
Avoid dropping or throwing
the smart key.
Protect the smart key from
extreme temperatures.
CAUTION
ODH046444N
Page 97 of 516
3-9
Convenient features of your vehicle
Battery replacement
If the Smart Key is not working prop-
erly, try replacing the battery with a
new one.
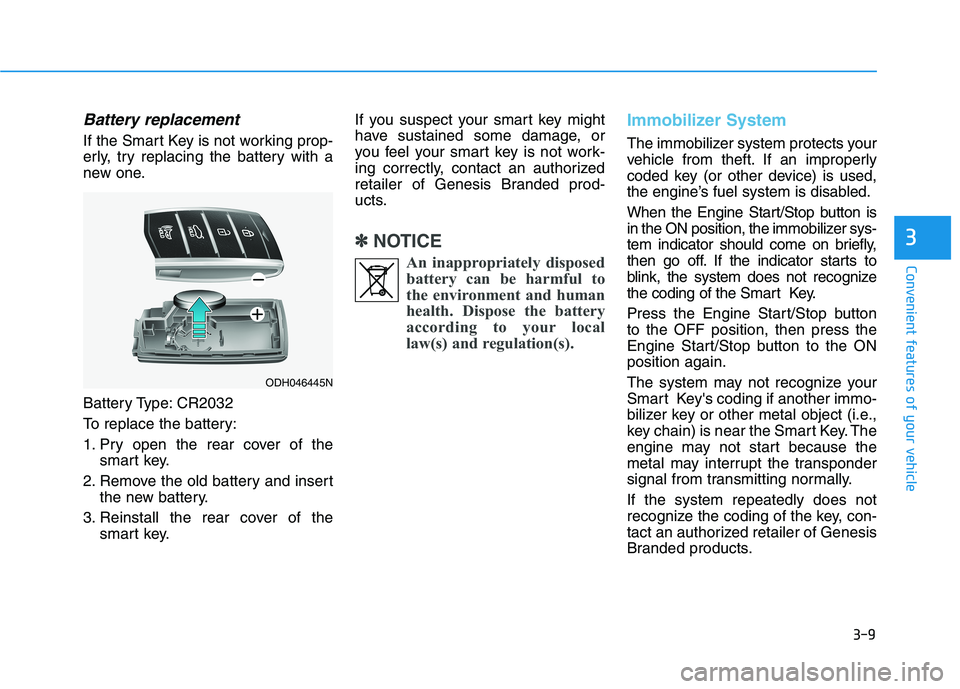
Battery Type: CR2032
To replace the battery:
1. Pry open the rear cover of the
smart key.
2. Remove the old battery and insert
the new battery.
3. Reinstall the rear cover of the
smart key.If you suspect your smart key might
have sustained some damage, or
you feel your smart key is not work-
ing correctly, contact an authorized
retailer of Genesis Branded prod-
ucts.
✽ ✽
NOTICE
An inappropriately disposed
battery can be harmful to
the environment and human
health. Dispose the battery
according to your local
law(s) and regulation(s).
Immobilizer System
The immobilizer system protects your
vehicle from theft. If an improperly
coded key (or other device) is used,
the engine’s fuel system is disabled.
When the Engine Start/Stop button is
in the ON position, the immobilizer sys-
tem indicator should come on briefly,
then go off. If the indicator starts to
blink, the system does not recognize
the coding of the Smart Key.
Press the Engine Start/Stop button
to the OFF position, then press the
Engine Start/Stop button to the ON
position again.
The system may not recognize your
Smart Key's coding if another immo-
bilizer key or other metal object (i.e.,
key chain) is near the Smart Key. The
engine may not start because the
metal may interrupt the transponder
signal from transmitting normally.
If the system repeatedly does not
recognize the coding of the key, con-
tact an authorized retailer of Genesis
Branded products.
3
ODH046445N
Page 102 of 516

3-14
Auto door lock/unlock features
Impact sensing door unlock
system
All doors will be automatically
unlocked when an impact causes the
air bags to deploy.
Speed sensing door lock system
All doors will be automatically locked
when vehicle speed exceeds 9 mph
(15 km/h).
All of the doors will be automatically
unlocked after the engine is turned
off.
Shift lever auto door lock
All doors will be automatically locked
when shifting the shift lever out of P
(Park) with the engine running.
You can activate or deactivate the
Auto Door Lock/Unlock features from
the User Settings Mode on the LCD
display.
For more details, refer to "LCD
Display" in this chapter.
Child-protector rear door locks
The child safety lock is provided to
help prevent children seated in the
rear from accidentally opening the
rear doors. The rear door safety locks
should be used whenever children
are in the vehicle.
The child safety lock is located on
the edge of each rear door. When the
child safety lock is in the lock (1)
position, the rear door will not open if
the inner door handle (2) is pulled.
Convenient features of your vehicle
ODH043013
Always secure your vehicle.
Leaving your vehicle unlocked
increases the potential risk to
you or others from someone
hiding in your vehicle.
To secure your vehicle, while
depressing the brake, move the
shift lever to the P (Park) posi-
tion, engage the parking brake,
and press the Engine Start/Stop
button to the OFF position, close
all windows, lock all doors, and
always take the Smart Key with
you.
WARNING
Opening a door when something
is approaching may cause dam-
age or injury. Be careful when
opening doors and watch for
vehicles, motorcycles, bicycles
or pedestrians approaching the
vehicle in the path of the door.
WARNING
Page 104 of 516
3-16
Convenient features of your vehicle
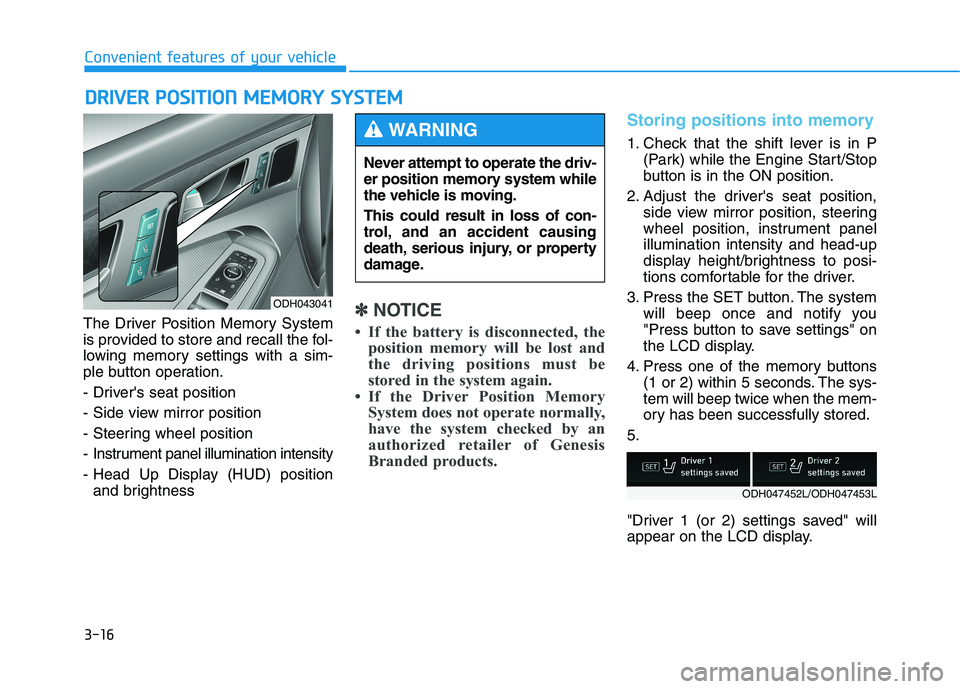
The Driver Position Memory System
is provided to store and recall the fol-
lowing memory settings with a sim-
ple button operation.
- Driver's seat position
- Side view mirror position
- Steering wheel position
- Instrument panel illumination intensity
- Head Up Display (HUD) position
and brightness
✽ ✽
NOTICE
• If the battery is disconnected, the
position memory will be lost and
the driving positions must be
stored in the system again.
• If the Driver Position Memory
System does not operate normally,
have the system checked by an
authorized retailer of Genesis
Branded products.
Storing positions into memory
1. Check that the shift lever is in P
(Park) while the Engine Start/Stop
button is in the ON position.
2. Adjust the driver's seat position,
side view mirror position, steering
wheel position, instrument panel
illumination intensity and head-up
display height/brightness to posi-
tions comfortable for the driver.
3. Press the SET button. The system
will beep once and notify you
"Press button to save settings" on
the LCD display.
4. Press one of the memory buttons
(1 or 2) within 5 seconds. The sys-
tem will beep twice when the mem-
ory has been successfully stored.
5.
"Driver 1 (or 2) settings saved" will
appear on the LCD display.
D DR
RI
IV
VE
ER
R
P
PO
OS
SI
IT
TI
IO
ON
N
M
ME
EM
MO
OR
RY
Y
S
SY
YS
ST
TE
EM
M
ODH043041
Never attempt to operate the driv-
er position memory system while
the vehicle is moving.
This could result in loss of con-
trol, and an accident causing
death, serious injury, or property
damage.
WARNING
ODH047452L/ODH047453L
Page 105 of 516
3-17
Convenient features of your vehicle
3
Recalling positions from memory
1. Check that the shift lever is in P
(Park) while the Engine Start/Stop
button is in the ON position.
2. Press the desired memory button
(1 or 2). The system will beep
once, and then the driver's seat
position, side view mirror position,
steering wheel position, instru-
ment panel illumination intensity
and head-up display height/bright-
ness will automatically adjust to
the stored positions.
3.
"Driver 1(or 2) settings is applied" will
appear on the LCD display.
✽ ✽
NOTICE
• While recalling the "1" memory
position, pressing the SET or 1
button temporarily stops the
adjustment of the recalled memo-
ry position. Pressing the 2 button
recalls the "2" memory position.
• While recalling the "2" memory
position, pressing the SET or 2
button temporarily stops the
adjustment of the recalled memo-
ry position. Pressing the 1 button
recalls the "1" memory position.
• While recalling the stored posi-
tions, pressing one of the control
buttons for the driver's seat, side
view mirror, steering wheel,
instrument panel illumination or
head-up display will cause the
movement of that component to
stop and move in the direction that
the control button is pressed.
Resetting the driver's seat
memory system
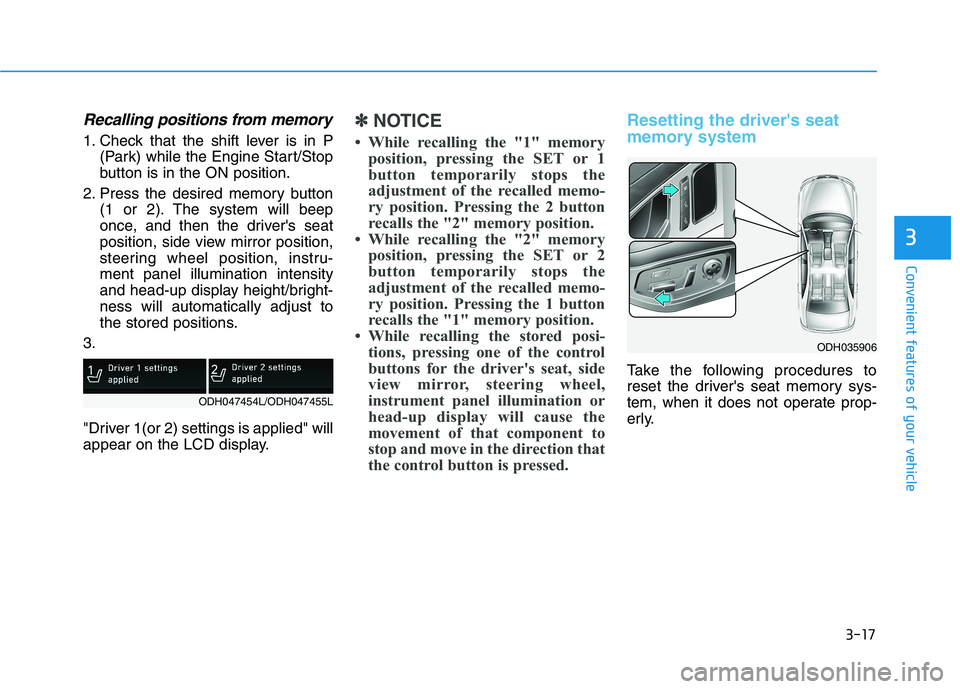
Take the following procedures to
reset the driver's seat memory sys-
tem, when it does not operate prop-
erly.
ODH035906
ODH047454L/ODH047455L
Page 106 of 516

3-18
To reset the driver's seat memo-
ry system
1. Press the Engine Start/Stop but-
ton to the ON position, set the
gear in P (Park), and open the dri-
ver's door.
2. Operate the control switch/lever to
set the driver's seat and seatback
to the foremost position.
3. Simultaneously press the SET
button and push forward the con-
trol lever over 2 seconds.
While resetting the driver's seat
memory system
1. It starts with the notification
sounds.
2. The driver's seat and seatback is
adjusted to the rearward position
with the notification sounds.
3. The driver's seat and seatback is
re-adjusted to the default position
(central position) with the notifica-
tion sounds.However, in the following cases, the
resetting procedure and the notifica-
tion sounds may stop.
- The memory button is pressed.
- The control switch/lever is operat-
ed.
- The gear is shifted out of P (Park).
- The driving speed exceeds 3 km/h.
- The driver's door is closed.
After the resetting procedure, set the
driver's seat memory system for your
comfort.
Easy access function
When exiting the vehicle, the steering
wheel will move away from the driver
and the seat will move rearward
when the engine is turned off.
When entering the vehicle, the steer-
ing wheel will move toward the driver
and the seat will move forward when
the Engine Start/Stop button is
pressed to the ACC position.
You can activate or deactivate the
Easy Access Function from the User
Settings Mode on the LCD display.
For more details, refer to "LCD
Display" in this chapter.
Convenient features of your vehicle
Reattempt to do the resetting
procedure again, when the
resetting procedure incom-
pletely stops or the notifica-
tion sounds do not stop.
Make sure that there is no
obstacle around the driver's
seat in advance of resetting
the driver's seat memory sys-
tem.
CAUTION
Driver should be cautious when
using this function to assure no
injury to passenger or child on
the back seat. In case of emer-
gency the driver has to stop
movement of front seat (when
easy access feature is activat-
ed) by pressing SET button or
any of the driver seat control
switches.
CAUTION
Page 107 of 516

3-19
Convenient features of your vehicle
3
S ST
TE
EE
ER
RI
IN
NG
G
W
WH
HE
EE
EL
L
Electric power steering (EPS)
The system assists you with steering
the vehicle. If the engine is turned off
or if the power steering system
becomes inoperative, you may still
steer the vehicle, but it will require
increased steering effort.
Should you notice any change in the
effort required to steer during normal
vehicle operation, we recommend
that the system be checked by an
authorized retailer of Genesis
Branded products.
✽ ✽
NOTICE
The following symptoms may occur
during normal vehicle operation:
• The steering effort may be high
immediately after placing the
Engine Start/Stop button in the
ON position.
This happens as the system per-
forms the EPS system diagnostics.
When the diagnostics is complet-
ed, the steering wheel will return
to its normal condition.
• A click noise may be heard from
the EPS relay after the Engine
Start/Stop button is in the ON or
OFF position.
• Motor noise may be heard when
the vehicle is at stop or at a low
driving speed.
• When you operate the steering
wheel in low temperature, abnor-
mal noise may occur. If tempera-
ture rises, the noise will disappear.
This is a normal condition.
Tilt steering / Telescope steering
Adjust the steering wheel so it points
toward your chest, not toward your
face. Make sure you can see the
instrument panel warning lights and
gauges. After adjusting, push the
steering wheel both up and down to
be certain it is locked in position.
Always adjust the position of the
steering wheel before driving.
If the Electric Power Steering
System does not operate nor-
mally, the warning light ( ) will
illuminate on the instrument
cluster. The steering wheel will
require increase effort. Take
your vehicle to an authorized
retailer of Genesis Branded
products and have the system
checked as soon as possible.
CAUTION
NEVER adjust the steering
wheel while driving. This may
cause loss of vehicle control
resulting in an accident.
WARNING
Page 109 of 516

3-21
Convenient features of your vehicle
3
When the Engine Start/Stop button
is in the ON position, press the heat-
ed steering wheel button to warm the
steering wheel.
To turn the heated steering wheel off,
press the button again. The indicator
on the button will turn off and notify
you on the LCD display when the
system turn off automatically after 30
minutes.
✽ ✽
NOTICE
The heated steering wheel will turn
off automatically approximately 30
minutes.
Horn
To sound the horn, press the area
indicated by the horn symbol on your
steering wheel (see illustration). The
horn will operate only when this area
is pressed. Do not install any cover or acces-
sory on the steering wheel. This
cover or accessory could cause
damage to the heated steering
wheel system.
CAUTION
Do not strike the horn severely to
operate it, or hit it with your fist.
Do not press on the horn with a
sharp-pointed object.
CAUTION
ODH043045
ODH047226L
Page 122 of 516
3-34
Convenient features of your vehicle
The mirror will unfold when you
approach the vehicle (all doors
closed and locked) with a smart key
in possession. (if equipped)
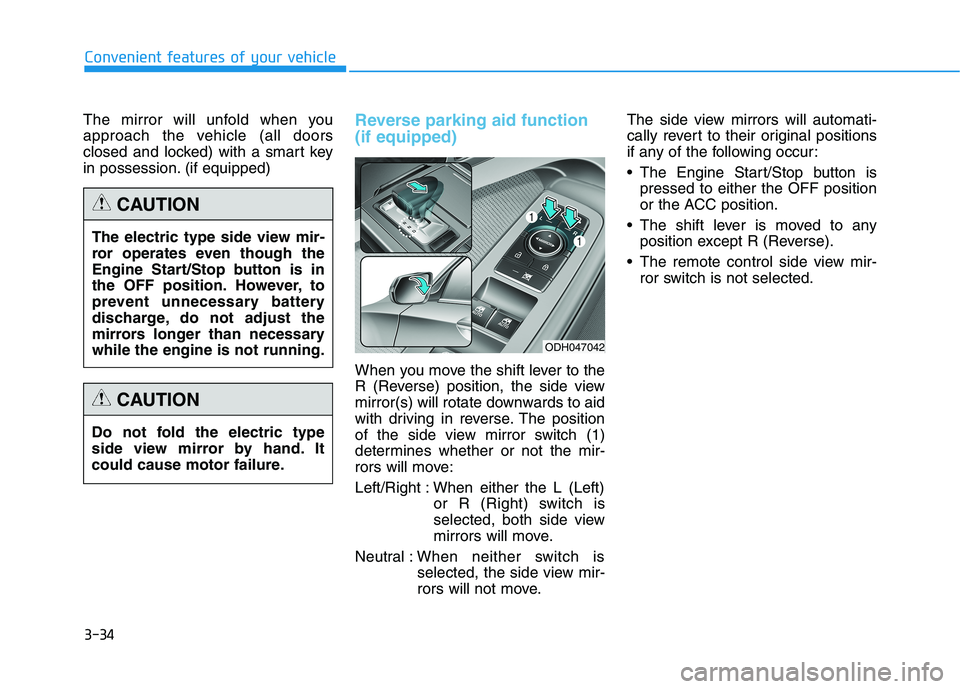
Reverse parking aid function
(if equipped)
When you move the shift lever to the
R (Reverse) position, the side view
mirror(s) will rotate downwards to aid
with driving in reverse. The position
of the side view mirror switch (1)
determines whether or not the mir-
rors will move:
Left/Right : When either the L (Left)
or R (Right) switch is
selected, both side view
mirrors will move.
Neutral :When neither switch is
selected, the side view mir-
rors will not move.The side view mirrors will automati-
cally revert to their original positions
if any of the following occur:
The Engine Start/Stop button is
pressed to either the OFF position
or the ACC position.
The shift lever is moved to any
position except R (Reverse).
The remote control side view mir-
ror switch is not selected. The electric type side view mir-
ror operates even though the
Engine Start/Stop button is in
the OFF position. However, to
prevent unnecessary battery
discharge, do not adjust the
mirrors longer than necessary
while the engine is not running.
CAUTION
Do not fold the electric type
side view mirror by hand. It
could cause motor failure.
CAUTION
ODH047042