stop start GENESIS G80 2018 Owner's Guide
[x] Cancel search | Manufacturer: GENESIS, Model Year: 2018, Model line: G80, Model: GENESIS G80 2018Pages: 516, PDF Size: 81.01 MB
Page 107 of 516

3-19
Convenient features of your vehicle
3
S ST
TE
EE
ER
RI
IN
NG
G
W
WH
HE
EE
EL
L
Electric power steering (EPS)
The system assists you with steering
the vehicle. If the engine is turned off
or if the power steering system
becomes inoperative, you may still
steer the vehicle, but it will require
increased steering effort.
Should you notice any change in the
effort required to steer during normal
vehicle operation, we recommend
that the system be checked by an
authorized retailer of Genesis
Branded products.
✽ ✽
NOTICE
The following symptoms may occur
during normal vehicle operation:
• The steering effort may be high
immediately after placing the
Engine Start/Stop button in the
ON position.
This happens as the system per-
forms the EPS system diagnostics.
When the diagnostics is complet-
ed, the steering wheel will return
to its normal condition.
• A click noise may be heard from
the EPS relay after the Engine
Start/Stop button is in the ON or
OFF position.
• Motor noise may be heard when
the vehicle is at stop or at a low
driving speed.
• When you operate the steering
wheel in low temperature, abnor-
mal noise may occur. If tempera-
ture rises, the noise will disappear.
This is a normal condition.
Tilt steering / Telescope steering
Adjust the steering wheel so it points
toward your chest, not toward your
face. Make sure you can see the
instrument panel warning lights and
gauges. After adjusting, push the
steering wheel both up and down to
be certain it is locked in position.
Always adjust the position of the
steering wheel before driving.
If the Electric Power Steering
System does not operate nor-
mally, the warning light ( ) will
illuminate on the instrument
cluster. The steering wheel will
require increase effort. Take
your vehicle to an authorized
retailer of Genesis Branded
products and have the system
checked as soon as possible.
CAUTION
NEVER adjust the steering
wheel while driving. This may
cause loss of vehicle control
resulting in an accident.
WARNING
Page 109 of 516

3-21
Convenient features of your vehicle
3
When the Engine Start/Stop button
is in the ON position, press the heat-
ed steering wheel button to warm the
steering wheel.
To turn the heated steering wheel off,
press the button again. The indicator
on the button will turn off and notify
you on the LCD display when the
system turn off automatically after 30
minutes.
✽ ✽
NOTICE
The heated steering wheel will turn
off automatically approximately 30
minutes.
Horn
To sound the horn, press the area
indicated by the horn symbol on your
steering wheel (see illustration). The
horn will operate only when this area
is pressed. Do not install any cover or acces-
sory on the steering wheel. This
cover or accessory could cause
damage to the heated steering
wheel system.
CAUTION
Do not strike the horn severely to
operate it, or hit it with your fist.
Do not press on the horn with a
sharp-pointed object.
CAUTION
ODH043045
ODH047226L
Page 122 of 516
3-34
Convenient features of your vehicle
The mirror will unfold when you
approach the vehicle (all doors
closed and locked) with a smart key
in possession. (if equipped)
Reverse parking aid function
(if equipped)
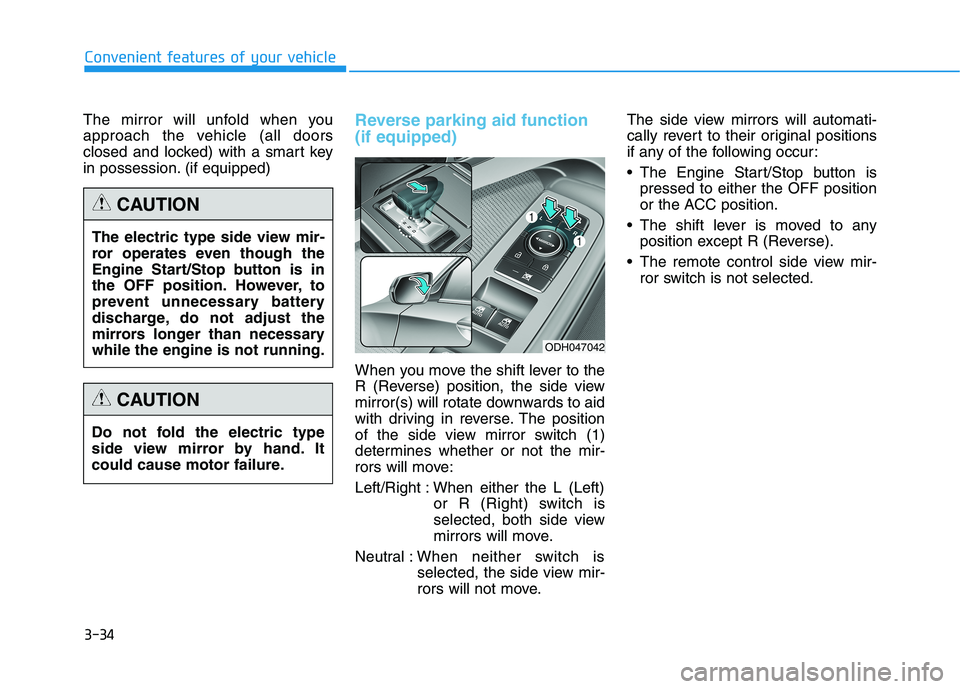
When you move the shift lever to the
R (Reverse) position, the side view
mirror(s) will rotate downwards to aid
with driving in reverse. The position
of the side view mirror switch (1)
determines whether or not the mir-
rors will move:
Left/Right : When either the L (Left)
or R (Right) switch is
selected, both side view
mirrors will move.
Neutral :When neither switch is
selected, the side view mir-
rors will not move.The side view mirrors will automati-
cally revert to their original positions
if any of the following occur:
The Engine Start/Stop button is
pressed to either the OFF position
or the ACC position.
The shift lever is moved to any
position except R (Reverse).
The remote control side view mir-
ror switch is not selected. The electric type side view mir-
ror operates even though the
Engine Start/Stop button is in
the OFF position. However, to
prevent unnecessary battery
discharge, do not adjust the
mirrors longer than necessary
while the engine is not running.
CAUTION
Do not fold the electric type
side view mirror by hand. It
could cause motor failure.
CAUTION
ODH047042
Page 124 of 516

3-36
Convenient features of your vehicle
Power windows
The Engine Start/Stop button must
be in the ON position to be able to
raise or lower the windows. Each
door has a Power Window switch to
control that door's window. The driv-
er has a Power Window Lock switch
which can block the operation of pas-
senger windows. The power windows
will operate for approximately 30
seconds after the Engine Start/Stop
button is placed in the ACC or OFF
position. However, if the front doors
are opened, the Power Windows
cannot be operated even within the
30 second period.
✽ ✽
NOTICE
• In cold and wet climates, power
windows may not work properly
due to freezing conditions.
• While driving with the rear win-
dows down or with the sunroof (if
equipped) opened (or partially
opened), your vehicle may demon-
strate a wind buffeting or pulsation
noise. This noise is normal and can
be reduced or eliminated by taking
the following actions. If the noise
occurs with one or both of the rear
windows down, partially lower
both front windows approximately
one inch. If you experience the
noise with the sunroof open, slight-
ly close the sunroof.
Window opening and closing
To open:
Press the window switch down to the
first detent position (5). Release the
switch when you want the window to
stop.
To close:
Pull the window switch up to the first
detent position (5). Release the win-
dow switch when you want the win-
dow to stop. To avoid serious injury or death,
do not extend your head, arms
or body outside the windows
while driving.
WARNING
ODH043027
Page 125 of 516

3-37
Convenient features of your vehicle
3
Auto up/down window
Pressing or pulling up the power win-
dow switch momentarily to the sec-
ond detent position (6) completely
lowers or lifts the window even when
the switch is released. To stop the
window at the desired position while
the window is in operation, pull up or
press down and release the switch.
To reset the power windows
If the power windows do not operate
normally, the automatic power win-
dow system must be reset as follows:
1. Place the Engine Start/Stop button
to the ON position.
2. Close the window and continue
pulling up on the power window
switch for at least one second.
If the power windows do not operate
properly after resetting, have the
system checked by an authorized
retailer of Genesis Branded prod-
ucts.
Automatic reverse
If a window senses any obstacle while
it is closing automatically, it will stop
and lower approximately 12 inches (30
cm) to allow the object to be cleared.
If the window detects the resistance
while the power window switch is
pulled up continuously, the window
will stop upward movement then
lower approximately 1 inch (2.5 cm).
If the power window switch is pulled
up continuously again within 5 sec-
onds after the window is lowered by
the automatic window reversal fea-
ture, the automatic window reversal
will not operate.
✽ ✽
NOTICE
The automatic reverse feature is
only active when the "Auto Up" fea-
ture is used by fully pulling up the
switch to the second detent.
ODH043136
Make sure body parts or other
objects are safely out of the way
before closing the windows to
avoid injuries or vehicle damage.
Objects less than 0.16 inch (4
mm) in diameter caught
between the window glass and
the upper window channel may
not be detected by the automat-
ic reverse window and the win-
dow will not stop and reverse
direction.
WARNING
Page 127 of 516

3-39
Convenient features of your vehicle
3
The Engine Start/Stop button must
be in the ON position before you can
open or close the sunroof.
✽ ✽
NOTICE
In cold and wet climates, the sunroof
may not work properly due to freez-
ing conditions.
Sunshade
To open the sunshade, press the
sunshade control switch (1).
To close the sunshade, press the
sunshade control switch (2). If you
press the switch when the sunroof
glass is opened, the sunroof glass
will close then the sunshade will
close.
To stop the sliding at any point, press
the sunshade control switch momen-
tarily.
P PA
AN
NO
OR
RA
AM
MA
A
S
SU
UN
NR
RO
OO
OF
F
(
(I
IF
F
E
EQ
QU
UI
IP
PP
PE
ED
D)
)
ODH043034To prevent damage to the sun-
roof and the motor, do not con-
tinue to press the sunroof con-
trol lever after the sunroof is in
the fully open, closed or tilt
position(s).
CAUTION
Never adjust the sunroof or sun-
shade while driving. This could
result in loss of vehicle control
resulting in an accident.
WARNING
ODH043035
Page 134 of 516
3-46
Convenient features of your vehicle
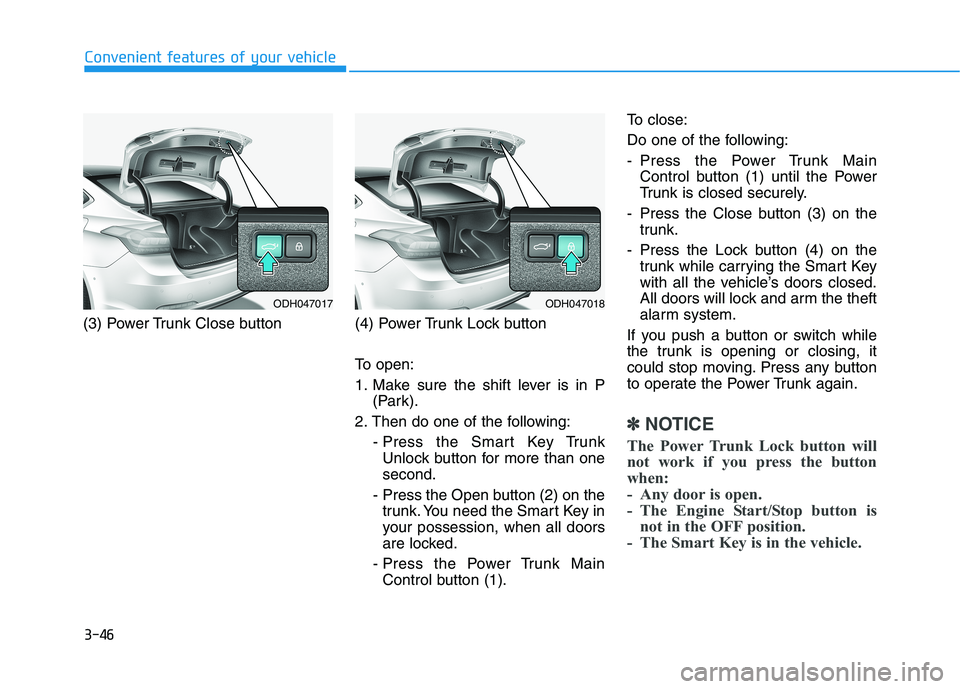
(3) Power Trunk Close button (4) Power Trunk Lock button
To open:
1. Make sure the shift lever is in P
(Park).
2. Then do one of the following:
- Press the Smart Key Trunk
Unlock button for more than one
second.
- Press the Open button (2) on the
trunk. You need the Smart Key in
your possession, when all doors
are locked.
- Press the Power Trunk Main
Control button (1).To close:
Do one of the following:
- Press the Power Trunk Main
Control button (1) until the Power
Trunk is closed securely.
- Press the Close button (3) on the
trunk.
- Press the Lock button (4) on the
trunk while carrying the Smart Key
with all the vehicle’s doors closed.
All doors will lock and arm the theft
alarm system.
If you push a button or switch while
the trunk is opening or closing, it
could stop moving. Press any button
to operate the Power Trunk again.
✽ ✽
NOTICE
The Power Trunk Lock button will
not work if you press the button
when:
- Any door is open.
- The Engine Start/Stop button is
not in the OFF position.
- The Smart Key is in the vehicle.
ODH047017ODH047018
Page 144 of 516
3-56
✽ ✽
NOTICE
• Make sure to refuel your
vehicle according to the "Fuel
Requirements" suggested in the
Introduction chapter.
• Do not spill fuel on the exterior
surfaces of the vehicle. Any type of
fuel spilled on painted surfaces
may damage the paint.
Convenient features of your vehicle
(Continued)
Do not use matches or a
lighter and do not smoke or
leave a lit cigarette in your
vehicle while at a gas station,
especially during refueling.
Do not over-fill or top-off your
vehicle tank, which can cause
gasoline spillage.
If a fire breaks out during refu-
eling, leave the vicinity of the
vehicle, and immediately con-
tact the manager of the gas
station and then contact the
local fire department. Follow
any safety instructions they
provide.
If pressurized fuel sprays out,
it can cover your clothes or
skin and thus subject you to
the risk of fire and burns.
Always remove the fuel cap
carefully and slowly. If the cap
is venting fuel or if you hear a
hissing sound, wait until the
condition stops before com-
pletely removing the cap.
(Continued)
(Continued)
Always check that the fuel cap
is installed securely to pre-
vent fuel spillage in the event
of an accident.
(Continued)
When using an approved
portable fuel container, be
sure to place the container on
the ground prior to refueling.
Static electricity discharge
from the container can ignite
fuel vapors causing a fire.
Once refueling has begun,
contact between your bare
hand and the vehicle should
be maintained until the filling
is complete.
Use only approved portable
plastic fuel containers designed
to carry and store gasoline.
When refueling, always move
the shift lever to the P (Park)
position, set the parking
brake, and press the Engine
Start/Stop button to the OFF
position. Sparks produced by
electrical components related
to the engine can ignite fuel
vapors causing a fire.
(Continued)
Page 147 of 516
3-59
Convenient features of your vehicle
3
Instrument Cluster Control
Adjusting Instrument Cluster
Illumination
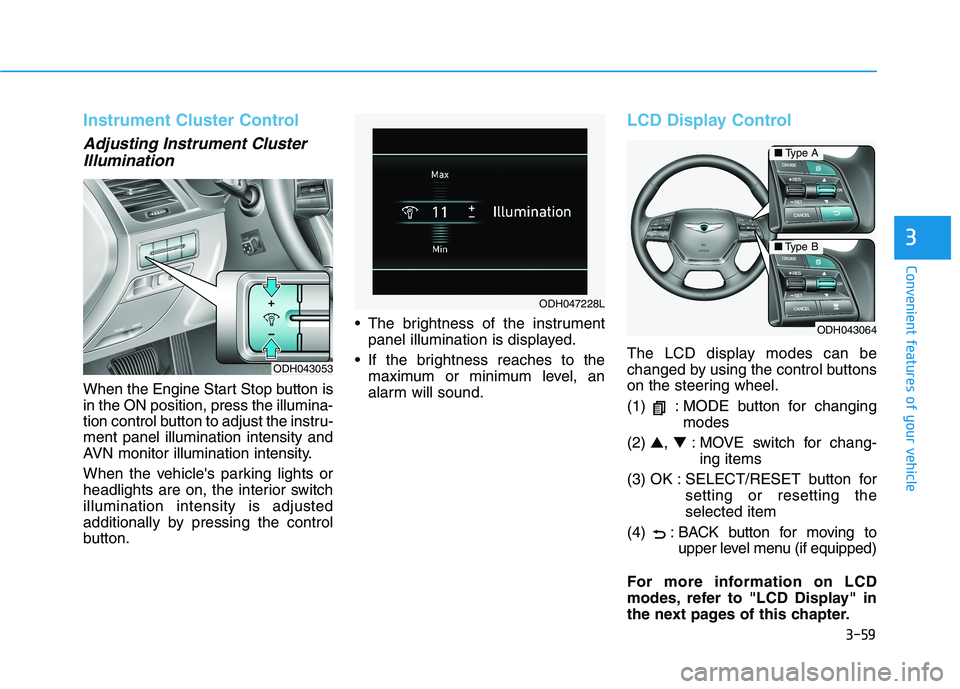
When the Engine Start Stop button is
in the ON position, press the illumina-
tion control button to adjust the instru-
ment panel illumination intensity and
AVN monitor illumination intensity.
When the vehicle's parking lights or
headlights are on, the interior switch
illumination intensity is adjusted
additionally by pressing the control
button. The brightness of the instrument
panel illumination is displayed.
If the brightness reaches to the
maximum or minimum level, an
alarm will sound.
LCD Display Control
The LCD display modes can be
changed by using the control buttons
on the steering wheel.
(1) : MODE button for changing
modes
(2) ▲, ▼: MOVE switch for chang-
ing items
(3) OK : SELECT/RESET button for
setting or resetting the
selected item
(4) : BACK button for moving to
upper level menu (if equipped)
For more information on LCD
modes, refer to "LCD Display" in
the next pages of this chapter.ODH043053
ODH047228L
ODH043064
■Type A
■Type B
Page 158 of 516
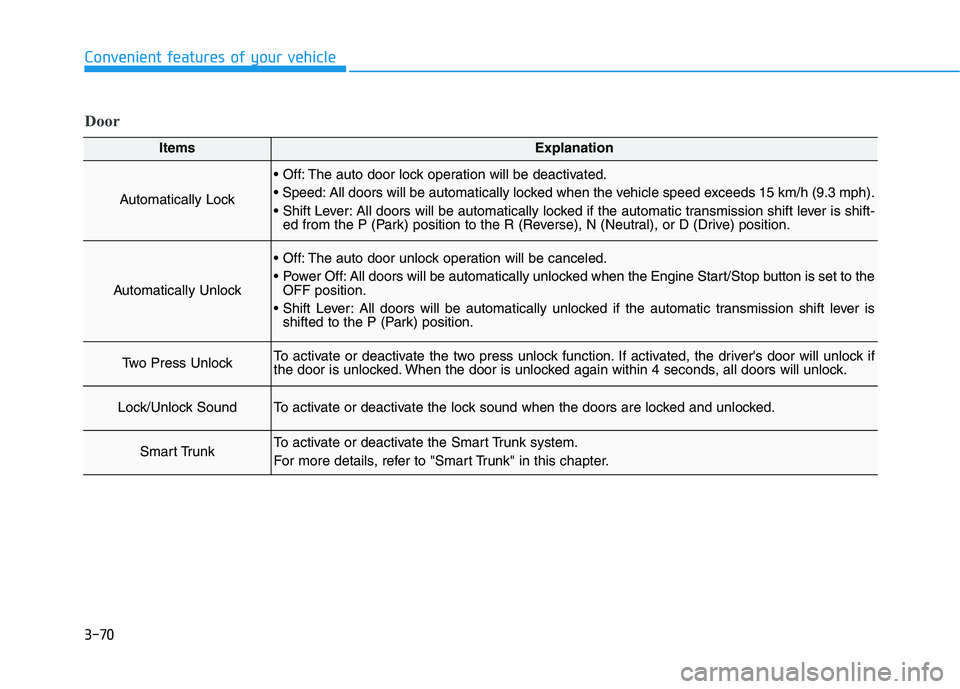
3-70
Convenient features of your vehicle
ItemsExplanation
Automatically Lock
The auto door lock operation will be deactivated.
All doors will be automatically locked when the vehicle speed exceeds 15 km/h (9.3 mph).
All doors will be automatically locked if the automatic transmission shift lever is shift-
ed from the P (Park) position to the R (Reverse), N (Neutral), or D (Drive) position.
Automatically Unlock
The auto door unlock operation will be canceled.
All doors will be automatically unlocked when the Engine Start/Stop button is set to the
OFF position.
All doors will be automatically unlocked if the automatic transmission shift lever is
shifted to the P (Park) position.
Two Press UnlockTo activate or deactivate the two press unlock function. If activated, the driver's door will unlock if
the door is unlocked. When the door is unlocked again within 4 seconds, all doors will unlock.
Lock/Unlock SoundTo activate or deactivate the lock sound when the doors are locked and unlocked.
Smart TrunkTo activate or deactivate the Smart Trunk system.
For more details, refer to "Smart Trunk" in this chapter.
Door