WHEEL SPEED GENESIS G80 2018 Owner's Manual
[x] Cancel search | Manufacturer: GENESIS, Model Year: 2018, Model line: G80, Model: GENESIS G80 2018Pages: 516, PDF Size: 81.01 MB
Page 22 of 516
2-3
Safety system of your vehicle
NEVER let the use of a mobile
device distract you from driving.
You have a responsibility to your
passengers and others on the road
to always drive safely, with your
hands on the wheel as well as your
eyes and attention on the road.
Control your speed
Excessive speed is a major factor in
crash injuries and deaths. Generally,
the higher the speed, the greater the
risk, but serious injuries can also
occur at lower speeds. Never drive
faster than is safe for current condi-
tions, regardless of the maximum
speed posted.
Keep your vehicle in safe condi-
tion
Having a tire blowout or a mechani-
cal failure can be extremely haz-
ardous. To reduce the possibility of
such problems, check your tire pres-
sures and condition frequently, and
perform all regularly scheduled
maintenance.
2
Page 68 of 516

2-49
Safety system of your vehicle
2
Side air bags
Your vehicle is equipped with a side
air bag in each front and outboard
rear seat. The purpose of the air bag
is to provide the vehicle's driver
and/or the front and outboard rear
passenger with additional protection
than that offered by the seat belt
alone.
The side air bags are designed to
deploy only during certain side impact
collisions, depending on the crash
severity, angle, speed and point of
impact.
The side air bags do not only deploy
on the side of the impact but also on
the opposite side.For vehicles equipped with a rollover
sensor the side and curtain air bags
on both sides of the vehicle may
deploy if a rollover or possible
rollover is detected.
The side air bags are not designed to
deploy in all side impact or rollover
situations.
(Continued)
•Do not allow the front passen-
ger to place their feet or legs on
the dashboard.
No objects (such as crash pad
cover, cellular phone holder,
cup holder, perfume or stick-
ers) should be placed over or
near the air bag modules on
the steering wheel, instrument
panel, windshield glass, and
the front passenger's panel
above the glove box. Such
objects could cause harm if
the vehicle is in a crash
severe enough to cause the
air bags to deploy.
Do not attach any objects on
front windshield and inside
mirror.
ODH037088L
Page 73 of 516
2-54
Safety system of your vehicle
Air bag deployment depends on a
number of factors including vehicle
speed, angles of impact and the
density and stiffness of the vehi-
cles or objects which your vehicle
impacts during a collision. The
determining factors are not limited
to those mentioned above.
The front air bags will completely
inflate and deflate in an instant. It is
virtually impossible for you to see
the air bags inflate during an acci-
dent. It is much more likely that you
will simply see the deflated air
bags hanging out of their storage
compartments after the collision.
In addition to inflating in serious
side collisions, vehicles equipped
with a rollover sensor, side and
curtain air bags will inflate if the
sensing system detects a rollover.
When a rollover is detected, side
and curtain air bags will remain
inflated longer to help provide pro-
tection from ejection, especially
when used in conjunction with the
seat belts. To help provide protection, the air
bags must inflate rapidly. The
speed of air bag inflation is a con-
sequence of extremely short time
in which to inflate the air bag
between the occupant and the
vehicle structures before the occu-
pant impacts those structures. This
speed of inflation reduces the risk
of serious or life-threatening
injuries and is thus a necessary
part of air bag design.
However, the rapid air bag inflation
can also cause injuries which can
include facial abrasions, bruises
and broken bones because the
inflation speed also causes the air
bags to expand with a great deal of
force.
There are even circumstances
under which contact with the air
bag can cause fatal injuries, espe-
cially if the occupant is positioned
excessively close to the air bag.You can take steps to reduce the risk
of being injured by an inflating air
bag. The greatest risk is sitting too
close to the air bag. An air bag needs
about 10 inches (25 cm) of space to
inflate. NHTSA recommends that
drivers allow at least 10 inches
(25 cm) between the center of the
steering wheel and the chest.
Page 106 of 516

3-18
To reset the driver's seat memo-
ry system
1. Press the Engine Start/Stop but-
ton to the ON position, set the
gear in P (Park), and open the dri-
ver's door.
2. Operate the control switch/lever to
set the driver's seat and seatback
to the foremost position.
3. Simultaneously press the SET
button and push forward the con-
trol lever over 2 seconds.
While resetting the driver's seat
memory system
1. It starts with the notification
sounds.
2. The driver's seat and seatback is
adjusted to the rearward position
with the notification sounds.
3. The driver's seat and seatback is
re-adjusted to the default position
(central position) with the notifica-
tion sounds.However, in the following cases, the
resetting procedure and the notifica-
tion sounds may stop.
- The memory button is pressed.
- The control switch/lever is operat-
ed.
- The gear is shifted out of P (Park).
- The driving speed exceeds 3 km/h.
- The driver's door is closed.
After the resetting procedure, set the
driver's seat memory system for your
comfort.
Easy access function
When exiting the vehicle, the steering
wheel will move away from the driver
and the seat will move rearward
when the engine is turned off.
When entering the vehicle, the steer-
ing wheel will move toward the driver
and the seat will move forward when
the Engine Start/Stop button is
pressed to the ACC position.
You can activate or deactivate the
Easy Access Function from the User
Settings Mode on the LCD display.
For more details, refer to "LCD
Display" in this chapter.
Convenient features of your vehicle
Reattempt to do the resetting
procedure again, when the
resetting procedure incom-
pletely stops or the notifica-
tion sounds do not stop.
Make sure that there is no
obstacle around the driver's
seat in advance of resetting
the driver's seat memory sys-
tem.
CAUTION
Driver should be cautious when
using this function to assure no
injury to passenger or child on
the back seat. In case of emer-
gency the driver has to stop
movement of front seat (when
easy access feature is activat-
ed) by pressing SET button or
any of the driver seat control
switches.
CAUTION
Page 107 of 516

3-19
Convenient features of your vehicle
3
S ST
TE
EE
ER
RI
IN
NG
G
W
WH
HE
EE
EL
L
Electric power steering (EPS)
The system assists you with steering
the vehicle. If the engine is turned off
or if the power steering system
becomes inoperative, you may still
steer the vehicle, but it will require
increased steering effort.
Should you notice any change in the
effort required to steer during normal
vehicle operation, we recommend
that the system be checked by an
authorized retailer of Genesis
Branded products.
✽ ✽
NOTICE
The following symptoms may occur
during normal vehicle operation:
• The steering effort may be high
immediately after placing the
Engine Start/Stop button in the
ON position.
This happens as the system per-
forms the EPS system diagnostics.
When the diagnostics is complet-
ed, the steering wheel will return
to its normal condition.
• A click noise may be heard from
the EPS relay after the Engine
Start/Stop button is in the ON or
OFF position.
• Motor noise may be heard when
the vehicle is at stop or at a low
driving speed.
• When you operate the steering
wheel in low temperature, abnor-
mal noise may occur. If tempera-
ture rises, the noise will disappear.
This is a normal condition.
Tilt steering / Telescope steering
Adjust the steering wheel so it points
toward your chest, not toward your
face. Make sure you can see the
instrument panel warning lights and
gauges. After adjusting, push the
steering wheel both up and down to
be certain it is locked in position.
Always adjust the position of the
steering wheel before driving.
If the Electric Power Steering
System does not operate nor-
mally, the warning light ( ) will
illuminate on the instrument
cluster. The steering wheel will
require increase effort. Take
your vehicle to an authorized
retailer of Genesis Branded
products and have the system
checked as soon as possible.
CAUTION
NEVER adjust the steering
wheel while driving. This may
cause loss of vehicle control
resulting in an accident.
WARNING
Page 175 of 516

3-87
Convenient features of your vehicle
3
The trip computer is a microcomput-
er-controlled driver information sys-
tem that displays information related
to driving.
✽ ✽
NOTICE
Some driving information stored in
the trip computer (for example
Average Vehicle Speed) resets if the
battery is disconnected.
Trip Modes Fuel economy
Average Fuel Economy (1)
The average fuel economy is cal-
culated by the total driving dis-
tance and fuel consumption since
the last average fuel economy
reset.
The average fuel economy can be
reset both manually and automati-
cally.
Manual reset
To clear the average fuel economy
manually, press the [OK] button on
the steering wheel for more than 1
second when the average fuel econ-
omy is displayed.
T TR
RI
IP
P
C
CO
OM
MP
PU
UT
TE
ER
R
· Tripmeter
· Fuel Economy
· Elapsed Time
Drive Info
· Tripmeter
· Fuel Economy
· Elapsed Time
Accumulated Info
· Average Fuel Economy
· Instant Fuel Economy
Fuel Economy
Digital Speedometer
ODH047271N
Page 219 of 516
3-131
Convenient features of your vehicle
3
A AU
UT
TO
OM
MA
AT
TI
IC
C
C
CL
LI
IM
MA
AT
TE
E
C
CO
ON
NT
TR
RO
OL
L
S
SY
YS
ST
TE
EM
M
ODH047081L/ODH047146L/ODH043082
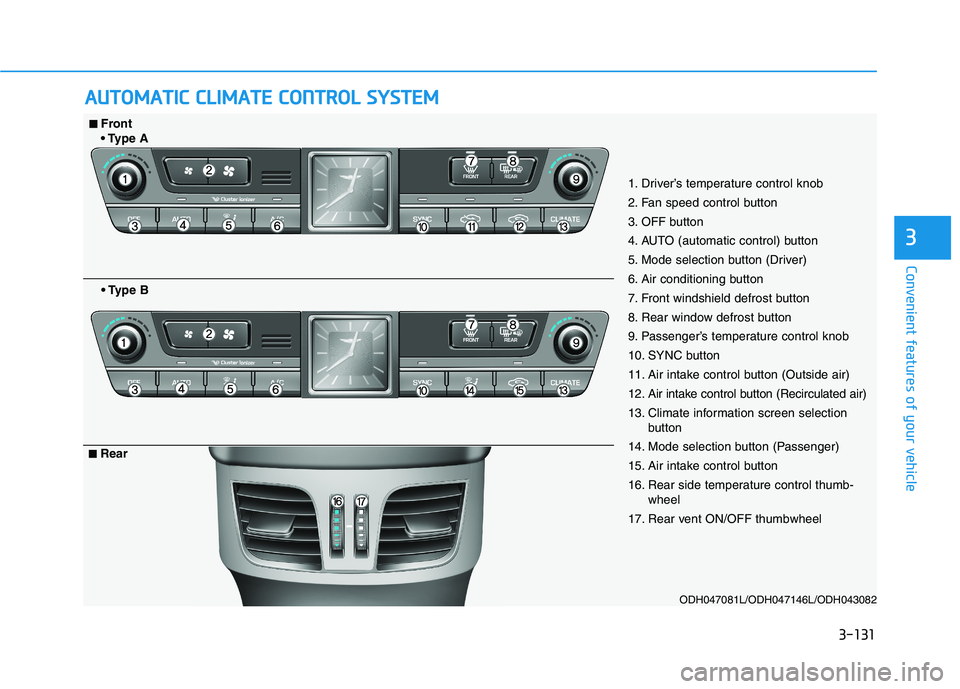
1. Driver’s temperature control knob
2. Fan speed control button
3. OFF button
4. AUTO (automatic control) button
5. Mode selection button (Driver)
6. Air conditioning button
7. Front windshield defrost button
8. Rear window defrost button
9. Passenger’s temperature control knob
10. SYNC button
11. Air intake control button (Outside air)
12. Air intake control button (Recirculated air)
13. Climate information screen selection
button
14. Mode selection button (Passenger)
15. Air intake control button
16. Rear side temperature control thumb-
wheel
17. Rear vent ON/OFF thumbwheel
■ ■Front
A
B
■ ■Rear
Page 256 of 516
Driving your vehicle
5
Before driving.........................................................5-4
Before entering the vehicle ...........................................5-4
Before starting...................................................................5-4
Engine Start/Stop button ................................................5-6
Automatic transmission (SBC)............................5-11
Automatic transmission operation ..............................5-11
Parking ...............................................................................5-17
Good driving practices ...................................................5-17
Automatic transmission (SBW) ..........................5-19
Automatic transmission operation ..............................5-19
Parking ...............................................................................5-24
LCD display messages ....................................................5-25
Good driving practices ...................................................5-27
All Wheel Drive (AWD) ........................................5-29
Using All Wheel Drive (AWD) .......................................5-29
Emergency precautions .................................................5-31
Braking system.....................................................5-33
Power brakes ...................................................................5-33
Disc brakes wear indicator ...........................................5-34
Foot parking brake .........................................................5-34
Electronic parking brake (EPB) ...................................5-36
AUTO HOLD ......................................................................5-41
Anti-lock Brake System (ABS) ....................................5-45
Electronic Stability Control (ESC)................................5-48
Vehicle Stability Management (VSM).........................5-51Hill-Start Assist Control (HAC) ....................................5-52
Good braking practices..................................................5-52
Genesis Adaptive Control Suspension ..............5-53
Electronic control suspension (ECS) ..........................5-53
Dynamic stability damping control (DSDC) ...............5-53
Drive mode integrated control system ..............5-54
Blind Spot Detection System (BSD) ...................5-57
BSD (Blind Spot Detection) /
LCA (Lane Change Assist) .............................................5-58
RCTA (Rear Cross Traffic Alert) ..................................5-60
Limitation of the System ...............................................5-63
Automatic Emergency Braking (AEB) ...............5-65
System setting and activation......................................5-65
AEB warning message and system control ..............5-67
AEB front radar sensor .................................................5-70
System malfunction ........................................................5-71
Limitation of the System ...............................................5-72
Advanced smart cruise control system ............5-78
To Adjust the Sensitivity of Smart Cruise Control...5-79
To convert to cruise control mode .............................5-80
Smart cruise control speed ..........................................5-80
Smart cruise control vehicle-to-vehicle distance ..5-85
Sensor to detect distance to the vehicle ahead .....5-87
Limitations of the system .............................................5-89
Page 268 of 516
5-13
Driving your vehicle
R (Reverse)
Use this position to drive the vehicle
backward.
N (Neutral)
The wheels and transmission are not
engaged.
Use N (Neutral) if you need to restart
a stalled engine, or if it is necessary
to stop with the engine ON. Shift into
P (Park) if you need to leave your
vehicle for any reason.
Always depress the brake pedal
when you are shifting from N
(Neutral) to another gear.
D (Drive)
This is the normal driving position.
The transmission will automatically
shift through a 8-gear sequence, pro-
viding the best fuel economy and
power.
For extra power when passing anoth-
er vehicle or driving uphill depress
the accelerator pedal further until
you feel the transmission downshift
to a lower gear.
The DRIVE MODE switch, located
on the shift lever console, allows the
driver to switch from NORMAL mode
to SPORT, ECO or SNOW mode.
When driving in ice or snow condi-
tions, it is recommended you switch
to SNOW mode. Press the DRIVE
MODE switch for 2~3 seconds until
"SNOW" displays in the center of the
instrument cluster. To cancel SNOW
mode, press the DRIVE MODE
switch one time to select NORMAL
mode.
For more information, refer to
"Drive Mode Integrated Control
System" later in this chapter.
5
Always come to a complete
stop before shifting into or out
of R (Reverse); you may dam-
age the transmission if you shift
into R (Reverse) while the vehi-
cle is in motion.
CAUTION
Do not shift into gear unless
your foot is firmly on the brake
pedal. Shifting into gear when
the engine is running at high
speed can cause the vehicle to
move very rapidly. You could
lose control of the vehicle and
hit people or objects.
WARNING
Page 272 of 516

5-17
Driving your vehicle
Parking
Always come to a complete stop and
continue to depress the brake pedal.
Move the shift lever into the P (Park)
position, apply the parking brake,
and place the Engine Start/Stop but-
ton in the OFF position. Take the Key
with you when exiting the vehicle.
Good driving practices
Never move the shift lever from P
(Park) or N (Neutral) to any other
position with the accelerator pedal
depressed.
Never move the shift lever into P
(Park) when the vehicle is in
motion.
Be sure the vehicle is completely
stopped before you attempt to shift
into R (Reverse) or D (Drive).
Do not move the shift lever to N
(Neutral) when driving. Doing so
may result in an accident because
of a loss of engine braking. Also, the
transmission could be damaged.
Do not drive with your foot resting
on the brake pedal. Even light, but
consistent pedal pressure can
result in the brakes overheating,
brake wear and possibly even
brake failure.
Depressing both accelerator and
brake pedals at the same time can
trigger logic for engine power
reduction to assure vehicle decel-
eration. Vehicle acceleration will
resume after the brake pedal is
released. When driving in Manual mode with
the paddle shifter, slow down
before shifting to a lower gear.
Otherwise, the lower gear may not
be engaged if the engine rpms are
outside of the allowable range.
Always apply the parking brake
when leaving the vehicle. Do not
depend on placing the transmis-
sion in P (Park) to keep the vehicle
from moving.
Exercise extreme caution when
driving on a slippery surface. Be
especially careful when braking,
accelerating or shifting gears. On a
slippery surface, an abrupt change
in vehicle speed can cause the
drive wheels to lose traction and
may cause loss of vehicle control
resulting in an accident.
Optimum vehicle performance and
economy is obtained by smoothly
depressing and releasing the
accelerator.
Do not use engine braking (shifting
from a high gear to lower gear) rap-
idly on slippery roads. The vehicle
may slip causing an accident.
5
When you stay in the vehicle
with the engine running, be
careful not to depress the
accelerator pedal for a long
period of time. The engine or
exhaust system may overheat
and start a fire.
The exhaust gas and the
exhaust system are very hot.
Keep away from the exhaust
system components.
Do not stop or park over flam-
mable materials, such as dry
grass, paper or leaves. They
may ignite and cause a fire.
WARNING