wheel GENESIS G80 2019 Quick Reference Guide
[x] Cancel search | Manufacturer: GENESIS, Model Year: 2019, Model line: G80, Model: GENESIS G80 2019Pages: 15, PDF Size: 5.21 MB
Page 5 of 15

Quick Reference Guide I 0403 I Quick Reference Guide
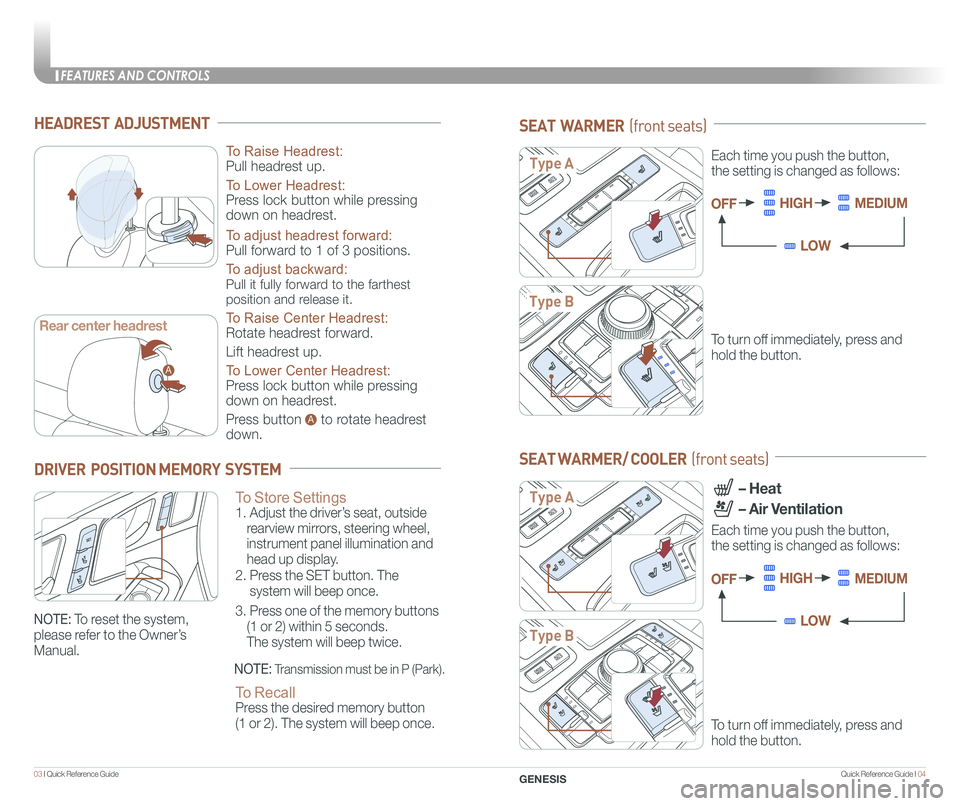
HEADREST ADJUSTMENT
To Raise Headrest:
Pull headrest up.
To Lower Headrest:
Press lock button while pressing
down on headrest.
To adjust headrest forward:
Pull forward to 1 of 3 positions.
To adjust backward:
Pull it fully forward to the farthest
position and release it.
To Raise Center Headrest:
Rotate headrest forward.
Lift headrest up.
To Lower Center Headrest:
Press lock button while pressing
down on headrest.
Press button to rotate headrest
down.
A
A
Rear center headrest
To Store Settings 1. Adjust the driver’s seat, outside
rearview mirrors, steering wheel,
instrument panel illumination and
head up display.
2. Press the SET button. The
system will beep once.
3. Press one of the memory buttons
(1 or 2) within 5 seconds.
The system will beep twice.
To Recall Press the desired memory button
(1 or 2). The system will beep once.
DRIVER POSITION MEMORY SYSTEM
NOTE: Transmission must be in P (Park).
NOTE: To reset the system,
please refer to the Owner’s
Manual.
SEAT WARMER (front seats)
To turn off immediately, press and
hold the button.
SEAT WARMER/ COOLER (front seats)
To turn off immediately, press and
hold the button.
Each time you push the button,
the setting is changed as follows:
– Heat
– Air Ventilation
Each time you push the button,
the setting is changed as follows:
OFF
OFF
HIGH
HIGH
MEDIUM
MEDIUM
LOW
LOW
Type A
Type B
Type A
Type B
FEATURES AND CONTROLS
GENESIS
Page 9 of 15

Quick Reference Guide I 1211 I Quick Reference Guide
DEFOGGING / DEFROSTINGSYSTEM OFF
Pressing the OFF button will
place the system in the OFF mode.
• Front blower will turn off.
• Outside (fresh) air position
will be selected.
• Vented air will be at last set
temperature.
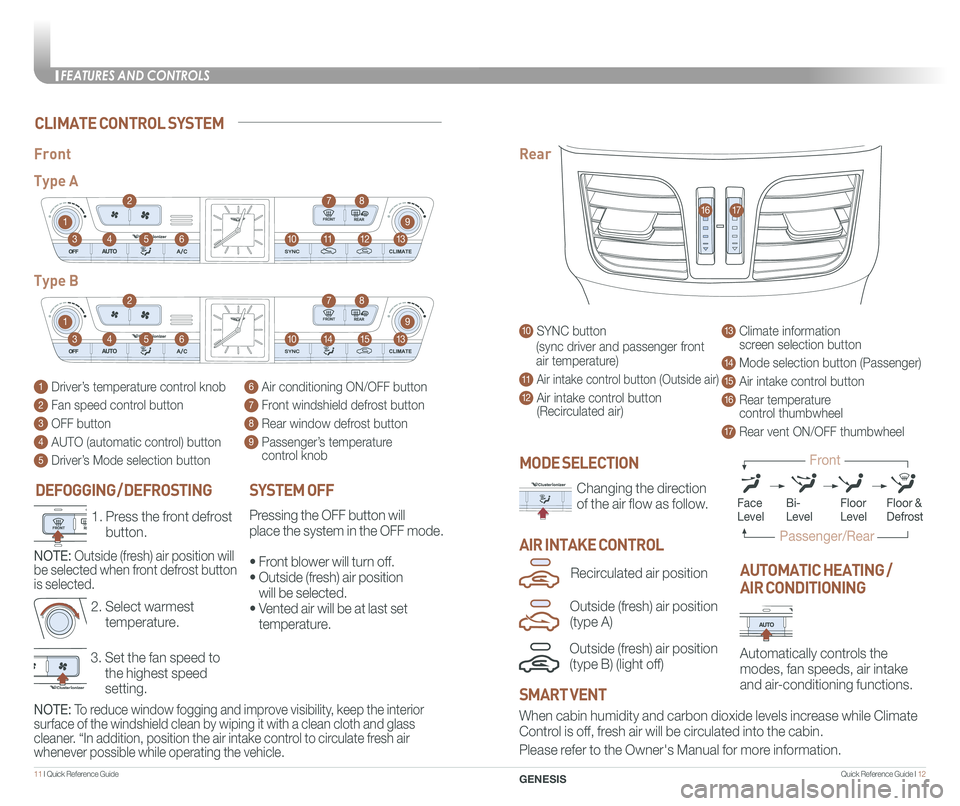
1 Driver’s temperature control knob
2 Fan speed control button
3 OFF button
4 AUTO (automatic control) button
5 Driver’s Mode selection button
6 Air conditioning ON/OFF button
7 Front windshield defrost button
8 Rear window defrost button
9 Passenger’s temperature control knob
Front
Type A
Type B
1
1
10
10
9
9
8
8
12
15
7
7
11
14
4
4
6
6
3
3
2
2
5
5
13
13
Changing the direction
of the air flow as follow.
MODE SELECTION
NOTE: To reduce window fogging and improve visibility, keep the interior
surface of the windshield clean by wiping it with a clean cloth and glas\
s
cleaner. “In addition, position the air intake control to circulate fresh air
whenever possible while operating the vehicle.
AIR INTAKE CONTROL
Automatically controls the
modes, fan speeds, air intake
and air-conditioning functions.
AUTOMATIC HEATING /
AIR CONDITIONING
10 SYNC button
(sync driver and passenger front
air temperature)
11 Air intake control button (Outside air)
12 Air intake control button (Recirculated air)
13 Climate information screen selection button
14 Mode selection button (Passenger)
15 Air intake control button
16 Rear temperature control thumbwheel
17 Rear vent ON/OFF thumbwheel
Rear
1617
When cabin humidity and carbon dioxide levels increase while Climate
Control is off, fresh air will be circulated into the cabin.
Please refer to the Owner's Manual for more information.
SMART VENT
Outside (fresh) air position
(type B) (light off)
Recirculated air position
Outside (fresh) air position
(type A)
CLIMATE CONTROL SYSTEM
3. Set the fan speed to
the highest speed
setting.
2. Select warmest
temperature.
1. Press the front defrost
button.
NOTE: Outside (fresh) air position will
be selected when front defrost button
is selected.
FaceLevelFloorLevelFloor &Defrost
Passenger/Rear
Front
Bi-Level
FEATURES AND CONTROLS
GENESIS
Page 15 of 15

23 I Quick Reference Guide
Guest Date
GENESIS BRAND OWNER RETAILER NAME
SALES CONSULTANT DATE
VIN PREVIOUS VEHICLE
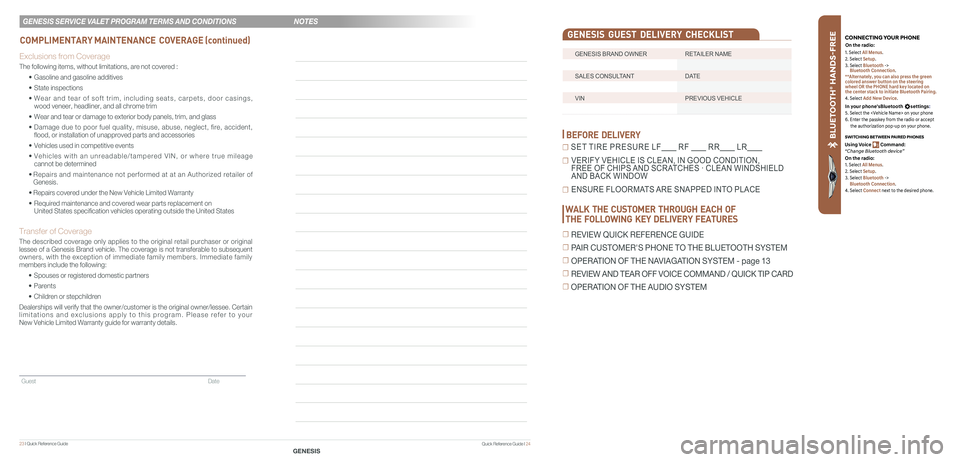
GENESIS GUEST DELIVERY CHECKLIST
BEFORE DELIVERY
☐ SET TIRE PRESURE LF RF RR LR
☐ VERIFY VEHICLE IS CLEAN, IN GOOD CONDITION, FREE OF CHIPS AND SCRATCHES · CLEAN WINDSHIELD AND BACK WINDOW
☐ ENSURE FLOORMATS ARE SNAPPED INTO PLACE
Quick Reference Guide I 24
Exclusions from Coverage
The following items, without limitations, are not covered :
• Gasoline and gasoline additives
• State inspections
• Wear and tear of soft trim, including seats, carpets, door casings, wood veneer, headliner, and all chrome trim
• Wear and tear or damage to exterior body panels, trim, and glass
• Damage due to poor fuel quality, misuse, abuse, neglect, fire, accident, flood, or installation of unapproved parts and accessories
• Vehicles used in competitive events
• Vehicles with an unreadable/tampered VIN, or where true mileage cannot be determined
• Repairs and maintenance not performed at at an Authorized retailer of Genesis.
• Repairs covered under the New Vehicle Limited Warranty
• Required maintenance and covered wear parts replacement on United States specification vehicles operating outside the United States\
Transfer of Coverage
The described coverage only applies to the original retail purchaser or original lessee of a Genesis Brand vehicle. The coverage is not transferable to s\
ubsequent owners, with the exception of immediate family members. Immediate family members include the following:
• Spouses or registered domestic partners
• Parents
• Children or stepchildren
Dealerships will verify that the owner/customer is the original owner/le\
ssee. Certain limitations and exclusions apply to this program. Please refer to your New Vehicle Limited Warranty guide for warranty details.
COMPLIMENTARY MAINTENANCE COVERAGE (continued)
GENESIS SERVICE VALET PROGRAM TERMS AND CONDITIONS
GENESIS
BLU ETO OTH
®
SWIT CHING BETWEEN P AIRED PHONES
On the r adio:
CONNE CTING \fOUR PHONEOn the r adio:
U sing Voic e Command:
“Change Blue too th de vice”1. Select All Menus.
2. Select Setup.
3. Select Bluetooth ->
Bluetooth Connection.
**Alternately, you can also press the green
colored answer button on the steering
wheel OR the PHONE hard key located on
the center stack to initiate Bluetooth Pairing.
4. Select Add New Device.
In your phone’sBluetooth settings:
5. Select the
6. Enter the passkey from the radio or accept
the authorization pop-up on your phone.
1. Select All Menus.
2. Select Setup.
3. Select Bluetooth ->
Bluetooth Connection.
4. Select Connect next to the desired phone.
WALK THE CUSTOMER THROUGH EACH OF
THE FOLLOWING KEY DELIVERY FEATURES
☐ REVIEW QUICK REFERENCE GUIDE
☐ PAIR CUSTOMER'S PHONE TO THE BLUETOOTH SYSTEM
☐ OPERATION OF THE NAVIAGATION SYSTEM - page 13
☐ REVIEW AND TEAR OFF VOICE COMMAND / QUICK TIP CARD
☐ OPERATION OF THE AUDIO SYSTEM
NOTES