change time GENESIS G80 2019 Quick Reference Guide
[x] Cancel search | Manufacturer: GENESIS, Model Year: 2019, Model line: G80, Model: GENESIS G80 2019Pages: 88, PDF Size: 6.71 MB
Page 4 of 88
4
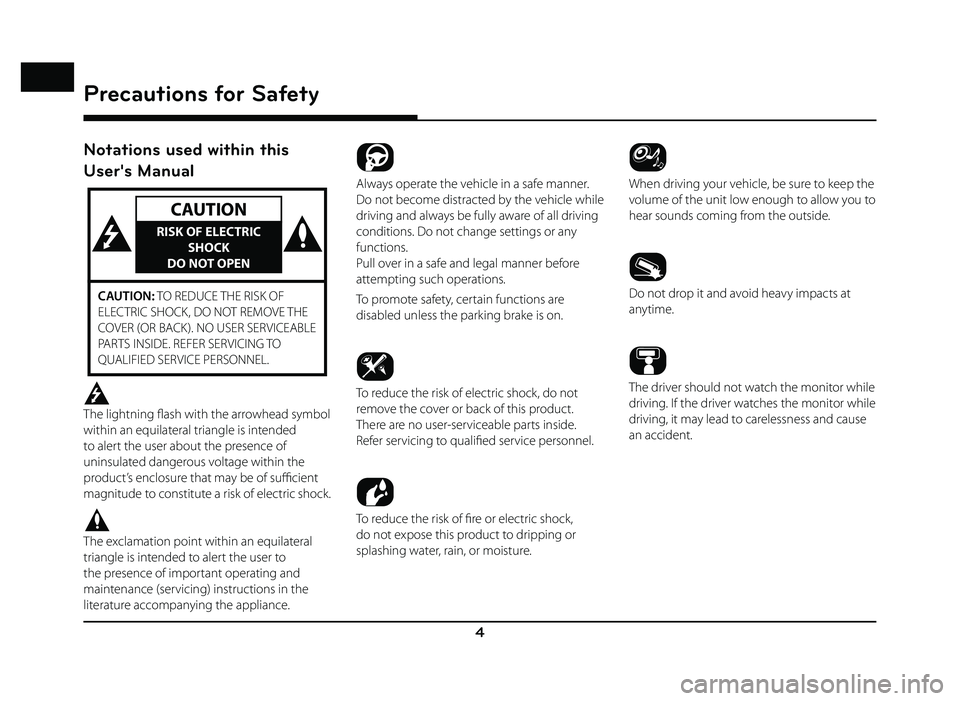
Notations used within this
User's Manual
CAUTION
RISK OF ELECTRIC SHOCK
DO NOT OPEN
CAUTION: TO REDUCE THE RISK OF
ELECTRIC SHOCK, DO NOT REMOVE THE
COVER (OR BACK). NO USER SERVICEABLE
PARTS INSIDE. REFER SERVICING TO
QUALIFIED SERVICE PERSONNEL.
The lightning fl ash with the arrowhead symbol
within an equilateral triangle is intended
to alert the user about the presence of
uninsulated dangerous voltage within the
product’s enclosure that may be of suffi cient
magnitude to constitute a risk of electric shock.
The exclamation point within an equilateral
triangle is intended to alert the user to
the presence of important operating and
maintenance (servicing) instructions in the
literature accompanying the appliance.
Always operate the vehicle in a safe manner.
Do not become distracted by the vehicle while
driving and always be fully aware of all driving
conditions. Do not change settings or any
functions.
Pull over in a safe and legal manner before
attempting such operations.
To promote safety, certain functions are
disabled unless the parking brake is on.
To reduce the risk of electric shock, do not
remove the cover or back of this product.
There are no user-serviceable parts inside.
Refer servicing to qualifi ed service personnel.
To reduce the risk of fi re or electric shock,
do not expose this product to dripping or
splashing water, rain, or moisture.
When driving your vehicle, be sure to keep the
volume of the unit low enough to allow you to
hear sounds coming from the outside.
Do not drop it and avoid heavy impacts at
anytime.
The driver should not watch the monitor while
driving. If the driver watches the monitor while
driving, it may lead to carelessness and cause
an accident.
Precautions for Safety
Precautions for Safety
Page 15 of 88
15
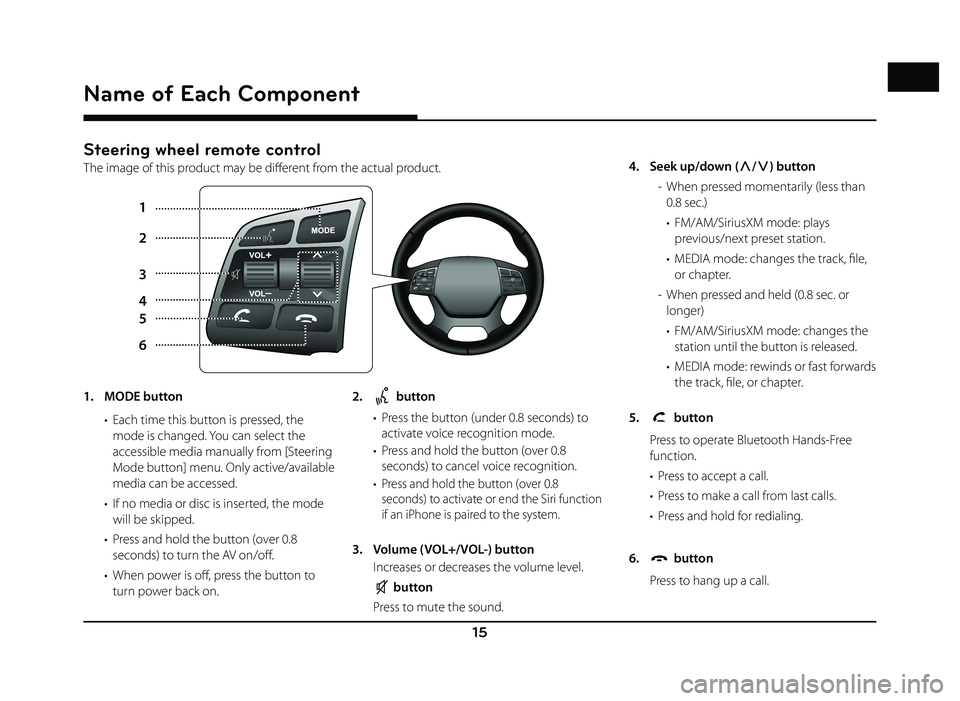
Steering wheel remote control
The image of this product may be diff erent from the actual product.
1
5
6 2
3
4
Name of Each Component
1. MODE button • Each time this button is pressed, the mode is changed. You can select the
accessible media manually from [Steering
Mode button] menu. Only active/available
media can be accessed.
• If no media or disc is inserted, the mode will be skipped.
• Press and hold the button (over 0.8 seconds) to turn the AV on/off .
• When power is off , press the button to turn power back on. 2. button
• Press the button (under 0.8 seconds) to activate voice recognition mode.
• Press and hold the button (over 0.8 seconds) to cancel voice recognition.
•
Press and hold the button (over 0.8
seconds) to activate or end the Siri function
if an iPhone is paired to the system.
3. Volume (VOL+/VOL-) button
Increases or decreases the volume level.
button
Press to mute the sound. 4. Seek up/down (
W/
S ) button
- When pressed momentarily (less than 0.8 sec.)
• FM/AM/SiriusXM mode: plays previous/next preset station.
• MEDIA mode: changes the track, fi le, or chapter.
- When pressed and held (0.8 sec. or longer)
• FM/AM/SiriusXM mode: changes the station until the button is released.
• MEDIA mode: rewinds or fast forwards the track, fi le, or chapter.
5.
button
Press to operate Bluetooth Hands-Free function.
• Press to accept a call.
• Press to make a call from last calls.
• Press and hold for redialing.
6.
button
Press to hang up a call.
Page 18 of 88
18
Radio Operation (SiriusXM™)
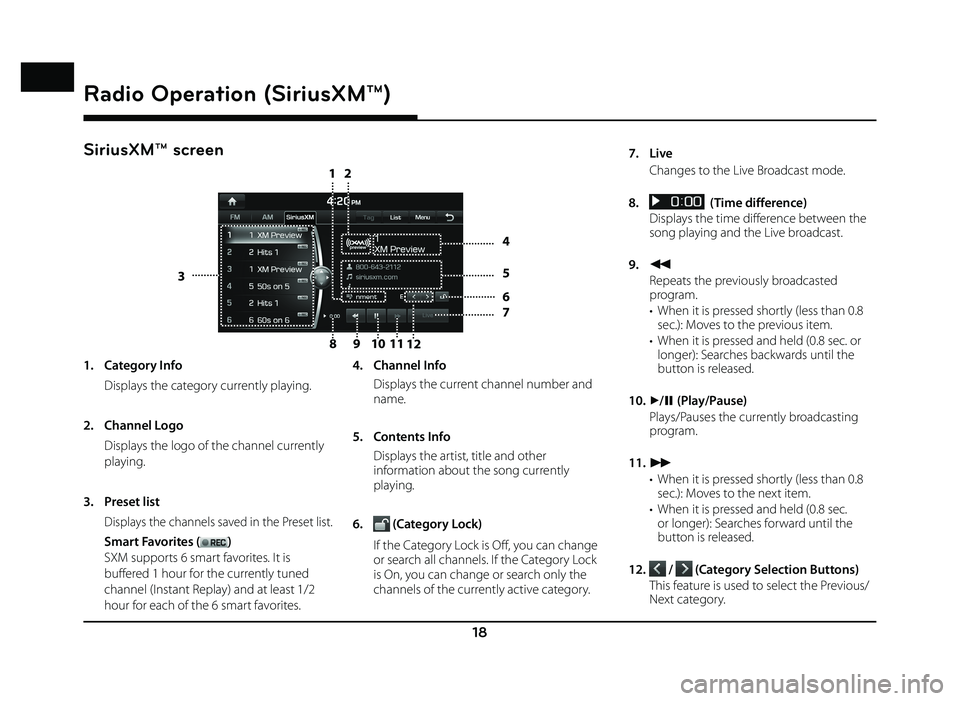
SiriusXM™ screen
810
12
9
11
3
4
5
6
7
21
Radio Operation (SiriusXM™)
1. Category Info
Displays the category currently playing.
2. Channel Logo
Displays the logo of the channel currently
playing.
3. Preset list
Displays the channels saved in the Preset list.
Smart Favorites ()
SXM supports 6 smart favorites. It is
buffered 1 hour for the currently tuned
channel (Instant Replay) and at least 1/2
hour for each of the 6 smart favorites. 4. Channel Info
Displays the current channel number and
name.
5. Contents Info
Displays the artist, title and other information about the song currently
playing.
6.
(Category Lock)
If the Category Lock is Off, you can change or search all channels. If the Category Lock
is On, you can change or search only the
channels of the currently active category. 7. Live
Changes to the Live Broadcast mode.
8.
(Time difference)
Displays the time difference between the song playing and the Live broadcast.
9.
c
Repeats the previously broadcasted program.
• When it is pressed shortly (less than 0.8 sec.): Moves to the previous item.
• When it is pressed and held (0.8 sec. or longer): Searches backwards until the
button is released.
10.
d/ M (Play/Pause)
Plays/Pauses the currently broadcasting program.
11.
v
• When it is pressed shortly (less than 0.8 sec.): Moves to the next item.
• When it is pressed and held (0.8 sec. or longer): Searches forward until the
button is released.
12.
/ (Category Selection Buttons)
This feature is used to select the Previous/ Next category.
Page 37 of 88
37
Bluetooth® Audio
Playing Bluetooth® Audio
Before playing the Bluetooth® Audio
• Music saved in the mobile phone can be played in the car through Bluetooth audio
streaming.
• Bluetooth audio can be played only when a Bluetooth phone has been connected.
To play Bluetooth audio, connect the
Bluetooth phone to the car system. For
more information on connecting Bluetooth,
please refer to user’s manual “Pairing and
connecting the unit and a Bluetooth phone”
on page 51.
• The audio streaming function may not be supported in some mobile phones. Only
one function can be used at a time between
the Bluetooth handsfree or Bluetooth audio
function. For example, if you convert to the
Bluetooth handsfree while playing Bluetooth
audio, the music will be discontinued.
Starting the Bluetooth® Audio
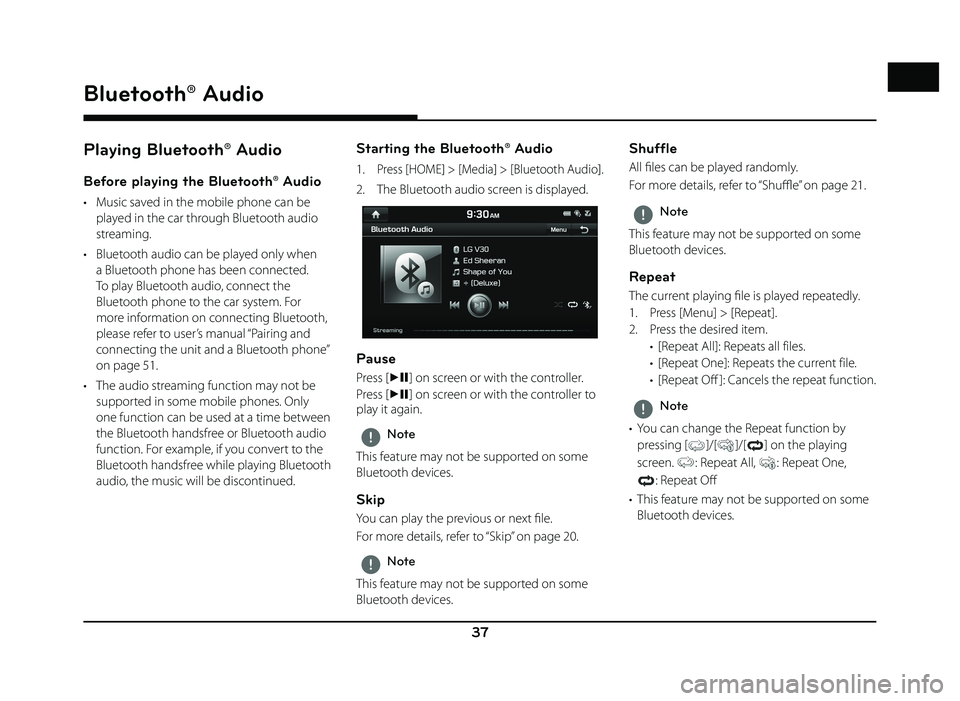
1. Press [HOME] > [Media] > [Bluetooth Audio].
2. The Bluetooth audio screen is displayed.
Pause
Press [dM] on screen or with the controller.
Press [
dM ] on screen or with the controller to
play it again.
,Note
This feature may not be supported on some
Bluetooth devices.
Skip
You can play the previous or next fi le.
For more details, refer to “Skip” on page 20.
,Note
This feature may not be supported on some
Bluetooth devices.
Shuffle
All fi les can be played randomly.
For more details, refer to “ Shuffl e” on page 21.
,Note
This feature may not be supported on some
Bluetooth devices.
Repeat
The current playing fi le is played repeatedly.
1. Press [Menu] > [Repeat].
2. Press the desired item. • [Repeat All]: Repeats all files.
• [Repeat One]: Repeats the current file.
• [Repeat Off ]: Cancels the repeat function.
,Note
• You can change the Repeat function by pressing
[]/[]/[] on the playing
screen.
: Repeat All, : Repeat One,
: Repeat Off
• This feature may not be supported on some Bluetooth devices.
Bluetooth® Audio
Page 39 of 88
![GENESIS G80 2019 Quick Reference Guide 39
Getting Started with Navigation
14
111312
8 76
9
10
6. Map scale display • Displays the current map scale.
• Sets the zoom level automatically to the guidance.
7. [
] button
Zoom out th GENESIS G80 2019 Quick Reference Guide 39
Getting Started with Navigation
14
111312
8 76
9
10
6. Map scale display • Displays the current map scale.
• Sets the zoom level automatically to the guidance.
7. [
] button
Zoom out th](/img/46/35634/w960_35634-38.png)
39
Getting Started with Navigation
14
111312
8 76
9
10
6. Map scale display • Displays the current map scale.
• Sets the zoom level automatically to the guidance.
7. [
] button
Zoom out the map. Press [
] repeatedly.
8. [MENU] button
Moves to quick menu screen. 9. Route guidance
Displays the route guidance to the
destination when a route is set.
10. Vehicle position
Displays current vehicle position and direction.
11. Current position
Displays the current position. Press to check the destination information. 12. Remaining distance display/ Remaining
time
Displays the distance and time of arrival to the destination or waypoint. Press and
check the information on destination.
13. Cancel Route
Cancels the route guidance to the destination or waypoint.
14. [Route] button
Changes the route conditions when a route is set.
Page 48 of 88
48
Using the Route Menu
Route menu overview
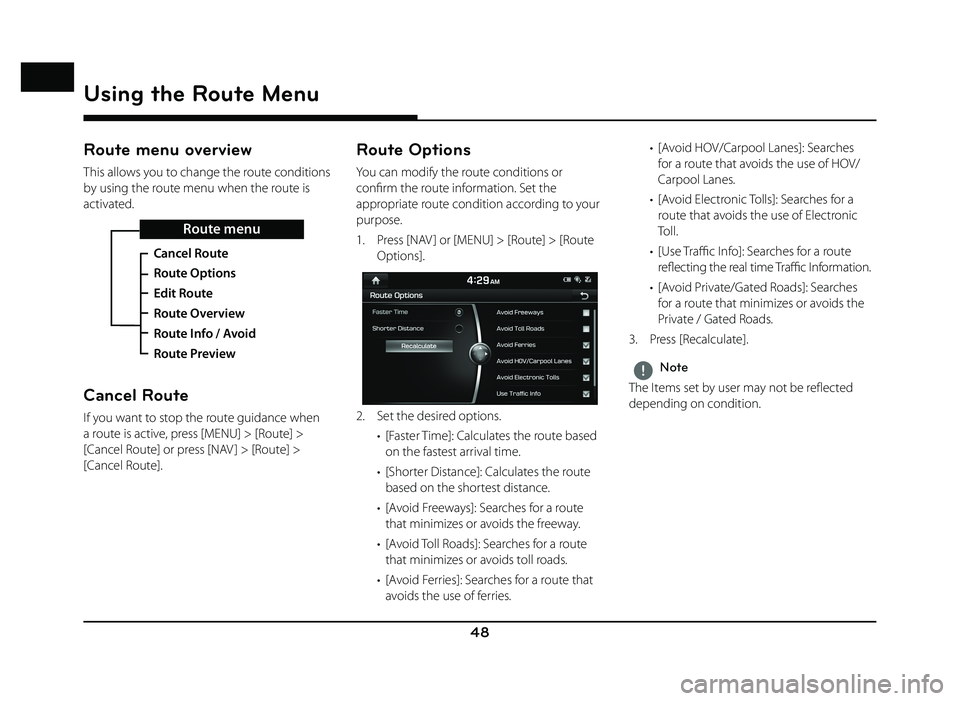
This allows you to change the route conditions
by using the route menu when the route is
activated.
Route menu
Cancel Route
Route Options
Edit Route
Route Overview
Route Info / Avoid
Route Preview
Cancel Route
If you want to stop the route guidance when
a route is active, press [MENU] > [Route] >
[Cancel Route] or press [NAV ] > [Route] >
[Cancel Route].
Route Options
You can modify the route conditions or
confi rm the route information. Set the
appropriate route condition according to your
purpose.
1. Press [NAV ] or [MENU] > [Route] > [Route
Options].
2. Set the desired options.
• [Faster Time]: Calculates the route based on the fastest arrival time.
• [Shorter Distance]: Calculates the route based on the shortest distance.
• [Avoid Freeways]: Searches for a route that minimizes or avoids the freeway.
• [Avoid Toll Roads]: Searches for a route that minimizes or avoids toll roads.
• [Avoid Ferries]: Searches for a route that avoids the use of ferries. • [Avoid HOV/Carpool Lanes]: Searches
for a route that avoids the use of HOV/
Carpool Lanes.
• [Avoid Electronic Tolls]: Searches for a route that avoids the use of Electronic
Toll.
• [Use Traffi c Info]: Searches for a route
refl ecting the real time Traffi c Information.
• [Avoid Private/Gated Roads]: Searches for a route that minimizes or avoids the
Private / Gated Roads.
3. Press [Recalculate].
,Note
The Items set by user may not be reflected
depending on condition.
Using the Route Menu
Page 61 of 88
61
Voice Recognition System
What is voice recognition?
Voice recognition technology runs the
system as ordered by recognizing your voice
command to help with the operation of
multimedia while you are driving the car.
Regretfully, not all possible voice commands
are recognized by the system due to
technological limitations. To make up for these
limitations, the system displays the voice
commands that are available for you to use.
There are errors in communication between
people. Likewise, voice recognition sometimes
misunderstands your voice command under
certain circumstances. If this happens, either
check the screen for the available options and
say the command again, or manually select
and press the button for the corresponding
command on the screen.
Voice recognition features by
language
Voice recognition support availability varies
according to the language set for the system.
Please verify the current language setting
before using the voice recognition.
• If you change the language set for the system to Korean, voice recognition will not
be supported. Change the system language
to other language.
Operating voice command
Condition for voice command system
Most of the functions can be operated by
voice. Please follow the instructions below for
optimal voice recognition performance.
• To improve the voice recognition performance, keep your car interior quiet by
closing all windows and the sunroof.
• Press the voice recognition button and say the desired voice command after the beep
sound.
• The microphone is positioned above the driver. Voice commands should be spoken
by driver practicing proper posture.
• Pronounce the voice commands naturally and clearly as if in a normal conversation.
• Special symbols of Phonebook Name are not considered in voice recognition.
Ex) James-Smith : “James Smith”
• House number or digits in Phonebook Name should be spoken discretely.
Ex) S1234 : “South one two three four”
• Depending on the specifi cations, some commands may not be supported.
Starting voice recognition
1. Press [] on the steering wheel remote
control.
2. Say a command.
,Note
• For proper recognition, please say the command after the voice instruction and
beep sound.
• When starting voice recognition, the voice command entry window with six
representative commands is displayed.
Voice Recognition System
Page 78 of 88
![GENESIS G80 2019 Quick Reference Guide 78
Android Auto/Apple CarPlay
Using Android Auto or Apple
CarPlay
1. Make sure only genuine USB cables are used that were provided by the mobile
phone´s manufacturer.
2. Enter [Android Auto] or GENESIS G80 2019 Quick Reference Guide 78
Android Auto/Apple CarPlay
Using Android Auto or Apple
CarPlay
1. Make sure only genuine USB cables are used that were provided by the mobile
phone´s manufacturer.
2. Enter [Android Auto] or](/img/46/35634/w960_35634-77.png)
78
Android Auto/Apple CarPlay
Using Android Auto or Apple
CarPlay
1. Make sure only genuine USB cables are used that were provided by the mobile
phone´s manufacturer.
2. Enter [Android Auto] or [Apple CarPlay] from the [HOME] screen.
3. Now the features such as navigation, music and phone are ready to be used.
NOTICE
• Before connecting your mobile phone, check whether Android Auto or Apple CarPlay is
activated in the [Phone Projection] menu.
• After connecting the mobile phone, the phone has to be unlocked and the
disclaimers on the phone have to be
accepted in order to launch Android Auto or
Apple CarPlay.
• The screens and features displayed on the multimedia system correspond to the
screens and features provided by Google
or Apple. They are subject to changes
according to the policy of the respective
company.
NOTICE-Android Auto
• Bluetooth media features will be disabled when Android Auto is activated. After
removing the USB cable, these features will
be available again.
• If Android Auto is not activated even after a successful connection, follow these steps:
- Check whether an error occurred on the phone.
- Check whether Android Auto has been closed on the phone.
- Check whether Android Auto is activated in the [
Phone Projection] menu.
• If Android Auto does not work normally even after a reconnection has been made,
visit the Google website http://support.
google.com/ androidauto.
• Please refer to the following websites to check the available countries for the
[Android Auto].
https://www.android.com/auto
NOTICE-Apple CarPlay
• Bluetooth phone/media features will be disabled when Apple CarPlay is activated.
After removing the USB cable, these features
will be available again.
• If Apple CarPlay is not activated even after a successful connection, follow these steps:
- Check whether Apple CarPlay is disabled
in the iPhone´s application settings.
- Check whether Apple CarPlay is activated
in the [
Phone Projection] menu.
• If Apple CarPlay does not work normally even after a reconnection has been made,
visit the Apple website http://www.apple.
com/ios/carplay/
• Please refer to the following websites to check the available countries for the [Apple
CarPlay].
http://www.apple.com/ios/feature-availability/
Page 83 of 88
83
Connected Services (USA Only)
Apps
Download Center
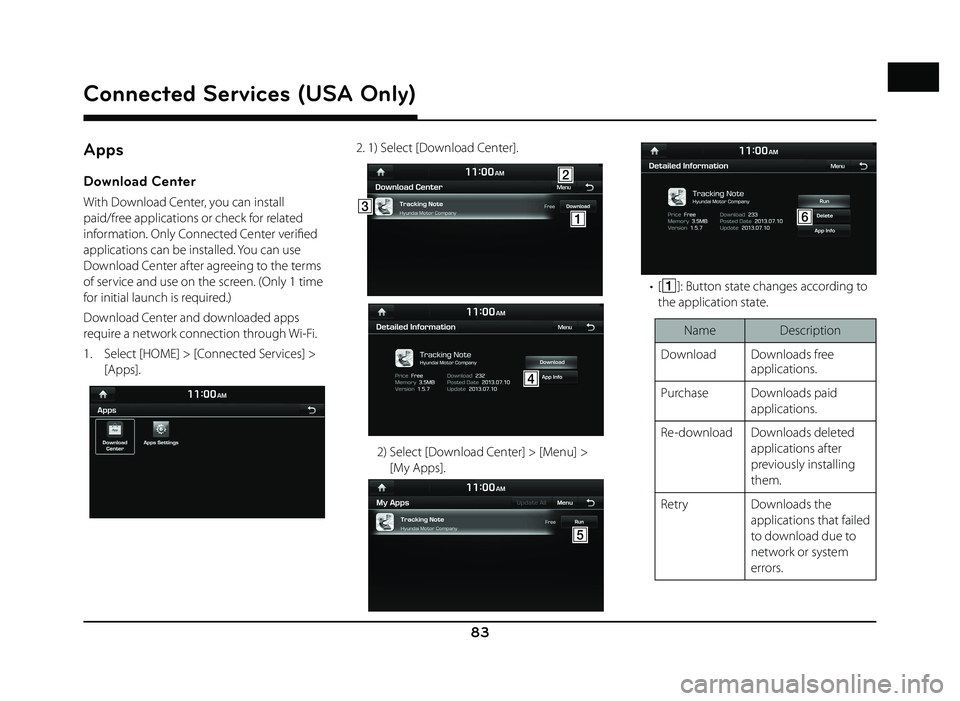
With Download Center, you can install
paid/free applications or check for related
information. Only Connected Center verifi ed
applications can be installed. You can use
Download Center after agreeing to the terms
of service and use on the screen. (Only 1 time
for initial launch is required.)
Download Center and downloaded apps
require a network connection through Wi-Fi.
1. Select [HOME] > [Connected Services] > [Apps].
2. 1) Select [Download Center].
AC
B
D
2) Select [Download Center] > [Menu] > [My Apps].
E
F
• [A]: Button state changes according to
the application state.
Name Description
Download Downloads free applications.
Purchase Downloads paid applications.
Re-download Downloads deleted applications after
previously installing
them.
Retry Downloads the applications that failed
to download due to
network or system
errors.