tow GENESIS G90 2017 Owner's Manual
[x] Cancel search | Manufacturer: GENESIS, Model Year: 2017, Model line: G90, Model: GENESIS G90 2017Pages: 524, PDF Size: 19.3 MB
Page 15 of 524
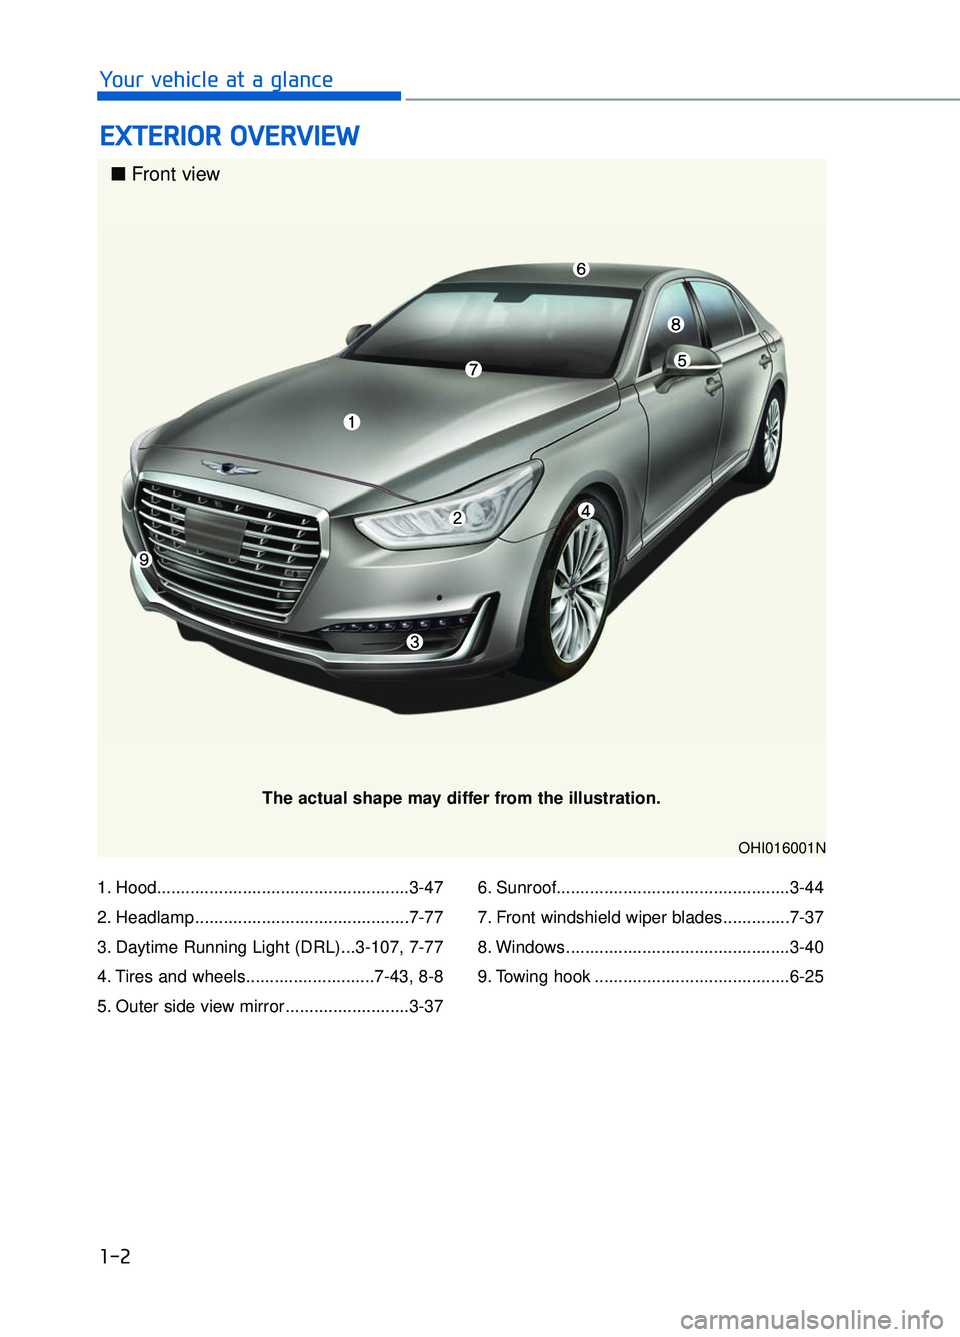
1. Hood.....................................................3-47
2. Headlamp .............................................7-77
3. Daytime Running Light (DRL)...3-107, 7-77
4. Tires and wheels...........................7-43, 8-8
5. Outer side view mirror ..........................3-376. Sunroof.................................................3-44
7. Front windshield wiper blades..............7-37
8. Windows ...............................................3-40
9. Towing hook .........................................6-25
E E
X
X T
TE
ER
R I
IO
O R
R
O
O V
VE
ER
R V
V I
IE
E W
W
1-2
Your vehicle at a glance
OHI016001N
■ Front view
The actual shape may differ from the illustration.
Page 16 of 524
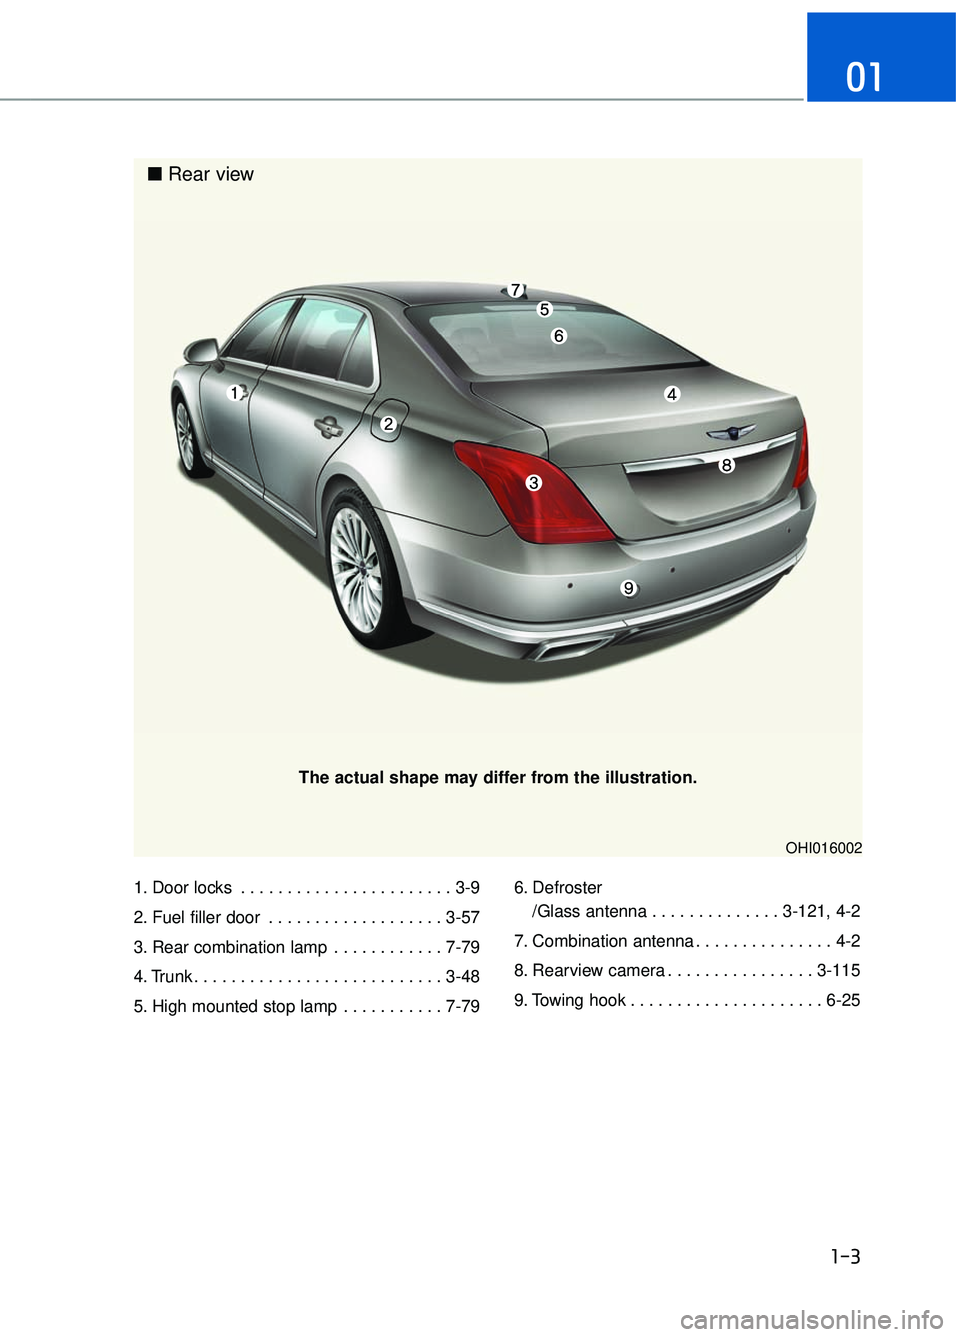
1. Door locks . . . . . . . . . . . . . . . . . . . . . . . 3-9
2. Fuel filler door . . . . . . . . . . . . . . . . . . . 3-57
3. Rear combination lamp . . . . . . . . . . . . 7-79
4. Trunk . . . . . . . . . . . . . . . . . . . . . . . . . . . 3-48
5. High mounted stop lamp . . . . . . . . . . . 7-796. Defroster
/Glass antenna . . . . . . . . . . . . . . 3-121, 4-2
7. Combination antenna . . . . . . . . . . . . . . . 4-2
8. Rearview camera . . . . . . . . . . . . . . . . 3-115
9. Towing hook . . . . . . . . . . . . . . . . . . . . . 6-25
1-3
01
OHI016002
The actual shape may differ from the illustration.
■ Rear view
Page 44 of 524

2-24
Safety system of your vehicle
Front seat head restraints
The driver's and front passenger's
seats are equipped with adjustable
head restraints for the passengers
safety and comfort.
Forward and rearward adjustment
Push the control switch forward or
backward to move the head restraint.
Release the switch once the head
restraint reaches the desired posi-
tion.
Adjusting the height up and down
Push the control switch up to raise or
down to lower the head restraint.
Release the switch once the head
restraint reaches the desired posi-
tion.
If you recline the seatback
towards the front with the head
restraint and seat cushion raised,
the head restraint may come in
contact with the sunvisor or other
parts of the vehicle.
NOTICE
OHI036008
OHI036009
OHI036133N
OHI036010
Page 75 of 524
2-55
02
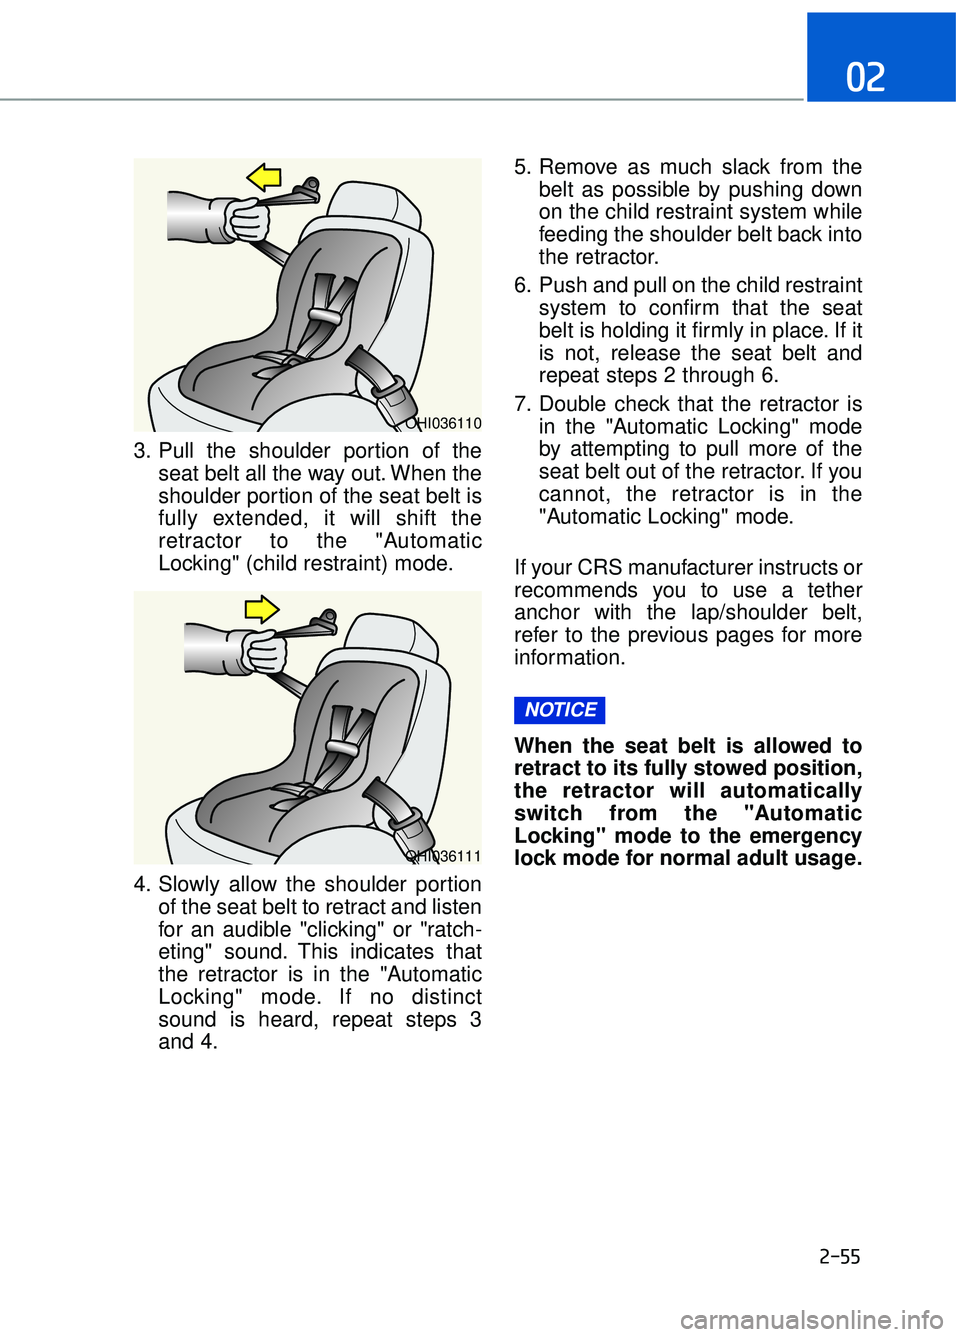
3. Pull the shoulder portion of theseat belt all the way out. When the
shoulder portion of the seat belt is
fully extended, it will shift the
retractor to the "Automatic
Locking" (child restraint) mode.
4. Slowly allow the shoulder portion of the seat belt to retract and listen
for an audible "clicking" or "ratch-
eting" sound. This indicates that
the retractor is in the "Automatic
Locking" mode. If no distinct
sound is heard, repeat steps 3
and 4. 5. Remove as much slack from the
belt as possible by pushing down
on the child restraint system while
feeding the shoulder belt back into
the retractor.
6. Push and pull on the child restraint system to confirm that the seat
belt is holding it firmly in place. If it
is not, release the seat belt and
repeat steps 2 through 6.
7. Double check that the retractor is in the "Automatic Locking" mode
by attempting to pull more of the
seat belt out of the retractor. If you
cannot, the retractor is in the
"Automatic Locking" mode.
If your CRS manufacturer instructs or
recommends you to use a tether
anchor with the lap/shoulder belt,
refer to the previous pages for more
information.
When the seat belt is allowed to
retract to its fully stowed position,
the retractor will automatically
switch from the "Automatic
Locking" mode to the emergency
lock mode for normal adult usage.
NOTICE
OHI036110
OHI036111
Page 91 of 524
2-71
02
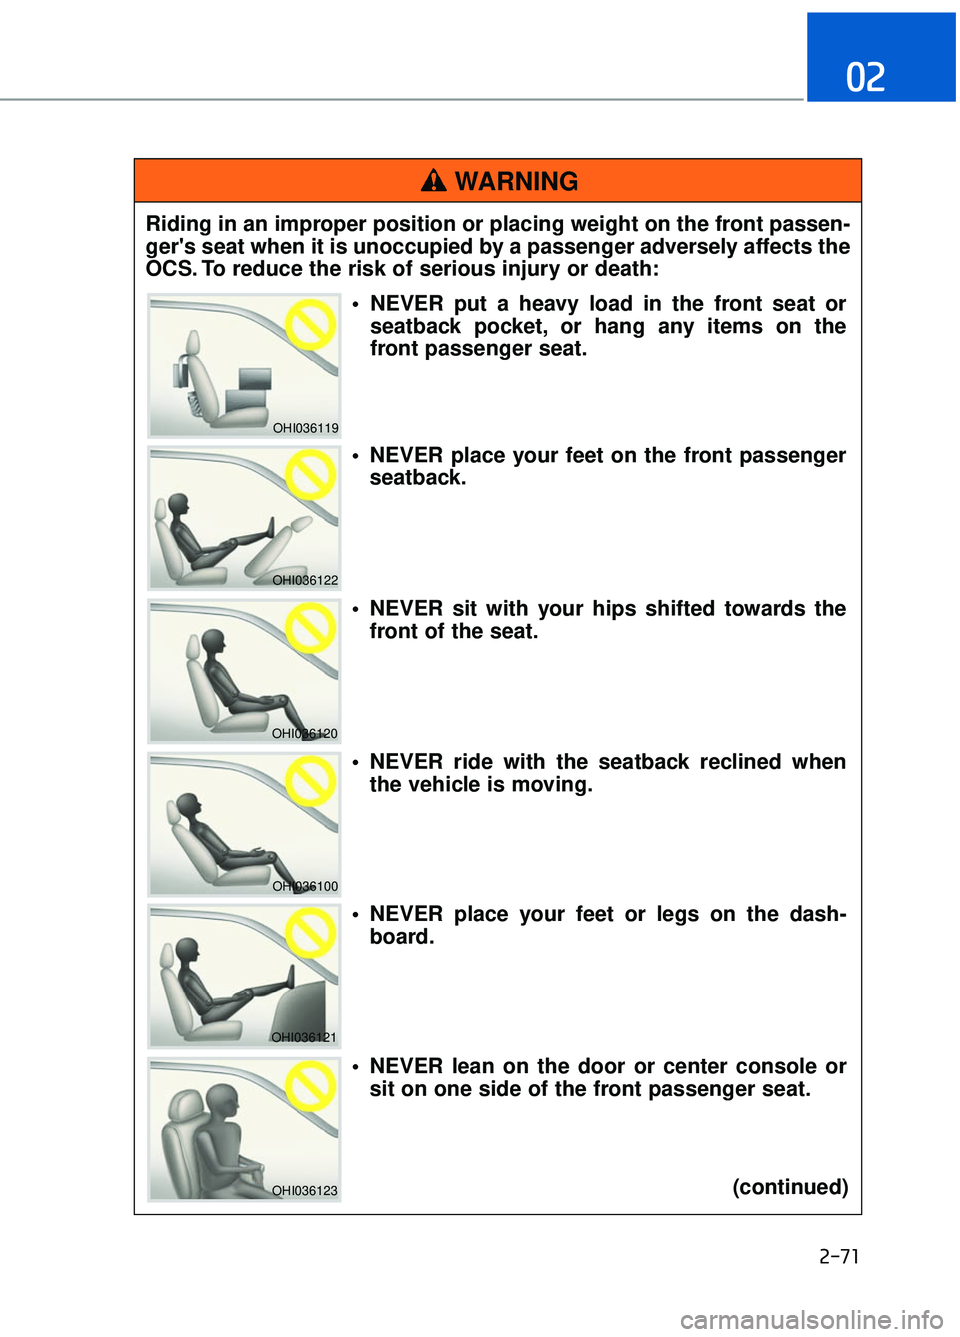
Riding in an improper position or placing weight on the front passen-
ger's seat when it is unoccupied by a passenger adversely affects the
OCS. To reduce the risk of serious injury or death:
WARNING
OHI036119
OHI036122
OHI036120
OHI036100
OHI036121
OHI036123
NEVER put a heavy load in the front seat orseatback pocket, or hang any items on the
front passenger seat.
NEVER place your feet on the front passenger seatback.
NEVER sit with your hips shifted towards the front of the seat.
NEVER ride with the seatback reclined when the vehicle is moving.
NEVER place your feet or legs on the dash- board.
NEVER lean on the door or center console or sit on one side of the front passenger seat.
(continued)
Page 96 of 524
2-76
Safety system of your vehicle
Air bag inflation conditions
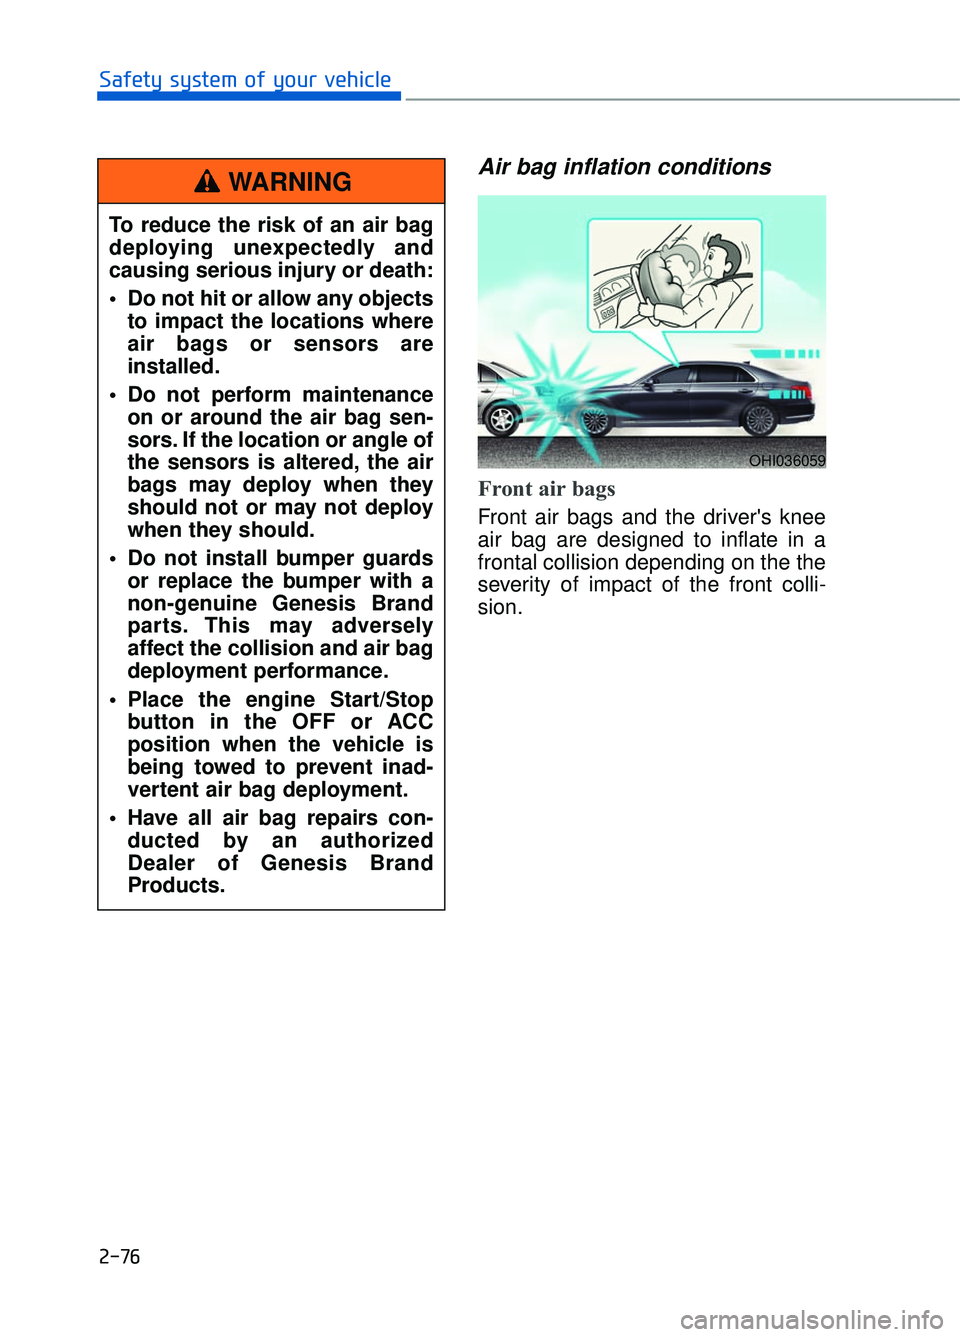
Front air bags
Front air bags and the driver's knee
air bag are designed to inflate in a
frontal collision depending on the the
severity of impact of the front colli-
sion.
OHI036059
To reduce the risk of an air bag
deploying unexpectedly and
causing serious injury or death:
Do not hit or allow any objectsto impact the locations where
air bags or sensors are
installed.
Do not perform maintenance on or around the air bag sen-
sors. If the location or angle of
the sensors is altered, the air
bags may deploy when they
should not or may not deploy
when they should.
Do not install bumper guards or replace the bumper with a
non-genuine Genesis Brand
parts. This may adversely
affect the collision and air bag
deployment performance.
Place the engine Start/Stop button in the OFF or ACC
position when the vehicle is
being towed to prevent inad-
vertent air bag deployment.
Have all air bag repairs con- ducted by an authorized
Dealer of Genesis Brand
Products.
WARNING
Page 108 of 524
Start-up
You can start the engine without
inserting the key.
For more information, refer to the
"Engine Start/Stop Button" section
in chapter 5.
To prevent damaging the smart key:
• Keep the smart key away fromany liquid or fire. Internal circuits
may malfunction if the inside of
the smart key gets damp (from
liquids or moisture) or if it is heat-
ed. This can exclude the smart
key from warranty coverage.
Avoid dropping or throwing the smart key.
Protect the smart key from extreme temperatures.
Mechanical key
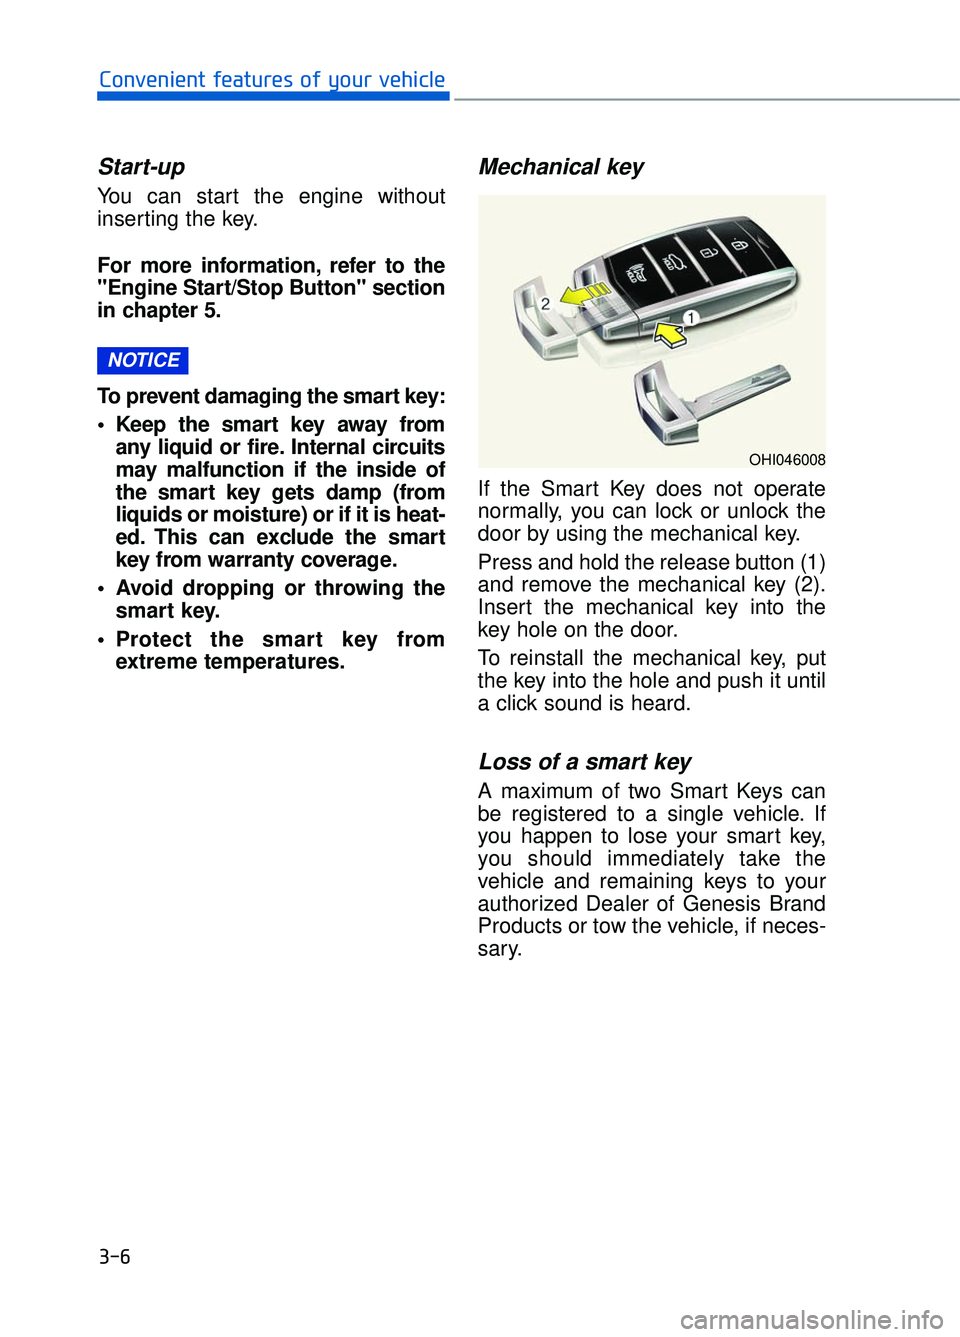
If the Smart Key does not operate
normally, you can lock or unlock the
door by using the mechanical key.
Press and hold the release button (1)
and remove the mechanical key (2).
Insert the mechanical key into the
key hole on the door.
To reinstall the mechanical key, put
the key into the hole and push it until
a click sound is heard.
Loss of a smart key
A maximum of two Smart Keys can
be registered to a single vehicle. If
you happen to lose your smart key,
you should immediately take the
vehicle and remaining keys to your
authorized Dealer of Genesis Brand
Products or tow the vehicle, if neces-
sary.
NOTICE
3-6
Convenient features of your vehicle
OHI046008
Page 111 of 524
3-9
03
Operating Door Locks from
Outside the Vehicle
Mechanical key
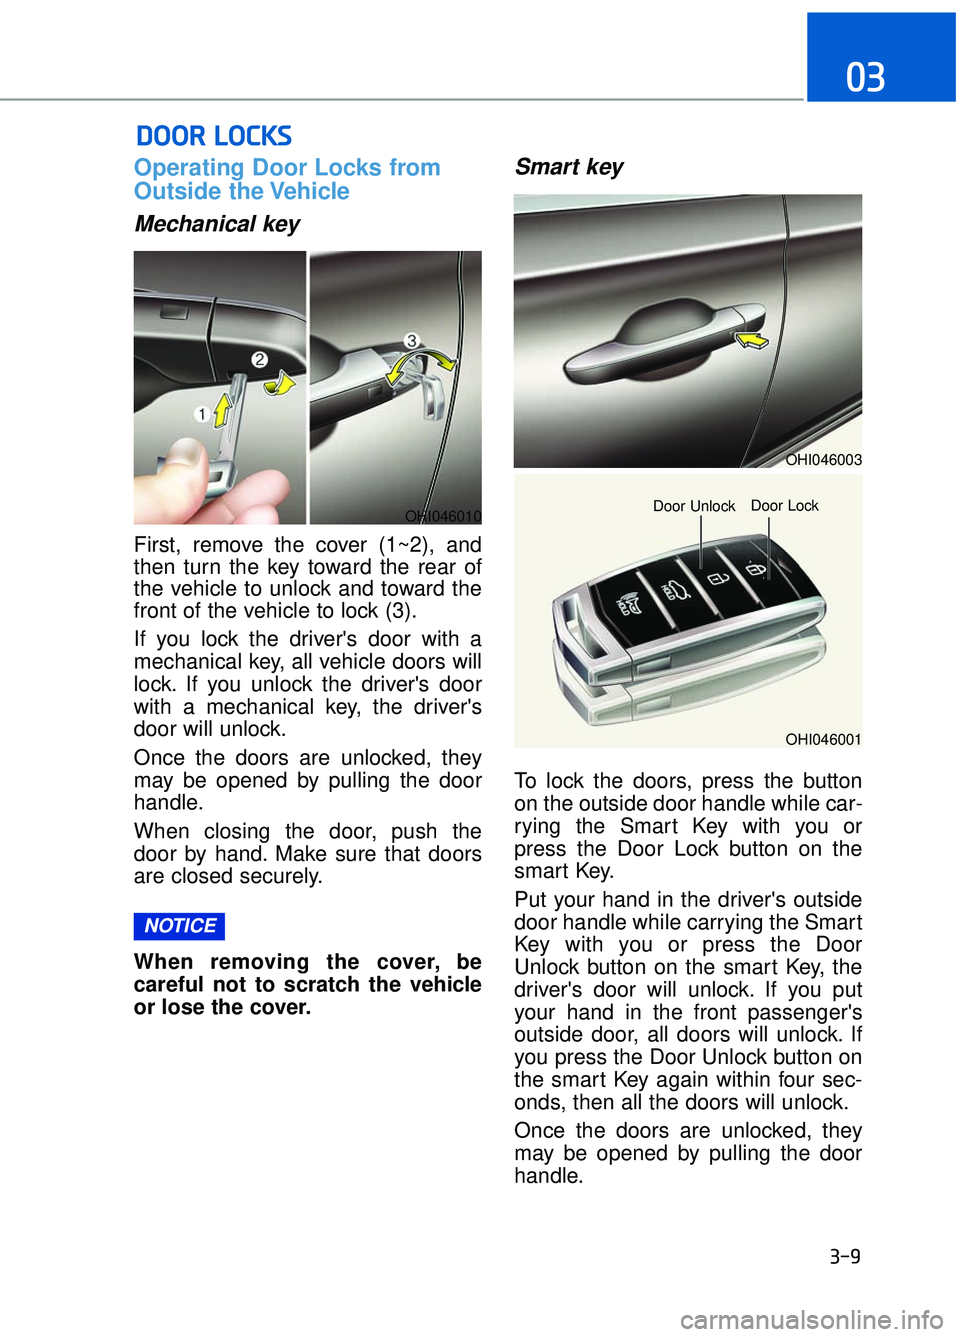
First, remove the cover (1~2), and
then turn the key toward the rear of
the vehicle to unlock and toward the
front of the vehicle to lock (3).
If you lock the driver's door with a
mechanical key, all vehicle doors will
lock. If you unlock the driver's door
with a mechanical key, the driver's
door will unlock.
Once the doors are unlocked, they
may be opened by pulling the door
handle.
When closing the door, push the
door by hand. Make sure that doors
are closed securely.
When removing the cover, be
careful not to scratch the vehicle
or lose the cover.
Smart key
To lock the doors, press the button
on the outside door handle while car-
rying the Smart Key with you or
press the Door Lock button on the
smart Key.
Put your hand in the driver's outside
door handle while carrying the Smart
Key with you or press the Door
Unlock button on the smart Key, the
driver's door will unlock. If you put
your hand in the front passenger's
outside door, all doors will unlock. If
you press the Door Unlock button on
the smart Key again within four sec-
onds, then all the doors will unlock.
Once the doors are unlocked, they
may be opened by pulling the door
handle.
NOTICE
D DO
O O
OR
R
L
L O
O C
CK
K S
S
OHI046010
OHI046003
OHI046001
Door Unlock
Door Lock
Page 118 of 524
3-16
Convenient features of your vehicle
Information
Only the driver's seat position memo-
ry appears on the LCD display.
Recalling memory positions
1. Move the shift lever into P (Park)while the Engine Start/Stop button
is in the ON position.
2. Press the desired memory button (1 or 2). The system will beep once,
and then the driver's seat position,
outer side view mirror position,
steering wheel position, instrument
panel illumination intensity and
head-up display height/brightness
will automatically adjust to the stored
positions.
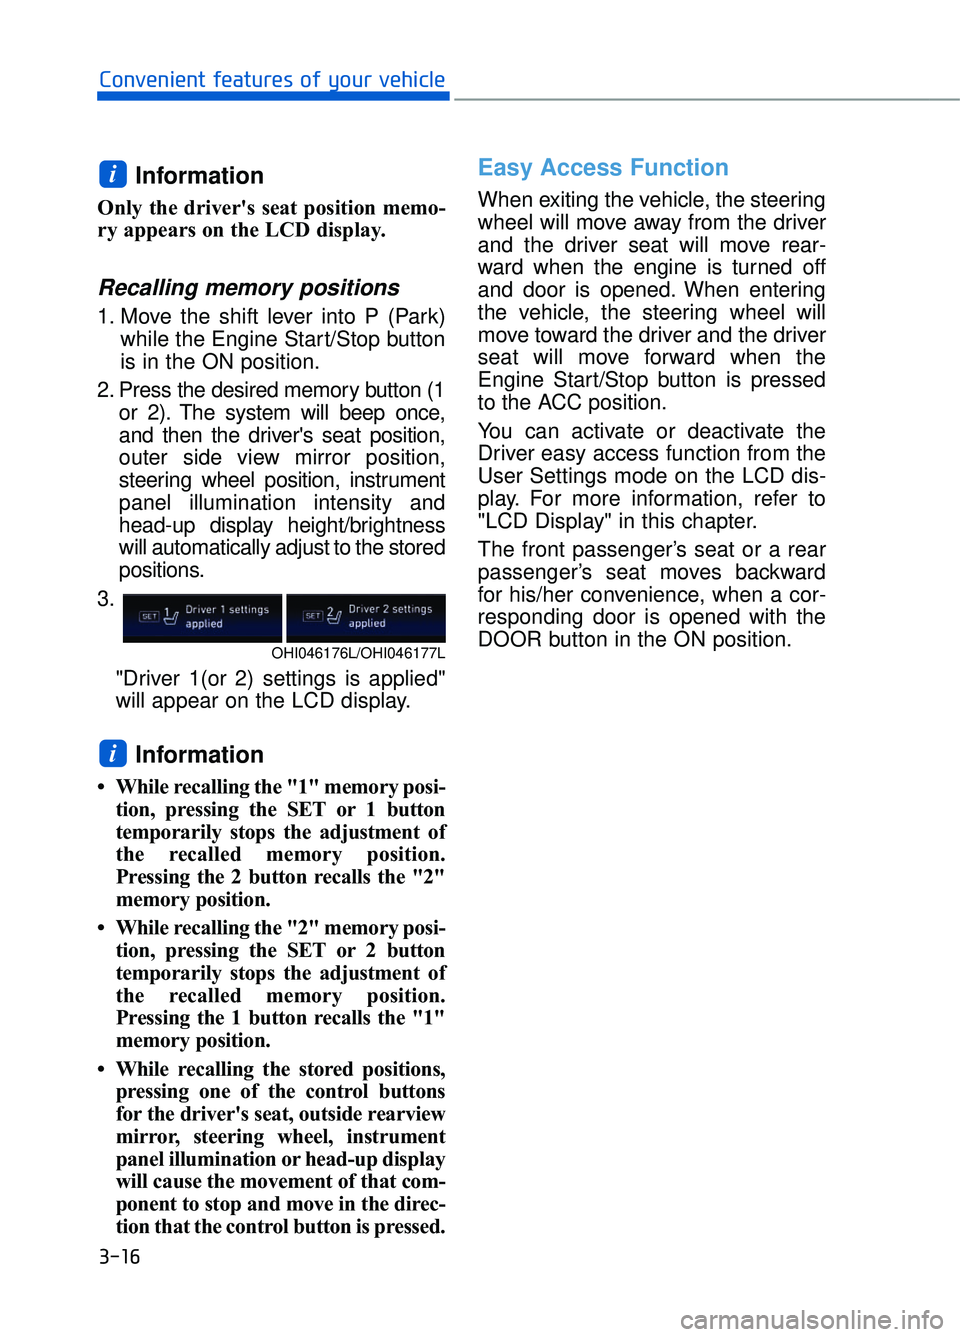
3.
"Driver 1(or 2) settings is applied"
will appear on the LCD display.
Information
• While recalling the "1" memory posi-tion, pressing the SET or 1 button
temporarily stops the adjustment of
the recalled memory position.
Pressing the 2 button recalls the "2"
memory position.
• While recalling the "2" memory posi- tion, pressing the SET or 2 button
temporarily stops the adjustment of
the recalled memory position.
Pressing the 1 button recalls the "1"
memory position.
• While recalling the stored positions, pressing one of the control buttons
for the driver's seat, outside rearview
mirror, steering wheel, instrument
panel illumination or head-up display
will cause the movement of that com-
ponent to stop and move in the direc-
tion that the control button is pressed.
Easy Access Function
When exiting the vehicle, the steering
wheel will move away from the driver
and the driver seat will move rear-
ward when the engine is turned off
and door is opened. When entering
the vehicle, the steering wheel will
move toward the driver and the driver
seat will move forward when the
Engine Start/Stop button is pressed
to the ACC position.
You can activate or deactivate the
Driver easy access function from the
User Settings mode on the LCD dis-
play. For more information, refer to
"LCD Display" in this chapter.
The front passenger’s seat or a rear
passenger’s seat moves backward
for his/her convenience, when a cor-
responding door is opened with the
DOOR button in the ON position.
i
i
OHI046176L/OHI046177L
Page 120 of 524
3-18
Convenient features of your vehicle
Tilt Steering / Telescope Steering
Adjust the steering wheel so it points
toward your chest, not toward your
face. Make sure you can see the
instrument cluster warning lights and
gauges. Always adjust the position of
the steering wheel before driving.
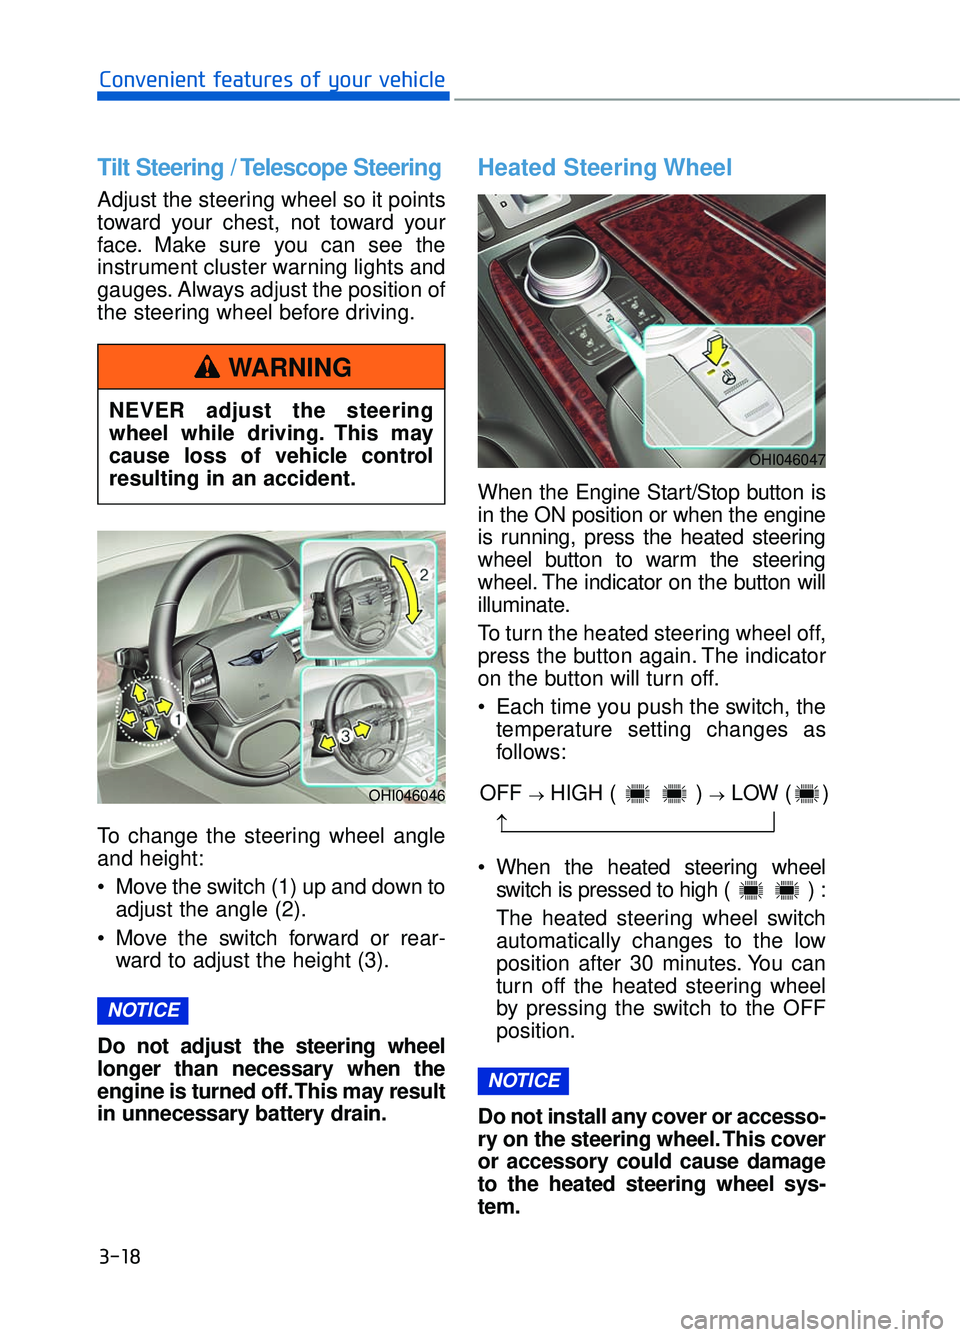
To change the steering wheel angle
and height:
Move the switch (1) up and down toadjust the angle (2).
Move the switch forward or rear- ward to adjust the height (3).
Do not adjust the steering wheel
longer than necessary when the
engine is turned off. This may result
in unnecessary battery drain.
Heated Steering Wheel
When the Engine Start/Stop button is
in the ON position or when the engine
is running, press the heated steering
wheel button to warm the steering
wheel. The indicator on the button will
illuminate.
To turn the heated steering wheel off,
press the button again. The indicator
on the button will turn off.
Each time you push the switch, the temperature setting changes as
follows:
When the heated steering wheel switch is pressed to high ( ) :
The heated steering wheel switch
automatically changes to the low
position after 30 minutes. You can
turn off the heated steering wheel
by pressing the switch to the OFF
position.
Do not install any cover or accesso-
ry on the steering wheel. This cover
or accessory could cause damage
to the heated steering wheel sys-
tem.
NOTICE
NOTICE
OHI046046
NEVER adjust the steering
wheel while driving. This may
cause loss of vehicle control
resulting in an accident.
WARNING
OHI046047
OFF →HIGH ( ) →LOW ( )
→