mirror GENESIS G90 2017 Owner's Guide
[x] Cancel search | Manufacturer: GENESIS, Model Year: 2017, Model line: G90, Model: GENESIS G90 2017Pages: 524, PDF Size: 19.3 MB
Page 207 of 524

3-105
03
Turn signals and lane changesignals
To signal a turn, push down on the
lever for a left turn or up for a right
turn in position (A).
If an indicator stays on and does not
flash or if it flashes abnormally, one of
the turn signal bulbs may be burned
out and will require replacement.
Onetouch turn signal function
To activate the One Touch Turn Signal
function, push the turn signal lever up
or down to position (B) and then
release it.
The lane change signals will blink 3,
5 or 7 times.
You can activate or deactivate the
One Touch Turn Signal function or
choose the number of blinking (3, 5,
or 7) from the User Settings mode
(Light) on the LCD display.
For more information, refer to the
"LCD Display" in this chapter.
OHI046420N
Do not place any accessories,
stickers or tint on the wind-
shield.
Have the windshield glass replaced from an authorized
dealer.
Do not remove or impact relat- ed parts of the Smart High
Beam system.
Be careful that water doesn’t get into the Smart High Beam
unit.
Do not place objects on the dashboard that reflects light
such as mirrors, white paper,
etc. The system may malfunc-
tion if sunlight is reflected.
At times, the Smart High Beam system may not work
properly, always check the
road conditions for your safe-
ty. When the system does not
operate normally, manually
change between the high
beam and low beam.
WARNING
Page 212 of 524

3-110
Convenient features of your vehicle
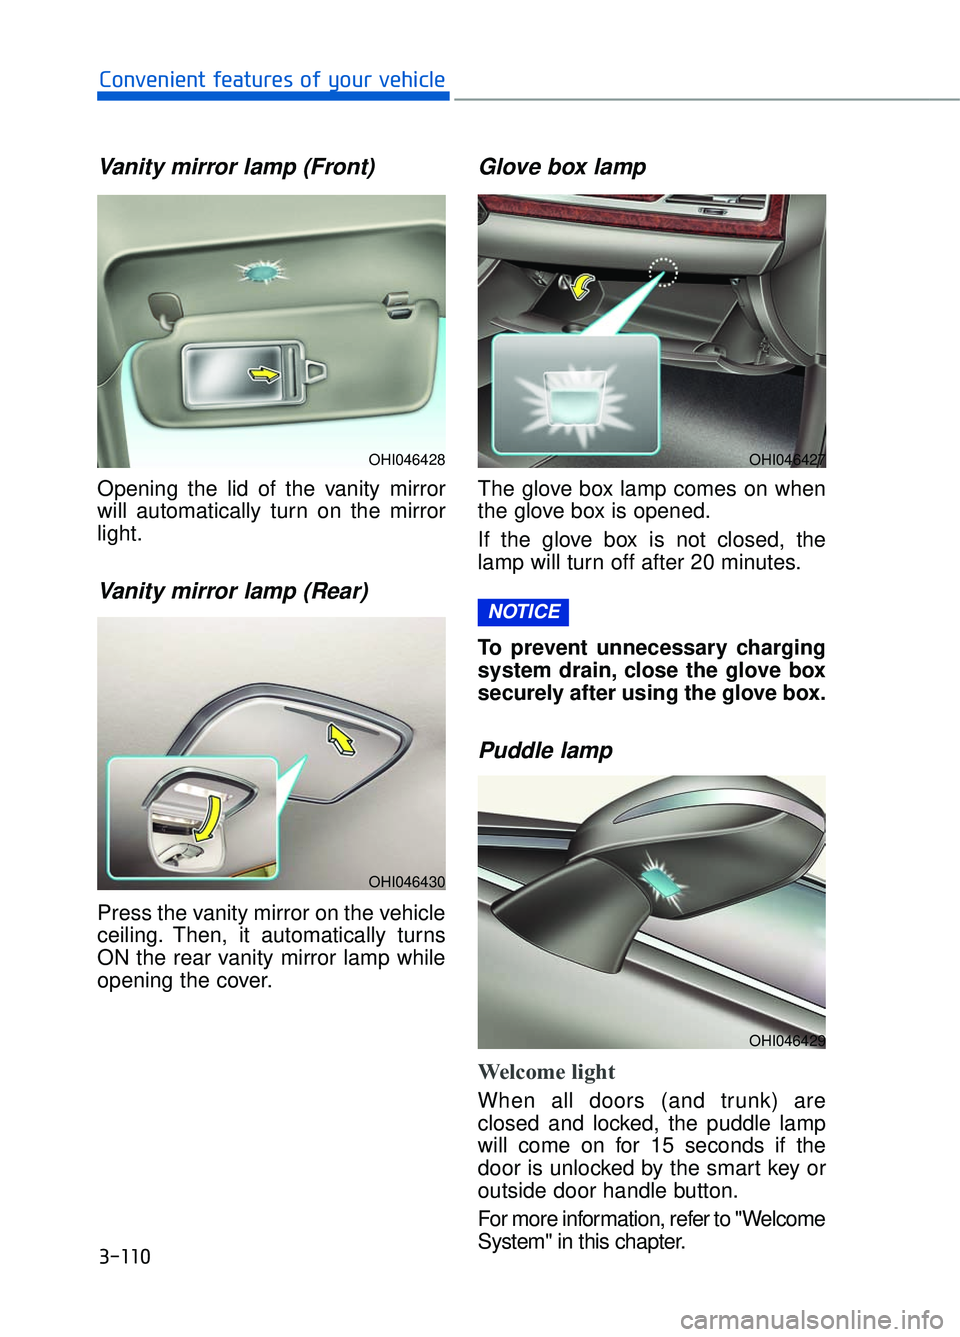
Vanity mirror lamp (Front)
Opening the lid of the vanity mirror
will automatically turn on the mirror
light.
Vanity mirror lamp (Rear)
Press the vanity mirror on the vehicle
ceiling. Then, it automatically turns
ON the rear vanity mirror lamp while
opening the cover.
Glove box lamp
The glove box lamp comes on when
the glove box is opened.
If the glove box is not closed, the
lamp will turn off after 20 minutes.
To prevent unnecessary charging
system drain, close the glove box
securely after using the glove box.
Puddle lamp
Welcome light
When all doors (and trunk) are
closed and locked, the puddle lamp
will come on for 15 seconds if the
door is unlocked by the smart key or
outside door handle button.
For more information, refer to "Welcome
System" in this chapter.
NOTICE
OHI046428
OHI046430
OHI046427
OHI046429
Page 218 of 524

Multi-View Camera System
(if equipped)
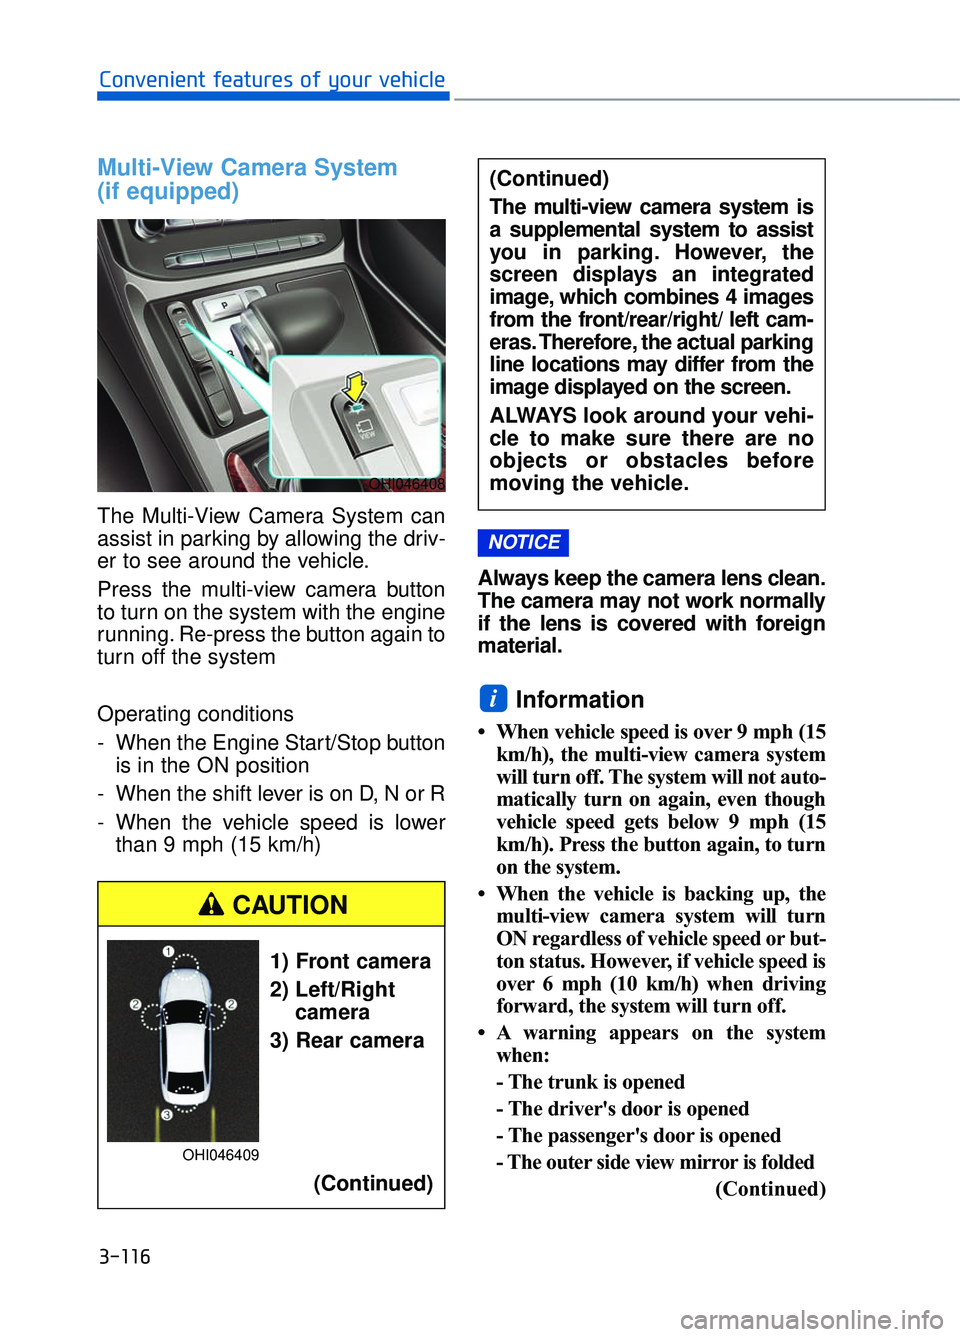
The Multi-View Camera System can
assist in parking by allowing the driv-
er to see around the vehicle.
Press the multi-view camera button
to turn on the system with the engine
running. Re-press the button again to
turn off the system
Operating conditions
- When the Engine Start/Stop buttonis in the ON position
- When the shift lever is on D, N or R
- When the vehicle speed is lower than 9 mph (15 km/h) Always keep the camera lens clean.
The camera may not work normally
if the lens is covered with foreign
material.
Information
• When vehicle speed is over 9 mph (15
km/h), the multi-view camera system
will turn off. The system will not auto-
matically turn on again, even though
vehicle speed gets below 9 mph (15
km/h). Press the button again, to turn
on the system.
• When the vehicle is backing up, the multi-view camera system will turn
ON regardless of vehicle speed or but-
ton status. However, if vehicle speed is
over 6 mph (10 km/h) when driving
forward, the system will turn off.
• A warning appears on the system when:
- The trunk is opened
- The driver's door is opened
- The passenger's door is opened
- The outer side view mirror is folded
(Continued)
i
NOTICE
3-116
Convenient features of your vehicle
OHI046408
(Continued)
The multi-view camera system is
a supplemental system to assist
you in parking. However, the
screen displays an integrated
image, which combines 4 images
from the front/rear/right/ left cam-
eras. Therefore, the actual parking
line locations may differ from the
image displayed on the screen.
ALWAYS look around your vehi-
cle to make sure there are no
objects or obstacles before
moving the vehicle.
1) Front camera
2) Left/Rightcamera
3) Rear camera
(Continued)
CAUTION
OHI046409
Page 223 of 524

To prevent damage to the conduc-
tors bonded to the inside surface
of the rear window, never use
sharp instruments or window
cleaners containing abrasives to
clean the window.
If you want to defrost and defog
the front windshield, refer to the
"Windshield Defrosting and
Defogging" section in this chapter.
Rear Window Defroster
The defroster heats the window to
remove frost, fog and thin ice from
the interior and exterior of the rear
window, while engine is running.
To activate the rear window defroster,
press the rear window defroster but-
ton located in the center facia switch
panel. The indicator on the rear win-
dow defroster button illuminates
when the defroster is ON.
To turn off the defroster, press therear window defroster button again.
Information
• If there is heavy accumulation ofsnow on the rear window, brush it off
before operating the rear defroster.
• The rear window defroster automat- ically turns off after approximately
20 minutes or when the Engine
Start/Stop button is in the OFF posi-
tion.
Side view mirror defroster
If your vehicle is equipped with the
side view mirror defrosters, they will
operate at the same time you turn on
the rear window defroster.
Front Wiper Deicer
If your vehicle is equipped with the
front wiper deicer, it will be operating
at the same time you operate the
rear window defroster.
iNOTICE
D DE
EF
FR
R O
O S
ST
T E
ER
R
3-121
03
OHI046304
Page 240 of 524

W
WI
IN
N D
DS
SH
H I
IE
E L
LD
D
D
D E
EF
FR
R O
O S
ST
T I
IN
N G
G
A
A N
N D
D
D
D E
EF
FO
O G
GG
GI
IN
N G
G
3-138
Convenient features of your vehicle
For maximum defrosting, set the temperature control to the extreme
right/hot position and the fan speed
control to the highest speed.
If warm air to the floor is desired while defrosting or defogging, set the
mode to the floor-defrost position.
Before driving, clear all snow and ice from the windshield, rear win-
dow, side view mirrors, and all side
windows.
Clear all snow and ice from the hood and air inlet in the cowl grill to
improve heater and defroster effi-
ciency and to reduce the probability
of fogging up the inside of the wind-
shield.
If the engine temperature is still
cold after starting, then a brief
engine warm up period may be
required for the vented air flow to
become warm or hot.
To defog inside windshield
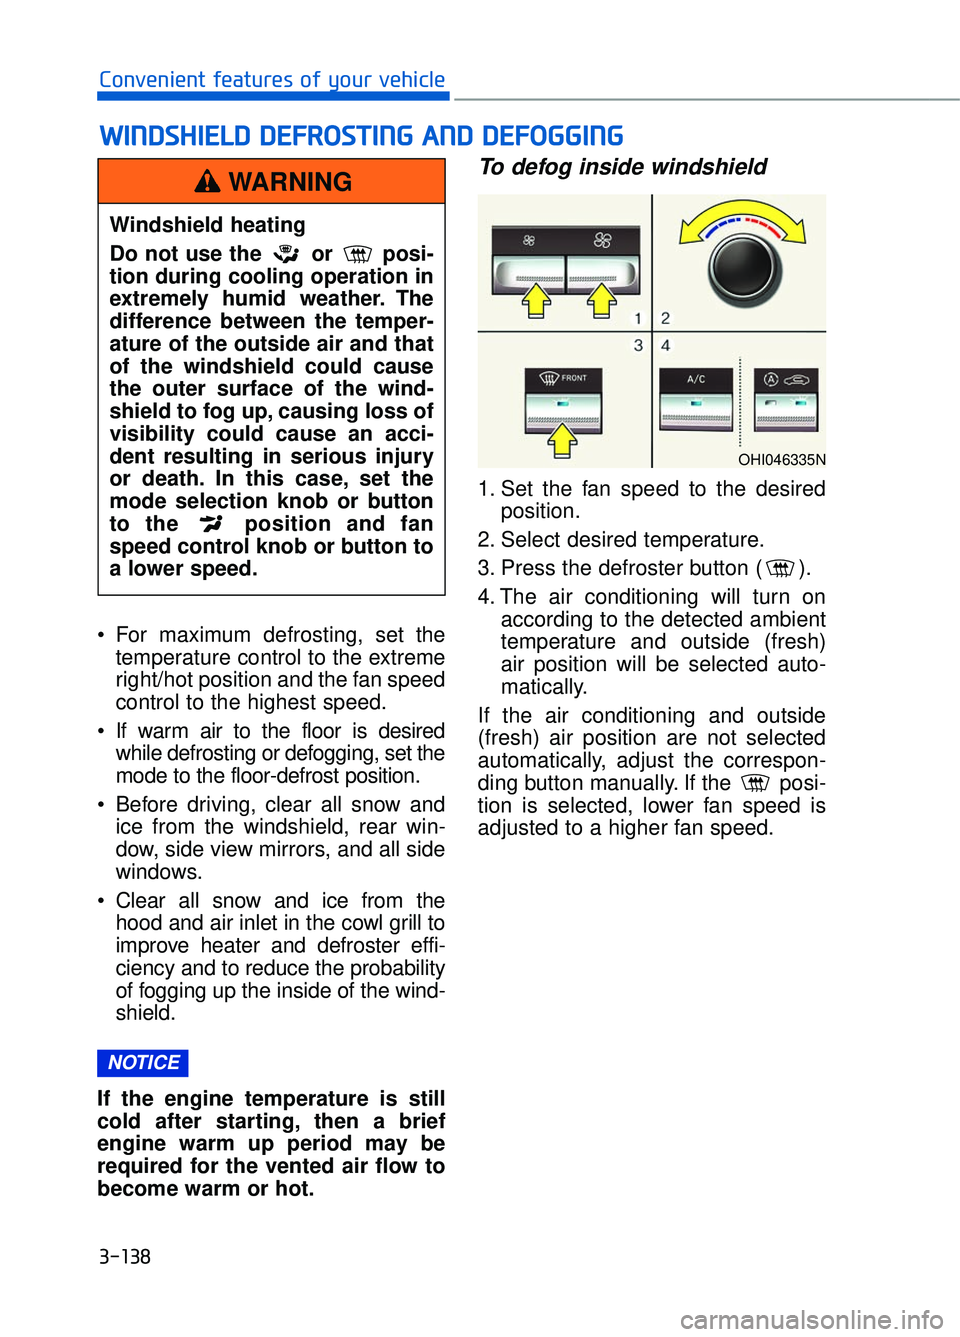
1. Set the fan speed to the desired position.
2. Select desired temperature.
3. Press the defroster button ( ).
4. The air conditioning will turn on according to the detected ambient
temperature and outside (fresh)
air position will be selected auto-
matically.
If the air conditioning and outside
(fresh) air position are not selected
automatically, adjust the correspon-
ding button manually. If the posi-
tion is selected, lower fan speed is
adjusted to a higher fan speed.
NOTICE
Windshield heating
Do not use the or posi-
tion during cooling operation in
extremely humid weather. The
difference between the temper-
ature of the outside air and that
of the windshield could cause
the outer surface of the wind-
shield to fog up, causing loss of
visibility could cause an acci-
dent resulting in serious injury
or death. In this case, set the
mode selection knob or button
to the position and fan
speed control knob or button to
a lower speed.
WARNING
OHI046335N
Page 246 of 524

3-144
Convenient features of your vehicle
Glove Box
The glove box can be locked and
unlocked with the mechanical key
(1).
To open:
Pull the lever (2).
Make sure the glove box is closed
while driving.
Sunglass Holder
To open:
Push and release the cover and the
holder will slowly open. Place your
sunglasses in the compartment door
with the lenses facing out.
To close:
Push back into position.
Make sure the sunglass holder is
closed while driving.
OHI046435
ALWAYS close the glove box
after use.
An open glove box can cause
serious injury to the passenger
in an accident, even if the pas-
senger is wearing a seat belt.
WARNING
OHI046436
Do not keep objects exceptsunglasses inside the sun-
glass holder. Such objects can
be thrown from the holder in
the event of a sudden stop or
an accident, possibly injuring
the passengers in the vehicle.
Do not open the sunglass holder while the vehicle is
moving. The rear view mirror of
the vehicle can be blocked by
an open sunglass holder.
Do not put the glasses forcibly into a sunglass holder. It may
cause personal injury if you try
to open it forcibly when the
glasses are jammed.
WARNING
Page 250 of 524

3-148
Convenient features of your vehicle
Sunvisor
To use a sunvisor, pull it downward.
To use a sunvisor for a side window,
pull it downward, unsnap it from the
bracket (1) and swing it to the side (2).
To use the vanity mirror, pull down the
sunvisor and slide the mirror cover (3).
Adjust the sunvisor forward or back-
ward (4) as needed. Use the ticket
holder (5) to hold tickets (if equipped).
Close the vanity mirror cover
securely and return the sunvisor
to its original position after use.
Do not put several tickets in theticket holder at one time. This
could cause damage to the tick-
et holder.
Avoid putting a plastic card such as a credit card in the tick-
et holder located in the outside
of the sunvisor. This could cause
damage to the plastic card.
Rear Vanity Mirror
Press the cover to open the rear van-
ity mirror. Push up the cover to close
the rear vanity mirror.
Make sure to close the rear vanity
mirror cover after use. If not, the
rear vanity mirror lamp remains
ON, possibly draining the battery
or damaging the rear vanity mirror.
NOTICE
NOTICE
NOTICE
OHI046444
For your safety, do not block your
view when using the sunvisor.
WARNING
OHI046430
Page 266 of 524

Before Entering the Vehicle
• Be sure all windows, outside mir-ror(s), and outside lights are clean
and unobstructed.
Remove frost, snow, or ice.
Visually check the tires for uneven wear and damage.
Check under the vehicle for any sign of leaks.
Be sure there are no obstacles behind you if you intend to back up.
Before Starting
Make sure the hood, the trunk, andthe doors are securely closed and
locked.
Adjust the position of the seat and steering wheel.
Adjust the inside and outside rearview mirrors.
Verify all the lights work.
Fasten your seatbelt. Check that all passengers have fastened their
seatbelts.
Check the gauges and indicators in the instrument panel and the mes-
sages on the instrument display
when the ignition switch is in the
ON position.
Check that any items you are car- rying are stored properly or fas-
tened down securely.
B BE
EF
FO
O R
RE
E
D
D R
RI
IV
V I
IN
N G
G
5-5
05
CALIFORNIA PROPOSITION 65
WARNING
Engine exhaust and a wide vari-
ety of automobile components
including components found in
the interior furnishings in a vehi-
cle, contain or emit harmful
chemicals known to the State of
California to cause cancer and
birth defects and reproductive
harm. In addition, certain fluids
contained in vehicles and certain
products of components contain
or emit chemicals known to the
State of California to cause can-
cer and birth defects or other
reproductive harm.
WARNING
Page 310 of 524

5-49
05
The Blind Spot Detection System
(BSD) uses radar sensors in the rear
bumper to monitor and warn the driv-
er of an approaching vehicle in the
driver's blind spot area.
The system monitors the rear area of
the vehicle and provides information
to the driver with an audible alert and
an indicator on the outer side view
mirrors.
(1) BSD (Blind Spot Detection)The blind spot detection range
varies relative to vehicle speed.
Note that if your vehicle is travel-
ing much faster than the vehicles
around you, the warning will not
occur.
(2) LCA (Lane Change Assist) The Lane Change Assist feature
will alert you when a vehicle is
approaching in an adjacent lane
at a high rate of speed. If the driv-
er activates the turn signal when
the system detects an oncoming
vehicle, the system sounds an
audible alert. (3) RCTA (Rear Cross Traffic Alert)
The Rear Cross Traffic Alert fea-
ture monitors approaching cross
traffic from the left and right side
of the vehicle when your vehicle is
in reverse. The feature will operate
when the vehicle is moving in
reverse below about 6 mph (10
km/h). If oncoming cross traffic is
detected a warning chime will
sound.
B BL
LI
IN
N D
D
S
S P
P O
O T
T
D
D E
ET
T E
EC
CT
T I
IO
O N
N
S
S Y
Y S
ST
T E
EM
M
(
( B
B S
SD
D )
)
(
( I
IF
F
E
E Q
Q U
UI
IP
P P
PE
ED
D )
)
OHI056206
Blind spot area
Closing at high speed
Always be aware of road con-
ditions while driving and be
alert for unexpected situa-
tions even though the Blind
Spot Detection System is
operating.
The Blind Spot Detection System (BSD) is a supplemen-
tal system to assist you. Do
not entirely rely on the sys-
tem. Always pay attention,
while driving, for your safety.
The Blind Spot Detection System (BSD) is not a substi-
tute for proper and safe driv-
ing. Always drive safely and
use caution when changing
lanes or backing up the vehi-
cle. The Blind Spot Detection
System (BSD) may not detect
every object alongside the
vehicle.
WARNING
Page 311 of 524

5-50
Driving your vehicle
Blind Spot Detection (BSD) /
Lane Change Assist (LCA)
Operating conditions
To operate:
Press the BSD switch with the
Engine Start/Stop button in the ON
position.
The indicator on the BSD switch will
illuminate.
To cancel:
Press the BSD switch again. The
indicator on the switch will go off.
Information
• If the Engine Start/Stop button ispressed OFF and then ON again, the
BSD system returns to the previous
state.
• When the system is turned on, the warning light will illuminate for 3
seconds on the outer side view mir-
ror. The system will activate when:
1. The system is on.
2. The vehicle speed is above about
20 mph (30 km/h).
3. An oncoming vehicle is detected in the blind spot area.
The initial warning alert time for the Lane Change Assist can be adjust-
ed. Go to the 'User Settings →
Driving Assist and select Lane
Change Assist' on the LCD display.
You may select between the two
stages you prefer.
- Normal/Late
First stage alert
If a vehicle is detected within the
boundary of the system, a warning
light will illuminate on the outer side
view mirror and the head-up display
(if equipped).
Once the detected vehicle is no
longer within the blind spot area, the
warning will turn off according to the
driving conditions of the vehicle.
i
OHI056063
OHI056064
■ Left side
■Right side