CAN GENESIS G90 2018 Owner's Manual
[x] Cancel search | Manufacturer: GENESIS, Model Year: 2018, Model line: G90, Model: GENESIS G90 2018Pages: 519, PDF Size: 19.52 MB
Page 460 of 519

7-58
Maintenance
Fuse/Relay Panel Description
Instrument panel fuse panel
Inside the fuse/relay box cover, you
can find the fuse/relay label describ-
ing fuse/relay name and capacity.
Information
Not all fuse panel descriptions in this
manual may be applicable to your
vehicle; the information is accurate at
the time of printing. When you inspect
the fuse box on your vehicle, refer to
the fuse box label.
i
OHI076032
OHI076033N
Page 464 of 519

7-62
Maintenance
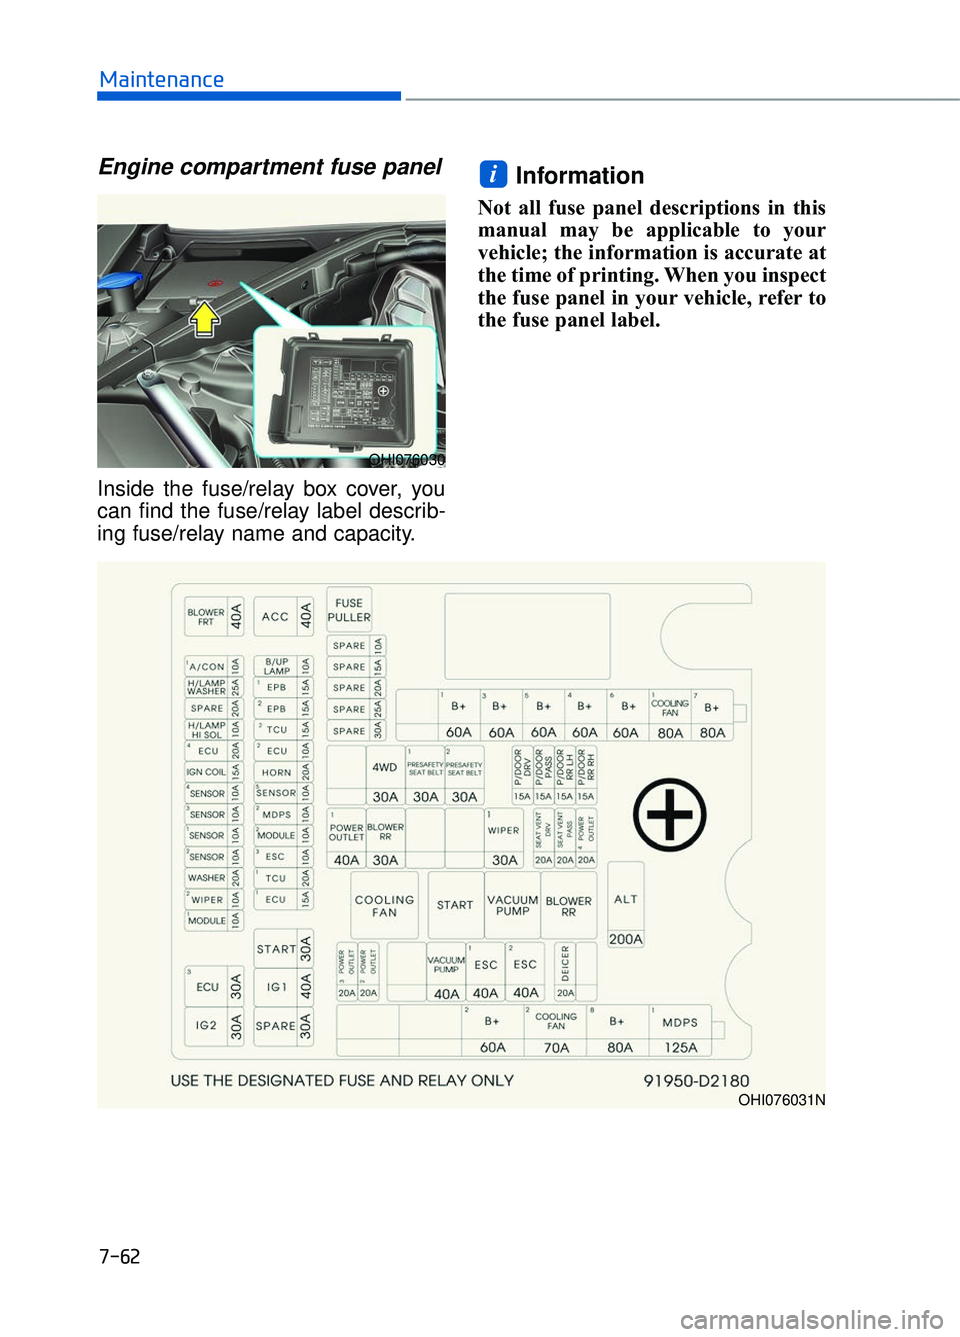
Engine compartment fuse panel
Inside the fuse/relay box cover, you
can find the fuse/relay label describ-
ing fuse/relay name and capacity.
Information
Not all fuse panel descriptions in this
manual may be applicable to your
vehicle; the information is accurate at
the time of printing. When you inspect
the fuse panel in your vehicle, refer to
the fuse panel label.
i
OHI076030
OHI076031N
Page 467 of 519
![GENESIS G90 2018 Owners Manual 7-65
07
Fuse name Fuse rating Circuit protected
SENSOR110A
[Lambda 3.3 T-GDI] Oil Controlvalve #1/#2/#3/#4(Intake/Exhaust), Purge Control
Solenoid Valve, Oil Pressure Solenoid
Valve, Canister Close Va GENESIS G90 2018 Owners Manual 7-65
07
Fuse name Fuse rating Circuit protected
SENSOR110A
[Lambda 3.3 T-GDI] Oil Controlvalve #1/#2/#3/#4(Intake/Exhaust), Purge Control
Solenoid Valve, Oil Pressure Solenoid
Valve, Canister Close Va](/img/46/35643/w960_35643-466.png)
7-65
07
Fuse name Fuse rating Circuit protected
SENSOR110A
[Lambda 3.3 T-GDI] Oil Controlvalve #1/#2/#3/#4(Intake/Exhaust), Purge Control
Solenoid Valve, Oil Pressure Solenoid
Valve, Canister Close Valve
[Tau 5.0 GDI] Oil Controlvalve #1/#2/#3/#4 (Intake/ Exhaust), Purge Control Solenoid Valve,
Canister Close Valve
SENSOR310A[Lambda 3.3 T-GDI] Electronic Thermostat, Rear Sub Junction Block (Fuel Pump Relay)
[Tau 5.0 GDI] Rear Sub Junction Block (Fuel Pump Relay)
SENSOR410A
[Lambda 3.3 T-GDI] E/R Junction Block (RLY. 1 - Cooling Fan Relay)
[Tau 5.0 GDI] E/R Junction Block (RLY. 1 - Cooling Fan Relay), Camshaft Position Sensor #1/#2/#3/#4
(Intake/ Exhaust)
IGN COIL15A[Lambda 3.3 T-GDI] Ignition Coil #1/#2/#3/#4/#5/#6
[Tau 5.0 GDI] Ignition Coil #1/#2/#3/#4/#5/#6/#7/#8
ECU420AECM
H/LAMPHI SOL10AHead Lamp (HI SOL) Relay
H/LAMP
WASHER25AHead Lamp Washer Relay
A/CON110AA/C Control Module
FRT
BLOWER40AFront Blower Relay
IGN140AIG1 Relay
START30AE/R Junction Block (RLY. 2 - Start Relay)
ECU115AECM
TCU120ATCM
ESC310AESC Control Module
Page 469 of 519

7-67
07
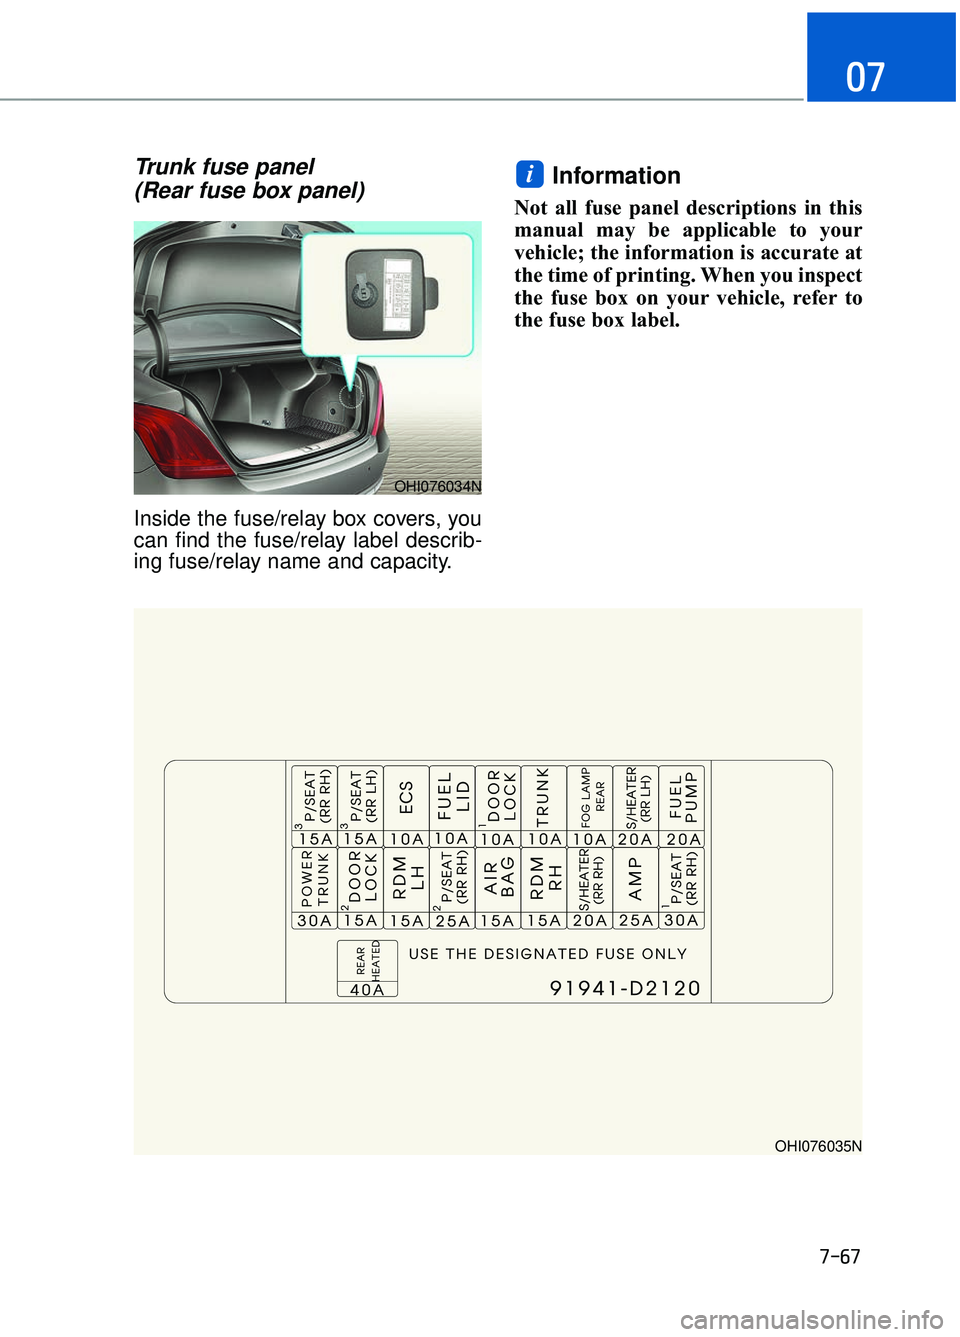
Trunk fuse panel (Rear fuse box panel)
Inside the fuse/relay box covers, you
can find the fuse/relay label describ-
ing fuse/relay name and capacity.
Information
Not all fuse panel descriptions in this
manual may be applicable to your
vehicle; the information is accurate at
the time of printing. When you inspect
the fuse box on your vehicle, refer to
the fuse box label.
i
OHI076034N
OHI076035N
Page 471 of 519

7-69
07
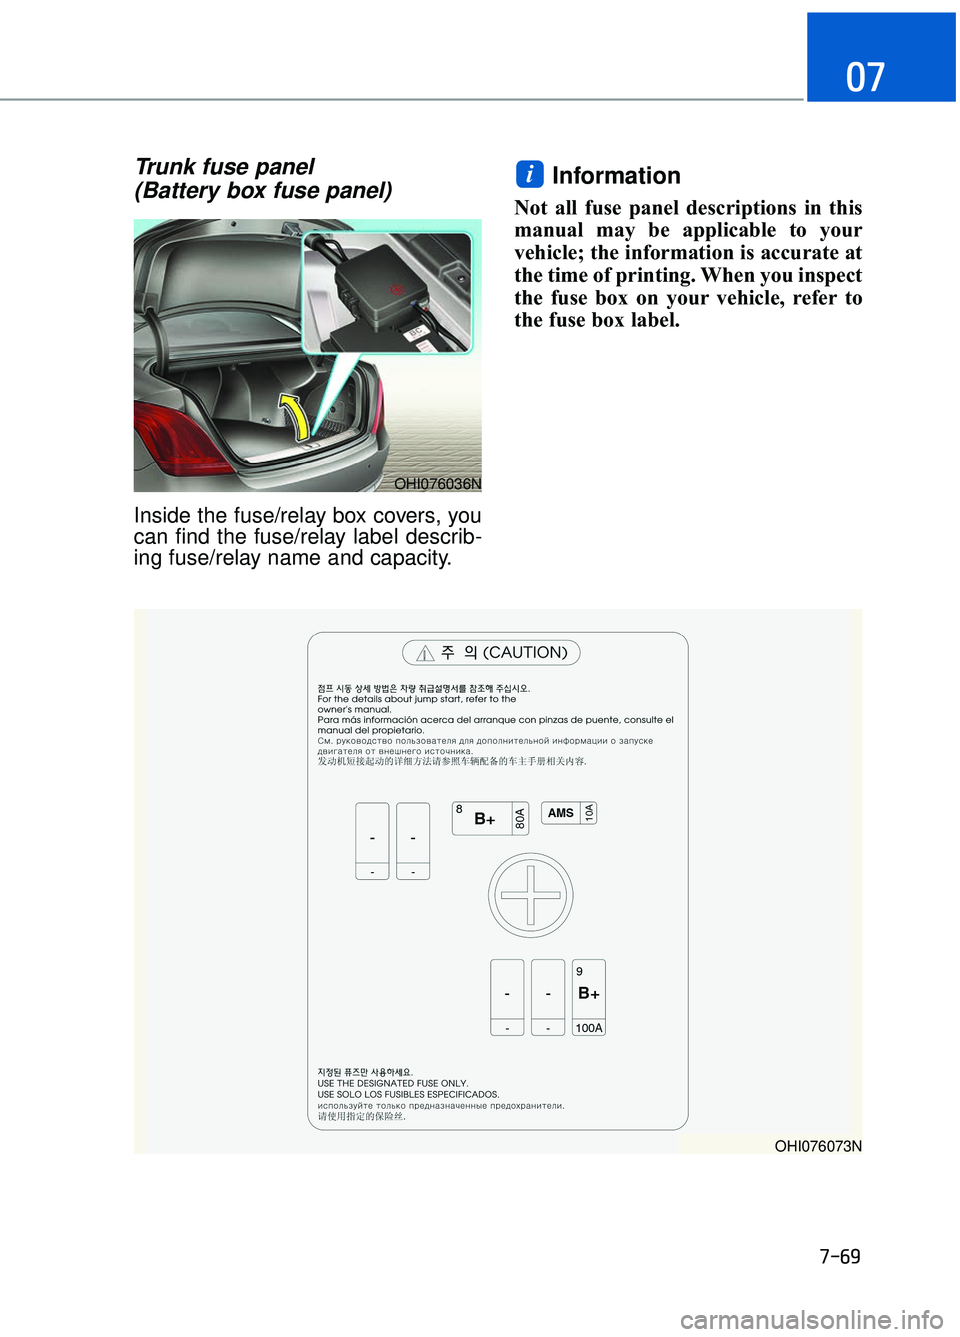
Trunk fuse panel (Battery box fuse panel)
Inside the fuse/relay box covers, you
can find the fuse/relay label describ-
ing fuse/relay name and capacity.
Information
Not all fuse panel descriptions in this
manual may be applicable to your
vehicle; the information is accurate at
the time of printing. When you inspect
the fuse box on your vehicle, refer to
the fuse box label.
i
OHI076036N
OHI076073N
Page 473 of 519

7-71
07
Consult an authorized HYUNDAI
dealer to replace most vehicle light
bulbs. It is difficult to replace vehicle
light bulbs because other parts of the
vehicle must be removed before you
can get to the bulb. This is especially
true for removing the headlamp
assembly to get to the bulb(s).
Removing/installing the headlamp
assembly can result in damage to
the vehicle.
Information
After heavy driving, rain or washing,
headlamp and trunk lenses could
appear frosty. This condition is caused
by the temperature difference between
the lamp inside and the outside tem-
perature. This is similar to the con-
densation on your windows inside
your vehicle during the rain and does-
n't indicate a problem with your vehi-
cle. If the water leaks into the lamp
bulb circuitry, have your vehicle
checked by an authorized retailer of
Genesis Branded products.
Headlamp, Parking Lamp, Turn
Signal Lamp, Daytime Running
Light and Side Marker
Replacement
Type A – HID headlamp
(1) Headlamp (Low/High)
(2) Parking lamp
(3) Turn signal lamp/ Daytime running light
(4) Side marker
Headlamp (Low, High)
If the light bulb does not operate,
have the vehicle checked by an
authorized retailer of Genesis
Branded products.
i
L L I
IG
G H
H T
T
B
B U
U L
LB
B S
S
Prior to replacing a lamp,
depress the foot brake, move
the shift lever into P (Park)
apply the parking brake, place
the Engine Start/Stop button
to the OFF position, and take
the key with you when leaving
the vehicle to avoid sudden
movement of the vehicle and
to prevent possible electric
shock.
Be aware the bulbs may be hot and may burn your fin-
gers.
WARNING
OHI076038N
Do not attempt to replace or
inspect the low/high beam
(XENON bulb) due to electric
shock danger. If the low/high
beam (XENON bulb) is not work-
ing, have your vehicle checked
by an authorized retailer of
Genesis Branded products.
WARNING
Page 474 of 519

7-72
Maintenance
Information
If your vehicle is equipped with High
Intensity Discharge (HID) headlamps,
these headlamps contain mercury. So
if you need to have your vehicle dis-
posed, you should remove the HID
headlamps before disposal. The
removed HID headlamps should be
recycled, re-used or disposed as haz-
ardous waste.
Information
HID lamps have superior perform-
ance vs. halogen bulbs.
HID lamps are estimated by the man-
ufacturer to last twice as long or
longer than halogen bulbs depending
on their frequency of use. They will
probably require replacement at some
point in the life of the vehicle. Cycling
the headlamps on and off more than
typical use will shorten HID lamps
life. HID lamps do not fail in the same
manner as halogen incandescent
lamps. If a headlamp goes out after a
period of operation but will immedi-
ately relight when the headlamp
switch is cycled it is likely the HID
lamp needs to be replaced. HID light-
ing components are more complex
than conventional halogen bulbs thus
have higher replacement cost.
Parking lamp/Daytime running
light/Side marker
Your vehicle is equipped with LED
lamps. LED lamps do not have
replaceable bulbs. If the LED lamp
does not operate, have the vehicle
checked by an authorized retailer of
Genesis Branded products.
Type B – LED headlamp
(1) Headlamp (Low)
(2) Headlamp (High)
(3) Parking lamp
(4) Turn signal/Daytime running light
(5) Side marker
Your vehicle is equipped with LED
lamps. LED lamps do not have
replaceable bulbs. If the LED lamp
does not operate, have the vehicle
checked by an authorized retailer of
Genesis Branded products.
i
i
OHI076039N
Page 477 of 519

7-75
07
Exterior Care
Exterior general caution
It is very important to follow the label
directions when using any chemical
cleaner or polish. Read all warning
and caution statements that appear
on the label.
High-pressure washing
When using high-pressure wash-ers, make sure to maintain suffi-
cient distance from the vehicle.
Insufficient clearance or excessive
pressure can lead to component
damage or water penetration.
Do not spray the camera, sensors or its surrounding area directly with
a high pressure washer. Shock
applied from high pressure water
may cause the device to not oper-
ate normally.
Do not bring the nozzle tip close to boots (rubber or plastic covers)or
connectors as they may be dam-
aged if they come into contact with
high pressure water.
Do not use any high-pressure noz- zles, which induce either one-direct
water stream or water swirling.
Finish maintenance
Washing
To help protect your vehicle’s finish
from rust and deterioration, wash it
thoroughly and frequently at least
once a month with lukewarm or cold
water.
If you use your vehicle for off-road
driving, you should wash it after each
off-road trip. Pay special attention to
the removal of any accumulation of
salt, dirt, mud, and other foreign
materials. Make sure the drain holes
in the lower edges of the doors and
rocker panels are kept clear and
clean.
Insects, tar, tree sap, bird droppings,
industrial pollution and similar
deposits can damage your vehicle’s
finish if not removed immediately.
Even prompt washing with plain
water may not completely remove all
these deposits. A mild soap, safe for
use on painted surfaces, should be
used.
After washing, rinse the vehicle thor-
oughly with lukewarm or cold water.
Do not allow soap to dry on the finish.
A AP
PP
PE
EA
A R
RA
A N
N C
CE
E
C
C A
A R
RE
E
After washing the vehicle, test
the brakes while driving slowly
to see if they have been affected
by water before getting on the
road. If braking performance is
impaired, dry the brakes by
applying them lightly while
maintaining a slow forward
speed.
WARNING
Page 479 of 519

7-77
07
Finish damage repair
Deep scratches or stone chips in the
painted surface must be repaired
promptly. Exposed metal will quickly
rust and may develop into a major
repair expense.
If your vehicle is damaged and
requires any metal repair or
replacement, be sure the body
shop applies anti-corrosion mate-
rials to the parts repaired or
replaced.
Bright-metal maintenance
To remove road tar and insects,use a tar remover, not a scraper or
other sharp object.
To protect the surfaces of bright- metal parts from corrosion, apply a
coating of wax or chrome preser-
vative and rub to a high luster.
During winter weather or in coastal areas, cover the bright metal parts
with a heavier coating of wax or
preservative. If necessary, coat the
parts with non-corrosive petroleum
jelly or other protective compound.
Underbody maintenance
Corrosive materials used for ice and
snow removal and dust control may
collect on the underbody. If these
materials are not removed, acceler-
ated rusting can occur on underbody
parts such as the fuel lines, frame,
floor pan and exhaust system, even
though they have been treated with
rust protection.
Thoroughly flush the vehicle under-
body and wheel openings with luke-
warm or cold water once a month,
after off-road driving and at the end
of each winter. Pay special attention
to these areas because it is difficult
to see all the mud and dirt. It will do
more harm than good to wet down the
road grime without removing it. The
lower edges of doors, rocker panels,
and frame members have drain holes
that should not be allowed to clog with
dirt; trapped water in these areas can
cause rusting.
NOTICE
After washing the vehicle, test
the brakes while driving slowly
to see if they have been affected
by water. If braking performance
is impaired, dry the brakes by
applying them lightly while
maintaining a slow forward
speed.
WARNING
Page 480 of 519

7-78
Maintenance
Aluminum wheel maintenance
The aluminum wheels are coated
with a clear protective finish.
Do not use abrasive cleaner, pol-ishing compound, solvent, or
wire brushes on aluminum
wheels.
Clean the wheel when it has cooled.
Use only a mild soap or neutral detergent, and rinse thoroughly
with water. Also, clean the
wheels after driving on salted
roads.
Do not wash the wheels with high-speed car wash brushes.
Do not use cleaners containing acid or alkaline detergents.
Corrosion protection
Protecting your vehicle from corro-
sion
By using the most advanced design
and construction practices to combat
corrosion, Genesis Branded Vehicle
produces cars of the highest quality.
However, this is only part of the job.
To achieve the long-term corrosion
resistance your vehicle can deliver,
the owner’s cooperation and assis-
tance is also required.
Common causes of corrosion
The most common causes of corro-
sion on your vehicle are:
Road salt, dirt and moisture that isallowed to accumulate underneath
the vehicle.
Removal of paint or protective coatings by stones, gravel, abra-
sion or minor scrapes and dents
which leave unprotected metal
exposed to corrosion.
High-corrosion areas
If you live in an area where your vehi-
cle is regularly exposed to corrosive
materials, corrosion protection is
particularly important. Some of the
common causes of accelerated cor-
rosion are road salts, dust control
chemicals, ocean air and industrial
pollution.
NOTICE