service GENESIS G90 2021 User Guide
[x] Cancel search | Manufacturer: GENESIS, Model Year: 2021, Model line: G90, Model: GENESIS G90 2021Pages: 538, PDF Size: 13.02 MB
Page 415 of 538

6
6. What to Do in an Emergency
Hazard Warning Flasher ...............6-2
In Case of an Emergency While
Driving............................................6-2
If the Engine Stalls While Driving....6-2
If the Engine Stalls at a Crossroad
or Crossing ......................................6-2
If you Have a Flat Tire While
Driving..............................................6-3
If the Engine Will Not Start ..........6-3
If the Engine Doesn't Turn Over or
Turns Over Slowly............................6-3
If the Engine Turns Over Normally
but Doesn't Start .............................6-3
Jump Starting ...............................6-4
Push-Starting....................................6-6
If the Engine Overheats ................6-7
Tire Pressure Monitoring System
(TPMS) ...........................................6-9
Check Tire Pressure .........................6-9
Tire Pressure Monitoring System ..6-10
Low Tire Pressure Telltale ...............6-11
Low Tire Pressure LCD Display
with Position Indicator ...................6-11
TPMS Malfunction Indicator ..........6-12
Changing a Tire with TPMS............6-13
If You Have a Flat Tire .................6-15
Jack Label........................................6-21
Towing ..........................................6-22
Towing Service................................6-22
Removable Towing Hook ...............6-24
Emergency Towing.........................6-24
Page 418 of 538

6-4
What to do in an emergency
Jump starting can be dangerous if
done incorrectly. Follow the jump
starting procedure in this section to
avoid serious injury or damage to
your vehicle. If in doubt about how to
properly jump start your vehicle, we
strongly recommend that you have a
service technician or towing service
do it for you.
JUMP STARTING
To prevent SERIOUS INJURY or
DEATH to you or bystanders,
always follow these precautions
when working near or handling
the battery:
Always read and follow
instructions carefully
when handling a battery.
Wear eye protection
designed to protect the
eyes from acid splashes.
Keep all flames, sparks, or
smoking materials away
from the battery.
Hydrogen is always pres-
ent in battery cells, is
highly combustible, and
may explode if ignited.
Keep batteries out of
reach of children.
Batteries contain sulfu-
ric acid which is highly
corrosive. Do not allow
acid to contact your
eyes, skin or clothing.
If acid gets into your eyes, flush
your eyes with clean water for at
least 15 minutes and get imme-
diate medical attention. If acid
gets on your skin, thoroughly
wash the area. If you feel pain or
a burning sensation, get med-
ical attention immediately.
• When lifting a plastic-cased
battery, excessive pressure
on the case may cause battery
acid to leak. Lift with a battery
carrier or with your hands on
opposite corners.
• Do not attempt to jump start
your vehicle if your battery is
frozen.
• NEVER attempt to recharge
the battery when the vehicle's
battery cables are connected
to the battery.
• The electrical ignition system
works with high voltage.
NEVER touch these compo-
nents with the engine running
or when the Engine Start/Stop
button is in the ON position.
WARNING
Page 419 of 538

6-5
06
Information
An inappropriately disposed
battery can be harmful to the
environment and human
health. Dispose of the battery
according to your local law(s)
or regulations.
To prevent damage to your vehi-
cle:
• Only use a 12-volt power supply
(battery or jumper system) to
jump start your vehicle.
• Do not attempt to jump start
your vehicle by push-starting.
Jump starting procedure
Information
Your vehicle has a battery in the trunk
compartment, but when you jump
start your vehicle, use the jumper ter-
minal in the engine compartment.
1. Position the vehicles close enough
that the jumper cables will reach,
but do not allow the vehicles to
touch.
2. Avoid fans or any moving parts in
the engine compartment at all
times, even when the vehicles are
turned off.
3. Turn off all electrical devices such
as radios, lights, air conditioning,
etc. Put the vehicles in P (Park)
and set the parking brakes. Turn
both vehicles OFF.
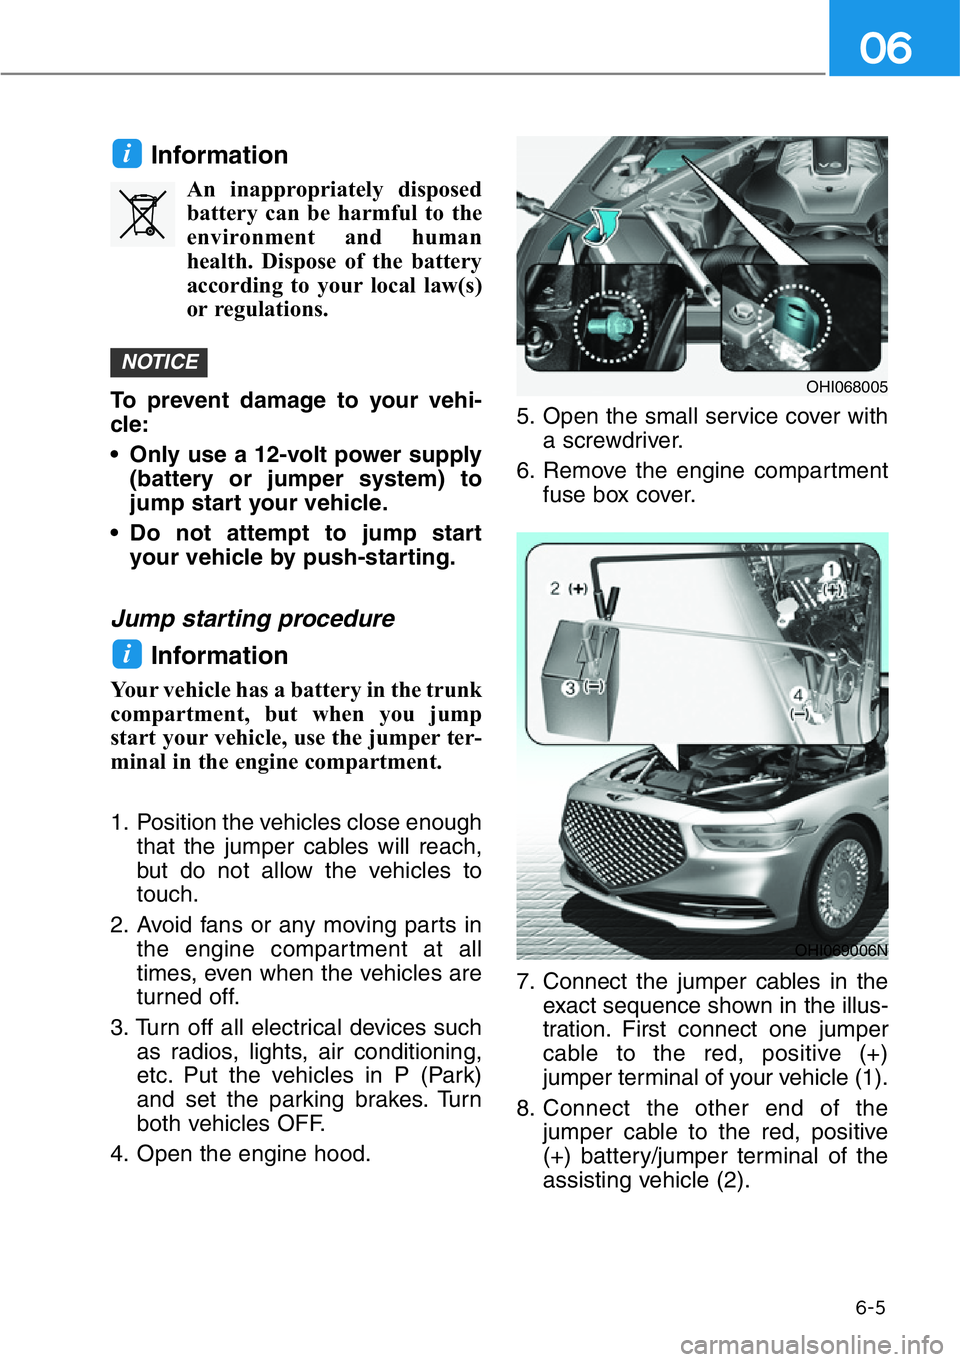
4. Open the engine hood.5. Open the small service cover with
a screwdriver.
6. Remove the engine compartment
fuse box cover.
7. Connect the jumper cables in the
exact sequence shown in the illus-
tration. First connect one jumper
cable to the red, positive (+)
jumper terminal of your vehicle (1).
8. Connect the other end of the
jumper cable to the red, positive
(+) battery/jumper terminal of the
assisting vehicle (2).
i
NOTICE
i
OHI069006N
OHI068005
Page 425 of 538

6-11
06
Information
If any of the below happens, have the
system checked by an authorized
retailer of Genesis Branded products.
1. The Low Tire Pressure Telltale/
TPMS Malfunction Indicator does
not illuminate for 3 seconds when
the Engine Start/Stop button is
pressed to the ON position or engine
is running.
2. The TPMS Malfunction Indicator
remains illuminated after blinking
for approximately 1 minute.
3. The Low Tire Pressure Position
Telltale remains illuminated.
Low Tire Pressure
Telltale
Low Tire
Pressure LCD
Display with
Position
Indicator
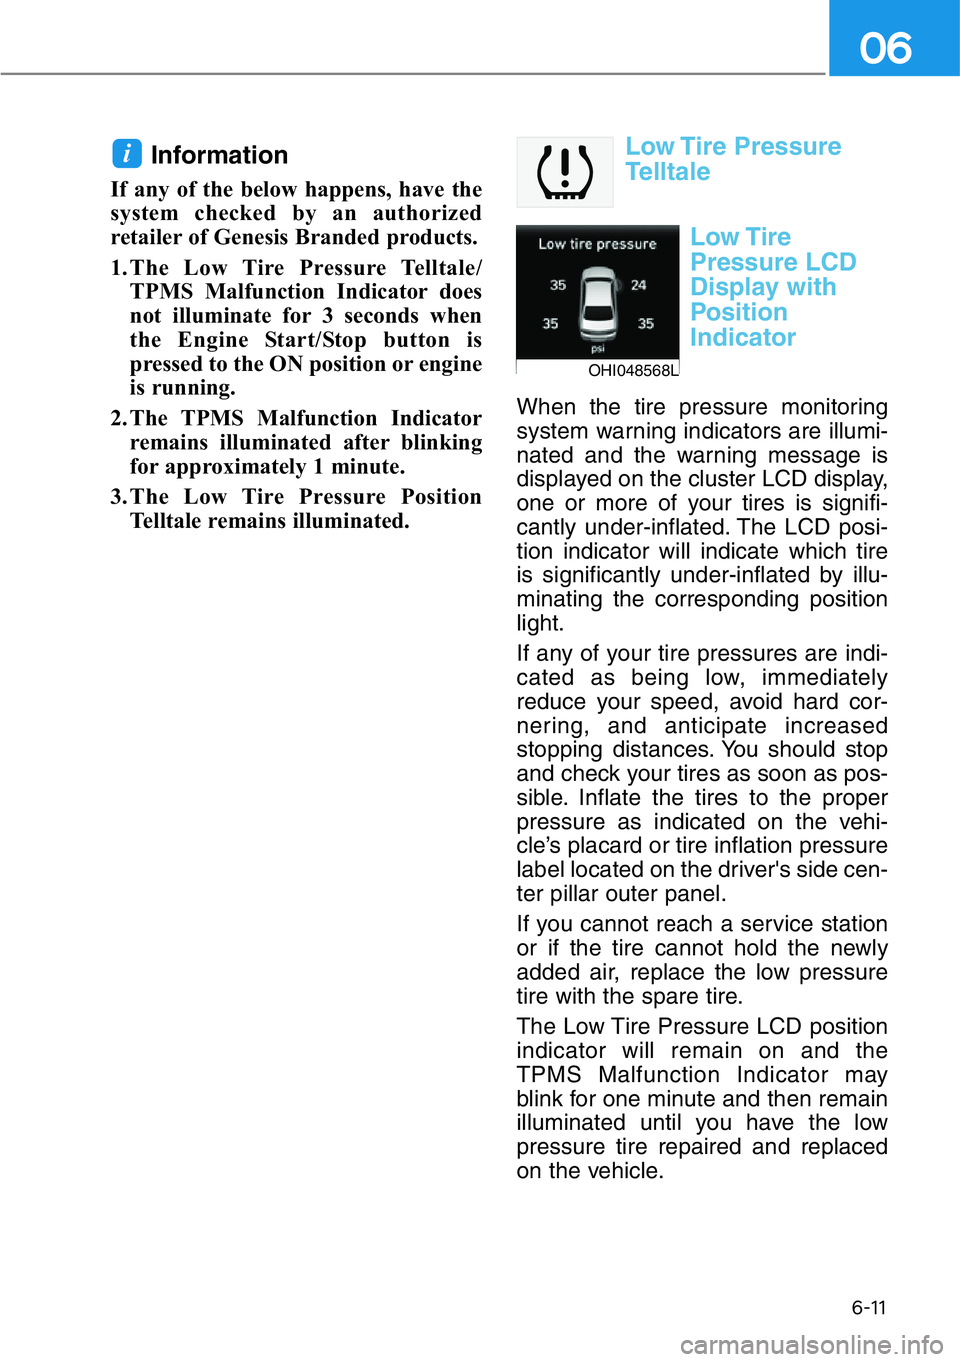
When the tire pressure monitoring
system warning indicators are illumi-
nated and the warning message is
displayed on the cluster LCD display,
one or more of your tires is signifi-
cantly under-inflated. The LCD posi-
tion indicator will indicate which tire
is significantly under-inflated by illu-
minating the corresponding position
light.
If any of your tire pressures are indi-
cated as being low, immediately
reduce your speed, avoid hard cor-
nering, and anticipate increased
stopping distances. You should stop
and check your tires as soon as pos-
sible. Inflate the tires to the proper
pressure as indicated on the vehi-
cle’s placard or tire inflation pressure
label located on the driver's side cen-
ter pillar outer panel.
If you cannot reach a service station
or if the tire cannot hold the newly
added air, replace the low pressure
tire with the spare tire.
The Low Tire Pressure LCD position
indicator will remain on and the
TPMS Malfunction Indicator may
blink for one minute and then remain
illuminated until you have the low
pressure tire repaired and replaced
on the vehicle.
i
OHI048568L
Page 430 of 538

6-16
What to do in an emergency
If it is hard to loosen the tire hold-
down wing bolt by hand, you can
loosen it easily using the jack handle.
1. Put the jack handle (1) inside of
the tire hold-down wing bolt.
2. Turn the tire hold-down wing bolt
counterclockwise with the jack
handle.
Changing tires
A vehicle can slip or roll off of a
jack causing serious injury or
death to you or those nearby.
Take the following safety pre-
cautions:
• Never place any portion of
your body under a vehicle that
is supported by a jack.
• NEVER attempt to change a
tire in the lane of traffic.
ALWAYS move the vehicle
completely off the road on
level, firm ground away from
traffic before trying to change
a tire. If you cannot find a
level, firm place off the road,
call a towing service for assis-
tance.
• Be sure to use the jack provid-
ed with the vehicle.
• ALWAYS place the jack on the
designated jacking positions
on the vehicle and NEVER on
the bumpers or any other part
of the vehicle for jacking sup-
port.
• Do not start or run the engine
while the vehicle is on the
jack.
• Do not allow anyone to remain
in the vehicle while it is on the
jack.
• Keep children away from the
road and the vehicle.
WARNING
OHI068029L
Page 432 of 538

6-18
What to do in an emergency
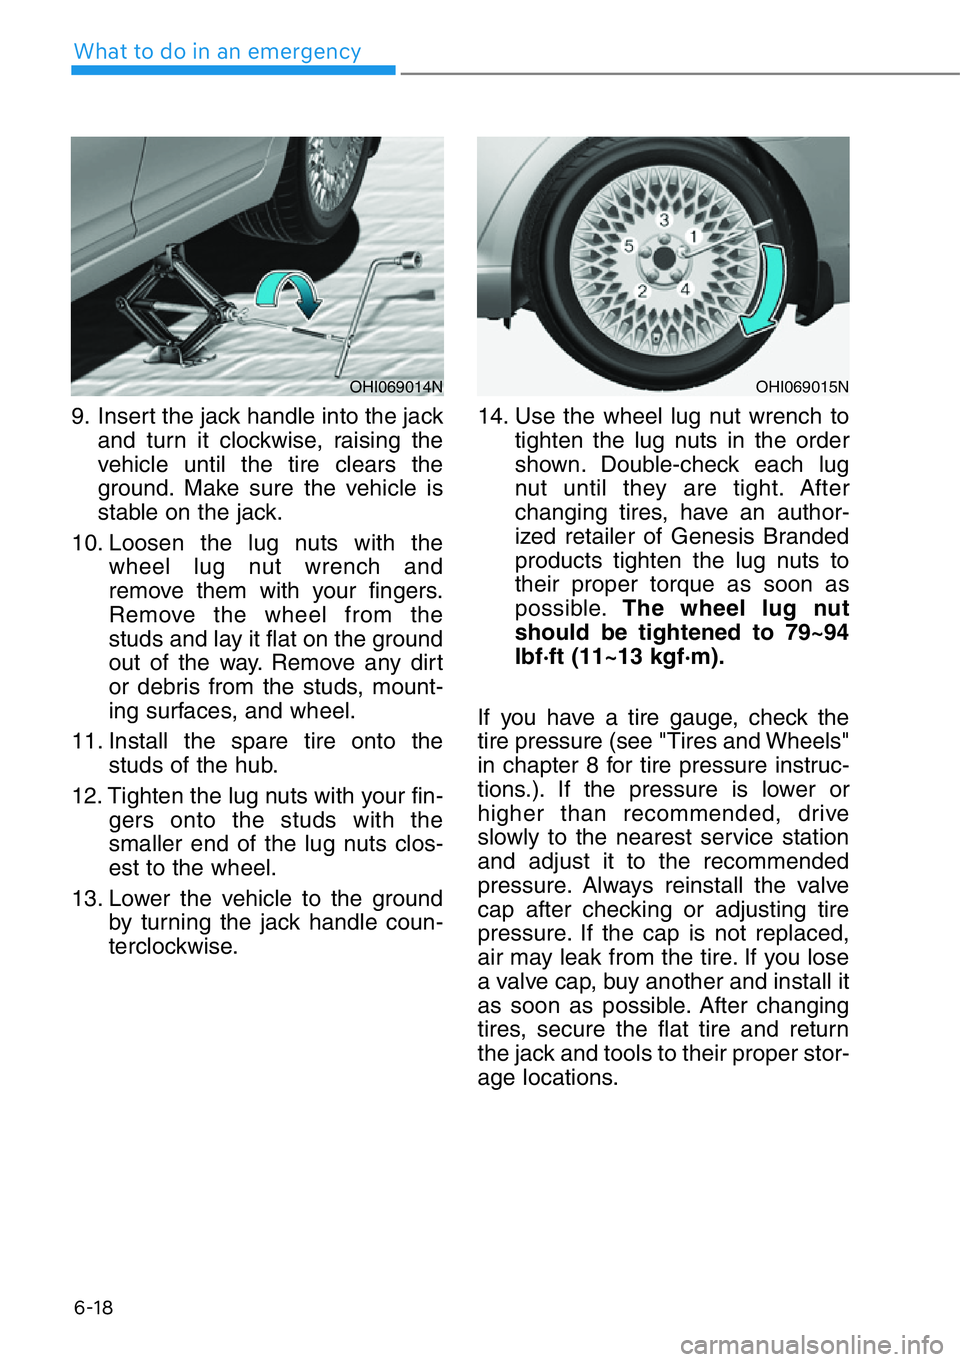
9. Insert the jack handle into the jack
and turn it clockwise, raising the
vehicle until the tire clears the
ground. Make sure the vehicle is
stable on the jack.
10. Loosen the lug nuts with the
wheel lug nut wrench and
remove them with your fingers.
Remove the wheel from the
studs and lay it flat on the ground
out of the way. Remove any dirt
or debris from the studs, mount-
ing surfaces, and wheel.
11. Install the spare tire onto the
studs of the hub.
12. Tighten the lug nuts with your fin-
gers onto the studs with the
smaller end of the lug nuts clos-
est to the wheel.
13. Lower the vehicle to the ground
by turning the jack handle coun-
terclockwise.14. Use the wheel lug nut wrench to
tighten the lug nuts in the order
shown. Double-check each lug
nut until they are tight. After
changing tires, have an author-
ized retailer of Genesis Branded
products tighten the lug nuts to
their proper torque as soon as
possible.The wheel lug nut
should be tightened to 79~94
lbf·ft (11~13 kgf·m).
If you have a tire gauge, check the
tire pressure (see "Tires and Wheels"
in chapter 8 for tire pressure instruc-
tions.). If the pressure is lower or
higher than recommended, drive
slowly to the nearest service station
and adjust it to the recommended
pressure. Always reinstall the valve
cap after checking or adjusting tire
pressure. If the cap is not replaced,
air may leak from the tire. If you lose
a valve cap, buy another and install it
as soon as possible. After changing
tires, secure the flat tire and return
the jack and tools to their proper stor-
age locations.
OHI069014NOHI069015N
Page 436 of 538

6-22
What to do in an emergency
Towing Service
If emergency towing is necessary,
we recommend having it done by an
authorized retailer of Genesis
Branded products or a commercial
tow-truck service. Proper lifting and
towing procedures are necessary to
prevent damage to the vehicle. The
use of wheel dollies or flatbed is rec-
ommended.
When towing the vehicle by flatbed
equipment, secure wheels by using
chocks and tie-down straps (or soft
belts).Do not place straps over body panels
or through the wheels.
Do not lift the vehicle by the tow
fitting or body and chassis parts.
Otherwise the vehicle may be
damaged.
On AWD vehicles, your vehicle must
be towed with a wheel lift and dollies
or flatbed equipment with all the
wheels off the ground.
AWD vehicle should never be
towed with the wheels on the
ground. This can cause serious
damage to the transmission or the
AWD system.
On 2WD vehicles, it is acceptable to
tow the vehicle with the front wheels
on the ground (without dollies) and
the rear wheels off the ground.
If any of the loaded wheels or sus-
pension components are damaged
or the vehicle is being towed with the
rear wheels on the ground, use a
towing dolly under the rear wheels.
When being towed by a commercial
tow truck and wheel dollies are not
used, the rear of the vehicle should
always be lifted, not the front.
NOTICE
NOTICE
TOWING
OHI068016Dolly
Dolly
A
B
C
OHI069031N
Page 438 of 538

6-24
What to do in an emergency
Removable Towing Hook
1. Open the tailgate, and remove the
towing hook from the tool case.
2. Remove the hole cover pressing
the lower part of the cover on the
front or rear bumper.
3. Install the towing hook by turning it
clockwise into the hole until it is
fully secured.
4. Remove the towing hook and
install the cover after use.
Emergency Towing
If towing is necessary, we recommend
you have it done by an authorized
retailer of Genesis Branded products
or a commercial tow truck service.
If a towing service is not available in
an emergency, your vehicle may be
temporarily towed using a cable or
chain secured to the emergency tow-
ing hook at the front (or rear) of the
vehicle.
Use extreme caution when towing
the vehicle with a cable or chain. A
driver must be in the vehicle to steer
it and operate the brakes.
Towing in this manner may be done
only on hard-surfaced roads for a
short distance and at low speeds.
Also, the wheels, axles, power train,
steering and brakes must all be in
good condition.
OHI069020N
■ Front
OHI068021
■ Rear
OHI069022N
■ Front
OHI068023
■ Rear
Page 441 of 538

7
7. Maintenance
Engine Compartment ....................7-3
Maintenance Services ..................7-5
Owner's Responsibility ....................7-5
Owner Maintenance Precautions ....7-5
Owner Maintenance......................7-6
Owner Maintenance Schedule ........7-7
Scheduled Maintenance Service ..7-8
Normal Maintenance Schedule
(5.0 GDI) ..........................................7-9
Maintenance Under Severe Usage
Conditions (5.0 GDI) ......................7-12
Normal Maintenance Schedule
(3.3 Turbo-GDI) ..............................7-14
Maintenance Under Severe Usage
Conditions (3.3 Turbo-GDI) ..........7-17
Explanation of Scheduled
Maintenance Items ......................7-19
Engine Oil ....................................7-22
Checking the Engine Oil Level ......7-22
Checking the Engine Oil and Filter ..7-23
Engine Coolant ............................7-24
Checking the Engine Coolant
Level................................................7-24
Changing Engine Coolant ..............7-26
Brake Fluid....................................7-27
Checking the Brake Fluid Level......7-27
Washer Fluid ................................7-28
Checking the Washer Fluid Level ..7-28
Air Cleaner ..................................7-29
Filter Replacement ........................7-29
Cabin Air Filter ............................7-30
Filter Inspection..............................7-30
Wiper Blades ................................7-31
Blade Inspection ..............................7-31
Blade Replacement ........................7-31
Battery ..........................................7-33
Battery Usage Recommendations..7-34
Battery Replacement ....................7-34
Battery Recharging ........................7-35
Reset features ................................7-36
Tires and Wheels ........................7-37
Tire Care ..........................................7-37
Recommended Cold Tire Inflation
Pressures ........................................7-38
Check Tire Inflation Pressure ........7-39
Tire Rotation ..................................7-39
Wheel Alignment and Tire
Balance ..........................................7-40
Tire Replacement ............................7-41
Wheel Replacement ......................7-42
Tire Traction ....................................7-42
Tire Maintenance............................7-42
Tire Sidewall Labeling ....................7-42
Tire Terminology and Definitions ..7-46
All Season Tires ..............................7-50
Summer Tires ................................7-50
Snow Tires ......................................7-50
Radial-Ply Tires ..............................7-50
Low Aspect Ratio Tires ..................7-51
Page 445 of 538

7-5
07
You should exercise the utmost care
to prevent damage to your vehicle
and injury to yourself whenever per-
forming any maintenance or inspec-
tion procedures.
We recommend you have your vehi-
cle maintained and repaired by an
authorized retailer of Genesis
Branded products. An authorized
retailer of Genesis Branded products
meets Genesis Branded Vehicle's
high service quality standards and
receives technical support from
Genesis Branded Vehicle in order to
provide you with a high level of serv-
ice satisfaction.
Owner's Responsibility
Maintenance service and record
retention are the owner's responsibil-
ity.
You should retain documents that
show proper maintenance has been
performed on your vehicle in accor-
dance with the scheduled mainte-
nance service charts shown on the
following pages. You need this infor-
mation to establish your compliance
with the servicing and maintenance
requirements of your vehicle war-
ranties.
Detailed warranty information is pro-
vided in your Owner's Handbook &
Warranty Information booklet.
Repairs and adjustments required as
a result of improper maintenance or
a lack of required maintenance are
not covered.
Owner Maintenance
Precautions
Inadequate, incomplete or insuffi-
cient servicing may result in opera-
tional problems with your vehicle that
could lead to vehicle damage, an
accident, or personal injury. This
chapter provides instructions only for
the maintenance items that are easy
to perform. Several procedures can
be done only by an authorized retail-
er of Genesis Branded products with
special tools.
Your vehicle should not be modified
in any way. Such modifications may
adversely affect the performance,
safety or durability of your vehicle
and may, in addition, violate condi-
tions of the limited warranties cover-
ing the vehicle.
Certain modifications may also be in
violation of regulations established by
the U.S. Department of Transportation
and other federal or state agencies.
Improper owner maintenance dur-
ing the warranty period may affect
warranty coverage.
For details, read the separate
Owner's Handbook & Warranty
Information booklet provided with
the vehicle.
If you're unsure about any service
or maintenance procedure, have it
done by an authorized retailer of
Genesis Branded products.
NOTICE
MAINTENANCE SERVICES