lights GENESIS G90 2021 Owner's Guide
[x] Cancel search | Manufacturer: GENESIS, Model Year: 2021, Model line: G90, Model: GENESIS G90 2021Pages: 538, PDF Size: 13.02 MB
Page 191 of 538
3-90
Convenient features of your vehicle
High Beam Assist (HBA)
(if equipped)
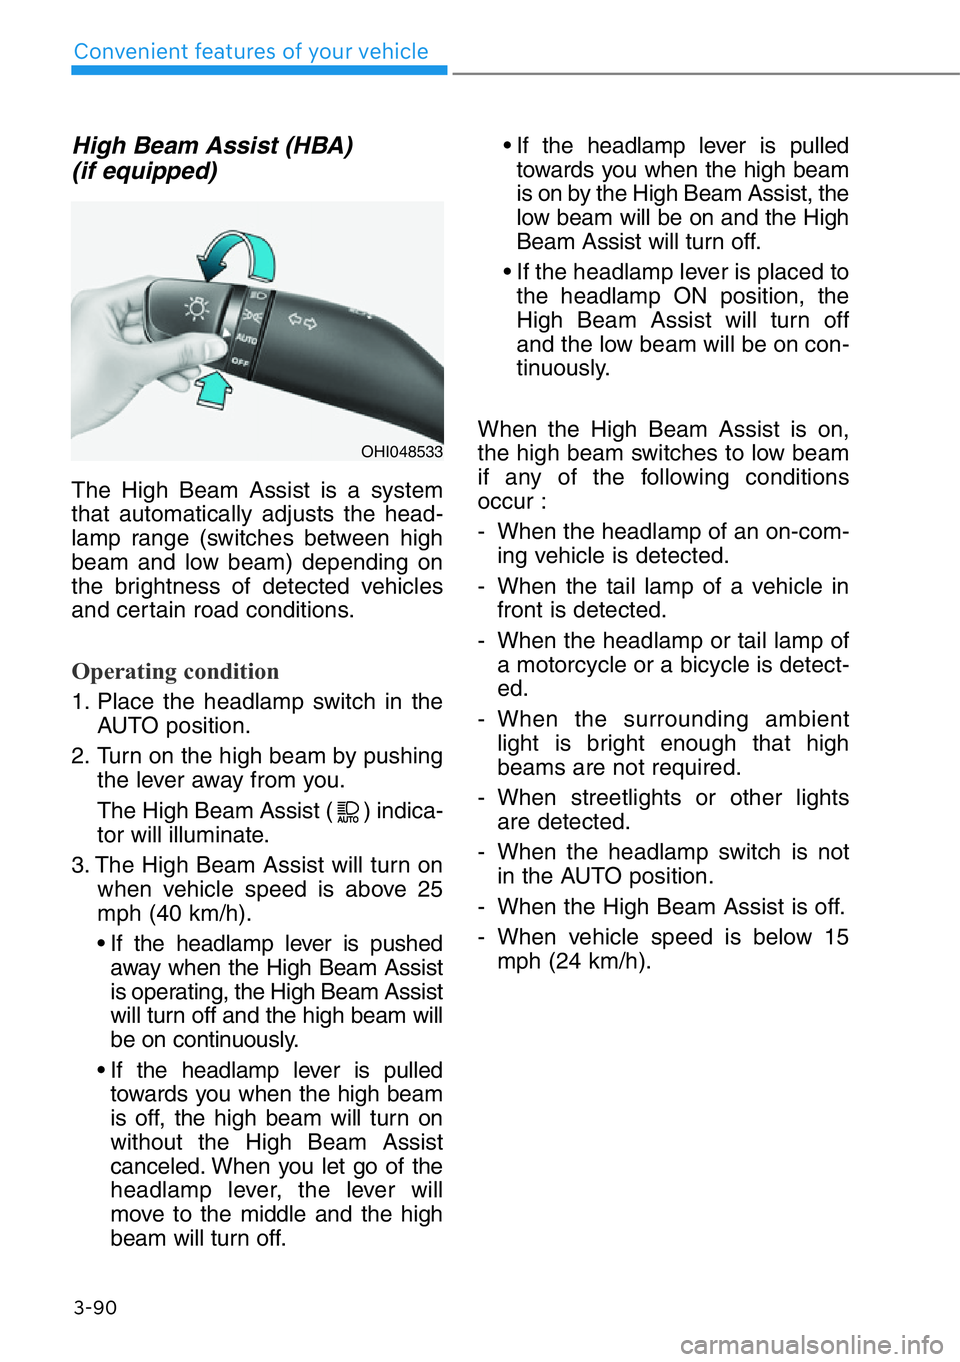
The High Beam Assist is a system
that automatically adjusts the head-
lamp range (switches between high
beam and low beam) depending on
the brightness of detected vehicles
and certain road conditions.
Operating condition
1. Place the headlamp switch in the
AUTO position.
2. Turn on the high beam by pushing
the lever away from you.
The High Beam Assist ( ) indica-
tor will illuminate.
3. The High Beam Assist will turn on
when vehicle speed is above 25
mph (40 km/h).
• If the headlamp lever is pushed
away when the High Beam Assist
is operating, the High Beam Assist
will turn off and the high beam will
be on continuously.
• If the headlamp lever is pulled
towards you when the high beam
is off, the high beam will turn on
without the High Beam Assist
canceled. When you let go of the
headlamp lever, the lever will
move to the middle and the high
beam will turn off.• If the headlamp lever is pulled
towards you when the high beam
is on by the High Beam Assist, the
low beam will be on and the High
Beam Assist will turn off.
• If the headlamp lever is placed to
the headlamp ON position, the
High Beam Assist will turn off
and the low beam will be on con-
tinuously.
When the High Beam Assist is on,
the high beam switches to low beam
if any of the following conditions
occur :
- When the headlamp of an on-com-
ing vehicle is detected.
- When the tail lamp of a vehicle in
front is detected.
- When the headlamp or tail lamp of
a motorcycle or a bicycle is detect-
ed.
- When the surrounding ambient
light is bright enough that high
beams are not required.
- When streetlights or other lights
are detected.
- When the headlamp switch is not
in the AUTO position.
- When the High Beam Assist is off.
- When vehicle speed is below 15
mph (24 km/h).
OHI048533
Page 194 of 538
3-93
03
Turn signals and lane change
signals
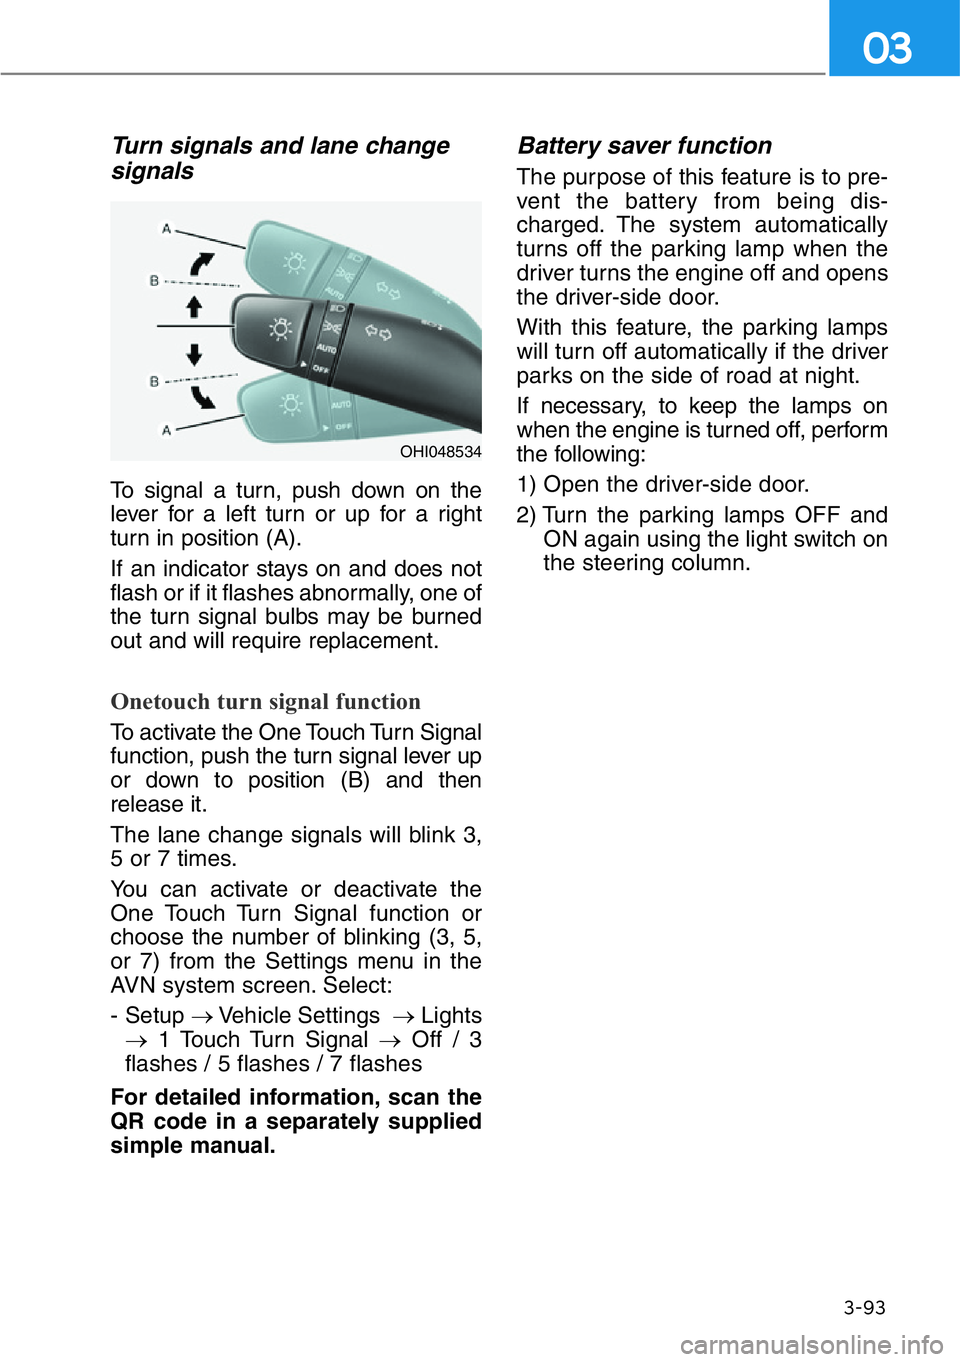
To signal a turn, push down on the
lever for a left turn or up for a right
turn in position (A).
If an indicator stays on and does not
flash or if it flashes abnormally, one of
the turn signal bulbs may be burned
out and will require replacement.
Onetouch turn signal function
To activate the One Touch Turn Signal
function, push the turn signal lever up
or down to position (B) and then
release it.
The lane change signals will blink 3,
5 or 7 times.
You can activate or deactivate the
One Touch Turn Signal function or
choose the number of blinking (3, 5,
or 7) from the Settings menu in the
AVN system screen. Select:
- Setup →Vehicle Settings →Lights
→1 Touch Turn Signal →Off / 3
flashes / 5 flashes / 7 flashes
For detailed information, scan the
QR code in a separately supplied
simple manual.
Battery saver function
The purpose of this feature is to pre-
vent the battery from being dis-
charged. The system automatically
turns off the parking lamp when the
driver turns the engine off and opens
the driver-side door.
With this feature, the parking lamps
will turn off automatically if the driver
parks on the side of road at night.
If necessary, to keep the lamps on
when the engine is turned off, perform
the following:
1) Open the driver-side door.
2) Turn the parking lamps OFF and
ON again using the light switch on
the steering column.
OHI048534
Page 195 of 538
3-94
Convenient features of your vehicle
Headlamp delay function
If the Engine Start/Stop button is
placed in the ACC position or the
OFF position with the headlamps
ON, the headlamps (and/or parking
lamps) remain on for about 5 min-
utes. However, if the driver’s door is
opened and closed, the headlights
are turned off after 15 seconds. Also,
with the engine off if the driver's door
is opened and closed, the headlamps
(and/or parking lamps) are turned off
after 15 seconds.
The headlamps (and/or parking
lamps) can be turned off by pressing
the lock button on the smart key
twice or turning the light switch to the
OFF or AUTO position.
You can activate or deactivate the
Headlamp Delay function from the
Settings menu in the AVN system
screen. Select:
- Setup →Vehicle Settings →Lights
→Headlight Delay
For detailed information, scan the
QR code in a separately supplied
simple manual.
If the driver exits the vehicle
through another door besides the
driver door, the battery saver func-
tion does not operate and the
headlamp delay function does not
turn OFF automatically. This may
cause the battery to discharge. To
avoid battery discharge, turn OFF
the headlamps manually from the
headlamp switch before exiting the
vehicle
AFS (Adaptive Front-Lighting
System) (if equipped)
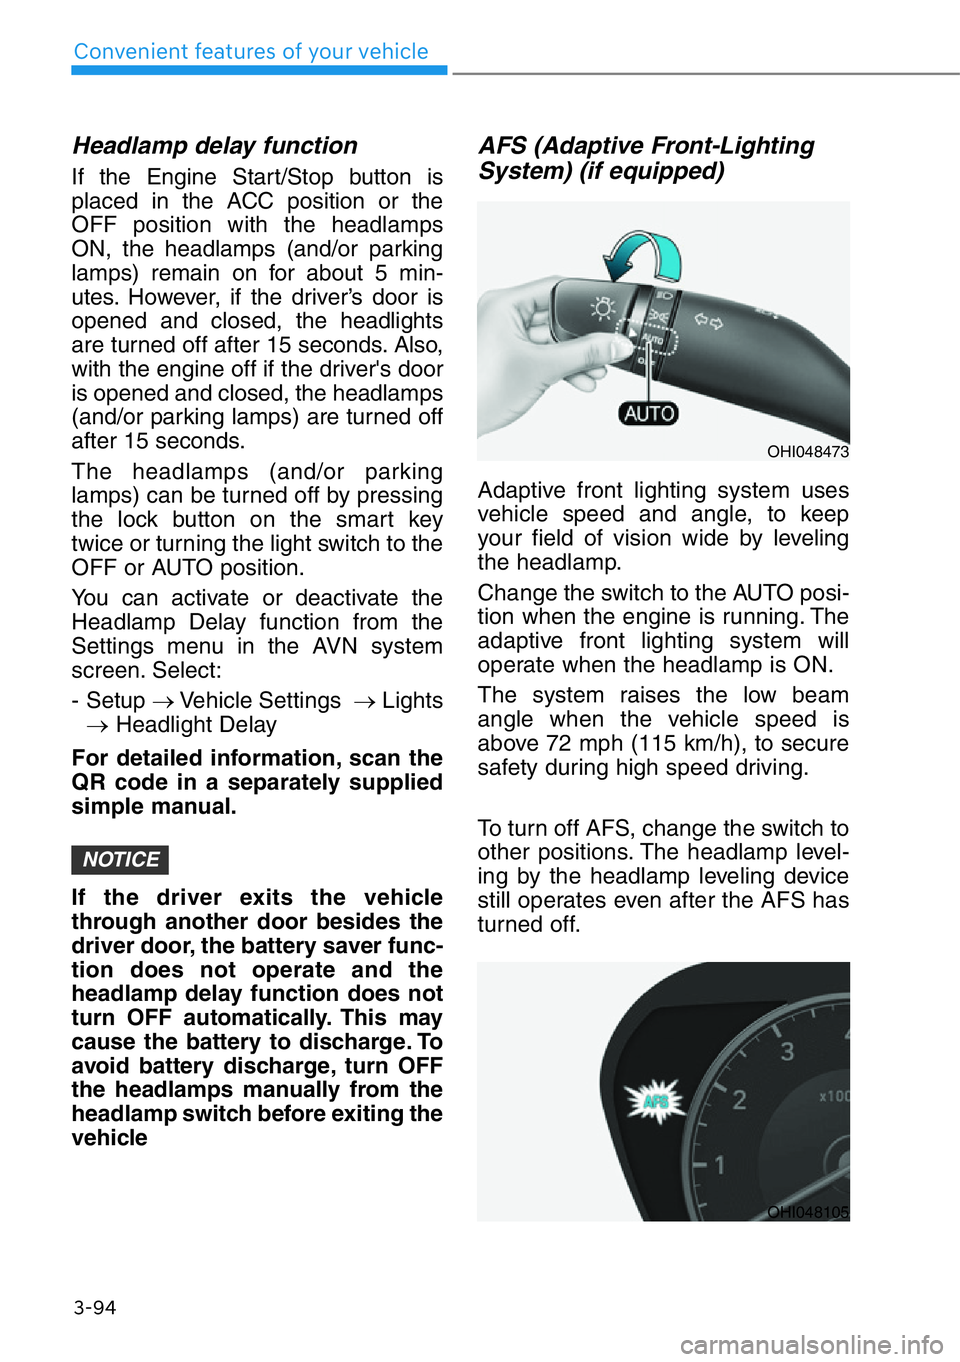
Adaptive front lighting system uses
vehicle speed and angle, to keep
your field of vision wide by leveling
the headlamp.
Change the switch to the AUTO posi-
tion when the engine is running. The
adaptive front lighting system will
operate when the headlamp is ON.
The system raises the low beam
angle when the vehicle speed is
above 72 mph (115 km/h), to secure
safety during high speed driving.
To turn off AFS, change the switch to
other positions. The headlamp level-
ing by the headlamp leveling device
still operates even after the AFS has
turned off.
NOTICE
OHI048473
OHI048105
Page 196 of 538

3-95
03
If the AFS malfunction indicator
comes on, the AFS is not working
properly.
Drive to the nearest safe location
and restart the engine. If the indica-
tor continuously remains on, we rec-
ommend that the system be checked
by an authorized retailer of Genesis
Branded products.
Daytime running light (DRL)
The Daytime Running Lights can
help others to see the front of your
vehicle during the day, especially
after dawn and before sunset.
The DRL system will turn OFF when:
• The light switch is in the parking or
headlamp lamp position, including
the operation that the parking lamp
or headlamp is turned on automat-
ically in the AUTO light position.
• The engine is turned off.
• The hazard warning flasher is on.
• The turn signal light is on.
If you turn on the turn signal light,
only the corresponding daytime
running lights will turn off.
• The parking brake is applied.
Headlamp leveling device
It automatically adjusts the headlamp
beam level according to the number
of passengers and loading weight in
the luggage area.
And it offers proper headlamp beam
under various conditions.
Headlamp moisture removal
function (if equipped)
When moisture fogs up inside of the
headlamp, if the headlamp is on for
certain period of time, the fan circu-
lates the air inside to remove mois-
ture. If the moisture is not removed,
have the vehicle checked by an
authorized retailer of Genesis
Branded products.
Reverse guide lamp
When the shift lever is in R
(Reverse), the back-up lamp turns on
and the reverse guide lamp at the
back of the vehicle lights the floor.
The lamp informs nearby drivers
that your vehicle is backing up.If the function does not work
properly, we recommend that
the system be inspected by an
authorized retailer of Genesis
Branded products. Do not
attempt to inspect or replace
the wiring yourself.
WARNING
Page 197 of 538

3-96
Convenient features of your vehicle
Interior Lights
Do not use the interior lights for
extended periods when the engine
is turned off or the battery will dis-
charge.
Interior lamp AUTO cut
The interior lamps will automatically
go off approximately 20 minutes after
the engine is turned off and the
doors are closed. If a door is opened,
the lamp will go off 40 minutes after
the engine is turned off. If the doors
are locked by the remote key or
smart key and the vehicle enters the
armed stage of the theft alarm sys-
tem, the lamps will go off five sec-
onds later.
Front lamps
•:
Press either of these buttons to
turn the map lamp on or off. This
light produces a spot beam for con-
venient use as a map lamp at night
or as a personal lamp for the driver
and the front passenger.
•
:
Press the button to turn ON all
front lamps. Re-repress the button
to turn OFF all front lamps.
NOTICE
OHI048423
Do not use the interior lights
when driving in the dark. The inte-
rior lights may obscure your view
and cause an accident.
WARNING
Page 256 of 538

5-4
Driving your vehicle
Before Entering the Vehicle
• Be sure all windows, outside mir-
ror(s), and outside lights are clean
and unobstructed.
• Remove frost, snow, or ice.
• Visually check the tires for uneven
wear and damage.
• Check under the vehicle for any
sign of leaks.
• Be sure there are no obstacles
behind you if you intend to back up.
Before Starting
• Make sure the hood, the trunk, and
the doors are securely closed and
locked.
• Adjust the position of the seat and
steering wheel.
• Adjust the inside and outer side
view mirrors.
• Verify all the lights work.
• Fasten your seatbelt. Check that all
passengers have fastened their
seatbelts.
• Check the gauges and indicators in
the instrument panel and the mes-
sages on the instrument display
when the ignition switch is in the
ON position.
• Check that any items you are car-
rying are stored properly or fas-
tened down securely.
BEFORE DRIVING
CALIFORNIA PROPOSITION 65
WARNING
Engine exhaust and a wide vari-
ety of automobile components
including components found in
the interior furnishings in a vehi-
cle, contain or emit harmful
chemicals known to the State of
California to cause cancer and
birth defects and reproductive
harm. In addition, certain fluids
contained in vehicles and certain
products of components contain
or emit chemicals known to the
State of California to cause can-
cer and birth defects or other
reproductive harm.
WARNING
Page 259 of 538

5-7
05
Engine Stop/Start Button
Positions
OFF
To turn off the engine, press the
Engine Start/Stop button with the
vehicle shifted to P (Park).
Note if the Engine Start/Stop button
is pressed with the vehicle shifted to
D (Drive) or R (Reverse), the vehicle
will automatically shift to P (Park).
If the Engine Start/Stop button is
pressed with the vehicle shifted to N
(Neutral), the Engine Start/Stop but-
ton will go to the ACC position.
ACC
Press the Engine Start/Stop button
when the button is in the OFF posi-
tion without depressing the brake
pedal.
Some of the electrical accessories
are usable. The steering wheel
unlocks.
Information
If you leave the Engine Start/Stop but-
ton in the ACC position for more than
one hour, the battery power will turn
off automatically to prevent the bat-
tery from discharging.
ON
Press the Engine Start/Stop button
while it is in the ACC position without
depressing the brake pedal.
The warning lights can be checked
before the engine is started.
Information
Do not leave the Engine Start/Stop
button in the ON position when the
engine is not running to prevent the
battery from discharging.
START
To start the engine, depress the
brake pedal and press the Engine
Start/Stop button with the vehicle
shifted to the P (Park) or the N
(Neutral) position.
For your safety, start the engine with
the vehicle shifted to the P (Park)
position.
Information
If you press the Engine Start/Stop but-
ton without depressing the brake
pedal, the engine does not start and
the Engine Start/Stop button changes
as follows:
OFF
→ACC →ON →OFF
However, the engine may start if you
depress the brake pedal within 0.5 sec-
ond after pressing the Engine Start/
Stop button from the OFF position.
i
i
i• NEVER reach through the
steering wheel for the Engine
Start/Stop button or any other
control while the vehicle is in
motion. The presence of your
hand or arm in this area may
cause a loss of vehicle control
resulting in an accident.
Page 285 of 538

5-33
05
Electronic Stability Control
(ESC)
The Electronic Stability Control sys-
tem helps to stabilize the vehicle dur-
ing cornering maneuvers. ESC
checks where you are steering and
where the vehicle is actually going.
ESC applies braking pressure to any
one of the vehicle's brakes and inter-
venes in the engine management
system to assist the driver with keep-
ing the vehicle on the intended path.
It is not a substitute for safe driving
practices. Always adjust your speed
and driving to the road conditions.
ESC operation
ESC ON condition
When the ignition switch is in the ON
position, the ESC and the ESC OFF
indicator lights illuminate for approxi-
mately three seconds. After both
lights go off, the ESC is enabled.
When operating
When the ESC is in oper-
ation, the ESC indicator
light blinks:
• When you apply your brakes under
conditions which may lock the
wheels, you may hear sounds from
the brakes, or feel a corresponding
sensation in the brake pedal. This
is normal and it means your ESC is
active.
• When the ESC activates, the
engine may not respond to the
accelerator as it does under rou-
tine conditions.
• If the Smart Cruise Control was in
use when the ESC activates, the
Smart Cruise Control automatically
disengages. The Smart Cruise
Control can be reengaged when
the road conditions allow. See
"Smart Cruise Control System"
later in this chapter.
• When moving out of the mud or
driving on a slippery road, the
engine RPM (revolutions per
minute) may not increase even if
you press the accelerator pedal
deeply. This is to maintain the sta-
bility and traction of the vehicle and
does not indicate a problem.
OHI058037
Never drive too fast for the road
conditions when cornering. The
ESC system will not prevent
accidents.
Excessive speed in turns, abrupt
maneuvers, and hydroplaning
on wet surfaces can result in
severe accidents.
WARNING
Page 287 of 538
5-35
05
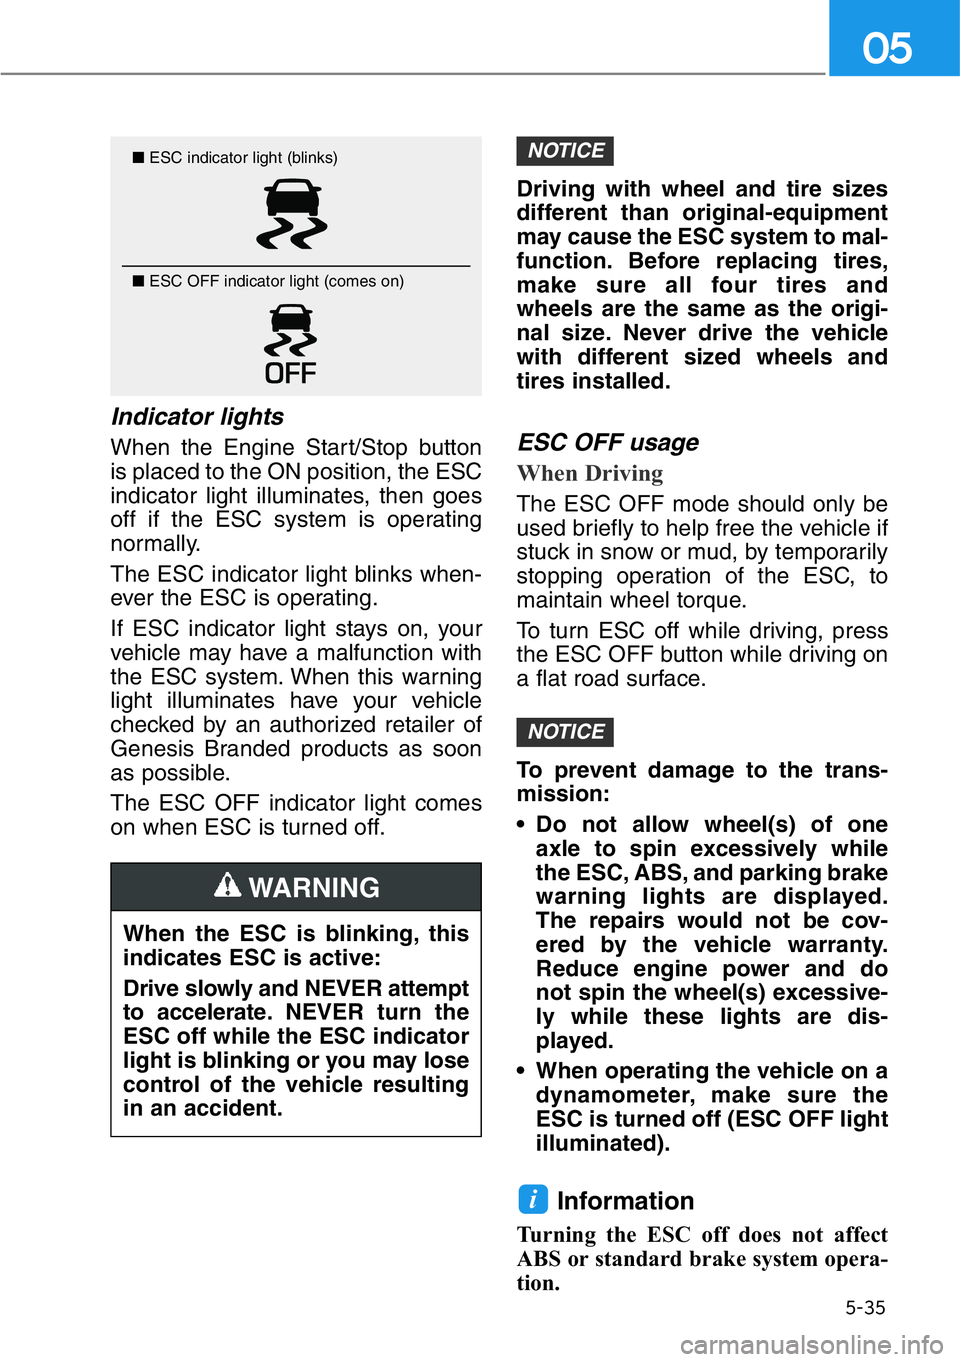
Indicator lights
When the Engine Start/Stop button
is placed to the ON position, the ESC
indicator light illuminates, then goes
off if the ESC system is operating
normally.
The ESC indicator light blinks when-
ever the ESC is operating.
If ESC indicator light stays on, your
vehicle may have a malfunction with
the ESC system. When this warning
light illuminates have your vehicle
checked by an authorized retailer of
Genesis Branded products as soon
as possible.
The ESC OFF indicator light comes
on when ESC is turned off.Driving with wheel and tire sizes
different than original-equipment
may cause the ESC system to mal-
function. Before replacing tires,
make sure all four tires and
wheels are the same as the origi-
nal size. Never drive the vehicle
with different sized wheels and
tires installed.ESC OFF usage
When Driving
The ESC OFF mode should only be
used briefly to help free the vehicle if
stuck in snow or mud, by temporarily
stopping operation of the ESC, to
maintain wheel torque.
To turn ESC off while driving, press
the ESC OFF button while driving on
a flat road surface.
To prevent damage to the trans-
mission:
• Do not allow wheel(s) of one
axle to spin excessively while
the ESC, ABS, and parking brake
warning lights are displayed.
The repairs would not be cov-
ered by the vehicle warranty.
Reduce engine power and do
not spin the wheel(s) excessive-
ly while these lights are dis-
played.
• When operating the vehicle on a
dynamometer, make sure the
ESC is turned off (ESC OFF light
illuminated).
Information
Turning the ESC off does not affect
ABS or standard brake system opera-
tion.
i
NOTICE
NOTICE■ESC indicator light (blinks)
■ ESC OFF indicator light (comes on)
When the ESC is blinking, this
indicates ESC is active:
Drive slowly and NEVER attempt
to accelerate.NEVER turn the
ESC off while the ESC indicator
light is blinking or you may lose
control of the vehicle resulting
in an accident.
WARNING
Page 312 of 538
5-60
Driving your vehicle
• The vehicle in front is an oversize
vehicle or trailer that is too big to
be detected by the camera recog-
nition system (for example a tractor
trailer, etc.)
• The camera's field of view is not
well illuminated (either too dark or
too much reflection or too much
backlight that obscures the field of
view)
• The vehicle in front does not have
their rear lights properly turned ON
or their rear lights are located
unusually
• The outside brightness changes
suddenly, for example when enter-
ing or exiting a tunnel
• Light coming from a street light or
an oncoming vehicle is reflected on
a wet road surface such as a pud-
dle in the road
• The field of view in front is obstruct-
ed by sun glare
• The windshield glass is fogged up;
a clear view of the road is obstruct-
ed
• The vehicle in front is driving errati-
cally
• The vehicle is on unpaved or
uneven rough surfaces, or road
with sudden gradient changes
• The vehicle is driven near areas
containing metal substances as a
construction zone, railroad, etc.
• The vehicle drives inside a building,
such as a basement parking lot
• The camera does not recognize
the entire vehicle in front
• The camera is damaged• The brightness outside is too low
such as when the headlamps are
not on at night or the vehicle is
going through a tunnel
• The shadow is on the road by a
median strip, trees, etc.
• The vehicle drives through a toll-
gate.
• The rear part of the vehicle in front
is not normally visible (the vehicle
turns in other direction or the vehi-
cle is overturned.)
• The adverse road conditions cause
excessive vehicle vibrations while
driving
• The sensor recognition changes
suddenly when passing over a
speed bump
• The vehicle in front is moving verti-
cally to the driving direction
• The vehicle in front is stopped ver-
tically
• The vehicle in front is driving
towards your vehicle or reversing
• You are on a roundabout and the
vehicle in front circles