battery replacement GENESIS G90 2021 Owner's Manual
[x] Cancel search | Manufacturer: GENESIS, Model Year: 2021, Model line: G90, Model: GENESIS G90 2021Pages: 538, PDF Size: 13.02 MB
Page 109 of 538
3-8
Convenient features of your vehicle
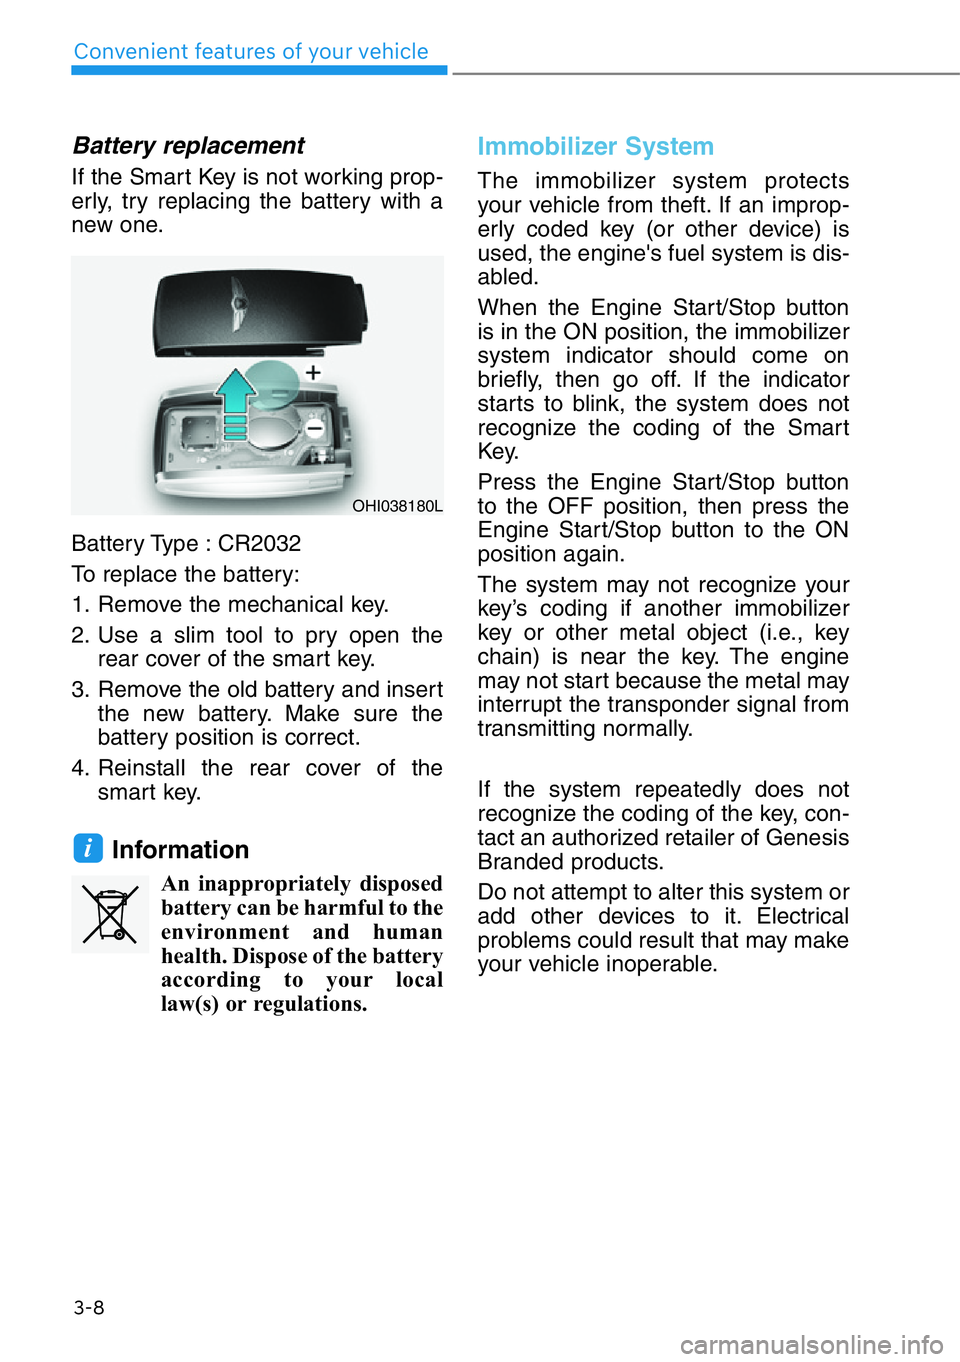
Battery replacement
If the Smart Key is not working prop-
erly, try replacing the battery with a
new one.
Battery Type : CR2032
To replace the battery:
1. Remove the mechanical key.
2. Use a slim tool to pry open the
rear cover of the smart key.
3. Remove the old battery and insert
the new battery. Make sure the
battery position is correct.
4. Reinstall the rear cover of the
smart key.
Information
An inappropriately disposed
battery can be harmful to the
environment and human
health. Dispose of the battery
according to your local
law(s) or regulations.
Immobilizer System
The immobilizer system protects
your vehicle from theft. If an improp-
erly coded key (or other device) is
used, the engine's fuel system is dis-
abled.
When the Engine Start/Stop button
is in the ON position, the immobilizer
system indicator should come on
briefly, then go off. If the indicator
starts to blink, the system does not
recognize the coding of the Smart
Key.
Press the Engine Start/Stop button
to the OFF position, then press the
Engine Start/Stop button to the ON
position again.
The system may not recognize your
key’s coding if another immobilizer
key or other metal object (i.e., key
chain) is near the key. The engine
may not start because the metal may
interrupt the transponder signal from
transmitting normally.
If the system repeatedly does not
recognize the coding of the key, con-
tact an authorized retailer of Genesis
Branded products.
Do not attempt to alter this system or
add other devices to it. Electrical
problems could result that may make
your vehicle inoperable.
i
OHI038180L
Page 194 of 538
3-93
03
Turn signals and lane change
signals
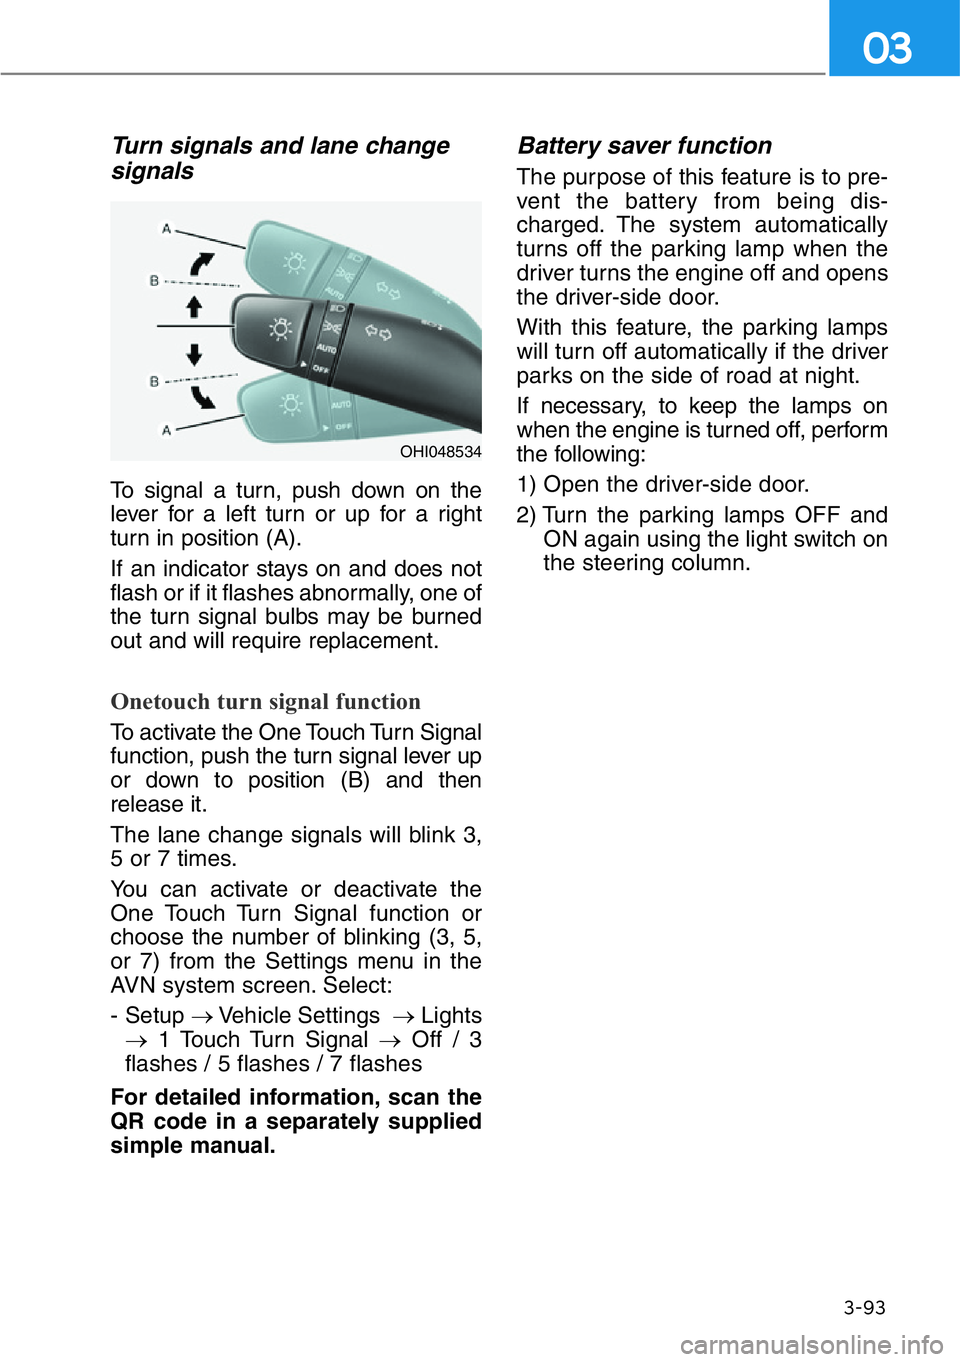
To signal a turn, push down on the
lever for a left turn or up for a right
turn in position (A).
If an indicator stays on and does not
flash or if it flashes abnormally, one of
the turn signal bulbs may be burned
out and will require replacement.
Onetouch turn signal function
To activate the One Touch Turn Signal
function, push the turn signal lever up
or down to position (B) and then
release it.
The lane change signals will blink 3,
5 or 7 times.
You can activate or deactivate the
One Touch Turn Signal function or
choose the number of blinking (3, 5,
or 7) from the Settings menu in the
AVN system screen. Select:
- Setup →Vehicle Settings →Lights
→1 Touch Turn Signal →Off / 3
flashes / 5 flashes / 7 flashes
For detailed information, scan the
QR code in a separately supplied
simple manual.
Battery saver function
The purpose of this feature is to pre-
vent the battery from being dis-
charged. The system automatically
turns off the parking lamp when the
driver turns the engine off and opens
the driver-side door.
With this feature, the parking lamps
will turn off automatically if the driver
parks on the side of road at night.
If necessary, to keep the lamps on
when the engine is turned off, perform
the following:
1) Open the driver-side door.
2) Turn the parking lamps OFF and
ON again using the light switch on
the steering column.
OHI048534
Page 441 of 538
7
7. Maintenance
Engine Compartment ....................7-3
Maintenance Services ..................7-5
Owner's Responsibility ....................7-5
Owner Maintenance Precautions ....7-5
Owner Maintenance......................7-6
Owner Maintenance Schedule ........7-7
Scheduled Maintenance Service ..7-8
Normal Maintenance Schedule
(5.0 GDI) ..........................................7-9
Maintenance Under Severe Usage
Conditions (5.0 GDI) ......................7-12
Normal Maintenance Schedule
(3.3 Turbo-GDI) ..............................7-14
Maintenance Under Severe Usage
Conditions (3.3 Turbo-GDI) ..........7-17
Explanation of Scheduled
Maintenance Items ......................7-19
Engine Oil ....................................7-22
Checking the Engine Oil Level ......7-22
Checking the Engine Oil and Filter ..7-23
Engine Coolant ............................7-24
Checking the Engine Coolant
Level................................................7-24
Changing Engine Coolant ..............7-26
Brake Fluid....................................7-27
Checking the Brake Fluid Level......7-27
Washer Fluid ................................7-28
Checking the Washer Fluid Level ..7-28
Air Cleaner ..................................7-29
Filter Replacement ........................7-29
Cabin Air Filter ............................7-30
Filter Inspection..............................7-30
Wiper Blades ................................7-31
Blade Inspection ..............................7-31
Blade Replacement ........................7-31
Battery ..........................................7-33
Battery Usage Recommendations..7-34
Battery Replacement ....................7-34
Battery Recharging ........................7-35
Reset features ................................7-36
Tires and Wheels ........................7-37
Tire Care ..........................................7-37
Recommended Cold Tire Inflation
Pressures ........................................7-38
Check Tire Inflation Pressure ........7-39
Tire Rotation ..................................7-39
Wheel Alignment and Tire
Balance ..........................................7-40
Tire Replacement ............................7-41
Wheel Replacement ......................7-42
Tire Traction ....................................7-42
Tire Maintenance............................7-42
Tire Sidewall Labeling ....................7-42
Tire Terminology and Definitions ..7-46
All Season Tires ..............................7-50
Summer Tires ................................7-50
Snow Tires ......................................7-50
Radial-Ply Tires ..............................7-50
Low Aspect Ratio Tires ..................7-51
Page 474 of 538
7-34
Maintenance
Battery Usage
Recommendations
• Keep the battery securely mount-
ed.
• Keep the battery top clean and dry.
• Keep the terminals and connec-
tions clean, tight, and coated with
petroleum jelly or terminal grease.
• Rinse any spilled acid from the bat-
tery immediately with a solution of
water and baking soda.
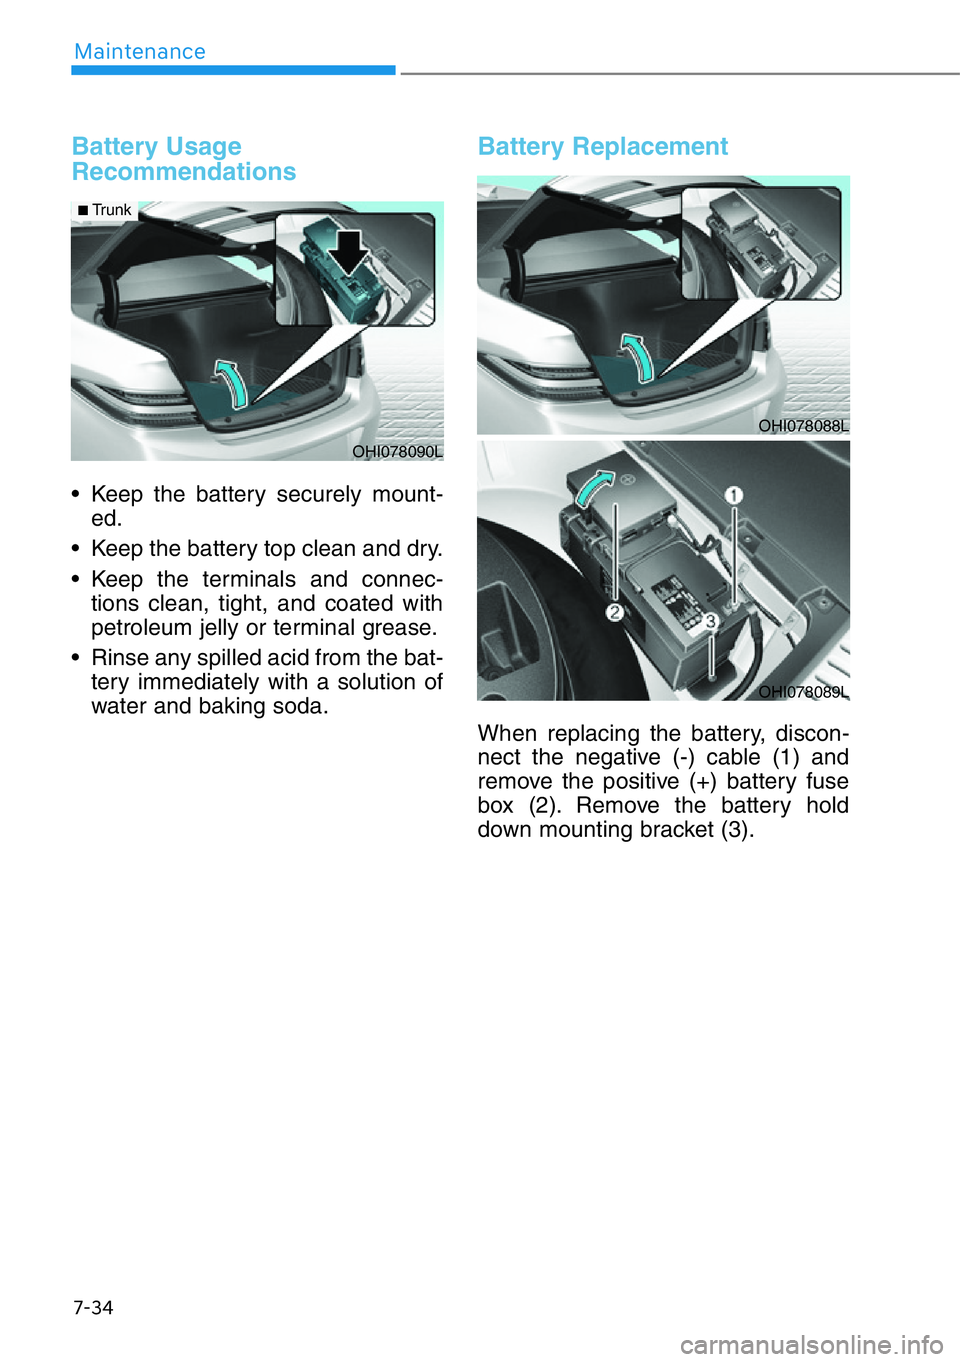
Battery Replacement
When replacing the battery, discon-
nect the negative (-) cable (1) and
remove the positive (+) battery fuse
box (2). Remove the battery hold
down mounting bracket (3).
OHI078090L
■Trunk
OHI078088L
OHI078089L
Page 475 of 538
7-35
07
Battery Recharging
By battery charger
Your vehicle has a maintenance-free,
calcium-based battery.
• If the battery becomes discharged
in a short time (because, for exam-
ple, the headlights or interior lights
were left on while the vehicle was
not in use), recharge it by slow
charging (trickle) for 10 hours.
• If the battery gradually discharges
because of high electric load while
the vehicle is being used, recharge
it at 20-30A for two hours.
AGM battery
• Absorbent Glass Matt (AGM)
batteries are maintenance-free
and we recommend that the
AGM battery be serviced by an
authorized retailer of Genesis
Branded products. For charging
your AGM battery, use only fully
automatic battery chargers that
are specially developed for AGM
batteries.
• When replacing the AGM bat-
tery, we recommend that you
use parts for replacement from
an authorized retailer of Genesis
Branded products.
• Do not open or remove the cap
on top of the battery. This may
cause leaks of internal elec-
trolyte that could result in
severe injury.
NOTICE
Always follow these instruc-
tions when recharging your
vehicle's battery to avoid the
risk of SERIOUS INJURY or
DEATH from explosions or acid
burns:
• Before performing mainte-
nance or recharging the bat-
tery, turn off all accessories
and press the Engine Start/
Stop button to the OFF posi-
tion.
• Keep all flames, sparks, or
smoking materials away from
the battery.
• Always work outdoors or in an
area with plenty of ventilation.
• Wear eye protection when
checking the battery during
charging.
• The battery must be removed
from the vehicle and placed in
a well ventilated area.
• Watch the battery during
charging, and stop or reduce
the charging rate if the battery
cells begin boiling violently.
WARNING
Page 492 of 538
7-52
Maintenance
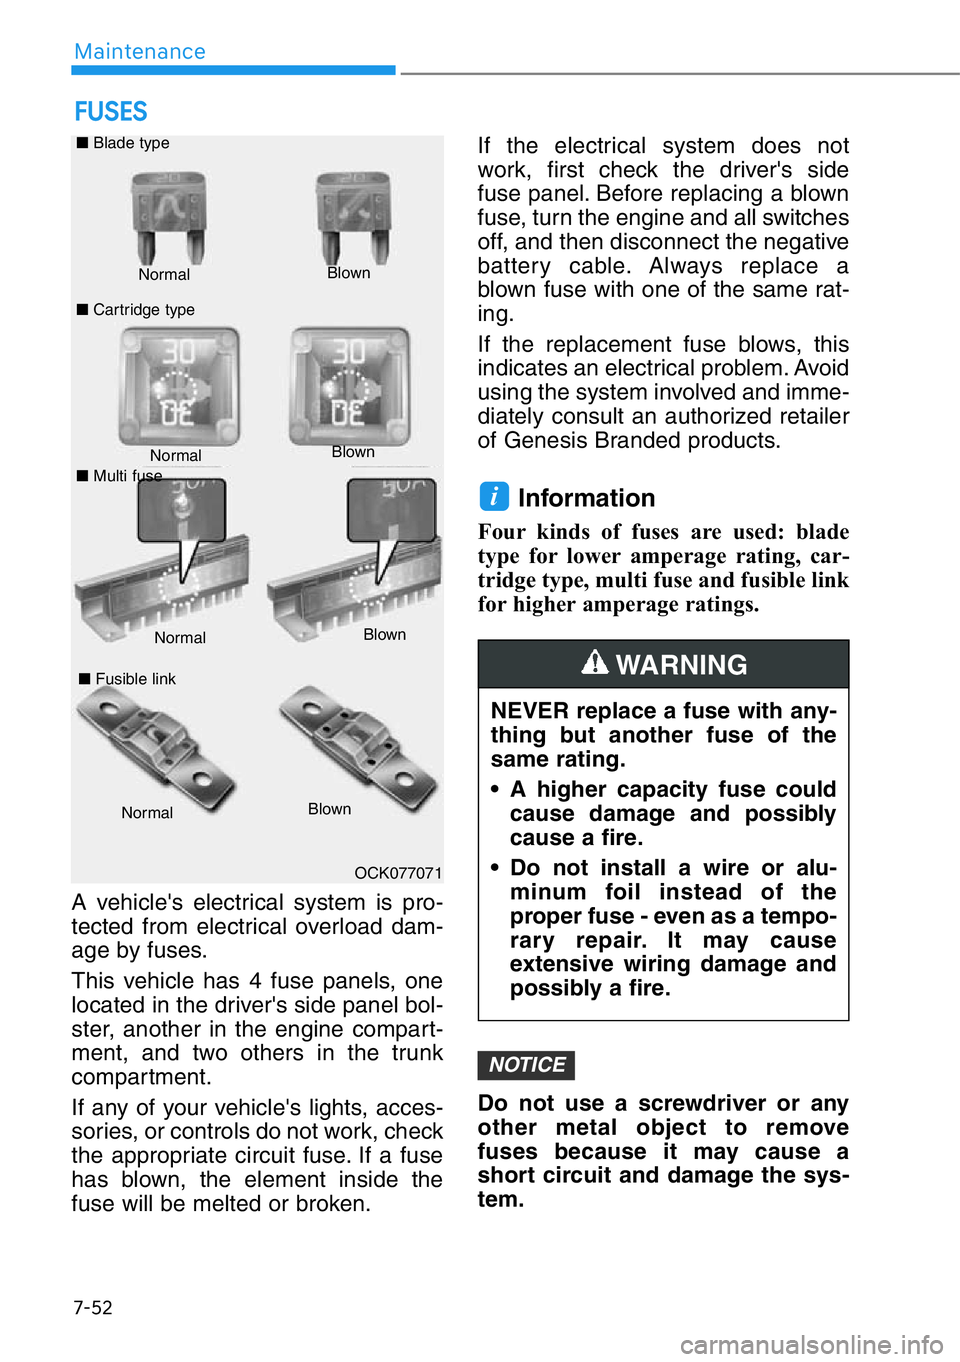
A vehicle's electrical system is pro-
tected from electrical overload dam-
age by fuses.
This vehicle has 4 fuse panels, one
located in the driver's side panel bol-
ster, another in the engine compart-
ment, and two others in the trunk
compartment.
If any of your vehicle's lights, acces-
sories, or controls do not work, check
the appropriate circuit fuse. If a fuse
has blown, the element inside the
fuse will be melted or broken.If the electrical system does not
work, first check the driver's side
fuse panel. Before replacing a blown
fuse, turn the engine and all switches
off, and then disconnect the negative
battery cable. Always replace a
blown fuse with one of the same rat-
ing.
If the replacement fuse blows, this
indicates an electrical problem. Avoid
using the system involved and imme-
diately consult an authorized retailer
of Genesis Branded products.
Information
Four kinds of fuses are used: blade
type for lower amperage rating, car-
tridge type, multi fuse and fusible link
for higher amperage ratings.
Do not use a screwdriver or any
other metal object to remove
fuses because it may cause a
short circuit and damage the sys-
tem.
NOTICE
i
FUSES
Normal Normal ■Blade type
■Cartridge typeBlown
Blown
■Fusible link
NormalBlown
OCK077071
NEVER replace a fuse with any-
thing but another fuse of the
same rating.
• A higher capacity fuse could
cause damage and possibly
cause a fire.
• Do not install a wire or alu-
minum foil instead of the
proper fuse - even as a tempo-
rary repair. It may cause
extensive wiring damage and
possibly a fire.
WARNING
■Multi fuse
NormalBlown