mirror GENESIS G90 2021 Owner's Manual
[x] Cancel search | Manufacturer: GENESIS, Model Year: 2021, Model line: G90, Model: GENESIS G90 2021Pages: 538, PDF Size: 13.02 MB
Page 15 of 538

1. Hood.....................................................3-41
2. Headlamp .............................................7-70
3. Tires and wheels...........................7-37, 8-4
4. Outer side view mirror ..........................3-305. Sunroof.................................................3-37
6. Front windshield wiper blades..............7-31
7. Windows ...............................................3-33
8. Side repeater lamp...............................7-70
EXTERIOR OVERVIEW
1-2
Your vehicle at a glance
OHI019001N
■Front view
The actual shape may differ from the illustration.
Page 17 of 538

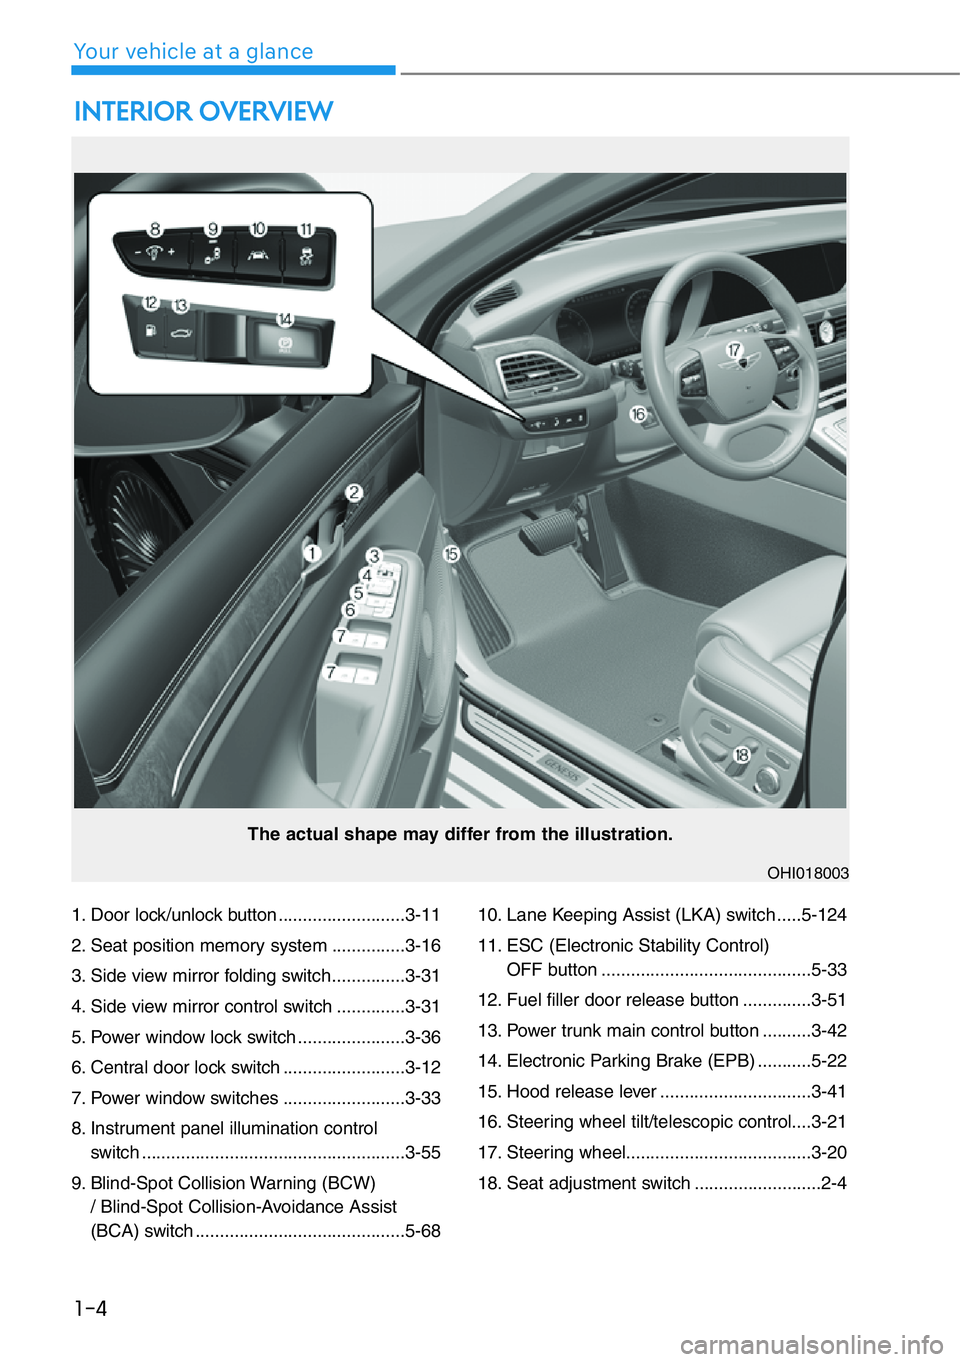
1. Door lock/unlock button ..........................3-11
2. Seat position memory system ...............3-16
3. Side view mirror folding switch ...............3-31
4. Side view mirror control switch ..............3-31
5. Power window lock switch ......................3-36
6. Central door lock switch .........................3-12
7. Power window switches .........................3-33
8. Instrument panel illumination control
switch ......................................................3-55
9. Blind-Spot Collision Warning (BCW)
/ Blind-Spot Collision-Avoidance Assist
(BCA) switch ...........................................5-6810. Lane Keeping Assist (LKA) switch .....5-124
11. ESC (Electronic Stability Control)
OFF button ...........................................5-33
12. Fuel filler door release button ..............3-51
13. Power trunk main control button ..........3-42
14. Electronic Parking Brake (EPB) ...........5-22
15. Hood release lever ...............................3-41
16. Steering wheel tilt/telescopic control....3-21
17. Steering wheel......................................3-20
18. Seat adjustment switch ..........................2-4
INTERIOR OVERVIEW
1-4
Your vehicle at a glance
The actual shape may differ from the illustration.
OHI018003
Page 102 of 538

3
3. Convenient Features of
Your Vehicle
Accessing Your Vehicle ................3-3
Smart Key ..........................................3-3
Immobilizer System ........................3-8
Door Locks ....................................3-9
Operating Door Locks from Outside
the Vehicle ......................................3-9
Operating Door Locks from Inside
the Vehicle ......................................3-11
Auto Door Lock and Unlock
Features ..........................................3-13
Child-Protector Rear Door locks....3-13
Safe Exit Assist (SEA) System ........3-14
Theft-Alarm System ....................3-15
Seat Position Memory System ....3-16
Storing Positions into Memory ......3-16
Recalling Positions from Memory..3-17
Resetting the Seat Position Memory
System ............................................3-17
Easy Access Function ....................3-18
Smart Posture Care System ........3-19
Steering wheel ............................3-20
Motor-Driven Power
Steering (MDPS) ............................3-20
Tilt Steering / Telescopic Steering 3-21
Heated Steering Wheel ..................3-21
Horn ................................................3-22
Mirrors ..........................................3-23
Inside Rearview Mirror ..................3-23
Side View Mirrors ..........................3-30
Reverse Parking Aid Function........3-32
Windows ......................................3-33Sunroof ........................................3-37
Sunroof Opening and Closing ......3-38
Tilting the Sunroof ........................3-39
Sunshade ........................................3-39
Resetting the Sunroof ..................3-40
Sunroof Open Warning ..................3-40
Exterior Features ........................3-41
Hood ................................................3-41
Trunk................................................3-42
Smart Trunk ....................................3-48
Fuel Filler Door ................................3-51
Instrument Cluster ......................3-54
Instrument Cluster Control............3-55
Gauges and Meters ........................3-55
Transmission Shift Indicator..........3-59
Warning and Indicator Lights ......3-60
LCD Display Messages ....................3-71
LCD Display..................................3-78
LCD Display Control ......................3-78
LCD Display Modes ........................3-79
Trip Computer ............................3-82
Trip Modes ......................................3-82
Vehicle Settngs ..........................3-85
Head-Up Display ........................3-86
Lighting ......................................3-88
Exterior Lights ................................3-88
Interior Lights ................................3-96
Welcome System ........................3-99
Wipers and Washers ..................3-101
Windshield Wipers ......................3-101
Windshield Washers ....................3-102
Surround View Monitor ............3-104
3
Page 103 of 538

Forward/Reverse Parking Distance
Warning (PDW) ........................3-106
Forward/Reverse Parking Distance
Warning system ..........................3-107
Non-operational Conditions of
Forward/Reverse Parking Distance
Warning system ........................3-109
Parking Distance Warning
(Reverse/Forward ) System
Precautions ..................................3-110
Automatic Climate Control
System..........................................3-111
Automatic Heating and Air
Conditioning ................................3-112
Manual Heating and Air
Conditioning ................................3-113
System Operation ........................3-123
System Maintenance ....................3-124
Defroster ....................................3-126
Rear Window Defroster ................3-126
Front Wiper Deicer........................3-126
Windshield Defrosting and
Defogging ..................................3-127
Auto Defogging System ..............3-129
Climate Control Additional
Features ......................................3-129
Clean Air ......................................3-130
Automatic Ventilation ..................3-130
Sunroof Inside Air Recirculation ..3-131
Setting the Climate Control
System in the AVN System
Screen ..........................................3-131
Storage Compartment ..............3-133
Center Console Storage ..............3-133
Rear Console Storage ..................3-133
Glove Box ......................................3-134
Sunglass Holder ............................3-134
Interior Features ........................3-135
Cup Holder ....................................3-135
Sunvisor ........................................3-136
Rear Mirror ..................................3-136
Power Outlet ..................................3-137
USB Charger ..................................3-138
Wireless Cellular Phone Charging
System ..........................................3-139
Coat hook ......................................3-141
Clock ..............................................3-141
Bag Hanger....................................3-142
Floor Mat Anchor(s) ......................3-142
Rear Window Sunshade ..............3-143
Rear Side Window Sunshade ......3-144
Luggage Net Holder ....................3-145
3
3. Convenient Features of
Your Vehicle
Page 104 of 538

3-3
03
Smart Key
Your G90 uses a Smart Key, which
you can use to lock or unlock the driv-
er and passenger doors or the trunk.
1. Door Lock
2. Door Unlock
3. Trunk Unlock
4. Panic
Locking your vehicle
To lock your vehicle using the door
handle button or the Smart Key:
1. Make sure all doors, the hood and
the trunk are closed.
2. Make sure you have the smart key
in your possession.3. Press either the button on the
door handle or the Door Lock but-
ton (1) on the smart key. The
chime will sound once and the
hazard warning lights will blink.
Also, the outer side view mirror will
fold, if the folding switch is in the
AUTO position.
4. Make sure the doors are locked by
checking the position of the door
lock button inside the vehicle.
Information
• The door handle button will only
operate when the smart key is with-
in 28~40 inches (0.7~1 m) from the
outside door handle.
• Pressing the door handle button
does not unlock the doors. To unlock
the doors, refer to the following
page.
Note that you cannot lock your vehi-
cle using the door handle button if
any of the following occur:
• The Smart Key is in the vehicle.
• The Engine Start/Stop button is in
ACC or ON position.
• Any door except the trunk is open.
i
ACCESSING YOUR VEHICLE
OHI048058
OHI048003
Page 105 of 538

3-4
Convenient features of your vehicle
Unlocking your vehicle
To unlock your vehicle:
1. Make sure you have the smart key
in your possession.
2. Put your hand in the outside door
handle or press the Door Unlock
button (2) on the smart key. The
driver's door will unlock and the
hazard warning lights will blink two
times. Also, the outer side view
mirror will unfold, if the folding
switch is in the AUTO position.Two Press Unlock Feature
The priority for unlocking the driver
door only, or unlocking all the doors
with one press may be adjusted in
the Settings menu in the AVN system
screen.
The Two Press Unlock feature, when
enabled, will require the user to
press the door unlock button once for
driver door only and twice for unlock-
ing all the doors.
Select or Deselect the Two Press
Unlock feature in the Settings menu
in the AVN system screen. The
option can be found under the follow-
ing menu:
Setup →Vehicle Settings →Door/
Trunk →2 Press Unlock
Information
• The door handle unlocking will only
operate when the smart key is with-
in 28-40 inches (0.7~1m) from the
outside door handle.
• Either the driver or front passenger
door can be opened with the door
handle button when the smart key is
within this range.
• If you put hour hand in the front
passenger outside door handle with
the smart key in your possession, all
the doors will unlock.
i
Do not leave the Smart Key in
your vehicle with unsupervised
children. Unattended children
could press the Engine Start/
Stop button and may operate
power windows or other con-
trols, or even make the vehicle
move, which could result in
serious injury or death.
WARNING
OHI048584L
Page 117 of 538

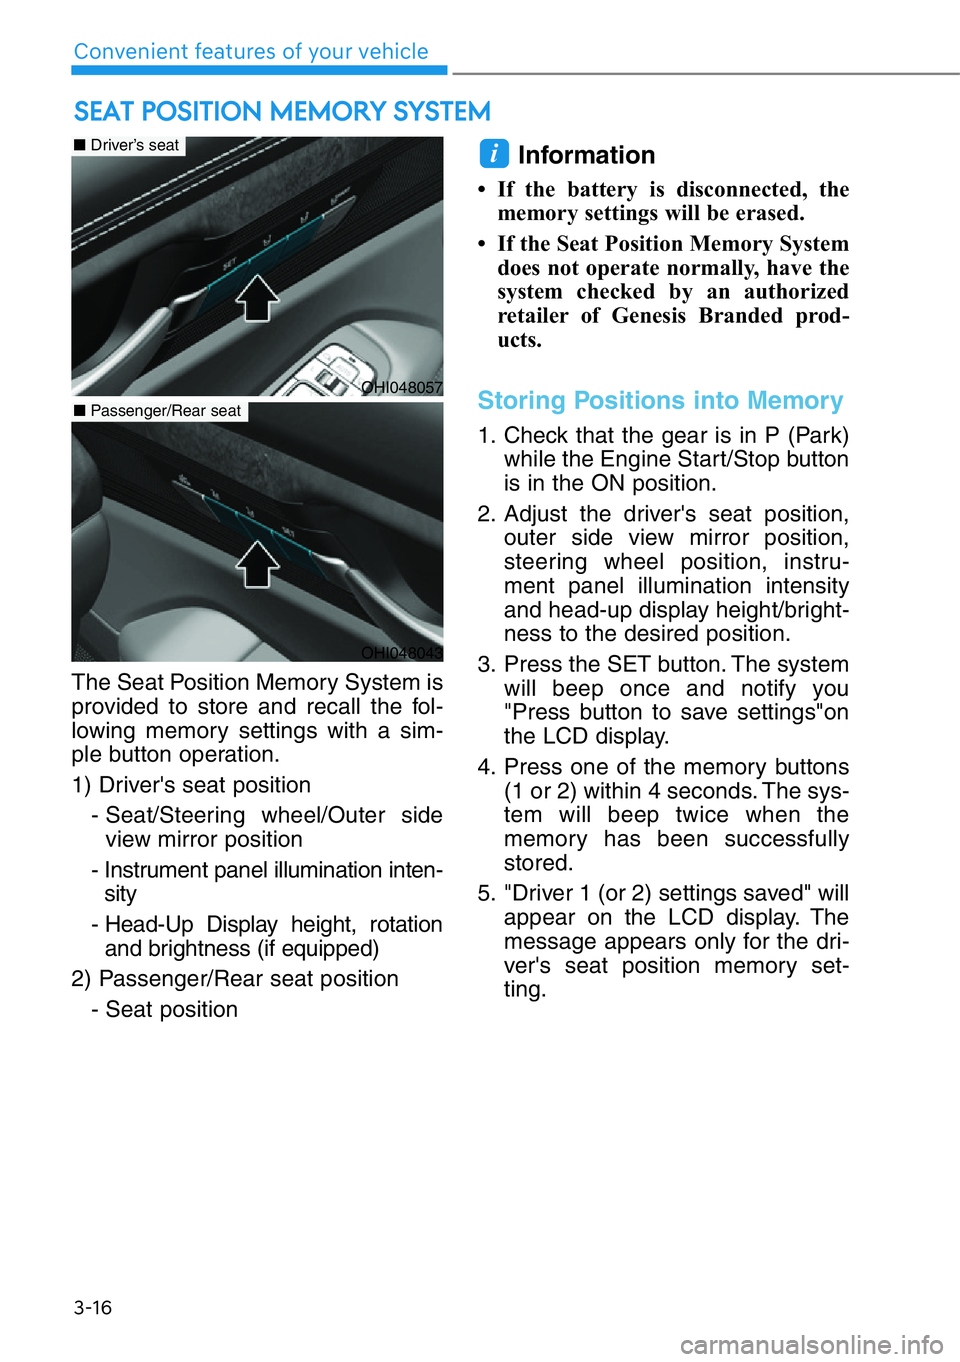
The Seat Position Memory System is
provided to store and recall the fol-
lowing memory settings with a sim-
ple button operation.
1) Driver's seat position
- Seat/Steering wheel/Outer side
view mirror position
- Instrument panel illumination inten-
sity
- Head-Up Display height, rotation
and brightness (if equipped)
2) Passenger/Rear seat position
- Seat position
Information
• If the battery is disconnected, the
memory settings will be erased.
• If the Seat Position Memory System
does not operate normally, have the
system checked by an authorized
retailer of Genesis Branded prod-
ucts.
Storing Positions into Memory
1. Check that the gear is in P (Park)
while the Engine Start/Stop button
is in the ON position.
2. Adjust the driver's seat position,
outer side view mirror position,
steering wheel position, instru-
ment panel illumination intensity
and head-up display height/bright-
ness to the desired position.
3. Press the SET button. The system
will beep once and notify you
"Press button to save settings"on
the LCD display.
4. Press one of the memory buttons
(1 or 2) within 4 seconds. The sys-
tem will beep twice when the
memory has been successfully
stored.
5. "Driver 1 (or 2) settings saved" will
appear on the LCD display. The
message appears only for the dri-
ver's seat position memory set-
ting.
i
SEAT POSITION MEMORY SYSTEM
3-16
Convenient features of your vehicle
OHI048057
■Driver’s seat
■Passenger/Rear seat
OHI048043
Page 118 of 538

3-17
03
Recalling Positions from
Memory
1. Check that the gear is in P (Park)
while the Engine Start/Stop button
is in the ON position.
2. Press the desired memory button
(1 or 2). The system will beep
once, and then the driver's seat
position, outer side view mirror
position, steering wheel position,
instrument panel illumination
intensity and head-up display
height/brightness will automatical-
ly adjust to the stored positions.
3. "Driver 1(or 2) settings applied"
will appear on the LCD display.
The message appears only for
the driver's seat position memory
setting.
Information
• If you press the SET button or num-
ber 1 button with the number 1 set-
ting in operation, the setting will tem-
porarily deactivate. If you press the
number 2 button, the number 2 set-
ting will activate.
• If you press the number 2 button or
SET button with the number 2 button
in operation, the number 2 setting
will temporarily deactivate. Press the
number 1 button, the number 1 set-
ting will activate.
• If you operate the seat adjustment
switch, side view mirror, steering
wheel, instrument panel illumination
or head-up display while recalling the
stored positions, the pre-set settings
will become ineffective.
Resetting the Seat Position
Memory System
Take the following procedures to
reset the seat position memory sys-
tem, when it does not operate prop-
erly.
To reset the seat position mem-
ory system
1. Stop the vehicle and open the dri-
ver's door with the Engine
Start/Stop button in the ON posi-
tion and the gear shifted to P
(Park).
2. Operate the control switch to set
the driver's seat and seatback to
the foremost position.
3. Simultaneously press the SET
button and push forward the dri-
ver's seat movement switch over 2
seconds.
While resetting the seat posi-
tion memory system
1. It starts with the notification sound.
2. The driver's seat and seatback is
adjusted to the rearward position
with the notification sound.
3. The driver's seat and seatback is
re-adjusted to the default position
(central position) with the notifica-
tion sound.
However, in the following cases, the
resetting procedure and the notifica-
tion sound may stop.
- The memory button is pressed.
- The seat control switch is operated.
- The gear is shifted out of P (Park).
- The driving speed exceeds 2 mph
(3 km/h).
- The driver's door is closed.
i
Page 120 of 538

3-19
03
The Smart Posture Care system
automatically provides a healthy pos-
ture (position) for the driver's back,
and sets the steering wheel, outer
side view mirrors, head-up display
positions according to the driver's
body measurements.
Information
If the Seat Posture Care System does
not operate normally, have the system
checked by an authorized retailer of
Genesis Branded products.1. Check that the gear is in P (Park)
while the Engine Start/Stop button
is in the ON position.
2. Press the SMART button on the
driver's door or select 'Setup →
Vehicle Settings →Convenience
→Smart Posture Care' from the
Settings menu in the AVN system
screen.
3. Enter information (Height, Pants
Inseam Length, Weight) in the
AVN system screen.
4. After entering the driver’s informa-
tion, press 'Adjust Posture'. The
driver’s seat, steering wheel, side
view mirror and head-up display
will be adjusted.
5. Press 'Save' and save the adjust-
ed seat position in 'Driver 1' or
'Driver 2'.
Reference table
For detailed information, scan the
QR code in a separately supplied
simple manual.
i
SMART POSTURE CARE SYSTEM (IF EQUIPPED)
OHI048042OHI049513N
Height4' 9'' ~ 6' 6"
Pants
Inseam
Length
Short/Average/Tall
Weight109 lbs. or Below ~
264 lbs. or Above
Page 124 of 538

3-23
03
MIRRORS
Inside Rearview Mirror
Before driving your vehicle, check to
see that your inside rearview mirror
is properly positioned. Adjust the
rearview mirror so that the view
through the rear window is properly
centered.
When cleaning the mirror, use a
paper towel or similar material
dampened with glass cleaner. Do
not spray glass cleaner directly on
the mirror as that may cause the
liquid cleaner to enter the mirror
housing.
Electrochromic mirror (ECM)
with HomeLink®system and
Genesis Connected Service
(if equipped)
[A] : Genesis Connected Services buttons
[B] : HomeLink buttons,
[C] : HomeLink indicator
Your vehicle may be equipped with a
Gentex Automatic-Dimming Mirror with
an Integrated HomeLink
®Wireless
Control System.
During nighttime driving, this feature
will automatically detect and reduce
rearview mirror glare. The HomeLink
®
Universal Transceiver allows you to
activate your garage door(s), electric
gate, home lighting, etc.
(1) HomeLink Channel 1
(2) HomeLink Channel 2
(3) HomeLink Channel 3
(4) Garage Door Opener Status
Indicator : Closing or Closed
(5) HomeLink Operation Indicator
(6) Garage Door Opener Status
Indicator : Opening or Opened
(7) HomeLink User Interface
Indicator
NOTICE
Make sure your line of sight is
not obstructed. Do not place
objects in the rear seat, cargo
area, or behind the rear head-
rests which could interfere with
your vision through the rear
window.
WARNING
To prevent serious injury during
an accident or deployment of
the air bag, do not modify the
rearview mirror and do not
install a wide mirror.
WARNING
NEVER adjust the mirror while
driving. This may cause loss of
vehicle control resulting in an
accident.
WARNING
OHI049594N