USB GENESIS G90 2021 Quick Reference Guide
[x] Cancel search | Manufacturer: GENESIS, Model Year: 2021, Model line: G90, Model: GENESIS G90 2021Pages: 31, PDF Size: 8.91 MB
Page 3 of 31
126 3
9
AIRBAG
GENESIS12
6 3
9
AIRBAG
GENESIS
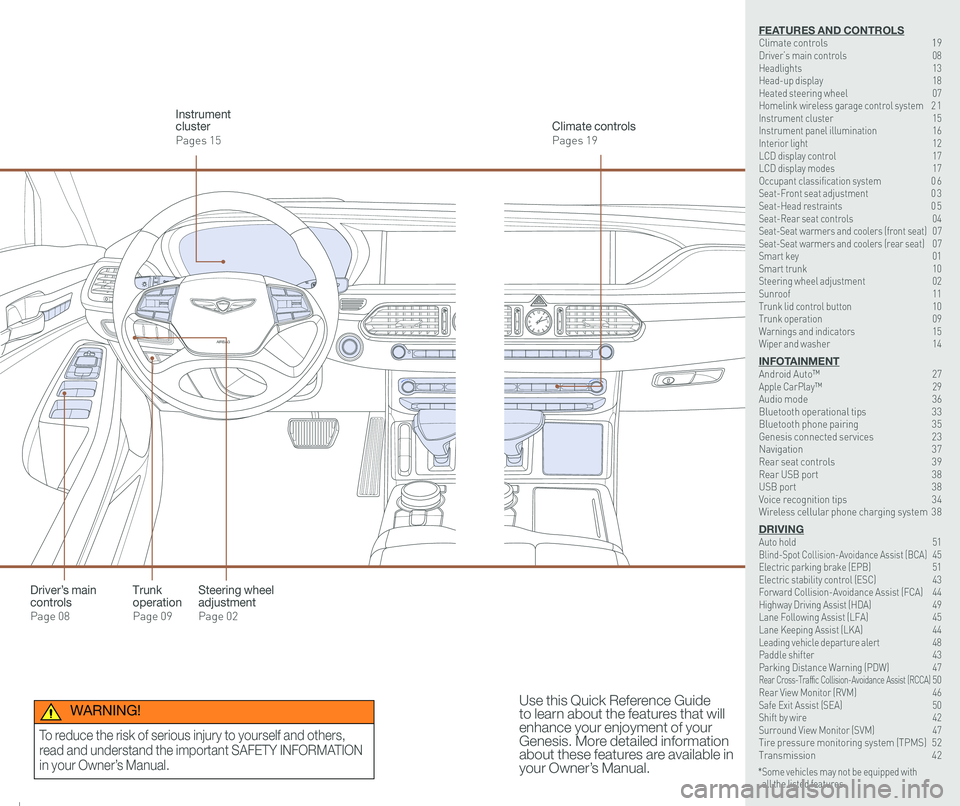
Steering wheel adjustment
Page 02
Climate controls
Pages 19
Instrument cluster
Pages 15
Use this Quick Reference Guide to learn about the features that will enhance your enjoyment of your Genesis. More detailed information about these features are available in your Owner’s Manual.
Trunk operation
Page 09
Driver’s main controls
Page 08
* Some vehicles may not be equipped with all the listed features.
WARNING!
To reduce the risk of serious injury to yourself and others,
read and understand the important SAFETY INFORMATION
in your Owner’s Manual.
FEATURES AND CONTROLSClimate controls 19Driver’s main controls 08Headlights 13Head-up display 18Heated steering wheel 07Homelink wireless garage control system 2 1Instrument cluster 15Instrument panel illumination 16Interior light 12LCD display control 17LCD display modes 17Occupant classification system 0 6 Seat-Front seat adjustment 0 3Seat-Head restraints 0 5Seat-Rear seat controls 04Seat-Seat warmers and coolers (front seat) 07Seat-Seat warmers and coolers (rear seat) 07Smart key 01 Smart trunk 10Steering wheel adjustment 02Sunroof 11Trunk lid control button 10Trunk operation 09Warnings and indicators 15Wiper and washer 14
INFOTAINMENTAndroid Auto™ 27Apple CarPlay™ \
29Audio mode 36Bluetooth operational tips 33Bluetooth phone pairing 35Genesis connected services 23Navigation 37Rear seat controls 39Rear USB port 38USB port 38Voice recognition tips 34Wireless cellular phone charging system 38
DRIVINGAuto hold 51 Blind-Spot Collision-Avoidance Assist (BCA) 45 Electric parking brake (EPB) 51 Electric stability control (ESC) 43Forward Collision-Avoidance Assist (FCA) 44Highway Driving Assist (HDA) 49Lane Following Assist (LFA) 45 Lane Keeping Assist (LKA) 44Leading vehicle departure alert 48 Paddle shifter 43Parking Distance Warning (PDW) 47Rear Cross-Traffic Collision-Avoidance Assist (RCCA) 50 Rear View Monitor (RVM) 46 Safe Exit Assist (SEA) 50 Shift by wire 42 Surround View Monitor (SVM) 47 Tire pressure monitoring system (TPMS) 52Transmission 42
Page 17 of 31
Quick Reference Guide I 2827 I Quick Reference Guide
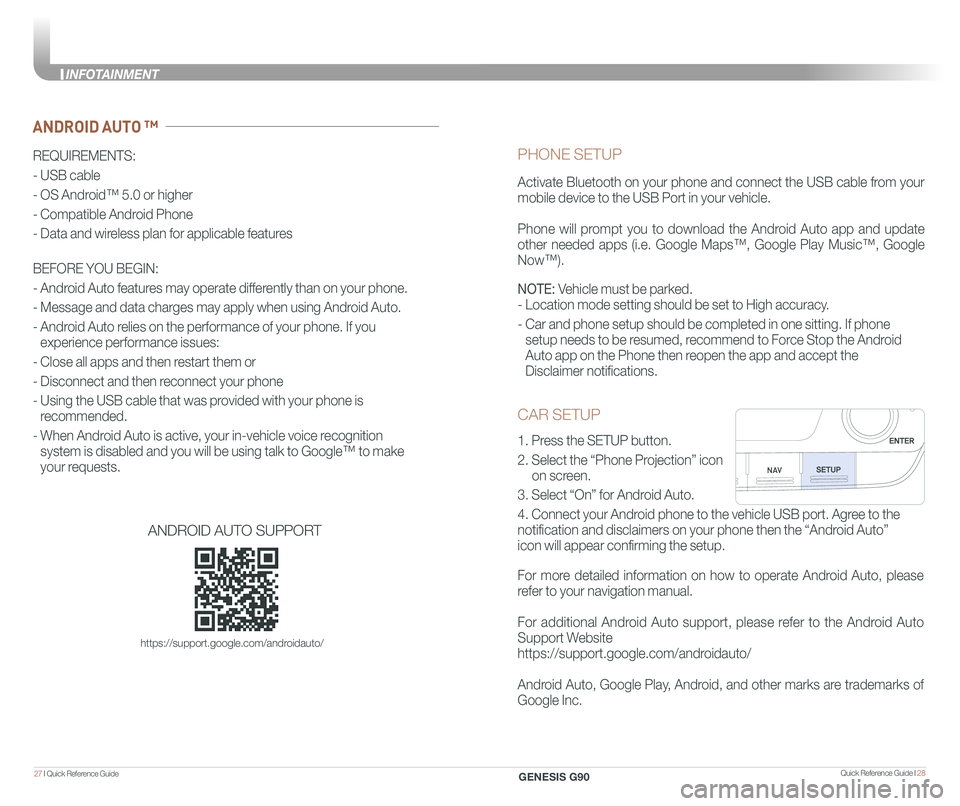
CAR SETUP
1. Press the SETUP button.
2. Select the “Phone Projection” icon
on screen.
3. Select “On” for Android Auto.
4. Connect your Android phone to the vehicle USB port. Agree to the
notification and disclaimers on your phone then the “Android Auto”
icon will appear confirming the setup.
For more detailed information on how to operate Android Auto, please
refer to your navigation manual.
For additional Android Auto support, please refer to the Android Auto
Support Website
https://support.google.com/androidauto/
Android Auto, Google Play, Android, and other marks are trademarks of
Google Inc.
PHONE SETUP
Activate Bluetooth on your phone and connect the USB cable from your
mobile device to the USB Port in your vehicle.
Phone will prompt you to download the Android Auto app and update
other needed apps (i.e. Google Maps™, Google Play Music™, Google
Now™).
NOTE: Vehicle must be parked.
- Location mode setting should be set to High accuracy.
- Car and phone setup should be completed in one sitting. If phone
setup needs to be resumed, recommend to Force Stop the Android
Auto app on the Phone then reopen the app and accept the
Disclaimer notifications.
ANDROID AUTO ™
REQUIREMENTS:
- USB cable
- OS Android™ 5.0 or higher
- Compatible Android Phone
- Data and wireless plan for applicable features
BEFORE YOU BEGIN:
- Android Auto features may operate differently than on your phone.
- Message and data charges may apply when using Android Auto.
- Android Auto relies on the performance of your phone. If you
experience performance issues:
- Close all apps and then restart them or
- Disconnect and then reconnect your phone
- Using the USB cable that was provided with your phone is
recommended.
- When Android Auto is active, your in-vehicle voice recognition
system is disabled and you will be using talk to Google™ to make
your requests.
ANDROID AUTO SUPPORT
https://support.google.com/androidauto/
GENESIS G90
INFOTAINMENT
Page 18 of 31
Quick Reference Guide I 3029 I Quick Reference Guide
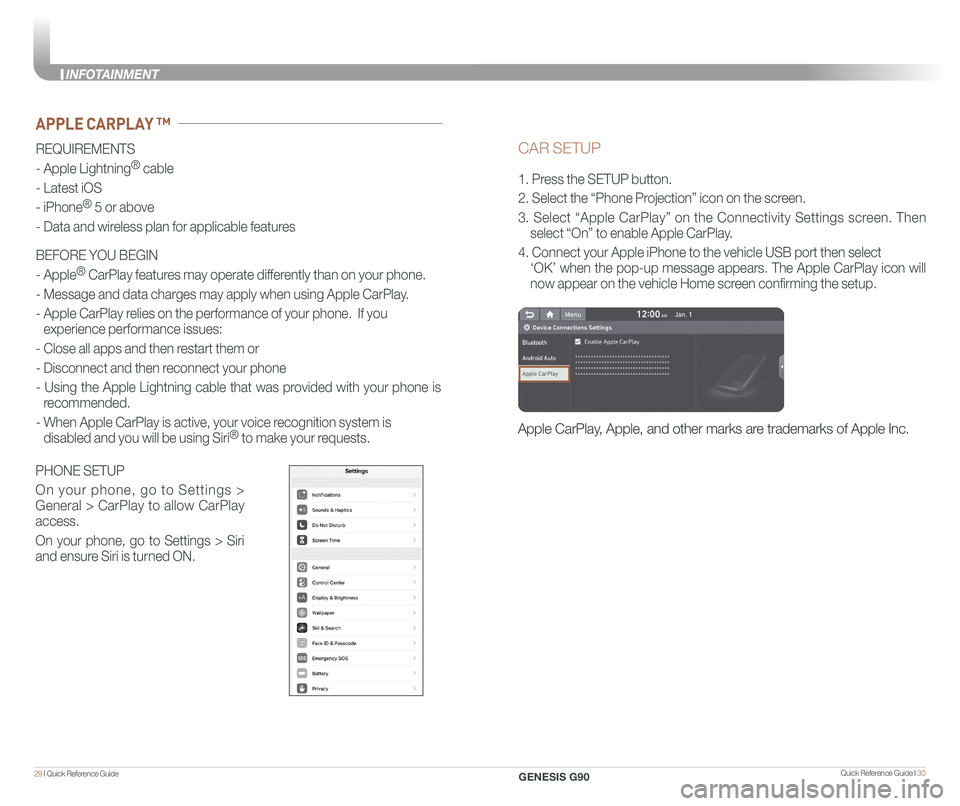
CAR SETUP
1. Press the SETUP button.
2. Select the “Phone Projection” icon on the screen.
3. Select “Apple CarPlay” on the Connectivity Settings screen. Then
select “On” to enable Apple CarPlay.
4. Connect your Apple iPhone to the vehicle USB port then select
‘OK’ when the pop-up message appears. The Apple CarPlay icon will \
now appear on the vehicle Home screen confirming the setup.
Apple CarPlay, Apple, and other marks are trademarks of Apple Inc.
REQUIREMENTS
- Apple Lightning® cable
- Latest iOS
- iPhone® 5 or above
- Data and wireless plan for applicable features
BEFORE YOU BEGIN
- Apple® CarPlay features may operate differently than on your phone.
- Message and data charges may apply when using Apple CarPlay.
- Apple CarPlay relies on the performance of your phone. If you
experience performance issues:
- Close all apps and then restart them or
- Disconnect and then reconnect your phone
- Using the Apple Lightning cable that was provided with your phone is
recommended.
- When Apple CarPlay is active, your voice recognition system is
disabled and you will be using Siri® to make your requests.
APPLE CARPLAY ™
PHONE SETUP
On your phone, go to Settings >
General > CarPlay to allow CarPlay
access.
On your phone, go to Settings > Siri
and ensure Siri is turned ON.
GENESIS G90
INFOT
Page 21 of 31
Quick Reference Guide I 3635 I Quick Reference Guide
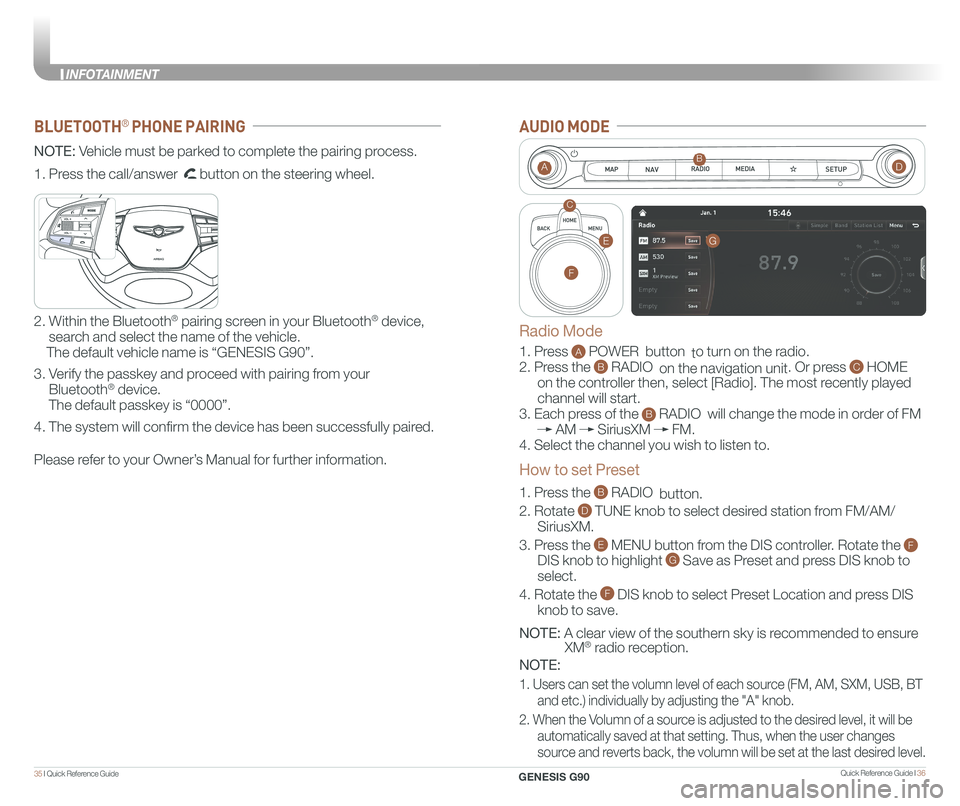
BLUETOOTH® PHONE PAIRING
NOTE: Vehicle must be parked to complete the pairing process.
Please refer to your Owner’s Manual for further information.
1. Press the call/answer button on the steering wheel.
2. Within the Bluetooth® pairing screen in your Bluetooth® device,
search and select the name of the vehicle.
The default vehicle name is “GENESIS G90”.
3. Verify the passkey and proceed with pairing from your
Bluetooth® device.
The default passkey is “0000”.
4. The system will confirm the device has been successfully paired.
GENESIS
GENESIS
AUDIO MODE
1. Press A POWER button to turn on the radio.
2. Press the B RADIO on the navigation unit. Or press C HOME
on the controller then, select [Radio]. The most recently played
channel will start.
3. Each press of the B RADIO will change the mode in order of FM
AM SiriusXM FM.
4. Select the channel you wish to listen to.
1. Press the B RADIO button.
2. Rotate D TUNE knob to select desired station from FM/AM/
SiriusXM.
3. Press the E MENU button from the DIS controller. Rotate the F
DIS knob to highlight G Save as Preset and press DIS knob to
select.
4. Rotate the F DIS knob to select Preset Location and press DIS
knob to save.
NOTE: A clear view of the southern sky is recommended to ensure
XM® radio reception.
NOTE:
1. Users can set the volumn level of each source (FM, AM, SXM, USB, BT
and etc.) individually by adjusting the "A" knob.
2. When the Volumn of a source is adjusted to the desired level, it will be
automatically saved at that setting. Thus, when the user changes
source and reverts back, the volumn will be set at the last desired level.
AB
C
Radio Mode
How to set Preset
G
F
E
D
GENESIS G90
INFOTAINMENT
Page 22 of 31
Quick Reference Guide I 3837 I Quick Reference Guide
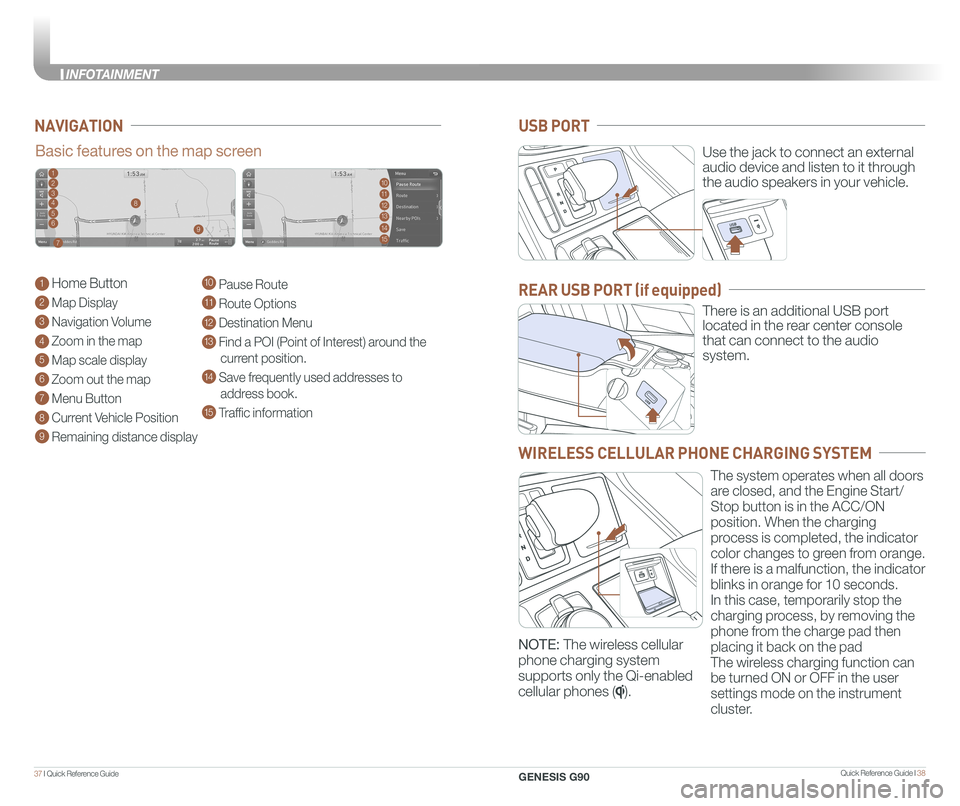
NAVIGATION
Basic features on the map screen
1 Home Button
2 Map Display
3 Navigation Volume
4 Zoom in the map
5 Map scale display
6 Zoom out the map
7 Menu Button
8 Current Vehicle Position
9 Remaining distance display
10 Pause Route
11 Route Options
12 Destination Menu
13 Find a POI (Point of Interest) around the
current position.
14 Save frequently used addresses to
address book.
15 Traffic information
1102113124135
146
157
8
9
Use the jack to connect an external
audio device and listen to it through
the audio speakers in your vehicle.
There is an additional USB port
located in the rear center console
that can connect to the audio
system.
USB PORT
REAR USB PORT (if equipped)
WIRELESS CELLULAR PHONE CHARGING SYSTEM
The system operates when all doors
are closed, and the Engine Start/
Stop button is in the ACC/ON
position. When the charging
process is completed, the indicator
color changes to green from orange.
If there is a malfunction, the indicator
blinks in orange for 10 seconds.
In this case, temporarily stop the
charging process, by removing the
phone from the charge pad then
placing it back on the pad
The wireless charging function can
be turned ON or OFF in the user
settings mode on the instrument
cluster.
NOTE: The wireless cellular
phone charging system
supports only the Qi-enabled
cellular phones ().
GENESIS G90
INFOTAINMENT
Page 23 of 31
Quick Reference Guide I 4039 I Quick Reference Guide
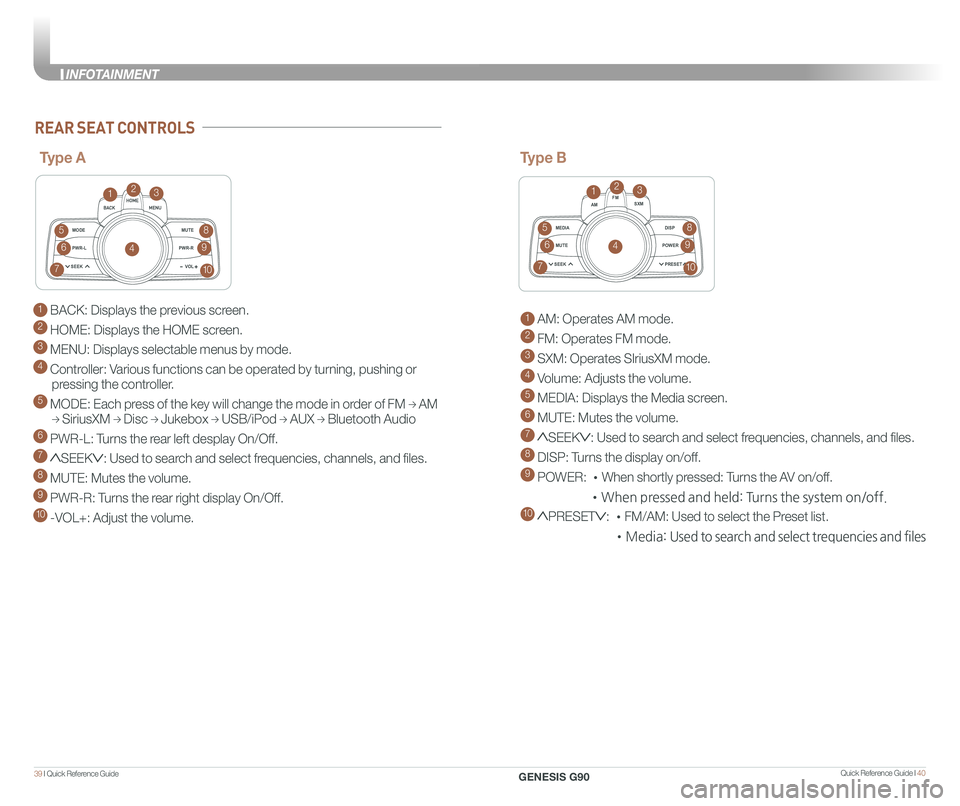
1 BACK: Displays the previous screen.
2 HOME: Displays the HOME screen.
3 MENU: Displays selectable menus by mode.
4 Controller: Various functions can be operated by turning, pushing or
pressing the controller.
5 MODE: Each press of the key will change the mode in order of FM → AM
→ SiriusXM → Disc → Jukebox → USB/iPod → AUX → Bluetooth Audio
6 PWR-L: Turns the rear left desplay On/Off.
7 SEEK: Used to search and select frequencies, channels, and files.
8 MUTE: Mutes the volume.
9 PWR-R: Turns the rear right display On/Off.
10 -VOL+: Adjust the volume.
MODEMUTE
PWR-L
SEEK VOL
PWR-R
MEDIA AM
FM
SXM
DISP
MUTE
SEEK PRESET
POWER
REAR SEAT CONTROLS
Type A
123
4
5
6
7
8
9
10
MODE
MUTE
PWR-L
SEEK VOL
PWR-R
MEDIA AM
FM
SXM
DISP
MUTE
SEEK PRESET
POWER
Type B
1 AM: Operates AM mode.
2 FM: Operates FM mode.
3 SXM: Operates SIriusXM mode.
4 Volume: Adjusts the volume.
5 MEDIA: Displays the Media screen.
6 MUTE: Mutes the volume.
7 SEEK: Used to search and select frequencies, channels, and files.
8 DISP: Turns the display on/off.
9 POWER: •When shortly pressed: Turns the AV on/off.
•When pressed and held: Turns the system on/off.
10 PRESET: •FM/AM: Used to select the Preset list.
•Media: Used to search and select trequencies and files
123
4
5
6
7
8
9
10
GENESIS G90
INFOTAINMENT