tow GENESIS GV80 2021 Owner's Manual
[x] Cancel search | Manufacturer: GENESIS, Model Year: 2021, Model line: GV80, Model: GENESIS GV80 2021Pages: 632, PDF Size: 9.37 MB
Page 11 of 632
01
1 -7
VEHICLE MODIFICATIONS
• This vehicle should not be modified. Modification of your vehicle could affect its
performance, safety or durability and may even violate governmental safety and
emissions regulations.
• In addition, damage or performance problems resulting from any modification may
not be covered under warranty.
• If you use unauthorized electronic devices, it may cause the vehicle to operate
abnormally, wire damage, battery discharge and fire. For your safety, do not use
unauthorized electronic devices.
NOTICE
All warning sounds (e.g. welcome/good-bye sound, virtual engine sound, road
active noise control) are generated from the interior amplifiers. If necessary, we
recommend you to purchase Genesis Part to replace an interior amplifier. Any
unauthorized product may cause a malfunction of the interior amplifiers.
VEHICLE BREAK-IN PROCESS
• Do not race the engine.
• While driving, keep your engine speed (rpm, or revolutions per minute) between
2,000 rpm and 4,000 rpm.
• Do not maintain a single speed for long periods of time, either fast or slow. Varying
engine speed is needed to properly break-in the engine.
• Avoid hard stops, except in emergencies, to allow the brakes to seat properly.
• Do not tow a trailer during the first 1,200 miles (2,000 km) of operation.
NOTICE
CALIFORNIA PROPOSITION 65 WARNING
Items contained in motor vehicles or emitted from them are known to the State of
California to cause cancer and birth defects or reproductive harm. These include:
• Gasoline and its vapors
• Engine exhaust
• Used engine oil
• Interior passenger compartment components and materials
• Component parts which are subject to heat and wear
In addition, battery posts, terminals and related accessories contain lead, lead
compounds and other chemicals known to the State of California to cause cancer
and reproductive harm.
Page 52 of 632

03
3-23
Front seat head restraints
OJX1039063LOJX1039063L
The driver’s and front passenger’s seats
are equipped with adjustable head
restraints for the passengers safety and
comfort.
OJX1039009OJX1039009
Adjusting the height up and down
To raise the head restraint:
1. Pull it up to the desired position (1).
To lower the head restraint:
1. Push and hold the release button (2)
on the head restraint support.
2. Lower the head restraint to the
desired position (3).
NOTICE
OHI038136OHI038136
If you recline the seatback towards the
front with the head restraint and seat
cushion raised, the head restraint may
come in contact with the sunvisor or
other parts of the vehicle.
Page 82 of 632
03
3-53
OHI038148OHI038148
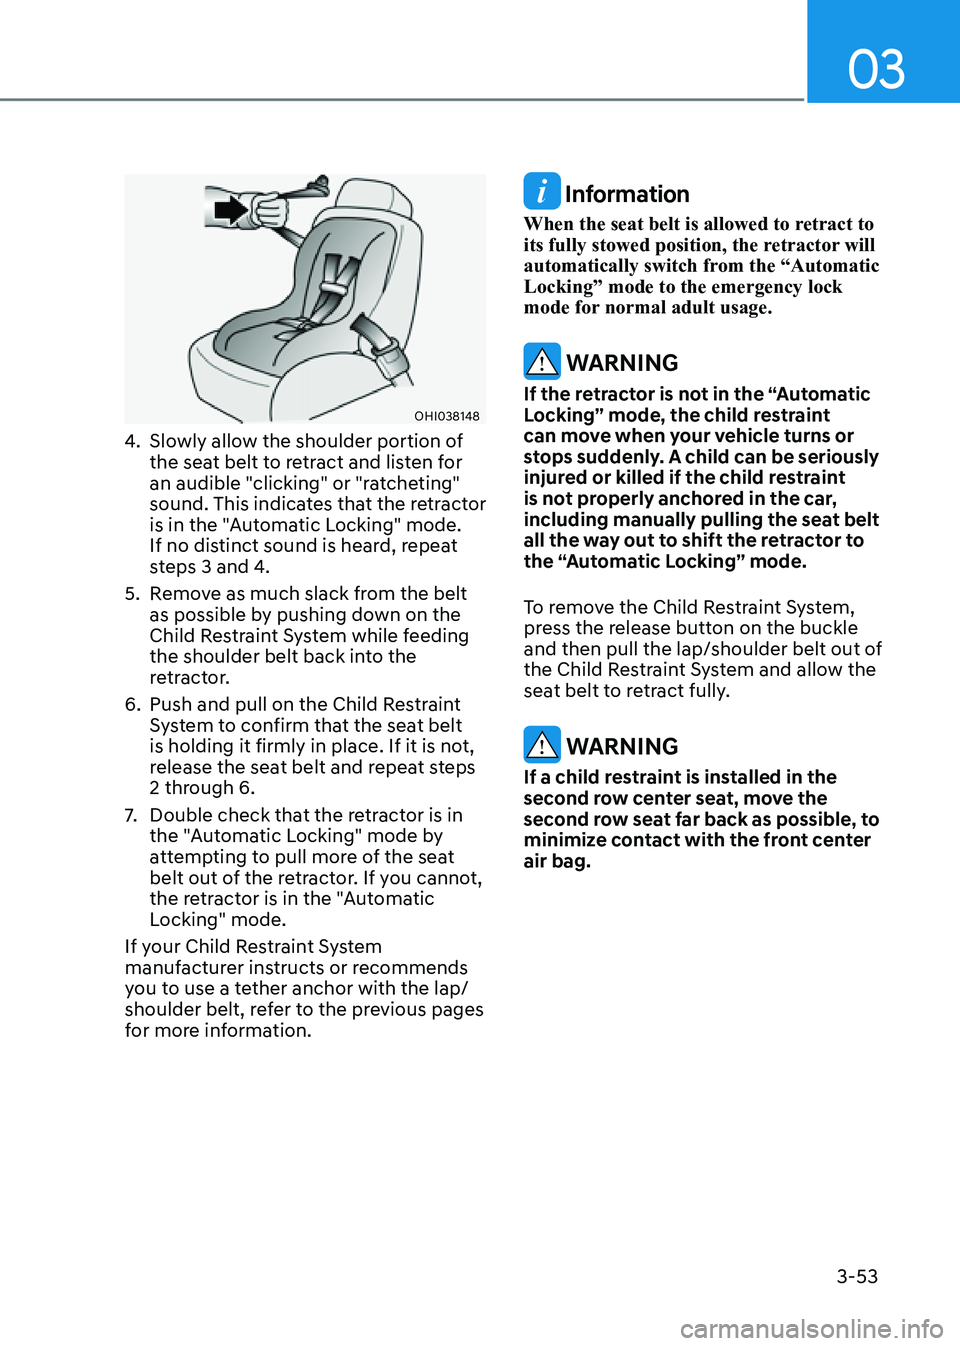
4. Slowly allow the shoulder portion of
the seat belt to retract and listen for
an audible "clicking" or "ratcheting"
sound. This indicates that the retractor
is in the "Automatic Locking" mode.
If no distinct sound is heard, repeat
steps 3 and 4.
5. Remove as much slack from the belt
as possible by pushing down on the
Child Restraint System while feeding
the shoulder belt back into the
retractor.
6. Push and pull on the Child Restraint
System to confirm that the seat belt
is holding it firmly in place. If it is not,
release the seat belt and repeat steps
2 through 6.
7. Double check that the retractor is in
the "Automatic Locking" mode by
attempting to pull more of the seat
belt out of the retractor. If you cannot,
the retractor is in the "Automatic
Locking" mode.
If your Child Restraint System
manufacturer instructs or recommends
you to use a tether anchor with the lap/
shoulder belt, refer to the previous pages
for more information.
Information
When the seat belt is allowed to retract to
its fully stowed position, the retractor will
automatically switch from the “Automatic
Locking” mode to the emergency lock
mode for normal adult usage.
WARNING
If the retractor is not in the “Automatic
Locking” mode, the child restraint
can move when your vehicle turns or
stops suddenly. A child can be seriously
injured or killed if the child restraint
is not properly anchored in the car,
including manually pulling the seat belt
all the way out to shift the retractor to
the “Automatic Locking” mode.
To remove the Child Restraint System,
press the release button on the buckle
and then pull the lap/shoulder belt out of
the Child Restraint System and allow the
seat belt to retract fully.
WARNING
If a child restraint is installed in the
second row center seat, move the
second row seat far back as possible, to
minimize contact with the front center
air bag.
Page 94 of 632
03
3-65
Main components of the Occupant
Classification System
• A detection device located within the
front passenger seat cushion.
• Electronic system to determine
whether the passenger air bag
systems should be activated or
deactivated.
• An indicator light located on the
instrument panel which illuminates
the words “PASSENGER AIR BAG OFF”
indicating the front passenger air bag
system is deactivated.
• The instrument panel air bag indicator
light is interconnected with the OCS.
The OCS is designed to help detect
the presence of a properly-seated
front passenger and determine if the
passenger’s front air bag should be
enabled (may inflate) or not.
The purpose is to help reduce the risk
of injury or death from an inflating air
bag to certain front passenger seat
occupants, such as children, by requiring
the air bag to be automatically turned
OFF.
For example, if a child restraint of the
type specified in the regulations is on the
seat, the occupant classification sensor
can detect it and cause the air bag to
turn OFF.
Front passenger seat adult occupants
who are properly seated and wearing the
seat belt properly, should not cause the
passenger air bag to be automatically
turned OFF. For smaller adults it may turn
OFF, however, if the occupant does not
sit in the seat properly (for example, by
not sitting upright, by sitting on the edge
of the seat, or by otherwise being out of
position), this could cause the sensor to
turn the air bag OFF. You will find the “PASSENGER AIR BAG
OFF” indicator on the center fascia
panel. This system detects the conditions
1-4 in the following table and activates or
deactivates the front passenger air bag
based on these conditions.
Always be sure that you and all vehicle
occupants are seated properly and
wearing the seat belt properly for the
most effective protection by the air bag
and the seat belt.
The OCS may not function properly if the
passenger takes actions which can affect
the classification system. These include:• Failing to sit in an upright position.
• Leaning against the door or center
console.
• Sitting towards the sides of the front
of the seat.
• Putting their legs on the dashboard or
resting them on other locations which
reduce the passenger weight on the
front seat.
• Wearing the seat belt improperly.
• Reclining the seatback.
• Wearing thick clothes like ski wear or
hip protection wear.
• Putting an additional thick cushion on
the seat.
• Putting electrical devices (e.g.
notebook, satellite radio) on the seat
with inverter charging.
Page 96 of 632

03
3-67
WARNING
Riding in an improper position or placing weight on the front passenger’s seat when
it is unoccupied by a passenger adversely affects the OCS. To reduce the risk of
serious injury or death:
OHI038163OHI038163
• NEVER put a heavy load in the front seat or seatback
pocket, or hang any items on the front passenger
seat.
OHI038156OHI038156
• NEVER place your feet on the front passenger
seatback.
OHI038155OHI038155
• NEVER sit with your hips shifted towards the front of
the seat.
OHI038157OHI038157
• NEVER ride with the seatback reclined when the
vehicle is moving.
OHI039192NOHI039192N
• NEVER place your feet or legs on the dashboard.
Page 99 of 632
Safety System
3-70
Do not install a Child Restraint
System on the Front Passenger's
Seat
OHI039193NOHI039193N
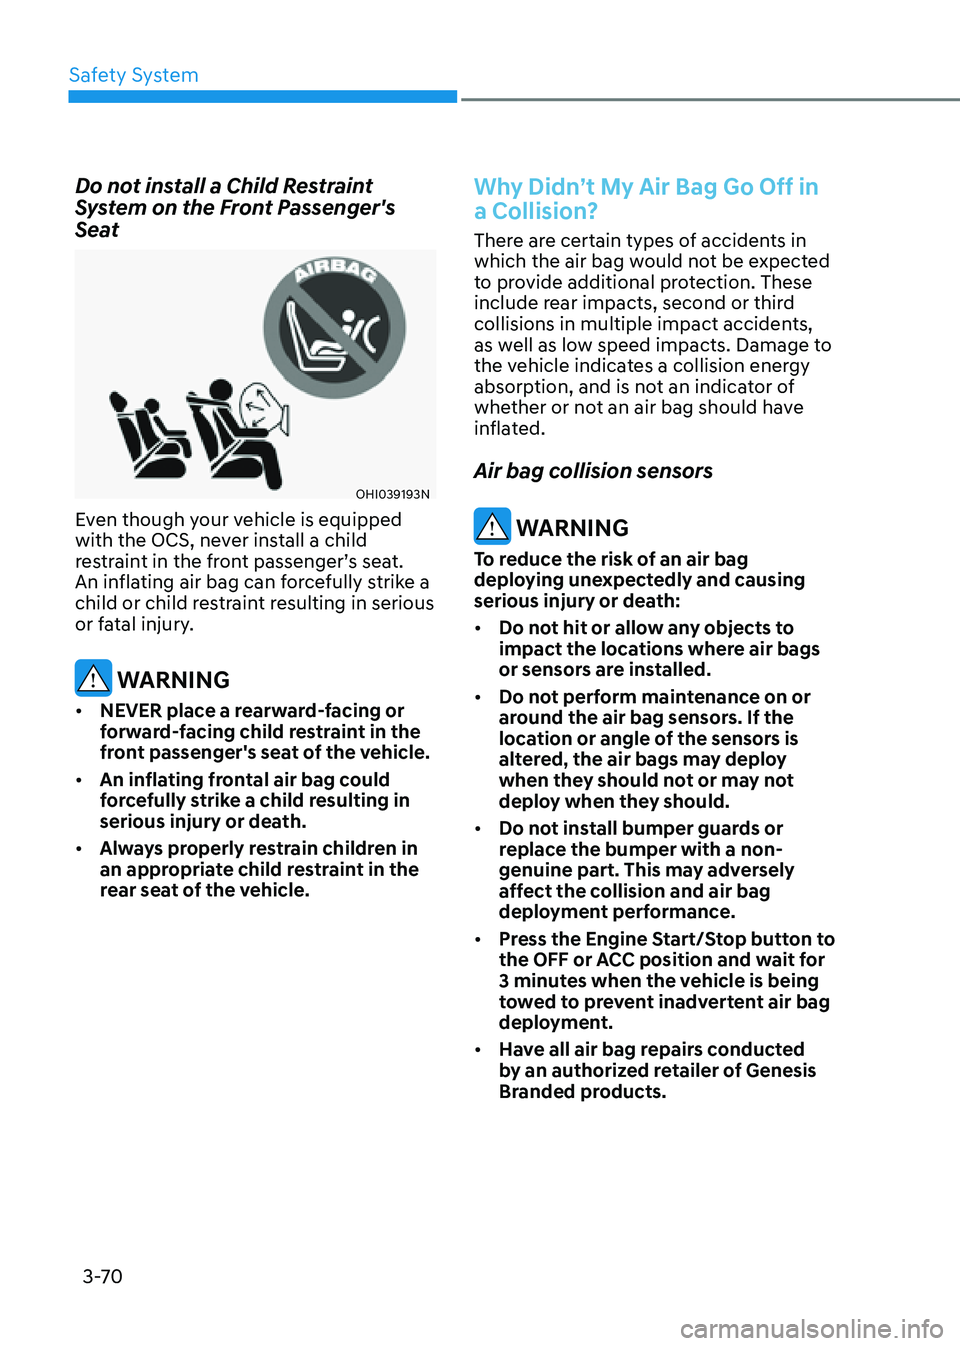
Even though your vehicle is equipped
with the OCS, never install a child
restraint in the front passenger’s seat.
An inflating air bag can forcefully strike a
child or child restraint resulting in serious
or fatal injury.
WARNING
• NEVER place a rearward-facing or
forward-facing child restraint in the
front passenger's seat of the vehicle.
• An inflating frontal air bag could
forcefully strike a child resulting in
serious injury or death.
• Always properly restrain children in
an appropriate child restraint in the
rear seat of the vehicle.
Why Didn’t My Air Bag Go Off in
a Collision?
There are certain types of accidents in
which the air bag would not be expected
to provide additional protection. These
include rear impacts, second or third
collisions in multiple impact accidents,
as well as low speed impacts. Damage to
the vehicle indicates a collision energy
absorption, and is not an indicator of
whether or not an air bag should have
inflated.
Air bag collision sensors
WARNING
To reduce the risk of an air bag
deploying unexpectedly and causing
serious injury or death:
• Do not hit or allow any objects to
impact the locations where air bags
or sensors are installed.
• Do not perform maintenance on or
around the air bag sensors. If the
location or angle of the sensors is
altered, the air bags may deploy
when they should not or may not
deploy when they should.
• Do not install bumper guards or
replace the bumper with a non-
genuine part. This may adversely
affect the collision and air bag
deployment performance.
• Press the Engine Start/Stop button to
the OFF or ACC position and wait for
3 minutes when the vehicle is being
towed to prevent inadvertent air bag
deployment.
• Have all air bag repairs conducted
by an authorized retailer of Genesis
Branded products.
Page 140 of 632
04
4-35
Information
• When your face gets too close or far to
the instrument cluster, or the camera
on the instrument cluster is blocked by
the steering wheel or other objects, the
3D cluster changes to 2D automatically.
However if the object blocking the
camera is removed, the cluster changes
back to 3D automatically.
• If outside temperature is below 39°F
(4°C), it may change to 2D about 1 to
10 minutes.
• Two red lights may appear on the
camera in the following conditions
when:
-The outside brightness is dim or
driving at night
-The vehicle drives inside a building,
such as a basement parking lot
-The camera case of the instrument
cluster is partially damaged
CAUTION
• It may sometimes be difficult to
read information on the 3D cluster
in the following situations. You must
change the cluster to 2D for safe
driving.
-The driver is wearing sunglasses,
special glasses, infrared cutoff
glasses, refracting glasses or thick
glasses
-The driver has heavy eye makeup
(eyeliner, mascara, color makeup,
false eyelash) or eye piercing
-The driver’s view is blocked by his/
her hair, etc.
-The driver is winking or wearing an
eye patch on one eye
-The driver’s face is covered
partially by a mask, muffler, hood,
etc.
-The driver’s view is blocked by
incoming light from outside of the
vehicle
-Light from outside, sunlight or
infrared LED light of the camera
is reflected on the glasses or
sunglasses
-The driver turns or lowers his/her
head so that the face or an eye is
hidden from the camera
-The driver shakes his/her head
up and down, or adverse road
conditions cause excessive vehicle
vibrations while driving
-The driver is too tall or short
-More than two people are
looking at the instrument cluster
simultaneously from the driver’s
seat
-The driver’s eyesight of both eyes
are severely different
-The driver has a severe headache
• Do not look toward the camera
within 8 in (20 cm) for longer than a
minute.
• If you use the 3D cluster while your
vehicle is stopped, it can cause eye
strains or dizziness.
• We recommend people who are
pregnant, elderly or has motion
sickness, avoid using the cluster in
3D.
Page 151 of 632
05
5-9
Mechanical key
If the Smart Key does not operate
normally, you can lock or unlock the
driver’s door by using the mechanical
key.
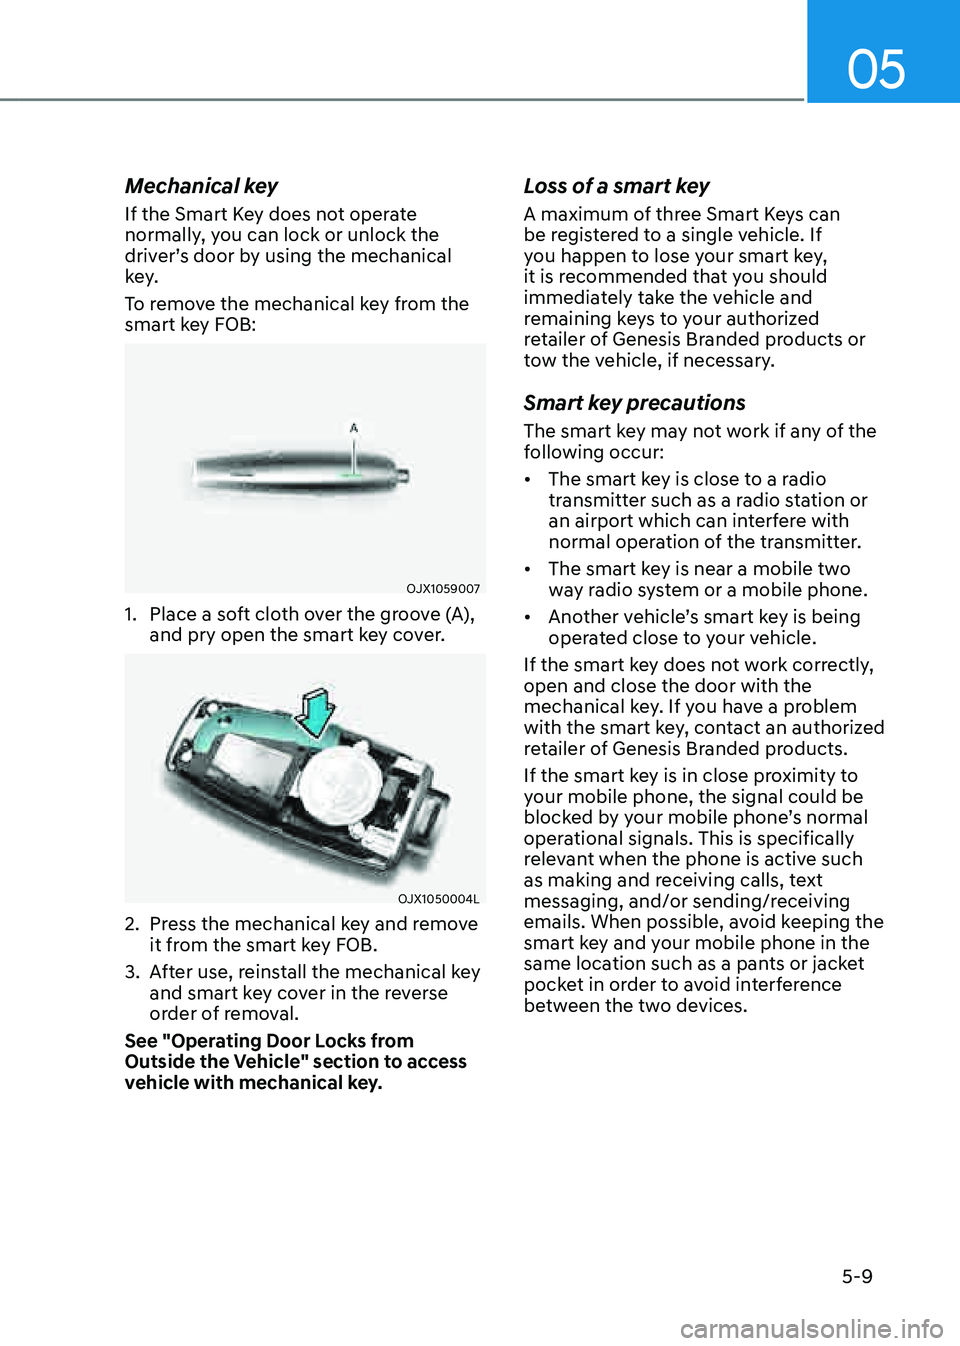
To remove the mechanical key from the
smart key FOB:
OJX1059007OJX1059007
1. Place a soft cloth over the groove (A),
and pry open the smart key cover.
OJX1050004LOJX1050004L
2. Press the mechanical key and remove
it from the smart key FOB.
3. After use, reinstall the mechanical key
and smart key cover in the reverse
order of removal.
See "Operating Door Locks from
Outside the Vehicle" section to access
vehicle with mechanical key.
Loss of a smart key
A maximum of three Smart Keys can
be registered to a single vehicle. If
you happen to lose your smart key,
it is recommended that you should
immediately take the vehicle and
remaining keys to your authorized
retailer of Genesis Branded products or
tow the vehicle, if necessary.
Smart key precautions
The smart key may not work if any of the
following occur:
• The smart key is close to a radio
transmitter such as a radio station or
an airport which can interfere with
normal operation of the transmitter.
• The smart key is near a mobile two
way radio system or a mobile phone.
• Another vehicle’s smart key is being
operated close to your vehicle.
If the smart key does not work correctly,
open and close the door with the
mechanical key. If you have a problem
with the smart key, contact an authorized
retailer of Genesis Branded products.
If the smart key is in close proximity to
your mobile phone, the signal could be
blocked by your mobile phone’s normal
operational signals. This is specifically
relevant when the phone is active such
as making and receiving calls, text
messaging, and/or sending/receiving
emails. When possible, avoid keeping the
smart key and your mobile phone in the
same location such as a pants or jacket
pocket in order to avoid interference
between the two devices.
Page 168 of 632
Convenient Features
5-26
Operating Door Locks From
Outside the Vehicle
Mechanical key
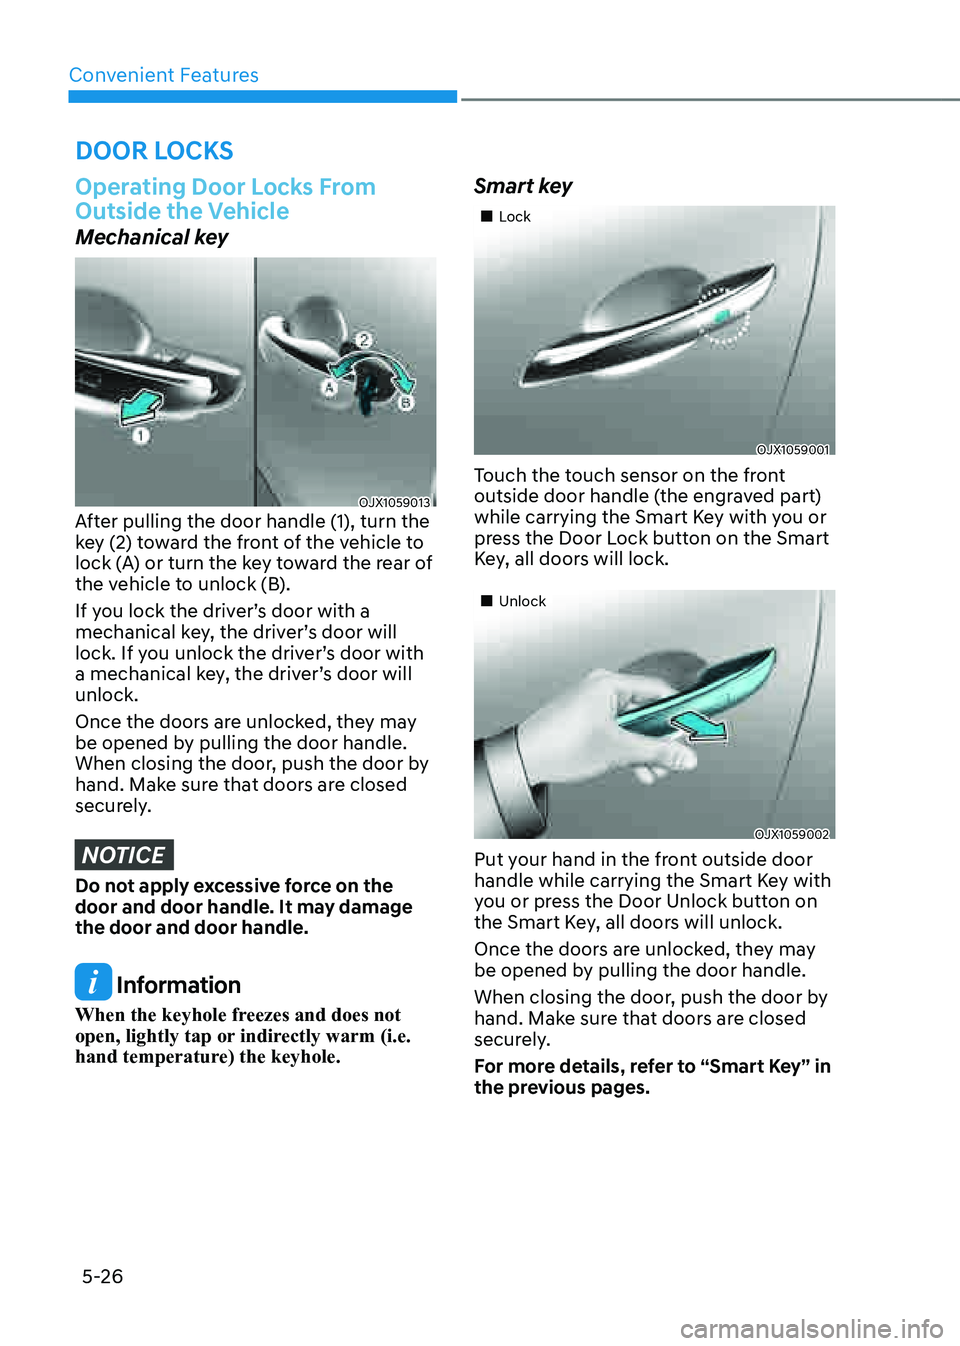
OJX1059013OJX1059013After pulling the door handle (1), turn the
key (2) toward the front of the vehicle to
lock (A) or turn the key toward the rear of
the vehicle to unlock (B).
If you lock the driver’s door with a
mechanical key, the driver’s door will
lock. If you unlock the driver’s door with
a mechanical key, the driver’s door will
unlock.
Once the doors are unlocked, they may
be opened by pulling the door handle.
When closing the door, push the door by
hand. Make sure that doors are closed
securely.
NOTICE
Do not apply excessive force on the
door and door handle. It may damage
the door and door handle.
Information
When the keyhole freezes and does not
open, lightly tap or indirectly warm (i.e.
hand temperature) the keyhole.
Smart key
�
Page 182 of 632
Convenient Features
5-40
Tilt / Telescopic Steering
When adjusting the steering wheel to a
comfortable position, adjust the steering
wheel so that it points toward your chest,
not toward your face. Make sure you can
see the instrument cluster warning lights
and gauges. After adjusting, push the
steering wheel both up and down to be
certain it is locked in position.
Always adjust the position of the steering
wheel before driving.
WARNING
NEVER adjust the steering wheel while
driving. This may cause loss of vehicle
control resulting in an accident.
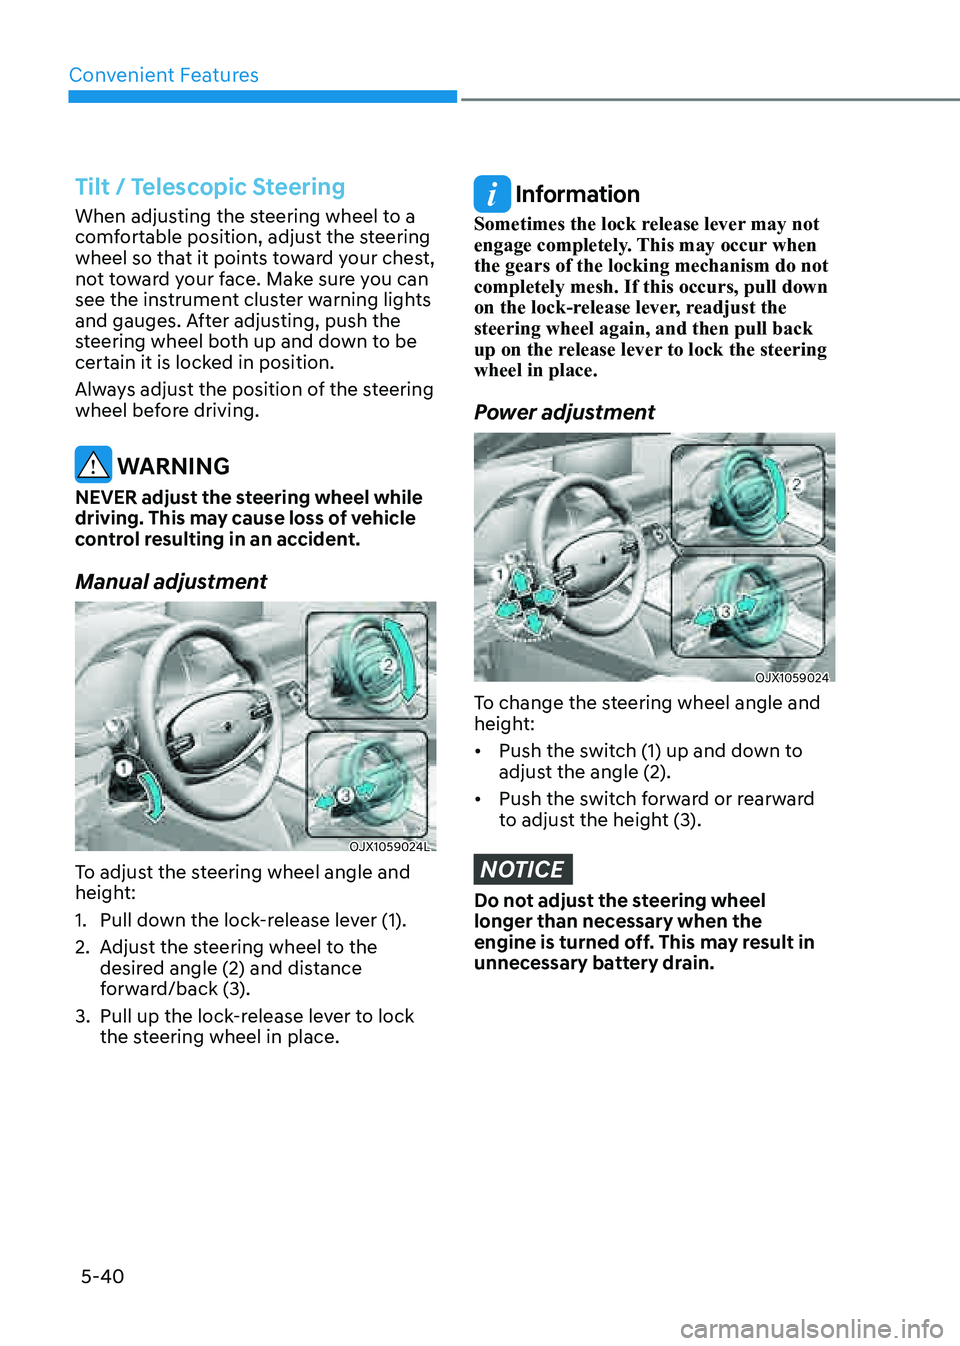
Manual adjustment
OJX1059024LOJX1059024L
To adjust the steering wheel angle and
height:
1. Pull down the lock-release lever (1).
2. Adjust the steering wheel to the
desired angle (2) and distance
forward/back (3).
3. Pull up the lock-release lever to lock
the steering wheel in place.
Information
Sometimes the lock release lever may not
engage completely. This may occur when
the gears of the locking mechanism do not
completely mesh. If this occurs, pull down
on the lock-release lever, readjust the
steering wheel again, and then pull back
up on the release lever to lock the steering
wheel in place.
Power adjustment
OJX1059024OJX1059024
To change the steering wheel angle and
height:
• Push the switch (1) up and down to
adjust the angle (2).
• Push the switch forward or rearward
to adjust the height (3).
NOTICE
Do not adjust the steering wheel
longer than necessary when the
engine is turned off. This may result in
unnecessary battery drain.