automatic transmission GENESIS GV80 2021 User Guide
[x] Cancel search | Manufacturer: GENESIS, Model Year: 2021, Model line: GV80, Model: GENESIS GV80 2021Pages: 632, PDF Size: 9.37 MB
Page 292 of 632
Driving Your Vehicle
6-20
Paddle Shifter (Manual Shift
Mode)
OJX1069011OJX1069011
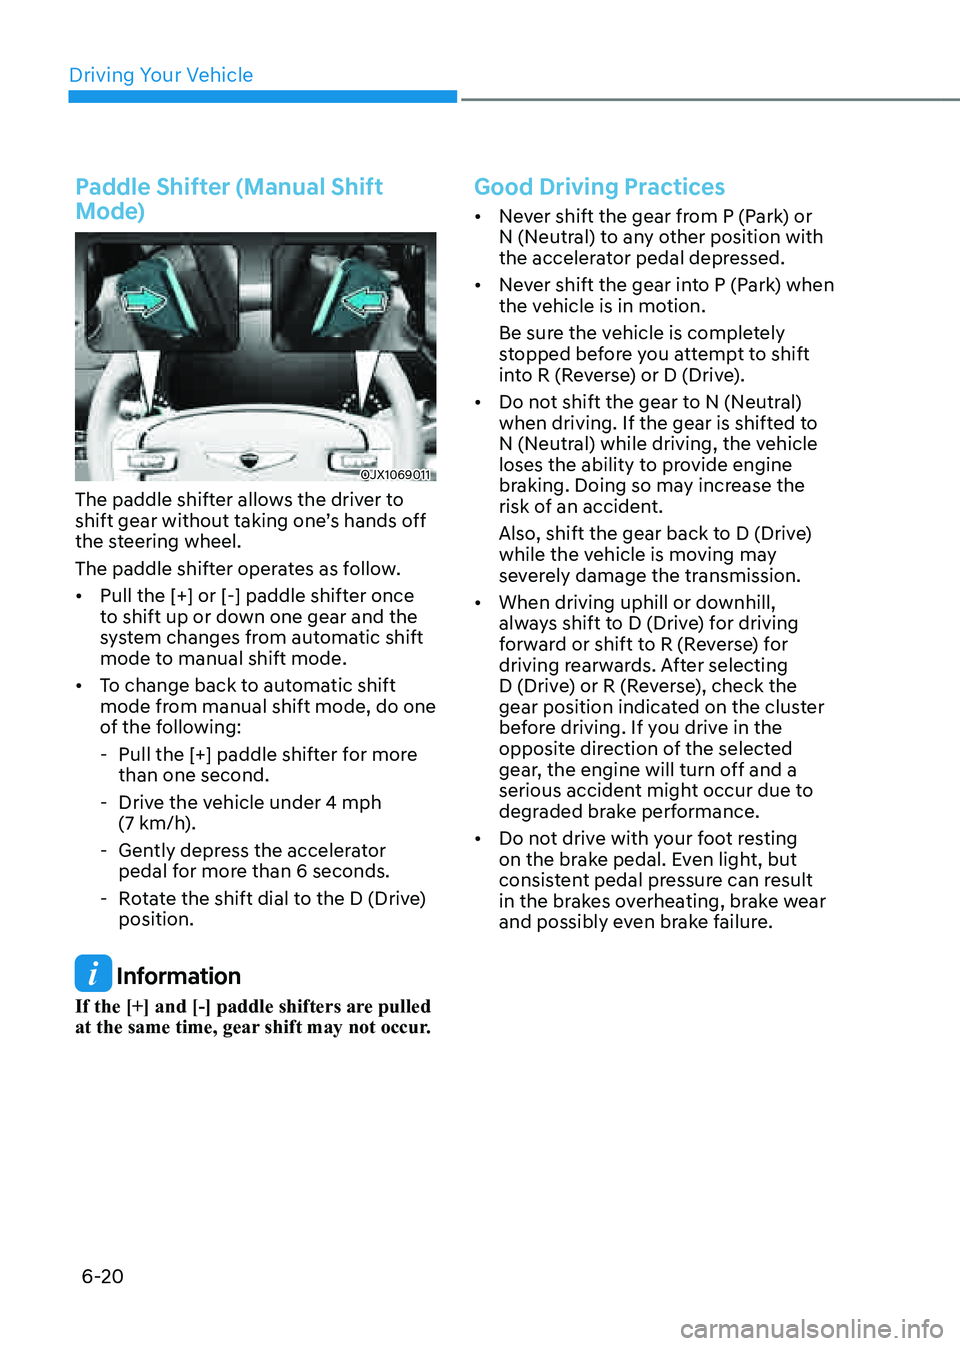
The paddle shifter allows the driver to
shift gear without taking one’s hands off
the steering wheel.
The paddle shifter operates as follow.
• Pull the [+] or [-] paddle shifter once
to shift up or down one gear and the
system changes from automatic shift
mode to manual shift mode.
• To change back to automatic shift
mode from manual shift mode, do one
of the following:
-Pull the [+] paddle shifter for more
than one second.
-Drive the vehicle under 4 mph (7 km/h).
-Gently depress the accelerator
pedal for more than 6 seconds.
-Rotate the shift dial to the D (Drive)
position.
Information
If the [+] and [-] paddle shifters are pulled
at the same time, gear shift may not occur.
Good Driving Practices
• Never shift the gear from P (Park) or
N (Neutral) to any other position with
the accelerator pedal depressed.
• Never shift the gear into P (Park) when
the vehicle is in motion.
Be sure the vehicle is completely
stopped before you attempt to shift
into R (Reverse) or D (Drive).
• Do not shift the gear to N (Neutral)
when driving. If the gear is shifted to
N (Neutral) while driving, the vehicle
loses the ability to provide engine
braking. Doing so may increase the
risk of an accident.
Also, shift the gear back to D (Drive)
while the vehicle is moving may
severely damage the transmission.
• When driving uphill or downhill,
always shift to D (Drive) for driving
forward or shift to R (Reverse) for
driving rearwards. After selecting
D (Drive) or R (Reverse), check the
gear position indicated on the cluster
before driving. If you drive in the
opposite direction of the selected
gear, the engine will turn off and a
serious accident might occur due to
degraded brake performance.
• Do not drive with your foot resting
on the brake pedal. Even light, but
consistent pedal pressure can result
in the brakes overheating, brake wear
and possibly even brake failure.
Page 293 of 632

06
6-21
• Always apply the parking brake when
leaving the vehicle. Do not depend on
placing the transmission in P (Park) to
keep the vehicle from moving.
• Exercise extreme caution when
driving on a slippery surface. Be
especially careful when braking,
accelerating or shifting gears. On a
slippery surface, an abrupt change
in vehicle speed can cause the drive
wheels to lose traction and may cause
loss of vehicle control resulting in an
accident.
• Optimum vehicle performance and
economy is obtained by smoothly
depressing and releasing the
accelerator.
WARNING
To reduce the risk of SERIOUS INJURY
or DEATH:
• ALWAYS wear your seat belt. In a
collision, an unbelted occupant
is significantly more likely to be
seriously injured or killed than a
properly belted occupant.
• Avoid high speeds when cornering or
turning.
• Do not make quick steering wheel
movements, such as sharp lane
changes or fast, sharp turns.
• The risk of rollover is greatly
increased if you lose control of your
vehicle at highway speeds.
• Loss of control often occurs if two or
more wheels drop off the roadway
and the driver over steers to reenter
the roadway.
• In the event your vehicle leaves
the roadway, do not steer sharply.
Instead, slow down before pulling
back into the travel lanes.
• Genesis Branded Vehicle
recommends you to follow all posted
speed limits.
NOTICE
Kickdown mechanism
Use the kickdown mechanism for
maximum acceleration. Depress the
accelerator pedal beyond the pressure
point. The automatic transmission will
shift to a lower gear depending on the
engine speed.
Page 324 of 632
Driving Your Vehicle
6-52
When certain conditions are met, the
engine is automatically decoupled from
the transmission while gear remains in D
(Drive). When Coasting is operating, the
engine stays at idling speed to reduce
fuel consumption and increase coasting
distance.
Coasting Setting
OJX1069045LOJX1069045L
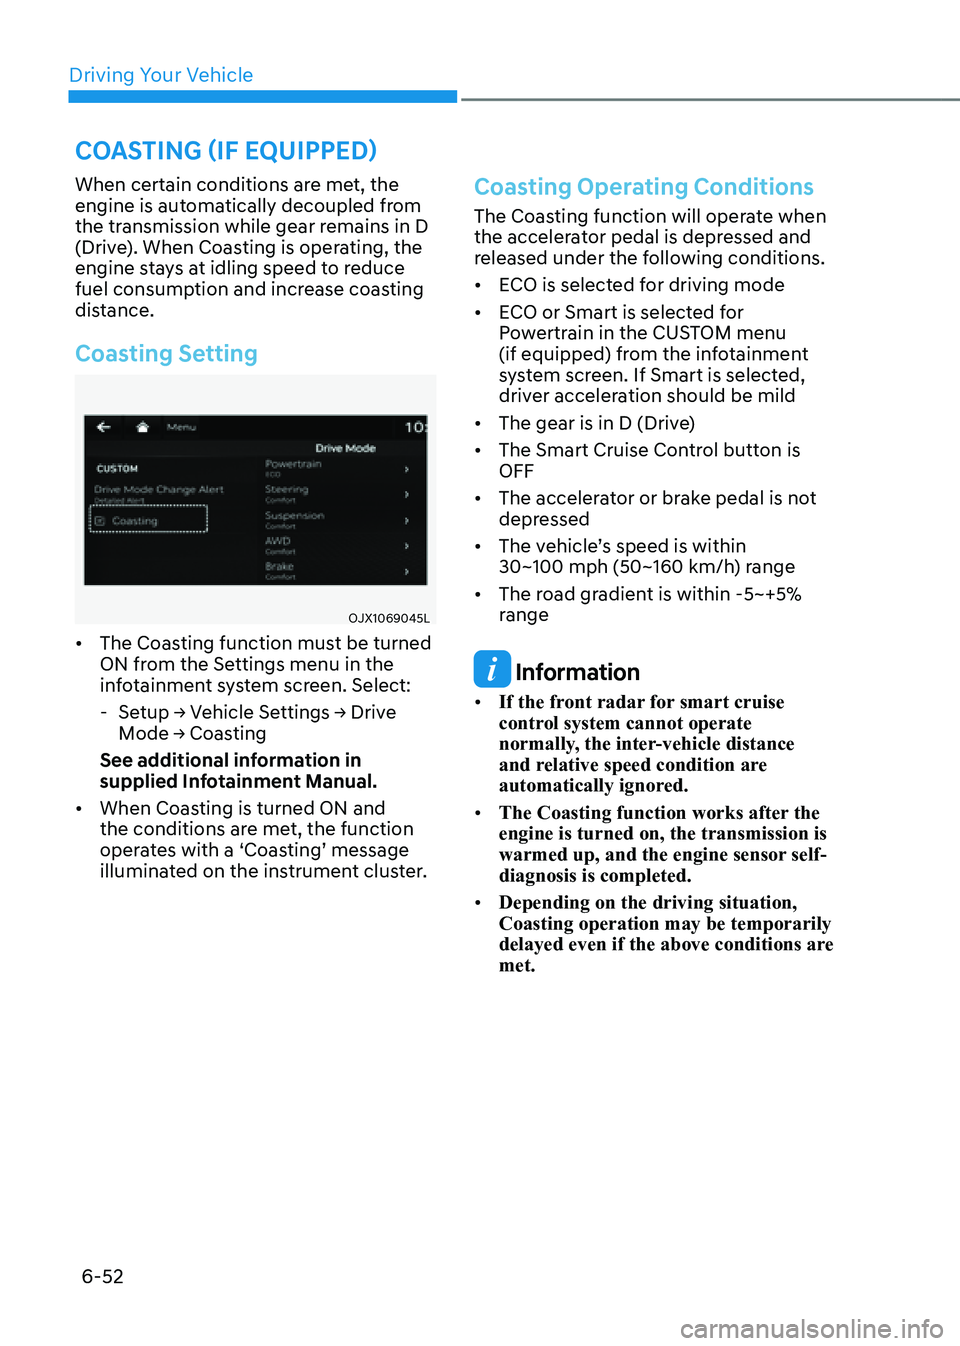
• The Coasting function must be turned
ON from the Settings menu in the
infotainment system screen. Select:
-Setup → Vehicle Settings → Drive
Mode → Coasting
See additional information in
supplied Infotainment Manual.
• When Coasting is turned ON and
the conditions are met, the function
operates with a ‘Coasting’ message
illuminated on the instrument cluster.
Coasting Operating Conditions
The Coasting function will operate when
the accelerator pedal is depressed and
released under the following conditions.
• ECO is selected for driving mode
• ECO or Smart is selected for
Powertrain in the CUSTOM menu
(if equipped) from the infotainment
system screen. If Smart is selected,
driver acceleration should be mild
• The gear is in D (Drive)
• The Smart Cruise Control button is
OFF
• The accelerator or brake pedal is not
depressed
• The vehicle’s speed is within 30~100 mph (50~160 km/h) range
• The road gradient is within -5~+5%
range
Information
• If the front radar for smart cruise
control system cannot operate
normally, the inter-vehicle distance
and relative speed condition are
automatically ignored.
• The Coasting function works after the
engine is turned on, the transmission is
warmed up, and the engine sensor self-
diagnosis is completed.
• Depending on the driving situation,
Coasting operation may be temporarily
delayed even if the above conditions are
met.
COASTING (IF EQUIPPED)
Page 325 of 632

06
6-53
Coasting Release Conditions
The Coasting function will be
automatically released when the
following conditions are met.
• Comfort or Sport is selected for
driving mode
• The driver uses the paddle shifter
• Smart Cruise Control is activated (Set
speed appears on the cluster)
• The vehicle’s speed exceeds 30~100 mph (50~160 km/h) range
• The road gradient is under -5% or over
+5%
• If the distance between the vehicle
ahead is too close or the relative
speed changes momentarily in Smart
mode
• If lane change is predicated in Smart
mode (e.g. the turn signal is turned
ON or a LKA warning appears due to
steering wheel control, etc.)
Information
It is recommended to turn off the
Coasting function if you are driving under
frequently stop-and-go condition. Change
the drive mode to Comfort or Sport or
deselect Coasting from the infotainment
system screen.
NOTICE
• If the accelerator pedal is pressed
quickly for accelerating with the
Coasting function in operation,
acceleration may occur after the
engagement of the clutch inside the
transmission. In turn, the driver may
continue to feel acceleration even
after the system is turned off.
• Driving with the Coasting function
off may be required in some cases
since the engine brake is not applied
while the Coasting function is
operating.
• Operating the infotainment system
screen to activate or deactivate
the Coasting function while driving
may be dangerous as the driver’s
attention is distracted.
Page 329 of 632
06
6-57
SPECIAL DRIVING CONDITIONS
Hazardous Driving Conditions
When hazardous driving elements
are encountered such as water, snow,
ice, mud and sand, take the following
precautions:
• Drive cautiously and maintain a longer
braking distance.
• Avoid abrupt braking or steering.
• When your vehicle is stuck in
snow, mud, or sand, use second
gear. Accelerate slowly to avoid
unnecessary wheel spin.
• Put sand, rock salt, tire chains or other
non-slip materials under the wheels to
provide additional traction while the
vehicle becomes stuck in ice, snow,
or mud.
WARNING
Downshifting with an automatic
transmission while driving on slippery
surfaces can cause an accident. The
sudden change in tire speed could
cause the tires to skid. Be careful when
downshifting on slippery surfaces.
Rocking the Vehicle
If it is necessary to rock the vehicle to
free it from snow, sand, or mud, first turn
the steering wheel right and left to clear
the area around your front wheels. Then,
shift back and forth between R (Reverse)
and a forward gear.
Try to avoid spinning the wheels, and do
not race the engine.
To prevent transmission wear, wait until
the wheels stop spinning before shifting
gears. Release the accelerator pedal
while shifting, and press lightly on the
accelerator pedal while the transmission
is in gear. Slowly spinning the wheels in
forward and reverse directions causes a
rocking motion that may free the vehicle.
WARNING
If the vehicle is stuck and excessive
wheel spin occurs, the temperature
in the tires can increase very quickly.
If the tires become damaged, a tire
blow out or tire explosion can occur.
This condition is dangerous - you and
others may be injured. Do not attempt
this procedure if people or objects are
anywhere near the vehicle.
If you attempt to free the vehicle, the
vehicle can overheat quickly, possibly
causing an engine compartment fire
or other damage. Try to avoid spinning
the wheels as much as possible to
prevent overheating of either the tires
or the engine. DO NOT allow the vehicle
to spin the wheels above 35 mph (56
km/h).
Information
The ESC system must be turned OFF
before rocking the vehicle.
NOTICE
If you are still stuck after rocking the
vehicle a few times, have the vehicle
pulled out by a tow vehicle to avoid
engine overheating, possible damage to
the transmission, and tire damage. See
“Towing” section in chapter 8.
Smooth Cornering
Avoid braking or gear changing in
corners, especially when roads are wet.
Ideally, corners should always be taken
under gentle acceleration.
Page 340 of 632
Driving Your Vehicle
6-68
Backing up
Hold the bottom of the steering wheel
with one hand. Then, to move the trailer
to the left, move your hand to the left. To
move the trailer to the right, move your
hand to the right. Always back up slowly
and, if possible, have someone guide
you.
Making turns
When you’re turning with a trailer, make
wider turns than normal. Do this so your
trailer won’t strike soft shoulders, curbs,
road signs, trees, or other objects. Avoid
jerky or sudden maneuvers. Signal well in
advance.
Turn signals
When you tow a trailer, your vehicle has
to have a different turn signal flasher and
extra wiring. The green arrows on your
instrument panel will flash whenever you
signal a turn or lane change. Properly
connected, the trailer lights will also flash
to alert other drivers you’re about to turn,
change lanes, or stop.
When towing a trailer, the green arrows
on your instrument panel will flash for
turns even if the bulbs on the trailer
are burned out. Thus, you may think
drivers behind you are seeing your
signals when, in fact, they are not. It’s
important to check frequently to be sure
the trailer bulbs are still working. You
must also check the lights every time
you disconnect and then reconnect the
wires.
WARNING
Do not connect a trailer lighting system
directly to your vehicle’s lighting
system. Use an approved trailer wiring
harness. Failure to do so could result in
damage to the vehicle electrical system
and/or personal injury. Consult an
authorized retailer of Genesis Branded
products for assistance.
Driving on hills
Reduce speed and shift to a lower gear
before you start down a long or steep
downgrade. If you don’t shift to a lower
gear, you may have to use your brakes
excessively and they would overheat and
may not operate efficiently.
On a long uphill grade, shift to a lower
gear and reduce your speed to around
45 mph (70 km/h) to reduce the possibility of engine and transmission
overheating.
If your trailer weighs more than the
maximum trailer weight without trailer
brakes and you have an automatic
transmission, you should drive in D
(Drive) when towing a trailer.
Operating your vehicle in D (Drive)
when towing a trailer will minimize heat
build-up and extend the life of your
transmission.
Page 496 of 632
Driver Assistance System
7-148
• When operating Remote Smart
Parking function, make sure all
smart keys are outside of the
vehicle.
• Remote Smart Parking function will
operate only when the smart key is
within 13 ft. (4 m) from the vehicle.
If there is no vehicle movement
even when the Remote Forward or
Reverse button is pressed on the
smart key, check the distance to the
vehicle and press the button again.
• The detecting range of the smart
key may vary depending on the
surroundings that are affected by
radio waves such as transmission
tower, broadcast station.
• The parking location indicator is
displayed on Surround View Monitor
screen and is displayed until the
vehicle enters the parking space
for the first time by Remote Smart
Parking function.
• When parking is completed, the
vehicle automatically shifts to P
(Park) and engages EPB (Electronic
Parking Brake).
• Depending on parking
environments, if the vehicle is
stopped by a stopper, parking may
be completed.
• If you need to change the vehicle's
position or location, manually
complete parking your vehicle.
CAUTION
• When using Remote Smart Parking
function with the digital key, the
smart key should be within 13 ft.
(4 m) from the vehicle.
• When using Remote Smart Parking
function, make sure that all
passengers have gotten out of the
vehicle.
• Before leaving the vehicle, close
windows and sunroofs, and make
sure the engine is off before locking
the doors.How to turn off Parking function while
operating
• Press the Parking/View () button
in the following stage:
- Searching for parking space
-Select parking type
• Shift the gear to R (Reverse) in the
following stage:
-Searching for parking space
-Select parking type
-Select operating mode
• Press the Parking Safety () button
or select ‘Cancel’ on the infotainment
system screen to turn off Parking
function.
• While Smart Parking function is
operating:
- If the vehicle is stopped by
depressing the brake pedal, and the
gear is shifted, Parking function will
turn off. At this time, EPB (Electronic
Parking Brake) will not be engaged.
• While Remote Smart Parking function
is operating:
-Press the Remote Start () button
on the smart key. Parking function
will turn off.
- Get in the vehicle with the smart
key. Parking function will turn off. At
this time, the engine will remain on.
Page 503 of 632

07
7-155
• The infotainment system has to
operate properly to use Remote
Entry/Exit Parking function.
• Method (2) can be used after the
vehicle has been driven above 3
mph (5 km/h).
• If the system is turned on again
after parallel parking is completed
by Remote Smart Parking Assist,
Remote Entry/Exit Parking function
can be used.
• Check that all smart keys are
outside the vehicle when using
Remote Entry/Exit Parking function.
2. Remote Entry/Exit Parking
OJX1079040OJX1079040
(1) Press and hold one of the Forward
() or Reverse () button on the
smart key. Remote Smart Parking
Assist will automatically control
the steering wheel, vehicle speed
and gearshift. The vehicle will
move in the direction of the button
pressed.
(2) While Remote Entry/Exit Parking
function is operating, if the you do
not hold down the Forward (
) or
Reverse () button, the vehicle
will stop and system control will
pause. The function will start
operating again when the button is
pressed and held again.
(3) When the vehicle reaches the
target location, the function will
turn off.
(4) When the driver gets in the vehicle
with the smart key, a message
will appear informing the driver
Remote Entry/Exit Parking
function is complete on the
infotainment system screen.
In addition, when the Remote
Start (
) button is pressed on the
smart key, a message will appear
informing the driver Remote Entry/
Exit Parking function is complete
and the engine will turn off.
• Remote Entry/Exit Parking function
will operate only when the smart
key is within 13 ft. (4 m) from
the vehicle. If there is no vehicle
movement even when the Forward
or Reverse button is pressed on the
smart key, check the distance to the
vehicle and press the button again.
• The detecting range of the smart
key may vary depending on the
surroundings that are affected by
radio waves such as transmission
tower, broadcast station, etc.
Page 530 of 632
08
8-19
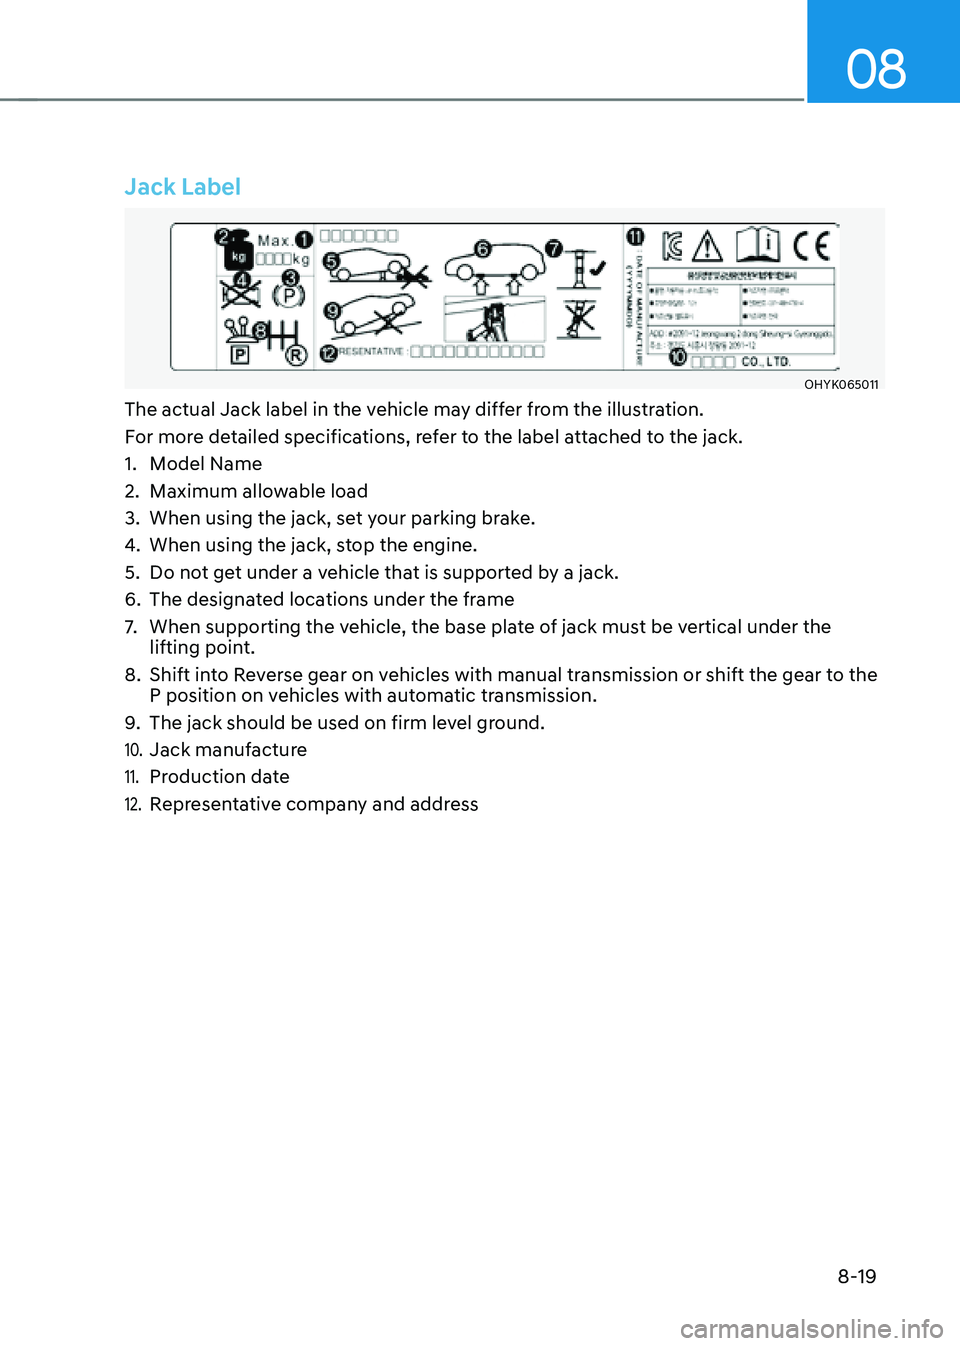
Jack Label
OHYK065011OHYK065011
The actual Jack label in the vehicle may differ from the illustration.
For more detailed specifications, refer to the label attached to the jack.
1. Model Name
2. Maximum allowable load
3. When using the jack, set your parking brake.
4. When using the jack, stop the engine.
5. Do not get under a vehicle that is supported by a jack.
6. The designated locations under the frame
7. When supporting the vehicle, the base plate of jack must be vertical under the
lifting point.
8. Shift into Reverse gear on vehicles with manual transmission or shift the gear to the
P position on vehicles with automatic transmission.
9. The jack should be used on firm level ground.
10. Jack manufacture
11. Production date
12. Representative company and address
Page 539 of 632
Emergency Situations
8-28
When towing your vehicle in an
emergency without wheel dollies:
1. Release EPB before turning off the
engine.
2. Press the Engine Start/Stop button to
the OFF position.
3. Change the gear to N (Neutral) by
pressing the P release button (need to
remove cap-cover) while pressing the
brake pedal. For more details, refer to
“Automatic Transmission” section in
chapter 6.
4. Press the Engine Start/Stop button to
the ACC position.
CAUTION
Failure to shift the gear to N (Neutral)
may cause internal damage to the
transmission.
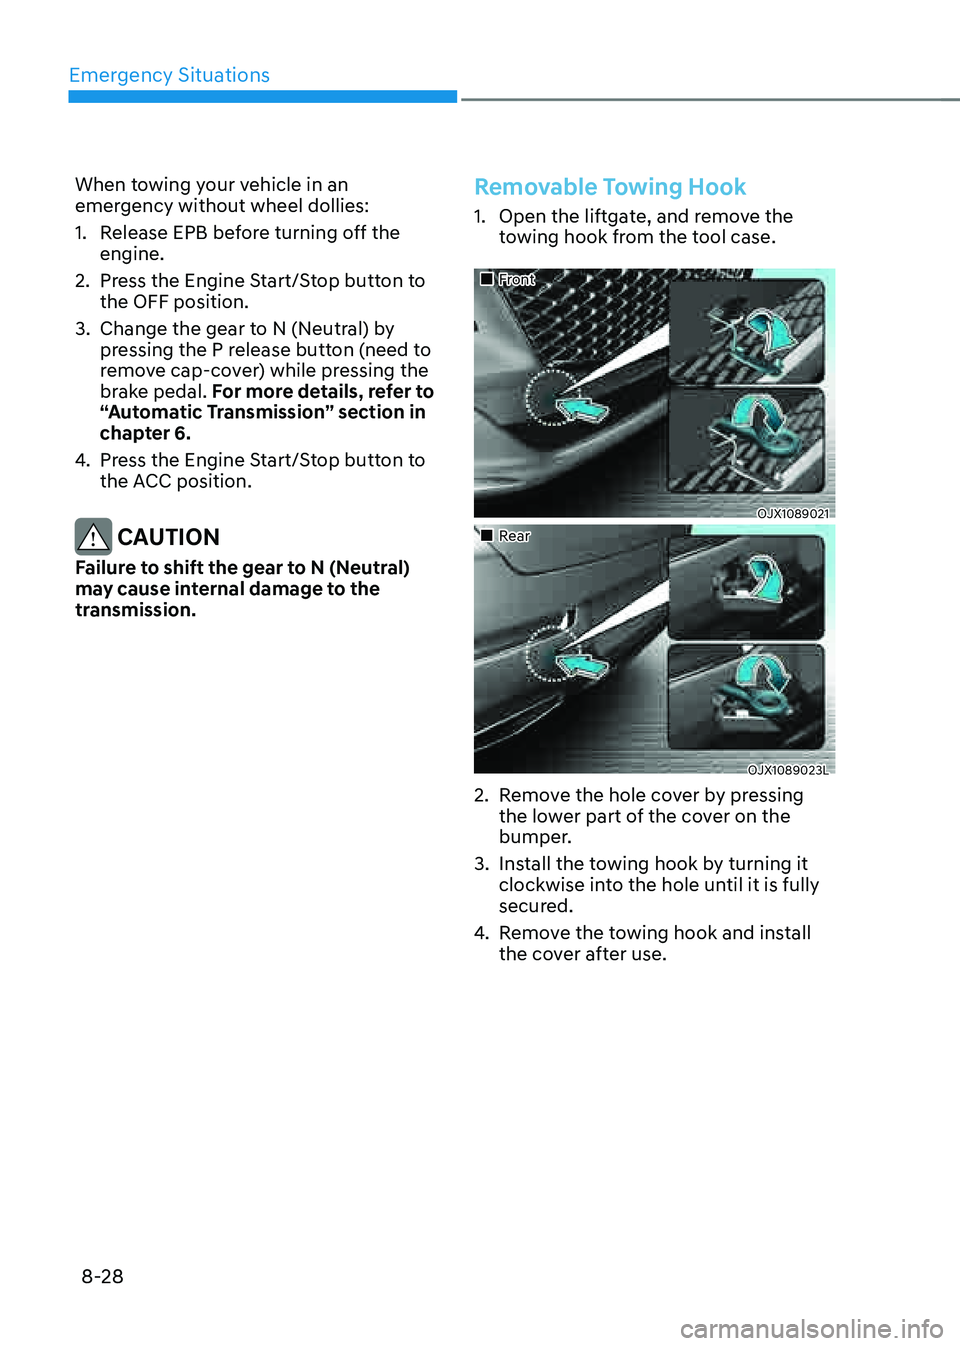
Removable Towing Hook
1. Open the liftgate, and remove the
towing hook from the tool case.
�