instrument panel GENESIS GV80 2021 User Guide
[x] Cancel search | Manufacturer: GENESIS, Model Year: 2021, Model line: GV80, Model: GENESIS GV80 2021Pages: 632, PDF Size: 9.37 MB
Page 110 of 632
04
4-5
Instrument Cluster Control
Instrument panel illumination
OJX1049053OJX1049053
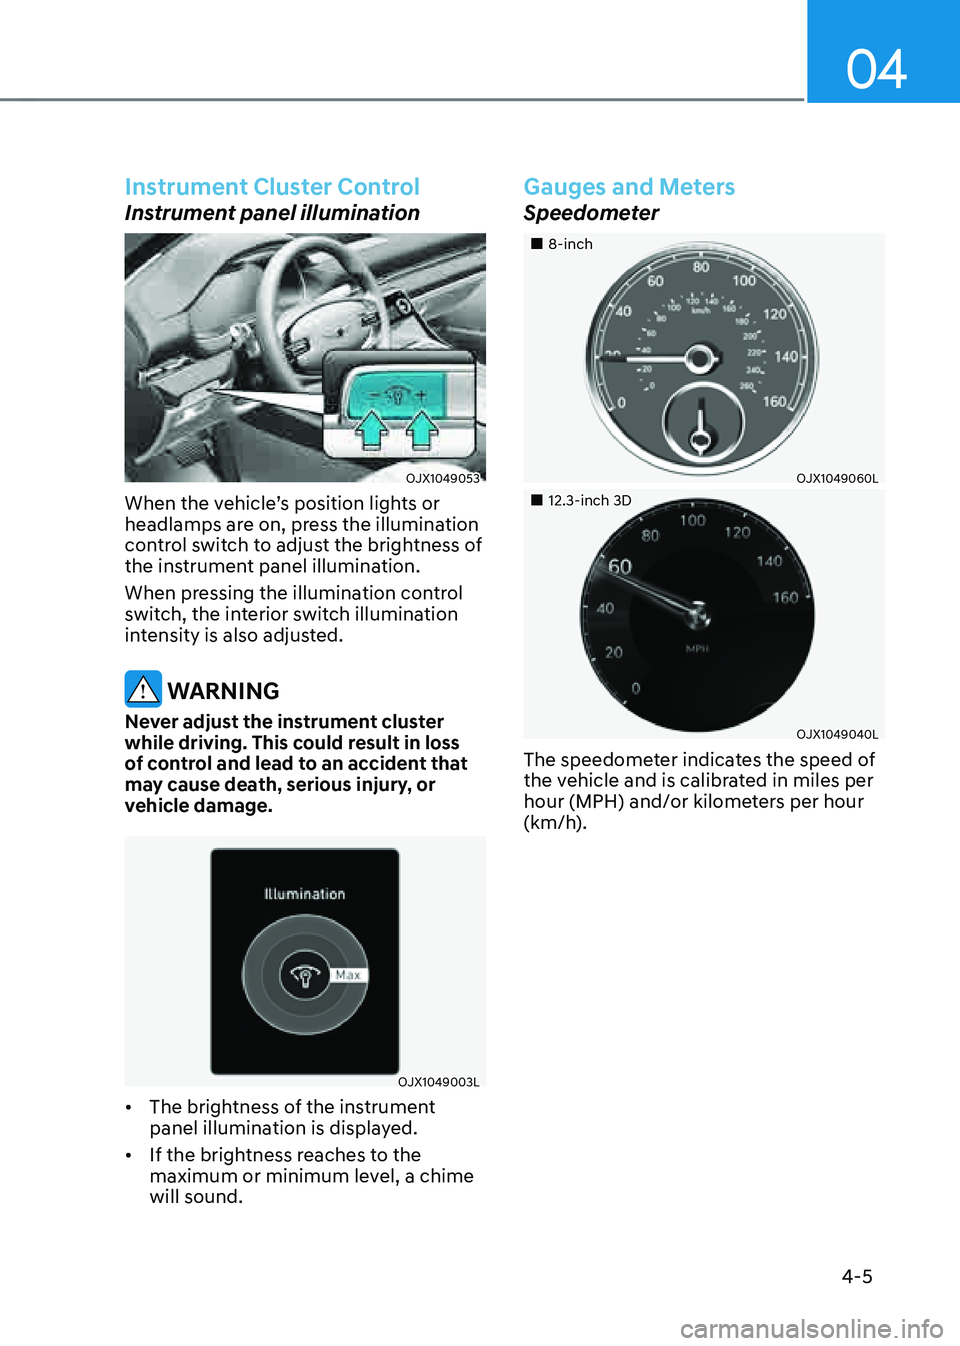
When the vehicle’s position lights or
headlamps are on, press the illumination
control switch to adjust the brightness of
the instrument panel illumination.
When pressing the illumination control
switch, the interior switch illumination
intensity is also adjusted.
WARNING
Never adjust the instrument cluster
while driving. This could result in loss
of control and lead to an accident that
may cause death, serious injury, or
vehicle damage.
OJX1049003LOJX1049003L
• The brightness of the instrument
panel illumination is displayed.
• If the brightness reaches to the
maximum or minimum level, a chime
will sound.
Gauges and Meters
Speedometer
�
Page 177 of 632
05
5-35
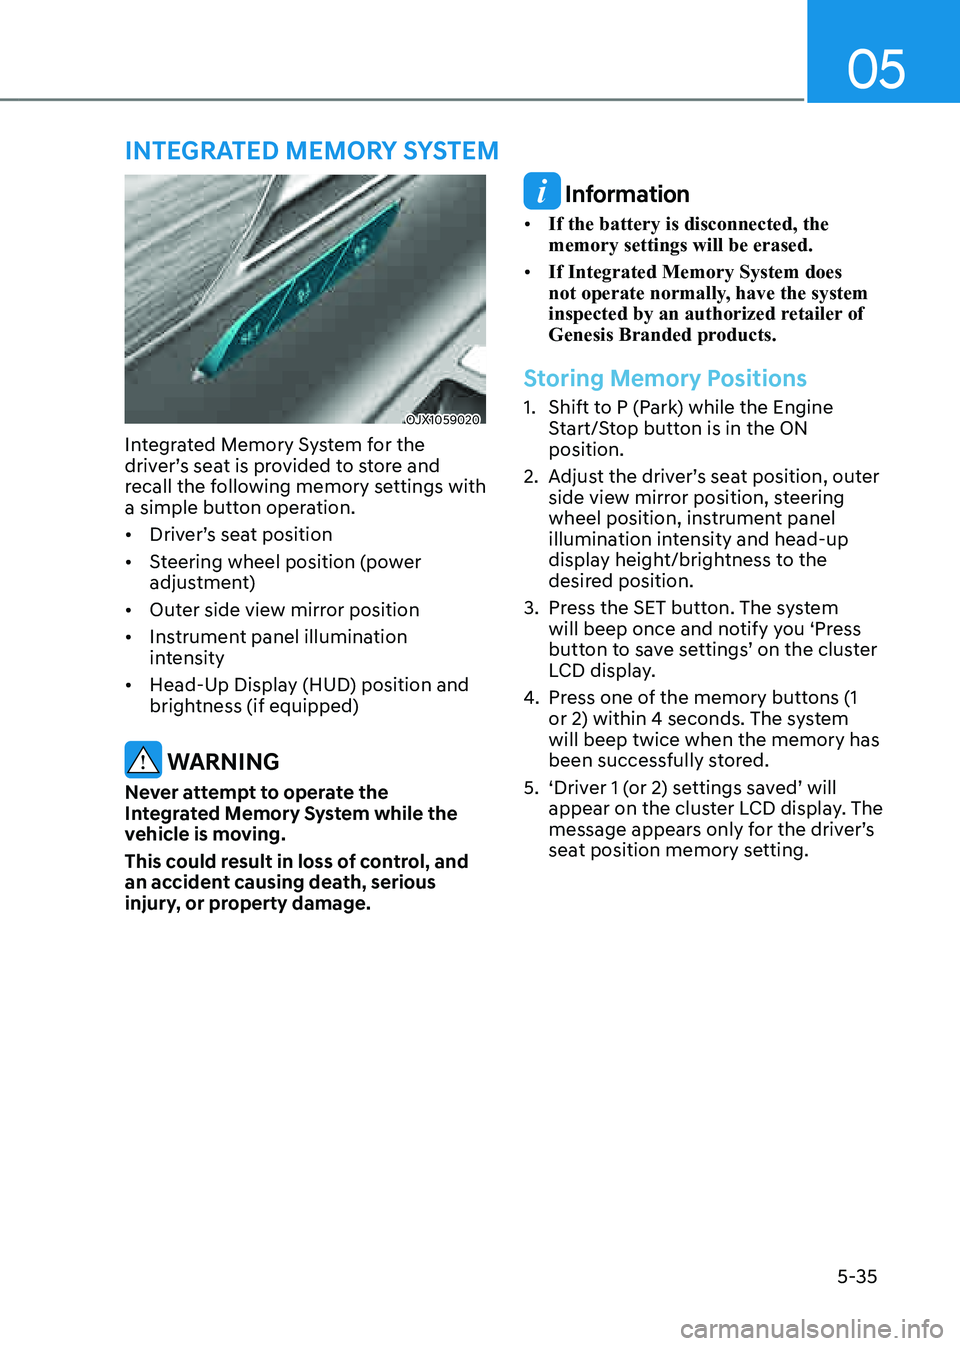
OJX1059020OJX1059020
Integrated Memory System for the
driver’s seat is provided to store and
recall the following memory settings with
a simple button operation.
• Driver’s seat position
• Steering wheel position (power
adjustment)
• Outer side view mirror position
• Instrument panel illumination
intensity
• Head-Up Display (HUD) position and
brightness (if equipped)
WARNING
Never attempt to operate the
Integrated Memory System while the
vehicle is moving.
This could result in loss of control, and
an accident causing death, serious
injury, or property damage.
Information
• If the battery is disconnected, the
memory settings will be erased.
• If Integrated Memory System does
not operate normally, have the system
inspected by an authorized retailer of
Genesis Branded products.
Storing Memory Positions
1. Shift to P (Park) while the Engine
Start/Stop button is in the ON
position.
2. Adjust the driver’s seat position, outer
side view mirror position, steering
wheel position, instrument panel
illumination intensity and head-up
display height/brightness to the
desired position.
3. Press the SET button. The system
will beep once and notify you ‘Press
button to save settings’ on the cluster
LCD display.
4. Press one of the memory buttons (1
or 2) within 4 seconds. The system
will beep twice when the memory has
been successfully stored.
5. ‘Driver 1 (or 2) settings saved’ will
appear on the cluster LCD display. The
message appears only for the driver’s
seat position memory setting.
INTEGRATED MEMORY SYSTEM
Page 178 of 632
Convenient Features
5-36
Recalling Memory Positions
1. Shift to P (Park) while the Engine
Start/Stop button is in the ON
position.
2. Press the desired memory button (1
or 2). The system will beep once, and
then the driver’s seat position, outer
side view mirror position, steering
wheel position, instrument panel
illumination intensity and head-
up display height/brightness will
automatically adjust to the stored
positions.
3. ‘Driver 1 (or 2) settings applied’ will
appear on the cluster LCD display.
Information
• If you press the SET button or the
corresponding button which the
setting is being recalled, the setting will
temporarily deactivate. If you press the
other buttons, the setting of the pressed
button will activate.
For example, if you press the SET
button or number 1 button with the
number 1 setting in operation, the
setting will temporarily deactivate. If
you press the number 2 button, the
number 2 setting will activate.
• If you adjust the seat, side view mirror,
steering wheel, instrument panel
illumination or head-up display while
recalling the stored positions, the pre-
set settings will become ineffective.
Resetting the System
Take the following procedures to reset
Integrated Memory System, when it does
not operate properly.
Resetting Integrated Memory
System
1. Stop the vehicle and open the driver’s
door with the vehicle shifted to P
(Park).
2. Adjust the driver’s seat and seatback
to the foremost position.
3. Press the SET button and push
forward the driver’s seat movement
switch over 2 seconds simultaneously.
While resetting Integrated Memory
System
1. Resetting starts with a notification
sound.
2. The driver’s seat and seatback is
adjusted to the rearward position with
the notification sound.
3. The driver’s seat and seatback is
re-adjusted to the default position
(central position) with the notification
sound.
However, in the following cases, the
resetting procedure and the notification
sound may stop.
• The memory button is pressed.
• The seat control switch is operated.
• The driving speed exceeds
2 mph (3 km/h).
• The driver’s door is closed.
Page 219 of 632
05
5-77
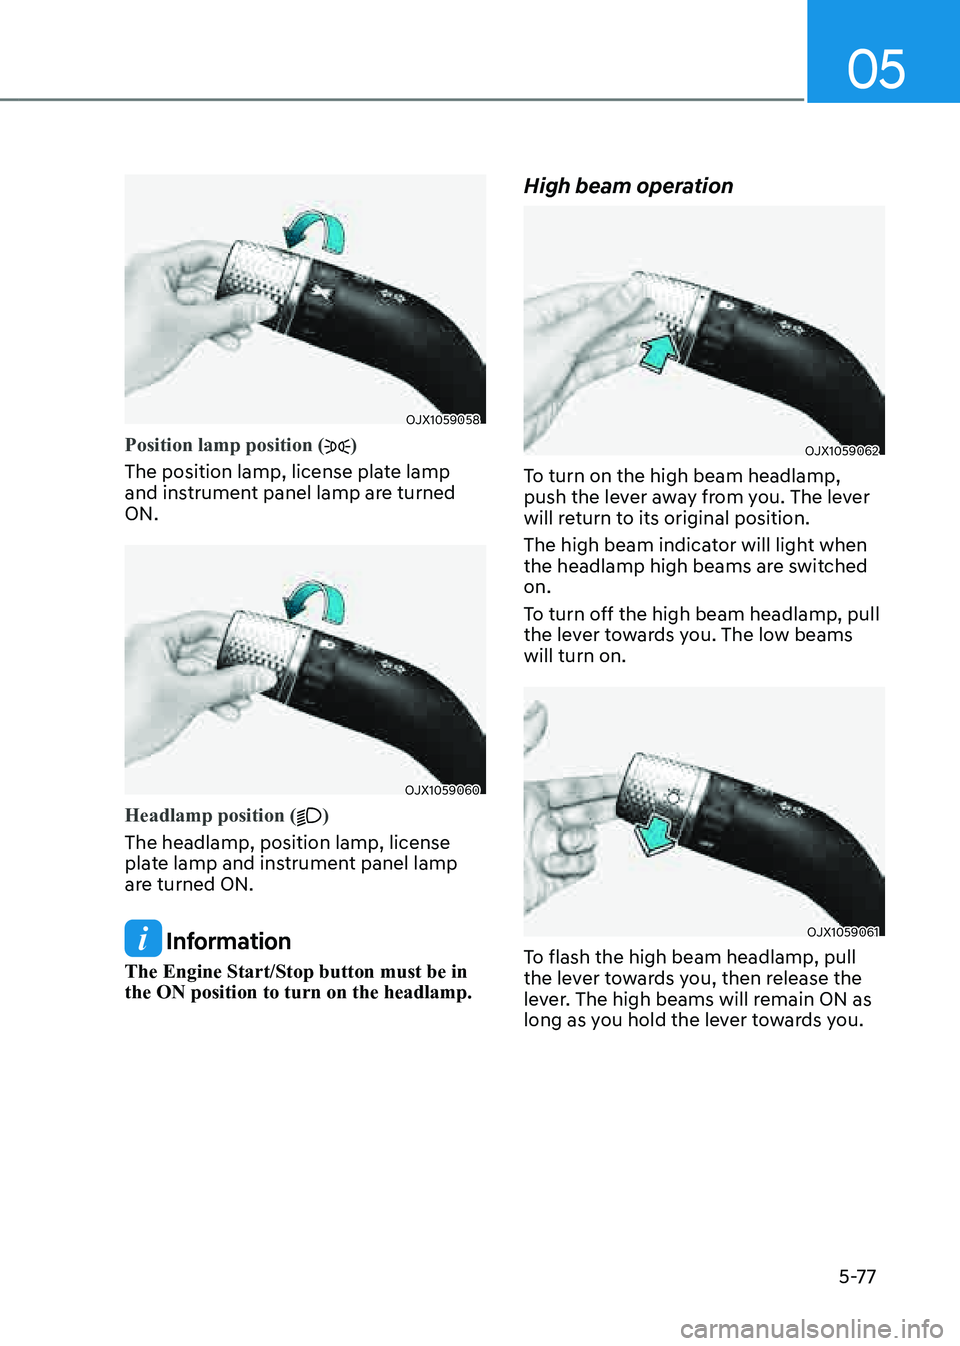
OJX1059058OJX1059058
Position lamp position ()
The position lamp, license plate lamp
and instrument panel lamp are turned
ON.
OJX1059060OJX1059060
Headlamp position ()
The headlamp, position lamp, license
plate lamp and instrument panel lamp
are turned ON.
Information
The Engine Start/Stop button must be in
the ON position to turn on the headlamp.
High beam operation
OJX1059062OJX1059062
To turn on the high beam headlamp,
push the lever away from you. The lever
will return to its original position.
The high beam indicator will light when
the headlamp high beams are switched
on.
To turn off the high beam headlamp, pull
the lever towards you. The low beams
will turn on.
OJX1059061OJX1059061
To flash the high beam headlamp, pull
the lever towards you, then release the
lever. The high beams will remain ON as
long as you hold the lever towards you.
Page 240 of 632
Convenient Features
5-98
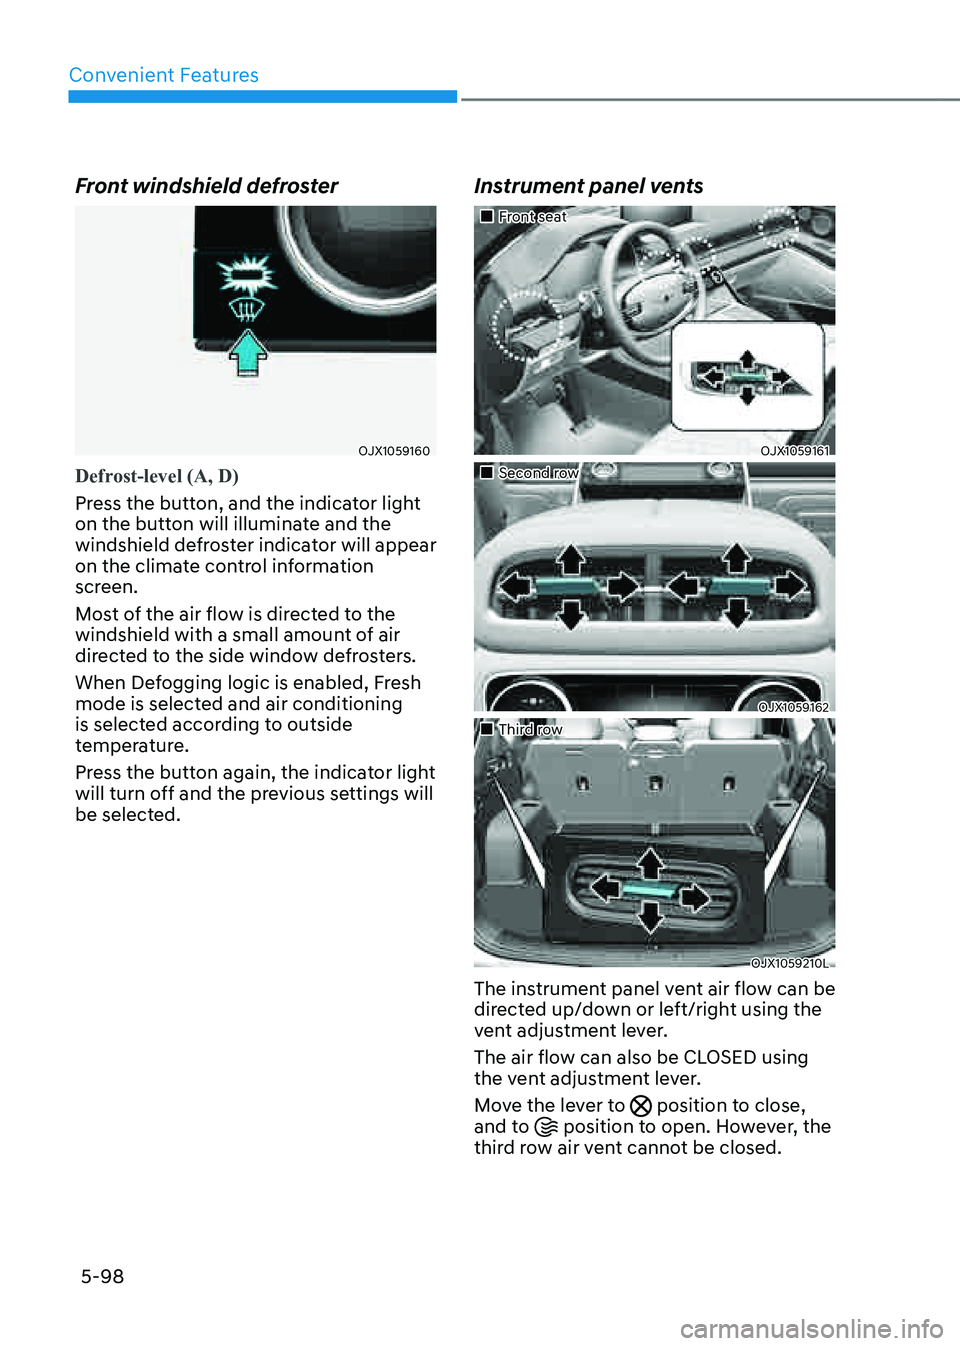
Front windshield defroster
OJX1059160OJX1059160
Defrost-level (A, D)
Press the button, and the indicator light
on the button will illuminate and the
windshield defroster indicator will appear
on the climate control information
screen.
Most of the air flow is directed to the
windshield with a small amount of air
directed to the side window defrosters.
When Defogging logic is enabled, Fresh
mode is selected and air conditioning
is selected according to outside
temperature.
Press the button again, the indicator light
will turn off and the previous settings will
be selected.
Instrument panel vents
�
Page 250 of 632

Convenient Features
5-108
Rear Window DefrosterNOTICE
To prevent damage to the rear window
defroster conducting elements bonded
to the inside surface of the rear window,
never use sharp instruments or window
cleaners containing abrasives to clean
the window.
OJX1059180OJX1059180
The defroster heats the window to
remove frost, fog and thin ice from the
interior and exterior of the rear window,
while the engine is running.
• To activate the rear window defroster,
press the rear window defroster
button located in the center control
panel. The indicator on the rear
window defroster button illuminates
when the defroster is ON.
• To turn off the defroster, press the rear
window defroster button again.
Information
• If there is heavy accumulation of snow
on the rear window, brush it off before
operating the rear defroster.
• The rear window defroster
automatically turns off after
approximately 20 minutes or when the
Engine Start/Stop button is in the OFF
position.
Side view mirror defroster
If your vehicle is equipped with the side
view mirror defrosters, they will operate
at the same time you turn on the rear
window defroster.
Page 276 of 632
Driving Your Vehicle
6-4
WARNING
Carbon monoxide (CO) gas is toxic. Breathing CO can cause unconsciousness and
death.
Engine exhaust contains carbon monoxide which cannot be seen or smelled.
Do not inhale engine exhaust.
If at any time you smell engine exhaust inside the vehicle, open the windows
immediately. Exposure to CO can cause unconsciousness and death by asphyxiation.
Be sure the exhaust system does not leak.
The exhaust system should be checked whenever the vehicle is raised to change the
oil or for any other purpose. If you hear a change in the sound of the exhaust or if you
drive over something that strikes the underneath side of the vehicle, have the exhaust
system checked as soon as possible by an authorized retailer of Genesis Branded
products.
Do not run the engine in an enclosed area.
Letting the engine idle in your garage, even with the garage door open, is a hazardous
practice. Run the engine only long enough to start the engine and to move the vehicle
out of the garage.
Avoid idling the engine for prolonged periods with people inside the vehicle.
If it is necessary to idle the engine for a prolonged period with people inside the
vehicle, be sure to do so only in an open area with the air intake set at “Fresh” and fan
control set to high so fresh air is drawn into the interior.
Keep the air intakes clear.
To assure proper operation of the ventilation system, keep the ventilation air intakes
located in front of the windshield clear of snow, ice, leaves, or other obstructions.
If you must drive with the liftgate open:
Close all windows.
Open instrument panel air vents.
Set the air intake control at “Fresh”, the air flow control at “Floor” or “Face”, and the fan
control set to high.
WARNING
CALIFORNIA PROPOSITION 65 WARNING
Engine exhaust and a wide variety of automobile components including
components found in the interior furnishings in a vehicle, contain or emit harmful
chemicals known to the State of California to cause cancer and birth defects and
reproductive harm. In addition, certain fluids contained in vehicles and certain
products of components contain or emit chemicals known to the State of California
to cause cancer and birth defects or other reproductive harm.
Page 277 of 632
06
6-5
Before Entering the Vehicle
• Be sure all windows, outside mirror(s),
and outside lights are clean and
unobstructed.
• Remove frost, snow, or ice.
• Visually check the tires for uneven
wear and damage.
• Check under the vehicle for any sign
of leaks.
• Be sure there are no obstacles behind
you if you intend to back up.
Before Starting
• Make sure the hood, the liftgate, and
the doors are securely closed and
locked.
• Adjust the position of the seat and
steering wheel.
• Adjust the inside and outer side view
mirrors.
• Verify all the lights work.
• Fasten your seat belt. Check that all
passengers have fastened their seat
belts.
• Check the gauges and indicators
in the instrument panel and the
messages on the instrument display
when the ignition switch is in the ON
position.
• Check that any items you are carrying
are stored properly or fastened down
securely.
WARNING
To reduce the risk of SERIOUS INJURY or
DEATH, take the following precautions:
• ALWAYS wear your seat belt. All
passengers must be properly belted
whenever the vehicle is moving.
For more information, refer to “Seat
Belts” section in chapter 3.
• Always drive defensively. Assume
other drivers or pedestrians may be
careless and make mistakes.
• Stay focused on the task of driving.
Driver distraction can cause
accidents.
• Leave plenty of space between you
and the vehicle in front of you.
WARNING
NEVER drink or take drugs and drive.
Drinking or taking drugs and driving
is dangerous and may result in an
accident and SERIOUS INJURY or
DEATH.
Drunk driving is the number one
contributor to the highway death
toll each year. Even a small amount
of alcohol will affect your reflexes,
perceptions and judgment. Just
one drink can reduce your ability to
respond to changing conditions and
emergencies and your reaction time
gets worse with each additional drink.
Driving while under the influence
of drugs is as dangerous or more
dangerous than driving under the
influence of alcohol.
You are much more likely to have a
serious accident if you drink or take
drugs and drive. If you are drinking or
taking drugs, don’t drive. Do not ride
with a driver who has been drinking
or taking drugs. Choose a designated
driver or call a taxi.
BEFORE DRIVING
Page 340 of 632
Driving Your Vehicle
6-68
Backing up
Hold the bottom of the steering wheel
with one hand. Then, to move the trailer
to the left, move your hand to the left. To
move the trailer to the right, move your
hand to the right. Always back up slowly
and, if possible, have someone guide
you.
Making turns
When you’re turning with a trailer, make
wider turns than normal. Do this so your
trailer won’t strike soft shoulders, curbs,
road signs, trees, or other objects. Avoid
jerky or sudden maneuvers. Signal well in
advance.
Turn signals
When you tow a trailer, your vehicle has
to have a different turn signal flasher and
extra wiring. The green arrows on your
instrument panel will flash whenever you
signal a turn or lane change. Properly
connected, the trailer lights will also flash
to alert other drivers you’re about to turn,
change lanes, or stop.
When towing a trailer, the green arrows
on your instrument panel will flash for
turns even if the bulbs on the trailer
are burned out. Thus, you may think
drivers behind you are seeing your
signals when, in fact, they are not. It’s
important to check frequently to be sure
the trailer bulbs are still working. You
must also check the lights every time
you disconnect and then reconnect the
wires.
WARNING
Do not connect a trailer lighting system
directly to your vehicle’s lighting
system. Use an approved trailer wiring
harness. Failure to do so could result in
damage to the vehicle electrical system
and/or personal injury. Consult an
authorized retailer of Genesis Branded
products for assistance.
Driving on hills
Reduce speed and shift to a lower gear
before you start down a long or steep
downgrade. If you don’t shift to a lower
gear, you may have to use your brakes
excessively and they would overheat and
may not operate efficiently.
On a long uphill grade, shift to a lower
gear and reduce your speed to around
45 mph (70 km/h) to reduce the possibility of engine and transmission
overheating.
If your trailer weighs more than the
maximum trailer weight without trailer
brakes and you have an automatic
transmission, you should drive in D
(Drive) when towing a trailer.
Operating your vehicle in D (Drive)
when towing a trailer will minimize heat
build-up and extend the life of your
transmission.
Page 375 of 632

07
7-27
Turning the system On/Off
OJX1079017OJX1079017
With the Engine Start/Stop button in
the ON position, press the Lane Safety
button located on the instrument
panel to turn on Lane Keeping Assist.
The white
indicator light will
illuminate on the cluster.
Press the button again to turn off the
system.
Information
• If the engine is restarted, Lane Keeping
Assist will maintain the last setting.
• When Lane Keeping Assist is turned
off with the Lane Safety button, Lane
Safety settings will turn off.
OJX1079246LOJX1079246L
Warning Volume
With the Engine Start/Stop button in the
ON position, select ‘Driver Assistance →
Warning Volume’ from the Settings menu
to change the Warning Volume to ‘High’,
‘Medium’, ‘Low’ or ‘Off’ for Lane Keeping
Assist.
However, even if ‘Off’ is selected, the
Hands-off Warning Volume will not be
turned off. Steering wheel vibration
function will also remain on even if 'Off'
is selected.
If you change the Warning Volume,
the Warning Volume of other Driver
Assistance systems may be changed.