infotainment screen GENESIS GV80 2021 Owner's Guide
[x] Cancel search | Manufacturer: GENESIS, Model Year: 2021, Model line: GV80, Model: GENESIS GV80 2021Pages: 632, PDF Size: 9.37 MB
Page 173 of 632

05
5-31
Automatic Door Lock and Unlock
Features
Your vehicle is equipped with features
that will automatically lock or unlock
your vehicle based on settings you select
in the infotainment system screen.
Auto LOCK Enable on speed
When this feature is set in the
infotainment system screen, all the doors
will be locked automatically when the
vehicle exceeds 9 mph (15 km/h).
Auto LOCK Enable on shift
When this feature is set in the
infotainment system screen, all the doors
will be locked automatically when the
vehicle is shifted out of P (Park) while the
engine is running.
Auto UNLOCK On Shift to P
When this feature is set in the
infotainment system screen, all the doors
will be unlocked automatically when the
vehicle is shifted back into P (Park) while
the engine is running.
Auto UNLOCK Vehicle off
When this feature is set in the
infotainment system screen, all the doors
will be unlocked automatically when the
vehicle is turned off.
See additional information in supplied
Infotainment Manual.
Additional unlock safety feature air
bag deployment
As an additional safety feature, all doors
will be automatically unlocked when an
impact causes the air bags to deploy.
Child-Protector Rear Door Locks
(if equipped)
OJX1059274LOJX1059274L
The child safety lock is provided to help
prevent children seated in the rear from
accidentally opening the rear doors. The
rear door safety locks should be used
whenever children are in the vehicle.
The child safety lock is located on the
edge of each rear door. When the child
safety lock is in the lock position, the
rear door will not open if the inner door
handle is pulled.
To lock the child safety lock, insert a
small flat blade tool (like a screwdriver or
similar) (1) into the slot and turn it to the
lock position as shown.
To allow a rear door to be opened from
inside the vehicle, unlock the child safety
lock.
WARNING
If children accidently open the rear
doors while the vehicle is in motion,
they could fall out of the vehicle. The
rear door safety locks should always
be used whenever children are in the
vehicle.
Page 175 of 632
05
5-33
Safe Exit Assist (if equipped with
electronic child safety lock)
Safe Exit Assist helps prevent the rear
occupant from opening the rear door.
When an approaching vehicle from the
rear area is detected after the vehicle
stops, the rear doors will not unlock even
when the driver tries to unlock the rear
doors using the electronic child safety
lock button.
For more details, refer to “Safe Exit
Assist (SEA)” section in chapter 7.
Vehicle Auto-Shut Off
If your parked vehicle is in a garage and
engine is left on for a period of time, the
engine will turn off automatically to help
reduce fuel consumption, etc.
System setting
You can activate or deactivate Vehicle
Auto-Shut Off from the Settings menu in
the infotainment system screen. Select:
-Setup → Vehicle Settings →
Convenience → Vehicle Auto-Shut Off
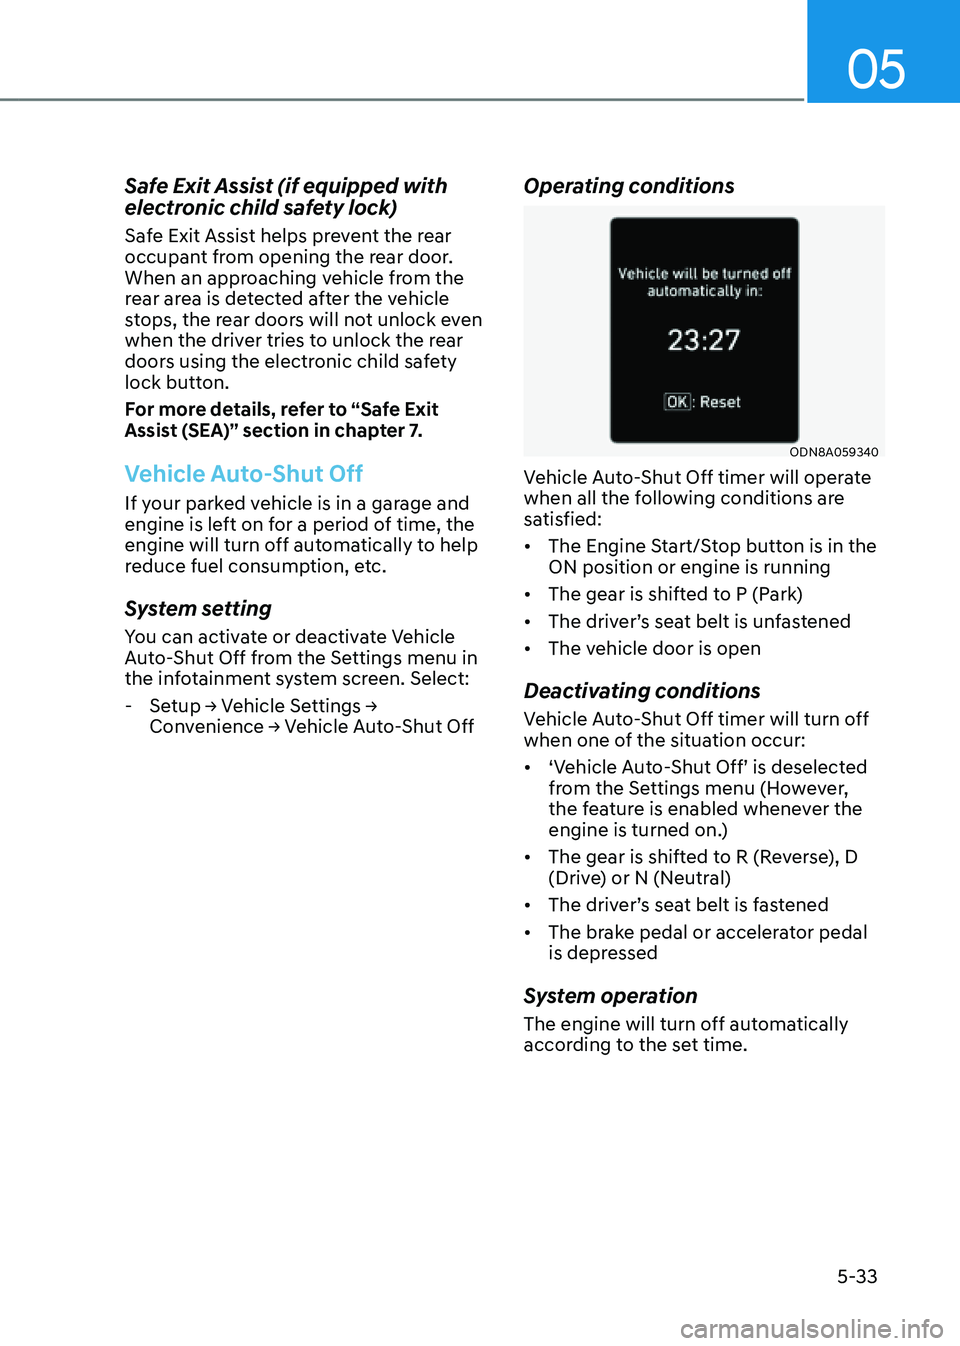
Operating conditions
ODN8A059340ODN8A059340
Vehicle Auto-Shut Off timer will operate
when all the following conditions are
satisfied:
• The Engine Start/Stop button is in the
ON position or engine is running
• The gear is shifted to P (Park)
• The driver’s seat belt is unfastened
• The vehicle door is open
Deactivating conditions
Vehicle Auto-Shut Off timer will turn off
when one of the situation occur:
• ‘Vehicle Auto-Shut Off’ is deselected
from the Settings menu (However,
the feature is enabled whenever the
engine is turned on.)
• The gear is shifted to R (Reverse), D
(Drive) or N (Neutral)
• The driver’s seat belt is fastened
• The brake pedal or accelerator pedal
is depressed
System operation
The engine will turn off automatically
according to the set time.
Page 179 of 632
05
5-37
NOTICE
• While Integrated Memory System
is being reset, if the resetting
and notification sound stops
incompletely, restart the resetting
procedure again.
• Make sure that there is no objects
around the driver’s seat in advance
of resetting the Integrated Memory
System.
Seat Easy Access
Seat easy access will move the driver’s
seat and steering wheel automatically as
follows:
• Exiting the vehicle:
The driver’s seat, steering wheel and
seat bolster will move as follows when
the Engine Start/Stop button is in the
OFF position with the gear in P (Park)
and the driver’s door open.
-Driver seat: Moves rearward
depending on the distance selected
from the Settings menu in the
infotainment system.
-Steering wheel: Moves upward
-Seat bolster (if equipped): Adjusted
to the default position.
However, the driver’s seat may not
move rearward if there is not enough
space between the driver’s seat and
the rear seats.
Also, on a regular basis, the steering
wheel will also move forward to adjust
its location by itself.
• Entering the vehicle:
The driver’s seat, steering wheel and
seat bolster will move as follows
when the Engine Start/Stop button
is pressed to the ACC, ON or START
position or while carrying the smart
key, the driver’s door is closed with
the Engine Start/Stop button in the
OFF position.
- Driver seat: Moves back to its
original position.
-Steering wheel: Moves back to its
original position.
-Seat bolster (if equipped): Adjusted
to the default position.
• You can set the Seat Easy Access
function from the Settings menu
in the infotainment system screen.
Select:
-Driver seat
Setup → Vehicle Settings → Seat →
Seating Easy Access → Driver Seat
Easy Access → Normal/Extended/Off
-Steering wheel
Setup → Vehicle Settings → Seat
→ Seating Easy Access → Steering
wheel easy access
See additional information in
supplied Infotainment Manual.
Page 180 of 632

Convenient Features
5-38
The Smart Posture Care system
automatically provides a healthy posture
(position) for the driver’s back, and sets
the steering wheel, side view mirrors,
head-up display positions according to
the driver’s body measurements.
Information
If the Seat Posture Care system does
not operate normally, have the system
checked by an authorized retailer of
Genesis Branded products.
OJX1079170LOJX1079170L
1. Check that the gear is in P (Park) while
the Engine Start/Stop button is in the
ON position.
2. Select ‘Setup → Vehicle Settings → Seat
→ Smart Posture Care → Enter Driver’s
Information’ from the Settings menu
in the infotainment system screen.
3. Enter information (Height, Sitting
height, Weight) in the infotainment
system screen.
4. After entering the driver’s information,
press ‘Posture Analysis → Adjust
Posture → Save Current Posture’. The
driver’s seat, steering wheel, side view
mirror and head-up display will be
adjusted.
5. Save the adjusted seat position in
‘Settings 1’ or ‘Settings 2’.
See additional information in
supplied Infotainment Manual.
SMART POSTURE CARE SYSTEM (IF EQUIPPED)
Page 192 of 632
Convenient Features
5-50
WARNING
Do not adjust or fold the side view
mirrors while driving. This may cause
loss of vehicle control resulting in an
accident.
NOTICE
• Do not scrape ice off the mirror face;
this may damage the surface of the
glass.
• If the mirror is jammed with ice, do
not adjust the mirror by force. Use an
approved spray de-icer (not radiator
antifreeze) spray, or a sponge or soft
cloth with very warm water, or move
the vehicle to a warm place and
allow the ice to melt.
• Do not clean the mirror with harsh
abrasives, fuel or other petroleum
based cleaning products.
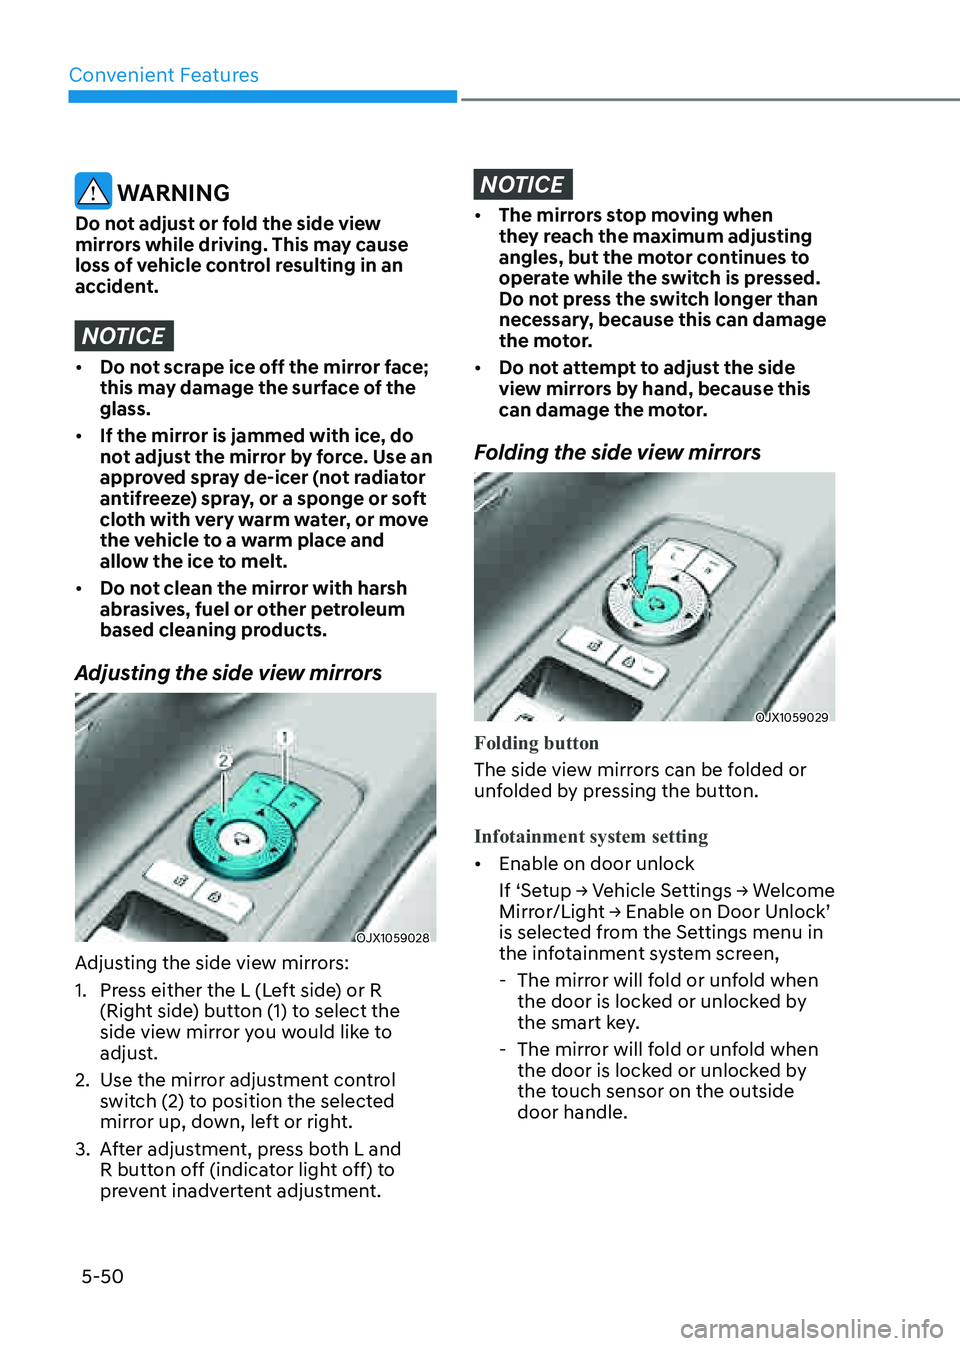
Adjusting the side view mirrors
OJX1059028OJX1059028
Adjusting the side view mirrors:
1. Press either the L (Left side) or R
(Right side) button (1) to select the
side view mirror you would like to
adjust.
2. Use the mirror adjustment control
switch (2) to position the selected
mirror up, down, left or right.
3. After adjustment, press both L and
R button off (indicator light off) to
prevent inadvertent adjustment.
NOTICE
• The mirrors stop moving when
they reach the maximum adjusting
angles, but the motor continues to
operate while the switch is pressed.
Do not press the switch longer than
necessary, because this can damage
the motor.
• Do not attempt to adjust the side
view mirrors by hand, because this
can damage the motor.
Folding the side view mirrors
OJX1059029OJX1059029
Folding button
The side view mirrors can be folded or
unfolded by pressing the button.
Infotainment system setting
• Enable on door unlock
If ‘Setup → Vehicle Settings → Welcome
Mirror/Light → Enable on Door Unlock’
is selected from the Settings menu in
the infotainment system screen,
-The mirror will fold or unfold when
the door is locked or unlocked by
the smart key.
-The mirror will fold or unfold when
the door is locked or unlocked by
the touch sensor on the outside
door handle.
Page 193 of 632
05
5-51
• Enable on driver approach
If ‘Setup → Vehicle Settings →
Welcome Mirror/Light → Enable on
Driver Approach’ is selected from the
Settings menu in the infotainment
system screen, the mirror will unfold
when the vehicle is approached with
the smart key in possession.
See additional information in supplied
Infotainment Manual.
NOTICE
The electric type side view mirror
operates even though the Engine Start/
Stop button is in the OFF position.
However, to prevent unnecessary
battery discharge, do not adjust the
mirrors longer than necessary while the
engine is not running.
NOTICE
Do not fold the electric type side view
mirror by hand. It could cause motor
failure.
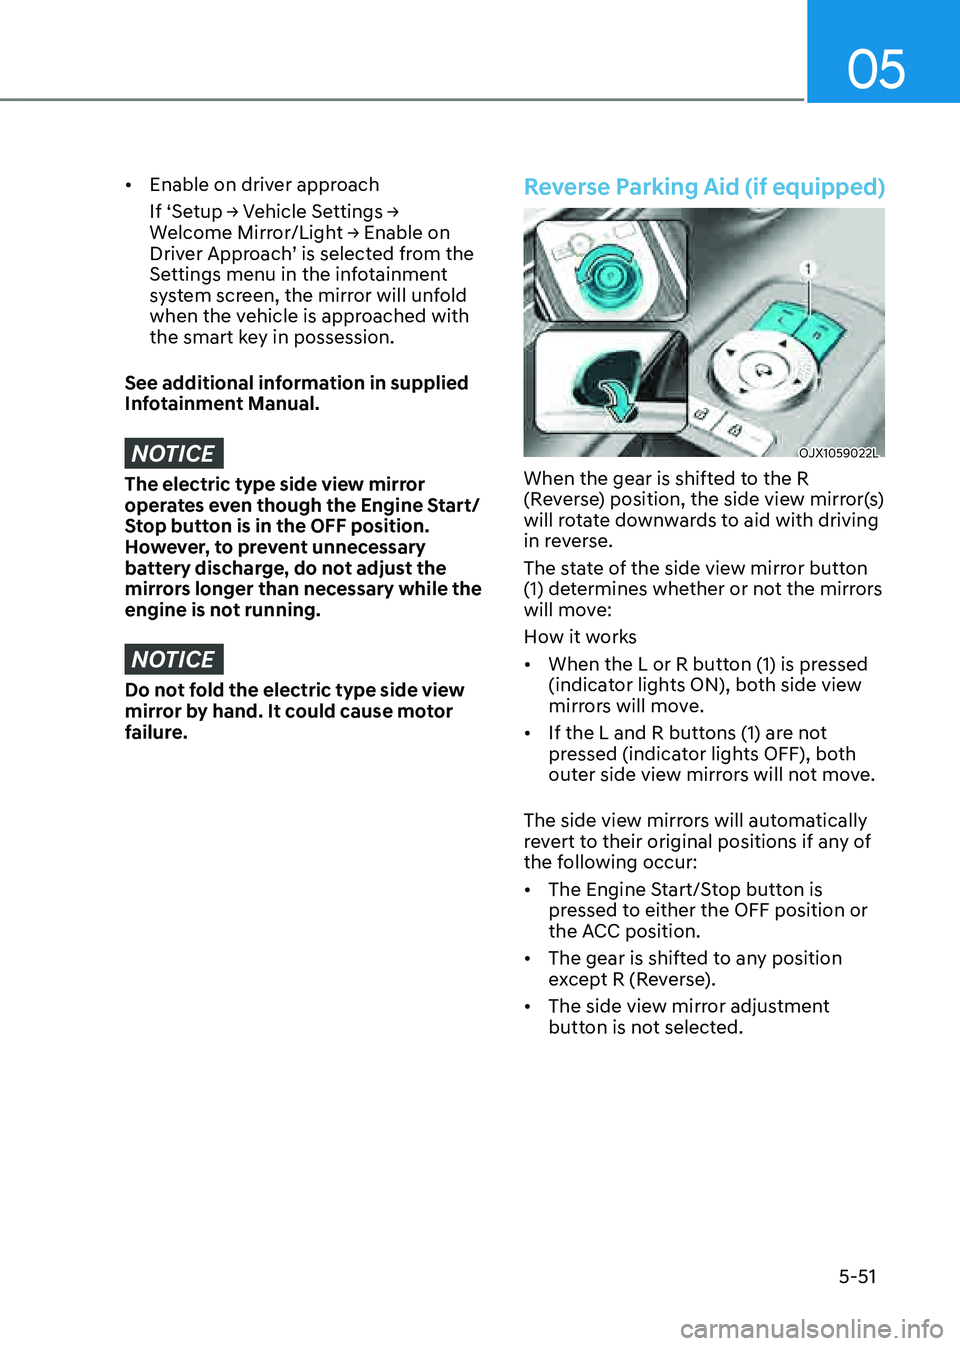
Reverse Parking Aid (if equipped)
OJX1059022LOJX1059022L
When the gear is shifted to the R
(Reverse) position, the side view mirror(s)
will rotate downwards to aid with driving
in reverse.
The state of the side view mirror button
(1) determines whether or not the mirrors
will move:
How it works
• When the L or R button (1) is pressed
(indicator lights ON), both side view
mirrors will move.
• If the L and R buttons (1) are not
pressed (indicator lights OFF), both
outer side view mirrors will not move.
The side view mirrors will automatically
revert to their original positions if any of
the following occur:
• The Engine Start/Stop button is
pressed to either the OFF position or
the ACC position.
• The gear is shifted to any position
except R (Reverse).
• The side view mirror adjustment
button is not selected.
Page 205 of 632
05
5-63
Power Liftgate
The power liftgate open/close button
automatically opens and closes the
liftgate.
Before using the power liftgate
The power liftgate operates when the
gear is in P (Park) with the Engine Start/
Stop button in the ON position. However,
the liftgate will operate regardless of the
gear position when the engine is off.
For safety, before attempting to open or
close the liftgate, make sure the vehicle
is in P (Park).
WARNING
• Never leave children unattended
in your vehicle. Children might
operate the power liftgate. Doing so
could result in injury to themselves
or others, and could damage the
vehicle.
• Make sure there are no people or
objects around the liftgate before
operating the power liftgate. Wait
until the liftgate is opened fully and
stopped before loading or unloading
cargo or passengers from the
vehicle.
NOTICE
Do not close or open the power
liftgate manually. This may cause
damage to the power liftgate. If it is
necessary to close or open the power
liftgate manually when the battery is
discharged or disconnected, do not
apply excessive force.
Setting the power liftgate
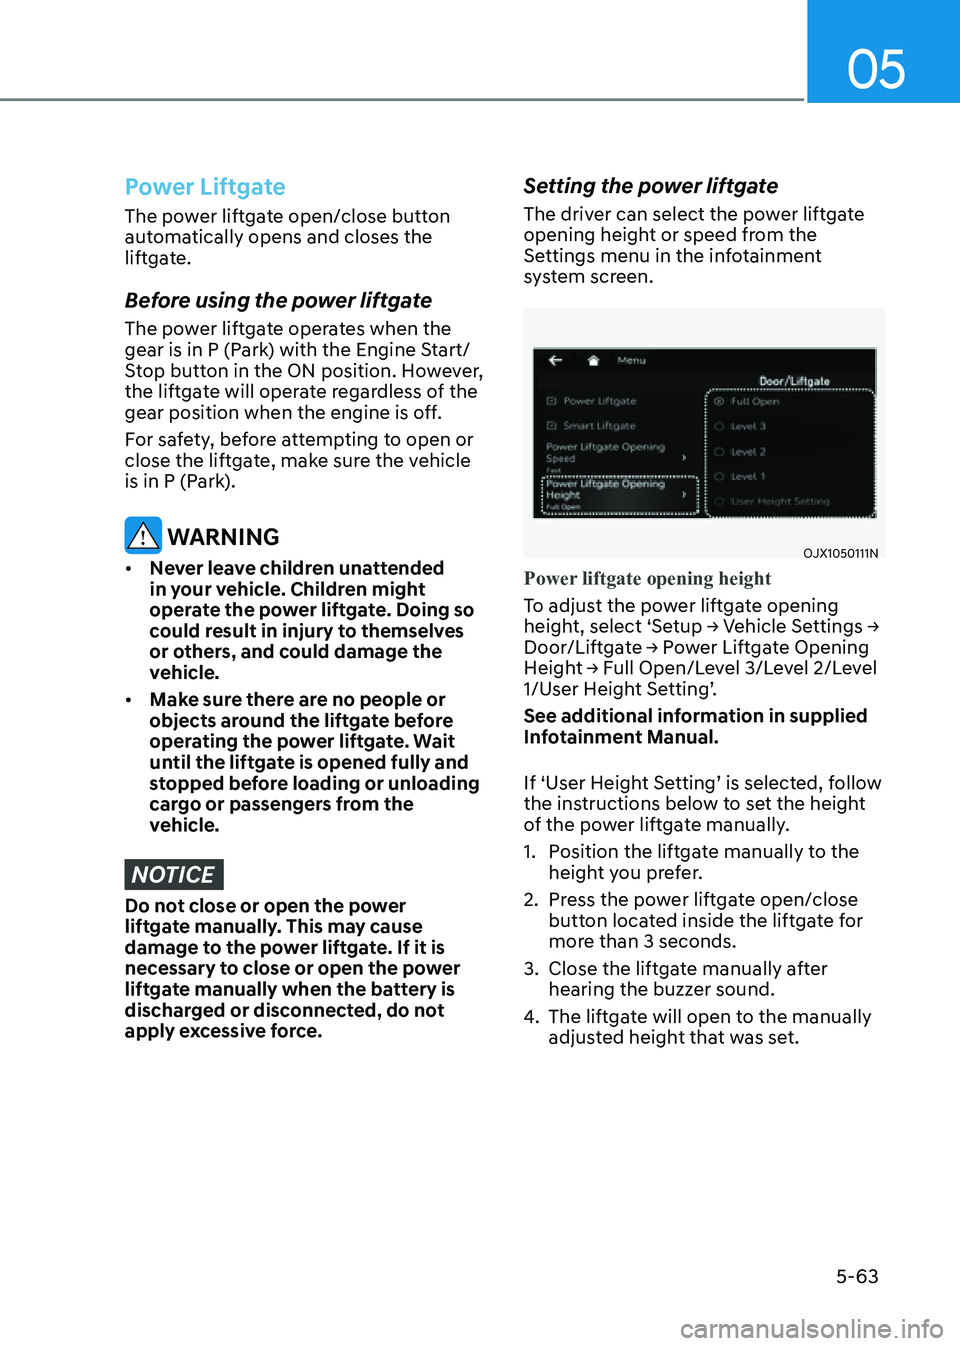
The driver can select the power liftgate
opening height or speed from the
Settings menu in the infotainment
system screen.
OJX1050111NOJX1050111N
Power liftgate opening height
To adjust the power liftgate opening
height, select ‘Setup → Vehicle Settings →
Door/Liftgate → Power Liftgate Opening
Height → Full Open/Level 3/Level 2/Level
1/User Height Setting’.
See additional information in supplied
Infotainment Manual.
If ‘User Height Setting’ is selected, follow
the instructions below to set the height
of the power liftgate manually.
1. Position the liftgate manually to the
height you prefer.
2. Press the power liftgate open/close
button located inside the liftgate for
more than 3 seconds.
3. Close the liftgate manually after
hearing the buzzer sound.
4. The liftgate will open to the manually
adjusted height that was set.
Page 211 of 632

05
5-69
Smart Liftgate
OJX1059050LOJX1059050L
On a vehicle equipped with a smart key,
the liftgate can be opened with hands-
free activation using the smart liftgate
system.
Using smart liftgate
The hands-free smart liftgate system
can be opened automatically when the
following conditions are met:
• The smart liftgate option is enabled in
the Settings menu in the infotainment
system screen.
• The smart liftgate is activated and
ready 15 seconds after all the doors
are closed and locked.
• The smart liftgate will open when
the smart key is detected in the area
behind the vehicle for 3 seconds.
Information
The smart liftgate will NOT operate when:
• A door is not locked or closed.
• The smart key is detected within 15 seconds from when the doors were closed and locked.
• The smart key is detected within 15 seconds after the doors are closed and locked, and within 60 in. (1.5 m) from the front door handles (for
vehicles equipped with Welcome Light).
• The smart key is in the vehicle.
1. Settings
To use smart liftgate, it must be
enabled from the Settings menu in the
infotainment system screen. Select:
-Setup → Vehicle Settings → Door/
Liftgate → Smart Liftgate
See additional information in
supplied Infotainment Manual.
2. Detect and Alert
The smart liftgate detecting area
extends approximately 20-40 in. (50-100 cm) behind the vehicle. If you are positioned in the detecting area and
are carrying the smart key, the hazard
warning lights will blink and the chime
will sound to alert you that the smart
liftgate will open.
Page 216 of 632
Convenient Features
5 -74
OJX1050054NOJX1050054N
The Head-Up Display is a feature that
allows the driver to view information
projected onto a transparent screen
while still keeping their eyes on the road
ahead while driving.
Head-Up Display Settings
OJX1079242LOJX1079242L
• Head-up display can be enabled from
the Settings menu in the infotainment
system screen. Select:
- Setup → Vehicle Settings → Head-
Up Display → Enable Head-Up
Display
• After turning on the head-up
display, you can change the settings
of ‘Display Control’ and ‘Content
Selection’ of the Head-Up Display.
See additional information in
supplied Infotainment Manual.
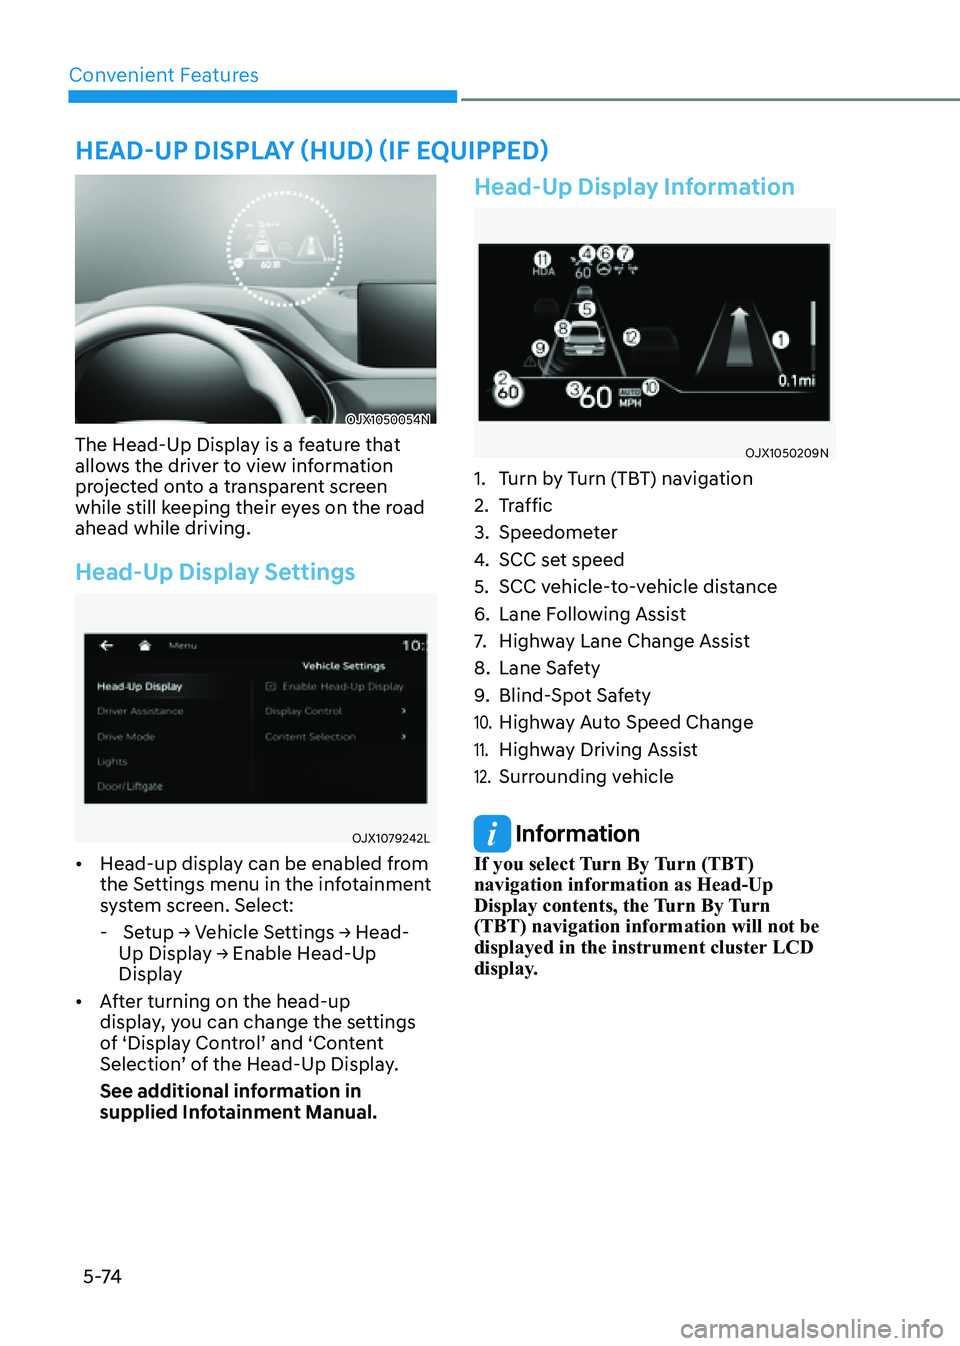
Head-Up Display Information
OJX1050209NOJX1050209N
1. Turn by Turn (TBT) navigation
2. Traffic
3. Speedometer
4. SCC set speed
5. SCC vehicle-to-vehicle distance
6. Lane Following Assist
7. Highway Lane Change Assist
8. Lane Safety
9. Blind-Spot Safety
10. Highway Auto Speed Change
11. Highway Driving Assist
12. Surrounding vehicle
Information
If you select Turn By Turn (TBT)
navigation information as Head-Up
Display contents, the Turn By Turn
(TBT) navigation information will not be
displayed in the instrument cluster LCD
display.
HEAD-UP DISPLAY (HUD) (IF EQUIPPED)
Page 217 of 632

05
5-75
Precautions While Using the
Head-Up Display
• It may sometimes be difficult to read
information on the Head-Up Display in
the following situations.
-The driver is improperly positioned
in the driver’s seat
-The driver wears polarizing-filter
sunglasses
-An object is located above the
Head-Up Display cover
-The vehicle is driven on a wet road
-Any improper lighting accessory is
installed inside the vehicle, or there
is incoming light from outside of the
vehicle
-The driver wears glasses
-The driver wears contact lenses
When it is difficult to read the Head-
Up Display information, adjust the
image height or brightness level from
the Settings menu in the infotainment
system screen.
• For your safety, make sure to stop the
vehicle before adjusting the settings.
• Do not tint the front windshield glass
or add other types of metallic coating.
Otherwise, the Head-Up Display
image may be invisible.
• Do not place any accessories on the
crash pad or attach any objects on the
windshield glass.
• When replacing the front windshield
glass, replace it with a windshield
glass designed for Head-Up Display
operation. Otherwise, duplicated
images may be displayed on the
windshield glass.
WARNING
Blind-Spot Collision Warning on the
Head-Up Display are supplemental. Do
not solely depend on them to change
lanes. Always take a look around before
changing lanes.