fuel GENESIS GV80 2021 Owner's Guide
[x] Cancel search | Manufacturer: GENESIS, Model Year: 2021, Model line: GV80, Model: GENESIS GV80 2021Pages: 632, PDF Size: 9.37 MB
Page 336 of 632
Driving Your Vehicle
6-64
If you are considering to tow with your
vehicle, you should first check with your
state's Department of Motor Vehicles to
determine legal requirements. Since laws
vary from state to state the requirements
for towing trailers, cars, or other types of
vehicles or apparatus may differ. Ask an
authorized retailer of Genesis Branded
products for further details before
towing.
Remember that trailering is different
than just driving your vehicle by
itself. Trailering means changes in
handling, durability, and fuel economy.
Successful, safe trailering requires
correct equipment, and it has to be used
properly. Damage to your vehicle caused
by improper trailer towing is not covered
by your vehicle manufacturer’s warranty.
This section contains many time-tested,
important trailering tips and safety
rules. Many of these are important for
your safety and that of your passengers.
Please read this section carefully before
you pull a trailer.
WARNING
Take the following precautions:
• If you don’t use the correct
equipment and/or drive improperly,
you can lose control of the vehicle
when you are pulling a trailer. For
example, if the trailer is too heavy,
the braking performance may be
reduced. You and your passengers
could be seriously or fatally injured.
Pull a trailer only if you have followed
all the steps in this section.
• Before towing, make sure the
total trailer weight, GCW (Gross
Combination Weight), GVW (Gross
Vehicle Weight), GAW (Gross Axle
Weight) and trailer tongue load are
all within the limits.
• When you tow a trailer, make sure to
turn off the Idle Stop and Go system.
If You Decide to Pull a Trailer?
Here are some important points if you
decide to pull a trailer:
• Consider using a sway control. You
can ask a trailer hitch dealer about
sway control.
• Do not do any towing with your
vehicle during its first 1,200 miles
(2,000 km) in order to allow the
engine to properly break in. Failure to
heed this caution may result in serious
engine or transmission damage.
• When towing a trailer, be sure
to consult an authorized retailer
of Genesis Branded products for
further information on additional
requirements such as a towing kit, etc.
• Always drive your vehicle at posted
towing speed limit.
• Carefully observe the weight and load
limits provided in the following pages.
• When towing a trailer, be sure to
disable Reverse Parking Collision-
Avoidance Assist. If towing and going
in reverse the system will activate as it
detects the trailer. Also, before towing
a trailer disable all Driving Assistance
systems as precaution such as
Forward Collision–Avoidance Assist,
Lane Keeping Assist, Smart Cruise
Control and others.
TRAILER TOWING
Page 343 of 632

06
6-71
Two labels on your driver’s door sill show
how much weight your vehicle was
designed to carry: the Tire and Loading
Information Label and the Certification
Label.
Before loading your vehicle, familiarize
yourself with the following terms for
determining your vehicle’s weight
ratings, from the vehicle’s specifications
and the Certification Label:
Base curb weight
This is the weight of the vehicle
including a full tank of fuel and all
standard equipment. It does not
include passengers, cargo, or optional
equipment.
Vehicle curb weight
This is the weight of your new vehicle
when you picked it up from your dealer
plus any aftermarket equipment.
Cargo weight
This figure includes all weight added to
the Base Curb Weight, including cargo
and optional equipment.
GAW (Gross Axle Weight)
This is the total weight placed on each
axle (front and rear) - including vehicle
curb weight and all payload.
GAWR (Gross Axle Weight Rating)
This is the maximum allowable weight
that can be carried by a single axle (front
or rear). These numbers are shown on
the Certification Label. The total load on
each axle must never exceed its GAWR.
GVW (Gross Vehicle Weight)
This is the Base Curb Weight plus actual
Cargo Weight plus passengers.
GVWR (Gross Vehicle Weight Rating)
This is the maximum allowable weight
of the fully loaded vehicle (including
all options, equipment, passengers
and cargo). The GVWR is shown on the
Certification Label located on the driver’s
door sill.
VEHICLE LOAD LIMIT
Page 348 of 632

Driving Your Vehicle
6 -76
Certification label
OBH059070OBH059070
The certification label is located on the
driver's door sill at the center pillar and
shows the maximum allowable weight of
the fully loaded vehicle. This is called the
GVWR (Gross Vehicle Weight Rating). The
GVWR includes the weight of the vehicle,
all occupants, fuel and cargo.
This label also tells you the maximum
weight that can be supported by the
front and rear axles, called Gross Axle
Weight Rating (GAWR).
The total weight of the vehicle, including
all occupants, accessories, cargo, and
trailer tongue load must not exceed the
Gross Vehicle Weight Rating (GVWR) or
the Gross Axle Weight Rating (GAWR).
To find out the actual loads on your front
and rear axles, you need to go to a weigh
station and weigh your vehicle. Be sure
to spread out your load equally on both
sides of the centerline.
WARNING
Overloading
• Never exceed the GVWR for your
vehicle, the GAWR for either the front
or rear axle and vehicle capacity
weight. Exceeding these ratings
can affect your vehicle's handling
and braking ability, and cause an
accident.
• Do not overload your vehicle.
Overloading your vehicle can cause
heat buildup in your vehicle's tires
and possible tire failure, increased
stopping distances and poor vehicle
handling-all of which may result in a
crash.
NOTICE
Overloading your vehicle may cause
damage. Repairs would not be covered
by your warranty. Do not overload your
vehicle.
WARNING
If you carry items inside your vehicle
(e.g., suitcases, tools, packages, or
anything else), they are moving as fast
as the vehicle. If you have to stop or
turn quickly, or if there is a crash, the
items will keep going and can cause
an injury if they strike the driver or a
passenger.
• Put items in the cargo area of your
vehicle. Try to spread the weight
evenly.
• Do not stack items, like suitcases,
inside the vehicle above the tops of
the seats.
• Do not leave an unsecured child
restraint in your vehicle.
• When you carry something inside the
vehicle, secure it.
Page 514 of 632
08
8-3
If You Have a Flat Tire While
Driving
If a tire goes flat while you are driving:
• Take your foot off the accelerator
pedal and let the vehicle slow down
while driving straight ahead. Do not
apply the brakes immediately or
attempt to pull off the road as this
may cause loss of vehicle control
resulting in an accident. When the
vehicle has slowed to such a speed
that it is safe to do so, brake carefully
and pull off the road. Drive off the
road as far as possible and park on
firm, level ground. If you are on a
divided highway, do not park in the
median area between the two traffic
lanes.
• When the vehicle is stopped, press the
hazard warning flasher button, shift
the gear to P (Park), apply the parking
brake, and press the Engine Start/Stop
button to the OFF position.
• Have all passengers get out of the
vehicle. Be sure they all get out on the
side of the vehicle that is away from
traffic.
• When changing a flat tire, follow the
instructions provided later in this
chapter.
IF THE ENGINE WILL NOT
START
• Be sure to shift the gear to N (Neutral)
or P (Park). The engine starts only
when the gear is in N (Neutral) or P
(Park).
• Turn on the interior light. If the light
dims or goes out when you operate
the starter, the battery is drained.
See instructions for “Jump Starting”
provided in this chapter.
• Check the fuel level and add fuel if
necessary.
If the vehicle still does not start, call an
authorized retailer of Genesis Branded
products for assistance.
NOTICE
Push or pull starting the vehicle may
cause the catalytic converter to
overload which can lead to damage to
the emission control system.
Page 520 of 632

08
8-9
Tire Pressure Monitoring System
WARNING
Over-inflation or under-inflation can
reduce tire life, adversely affect vehicle
handling, and lead to sudden tire failure
that may cause loss of vehicle control
resulting in an accident.
Each tire, including the spare (if
provided), should be checked monthly
when cold and inflated to the inflation
pressure recommended by the vehicle
manufacturer on the vehicle placard
or tire inflation pressure label. (If your
vehicle has tires of a different size than
the size indicated on the vehicle placard
or tire inflation pressure label, you should
determine the proper tire inflation
pressure for those tires.)
As an added safety feature, your
vehicle has been equipped with a tire
pressure monitoring system (TPMS)
that illuminates a low tire pressure
telltale when one or more of your tires is
significantly under-inflated. Accordingly,
when the low tire pressure telltale
illuminates, you should stop and check
your tires as soon as possible, and inflate
them to the proper pressure. Driving on
a significantly under-inflated tire causes
the tire to overheat and can lead to tire
failure.
Under-inflation also reduces fuel
efficiency and tire tread life, and may
affect the vehicle’s handling and
stopping ability.
Please note that the TPMS is not a
substitute for proper tire maintenance,
and it is the driver’s responsibility to
maintain correct tire pressure, even if
under-inflation has not reached the level
to trigger illumination of the TPMS low
tire pressure telltale.
Your vehicle has also been equipped with
a TPMS malfunction indicator to indicate
when the system is not operating
properly. The TPMS malfunction
indicator is combined with the low
tire pressure telltale. When the system
detects a malfunction, the telltale will
flash for approximately one minute and
then remain continuously illuminated.
This sequence will continue upon
subsequent vehicle start-ups as long as
the malfunction exists.
When the malfunction indicator is
illuminated, the system may not be able
to detect or signal low tire pressure as
intended. TPMS malfunctions may occur
for a variety of reasons, including the
installation of replacement or alternate
tires or wheels on the vehicle that
prevent the TPMS from functioning
properly.
Always check the TPMS malfunction
telltale after replacing one or more tires
or wheels on your vehicle to ensure that
the replacement or alternate tires and
wheels allow the TPMS to continue to
function properly.
NOTICE
If any of the below happens, have
the system checked by an authorized
retailer of Genesis Branded products.
1. The Low Tire Pressure Telltale/ TPMS
Malfunction Indicator does not
illuminate for 3 seconds when the
Engine Start/Stop button is pressed
to the ON position or when the
engine is running.
2. The TPMS Malfunction Indicator
remains illuminated after blinking for
approximately 1 minute.
3. The Low Tire Pressure Position
Telltale remains illuminated.
Page 542 of 632
Maintenance
9
9. Maintenance
Engine Compartment ........................................................................\
...............9-3
Maintenance Services
........................................................................\
..............9-4Owner’s Responsibility ........................................................................\
.......................9-4
Owner Maintenance Precautions ........................................................................\
.......9-4
Owner Maintenance ........................................................................\
.................9-5Owner Maintenance Schedule ........................................................................\
...........9-6
Scheduled Maintenance Services ....................................................................9 -7Normal Maintenance Schedule ........................................................................\
..........9-8
Maintenance Under Severe Usage Conditions .........................................................9-11
Explanation of Scheduled Maintenance Items ..............................................9-13Fuel Filter ........................................................................\
............................................9-13
Engine oil ........................................................................\
..................................9-15Checking the Engine Oil Level ........................................................................\
...........9-15
Checking the Engine Oil and Filter ........................................................................\
...9-16
Engine Coolant/Liquid-Cooled Intercooler Coolant .....................................9-17Checking the Coolant Level ........................................................................\
................ 9-17
Changing Coolant ........................................................................\
..............................9-19
Brake Fluid ........................................................................\
...............................9-20
Checking the Brake Fluid Level ........................................................................\
........9-20
Washer Fluid ........................................................................\
.............................9-21Checking the Washer Fluid Level ........................................................................\
......9-21
Air Cleaner ........................................................................\
...............................9-22Filter Replacement ........................................................................\
.............................9-22
Cabin Air Filter ........................................................................\
.........................9-23Filter Inspection ........................................................................\
.................................. 9-23
Filter Replacement ........................................................................\
.............................9-23
Wiper Blades ........................................................................\
...........................9-24Blade Inspection ........................................................................\
................................9-24
Blade Replacement ........................................................................\
............................9-24
Battery ........................................................................\
......................................9-27Battery Usage Recommendations ........................................................................\
....9-28
Battery Recharging ........................................................................\
............................9-28
Reset Items ........................................................................\
.........................................9-29
Page 546 of 632

09
9-5
WARNING
Performing maintenance work on a
vehicle can be dangerous. If you lack
sufficient knowledge and experience or
the proper tools and equipment to do
the work, have it done by an authorized
retailer of Genesis Branded products.
ALWAYS follow these precautions for
performing maintenance work:
• Park your vehicle on level ground.
Shift the vehicle to P (Park), apply
the parking brake, and press the
Engine Start/Stop button to the OFF
position.
• Block the tires (front and back) to
prevent the vehicle from moving.
Remove loose clothing or jewelry
that can become entangled in
moving parts.
• If you must operate the engine
during maintenance, do so
outdoors or in an area with plenty of
ventilation.
• Keep flames, sparks, or smoking
materials away from the battery and
fuel-related parts.
WARNING
Touching metal parts
Do not touch metal parts
(including strut bars) while
the engine is operating or
hot. Doing so could result in
serious personal injury. Turn
the engine off and wait until
the metal parts cool down to
perform maintenance work on
the vehicle.
The following lists are vehicle checks and
inspections that should be performed
by the owner or an authorized retailer
of Genesis Branded products at the
frequencies indicated to help ensure
safe, dependable operation of your
vehicle.
Any adverse conditions should be
brought to the attention of your dealer as
soon as possible.
These Owner Maintenance vehicle
checks are generally not covered by
warranties and you may be charged for
labor, parts and lubricants used.
OWNER MAINTENANCE
Page 547 of 632
Maintenance
9-6
Owner Maintenance Schedule
When you stop for fuel:
• Check the engine oil level.
• Check the coolant level in the engine
coolant reservoir or the liquid-cooled
intercooler coolant reservoir.
• Check the windshield liquid fluid level.
• Check for low or under-inflated tires.
WARNING
Be careful when checking your coolant
level when the engine is hot. This may
result in coolant being blown out of the
opening and cause serious burns and
other injuries.
While operating your vehicle:
• Note any changes in the sound of the
exhaust or any smell of exhaust fumes
in the vehicle.
• Check for vibrations in the steering
wheel. Notice if there is any increased
steering effort or looseness in the
steering wheel, or change in its
straight-ahead position.
• Notice if your vehicle constantly turns
slightly or “pulls” to one side when
traveling on smooth, level road.
• When stopping, listen and check for
unusual sounds, pulling to one side,
increased brake pedal travel or “hard-
to-push” brake pedal.
• If any slipping or changes in the
operation of your transmission occurs,
check the transmission fluid level.
• Check the automatic transmission P
(Park) function.
• Check the parking brake.
• Check for fluid leaks under your
vehicle (water dripping from the air
conditioning system during or after
use is normal).
At least monthly:
• Check coolant level in the engine
coolant reservoir.
• Check the operation of all exterior
lights, including the stoplights, turn
signals and hazard warning flashers.
• Check the inflation pressures of all
tires including the spare for tires that
are worn, show uneven wear, or are
damaged.
• Check for loose wheel lug nuts.
At least twice a year: (i.e., every
Spring and Autumn)
• Check radiator, heater and air
conditioning hoses for leaks or
damage.
• Check windshield washer spray and
wiper operation. Clean wiper blades
with a clean cloth dampened with
washer fluid.
• Check headlamp alignment.
• Check muffler, exhaust pipes, shields
and clamps.
• Check the seat belts for wear and
function.
At least once a year:
• Clean body and door drain holes.
• Lubricate door hinges and hood
hinges.
• Lubricate door and hood locks and
latches.
• Lubricate door rubber weather strips.
• Check the air conditioning system.
• Inspect and lubricate automatic
transmission linkage and controls.
• Clean the battery and terminals.
• Check the brake fluid level.
Page 549 of 632
Maintenance
9-8
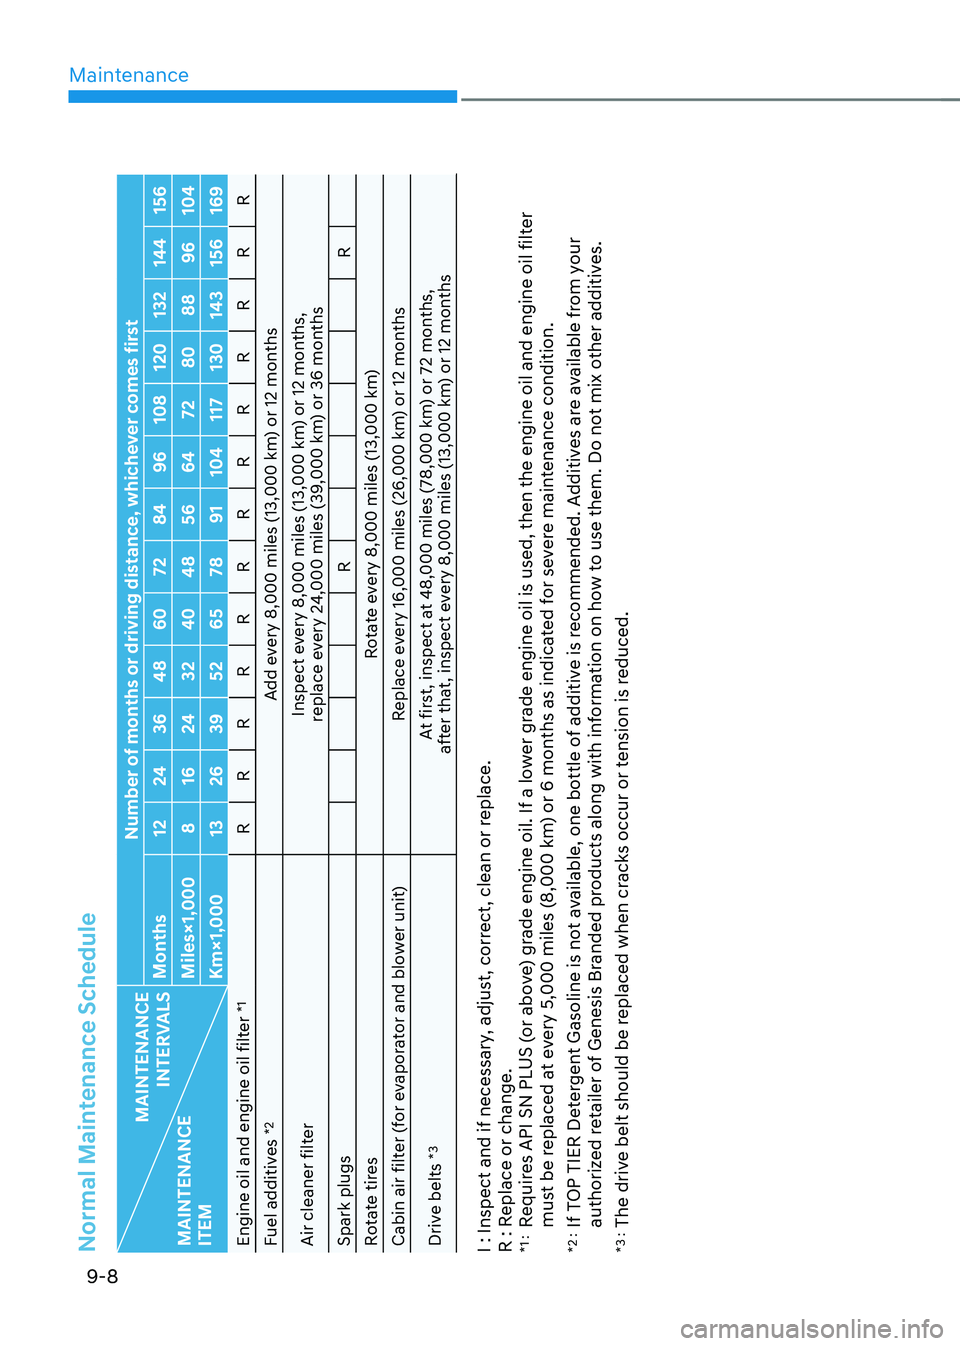
Normal Maintenance Schedule
MAINTENANCE
INTERVALS
MAINTENANCE
ITEM Number of months or driving distance, whichever comes first
Months 1224 3648 60 7284 96108 120 132144 156
Miles×1,000 816 24 3240 48 5664 7280 8896104
Km×1,000 1326 39 5265 78 91104 117130 143156169
Engine oil and engine oil filter
*1
R RRRRRRRRRRRR
Fuel additives
*2
Add every 8,000 miles (13,000 km) or 12 months
Air cleaner filter Inspect every 8,000 miles (13,000 km) or 12 months,
replace every 24,000 miles (39,000 km) or 36 months
Spark plugs RR
Rotate tires Rotate every 8,000 miles (13,000 km)
Cabin air filter (for evaporator and blower unit) Replace every 16,000 miles (26,000 km) or 12 months
Drive belts
*3
At first, inspect at 48,000 miles (78,000 km) or 72 months,
after that, inspect every 8,000 miles (13,000 km) or 12 months
I : Inspect and if necessary, adjust, correct, clean or replace.
R : Replace or change.*1 : Requires API SN PLUS (or above) grade engine oil. If a lower grade engine oil is used, then the engine oil and engine oil filter
must be replaced at every 5,000 miles (8,000 km) or 6 months as indicated for severe maintenance condition.
*2 : If TOP TIER Detergent Gasoline is not available, one bottle of additive is recommended. Additives are available from your
authorized retailer of Genesis Branded products along with information on how to use them. Do not mix other additives.
*3 : The drive belt should be replaced when cracks occur or tension is reduced.
Page 551 of 632
Maintenance
9-10
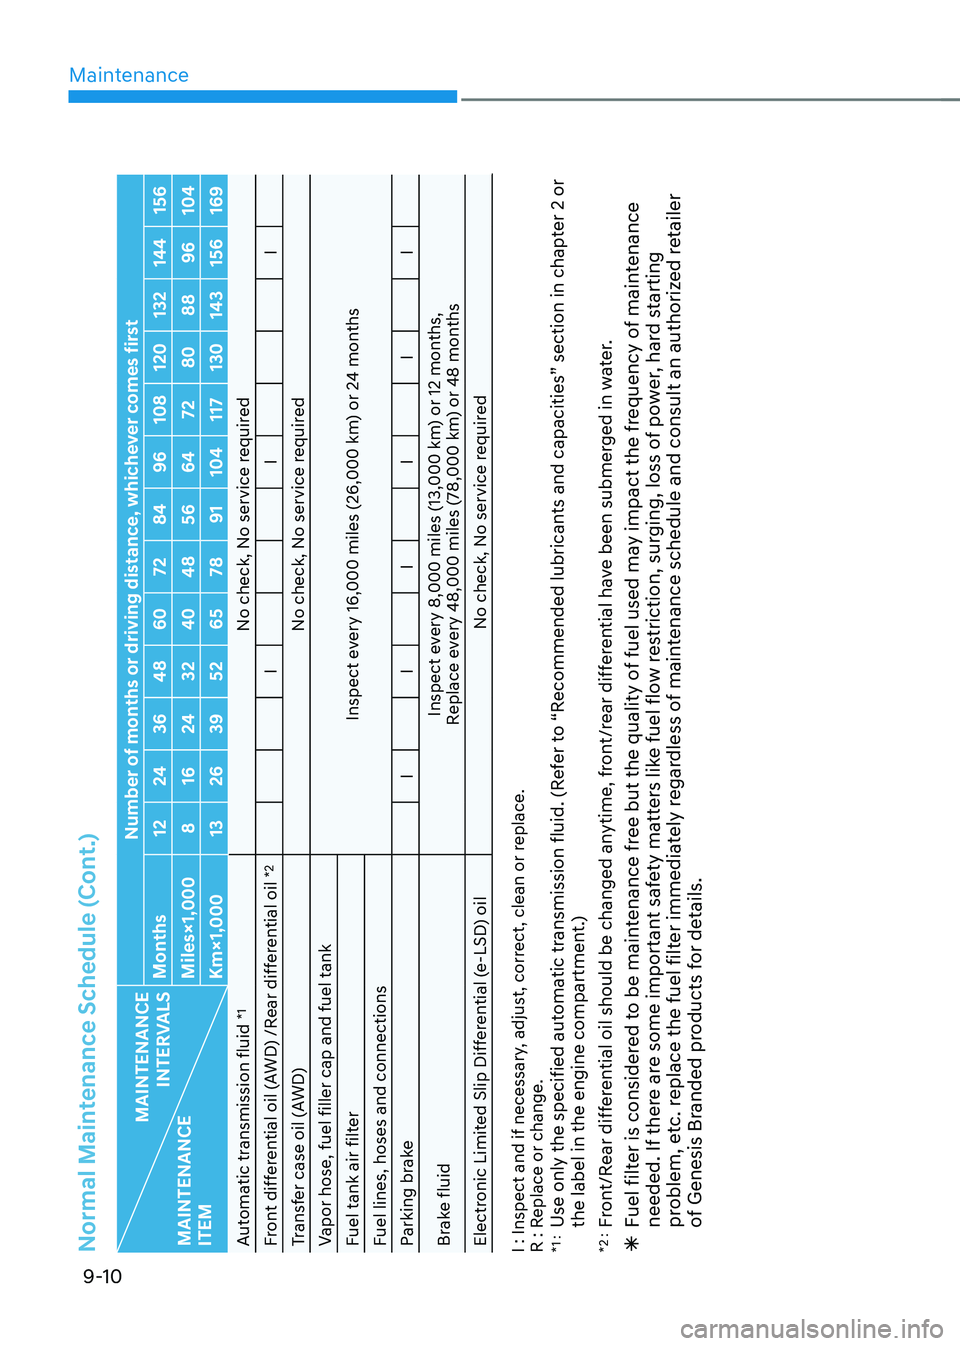
Normal Maintenance Schedule (Cont.)
MAINTENANCE
INTERVALS
MAINTENANCE
ITEM Number of months or driving distance, whichever comes first
Months 1224 3648 60 7284 96108 120 132144 156
Miles×1,000 816 24 3240 48 5664 7280 8896104
Km×1,000 1326 39 5265 78 91104 117130 143156169
Automatic transmission fluid
*1
No check, No service required
Front differential oil (AWD) /Rear differential oil
*2
I II
Transfer case oil (AWD) No check, No service required
Vapor hose, fuel filler cap and fuel tank Inspect every 16,000 miles (26,000 km) or 24 months
Fuel tank air filter
Fuel lines, hoses and connections
Parking brake IIIIII
Brake fluid Inspect every 8,000 miles (13,000 km) or 12 months,
Replace every 48,000 miles (78,000 km) or 48 months
Electronic Limited Slip Differential (e-LSD) oil No check, No service required
I : Inspect and if necessary, adjust, correct, clean or replace.
R : Replace or change.
*1 : Use only the specified automatic transmission fluid. (Refer to “Recommended lubricants and capacities” section in chapter 2 or
the label in the engine compartment.)
*2 : Front/Rear differential oil should be changed anytime, front/rear differential have been submerged in water. Ã Fuel filter is considered to be maintenance free but the quality of fuel used may impact the frequency of maintenance
needed. If there are some important safety matters like fuel flow restriction, surging, loss of power, hard starting
problem, etc. replace the fuel filter immediately regardless of maintenance schedule and consult an authorized retailer
of Genesis Branded products for details.