engine GENESIS GV80 2021 Manual Online
[x] Cancel search | Manufacturer: GENESIS, Model Year: 2021, Model line: GV80, Model: GENESIS GV80 2021Pages: 632, PDF Size: 9.37 MB
Page 204 of 632
Convenient Features
5-62
Hood
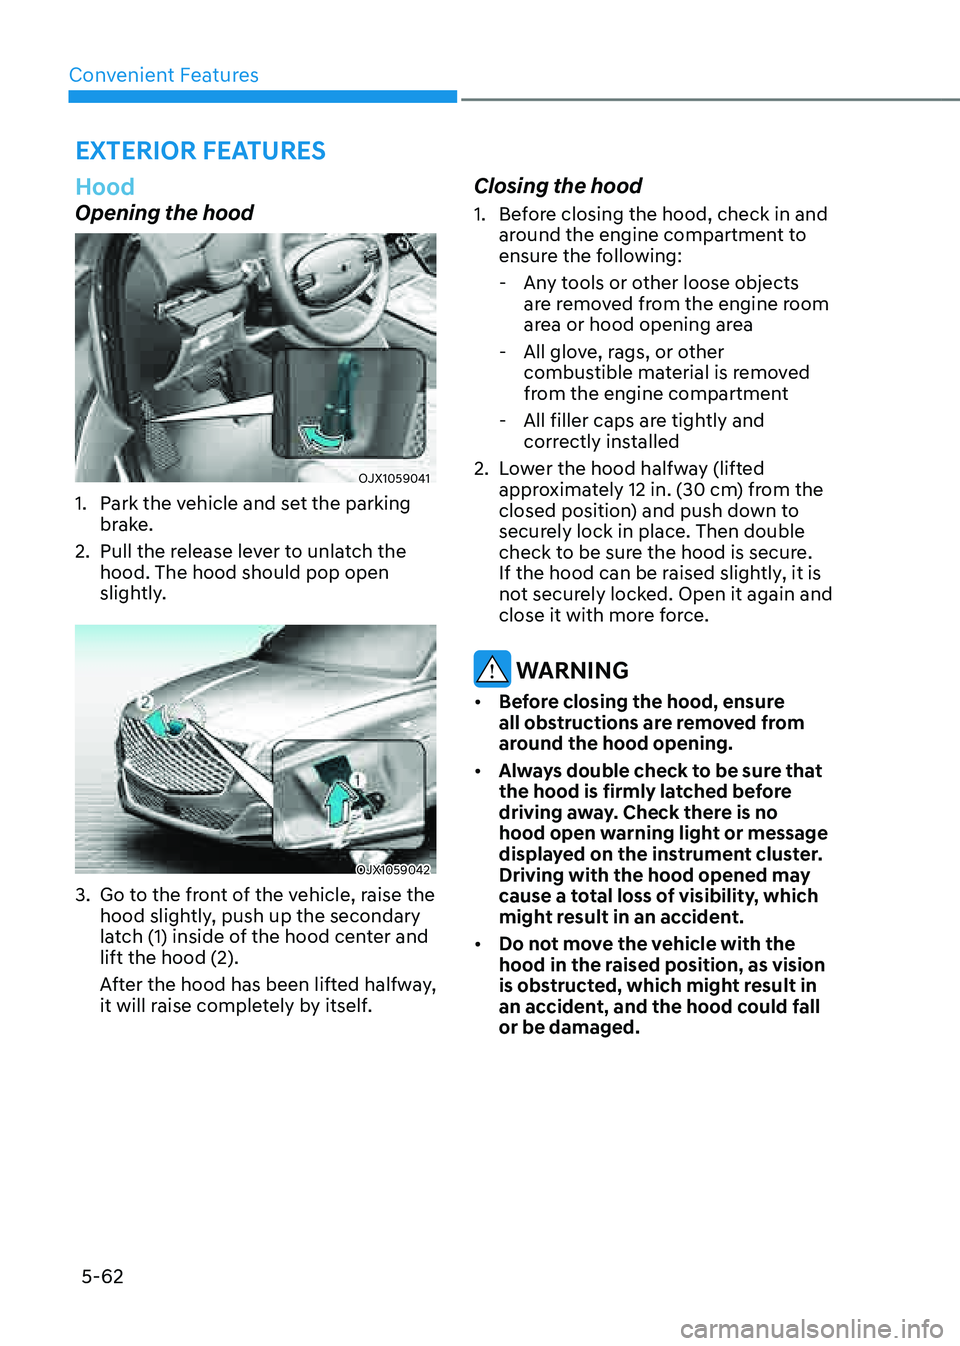
Opening the hood
OJX1059041 OJX1059041
1. Park the vehicle and set the parking
brake.
2. Pull the release lever to unlatch the
hood. The hood should pop open
slightly.
OJX1059042 OJX1059042
3. Go to the front of the vehicle, raise the
hood slightly, push up the secondary
latch (1) inside of the hood center and
lift the hood (2).
After the hood has been lifted halfway,
it will raise completely by itself.
Closing the hood
1. Before closing the hood, check in and
around the engine compartment to
ensure the following:
-Any tools or other loose objects
are removed from the engine room
area or hood opening area
-All glove, rags, or other
combustible material is removed
from the engine compartment
-All filler caps are tightly and
correctly installed
2. Lower the hood halfway (lifted
approximately 12 in. (30 cm) from the
closed position) and push down to
securely lock in place. Then double
check to be sure the hood is secure.
If the hood can be raised slightly, it is
not securely locked. Open it again and
close it with more force.
WARNING
• Before closing the hood, ensure
all obstructions are removed from
around the hood opening.
• Always double check to be sure that
the hood is firmly latched before
driving away. Check there is no
hood open warning light or message
displayed on the instrument cluster.
Driving with the hood opened may
cause a total loss of visibility, which
might result in an accident.
• Do not move the vehicle with the
hood in the raised position, as vision
is obstructed, which might result in
an accident, and the hood could fall
or be damaged.
EXTERIOR FEATURES
Page 205 of 632
05
5-63
Power Liftgate
The power liftgate open/close button
automatically opens and closes the
liftgate.
Before using the power liftgate
The power liftgate operates when the
gear is in P (Park) with the Engine Start/
Stop button in the ON position. However,
the liftgate will operate regardless of the
gear position when the engine is off.
For safety, before attempting to open or
close the liftgate, make sure the vehicle
is in P (Park).
WARNING
• Never leave children unattended
in your vehicle. Children might
operate the power liftgate. Doing so
could result in injury to themselves
or others, and could damage the
vehicle.
• Make sure there are no people or
objects around the liftgate before
operating the power liftgate. Wait
until the liftgate is opened fully and
stopped before loading or unloading
cargo or passengers from the
vehicle.
NOTICE
Do not close or open the power
liftgate manually. This may cause
damage to the power liftgate. If it is
necessary to close or open the power
liftgate manually when the battery is
discharged or disconnected, do not
apply excessive force.
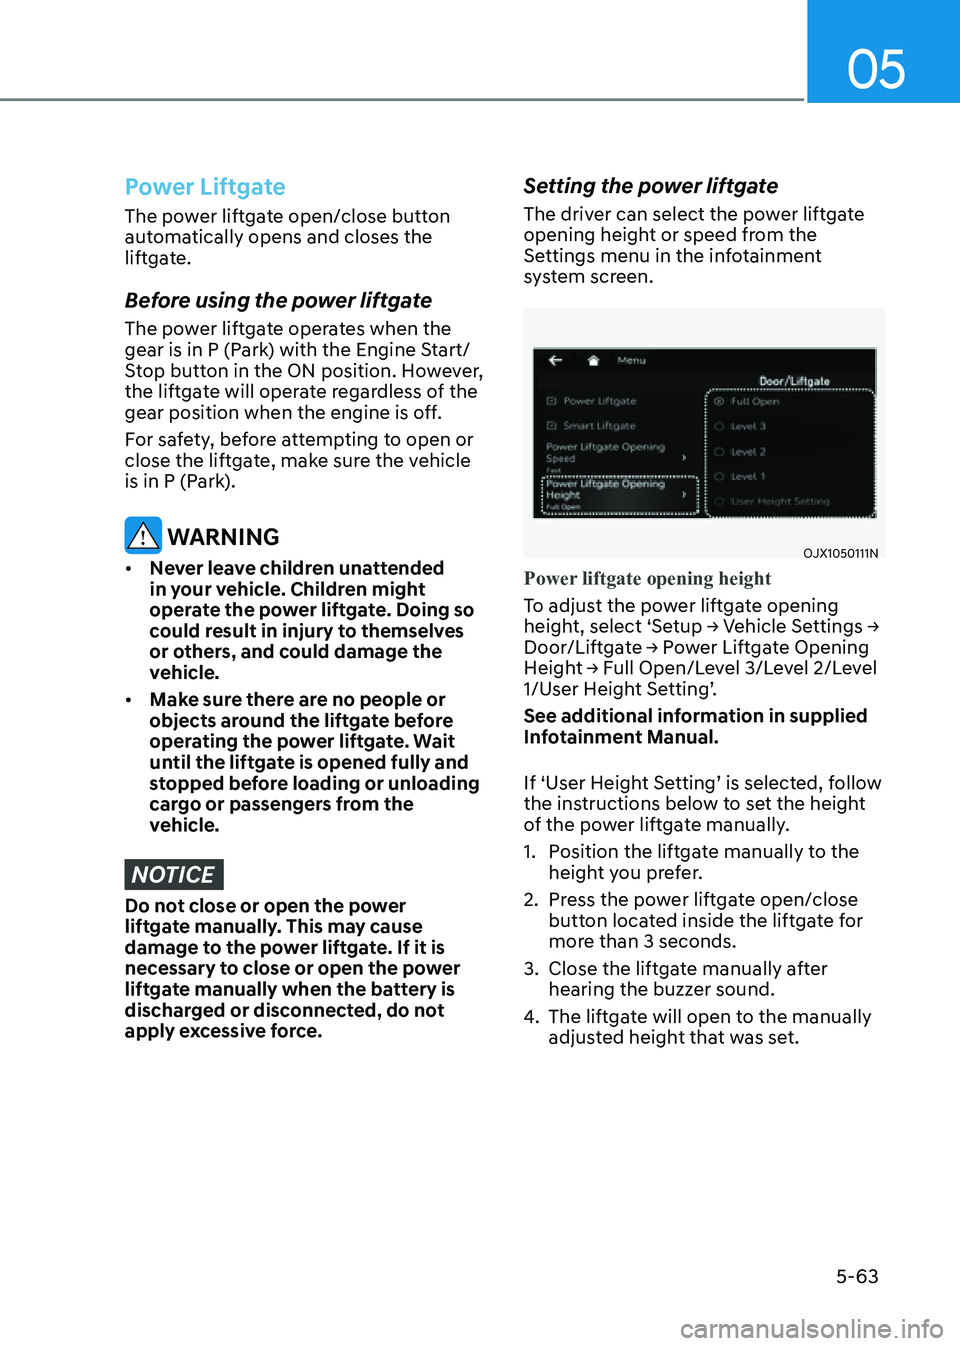
Setting the power liftgate
The driver can select the power liftgate
opening height or speed from the
Settings menu in the infotainment
system screen.
OJX1050111NOJX1050111N
Power liftgate opening height
To adjust the power liftgate opening
height, select ‘Setup → Vehicle Settings →
Door/Liftgate → Power Liftgate Opening
Height → Full Open/Level 3/Level 2/Level
1/User Height Setting’.
See additional information in supplied
Infotainment Manual.
If ‘User Height Setting’ is selected, follow
the instructions below to set the height
of the power liftgate manually.
1. Position the liftgate manually to the
height you prefer.
2. Press the power liftgate open/close
button located inside the liftgate for
more than 3 seconds.
3. Close the liftgate manually after
hearing the buzzer sound.
4. The liftgate will open to the manually
adjusted height that was set.
Page 208 of 632

Convenient Features
5-66
NOTICE
• The power liftgate can be operated
when the engine is not running.
However, power liftgate operation
consumes a large amount of eclectic
power. To prevent the battery from
being discharged, do not operate it
excessively (e.g. more than 5 times
repeatedly).
• To prevent the battery from being
discharged, do not leave the power
liftgate in the open position for a
long time.
• Do not modify or repair any part
of the power liftgate by yourself.
This must be done by an authorized
retailer of Genesis Branded products.
• When jacking up the vehicle to
change a tire or repair the vehicle, do
not operate the power liftgate. This
could cause the power liftgate to
operate improperly.
• In cold and wet climates, the power
liftgate may not work properly due to
freezing conditions.
Automatic reverse
OJX1059048LOJX1059048L
During power opening or closing if the
power liftgate senses any obstacle, the
power liftgate will stop and move in the
opposite direction.
The auto reverse function may not work
if objects are too soft or thin, or if the
liftgate is almost fully closed near the
latched position.
Caution should be taken to prevent any
objects from obstructing the liftgate
opening.
If the automatic reverse feature operates
more than two times while attempting
to open or close the liftgate, the power
liftgate may stop at that position. If
this occurs, carefully close the liftgate
manually, and then try to operate the
power liftgate automatically again.
WARNING
Never intentionally place any object
or part of your body in the path of
the power liftgate to make sure the
automatic reverse function operates.
NOTICE
Do not put heavy objects on the power
liftgate before you operate the power
liftgate. Additional weight may damage
the operation of the system.
Page 213 of 632
05
5-71
• The alert stops once the smart key is
moved outside of the detecting area
within the 3 second period.
Information
• Smart liftgate may not operate
properly if any of the following occur:
-The smart key is close to a radio
transmitter such as a radio station or
an airport which can interfere with
normal operation of the transmitter.
-The smart key is near a mobile two
way radio system or a mobile phone.
-Another vehicle’s smart key is being
operated close to your vehicle.
• Smart liftgate detecting area may
change when:
-The vehicle is parked on an incline
or slope.
-One side of the vehicle is raised or
lowered relative to the opposite side.
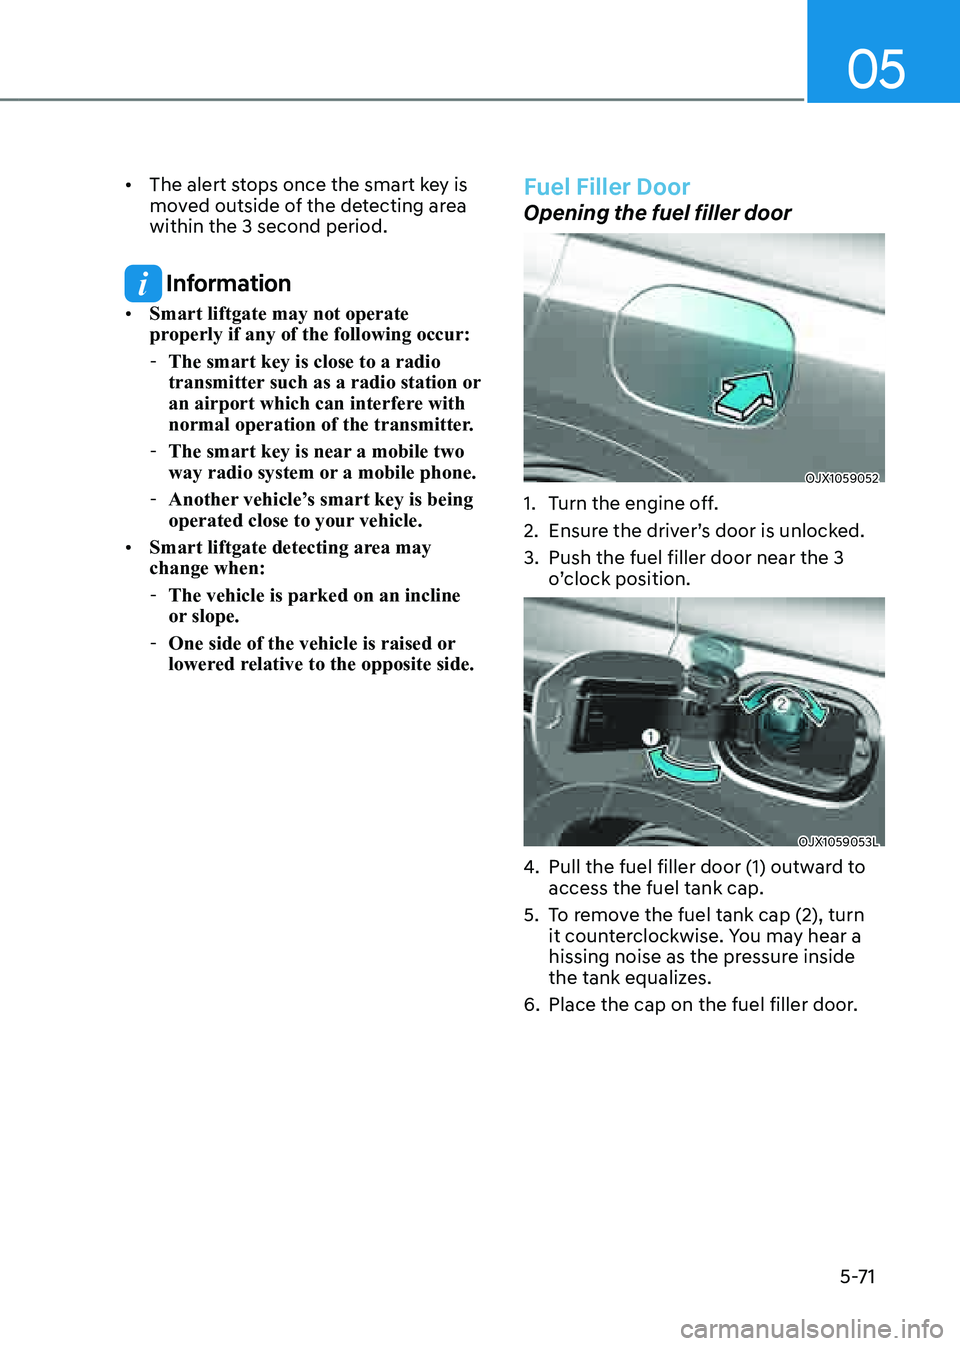
Fuel Filler Door
Opening the fuel filler door
OJX1059052OJX1059052
1. Turn the engine off.
2. Ensure the driver’s door is unlocked.
3. Push the fuel filler door near the 3
o’clock position.
OJX1059053LOJX1059053L
4. Pull the fuel filler door (1) outward to
access the fuel tank cap.
5. To remove the fuel tank cap (2), turn
it counterclockwise. You may hear a
hissing noise as the pressure inside
the tank equalizes.
6. Place the cap on the fuel filler door.
Page 215 of 632
05
5-73
• When using an approved portable
fuel container, be sure to place the
container on the ground prior to
refueling. Static electricity discharge
from the container can ignite fuel
vapors causing a fire.
Once refueling has begun, contact
between your bare hand and the
vehicle should be maintained until
the filling is complete.
• Use only approved portable plastic
fuel containers designed to carry and
store gasoline.
• When refueling, always shift the
gear to the P (Park) position, set
the parking brake, and press the
Engine Start/Stop button to the
OFF position. Sparks produced by
electrical components related to the
engine can ignite fuel vapors causing
a fire.
• Do not use matches or a lighter and
do not smoke or leave a lit cigarette
in your vehicle while at a gas station,
especially during refueling.
• Do not over-fill or top-off your
vehicle tank, which can cause
gasoline spillage.
• If a fire breaks out during refueling,
leave the vicinity of the vehicle, and
immediately contact the manager
of the gas station and then contact
the local fire department. Follow any
safety instructions they provide.
• If pressurized fuel sprays out, it can
cover your clothes or skin and thus
subject you to the risk of fire and
burns. Always remove the fuel cap
carefully and slowly. If the cap is
venting fuel or if you hear a hissing
sound, wait until the condition stops
before completely removing the cap.
• Always check that the fuel cap is
installed securely to prevent fuel
spillage in the event of an accident.
Information
Make sure to refuel your vehicle according
to the “Fuel Requirements” section in
suggested in chapter 1.
NOTICE
• Do not spill fuel on the exterior
surfaces of the vehicle. Any type of
fuel spilled on painted surfaces may
damage the paint.
• If the fuel filler cap requires
replacement, use only a genuine
Genesis cap or the equivalent
specified for your vehicle. An
incorrect fuel filler cap can result
in a serious malfunction of the fuel
system or emission control system.
Page 219 of 632
05
5-77
OJX1059058OJX1059058
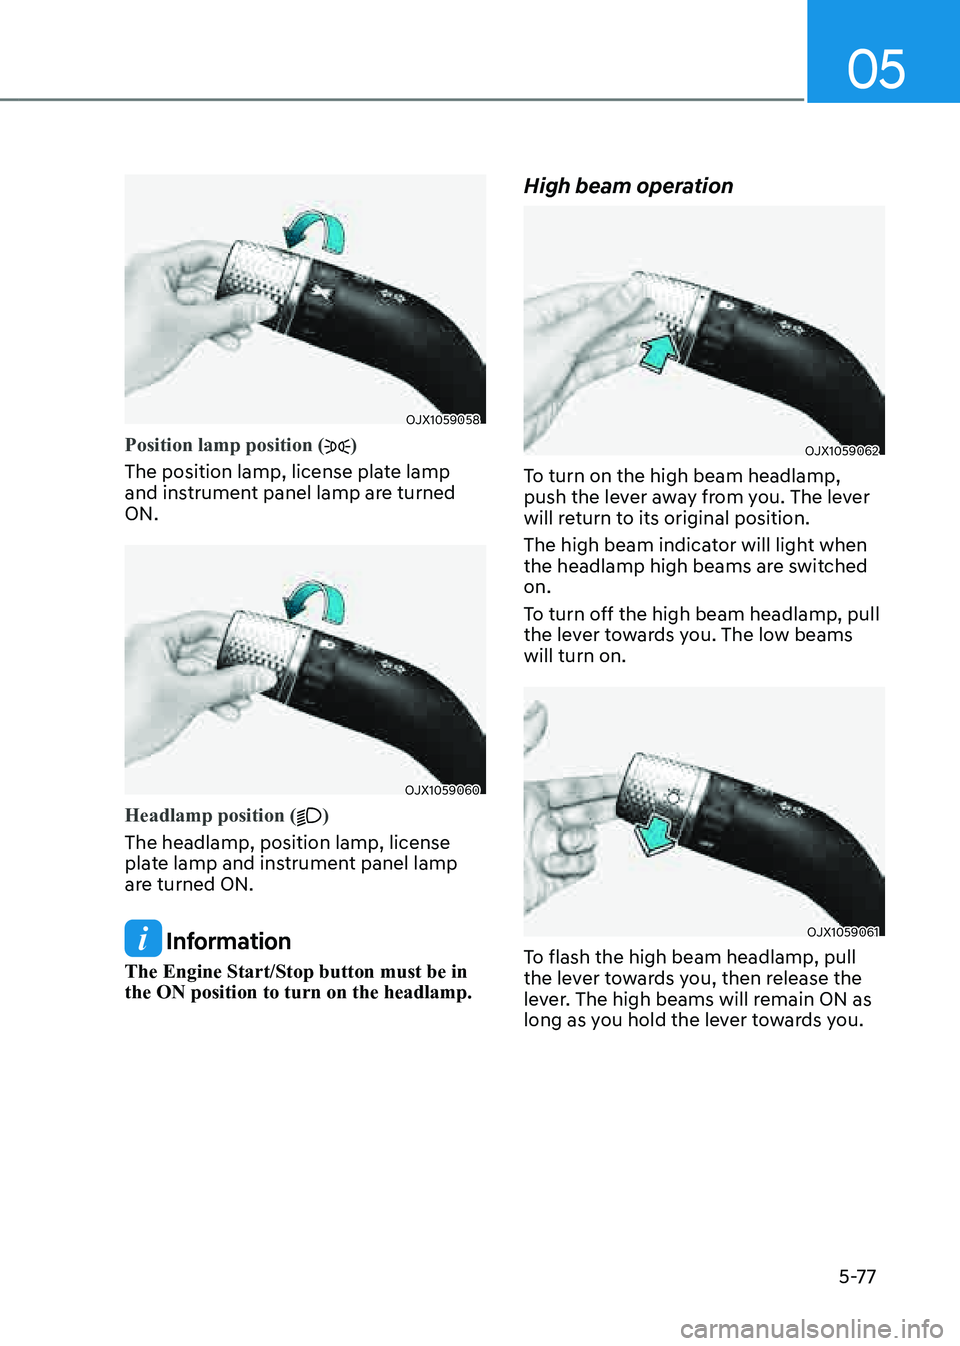
Position lamp position ()
The position lamp, license plate lamp
and instrument panel lamp are turned
ON.
OJX1059060OJX1059060
Headlamp position ()
The headlamp, position lamp, license
plate lamp and instrument panel lamp
are turned ON.
Information
The Engine Start/Stop button must be in
the ON position to turn on the headlamp.
High beam operation
OJX1059062OJX1059062
To turn on the high beam headlamp,
push the lever away from you. The lever
will return to its original position.
The high beam indicator will light when
the headlamp high beams are switched
on.
To turn off the high beam headlamp, pull
the lever towards you. The low beams
will turn on.
OJX1059061OJX1059061
To flash the high beam headlamp, pull
the lever towards you, then release the
lever. The high beams will remain ON as
long as you hold the lever towards you.
Page 221 of 632
05
5-79
Headlamp delay function
If the Engine Start/Stop button is in the
ACC position or the OFF position with
the headlamps ON, the headlamps (and/
or position lamps) remain on for about
5 minutes. However, if the driver’s door
is opened and closed, the headlamps
are turned off after 15 seconds. Also,
with the vehicle off if the driver’s door is
opened and closed, the headlamps (and/
or position lamps) are turned off after 15
seconds.
The headlamps (and/or position lamps)
can be turned off by pressing the lock
button on the smart key twice or turning
the headlamp switch to the OFF or AUTO
position.
You can enable the headlamp delay
function by selecting ‘Setup → Vehicle
Settings → Lights → Headlight Delay (or
Headlight time-out)’ in the infotainment
system screen.
See additional information in supplied
Infotainment Manual.
NOTICE
If the driver exits the vehicle through
another door besides the driver
door, the battery saver function
does not operate and the headlamp
delay function does not turn OFF
automatically.
This may cause the battery to
discharge. To avoid battery discharge,
turn OFF the headlamps manually from
the headlamp switch before exiting the
vehicle.
Headlamp moisture removal
function
Moisture may temporarily build up inside
of the headlamp when the headlamps
are on; the fan inside the headlamp will
begin to circulate air inside to remove
the moisture. If moisture is not removed,
have the vehicle inspected by an
authorized retailer of Genesis Branded
products.
Interior Lights
WARNING
Do not use the interior lights when
driving in the dark. The interior lights
may obscure your view and cause an
accident.
NOTICE
Do not use the interior lights for
extended periods when the vehicle is
turned off or the battery will discharge.
Interior lamp AUTO cut
The interior lamps will automatically go
off approximately 20 minutes after the
vehicle is turned off and the doors are
closed. If a door is opened, the lamp
will go off 25 minutes after the vehicle
is turned off. If the doors are locked by
the smart key and the vehicle enters the
armed stage of the theft alarm system,
the lamps will go off five seconds later.
Page 222 of 632

Convenient Features
5-80
Front lamps
OJX1050201NOJX1050201N
Front map lamp ():
Touch either icons to turn the map lamp
on or off. This light produces a spot
beam for convenient use as a map lamp
at night or as a personal lamp for the
driver and the front passenger.
Door lamp (
):
The front or rear room lamps come on
when the front or rear doors are opened.
When doors are unlocked by the smart
key, the front and rear lamps come on
for approximately 30 seconds as long as
any door is not opened. The front and
rear room lamps go out gradually after
approximately 30 seconds when the
door is closed. However, if the Engine
Start/Stop button is in the ON position
or all doors are locked, the front and rear
lamps will turn off. If a door is opened
with the Engine Start/Stop button in
the ACC position or the OFF position,
the front and rear lamps will stay on for
about 5 minutes.
Room lamp (
)
Press the button to turn ON the room
lamp for the front/rear seats.
Rear lamps
�
Page 224 of 632

Convenient Features
5-82
Luggage compartment lamp
OJX1059069LOJX1059069L
The lamp turns on when the liftgate is
opened.
Puddle lamp
OJX1059071OJX1059071
Welcome light
When all doors (and liftgate) are closed
and locked, the puddle lamp will turn on
for 15 seconds if the door is unlocked by
the smart key or when you put your hand
in the outside door handle with the smart
key in possession.
For more details, refer to “Welcome
System” in this chapter.
Escort light
When the Engine Start/Stop button is in
the OFF position and the driver’s door is
opened, the puddle lamp will turn on for
30 seconds. If the driver’s door is closed
within the 30 second period, the puddle
lamp will turn off after 15 seconds. If the
driver’s door is closed and locked, the
puddle lamp will turn off immediately.
The Puddle Lamp Escort Light will turn
on only the first time the driver’s door is
opened after the engine is turned off.
Page 226 of 632
Convenient Features
5-84
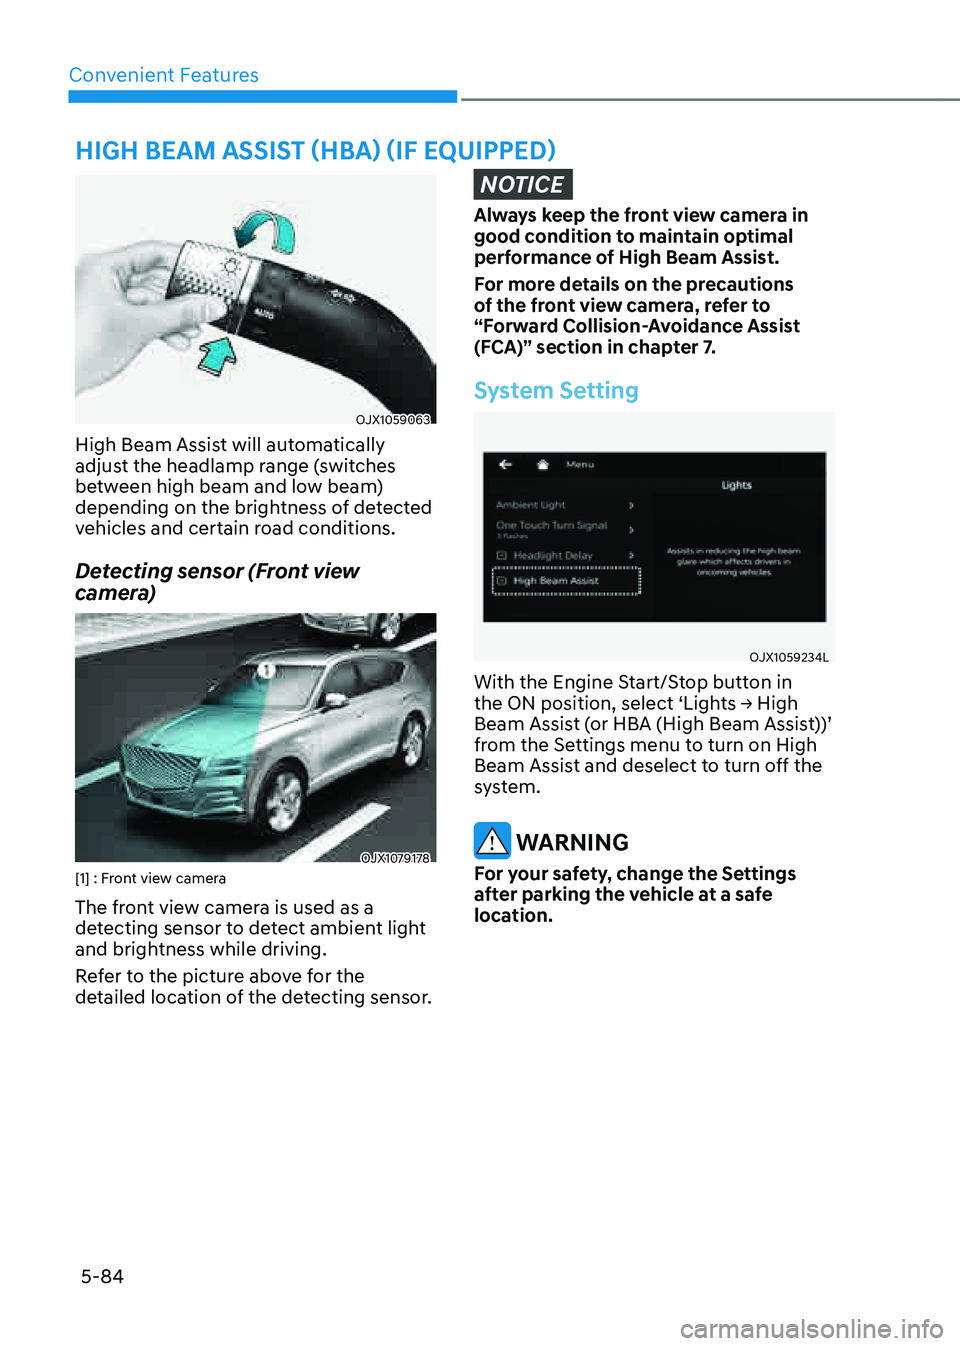
OJX1059063OJX1059063
High Beam Assist will automatically
adjust the headlamp range (switches
between high beam and low beam)
depending on the brightness of detected
vehicles and certain road conditions.
Detecting sensor (Front view
camera)
OJX1079178OJX1079178[1] : Front view camera
The front view camera is used as a
detecting sensor to detect ambient light
and brightness while driving.
Refer to the picture above for the
detailed location of the detecting sensor.
NOTICE
Always keep the front view camera in
good condition to maintain optimal
performance of High Beam Assist.
For more details on the precautions
of the front view camera, refer to
“Forward Collision-Avoidance Assist
(FCA)” section in chapter 7.
System Setting
OJX1059234LOJX1059234L
With the Engine Start/Stop button in
the ON position, select ‘Lights → High
Beam Assist (or HBA (High Beam Assist))’
from the Settings menu to turn on High
Beam Assist and deselect to turn off the
system.
WARNING
For your safety, change the Settings
after parking the vehicle at a safe
location.
HIGH BEAM ASSIST (HBA) (IF EQUIPPED)