jack GENESIS GV80 2021 Owner's Manual
[x] Cancel search | Manufacturer: GENESIS, Model Year: 2021, Model line: GV80, Model: GENESIS GV80 2021Pages: 632, PDF Size: 9.37 MB
Page 151 of 632
05
5-9
Mechanical key
If the Smart Key does not operate
normally, you can lock or unlock the
driver’s door by using the mechanical
key.
To remove the mechanical key from the
smart key FOB:
OJX1059007OJX1059007
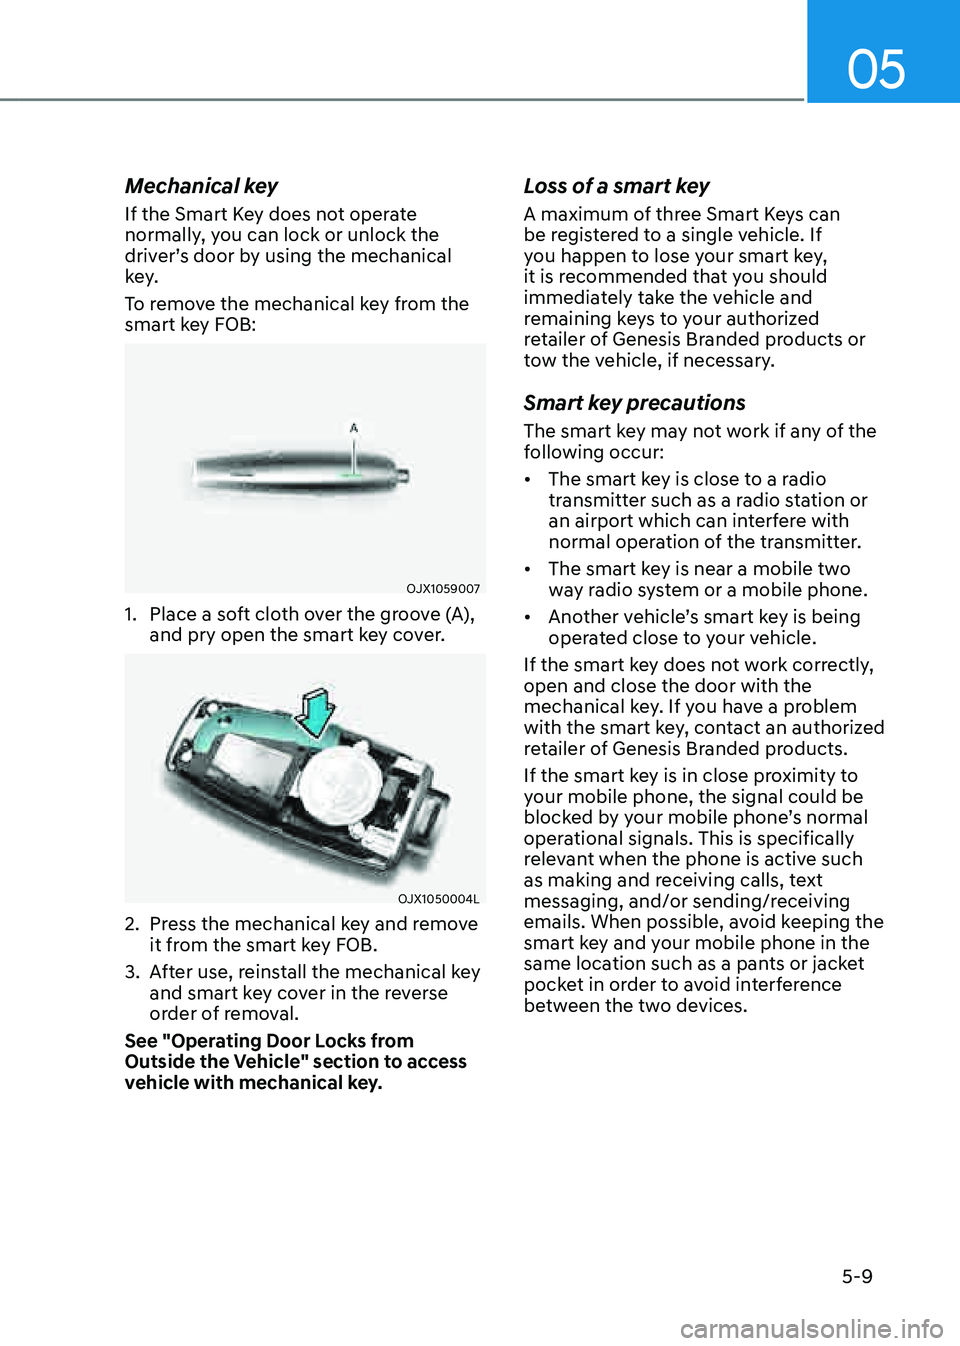
1. Place a soft cloth over the groove (A),
and pry open the smart key cover.
OJX1050004LOJX1050004L
2. Press the mechanical key and remove
it from the smart key FOB.
3. After use, reinstall the mechanical key
and smart key cover in the reverse
order of removal.
See "Operating Door Locks from
Outside the Vehicle" section to access
vehicle with mechanical key.
Loss of a smart key
A maximum of three Smart Keys can
be registered to a single vehicle. If
you happen to lose your smart key,
it is recommended that you should
immediately take the vehicle and
remaining keys to your authorized
retailer of Genesis Branded products or
tow the vehicle, if necessary.
Smart key precautions
The smart key may not work if any of the
following occur:
• The smart key is close to a radio
transmitter such as a radio station or
an airport which can interfere with
normal operation of the transmitter.
• The smart key is near a mobile two
way radio system or a mobile phone.
• Another vehicle’s smart key is being
operated close to your vehicle.
If the smart key does not work correctly,
open and close the door with the
mechanical key. If you have a problem
with the smart key, contact an authorized
retailer of Genesis Branded products.
If the smart key is in close proximity to
your mobile phone, the signal could be
blocked by your mobile phone’s normal
operational signals. This is specifically
relevant when the phone is active such
as making and receiving calls, text
messaging, and/or sending/receiving
emails. When possible, avoid keeping the
smart key and your mobile phone in the
same location such as a pants or jacket
pocket in order to avoid interference
between the two devices.
Page 208 of 632

Convenient Features
5-66
NOTICE
• The power liftgate can be operated
when the engine is not running.
However, power liftgate operation
consumes a large amount of eclectic
power. To prevent the battery from
being discharged, do not operate it
excessively (e.g. more than 5 times
repeatedly).
• To prevent the battery from being
discharged, do not leave the power
liftgate in the open position for a
long time.
• Do not modify or repair any part
of the power liftgate by yourself.
This must be done by an authorized
retailer of Genesis Branded products.
• When jacking up the vehicle to
change a tire or repair the vehicle, do
not operate the power liftgate. This
could cause the power liftgate to
operate improperly.
• In cold and wet climates, the power
liftgate may not work properly due to
freezing conditions.
Automatic reverse
OJX1059048LOJX1059048L
During power opening or closing if the
power liftgate senses any obstacle, the
power liftgate will stop and move in the
opposite direction.
The auto reverse function may not work
if objects are too soft or thin, or if the
liftgate is almost fully closed near the
latched position.
Caution should be taken to prevent any
objects from obstructing the liftgate
opening.
If the automatic reverse feature operates
more than two times while attempting
to open or close the liftgate, the power
liftgate may stop at that position. If
this occurs, carefully close the liftgate
manually, and then try to operate the
power liftgate automatically again.
WARNING
Never intentionally place any object
or part of your body in the path of
the power liftgate to make sure the
automatic reverse function operates.
NOTICE
Do not put heavy objects on the power
liftgate before you operate the power
liftgate. Additional weight may damage
the operation of the system.
Page 316 of 632
Driving Your Vehicle
6-44
WARNING
OJX1069025OJX1069025
Never start or run the engine while
an AWD vehicle is raised on a jack.
The vehicle can slip or roll off of a jack
causing serious injury or death to you or
those nearby.
Towing
AWD vehicles must be towed with
a wheel lift and dollies or flatbed
equipment with all the wheels off the
ground. For more details, refer to
"Towing" section in chapter 8.
Vehicle inspection
• If the vehicle needs to be operated on
a vehicle lift do not attempt to stop
any of the four wheels from turning.
This could damage the AWD system.
• Never engage the parking brake while
running the engine on a car lift. This
may damage the AWD system.
Dynamometer testing
An AWD vehicle must be tested on a
special four wheel chassis dynamometer.
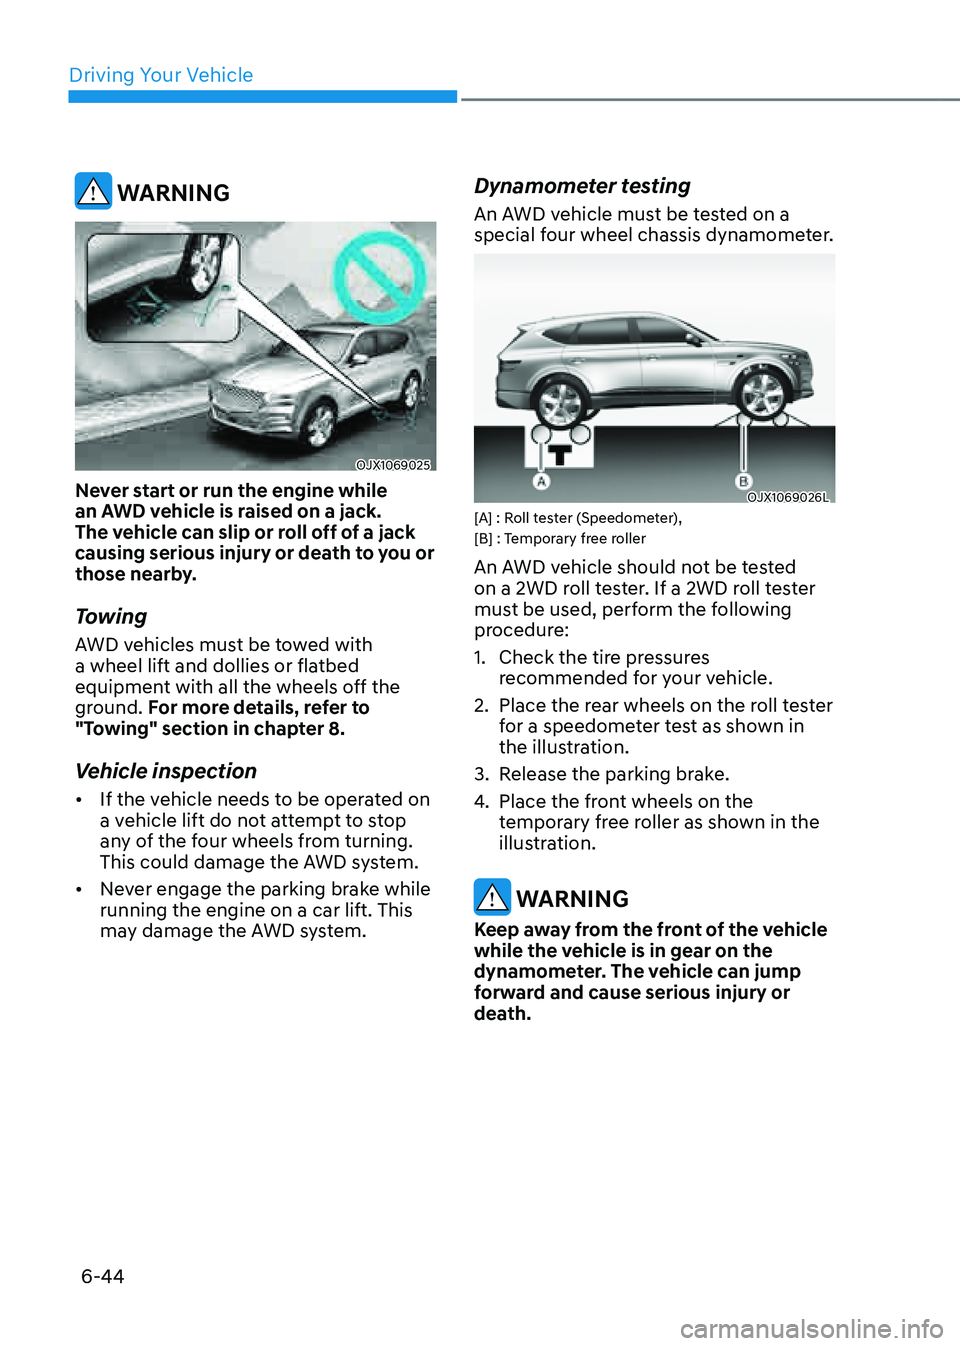
OJX1069026LOJX1069026L[A] : Roll tester (Speedometer),
[B] : Temporary free roller
An AWD vehicle should not be tested
on a 2WD roll tester. If a 2WD roll tester
must be used, perform the following
procedure:
1. Check the tire pressures
recommended for your vehicle.
2. Place the rear wheels on the roll tester
for a speedometer test as shown in
the illustration.
3. Release the parking brake.
4. Place the front wheels on the
temporary free roller as shown in the
illustration.
WARNING
Keep away from the front of the vehicle
while the vehicle is in gear on the
dynamometer. The vehicle can jump
forward and cause serious injury or
death.
Page 317 of 632
06
6-45
ELECTRONIC LIMITED SLIP DIFFERENTIAL (IF EQUIPPED)
Electronic Limited Slip Differential
controls the differential functions of the
wheels to help:
-Improve steering performance when
circling at high speed.
-Improve launching performance.
-Prevent slipping on rainy or snowy
roads due to dissimilar friction of the
left and right wheels.
WARNING
Never run the wheels with one of
wheels lifted on a jack. It is extremely
dangerous for a vehicle equipped with
Electronic Limited Slip Differential.
Drive Mode Selection
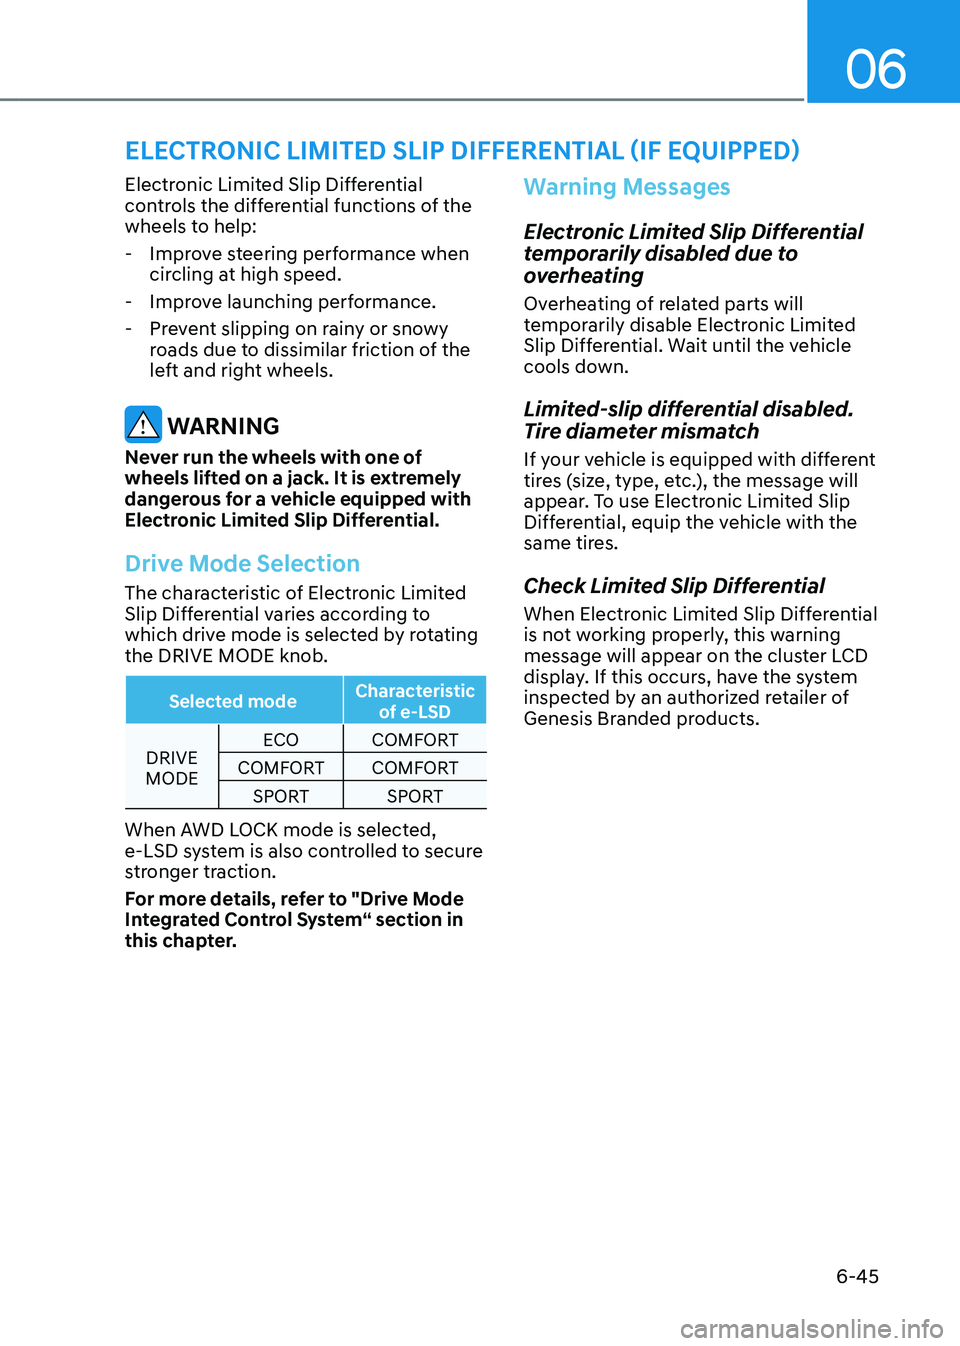
The characteristic of Electronic Limited
Slip Differential varies according to
which drive mode is selected by rotating
the DRIVE MODE knob.
Selected mode Characteristic
of e-LSD
DRIVE
MODE ECO
COMFORT
COMFORT COMFORT
SPORT SPORT
When AWD LOCK mode is selected,
e-LSD system is also controlled to secure
stronger traction.
For more details, refer to "Drive Mode
Integrated Control System“ section in
this chapter.
Warning Messages
Electronic Limited Slip Differential
temporarily disabled due to
overheating
Overheating of related parts will
temporarily disable Electronic Limited
Slip Differential. Wait until the vehicle
cools down.
Limited-slip differential disabled.
Tire diameter mismatch
If your vehicle is equipped with different
tires (size, type, etc.), the message will
appear. To use Electronic Limited Slip
Differential, equip the vehicle with the
same tires.
Check Limited Slip Differential
When Electronic Limited Slip Differential
is not working properly, this warning
message will appear on the cluster LCD
display. If this occurs, have the system
inspected by an authorized retailer of
Genesis Branded products.
Page 512 of 632
Emergency Situations
Hazard Warning Flasher ........................................................................\
...........8-2
In Case of an Emergency While Driving
..........................................................8-2If the Engine Stalls While Driving ........................................................................\
........8-2
If the Engine Stalls at a Crossroad or Crossing ..........................................................8-2
If You Have a Flat Tire While Driving ........................................................................\
...8-3
If the Engine Will Not Start ........................................................................\
.......8-3
Jump Starting
........................................................................\
...........................8-4
If the Engine Overheats
........................................................................\
............8-6
Tire Pressure Monitoring System (TPMS)
........................................................8-8Check Tire Pressure ........................................................................\
.............................8-8
Tire Pressure Monitoring System ........................................................................\
.......8-9
Low Tire Pressure Warning Light ........................................................................\
.......8-10
Low Tire Pressure Position and Tire Pressure Telltale ..............................................8-10
TPMS (Tire Pressure Monitoring System) Malfunction Indicator .............................8-11
Changing a Tire with TPMS ........................................................................\
................8-11
If You Have a Flat Tire (with Spare Tire) ..........................................................8-13Jack and Tools ........................................................................\
....................................8-13
Changing Tires ........................................................................\
....................................8-14
Jack Label ........................................................................\
...........................................8-19
If You Have a Flat Tire (with Tire Mobility Kit) ...............................................8-20Introduction ........................................................................\
.......................................8-20
Notes on the Safe Use of the Tire Mobility Kit .........................................................8-21
Components of the Tire Mobility Kit ........................................................................\
.8-22
Using the Tire Mobility Kit ........................................................................\
.................8-23
Checking the Tire Inflation Pressure ........................................................................\
.8-25
Towing ........................................................................\
......................................8-27Towing Service ........................................................................\
...................................8-27
Removable Towing Hook ........................................................................\
...................8-28
Emergency Towing ........................................................................\
.............................8-29
8. Emergency Situations
8
Page 524 of 632

08
8-13
IF YOU HAVE A FLAT TIRE (WITH SPARE TIRE, IF EQUIPPED)
WARNING
Changing a tire can be dangerous.
Follow the instructions in this section
when changing a tire to reduce the risk
of serious injury or death.
CAUTION
Be careful as you use the jack handle to
stay clear of the flat end. The flat end
has sharp edges that could cause cuts.
Jack and Tools
OJX1089025OJX1089025
1. Jack handle
2. Jack
3. Wheel lug wrench
4. Centering pin
The jack, jack handle, and wheel lug
wrench are stored in the luggage
compartment under the luggage box
cover.
The jack is provided for emergency tire
changing only.
OJX1089026OJX1089026
Turn the winged hold down bolt
counterclockwise to remove the spare
tire.
Store the spare tire in the same
compartment by turning the winged hold
down bolt clockwise.
To prevent the spare tire and tools from
“rattling”, store them in their proper
location.
OJX1089027OJX1089027
If it is hard to loosen the tire hold-down
wing bolt by hand, you can loosen
it easily using the wheel lug wrench
(1). Turn the tire hold-down wing bolt
counterclockwise with the wheel lug
wrench.
Page 525 of 632
Emergency Situations
8-14
Changing Tires
WARNING
A vehicle can slip or roll off of a jack
causing serious injury or death to you or
those nearby. Take the following safety
precautions:
• Do not get under a vehicle that is
supported by a jack.
• NEVER attempt to change a tire in
the lane of traffic. ALWAYS move the
vehicle completely off the road on
level, firm ground away from traffic
before trying to change a tire. If you
cannot find a level, firm place off
the road, call a towing service for
assistance.
• Be sure to use the jack provided with
the vehicle.
• ALWAYS place the jack on the
designated jacking positions on the
vehicle and NEVER on the bumpers
or any other part of the vehicle for
jacking support.
• Do not start or run the engine while
the vehicle is on the jack.
• Do not allow anyone to remain in the
vehicle while it is on the jack.
• Keep children away from the road
and the vehicle.Follow these steps to change your
vehicle’s tire:
1. Park on a level, firm surface.
2. Shift the gear to P (Park), apply the
parking brake, and press the Engine
Start/Stop button to the OFF position.
3. Press the hazard warning flasher
button.
4. Remove the wheel lug wrench, jack,
jack handle, and spare tire from the
vehicle.
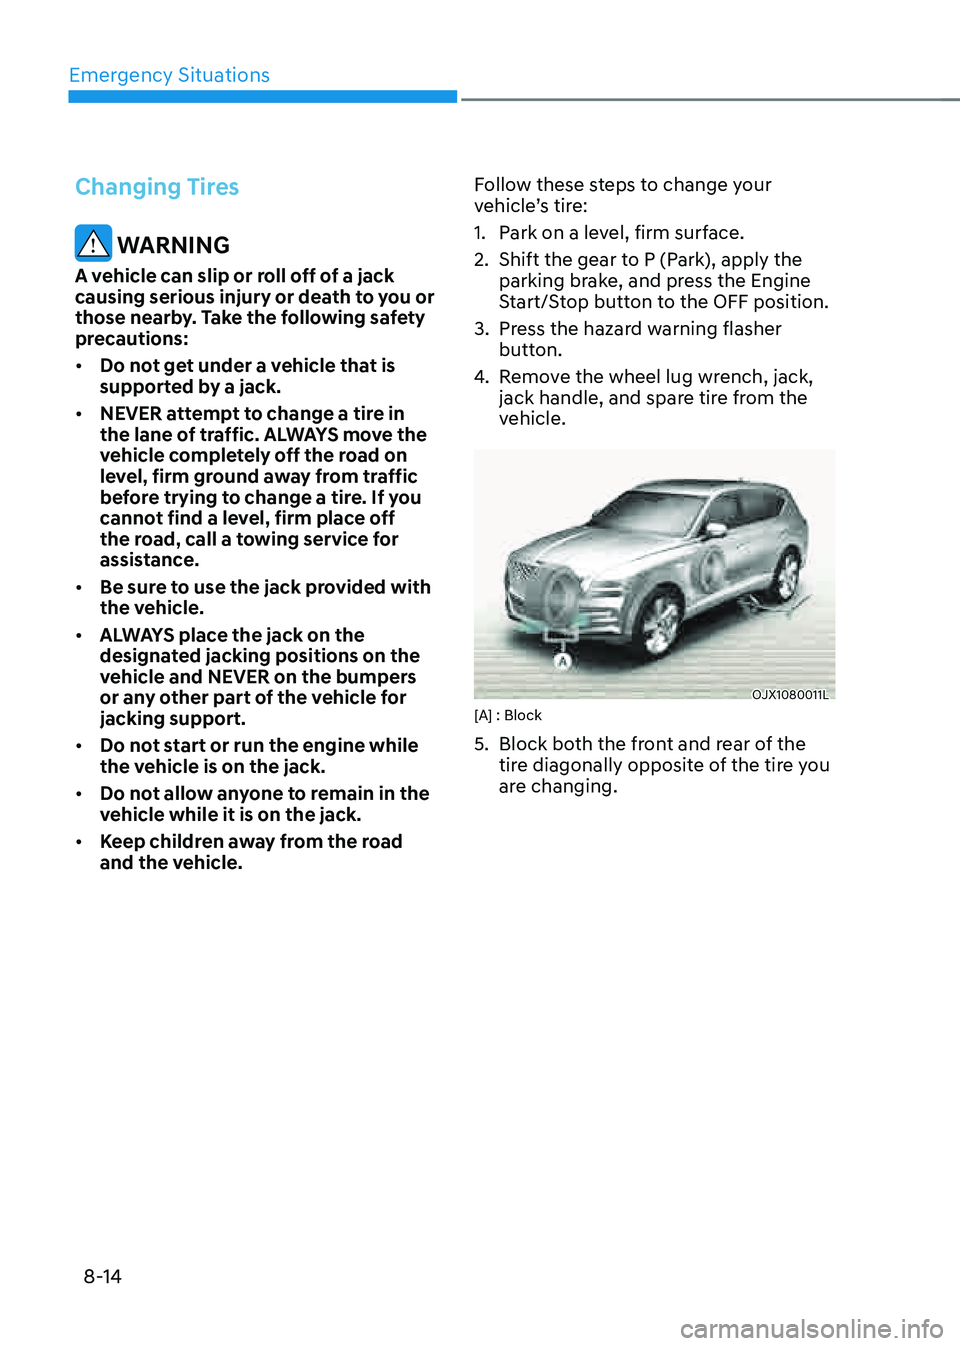
OJX1080011LOJX1080011L[A] : Block
5. Block both the front and rear of the
tire diagonally opposite of the tire you
are changing.
Page 526 of 632
08
8-15
OJX1080012LOJX1080012L
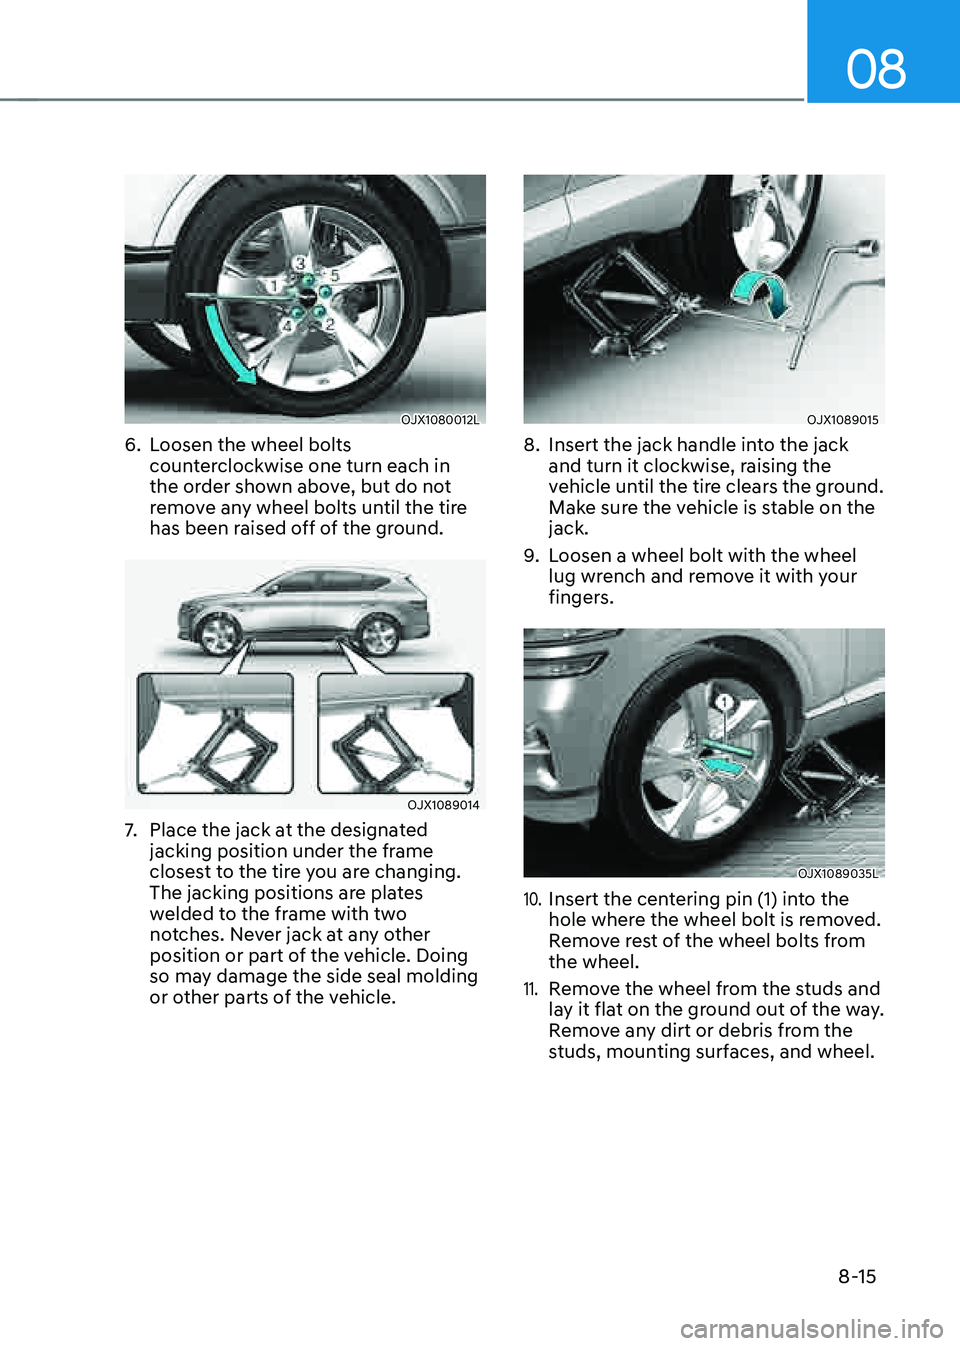
6. Loosen the wheel bolts
counterclockwise one turn each in
the order shown above, but do not
remove any wheel bolts until the tire
has been raised off of the ground.
OJX1089014OJX1089014
7. Place the jack at the designated
jacking position under the frame
closest to the tire you are changing.
The jacking positions are plates
welded to the frame with two
notches. Never jack at any other
position or part of the vehicle. Doing
so may damage the side seal molding
or other parts of the vehicle.
OJX1089015OJX1089015
8. Insert the jack handle into the jack
and turn it clockwise, raising the
vehicle until the tire clears the ground.
Make sure the vehicle is stable on the
jack.
9. Loosen a wheel bolt with the wheel
lug wrench and remove it with your
fingers.
OJX1089035LOJX1089035L
10. Insert the centering pin (1) into the
hole where the wheel bolt is removed.
Remove rest of the wheel bolts from
the wheel.
11. Remove the wheel from the studs and
lay it flat on the ground out of the way.
Remove any dirt or debris from the
studs, mounting surfaces, and wheel.
Page 527 of 632
Emergency Situations
8-16
OJX1089036LOJX1089036L
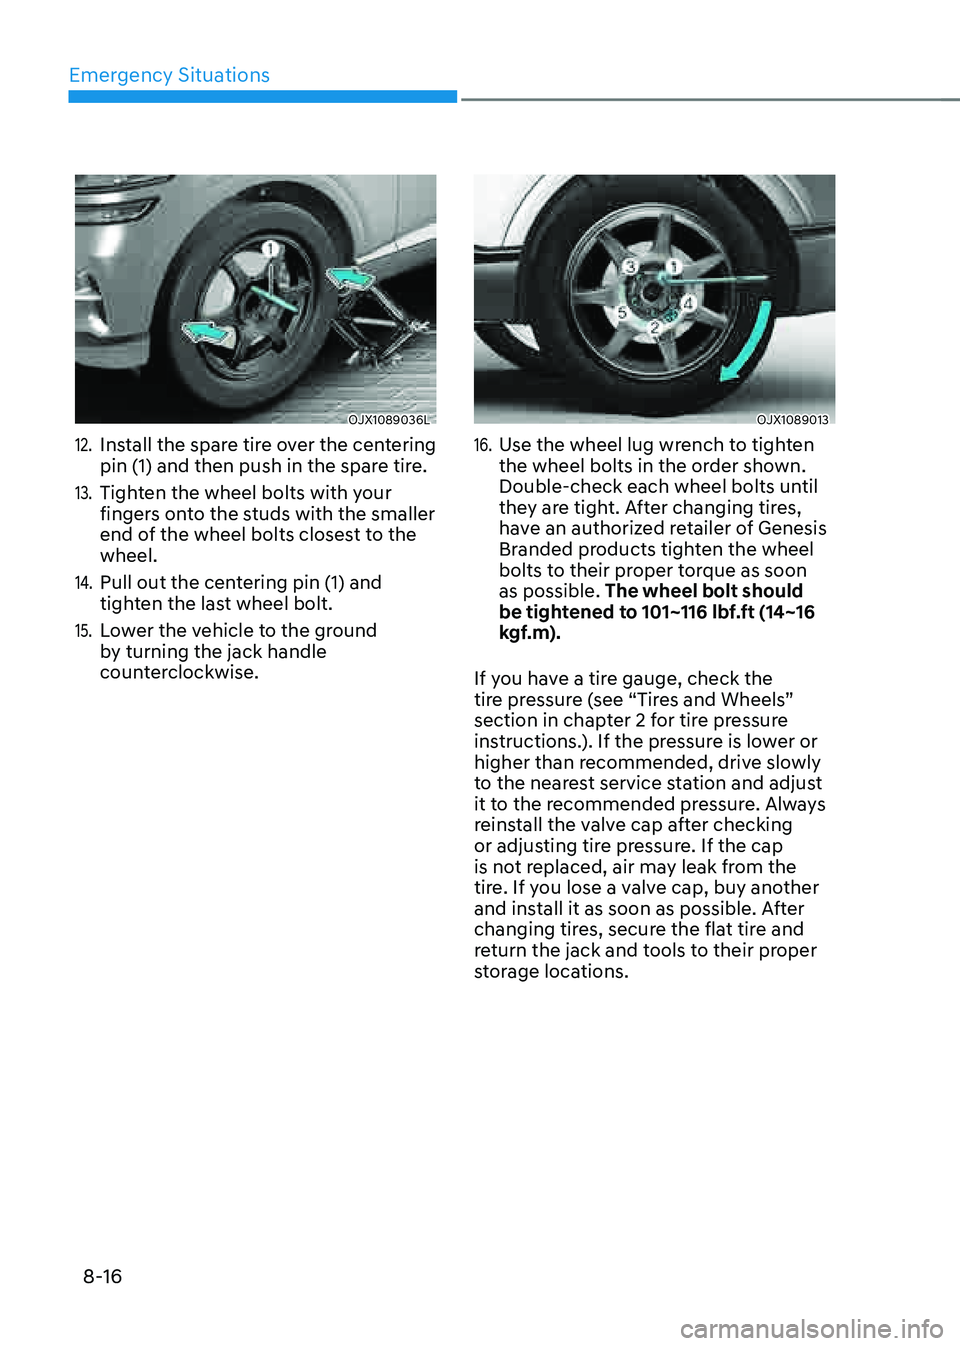
12. Install the spare tire over the centering
pin (1) and then push in the spare tire.
13. Tighten the wheel bolts with your
fingers onto the studs with the smaller
end of the wheel bolts closest to the
wheel.
14. Pull out the centering pin (1) and
tighten the last wheel bolt.
15. Lower the vehicle to the ground
by turning the jack handle
counterclockwise.
OJX1089013OJX1089013
16. Use the wheel lug wrench to tighten
the wheel bolts in the order shown.
Double-check each wheel bolts until
they are tight. After changing tires,
have an authorized retailer of Genesis
Branded products tighten the wheel
bolts to their proper torque as soon
as possible. The wheel bolt should
be tightened to 101~116 lbf.ft (14~16
kgf.m).
If you have a tire gauge, check the
tire pressure (see “Tires and Wheels”
section in chapter 2 for tire pressure
instructions.). If the pressure is lower or
higher than recommended, drive slowly
to the nearest service station and adjust
it to the recommended pressure. Always
reinstall the valve cap after checking
or adjusting tire pressure. If the cap
is not replaced, air may leak from the
tire. If you lose a valve cap, buy another
and install it as soon as possible. After
changing tires, secure the flat tire and
return the jack and tools to their proper
storage locations.
Page 528 of 632
08
8-17
NOTICE
Check the tire pressure as soon as
possible after installing a spare tire.
Adjust it to the recommended pressure.
CAUTION
Your vehicle has metric threads on the
studs and wheel bolts. Make certain
during tire changing that the same bolts
that were removed are reinstalled. If
you have to replace your wheel bolts
make sure they have metric threads to
avoid damaging the studs and ensure
the wheel is properly secured to the
hub. Consult an authorized retailer
of Genesis Branded products for
assistance.
If any of the equipment such as the jack,
wheel bolts, studs, or other equipment
is damaged or in poor condition, do not
attempt to change the tire and call for
assistance.
Use of compact spare tires
(if equipped)
Compact spare tires are designed for
emergency use only. Drive carefully on
the compact spare tire and always follow
the safety precautions.
WARNING
To prevent compact spare tire failure
and loss of control possibly resulting in
an accident:
• Use the compact spare tire only in an
emergency.
• NEVER operate your vehicle over 50 mph (80 km/h).
• Do not exceed the vehicle’s
maximum load rating or the load
carrying capacity shown on the
sidewall of the compact spare tire.
• Do not use the compact spare tire
continuously. Repair or replace the
original tire as soon as possible to
avoid failure of the compact spare
tire.