open GENESIS GV80 2021 Owner's Manual
[x] Cancel search | Manufacturer: GENESIS, Model Year: 2021, Model line: GV80, Model: GENESIS GV80 2021Pages: 632, PDF Size: 9.37 MB
Page 10 of 632
Introduction
1-6
Using Fuel Additives (except Detergent Fuel Additives)
Using fuel additives such as:
-Silicone fuel additive
-Ferrocene (iron-based) fuel additive
-Other metallic-based fuel additives
may result in cylinder misfire, poor acceleration, engine stalling, damage to the
catalyst, or abnormal corrosion, and may cause damage to the engine resulting in a
reduction in the overall life of the powertrain.
The Malfunction Indicator Lamp (MIL) may illuminate.
NOTICE
Damage to the fuel system or performance problem caused by the use of these fuels
or fuel additives may not be covered by your New Vehicle Limited Warranty.
Gasoline containing MMT
Some gasoline contains harmful manganese-based fuel additives such as MMT
(Methylcyclopentadienyl Manganese Tricarbonyl).
Genesis Branded Vehicle does not recommend the use of gasoline containing MMT.
This type of fuel can reduce vehicle performance and affect your emission control
system.
The malfunction indicator lamp on the cluster may come on.
Detergent Fuel Additives
Genesis Branded Vehicle recommends that you use good quality gasolines treated
with detergent additives such as TOP TIER Detergent Gasoline, which help prevent
deposit formation in the engine. These gasolines will help the engine run cleaner and
enhance performance of the Emission Control System. For more information on TOP
TIER Detergent Gasoline, please go to the website ( www.toptiergas.com).
For customers who do not use TOP Tier Detergent Gasoline regularly, and have
problems starting or the engine does not run smoothly, detergent-based fuel additives
that you can purchase separately may be added to the gasoline. If TOP TIER Detergent
Gasoline is not available, one bottle of additive added to the fuel tank at every 8,000
miles or 12 months is recommended.
Additives are available from your authorized retailer of Genesis Branded products
along with information on how to use them. Do not mix other additives.
Operation in foreign countries
If you are going to drive your vehicle in another country, be sure to:
• Observe all regulations regarding registration and insurance.
• Determine that acceptable fuel is available.
Page 16 of 632
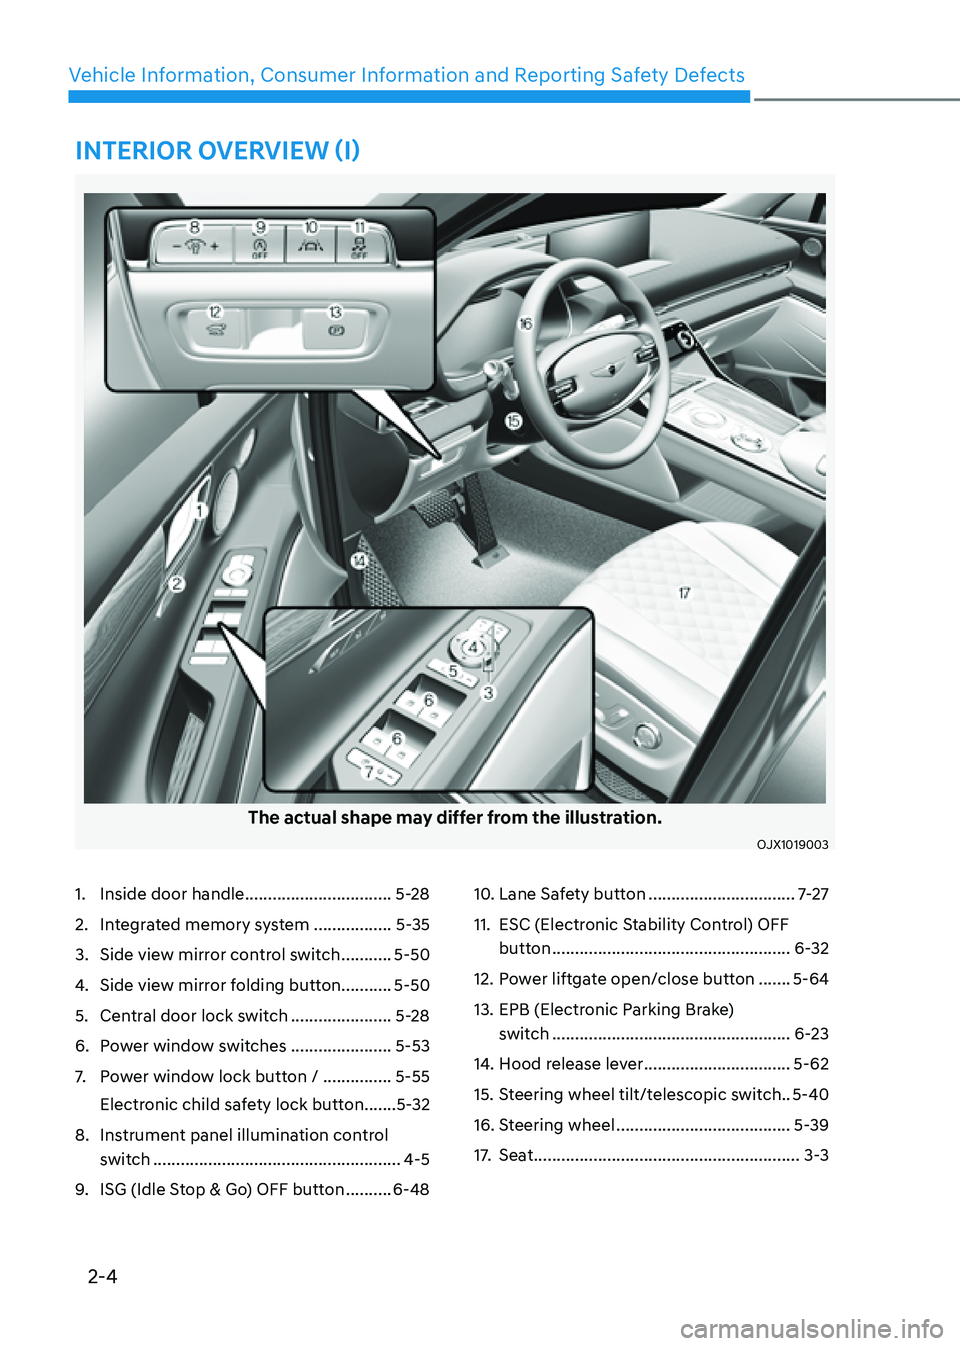
2-4
Vehicle Information, Consumer Information and Reporting Safety Defects
The actual shape may differ from the illustration.
OJX1019003OJX1019003
1. Inside door handle ................................5-28
2. Integrated memory system .................5-35
3. Side view mirror control switch ...........5-50
4. Side view mirror folding button...........5-50
5. Central door lock switch ......................5-28
6. Power window switches ......................5-53
7. Power window lock button / ...............5-55
Electronic child safety lock button
.......5-32
8. Instrument panel illumination control
switch
......................................................4-5
9. ISG (Idle Stop & Go) OFF button ..........6-48
10. Lane Safety button ................................7-27
11. ESC (Electronic Stability Control) OFF
button
....................................................6-32
12. Power liftgate open/close button .......5-64
13. EPB (Electronic Parking Brake)
switch
....................................................6-23
14. Hood release lever ................................5-62
15. Steering wheel tilt/telescopic switch ..5-40
16. Steering wheel ......................................5-39
17. Seat ..........................................................3-3
INTERIOR OVERVIEW (I)
Page 29 of 632

02
2-17
If you believe that your vehicle has a defect which could cause a crash or could cause
injury or death, you should immediately inform the National Highway Traffic Safety
Administration (NHTSA) in addition to notifying Genesis Customer Care.
If NHTSA receives similar complaints, it may open an investigation, and if it finds that a
safety defect exists in a group of vehicles, it may order a recall and remedy campaign.
However, NHTSA cannot become involved in individual problems between you, your
dealer, or Genesis Customer Care.
To contact NHTSA, you may call the Vehicle Safety Hotline toll-free at 1-888-327-4236
(TTY: 1-800-424-9153);
go to http://www.safercar.gov;
download the SaferCar mobile application;
or write to: Administrator, NHTSA.
1200 New Jersey Ave, SE.,
Washington, DC. 20590.
You can also obtain other information about motor vehicle safety from
http://www.safercar.gov.
REPORTING SAFETY DEFECTS
Page 44 of 632
03
3-15
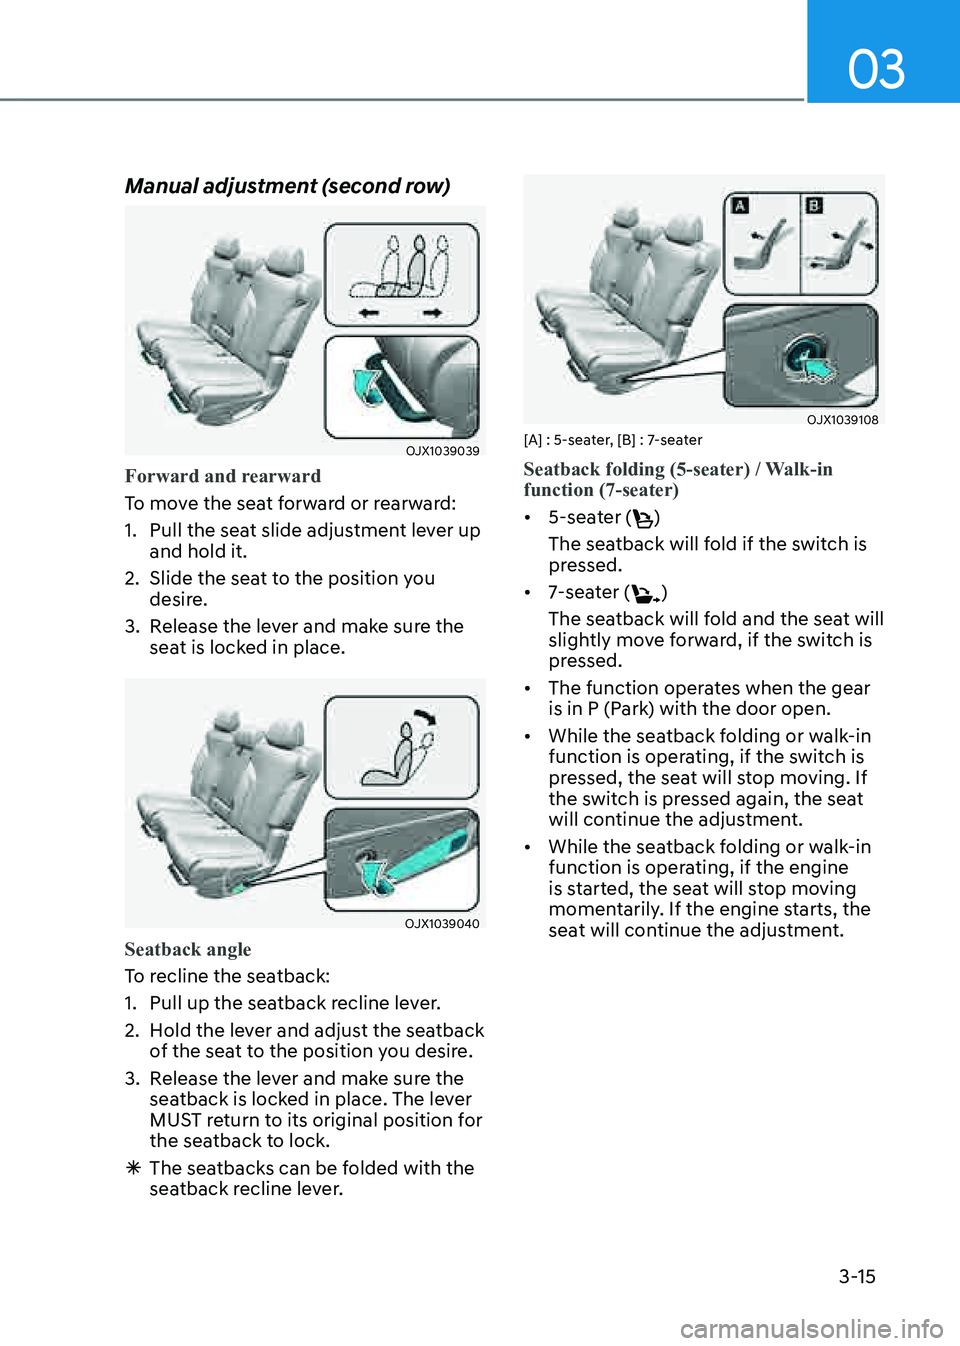
Manual adjustment (second row)
OJX1039039OJX1039039
Forward and rearward
To move the seat forward or rearward:
1. Pull the seat slide adjustment lever up
and hold it.
2. Slide the seat to the position you
desire.
3. Release the lever and make sure the
seat is locked in place.
OJX1039040OJX1039040
Seatback angle
To recline the seatback:
1. Pull up the seatback recline lever.
2. Hold the lever and adjust the seatback
of the seat to the position you desire.
3. Release the lever and make sure the
seatback is locked in place. The lever
MUST return to its original position for
the seatback to lock.
ÃThe seatbacks can be folded with the
seatback recline lever.
OJX1039108OJX1039108[A] : 5-seater, [B] : 7-seater
Seatback folding (5-seater) / Walk-in
function (7-seater)
• 5-seater ()
The seatback will fold if the switch is
pressed.
• 7-seater ()
The seatback will fold and the seat will
slightly move forward, if the switch is
pressed.
• The function operates when the gear
is in P (Park) with the door open.
• While the seatback folding or walk-in
function is operating, if the switch is
pressed, the seat will stop moving. If
the switch is pressed again, the seat
will continue the adjustment.
• While the seatback folding or walk-in
function is operating, if the engine
is started, the seat will stop moving
momentarily. If the engine starts, the
seat will continue the adjustment.
Page 45 of 632
Safety System
3-16
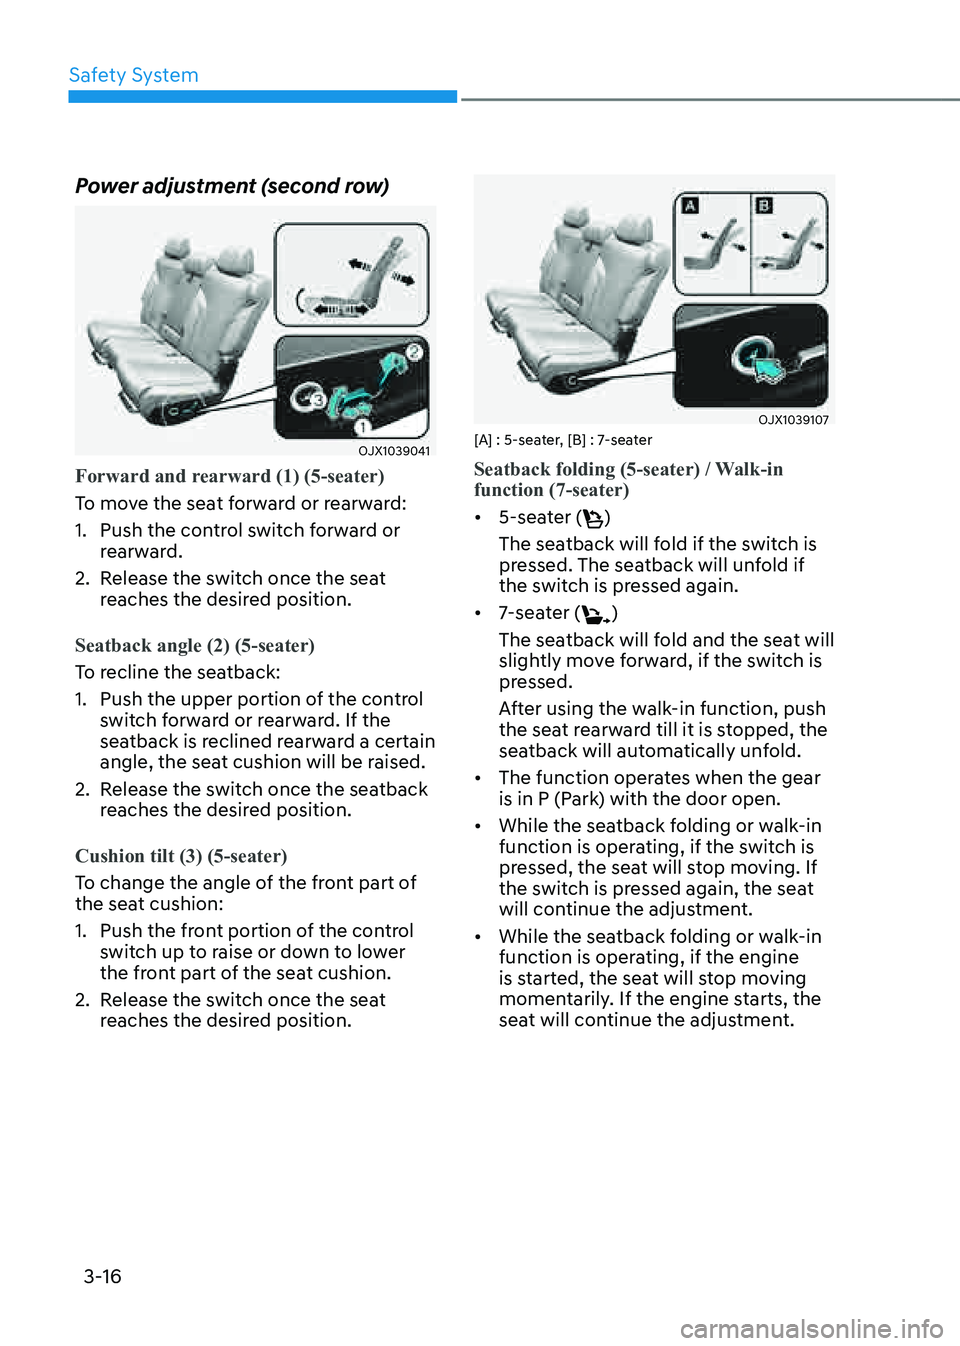
Power adjustment (second row)
OJX1039041OJX1039041
Forward and rearward (1) (5-seater)
To move the seat forward or rearward:
1. Push the control switch forward or
rearward.
2. Release the switch once the seat
reaches the desired position.
Seatback angle (2) (5-seater)
To recline the seatback:
1. Push the upper portion of the control
switch forward or rearward. If the
seatback is reclined rearward a certain
angle, the seat cushion will be raised.
2. Release the switch once the seatback
reaches the desired position.
Cushion tilt (3) (5-seater)
To change the angle of the front part of
the seat cushion:
1. Push the front portion of the control
switch up to raise or down to lower
the front part of the seat cushion.
2. Release the switch once the seat
reaches the desired position.
OJX1039107OJX1039107[A] : 5-seater, [B] : 7-seater
Seatback folding (5-seater) / Walk-in
function (7-seater)
• 5-seater ()
The seatback will fold if the switch is
pressed. The seatback will unfold if
the switch is pressed again.
• 7-seater ()
The seatback will fold and the seat will
slightly move forward, if the switch is
pressed.
After using the walk-in function, push
the seat rearward till it is stopped, the
seatback will automatically unfold.
• The function operates when the gear
is in P (Park) with the door open.
• While the seatback folding or walk-in
function is operating, if the switch is
pressed, the seat will stop moving. If
the switch is pressed again, the seat
will continue the adjustment.
• While the seatback folding or walk-in
function is operating, if the engine
is started, the seat will stop moving
momentarily. If the engine starts, the
seat will continue the adjustment.
Page 47 of 632
Safety System
3-18
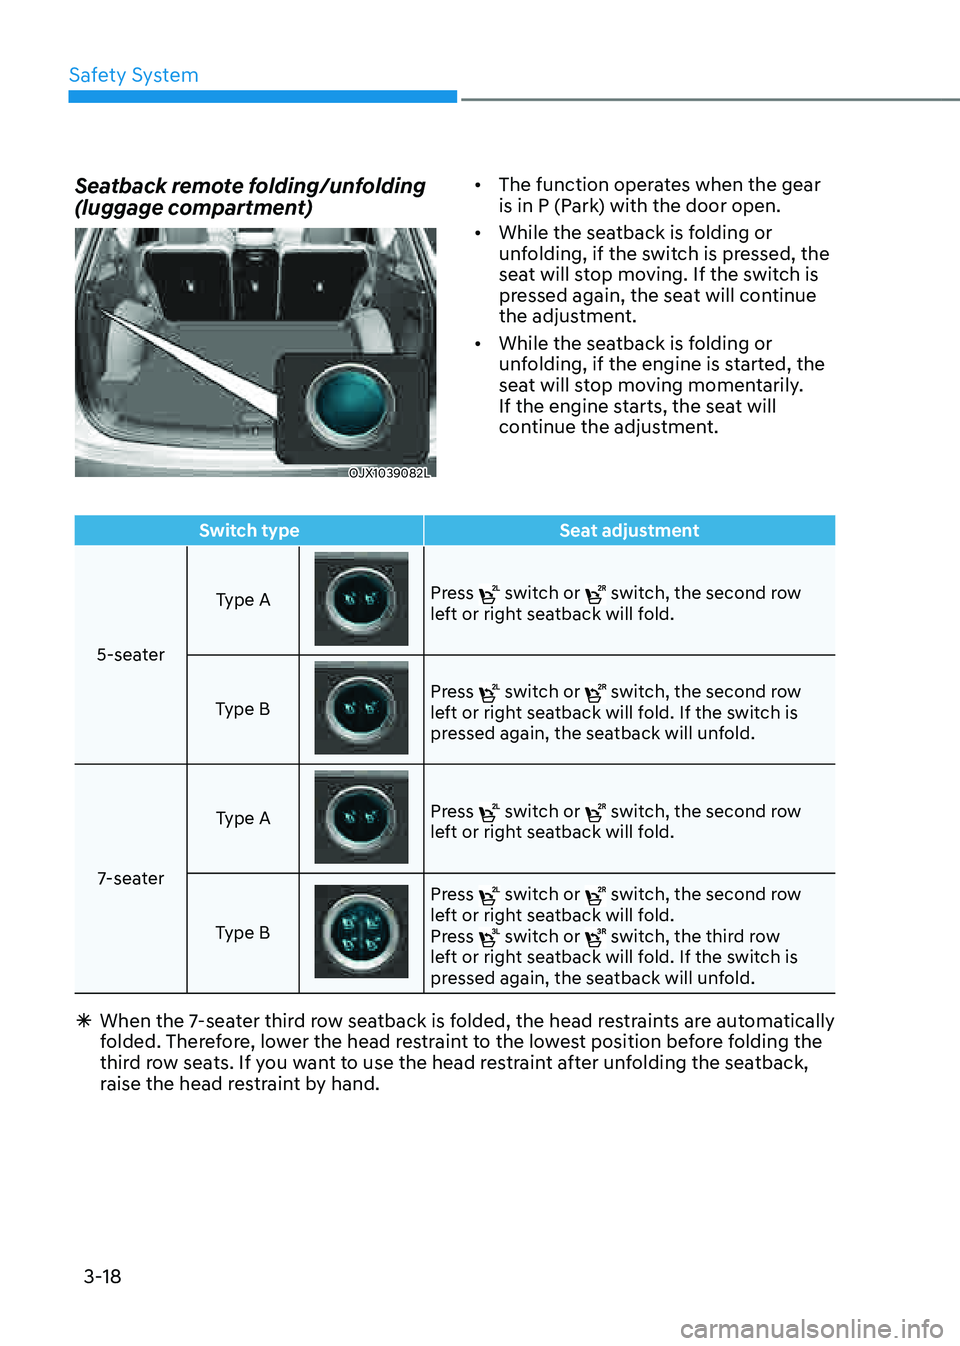
Switch typeSeat adjustment
5-seater Type A
Press switch or switch, the second row left or right seatback will fold.
Type B
Press switch or switch, the second row left or right seatback will fold. If the switch is
pressed again, the seatback will unfold.
7-seater Type A
Press switch or switch, the second row left or right seatback will fold.
Type B
Press switch or switch, the second row left or right seatback will fold.
Press switch or switch, the third row left or right seatback will fold. If the switch is
pressed again, the seatback will unfold.
à When the 7-seater third row seatback is folded, the head restraints are automatically
folded. Therefore, lower the head restraint to the lowest position before folding the
third row seats. If you want to use the head restraint after unfolding the seatback,
raise the head restraint by hand.
Seatback remote folding/unfolding
(luggage compartment)
OJX1039082LOJX1039082L
• The function operates when the gear
is in P (Park) with the door open.
• While the seatback is folding or
unfolding, if the switch is pressed, the
seat will stop moving. If the switch is
pressed again, the seat will continue
the adjustment.
• While the seatback is folding or
unfolding, if the engine is started, the
seat will stop moving momentarily.
If the engine starts, the seat will
continue the adjustment.
Page 49 of 632
Safety System
3-20
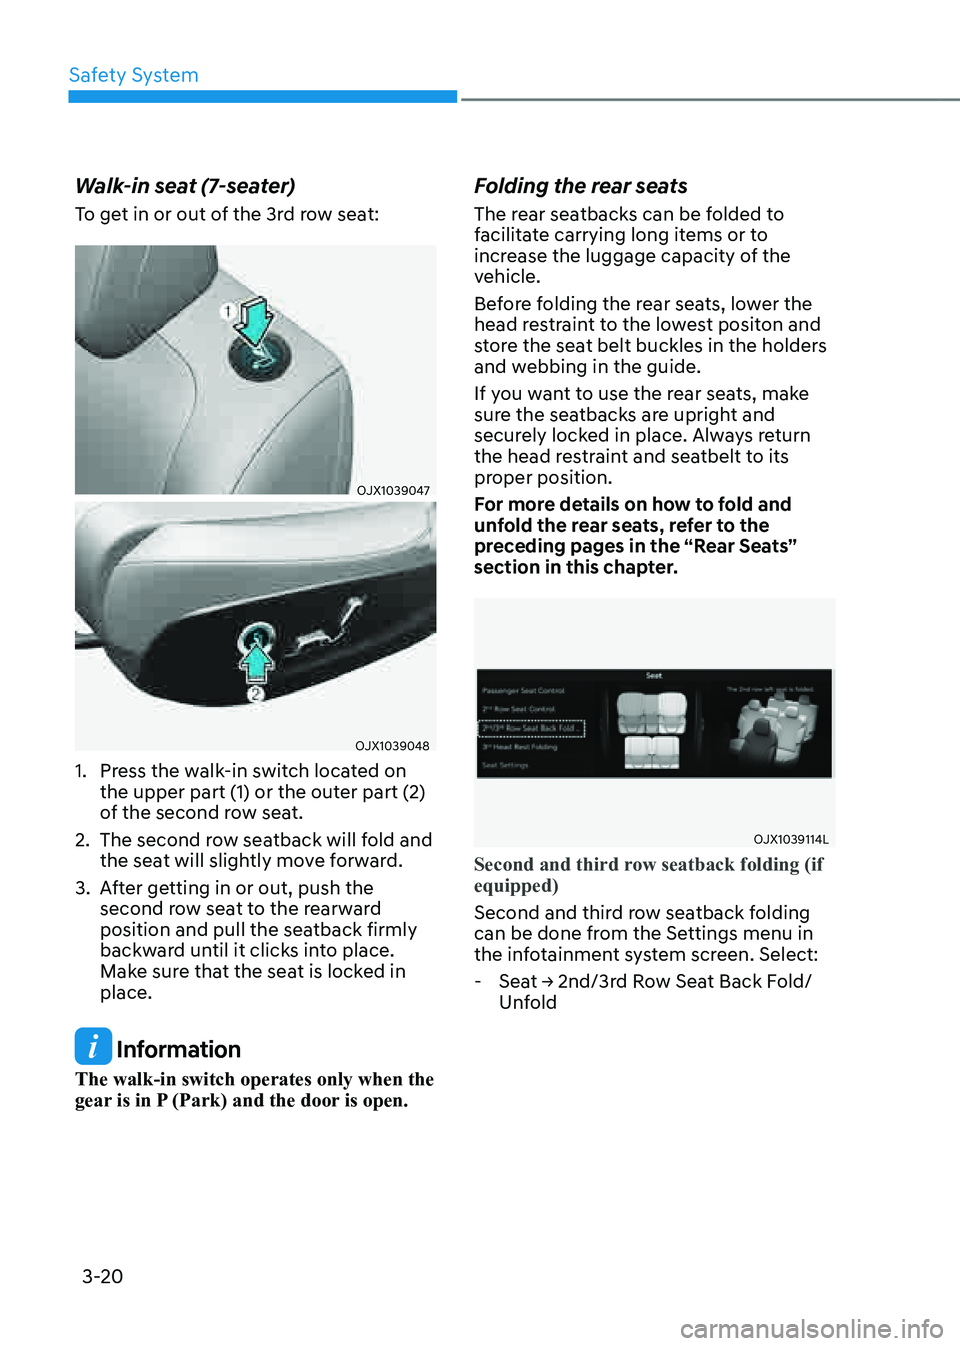
Walk-in seat (7-seater)
To get in or out of the 3rd row seat:
OJX1039047OJX1039047
OJX1039048OJX1039048
1. Press the walk-in switch located on
the upper part (1) or the outer part (2)
of the second row seat.
2. The second row seatback will fold and
the seat will slightly move forward.
3. After getting in or out, push the
second row seat to the rearward
position and pull the seatback firmly
backward until it clicks into place.
Make sure that the seat is locked in
place.
Information
The walk-in switch operates only when the
gear is in P (Park) and the door is open.
Folding the rear seats
The rear seatbacks can be folded to
facilitate carrying long items or to
increase the luggage capacity of the
vehicle.
Before folding the rear seats, lower the
head restraint to the lowest positon and
store the seat belt buckles in the holders
and webbing in the guide.
If you want to use the rear seats, make
sure the seatbacks are upright and
securely locked in place. Always return
the head restraint and seatbelt to its
proper position.
For more details on how to fold and
unfold the rear seats, refer to the
preceding pages in the “Rear Seats”
section in this chapter.
OJX1039114LOJX1039114L
Second and third row seatback folding (if
equipped)
Second and third row seatback folding
can be done from the Settings menu in
the infotainment system screen. Select:
-Seat -> 2nd/3rd Row Seat Back Fold/Unfold
Page 61 of 632
Safety System
3-32
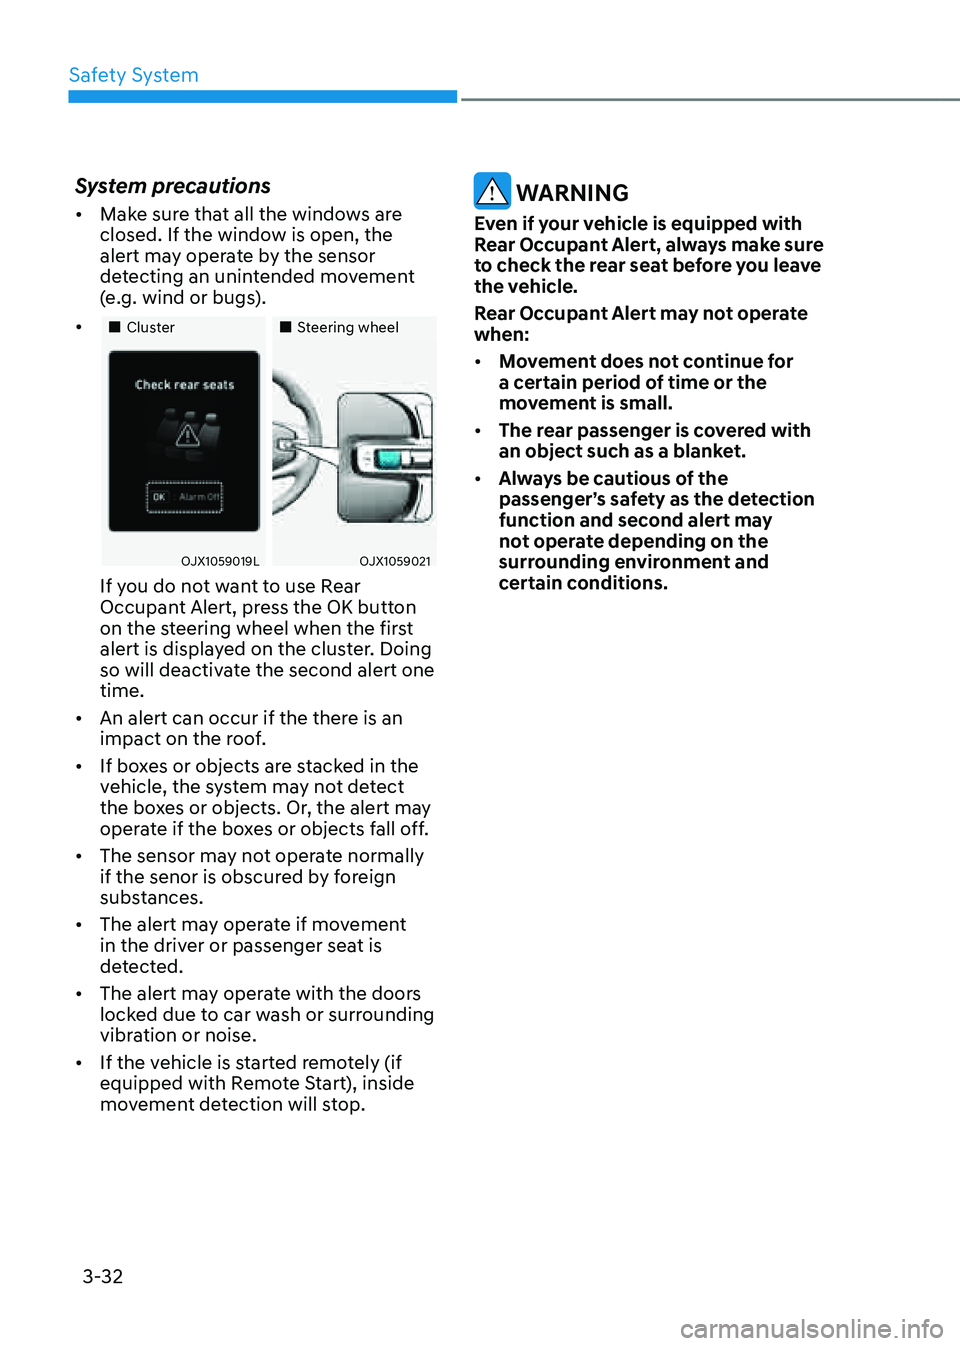
System precautions
• Make sure that all the windows are
closed. If the window is open, the
alert may operate by the sensor
detecting an unintended movement
(e.g. wind or bugs).
•
Page 88 of 632

03
3-59
Curtain air bags
OJX1039076OJX1039076
OJX1039077OJX1039077
Curtain air bags are located along both
sides of the roof rails above the front and
rear doors.
They are designed to help protect the
heads of the front seat occupants and
the rear outboard seat occupants in
certain side impact collisions.
The curtain air bags are designed to
deploy during certain side impact
collisions, depending on the crash
severity.The side and/or curtain air bags and pre-
tensioners on both sides of the vehicle
may deploy if a rollover or possible
rollover is detected.
The curtain air bags are not designed
to deploy in all side impact or rollover
situations.
WARNING
To reduce the risk of serious injury or
death from an inflating curtain air bag,
take the following precautions:
• All seat occupants must wear
seat belts at all times to help keep
occupants positioned properly.
• Properly secure Child Restraint
System as far away from the door as
possible.
• Do not place any objects over the air
bag. Also, do not attach any objects
around the area the air bag inflates
such as the door, side door glass,
front and rear pillar, roof side rail.
• Do not hang other objects except
clothes, especially hard or breakable
objects.
In an accident, it may cause vehicle
damage or personal injury.
• Do not allow passengers to lean their
heads or bodies onto doors, put their
arms on the doors, stretch their arms
out of the window, or place objects
between the doors and seats.
• Do not open or repair the side curtain
air bags.
Page 93 of 632
Safety System
3-64
What to Expect After an Air Bag
Inflates
After a frontal or side air bag inflates, it
will deflate very quickly. Air bag inflation
will not prevent the driver from seeing
out of the windshield or being able
to steer. Curtain air bags may remain
partially inflated for some time after they
deploy.
WARNING
After an air bag inflates, take the
following precautions:
• Open your windows and doors as
soon as possible after impact to
reduce prolonged exposure to the
smoke and powder released by the
inflating air bag.
• Do not touch the air bag storage
area’s internal components
immediately after an air bag has
inflated. The parts that come into
contact with an inflating air bag may
be very hot.
• Always wash exposed skin areas
thoroughly with cold water and mild
soap.
• Always have an authorized retailer of
Genesis Branded products replace
the air bag immediately after
deployment. Air bags are designed to
be used only once.
Noise and smoke from inflating air
bag
When the air bags inflate, they make a
loud noise and may produce smoke and
powder in the air inside of the vehicle.
This is normal and is a result of the
ignition of the air bag inflator. After the
air bag inflates, you may feel substantial
discomfort in breathing because of the
contact of your chest with both the seat
belt and the air bag, as well as from
breathing the smoke and powder. The
powder may aggravate asthma for some
people. If you experience breathing
problems after an air bag deployment,
seek medical attention immediately.
Though the smoke and powder are
nontoxic, they may cause irritation to
the skin, eyes, nose, throat, etc. If this is
the case, wash and rinse with cold water
immediately and seek medical attention
if the symptoms persist.
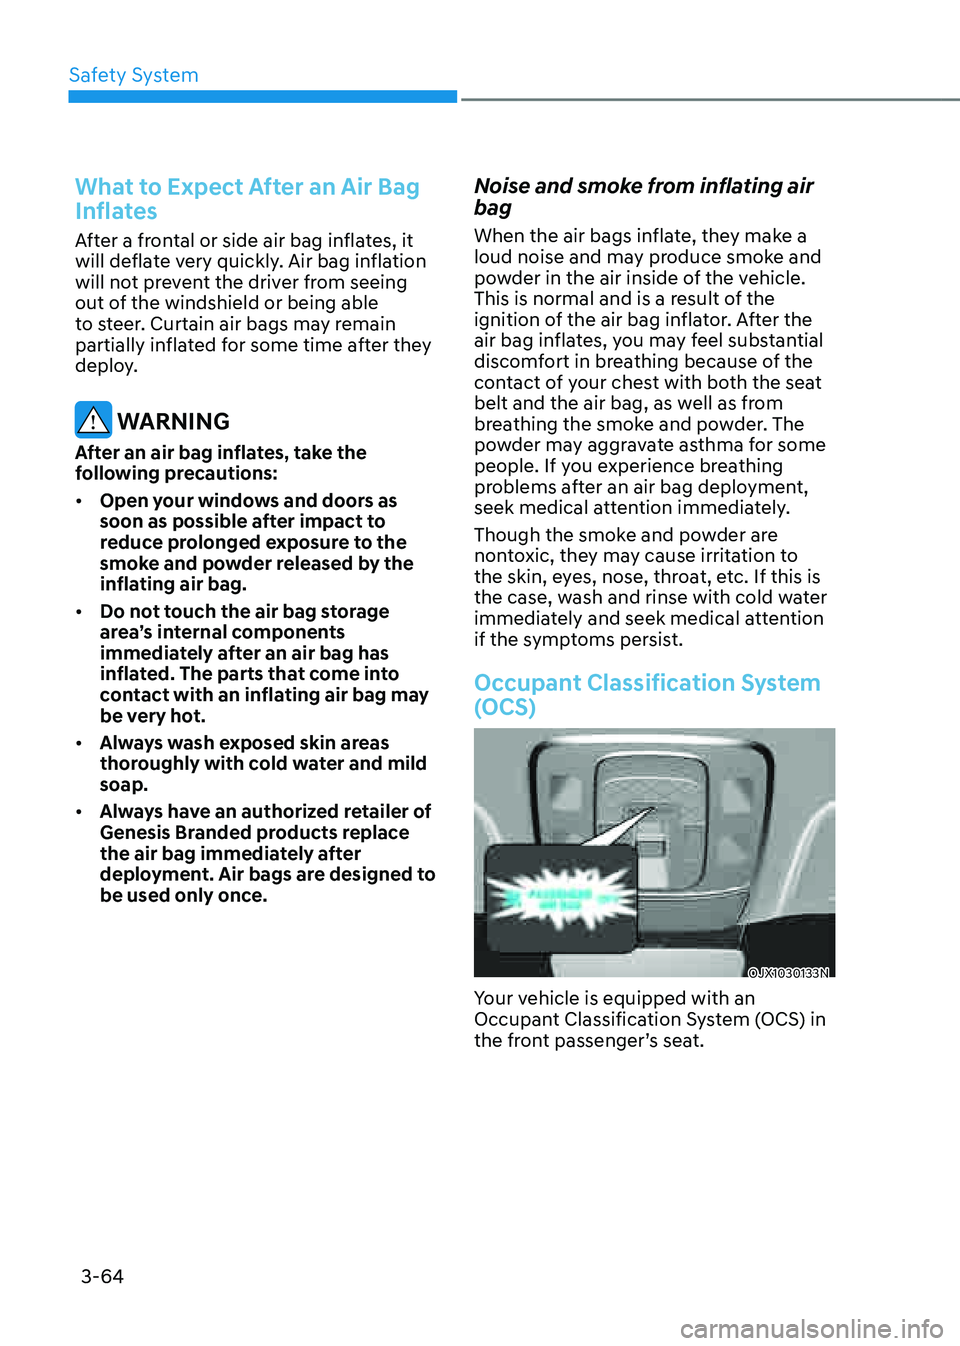
Occupant Classification System
(OCS)
OJX1030133NOJX1030133N
Your vehicle is equipped with an
Occupant Classification System (OCS) in
the front passenger’s seat.