stop start GENESIS GV80 2021 Owner's Manual
[x] Cancel search | Manufacturer: GENESIS, Model Year: 2021, Model line: GV80, Model: GENESIS GV80 2021Pages: 632, PDF Size: 9.37 MB
Page 17 of 632
2-5
02
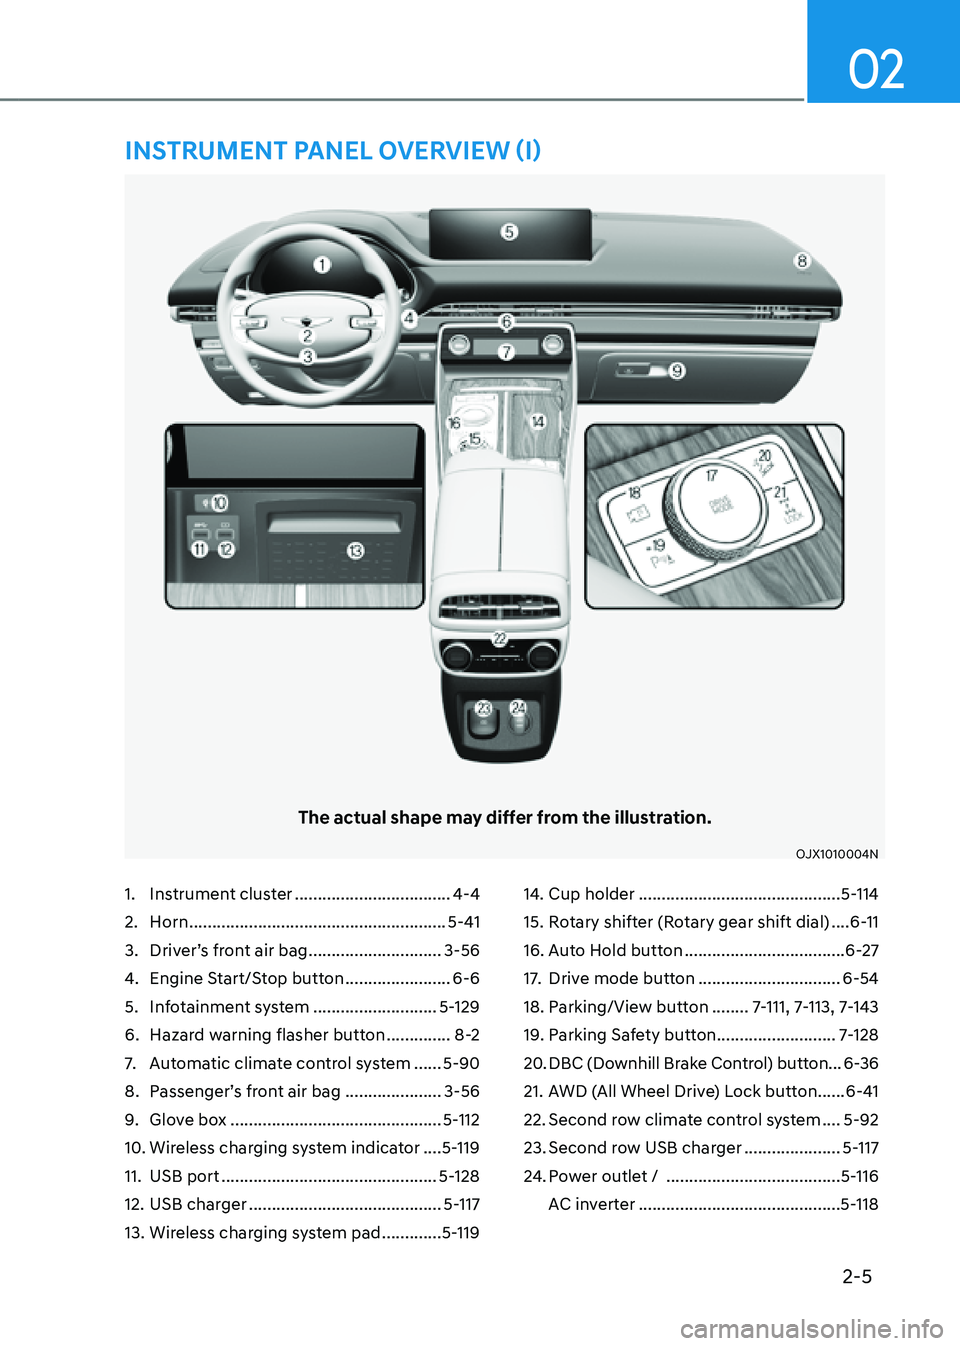
1. Instrument cluster ..................................4-4
2. Horn ........................................................5-41
3. Driver’s front air bag .............................3-56
4. Engine Start/Stop button .......................6-6
5. Infotainment system ...........................5-129
6. Hazard warning flasher button ..............8-2
7. Automatic climate control system ......5-90
8. Passenger’s front air bag .....................3-56
9. Glove box ..............................................5-112
10. Wireless charging system indicator ....5-119
11. USB port ...............................................5-128
12. USB charger ..........................................5-117
13. Wireless charging system pad .............5-119
14. Cup holder ............................................5-114
15. Rotary shifter (Rotary gear shift dial) ....6-11
16. Auto Hold button ...................................6-27
17. Drive mode button ...............................6-54
18. Parking/View button ........7-111, 7-113, 7-143
19. Parking Safety button ..........................7-128
20. DBC (Downhill Brake Control) button ...6-36
21. AWD (All Wheel Drive) Lock button ......6-41
22. Second row climate control system ....5-92
23. Second row USB charger .....................5-117
24. Power outlet / ......................................5-116
AC inverter
............................................5-118
The actual shape may differ from the illustration.
OJX1010004NOJX1010004N
INSTRUMENT PANEL OVERVIEW (I)
Page 36 of 632
03
3 -7
Information
The information provided may differ
depending on which functions are
applicable to your vehicle.
Safety Precautions
Adjusting the seats so that you are sitting
in a safe and comfortable position plays
an important role for the safety of the
driver and passengers, along with seat
belts and air bags when in an accident.
WARNING
Do not use a cushion that reduces
friction between the seat and the
passenger. The passenger’s hips may
slide under the lap portion of the seat
belt during an accident or a sudden
stop.
Serious or fatal internal injuries could
result because the seat belt cannot
operate properly.
Air bags
You can take steps to reduce the risk
of being injured by an inflating air bag.
Sitting too close to an air bag greatly
increases the risk of injury in the event
the air bag inflates. The National
Highway Traffic Safety Administration
(NHTSA) recommends that drivers allow
at least 10 inches (25 cm) between the
center of the steering wheel and their
chest.
WARNING
To reduce the risk of serious injury or
death from an inflating air bag, take the
following precautions:
• Adjust the driver’s seat as far to the
rear as possible maintaining the
ability to control the vehicle.
• Adjust the front passenger seat as far
to the rear as possible.
• Hold the steering wheel by the rim
with hands at the 9 o’clock and 3
o’clock positions to minimize the risk
of injuries to your hands and arms.
• NEVER place anything or anyone
between you and the air bag.
• Do not allow the front passenger to
place feet or legs on the dashboard
to minimize the risk of leg injuries.
Seat belts
Always fasten your seat belt before
starting any trip. At all times, passengers
should sit upright and be properly
restrained. Infants and small children
must be restrained in appropriate Child
Restraint Systems. Children who have
outgrown a booster seat and adults must
be restrained using the seat belts.
WARNING
Take the following precautions when
adjusting your seat belt:
• NEVER use one seat belt for more
than one occupant.
• Always position the seatback upright
with the lap portion of the seat belt
snug and low across the hips.
• NEVER allow children or small infants
to ride on a passenger’s lap.
• Do not route the seat belt across your
neck, across sharp edges, or reroute
the shoulder strap away from your
body.
• Do not allow the seat belt to become
caught or jammed.
Page 44 of 632
03
3-15
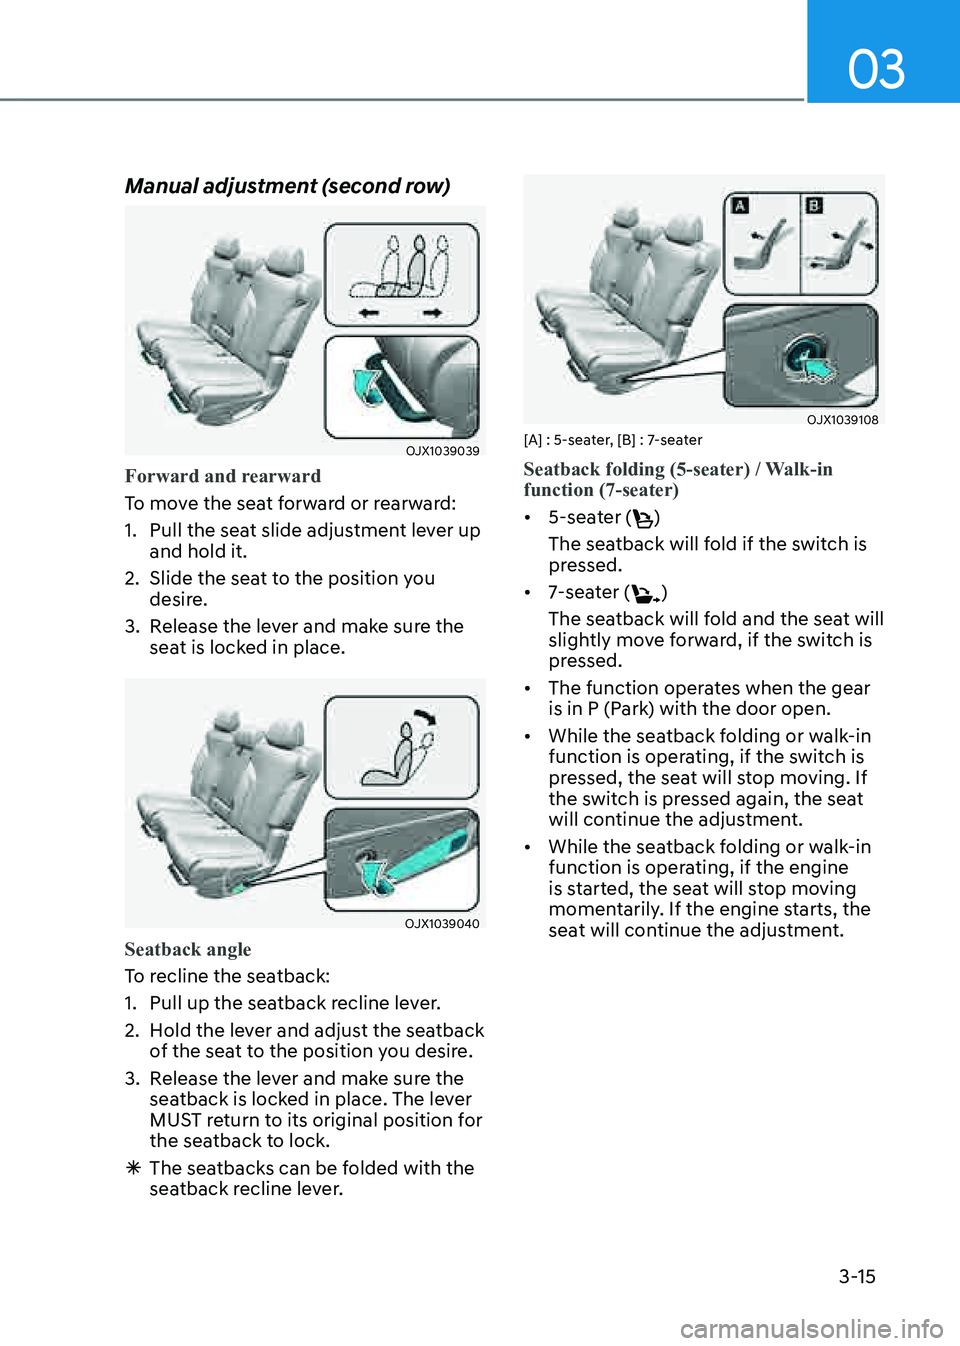
Manual adjustment (second row)
OJX1039039OJX1039039
Forward and rearward
To move the seat forward or rearward:
1. Pull the seat slide adjustment lever up
and hold it.
2. Slide the seat to the position you
desire.
3. Release the lever and make sure the
seat is locked in place.
OJX1039040OJX1039040
Seatback angle
To recline the seatback:
1. Pull up the seatback recline lever.
2. Hold the lever and adjust the seatback
of the seat to the position you desire.
3. Release the lever and make sure the
seatback is locked in place. The lever
MUST return to its original position for
the seatback to lock.
ÃThe seatbacks can be folded with the
seatback recline lever.
OJX1039108OJX1039108[A] : 5-seater, [B] : 7-seater
Seatback folding (5-seater) / Walk-in
function (7-seater)
• 5-seater ()
The seatback will fold if the switch is
pressed.
• 7-seater ()
The seatback will fold and the seat will
slightly move forward, if the switch is
pressed.
• The function operates when the gear
is in P (Park) with the door open.
• While the seatback folding or walk-in
function is operating, if the switch is
pressed, the seat will stop moving. If
the switch is pressed again, the seat
will continue the adjustment.
• While the seatback folding or walk-in
function is operating, if the engine
is started, the seat will stop moving
momentarily. If the engine starts, the
seat will continue the adjustment.
Page 45 of 632
Safety System
3-16
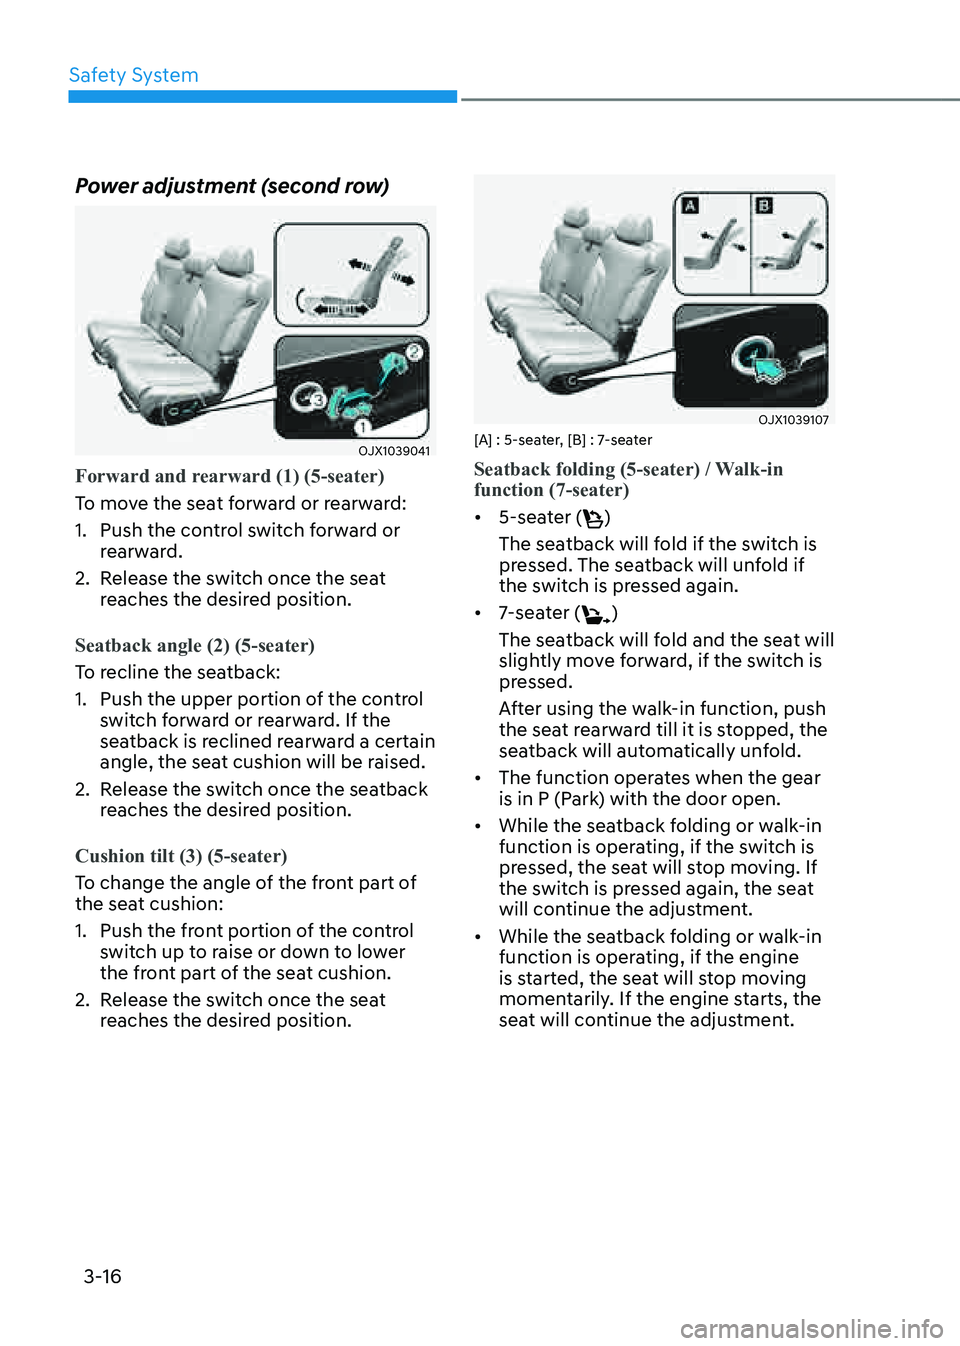
Power adjustment (second row)
OJX1039041OJX1039041
Forward and rearward (1) (5-seater)
To move the seat forward or rearward:
1. Push the control switch forward or
rearward.
2. Release the switch once the seat
reaches the desired position.
Seatback angle (2) (5-seater)
To recline the seatback:
1. Push the upper portion of the control
switch forward or rearward. If the
seatback is reclined rearward a certain
angle, the seat cushion will be raised.
2. Release the switch once the seatback
reaches the desired position.
Cushion tilt (3) (5-seater)
To change the angle of the front part of
the seat cushion:
1. Push the front portion of the control
switch up to raise or down to lower
the front part of the seat cushion.
2. Release the switch once the seat
reaches the desired position.
OJX1039107OJX1039107[A] : 5-seater, [B] : 7-seater
Seatback folding (5-seater) / Walk-in
function (7-seater)
• 5-seater ()
The seatback will fold if the switch is
pressed. The seatback will unfold if
the switch is pressed again.
• 7-seater ()
The seatback will fold and the seat will
slightly move forward, if the switch is
pressed.
After using the walk-in function, push
the seat rearward till it is stopped, the
seatback will automatically unfold.
• The function operates when the gear
is in P (Park) with the door open.
• While the seatback folding or walk-in
function is operating, if the switch is
pressed, the seat will stop moving. If
the switch is pressed again, the seat
will continue the adjustment.
• While the seatback folding or walk-in
function is operating, if the engine
is started, the seat will stop moving
momentarily. If the engine starts, the
seat will continue the adjustment.
Page 47 of 632
Safety System
3-18
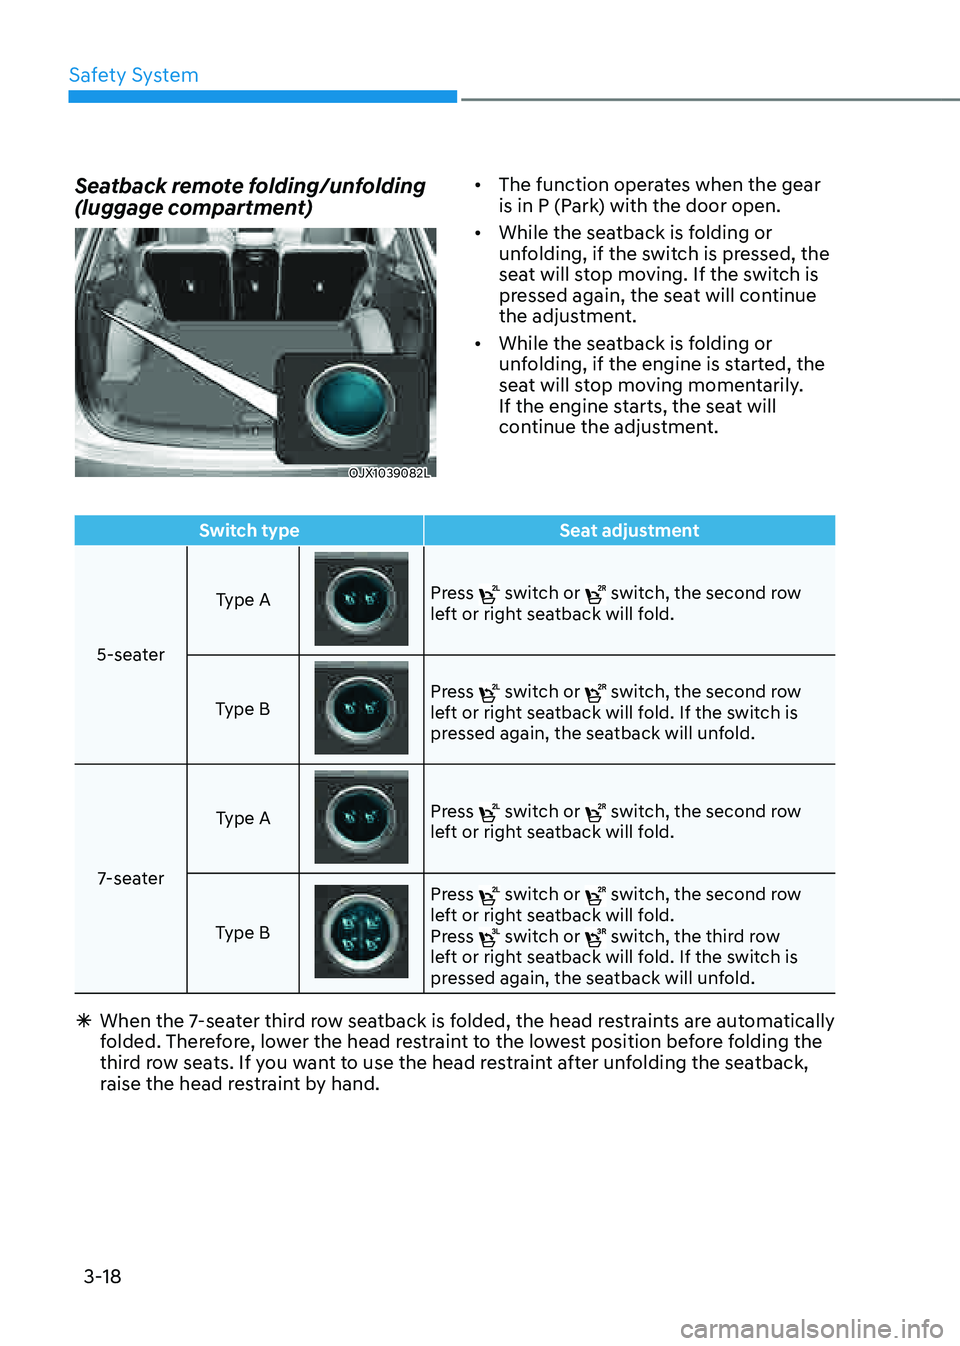
Switch typeSeat adjustment
5-seater Type A
Press switch or switch, the second row left or right seatback will fold.
Type B
Press switch or switch, the second row left or right seatback will fold. If the switch is
pressed again, the seatback will unfold.
7-seater Type A
Press switch or switch, the second row left or right seatback will fold.
Type B
Press switch or switch, the second row left or right seatback will fold.
Press switch or switch, the third row left or right seatback will fold. If the switch is
pressed again, the seatback will unfold.
à When the 7-seater third row seatback is folded, the head restraints are automatically
folded. Therefore, lower the head restraint to the lowest position before folding the
third row seats. If you want to use the head restraint after unfolding the seatback,
raise the head restraint by hand.
Seatback remote folding/unfolding
(luggage compartment)
OJX1039082LOJX1039082L
• The function operates when the gear
is in P (Park) with the door open.
• While the seatback is folding or
unfolding, if the switch is pressed, the
seat will stop moving. If the switch is
pressed again, the seat will continue
the adjustment.
• While the seatback is folding or
unfolding, if the engine is started, the
seat will stop moving momentarily.
If the engine starts, the seat will
continue the adjustment.
Page 57 of 632
Safety System
3-28
• Manual temperature control
Each time you touch the icon, the
temperature setting of the seat is
changed as follows :
OFF → HIGH ( ) → MIDDLE ( ) → LOW ( )
• Automatic temperature control
The seat warmer starts to
automatically control the seat
temperature in order to prevent
low temperature burns after being
manually turned ON.
OFF → HIGH ( ) → MIDDLE ( ) → LOW ( )
30 min 60 min
You may manually touch the icon to
increase seat temperature. However,
the seat temperature is automatically
adjusted again.
• Seat Heater Balance
You may lower the seat warmer
setting, or may turn the seat warmer
off for either the seatback or seat
cushion, when the seat warmer is on.
To use this function, it must be
enabled from the Settings menu in the
infotainment system screen. Select:
-Setup -> Vehicle Settings -> Seat -> Heated/Ventilated Features -> Seat Heater Balance
• When touching the icon for more than
1.5 seconds with the seat warmer
operating, the seat warmer will turn
OFF.
• The seat warmer defaults to the OFF
position whenever the Engine Start/
Stop button is pressed to the ON
position.
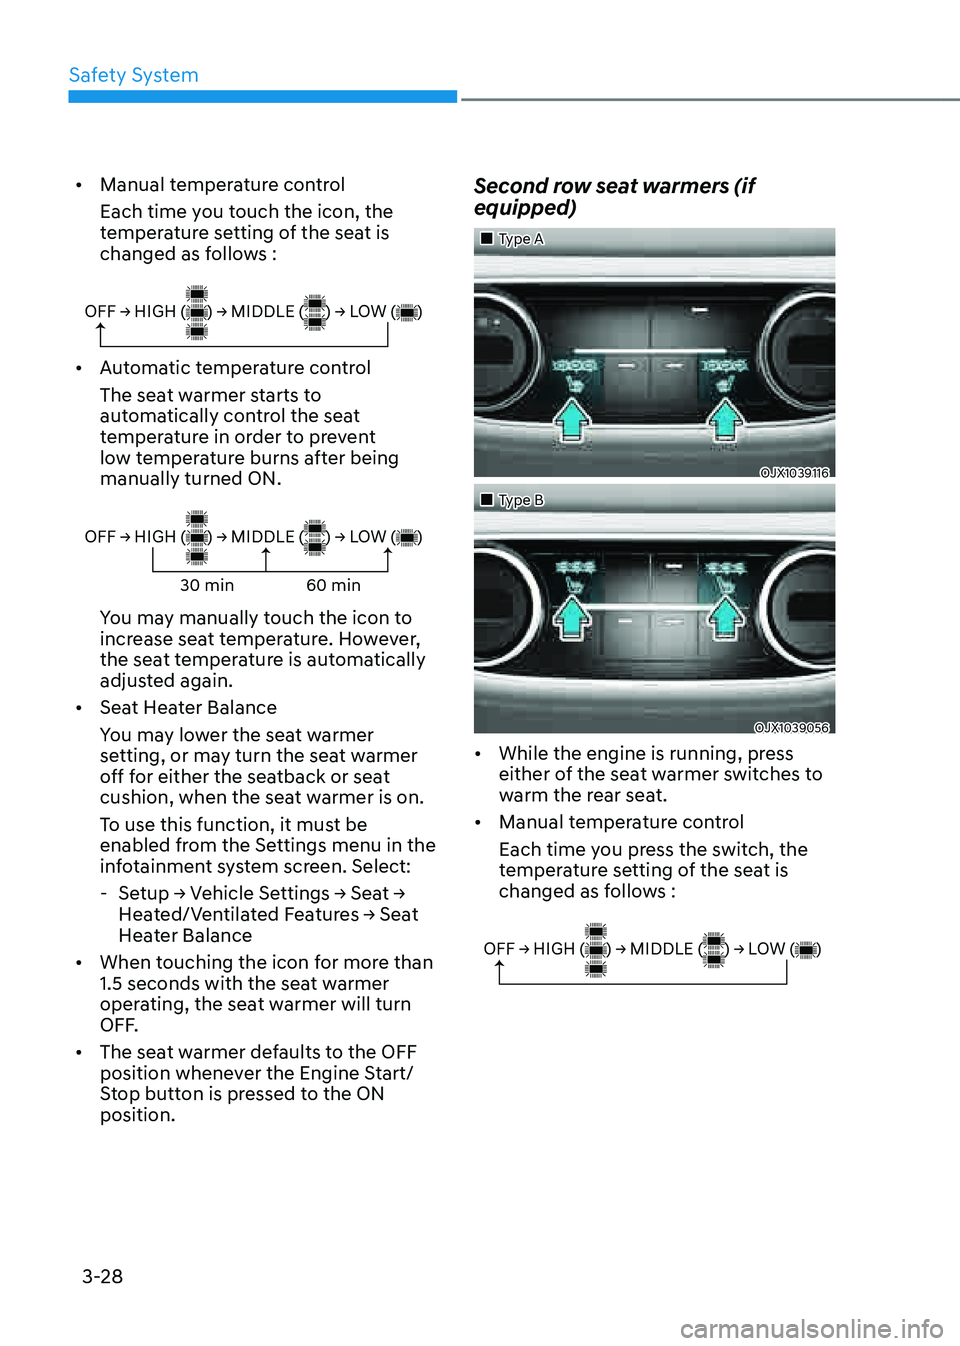
Second row seat warmers (if
equipped)
�
Page 58 of 632
03
3-29
• Automatic temperature control
The seat warmer starts to
automatically control the seat
temperature in order to prevent
low temperature burns after being
manually turned ON.
OFF → HIGH ( ) → MIDDLE ( ) → LOW ( )
30 min 60 min
You may manually push the switch to
increase seat temperature. However,
the seat temperature is automatically
adjusted again.
• When pressing the switch for more
than 1.5 seconds with the seat warmer
operating, the seat warmer will turn
OFF.
• The seat warmer defaults to the OFF
position whenever the Engine Start/
Stop button is pressed to the ON
position.
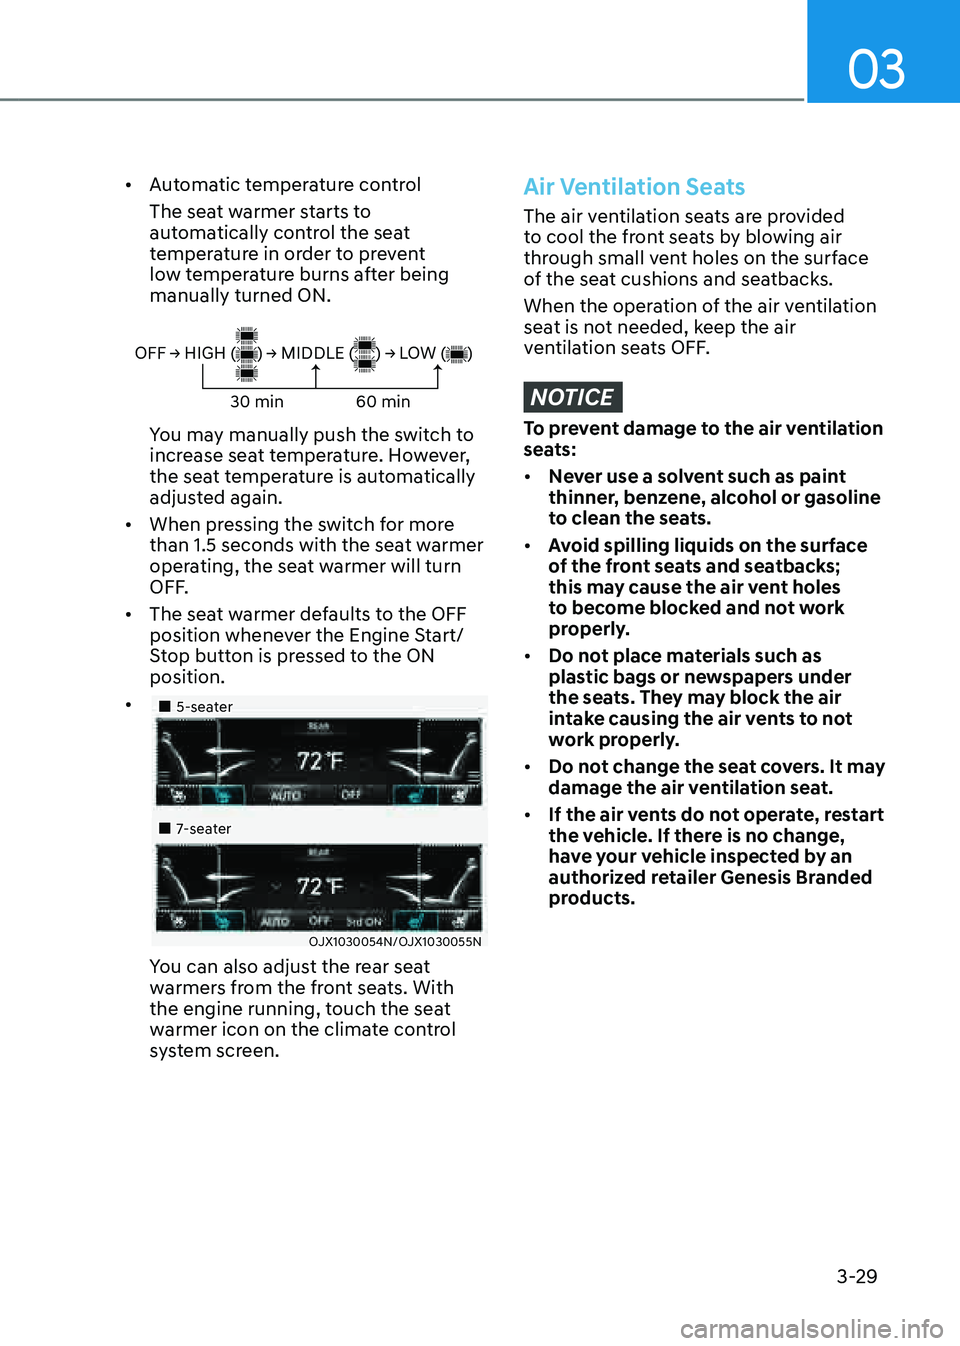
• �
Page 59 of 632
Safety System
3-30
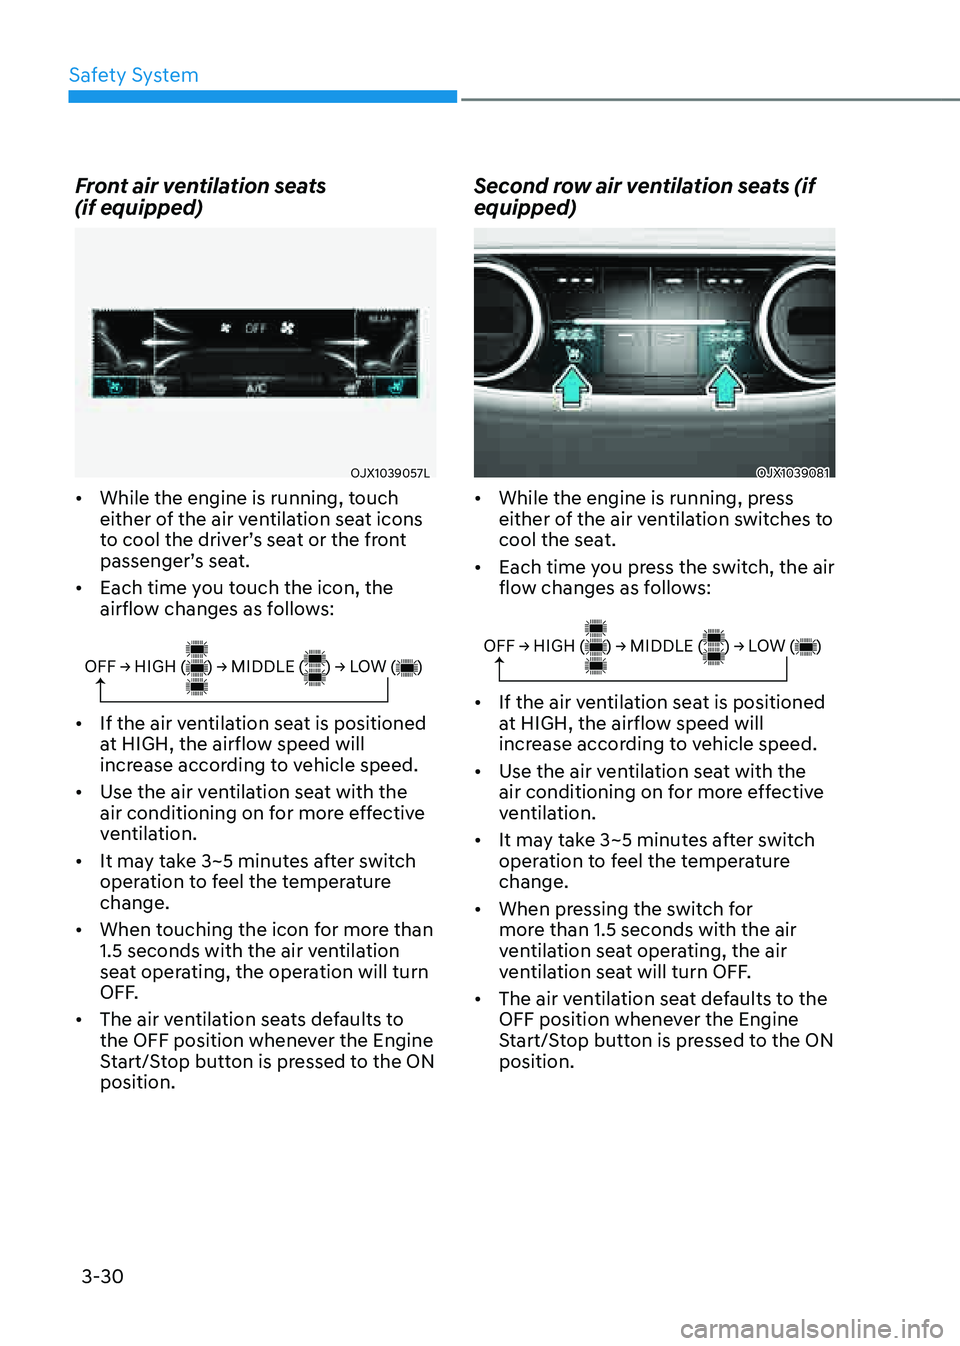
Front air ventilation seats
(if equipped)
OJX1039057LOJX1039057L
• While the engine is running, touch
either of the air ventilation seat icons
to cool the driver’s seat or the front
passenger’s seat.
• Each time you touch the icon, the
airflow changes as follows:
OFF → HIGH ( ) → MIDDLE ( ) → LOW ( )
• If the air ventilation seat is positioned
at HIGH, the airflow speed will
increase according to vehicle speed.
• Use the air ventilation seat with the
air conditioning on for more effective
ventilation.
• It may take 3~5 minutes after switch
operation to feel the temperature
change.
• When touching the icon for more than
1.5 seconds with the air ventilation
seat operating, the operation will turn
OFF.
• The air ventilation seats defaults to
the OFF position whenever the Engine
Start/Stop button is pressed to the ON
position.
Second row air ventilation seats (if
equipped)
OJX1039081OJX1039081
• While the engine is running, press
either of the air ventilation switches to
cool the seat.
• Each time you press the switch, the air
flow changes as follows:
OFF → HIGH ( ) → MIDDLE ( ) → LOW ( )
• If the air ventilation seat is positioned
at HIGH, the airflow speed will
increase according to vehicle speed.
• Use the air ventilation seat with the
air conditioning on for more effective
ventilation.
• It may take 3~5 minutes after switch
operation to feel the temperature
change.
• When pressing the switch for
more than 1.5 seconds with the air
ventilation seat operating, the air
ventilation seat will turn OFF.
• The air ventilation seat defaults to the
OFF position whenever the Engine
Start/Stop button is pressed to the ON
position.
Page 62 of 632
03
3-33
This section describes how to use the
seat belts properly. It also describes
some of the things not to do when using
seat belts.
Seat Belt Safety Precautions
Always fasten your seat belt and make
sure all passengers have fastened their
seat belts before starting any trip. Air
bags are designed to supplement the
seat belt as an additional safety device,
but they are not a substitute. Most states
require all occupants of a vehicle to wear
seat belts.
WARNING
Seat belts must be used by ALL
passengers whenever the vehicle is
moving. Take the following precautions
when adjusting and wearing seat belts:
• ALWAYS properly restrain children
under age 13 in the rear seats.
• NEVER allow children to ride in the
front passenger seat. If a child age 13
or older must be seated in the front
seat, move the seat as far back as
possible and properly restrain them
in the seat.
• NEVER allow an infant or child to be
carried on an occupant’s lap.
• NEVER ride with the seatback
reclined when the vehicle is moving.
• Do not allow children to share a seat
or seat belt.
• Do not wear the shoulder belt under
your arm or behind your back.
• Always wear both the shoulder
portion and lap portion of the lap/
shoulder belt.
• Never wear a seat belt over fragile
objects. If there is a sudden stop or
impact, the seat belt can damage it.
• Do not use the seat belt if it is
twisted. A twisted seat belt will not
protect you properly in an accident.
• Do not use a seat belt if the webbing
or hardware is damaged.
• Do not latch the seat belt into the
buckles of other seats.
• NEVER unfasten the seat belt
while driving. This may cause loss
of vehicle control resulting in an
accident.
• Make sure there is nothing in the
buckle interfering with the seat belt
latch mechanism. This may prevent
the seat belt from fastening securely.
• No modifications or additions
should be made by the user which
will either prevent the seat belt
adjusting devices from operating to
remove slack, or prevent the seat
belt assembly from being adjusted to
remove slack.
WARNING
Damaged seat belts and seat belt
assemblies will not operate properly.
Always replace:
• Frayed, contaminated, or damaged
webbing
• Damaged hardware
• The entire seat belt assembly after it
has been worn in an accident, even
if damage to webbing or assembly is
not apparent
SEAT BELTS
Page 69 of 632
Safety System
3-40
NOTICE
The sensor that activates the SRS
control module is connected with the
pre–tensioner seat belts. The SRS air
bag warning light on the instrument
cluster will illuminate for approximately
3~6 seconds after the Engine Start/Stop
button is in the ON position, and then it
should turn off.
If the pre-tensioner is not working
properly, the warning light will
illuminate even if the SRS air bag is not
malfunctioning. If the warning light
does not illuminate, stays illuminated
or illuminates when the vehicle is being
driven, have an authorized retailer of
Genesis Branded products inspect the
pre-tensioner seat belts and SRS air
bags as soon as possible.
Information
• Both the driver's and front passenger's
pre-tensioner seat belts may be
activated in certain frontal or side
collisions or rollovers.
• When the pre-tensioner seat belts are
activated, a loud noise may be heard
and fine dust, which may appear to be
smoke, may be visible in the passenger
compartment. These are normal
operating conditions and are not
hazardous.
• Although it is non-toxic, the fine dust
may cause skin irritation and should
not be inhaled for prolonged periods.
Wash all exposed skin areas thoroughly
after an accident in which the pre-
tensioner seat belts were activated.
• The pre-tensioner seat belt system may
get adversely affected by installing an
audio system to the center console or
welding/painting the frontal vehicle
body.
In this case, consult an authorized
retailer of Genesis Branded products.
The air bag warning light illuminates,
if there is a malfunction with the pre-
tensioner seat belt system.
• In following situations, immediately
have the air bag system and the pre-
tensioner seat belt system checked
by an authorized retailer of Genesis
Branded products.
-The air bag warning light does not
illuminate at all after turning ON the
engine
-The air bag warning light remains
ON over 3~6 seconds after turning
ON the engine