wheel GENESIS GV80 2021 Quick Reference Guide
[x] Cancel search | Manufacturer: GENESIS, Model Year: 2021, Model line: GV80, Model: GENESIS GV80 2021Pages: 25, PDF Size: 8.8 MB
Page 5 of 25
Quick Reference Guide I 0403 I Quick Reference Guide
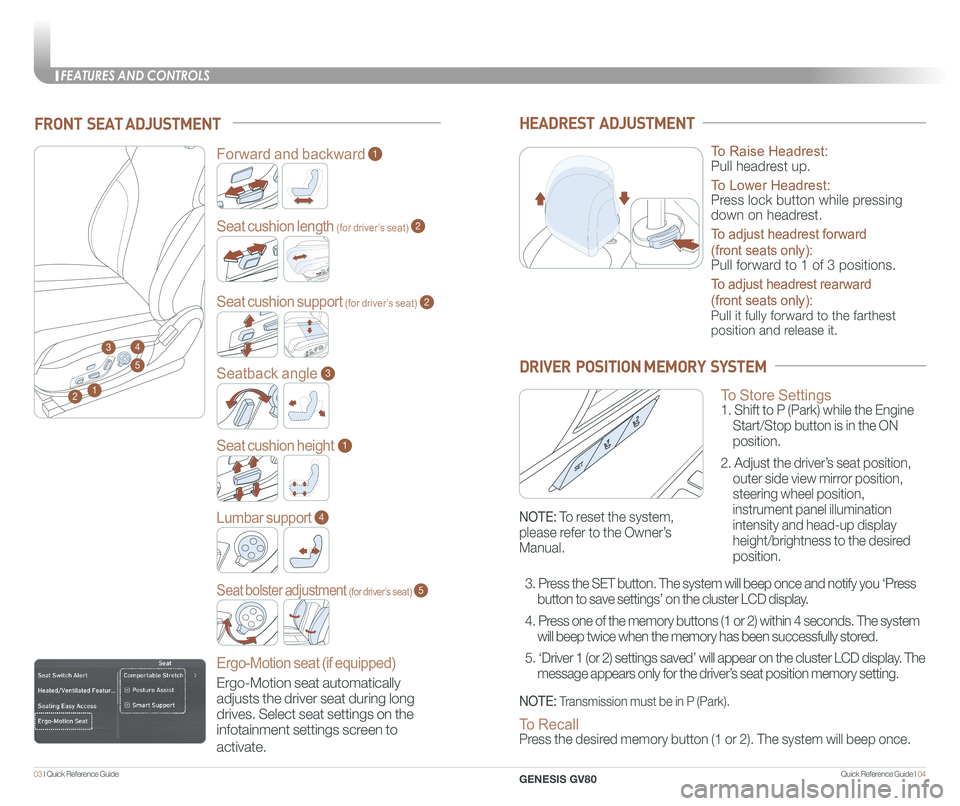
FRONT SEAT ADJUSTMENT
2
Forward and backward1
Seat cushion length (for driver’s seat)
Seat cushion support (for driver’s seat)
2
2
Seatback angle3
Seat cushion height1
Lumbar support
Ergo-Motion seat (if equipped)
4
Seat bolster adjustment (for driver’s seat)5
1
34
5
HEADREST ADJUSTMENT
To Raise Headrest:
Pull headrest up.
To Lower Headrest:
Press lock button while pressing
down on headrest.
To adjust headrest forward
(front seats only):
Pull forward to 1 of 3 positions.
To adjust headrest rearward
(front seats only):
Pull it fully forward to the farthest
position and release it.
To Store Settings 1. Shift to P (Park) while the Engine
Start/Stop button is in the ON
position.
2. Adjust the driver’s seat position,
outer side view mirror position,
steering wheel position,
instrument panel illumination
intensity and head-up display
height/brightness to the desired
position.
DRIVER POSITION MEMORY SYSTEM
NOTE: Transmission must be in P (Park).
NOTE: To reset the system,
please refer to the Owner’s
Manual.
To Recall Press the desired memory button (1 or 2). The system will beep once.
3. Press the SET button. The system will beep once and notify you ‘Press
button to save settings’ on the cluster LCD display.
4. Press one of the memory buttons (1 or 2) within 4 seconds. The system
will beep twice when the memory has been successfully stored.
5. ‘Driver 1 (or 2) settings saved’ will appear on the cluster L\
CD display. The
message appears only for the driver’s seat position memory setting. Ergo-Motion seat automatically
adjusts the driver seat during long
drives. Select seat settings on the
infotainment settings screen to
activate.
FEATURES AND CONTROLS
GENESIS GV80
Page 13 of 25
Quick Reference Guide I 2019 I Quick Reference Guide
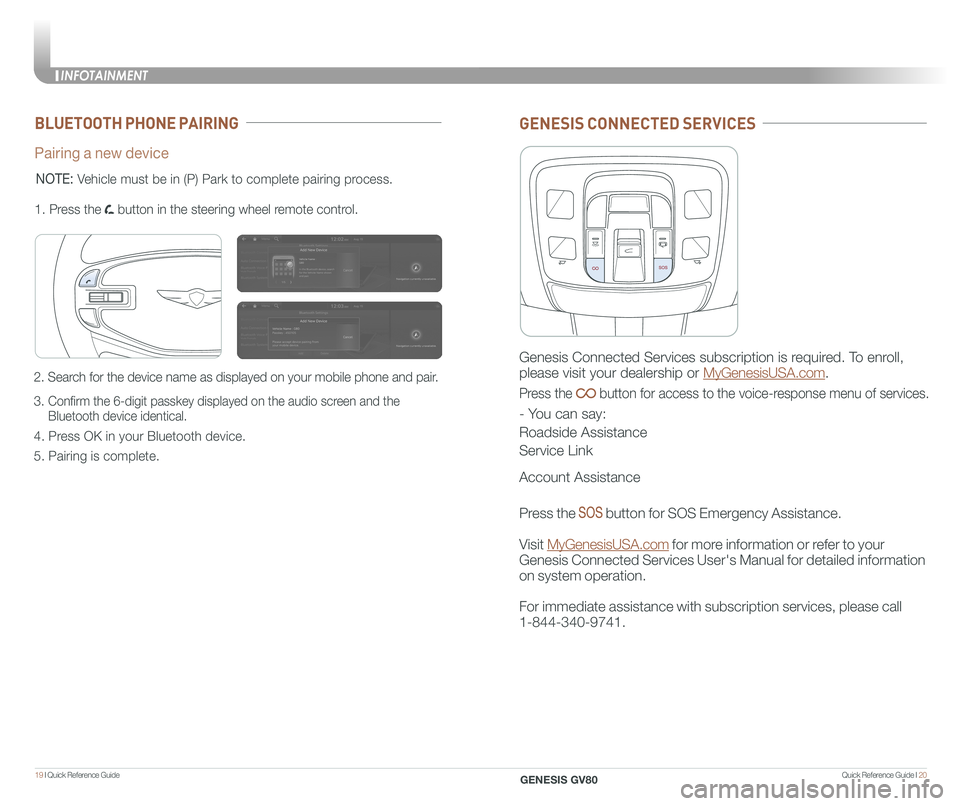
BLUETOOTH PHONE PAIRING
Pairing a new device
2. Search for the device name as displayed on your mobile phone and pair.
3. Confirm the 6-digit passkey displayed on the audio screen and the
Bluetooth device identical.
4. Press OK in your Bluetooth device.
5. Pairing is complete.
1. Press the button in the steering wheel remote control.
MODE
NOTE: Vehicle must be in (P) Park to complete pairing process.
GENESIS CONNECTED SERVICES
Genesis Connected Services subscription is required. To enroll,
please visit your dealership or MyGenesisUSA.com.
Press the button for access to the voice-response menu of services.
- You can say:
Roadside Assistance
Service Link
Account Assistance
Press the button for SOS Emergency Assistance.
Visit MyGenesisUSA.com for more information or refer to your
Genesis Connected Services User's Manual for detailed information
on system operation.
For immediate assistance with subscription services, please call
1-844-340-9741.
INFOTAINMENT
GENESIS GV80
Page 17 of 25
Quick Reference Guide I 2827 I Quick Reference Guide
PHONE
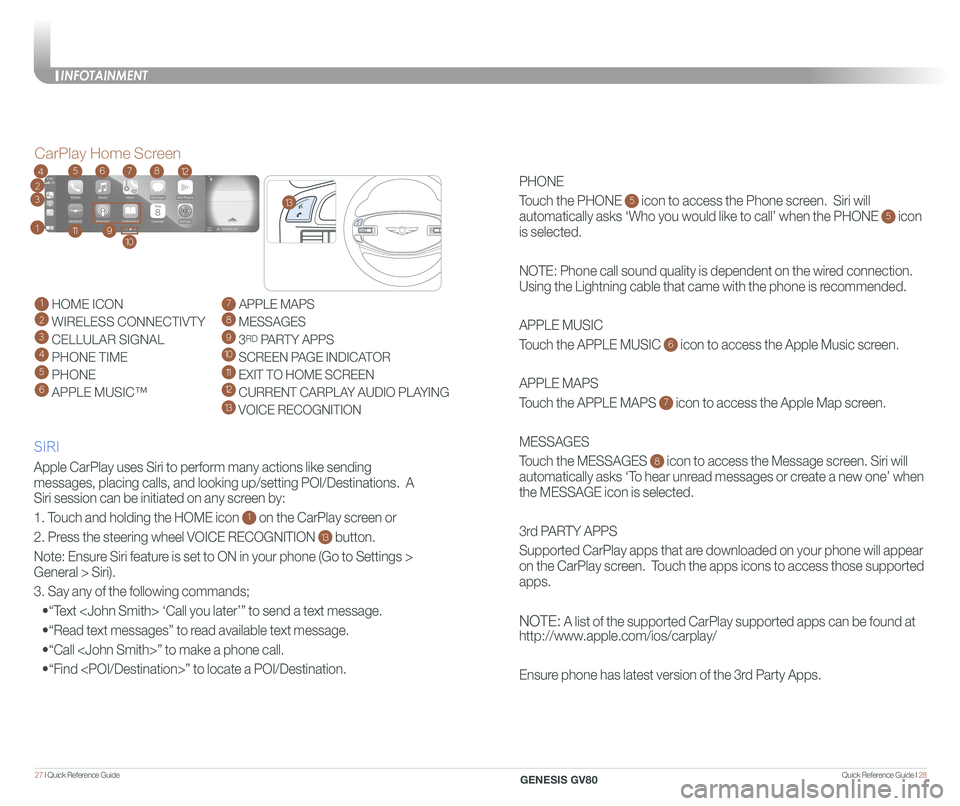
Touch the PHONE 5 icon to access the Phone screen. Siri will
automatically asks ‘Who you would like to call’ when the PHONE 5 icon
is selected.
NOTE: Phone call sound quality is dependent on the wired connection.
Using the Lightning cable that came with the phone is recommended.
APPLE MUSIC
Touch the APPLE MUSIC 6 icon to access the Apple Music screen.
APPLE MAPS
Touch the APPLE MAPS 7 icon to access the Apple Map screen.
MESSAGES
Touch the MESSAGES 8 icon to access the Message screen. Siri will
automatically asks ‘To hear unread messages or create a new one’ when
the MESSAGE icon is selected.
3rd PARTY APPS
Supported CarPlay apps that are downloaded on your phone will appear
on the CarPlay screen. Touch the apps icons to access those supported
apps.
NOTE: A list of the supported CarPlay supported apps can be found at
http://www.apple.com/ios/carplay/
Ensure phone has latest version of the 3rd Party Apps.
Apple CarPlay uses Siri to perform many actions like sending
messages, placing calls, and looking up/setting POI/Destinations. A
Siri session can be initiated on any screen by:
1. Touch and holding the HOME icon 1 on the CarPlay screen or
2. Press the steering wheel VOICE RECOGNITION 13 button.
Note: Ensure Siri feature is set to ON in your phone (Go to Settings >
General > Siri).
3. Say any of the following commands;
•“Text
•“Read text messages” to read available text message.
•“Call
•“Find
CarPlay Home Screen
SIRI
1 HOME ICON
2 WIRELESS CONNECTIVTY
3 CELLULAR SIGNAL
4 PHONE TIME5 PHONE
6 APPLE MUSIC™
7 APPLE MAPS
8 MESSAGES
9 3RD PARTY APPS
10 SCREEN PAGE INDICATOR
11 EXIT TO HOME SCREEN12 CURRENT CARPLAY AUDIO PLAYING
13 VOICE RECOGNITION
2
3
4
1
6578
911
12
13
10
INFOTAINMENT
GENESIS GV80
Page 21 of 25

Quick Reference Guide I 3635 I Quick Reference Guide
• To turn LKA on,
press the Lane Safety button.
• To turn LKA off,
press the button again.
Lane Keeping Assist detects lane
markers on the road, and helps
prevent the vehicle from departing
the lane while driving.
LANE KEEPING ASSIST (LKA)
LKA operates only when the vehicle
speed is above 37 mph and when the
in the instrument cluster is green.
LKA will not operate properly if the
following conditions are present:
- the lane line is not clear
- on sharp bend in a road
- heavy fog
Refer to the Owner's Manual for more
detailed information.
NOTE: During operation, you
may feel the sensation of steering
wheel movement. Depending on
the road condition(gradient), the
deflection driving may occur. LKA
mode can be adjusted in the
User Settings page of the
infotainment system.
ELECTRONIC PARKING BRAKE (EPB)
PULL
PULL
or
Stop the vehicle then pull
the EPB switch.PULL
PULL
Applying
Move shift lever from P/N
to D/R while depressing
the brake pedal.
Releasing
Press the EPB switch while
depressing the brake pedal.
PULL
PULL
NOTE: If necessary, emergency braking is
possible by pulling and holding the EPB
switch.
SMART CRUISE CONTROL (SCC)
Adjusting the vehicle speed
1. Push '+' switch 1 UP to increase cruising speed.
2. Push '-' switch 2 DOWN to decrease cruising speed.
NOTE: Quick push up/down will change speed by 1 mph. Holding
switch up/down will change speed by 5 mph.
MODEM ODEM ODE+-
M ODEM ODEM ODE+-
Smart Cruise Control helps maintain
distance from the vehicle ahead and drive at
a speed, set by the driver.
M ODEM ODEM ODE
+-
M ODEM ODEM ODE
+-
To turn on SCC:
1. Press the Driving Assist button
to turn on SCC. The speed will be set to
the current speed on the cluster.
2. If there is no vehicle in front of you, the
set speed will be maintained, but if there
is a vehicle in front of you, the speed
may decrease to maintain the distance
to the vehicle ahead. If the vehicle
ahead accelerates, your vehicle will
accelerate.
To set vehicle distance
Each time the button is pressed, the vehicle
to vehicle distance changes as follows:
Distance 2Distance 3Distance 4
Distance 1
To Cancel Smart Cruise Control
To temporarily cancel SCC
Press the switch or depress the brake
pedal to temporarily cancel SCC.
To turn off the SCC
Press the Driving Assist button to turn
SCC off. M ODEM ODEM ODE+-M ODEM ODEM ODE
+-
M ODEM ODE
1
2
DRIVING
GENESIS GV80
Page 22 of 25
Quick Reference Guide I 3837 I Quick Reference Guide
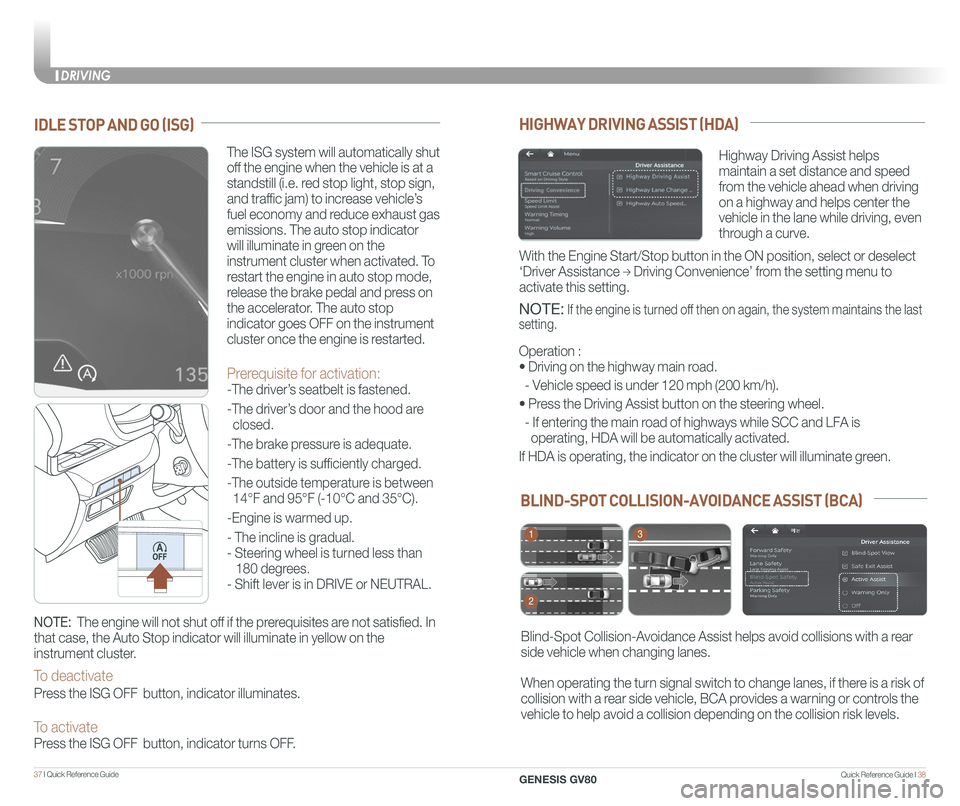
BLIND-SPOT COLLISION-AVOIDANCE ASSIST (BCA)
Blind-Spot Collision-Avoidance Assist helps avoid collisions with a rear
side vehicle when changing lanes.
When operating the turn signal switch to change lanes, if there is a risk of
collision with a rear side vehicle, BCA provides a warning or controls the
vehicle to help avoid a collision depending on the collision risk levels\
.
1
2
3
HIGHWAY DRIVING ASSIST (HDA)
Highway Driving Assist helps
maintain a set distance and speed
from the vehicle ahead when driving
on a highway and helps center the
vehicle in the lane while driving, even
through a curve.
NOTE: If the engine is turned off then on again, the system maintains the last
setting.
Operation :
• Driving on the highway main road.
- Vehicle speed is under 120 mph (200 km/h).
• Press the Driving Assist button on the steering wheel.
- If entering the main road of highways while SCC and LFA is
operating, HDA will be automatically activated.
If HDA is operating, the indicator on the cluster will illuminate green.\
With the Engine Start/Stop button in the ON position, select or deselect \
‘Driver Assistance → Driving Convenience’ from the setting menu to
activate this setting.
IDLE STOP AND GO (ISG)
The ISG system will automatically shut
off the engine when the vehicle is at a
standstill (i.e. red stop light, stop sign,
and traffic jam) to increase vehicle’s
fuel economy and reduce exhaust gas
emissions. The auto stop indicator
will illuminate in green on the
instrument cluster when activated. To
restart the engine in auto stop mode,
release the brake pedal and press on
the accelerator. The auto stop
indicator goes OFF on the instrument
cluster once the engine is restarted.
Prerequisite for activation:
-The driver’s seatbelt is fastened.
-The driver’s door and the hood are
closed.
-The brake pressure is adequate.
-The battery is sufficiently charged.
-The outside temperature is between
14°F and 95°F (-10°C and 35°C).
-Engine is warmed up.
- The incline is gradual.
- Steering wheel is turned less than
180 degrees.
- Shift lever is in DRIVE or NEUTRAL.
NOTE: The engine will not shut off if the prerequisites are not satisfied. In
that case, the Auto Stop indicator will illuminate in yellow on the
instrument cluster.
To deactivate
Press the ISG OFF button, indicator illuminates.
To activate Press the ISG OFF button, indicator turns OFF.
DRIVING
GENESIS GV80
Page 23 of 25
Quick Reference Guide I 4039 I Quick Reference Guide
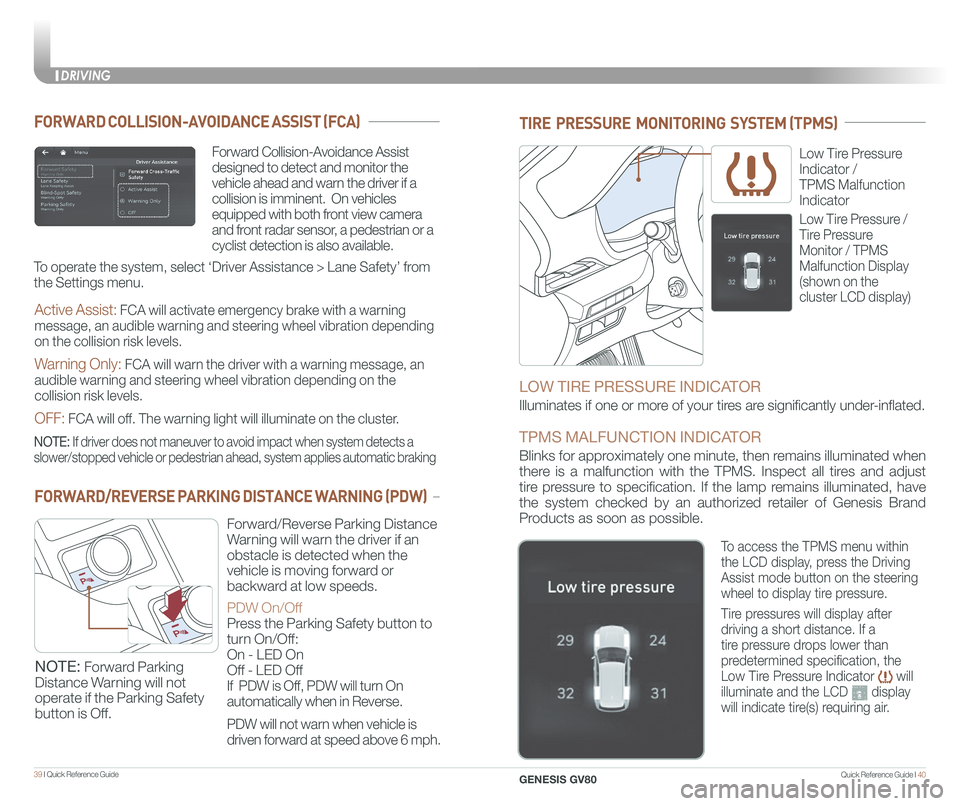
TIRE PRESSURE MONITORING SYSTEM (TPMS)
Low Tire Pressure
Indicator /
TPMS Malfunction
Indicator
LOW TIRE PRESSURE INDICATOR
Illuminates if one or more of your tires are significantly under-inflated.
TPMS MALFUNCTION INDICATOR
Blinks for approximately one minute, then remains illuminated when
there is a malfunction with the TPMS. Inspect all tires and adjust
tire pressure to specification. If the lamp remains illuminated, have
the system checked by an authorized retailer of Genesis Brand
Products as soon as possible.
Low Tire Pressure /
Tire Pressure
Monitor / TPMS
Malfunction Display
(shown on the
cluster LCD display)
To access the TPMS menu within
the LCD display, press the Driving
Assist mode button on the steering
wheel to display tire pressure.
Tire pressures will display after
driving a short distance. If a
tire pressure drops lower than
predetermined specification, the
Low Tire Pressure Indicator will
illuminate and the LCD display
will indicate tire(s) requiring air.
Forward Collision-Avoidance Assist
designed to detect and monitor the
vehicle ahead and warn the driver if a
collision is imminent. On vehicles
equipped with both front view camera
and front radar sensor, a pedestrian or a
cyclist detection is also available.
FORWARD COLLISION-AVOIDANCE ASSIST (FCA)
NOTE: If driver does not maneuver to avoid impact when system detects a
slower/stopped vehicle or pedestrian ahead, system applies automatic bra\
king
To operate the system, select ‘Driver Assistance > Lane Safety’ from
the Settings menu.
Active Assist: FCA will activate emergency brake with a warning
message, an audible warning and steering wheel vibration depending
on the collision risk levels.
Warning Only: FCA will warn the driver with a warning message, an
audible warning and steering wheel vibration depending on the
collision risk levels.
OFF: FCA will off. The warning light will illuminate on the cluster.
FORWARD/REVERSE PARKING DISTANCE WARNING (PDW)
Forward/Reverse Parking Distance
Warning will warn the driver if an
obstacle is detected when the
vehicle is moving forward or
backward at low speeds.
PDW On/Off
Press the Parking Safety button to
turn On/Off:
On - LED On
Off - LED Off
If PDW is Off, PDW will turn On
automatically when in Reverse.
PDW will not warn when vehicle is
driven forward at speed above 6 mph.
NOTE: Forward Parking
Distance Warning will not
operate if the Parking Safety
button is Off.
DRIVING
GENESIS GV80
Page 25 of 25
43 I Quick Reference Guide
GENESIS BRAND OWNER RETAILER NAME
SALES CONSULTANT DATE
VIN PREVIOUS VEHICLE
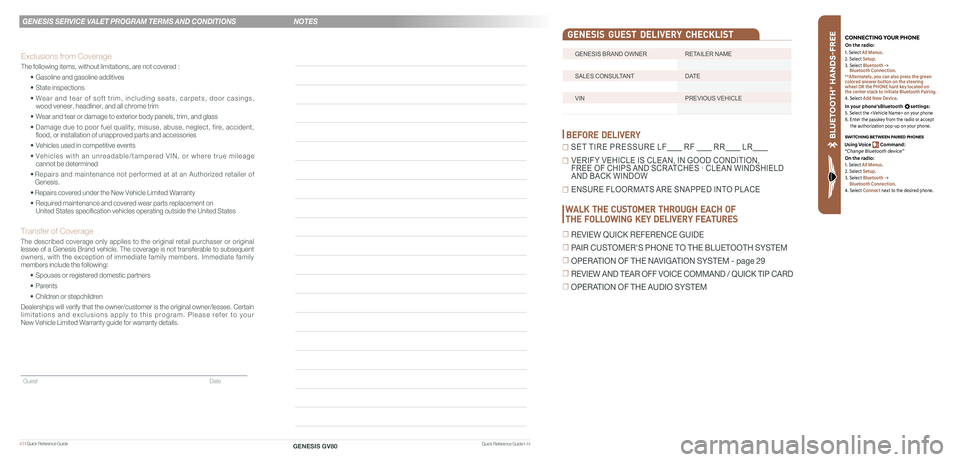
GENESIS GUEST DELIVERY CHECKLIST
BEFORE DELIVERY
☐ SET TIRE PRESSURE LF RF RR LR
☐ VERIFY VEHICLE IS CLEAN, IN GOOD CONDITION, FREE OF CHIPS AND SCRATCHES · CLEAN WINDSHIELD AND BACK WINDOW
☐ ENSURE FLOORMATS ARE SNAPPED INTO PLACE
Quick Reference Guide I 44
GENESIS SERVICE VALET PROGRAM TERMS AND CONDITIONS
GENESIS GV80
WALK THE CUSTOMER THROUGH EACH OF
THE FOLLOWING KEY DELIVERY FEATURES
☐ REVIEW QUICK REFERENCE GUIDE
☐ PAIR CUSTOMER'S PHONE TO THE BLUETOOTH SYSTEM
☐ OPERATION OF THE NAVIGATION SYSTEM - page 29
☐ REVIEW AND TEAR OFF VOICE COMMAND / QUICK TIP CARD
☐ OPERATION OF THE AUDIO SYSTEM
NOTES
Guest Date
Exclusions from Coverage
The following items, without limitations, are not covered :
• Gasoline and gasoline additives
• State inspections
• Wear and tear of soft trim, including seats, carpets, door casings, wood veneer, headliner, and all chrome trim
• Wear and tear or damage to exterior body panels, trim, and glass
• Damage due to poor fuel quality, misuse, abuse, neglect, fire, accident, flood, or installation of unapproved parts and accessories
• Vehicles used in competitive events
• Vehicles with an unreadable/tampered VIN, or where true mileage cannot be determined
• Repairs and maintenance not performed at at an Authorized retailer of Genesis.
• Repairs covered under the New Vehicle Limited Warranty
• Required maintenance and covered wear parts replacement on United States specification vehicles operating outside the United States\
Transfer of Coverage
The described coverage only applies to the original retail purchaser or original lessee of a Genesis Brand vehicle. The coverage is not transferable to s\
ubsequent owners, with the exception of immediate family members. Immediate family members include the following:
• Spouses or registered domestic partners
• Parents
• Children or stepchildren
Dealerships will verify that the owner/customer is the original owner/le\
ssee. Certain limitations and exclusions apply to this program. Please refer to your New Vehicle Limited Warranty guide for warranty details.
BLU ETO OTH
®
SWIT CHING BETWEEN P AIRED PHONES
On the r adio:
CONNE CTING \fOUR PHONEOn the r adio:
U sing Voic e Command:
“Change Blue too th de vice”1. Select All Menus.
2. Select Setup.
3. Select Bluetooth ->
Bluetooth Connection.
**Alternately, you can also press the green
colored answer button on the steering
wheel OR the PHONE hard key located on
the center stack to initiate Bluetooth Pairing.
4. Select Add New Device.
In your phone’sBluetooth settings:
5. Select the
6. Enter the passkey from the radio or accept
the authorization pop-up on your phone.
1. Select All Menus.
2. Select Setup.
3. Select Bluetooth ->
Bluetooth Connection.
4. Select Connect next to the desired phone.