seat adjustment GMC ACADIA 2007 Owner's Manual
[x] Cancel search | Manufacturer: GMC, Model Year: 2007, Model line: ACADIA, Model: GMC ACADIA 2007Pages: 554, PDF Size: 2.76 MB
Page 7 of 554
Front Seats..................................................... 9
Manual Seats................................................ 9
Driver Seat Height Adjuster......................... 10
Power Seats............................................... 10
Manual Lumbar........................................... 11
Power Lumbar............................................. 12
Heated Seats.............................................. 12
Memory Seat and Mirrors............................ 13
Reclining Seatbacks.................................... 15
Head Restraints.......................................... 17
Rear Seats.................................................... 18
Rear Seat Operation................................... 18
Third Row Seats......................................... 21
Safety Belts.................................................. 24
Safety Belts: They Are for Everyone........... 24
Questions and Answers About
Safety Belts............................................. 28
How to Wear Safety Belts Properly............. 29Driver Position............................................. 30
Shoulder Belt Height Adjustment................. 38
Safety Belt Use During Pregnancy.............. 39
Right Front Passenger Position................... 39
Rear Seat Passengers................................ 40
Rear Safety Belt Comfort Guides................ 43
Safety Belt Pretensioners............................ 47
Safety Belt Extender................................... 47
Child Restraints............................................ 48
Older Children............................................. 48
Infants and Young Children......................... 51
Child Restraint Systems.............................. 55
Where to Put the Restraint.......................... 60
Lower Anchors and Tethers for
Children (LATCH).................................... 61
Securing a Child Restraint in a Rear
Seat Position........................................... 69
Securing a Child Restraint in the Right
Front Seat Position.................................. 72
Section 1 Seats and Restraint Systems
7
Page 9 of 554
Front Seats
Manual Seats
{CAUTION:
You can lose control of the vehicle if you
try to adjust a manual driver’s seat while
the vehicle is moving. The sudden
movement could startle and confuse you,
or make you push a pedal when you do
not want to. Adjust the driver’s seat only
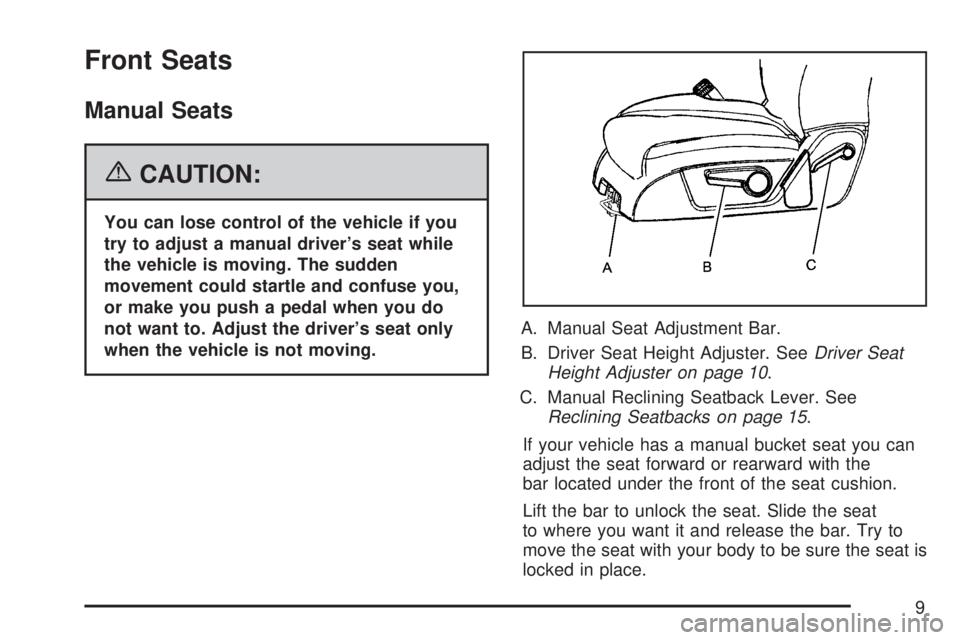
when the vehicle is not moving.A. Manual Seat Adjustment Bar.
B. Driver Seat Height Adjuster. SeeDriver Seat
Height Adjuster on page 10.
C. Manual Reclining Seatback Lever. See
Reclining Seatbacks on page 15.
If your vehicle has a manual bucket seat you can
adjust the seat forward or rearward with the
bar located under the front of the seat cushion.
Lift the bar to unlock the seat. Slide the seat
to where you want it and release the bar. Try to
move the seat with your body to be sure the seat is
locked in place.
9
Page 10 of 554
Driver Seat Height Adjuster
If your vehicle has a manual driver seat height
adjuster, it is located on the outboard side of the
seat. SeeManual Seats on page 9for more
information. To raise the seat, move the lever
upward repeatedly until the seat is at the desired
height. To lower the seat, move the lever
downward repeatedly until the seat is at the
desired height.
Power Seats
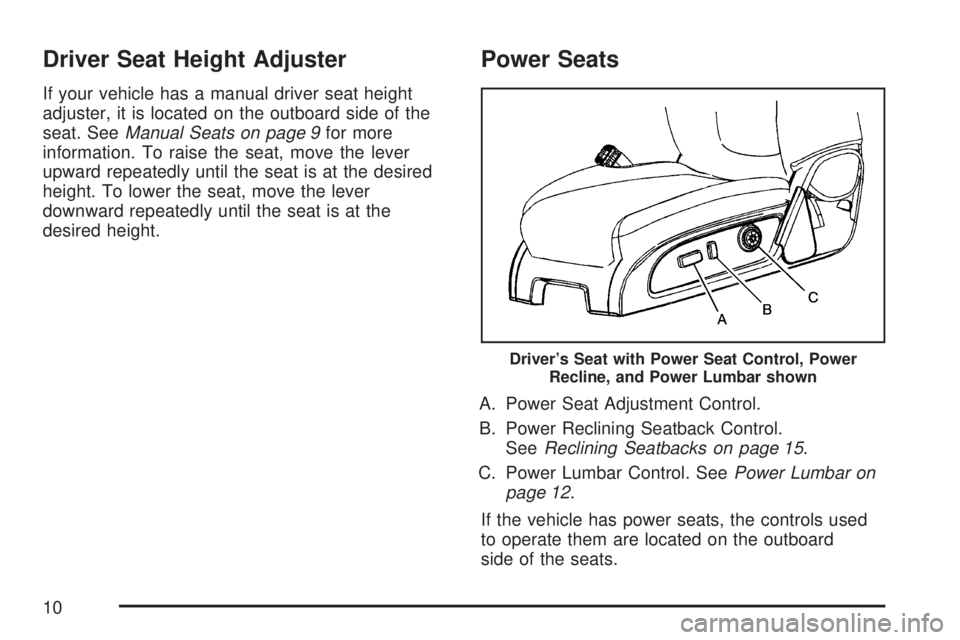
A. Power Seat Adjustment Control.
B. Power Reclining Seatback Control.
SeeReclining Seatbacks on page 15.
C. Power Lumbar Control. SeePower Lumbar on
page 12.
If the vehicle has power seats, the controls used
to operate them are located on the outboard
side of the seats.
Driver’s Seat with Power Seat Control, Power
Recline, and Power Lumbar shown
10
Page 18 of 554
Rear Seats
Rear Seat Operation
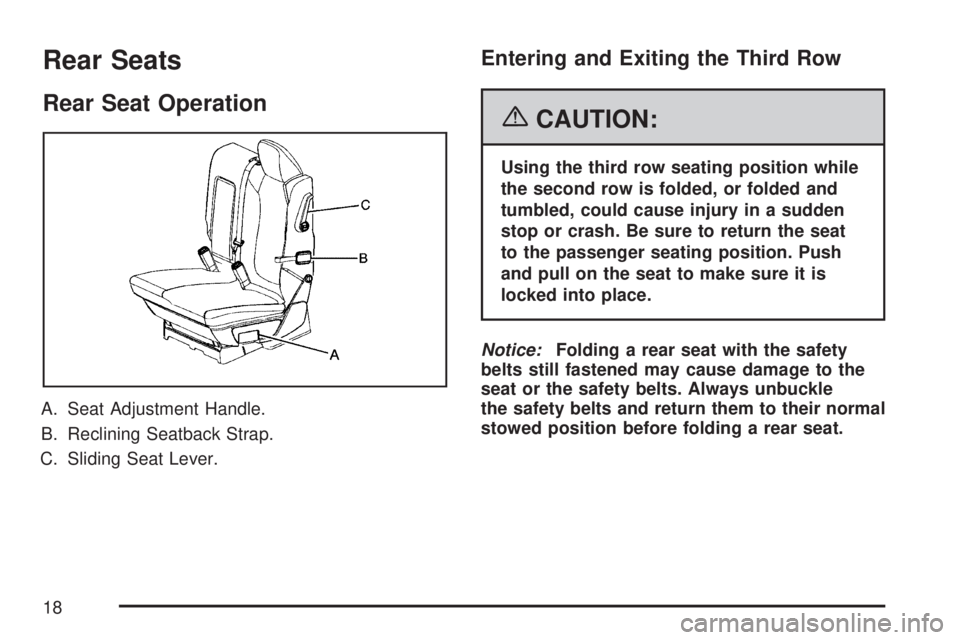
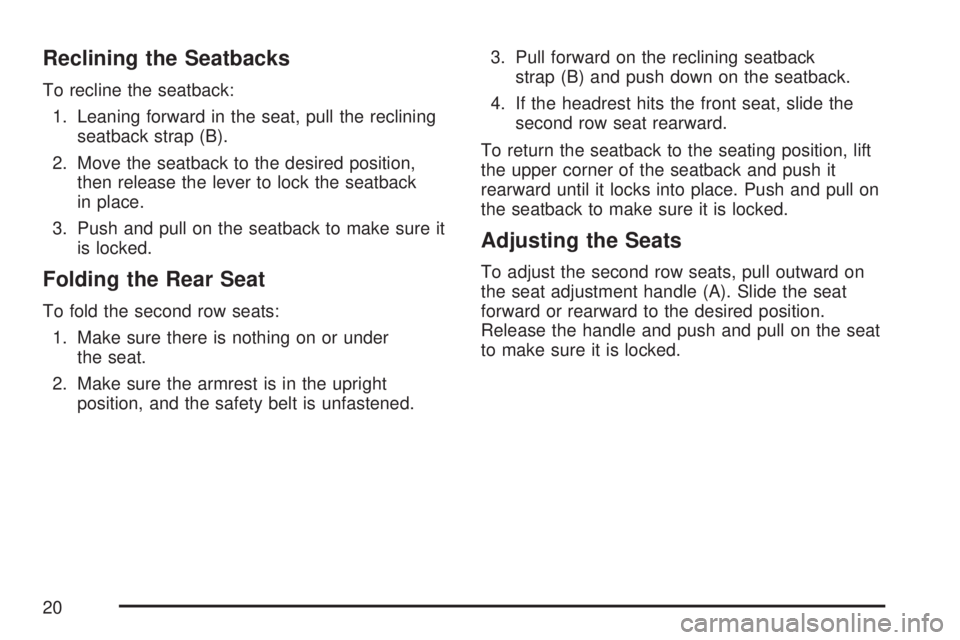
A. Seat Adjustment Handle.
B. Reclining Seatback Strap.
C. Sliding Seat Lever.
Entering and Exiting the Third Row
{CAUTION:
Using the third row seating position while
the second row is folded, or folded and
tumbled, could cause injury in a sudden
stop or crash. Be sure to return the seat
to the passenger seating position. Push
and pull on the seat to make sure it is
locked into place.
Notice:Folding a rear seat with the safety
belts still fastened may cause damage to the
seat or the safety belts. Always unbuckle
the safety belts and return them to their normal
stowed position before folding a rear seat.
18
Page 20 of 554
Reclining the Seatbacks
To recline the seatback:
1. Leaning forward in the seat, pull the reclining
seatback strap (B).
2. Move the seatback to the desired position,
then release the lever to lock the seatback
in place.
3. Push and pull on the seatback to make sure it
is locked.
Folding the Rear Seat
To fold the second row seats:
1. Make sure there is nothing on or under
the seat.
2. Make sure the armrest is in the upright
position, and the safety belt is unfastened.3. Pull forward on the reclining seatback
strap (B) and push down on the seatback.
4. If the headrest hits the front seat, slide the
second row seat rearward.
To return the seatback to the seating position, lift
the upper corner of the seatback and push it
rearward until it locks into place. Push and pull on
the seatback to make sure it is locked.
Adjusting the Seats
To adjust the second row seats, pull outward on
the seat adjustment handle (A). Slide the seat
forward or rearward to the desired position.
Release the handle and push and pull on the seat
to make sure it is locked.
20
Page 30 of 554
Driver Position
Lap-Shoulder Belt
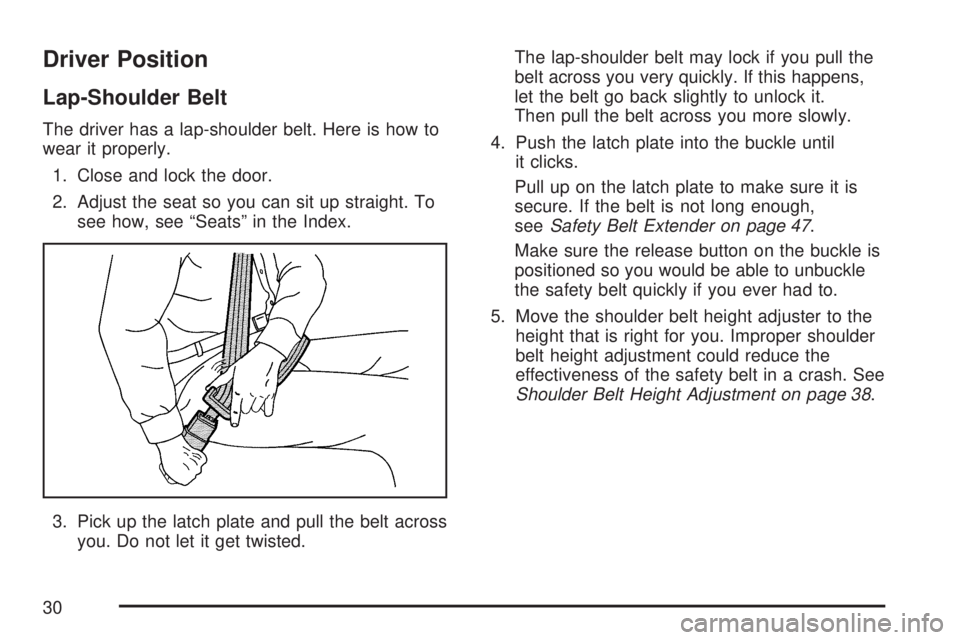
The driver has a lap-shoulder belt. Here is how to
wear it properly.
1. Close and lock the door.
2. Adjust the seat so you can sit up straight. To
see how, see “Seats” in the Index.
3. Pick up the latch plate and pull the belt across
you. Do not let it get twisted.The lap-shoulder belt may lock if you pull the
belt across you very quickly. If this happens,
let the belt go back slightly to unlock it.
Then pull the belt across you more slowly.
4. Push the latch plate into the buckle until
it clicks.
Pull up on the latch plate to make sure it is
secure. If the belt is not long enough,
seeSafety Belt Extender on page 47.
Make sure the release button on the buckle is
positioned so you would be able to unbuckle
the safety belt quickly if you ever had to.
5. Move the shoulder belt height adjuster to the
height that is right for you. Improper shoulder
belt height adjustment could reduce the
effectiveness of the safety belt in a crash. See
Shoulder Belt Height Adjustment on page 38.
30
Page 210 of 554
Rear Window Defogger
The rear window defogger uses a warming grid to
remove fog from the rear window.
<(Rear Window Defogger):Press this button
to turn the rear window defogger on or off. The
rear window defogger stays on for about
10 minutes after the button is pressed, before
turning off. The defogger can also be turned off
by pressing the button again or by turning off
the engine. Do not drive the vehicle until all the
windows are clear.
If your vehicle has heated outside rearview
mirrors, the mirrors will heat to help clear fog or
frost from the surface of the mirror when the
rear window defog button is pressed.
Notice:Do not use a razor blade or sharp
object to clear the inside rear window. Do not
adhere anything to the defogger grid lines
in the rear glass. These actions may damage
the rear defogger. Repairs would not be
covered by your warranty.
Outlet Adjustment
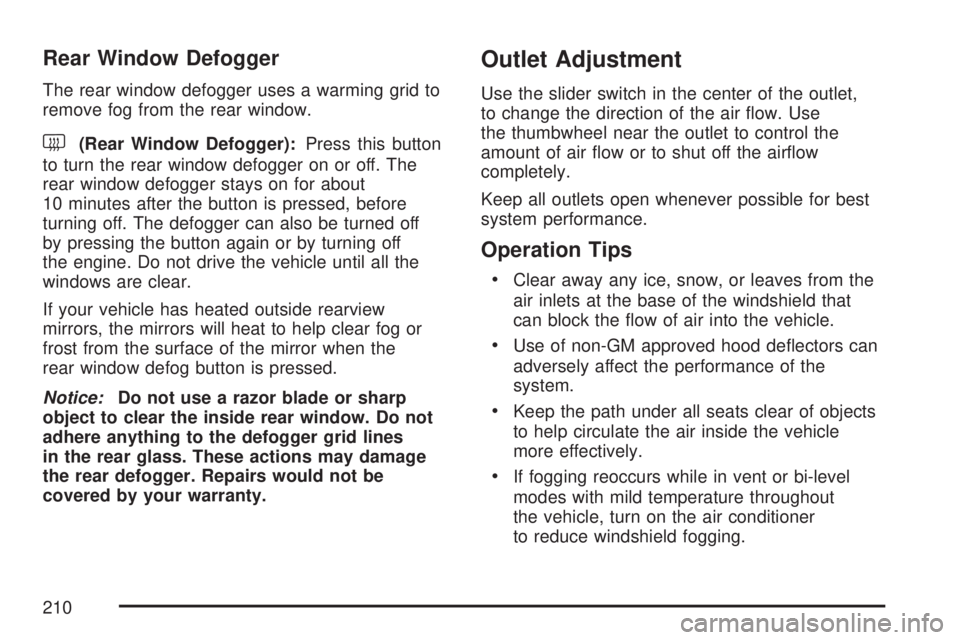
Use the slider switch in the center of the outlet,
to change the direction of the air �ow. Use
the thumbwheel near the outlet to control the
amount of air �ow or to shut off the air�ow
completely.
Keep all outlets open whenever possible for best
system performance.
Operation Tips
Clear away any ice, snow, or leaves from the
air inlets at the base of the windshield that
can block the �ow of air into the vehicle.
Use of non-GM approved hood de�ectors can
adversely affect the performance of the
system.
Keep the path under all seats clear of objects
to help circulate the air inside the vehicle
more effectively.
If fogging reoccurs while in vent or bi-level
modes with mild temperature throughout
the vehicle, turn on the air conditioner
to reduce windshield fogging.
210
Page 278 of 554
To use a portable audio player, connect a
3.5 mm (1/8 inch) cable to the radio’s front
auxiliary input jack. When a device is connected,
press the radio CD/AUX button to begin playing
audio from the device over the vehicle speakers.
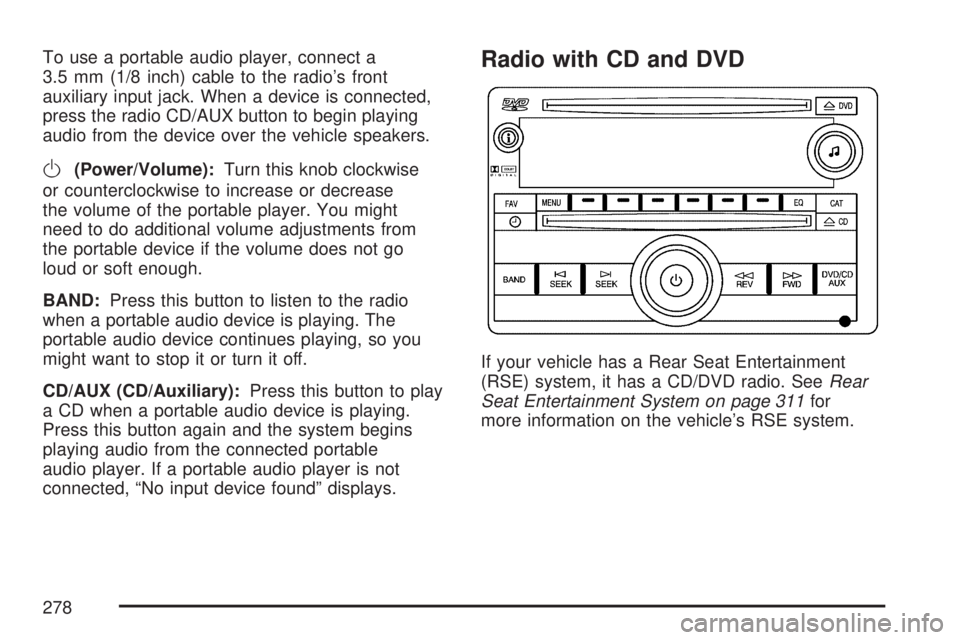
O(Power/Volume):Turn this knob clockwise
or counterclockwise to increase or decrease
the volume of the portable player. You might
need to do additional volume adjustments from
the portable device if the volume does not go
loud or soft enough.
BAND:Press this button to listen to the radio
when a portable audio device is playing. The
portable audio device continues playing, so you
might want to stop it or turn it off.
CD/AUX (CD/Auxiliary):Press this button to play
a CD when a portable audio device is playing.
Press this button again and the system begins
playing audio from the connected portable
audio player. If a portable audio player is not
connected, “No input device found” displays.
Radio with CD and DVD
If your vehicle has a Rear Seat Entertainment
(RSE) system, it has a CD/DVD radio. SeeRear
Seat Entertainment System on page 311for
more information on the vehicle’s RSE system.
278
Page 295 of 554
O(Power/Volume):Turn this knob clockwise or
counterclockwise to increase or decrease the
volume of the portable player. You might need
to do additional volume adjustments from
the portable device if the volume does not go
loud or soft enough.
BAND:Press this button to listen to the radio
when a portable audio device is playing. The
portable audio device continues playing, so you
might want to stop it or power it off.
DVD/CD AUX (CD/Auxiliary):Press this button
to cycle through DVD, CD, or Auxiliary when
listening to the radio. The DVD/CD text label and
a message showing track or chapter number
displays when a disc is in either slot. Press this
button again and the system automatically
searches for an auxiliary input device, such as a
portable audio player. If a portable audio player is
not connected, “No aux input device” displays.
If a disc is in both the DVD slot and the CD slot the
DVD/CD AUX button cycles between the two
sources and not indicate “No aux input device”.
If a front auxiliary device is connected, the
DVD/CD AUX button cycles through all available
options, such as: DVD slot, CD slot, Front
Auxiliary, and Rear Auxiliary (if available).See “Using the Auxiliary Input Jack(s)” later in this
section, or “Audio/Video (A/V) Jacks” under,
Rear Seat Entertainment System on page 311for
more information.
Using an MP3 (Radio with CD or
Six-Disc CD Player)
MP3/WMA CD-R or CD-RW Disc
The radio plays MP3/WMA �les that were recorded
on a CD-R or CD-RW disc. The �les can be
recorded with the following �xed bit rates: 32 kbps,
40 kbps, 56 kbps, 64 kbps, 80 kbps, 96 kbps,
112 kbps, 128 kbps, 160 kbps, 192 kbps,
224 kbps, 256 kbps, and 320 kbps or a variable
bit rate. Song title, artist name, and album
are available for display by the radio when
recorded using ID3 tags version 1 and 2.
Compressed Audio
The radio also plays discs that contain both
uncompressed CD audio (.CDA �les) and
MP3/WMA �les. By default the radio shows the
MP3 label on the left side of the screen but
plays both �le formats in the order in which
they were recorded to the disc.
295
Page 506 of 554
Maintenance Footnotes
(a)Visually inspect brake lines and hoses for
proper hook-up, binding, leaks, cracks, chafing,
etc. Inspect disc brake pads for wear and rotors for
surface condition. Inspect other brake parts,
including calipers, parking brake, etc. Check
parking brake adjustment.
(b)Visually inspect front and rear suspension and
steering system for damaged, loose, or missing
parts or signs of wear. Inspect power steering lines
and hoses for proper hook-up, binding, leaks,
cracks, chafing, etc.
(c)Visually inspect hoses and have them replaced
if they are cracked, swollen, or deteriorated.
Inspect all pipes, fittings and clamps; replace with
genuine parts as needed. To help ensure
proper operation, a pressure test of the cooling
system and pressure cap and cleaning the outside
of the radiator and air conditioning condenser is
recommended at least once a year.(d)Inspect wiper blades for wear, cracking, or
contamination. Clean the windshield and
wiper blades, if contaminated. Replace wiper
blades that are worn or damaged. See Windshield
Wiper Blade Replacement on page 434and
Windshield, Backglass, and Wiper Blades on
page 484for more information.
(e)Make sure the safety belt reminder light and all
belts, buckles, latch plates, retractors, and
anchorages are working properly. Look for any
other loose or damaged safety belt system parts.
If you see anything that might keep a safety
belt system from doing its job, have it repaired.
Have any torn or frayed safety belts replaced. Also
look for any opened or broken airbag coverings,
and have them repaired or replaced. The airbag
system does not need regular maintenance.
(f)Lubricate all key lock cylinders, hood latch
assemblies, secondary latches, pivots, spring
anchor and release pawl, hood and door hinges,
rear folding seats, and liftgate hinges. More
frequent lubrication may be required when
exposed to a corrosive environment. Applying
silicone grease on weatherstrips with a clean cloth
will make them last longer, seal better, and not
stick or squeak.
506