climate controls GMC ACADIA 2011 Owner's Guide
[x] Cancel search | Manufacturer: GMC, Model Year: 2011, Model line: ACADIA, Model: GMC ACADIA 2011Pages: 478, PDF Size: 5.52 MB
Page 268 of 478
Black plate (10,1)GMC Acadia/Acadia Denali Owner Manual - 2011
8-10 Climate Controls
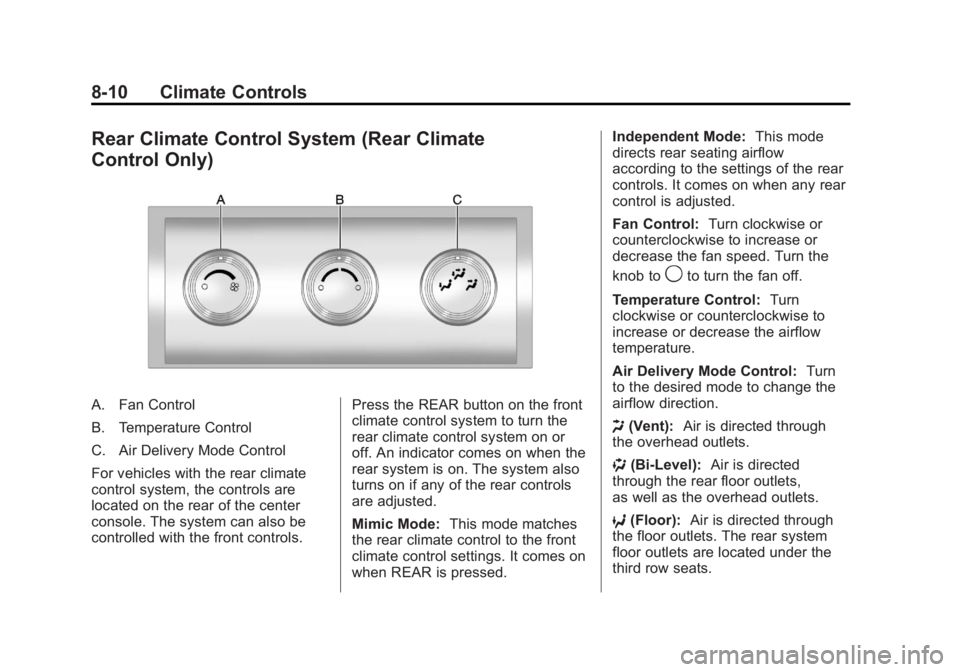
Rear Climate Control System (Rear Climate
Control Only)
A. Fan Control
B. Temperature Control
C. Air Delivery Mode Control
For vehicles with the rear climate
control system, the controls are
located on the rear of the center
console. The system can also be
controlled with the front controls.Press the REAR button on the front
climate control system to turn the
rear climate control system on or
off. An indicator comes on when the
rear system is on. The system also
turns on if any of the rear controls
are adjusted.
Mimic Mode:
This mode matches
the rear climate control to the front
climate control settings. It comes on
when REAR is pressed. Independent Mode:
This mode
directs rear seating airflow
according to the settings of the rear
controls. It comes on when any rear
control is adjusted.
Fan Control: Turn clockwise or
counterclockwise to increase or
decrease the fan speed. Turn the
knob to
9to turn the fan off.
Temperature Control: Turn
clockwise or counterclockwise to
increase or decrease the airflow
temperature.
Air Delivery Mode Control: Turn
to the desired mode to change the
airflow direction.
H (Vent): Air is directed through
the overhead outlets.
) (Bi-Level): Air is directed
through the rear floor outlets,
as well as the overhead outlets.
6 (Floor): Air is directed through
the floor outlets. The rear system
floor outlets are located under the
third row seats.
Page 269 of 478
Black plate (11,1)GMC Acadia/Acadia Denali Owner Manual - 2011
Climate Controls 8-11
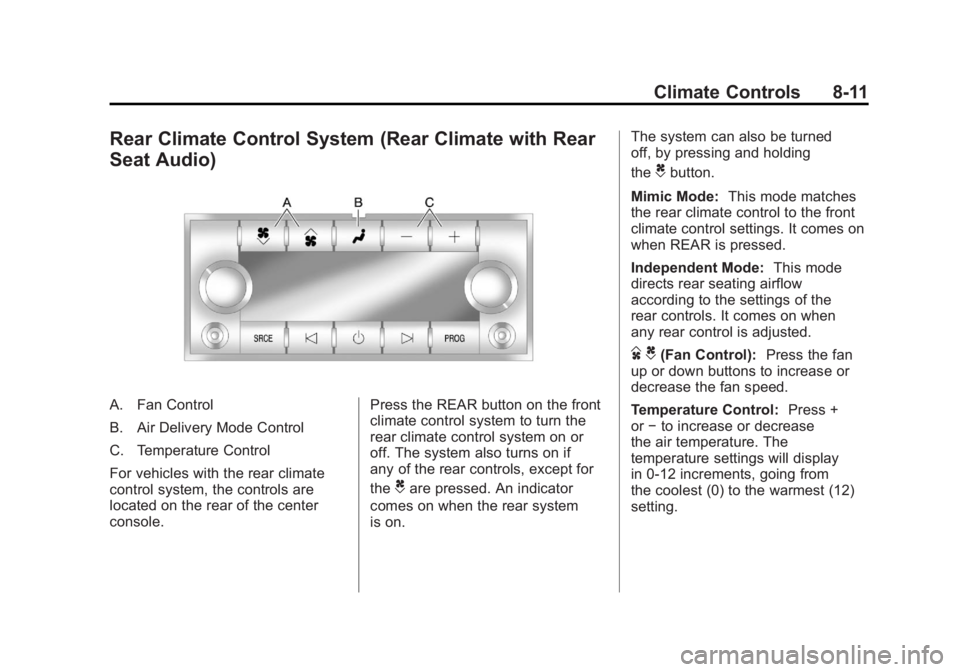
Rear Climate Control System (Rear Climate with Rear
Seat Audio)
A. Fan Control
B. Air Delivery Mode Control
C. Temperature Control
For vehicles with the rear climate
control system, the controls are
located on the rear of the center
console.Press the REAR button on the front
climate control system to turn the
rear climate control system on or
off. The system also turns on if
any of the rear controls, except for
the
Care pressed. An indicator
comes on when the rear system
is on. The system can also be turned
off, by pressing and holding
the
Cbutton.
Mimic Mode: This mode matches
the rear climate control to the front
climate control settings. It comes on
when REAR is pressed.
Independent Mode: This mode
directs rear seating airflow
according to the settings of the
rear controls. It comes on when
any rear control is adjusted.
D C(Fan Control): Press the fan
up or down buttons to increase or
decrease the fan speed.
Temperature Control: Press +
or −to increase or decrease
the air temperature. The
temperature settings will display
in 0‐12 increments, going from
the coolest (0) to the warmest (12)
setting.
Page 270 of 478
Black plate (12,1)GMC Acadia/Acadia Denali Owner Manual - 2011
8-12 Climate Controls
N(Air Delivery Mode Control):
Press to manually change the
direction of the airflow. Repeatedly
press the button until the desired
mode appears on the display.
H(Vent): Air is directed through
the overhead outlets.
)(Bi-Level): Air is directed
through the rear floor outlets, as
well as the overhead outlets.
6(Floor): Air is directed through
the floor outlets. The rear system
floor outlets are located under the
third row seats.
Air Vents
Use the slider switch in the center of
the outlet, to change the direction
of the air flow. Use the thumbwheel
near the outlet to control the amount
of air flow or to shut off the airflow.
Keep all outlets open whenever
possible for best system
performance.
Operation Tips
.Clear away any ice, snow,
or leaves from the air inlets at
the base of the windshield that
can block the flow of air into the
vehicle.
.Use of non-GM approved hood
deflectors can adversely affect
the performance of the system.
.Keep the path under all seats
clear of objects to help circulate
the air inside the vehicle more
effectively.
.If fogging reoccurs while in
vent or bi-level modes with
mild temperature throughout
the vehicle, turn on the air
conditioner to reduce windshield
fogging.
Page 271 of 478
Black plate (13,1)GMC Acadia/Acadia Denali Owner Manual - 2011
Climate Controls 8-13
Maintenance
Passenger Compartment
Air Filter
The filter removes dust, pollen,
and other airborne irritants from
outside air and inside air when in
recirculation mode.
To find out what type of replacement
filter to use, seeMaintenance
Replacement Parts on page 11‑9.
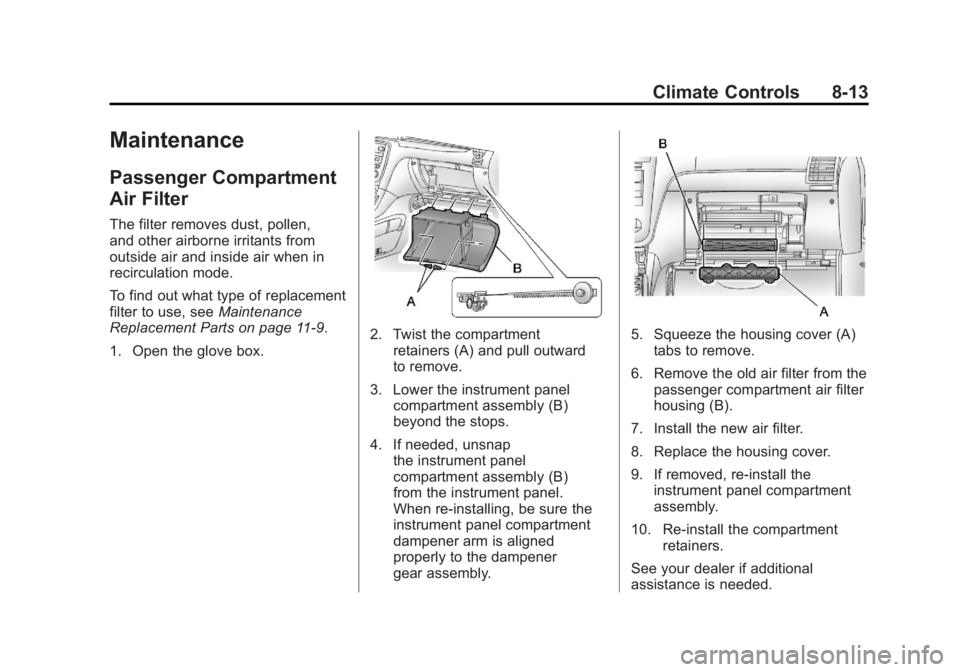
1. Open the glove box.
2. Twist the compartment retainers (A) and pull outward
to remove.
3. Lower the instrument panel compartment assembly (B)
beyond the stops.
4. If needed, unsnap the instrument panel
compartment assembly (B)
from the instrument panel.
When re-installing, be sure the
instrument panel compartment
dampener arm is aligned
properly to the dampener
gear assembly.5. Squeeze the housing cover (A)tabs to remove.
6. Remove the old air filter from the passenger compartment air filter
housing (B).
7. Install the new air filter.
8. Replace the housing cover.
9. If removed, re‐install the instrument panel compartment
assembly.
10. Re‐install the compartment retainers.
See your dealer if additional
assistance is needed.
Page 272 of 478

Black plate (14,1)GMC Acadia/Acadia Denali Owner Manual - 2011
8-14 Climate Controls
2NOTES
Page 300 of 478
Black plate (28,1)GMC Acadia/Acadia Denali Owner Manual - 2011
9-28 Driving and Operating
Tow/Haul Mode
_
(Tow/Haul):The vehicle may
have a Tow/Haul mode.
The button is located on the
instrument panel under the climate
controls.
Push the button to activate the
system. Push it again to deactivate
the system. You can use this feature
to assist when towing or hauling a
heavy load.
When Tow/Haul is activated the
Tow/Haul symbol will come on
the instrument panel cluster.
See “Tow/Haul Mode” underDriving
Characteristics and Towing Tips on
page 9‑47 for more information.
Automatic Engine Grade
Braking
Automatic Engine Grade Braking
assists when driving on a downhill
grade. It maintains vehicle speed
by automatically implementing
a shift schedule that uses the
engine and the transmission to
slow the vehicle. The system will
automatically command downshifts
to reduce vehicle speed, until the
brake pedal is no longer being
pressed.
While in the Electronic Range
Select (ERS) mode, grade braking
is deactivated, allowing the driver
to select a range and limiting the
highest gear available. Grade
braking is available for normal
driving and in Tow/Haul mode.
SeeAutomatic Transmission on
page 9‑25.
Drive Systems
All-Wheel Drive
Vehicles with this feature always
send engine power to all four
wheels. It is fully automatic, and
adjusts itself as needed for road
conditions.
When using a compact spare
tire on an AWD vehicle, the
system automatically detects the
compact spare and disables AWD.
To restore AWD operation and
prevent excessive wear on the
system, replace the compact
spare with a full-size tire as soon
as possible. See Compact Spare
Tire on page 10‑82 for more
information.
Page 328 of 478
Black plate (56,1)GMC Acadia/Acadia Denali Owner Manual - 2011
9-56 Driving and Operating
*The fuse for this circuit is installed
in the underhood electrical center,
but the wires are not connected.
They should be connected by your
dealer or a qualified service center.
If the back-up lamp circuit is not
functional, contact your dealer.
If a remote (non-vehicle) battery is
being charged, press the Tow/Haul
mode switch located on the center
console near the climate controls.
This will boost the vehicle system
voltage and properly charge the
battery. If the trailer is too light
for Tow/Haul mode, turn on the
headlamps (Non‐HID only) as a
second way to boost the vehicle
system and charge the battery.Electric Trailer Brake Control
Wiring Provisions
These wiring provisions for an
electric trailer brake controller
are included with the vehicle as
part of the trailer wiring package.
The instrument panel contains
blunt cut wires behind the steering
column for the electric trailer brake
controller. The harness contains
the following wires:
.Red/Black: Power Supply
.White: Brake Switch Signal
.Gray: Illumination
.Dark Blue: Trailer Brake Signal
.Black: Ground
The electric trailer brake controller
should be installed by your dealer
or a qualified service center.
Conversions and
Add-Ons
Add-On Electrical
Equipment
Notice: Do not add anything
electrical to the vehicle unless
you check with your dealer first.
Some electrical equipment can
damage the vehicle and the
damage would not be covered
by the vehicle's warranty. Some
add-on electrical equipment can
keep other components from
working as they should.
Add-on equipment can drain the
vehicle's 12‐volt battery, even if the
vehicle is not operating.
The vehicle has an airbag system.
Before attempting to add anything
electrical to the vehicle, see
Servicing the Airbag-Equipped
Vehicle on page 3‑45 andAdding
Equipment to the Airbag-Equipped
Vehicle on page 3‑46.
Page 468 of 478
Black plate (4,1)GMC Acadia/Acadia Denali Owner Manual - 2011
i-4 INDEX
Driver InformationCenter (DIC) . . . . . . . . . . . 5-25, 5-30
Driving Characteristics andTowing Tips . . . . . . . . . . . . . . . . . 9-47
Defensive . . . . . . . . . . . . . . . . . . . . . . 9-2
Drunk . . . . . . . . . . . . . . . . . . . . . . . . . . 9-2
Highway Hypnosis . . . . . . . . . . . . . 9-8
Hill and Mountain Roads . . . . . . . 9-8
If the Vehicle is Stuck . . . . . . . . . 9-11
Loss of Control . . . . . . . . . . . . . . . . 9-6
Off-Road Recovery . . . . . . . . . . . . 9-5
Vehicle Load Limits . . . . . . . . . . . 9-12
Wet Roads . . . . . . . . . . . . . . . . . . . . 9-7
Winter . . . . . . . . . . . . . . . . . . . . . . . . . 9-9
Driving for Better Fuel
Economy . . . . . . . . . . . . . . . . . . . . . 1-22
Dual Automatic Climate Control System . . . . . . . . . . . . . . . . 8-4
DVD Rear Seat Entertainment
System . . . . . . . . . . . . . . . . . . . . . . 7-39
DVD/CD Player . . . . . . . . . . . . . . . . 7-16E
Electrical Equipment, Add-On . . . . . . . . . . . . . . . . . . . . . . 9-56
Electrical System Engine CompartmentFuse Block . . . . . . . . . . . . . . . . 10-33
Fuses and Circuit
Breakers . . . . . . . . . . . . . . . . . . 10-32
Instrument Panel Fuse Block . . . . . . . . . . . . . . . . . . . . . . 10-35
Overload . . . . . . . . . . . . . . . . . . . 10-32
Engine Air Cleaner/Filter . . . . . . . . . . . 10-13
Check and Service EngineSoon Light . . . . . . . . . . . . . . . . . . 5-18
Compartment Overview . . . . . . . 10-6
Coolant . . . . . . . . . . . . . . . . . . . . . 10-15
Coolant Temperature
Gauge . . . . . . . . . . . . . . . . . . . . . . 5-14
Coolant Temperature
Warning Light . . . . . . . . . . . . . . . 5-22 Engine (cont.)
Cooling System . . . . . . . . . . . . . 10-15
Cooling System Messages . . . 5-39
Cover . . . . . . . . . . . . . . . . . . . . . . . . . 10-7
Drive Belt Routing . . . . . . . . . . . . 12-3
Exhaust . . . . . . . . . . . . . . . . . . . . . . 9-24
Heater . . . . . . . . . . . . . . . . . . . . . . . . 9-20
Overheated Protection
Operating Mode . . . . . . . . . . . 10-22
Overheating . . . . . . . . . . . . . . . . 10-19
Power Messages . . . . . . . . . . . . . 5-41
Pressure Light . . . . . . . . . . . . . . . . 5-23
Running While Parked . . . . . . . . 9-24
Starting . . . . . . . . . . . . . . . . . . . . . . . 9-19
Engine Oil Life System . . . . . . . . . . . . . . . . . .10-11
Messages . . . . . . . . . . . . . . . . . . . . 5-40
Entry Lighting . . . . . . . . . . . . . . . . . . . 6-6
Equipment, Towing . . . . . . . . . . . . 9-54
Event Data Recorders . . . . . . . . 13-18
Extender, Safety Belt . . . . . . . . . . 3-31
Exterior Lamp Controls . . . . . . . . . 6-1