engine GMC ACADIA 2017 Owners Manual
[x] Cancel search | Manufacturer: GMC, Model Year: 2017, Model line: ACADIA, Model: GMC ACADIA 2017Pages: 419, PDF Size: 5.89 MB
Page 303 of 419
GMC Acadia/Acadia Denali Owner Manual (GMNA-Localizing-U.S./Canada/
Mexico-9803770) - 2017 - crc - 7/12/16
302 Vehicle Care
Extended Storage: Remove the
black, negative (−) cable from the
battery or use a battery trickle
charger.
All-Wheel Drive
Transfer Case
Under normal driving conditions,
transfer case fluid does not require
maintenance unless there is a fluid
leak or unusual noise. If required,
have the transfer case serviced by
your dealer.
Starter Switch Check
{Warning
When you are doing this
inspection, the vehicle could
move suddenly. If the vehicle
moves, you or others could be
injured.
1. Before starting this check, be sure there is enough room
around the vehicle. 2. Apply both the parking brake
and the regular brake.
Do not use the accelerator
pedal, and be ready to turn off
the engine immediately if it
starts.
3. Try to start the engine in each gear. The vehicle should start
only in P (Park) or N (Neutral).
If the vehicle starts in any other
position, contact your dealer for
service.
Automatic Transmission
Shift Lock Control
Function Check
{Warning
When you are doing this
inspection, the vehicle could
move suddenly. If the vehicle
moves, you or others could be
injured. 1. Before starting this check, be
sure there is enough room
around the vehicle. It should be
parked on a level surface.
2. Apply the parking brake. Be ready to apply the regular
brake immediately if the vehicle
begins to move.
3. With the engine off, turn the ignition on, but do not start the
engine. Without applying the
regular brake, try to move the
shift lever out of P (Park) with
normal effort. If the shift lever
moves out of P (Park), contact
your dealer for service.
Page 304 of 419
GMC Acadia/Acadia Denali Owner Manual (GMNA-Localizing-U.S./Canada/
Mexico-9803770) - 2017 - crc - 7/12/16
Vehicle Care 303
Park Brake and P (Park)
Mechanism Check
{Warning
When you are doing this check,
the vehicle could begin to move.
You or others could be injured
and property could be damaged.
Make sure there is room in front
of the vehicle in case it begins to
roll. Be ready to apply the regular
brake at once should the vehicle
begin to move.
Park on a fairly steep hill, with the
vehicle facing downhill. Keeping
your foot on the regular brake, set
the parking brake.
. To check the parking brake's
holding ability: With the engine
running and the transmission in
N (Neutral), slowly remove foot
pressure from the regular brake
pedal. Do this until the vehicle is
held by the parking brake only. .
To check the P (Park)
mechanism's holding ability:
With the engine running, shift to
P (Park). Then release the
parking brake followed by the
regular brake.
Contact your dealer if service is
required.
Wiper Blade Replacement
Windshield wiper blades should be
inspected for wear or cracking.
It is a good idea to clean or replace
the wiper blade assembly on a
regular basis or when worn. For
proper windshield wiper blade
length and type, see Maintenance
Replacement Parts 0378.
Caution
Allowing the wiper arm to touch
the windshield when no wiper
blade is installed could damage
the windshield. Any damage that
occurs would not be covered by
(Continued)
Caution (Continued)
the vehicle warranty. Do not allow
the wiper arm to touch the
windshield.
Front Wiper Blade
Replacement
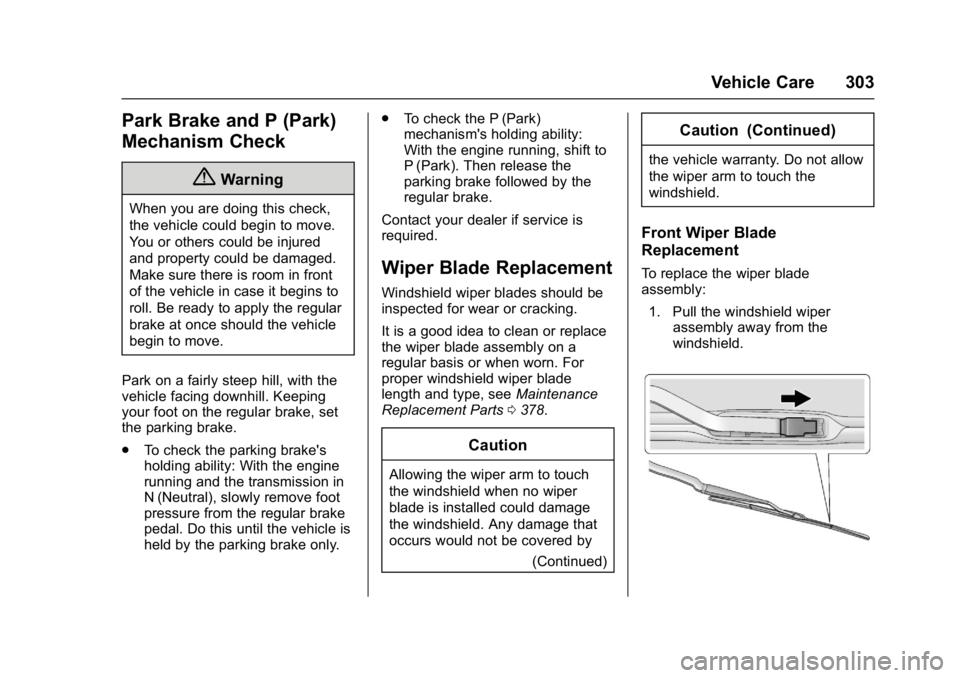
To replace the wiper blade
assembly:
1. Pull the windshield wiper assembly away from the
windshield.
Page 308 of 419
GMC Acadia/Acadia Denali Owner Manual (GMNA-Localizing-U.S./Canada/
Mexico-9803770) - 2017 - crc - 7/12/16
Vehicle Care 307
Headlamp Wiring
An electrical overload may cause
the lamps to go on and off, or in
some cases to remain off. Have the
headlamp wiring checked right away
if the lamps go on and off or
remain off.
Windshield Wipers
If the wiper motor overheats due to
heavy snow or ice, the windshield
wipers will stop until the motor cools
and will then restart.
Although the circuit is protected
from electrical overload, overload
due to heavy snow or ice may
cause wiper linkage damage.
Always clear ice and heavy snow
from the windshield before using the
windshield wipers.
If the overload is caused by an
electrical problem and not snow or
ice, be sure to get it fixed.
Fuses and Circuit
Breakers
The wiring circuits in your vehicle
are protected from short circuits by
a combination of fuses, circuit
breakers and fusible thermal links.
This greatly reduces the chance of
fires caused by electrical problems.
Look at the silver-colored band
inside the fuse. If the band is broken
or melted, replace the fuse. Be sure
you replace a bad fuse with a new
one of the identical size and rating.
Fuses of the same amperage can
be temporarily borrowed from
another fuse location, if a fuse goes
out. Replace the fuse as soon as
you can.
Engine Compartment
Fuse Block
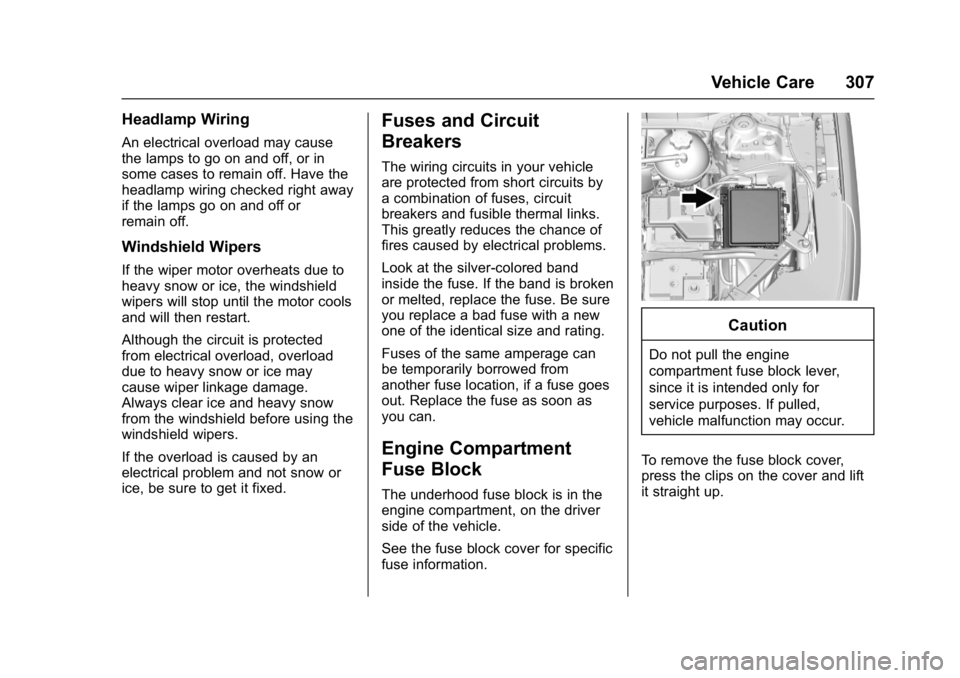
The underhood fuse block is in the
engine compartment, on the driver
side of the vehicle.
See the fuse block cover for specific
fuse information.
Caution
Do not pull the engine
compartment fuse block lever,
since it is intended only for
service purposes. If pulled,
vehicle malfunction may occur.
To remove the fuse block cover,
press the clips on the cover and lift
it straight up.
Page 309 of 419
GMC Acadia/Acadia Denali Owner Manual (GMNA-Localizing-U.S./Canada/
Mexico-9803770) - 2017 - crc - 7/12/16
308 Vehicle Care
Caution
Spilling liquid on any electrical
component on the vehicle may
damage it. Always keep the
covers on any electrical
component.
To remove fuses, hold the end of
the fuse between your thumb and
index finger and pull straight out.
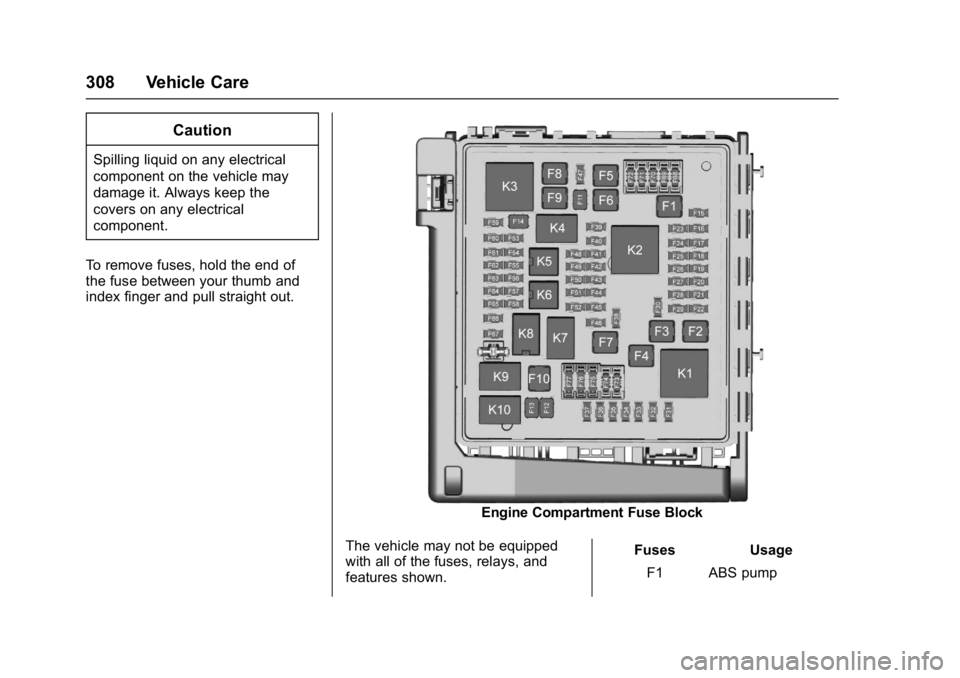
Engine Compartment Fuse Block
The vehicle may not be equipped
with all of the fuses, relays, and
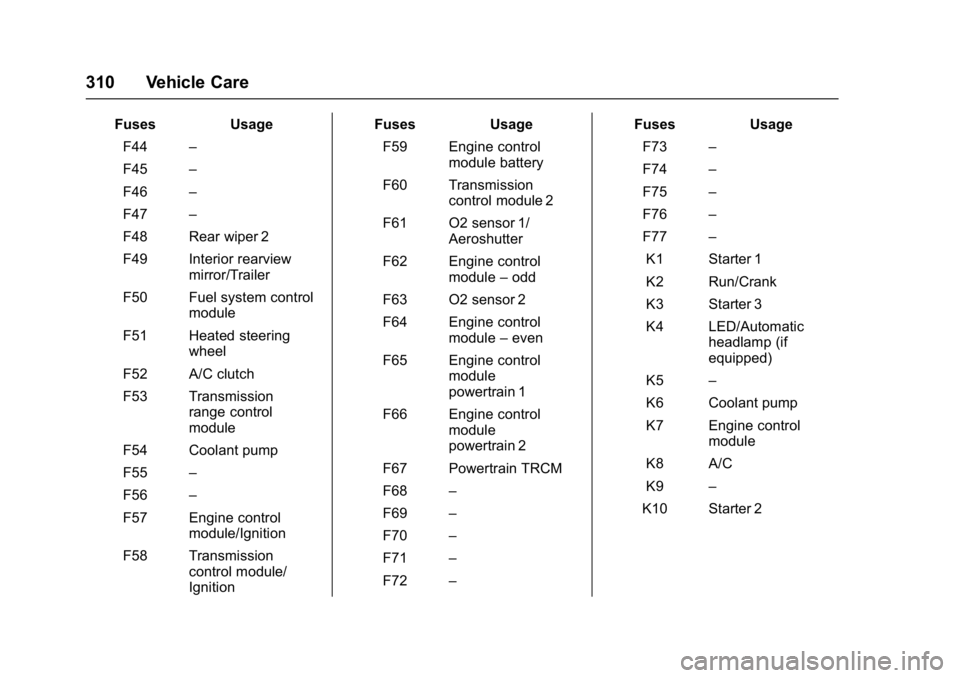
features shown. Fuses Usage
F1 ABS pump
Page 311 of 419
GMC Acadia/Acadia Denali Owner Manual (GMNA-Localizing-U.S./Canada/
Mexico-9803770) - 2017 - crc - 7/12/16
310 Vehicle Care
FusesUsage
F44 –
F45 –
F46 –
F47 –
F48 Rear wiper 2
F49 Interior rearview mirror/Trailer
F50 Fuel system control module
F51 Heated steering wheel
F52 A/C clutch
F53 Transmission range control
module
F54 Coolant pump
F55 –
F56 –
F57 Engine control module/Ignition
F58 Transmission control module/
Ignition Fuses
Usage
F59 Engine control module battery
F60 Transmission control module 2
F61 O2 sensor 1/ Aeroshutter
F62 Engine control module–odd
F63 O2 sensor 2
F64 Engine control module–even
F65 Engine control module
powertrain 1
F66 Engine control module
powertrain 2
F67 Powertrain TRCM
F68 –
F69 –
F70 –
F71 –
F72 – Fuses
Usage
F73 –
F74 –
F75 –
F76 –
F77 –
K1 Starter 1
K2 Run/Crank
K3 Starter 3
K4 LED/Automatic headlamp (if
equipped)
K5 –
K6 Coolant pump
K7 Engine control module
K8 A/C
K9 –
K10 Starter 2
Page 320 of 419
GMC Acadia/Acadia Denali Owner Manual (GMNA-Localizing-U.S./Canada/
Mexico-9803770) - 2017 - crc - 7/12/16
Vehicle Care 319
road tire has lost air and gone
flat. If the vehicle has a compact
spare tire, seeCompact Spare
Tire 0350 andIf a Tire Goes
Flat 0336.
(3) Tire Identification Number
(TIN)
:The letters and numbers
following the DOT (Department
of Transportation) code are the
Tire Identification Number (TIN).
The TIN shows the
manufacturer and plant code,
tire size, and date the tire was
manufactured. The TIN is
molded onto both sides of the
tire, although only one side may
have the date of manufacture.
(4) Maximum Cold Inflation
Load Limit
:Maximum load that
can be carried and the
maximum pressure needed to
support that load.
(5) Tire Inflation
:The
temporary use tire or compact
spare tire should be inflated to
420 kPa (60 psi). For more information on tire pressure and
inflation see
Tire
Pressure 0323.
(6) Tire Size
:A combination of
letters and numbers define a
tire's width, height, aspect ratio,
construction type, and service
description. The letter T as the
first character in the tire size
means the tire is for temporary
use only.
(7) TPC Spec (Tire
Performance Criteria
Specification)
:Original
equipment tires designed to
GM's specific tire performance
criteria have a TPC specification
code molded onto the sidewall.
GM's TPC specifications meet or
exceed all federal safety
guidelines.
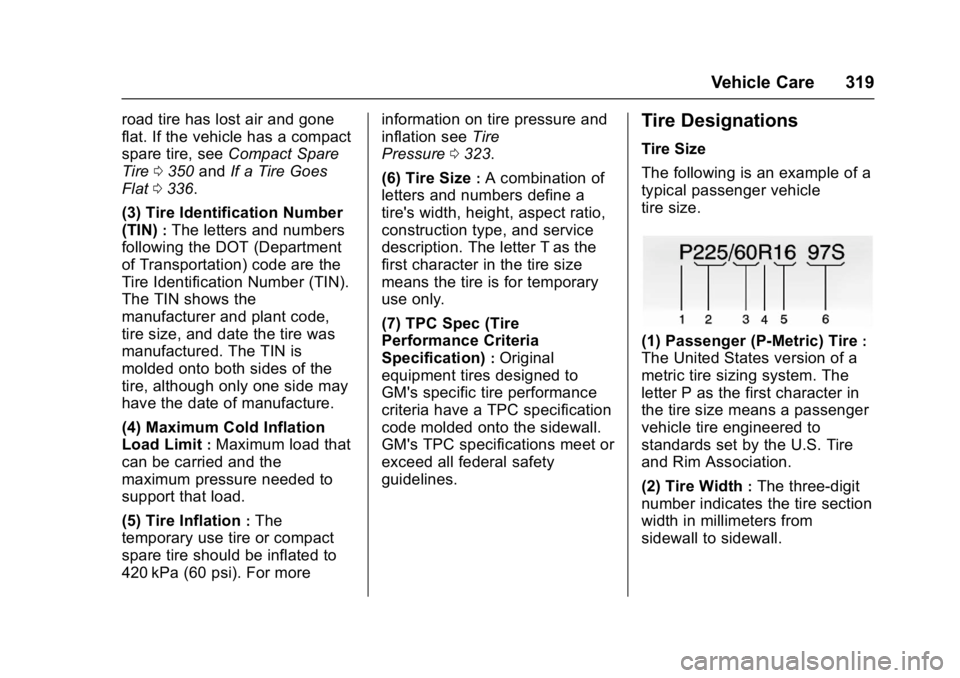
Tire Designations
Tire Size
The following is an example of a
typical passenger vehicle
tire size.
(1) Passenger (P-Metric) Tire:
The United States version of a
metric tire sizing system. The
letter P as the first character in
the tire size means a passenger
vehicle tire engineered to
standards set by the U.S. Tire
and Rim Association.
(2) Tire Width
:The three-digit
number indicates the tire section
width in millimeters from
sidewall to sidewall.
Page 338 of 419
GMC Acadia/Acadia Denali Owner Manual (GMNA-Localizing-U.S./Canada/
Mexico-9803770) - 2017 - crc - 7/12/16
Vehicle Care 337
Warning (Continued)
2. Put an automatictransmission in P (Park) or a
manual transmission in
1 (First) or R (Reverse).
3. Turn off the engine and do not restart while the vehicle
is raised.
4. Do not allow passengers to remain in the vehicle.
5. Place wheel blocks, if equipped, on both sides of
the tire at the opposite
corner of the tire being
changed.
This vehicle may come with a jack
and spare tire or a tire sealant and
compressor kit. To use the jacking
equipment to change a spare tire
safely, follow the instructions below.
Then see Tire Changing 0344. To
use the tire sealant and compressor
kit, see Tire Sealant and
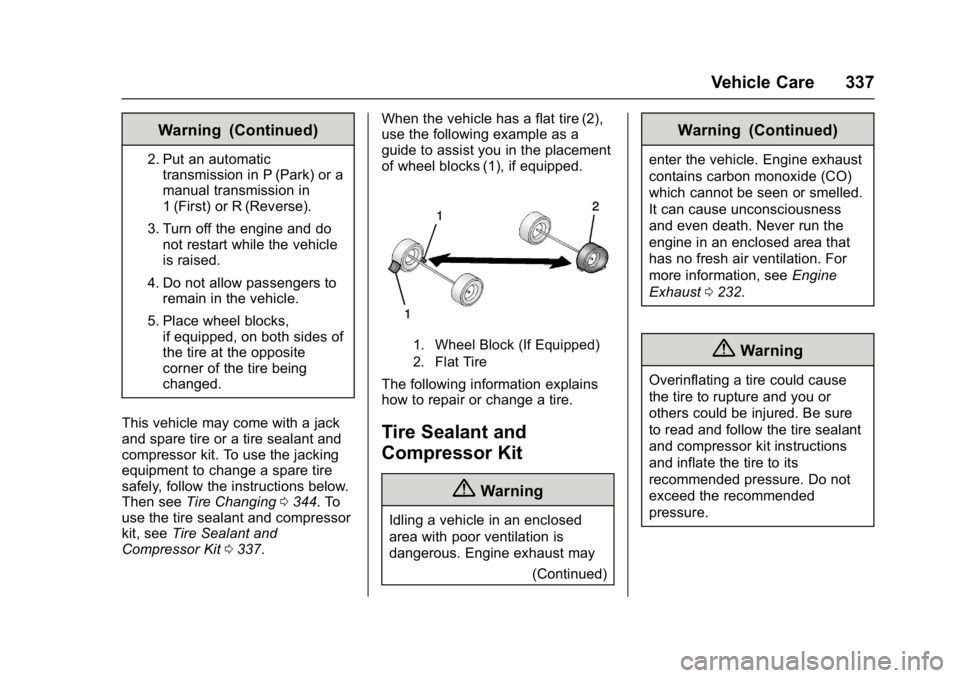
Compressor Kit 0337. When the vehicle has a flat tire (2),
use the following example as a
guide to assist you in the placement
of wheel blocks (1), if equipped.
1. Wheel Block (If Equipped)
2. Flat Tire
The following information explains
how to repair or change a tire.
Tire Sealant and
Compressor Kit
{Warning
Idling a vehicle in an enclosed
area with poor ventilation is
dangerous. Engine exhaust may
(Continued)
Warning (Continued)
enter the vehicle. Engine exhaust
contains carbon monoxide (CO)
which cannot be seen or smelled.
It can cause unconsciousness
and even death. Never run the
engine in an enclosed area that
has no fresh air ventilation. For
more information, seeEngine
Exhaust 0232.
{Warning
Overinflating a tire could cause
the tire to rupture and you or
others could be injured. Be sure
to read and follow the tire sealant
and compressor kit instructions
and inflate the tire to its
recommended pressure. Do not
exceed the recommended
pressure.
Page 354 of 419
GMC Acadia/Acadia Denali Owner Manual (GMNA-Localizing-U.S./Canada/
Mexico-9803770) - 2017 - crc - 7/12/16
Vehicle Care 353
3. Set the parking brake firmlyand put the shift lever in
P (Park) with an automatic
transmission, or Neutral with a
manual transmission. See
Shifting Into Park 0230.
Caution
If any accessories are left on or
plugged in during the jump
starting procedure, they could be
damaged. The repairs would not
be covered by the vehicle
warranty. Whenever possible, turn
off or unplug all accessories on
either vehicle when jump starting.
4. Set the ignition to OFF. Turn off all lights and accessories in
both vehicles, except the
hazard warning flashers if
needed.
{Warning
An electric fan can start up even
when the engine is not running
and can injure you. Keep hands,
clothing, and tools away from any
underhood electric fan.
{Warning
Using a match near a battery can
cause battery gas to explode.
People have been hurt doing this,
and some have been blinded.
Use a flashlight if you need more
light.
Battery fluid contains acid that
can burn you. Do not get it on
you. If you accidentally get it in
your eyes or on your skin, flush
the place with water and get
medical help immediately.
{Warning
Fans or other moving engine
parts can injure you badly. Keep
your hands away from moving
parts once the engine is running.
5. Connect one end of the red positive (+) cable to the
positive (+) terminal on the
discharged battery.
6. Connect the other end of the red positive (+) cable to the
positive (+) terminal of the good
battery.
7. Connect one end of the black negative (–) cable to the
negative (–) terminal of the
good battery.
8. Connect the other end of the black negative (–) cable to the
remote negative (–) terminal for
the discharged battery.
9. Start the engine in the vehicle with the good battery and run
the engine at idle speed for at
least four minutes.
Page 356 of 419
GMC Acadia/Acadia Denali Owner Manual (GMNA-Localizing-U.S./Canada/
Mexico-9803770) - 2017 - crc - 7/12/16
Vehicle Care 355
.The proper towing equipment.
See your dealer or trailering
professional for additional advice
and equipment
recommendations.
. If the vehicle is ready to be
towed. Just as preparing the
vehicle for a long trip, make sure
the vehicle is prepared to be
towed.
Caution
Use of a shield mounted in front
of the vehicle grille could restrict
airflow and cause damage to the
transmission. The repairs would
not be covered by the vehicle
warranty. If using a shield, only
use one that attaches to the
towing vehicle.
Dinghy Towing (2.5L L4
Engine)
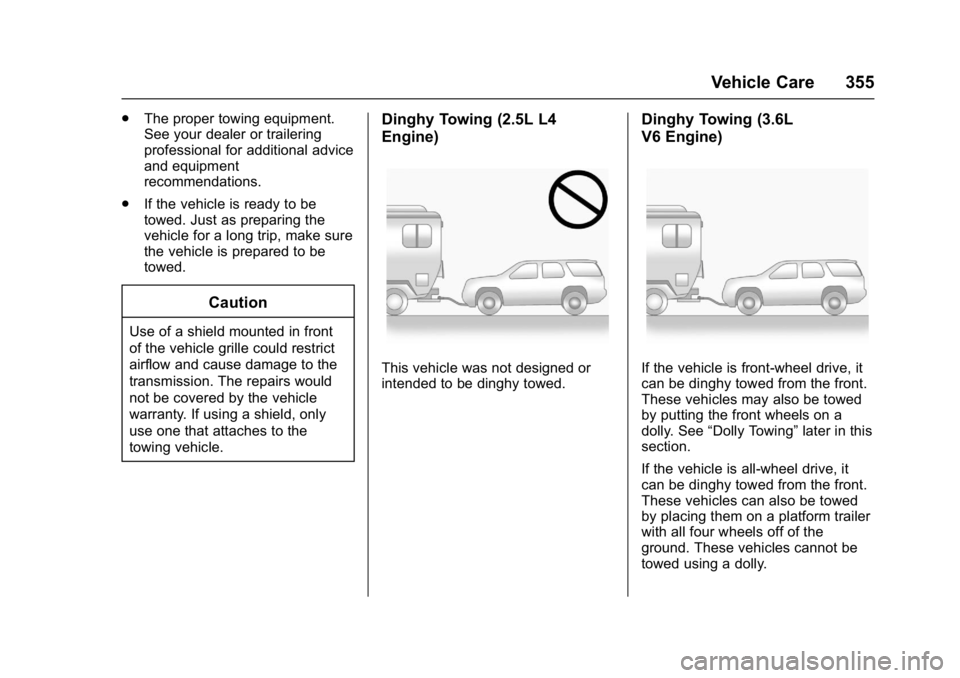
This vehicle was not designed or
intended to be dinghy towed.
Dinghy Towing (3.6L
V6 Engine)
If the vehicle is front-wheel drive, it
can be dinghy towed from the front.
These vehicles may also be towed
by putting the front wheels on a
dolly. See “Dolly Towing” later in this
section.
If the vehicle is all-wheel drive, it
can be dinghy towed from the front.
These vehicles can also be towed
by placing them on a platform trailer
with all four wheels off of the
ground. These vehicles cannot be
towed using a dolly.
Page 357 of 419
GMC Acadia/Acadia Denali Owner Manual (GMNA-Localizing-U.S./Canada/
Mexico-9803770) - 2017 - crc - 7/12/16
356 Vehicle Care
For vehicles being dinghy towed,
the vehicle should be run at the
beginning of each day and at each
RV fuel stop for about five minutes.
This will ensure proper lubrication of
transmission components.
To tow the vehicle from the front
with all four wheels on the ground:1. Position the vehicle that will be towed and secure it to the
towing vehicle.
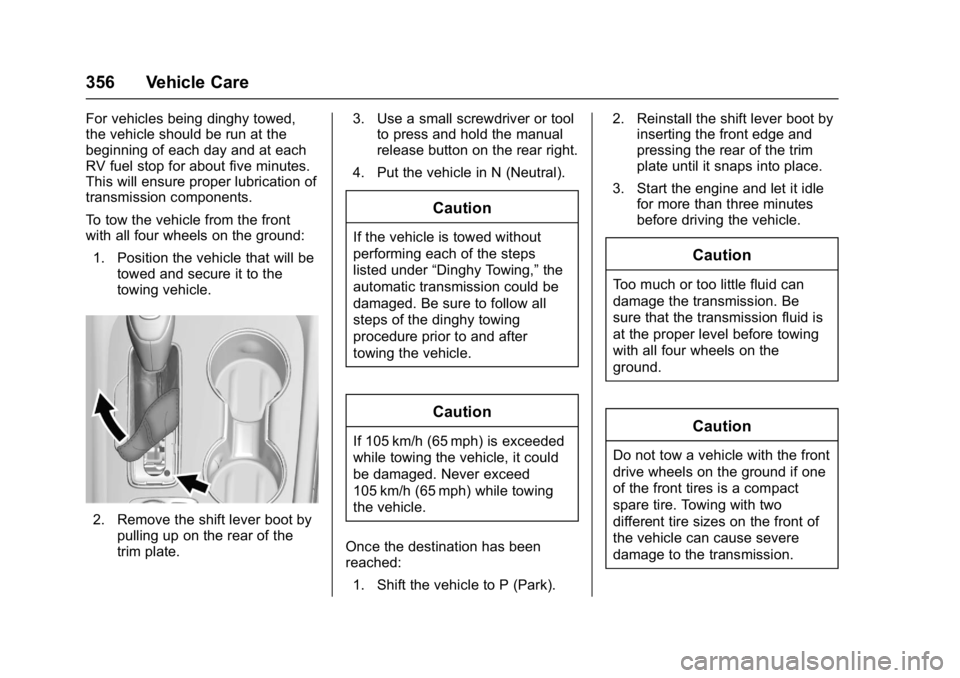
2. Remove the shift lever boot bypulling up on the rear of the
trim plate. 3. Use a small screwdriver or tool
to press and hold the manual
release button on the rear right.
4. Put the vehicle in N (Neutral).
Caution
If the vehicle is towed without
performing each of the steps
listed under “Dinghy Towing,” the
automatic transmission could be
damaged. Be sure to follow all
steps of the dinghy towing
procedure prior to and after
towing the vehicle.
Caution
If 105 km/h (65 mph) is exceeded
while towing the vehicle, it could
be damaged. Never exceed
105 km/h (65 mph) while towing
the vehicle.
Once the destination has been
reached: 1. Shift the vehicle to P (Park). 2. Reinstall the shift lever boot by
inserting the front edge and
pressing the rear of the trim
plate until it snaps into place.
3. Start the engine and let it idle for more than three minutes
before driving the vehicle.
Caution
Too much or too little fluid can
damage the transmission. Be
sure that the transmission fluid is
at the proper level before towing
with all four wheels on the
ground.
Caution
Do not tow a vehicle with the front
drive wheels on the ground if one
of the front tires is a compact
spare tire. Towing with two
different tire sizes on the front of
the vehicle can cause severe
damage to the transmission.