power steering GMC ACADIA 2018 Get To Know Guide
[x] Cancel search | Manufacturer: GMC, Model Year: 2018, Model line: ACADIA, Model: GMC ACADIA 2018Pages: 20, PDF Size: 3.21 MB
Page 2 of 20
2
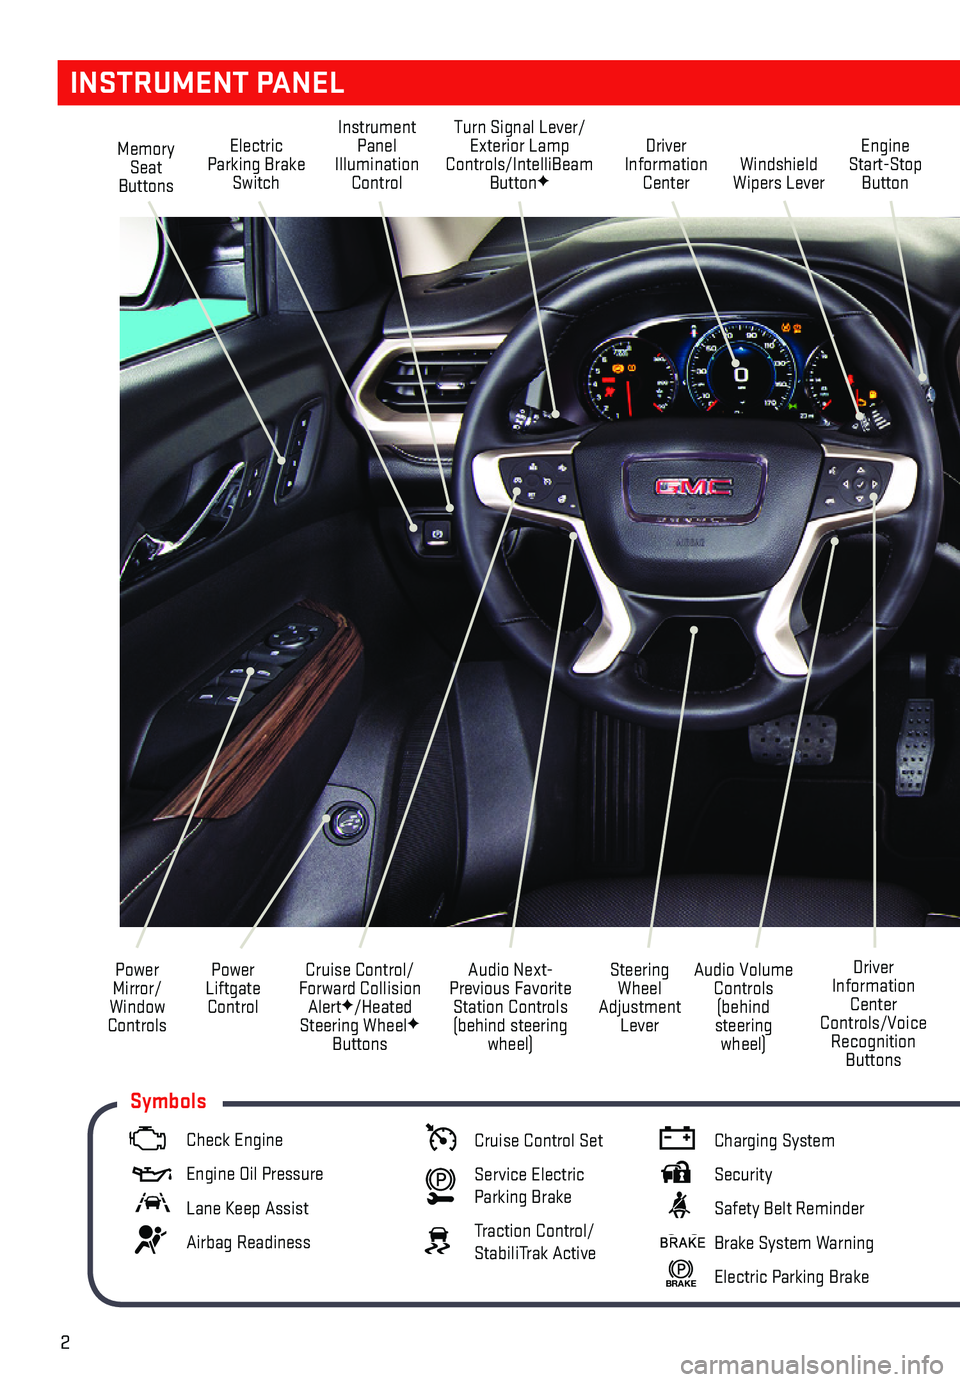
Memory Seat Buttons
Instrument Panel Illumination Control
Turn Signal Lever/Exterior Lamp Controls/IntelliBeam ButtonFWindshield Wipers Lever
Engine Start-Stop Button
Driver Information Center
Power Liftgate Control
Cruise Control/Forward Collision AlertF/Heated Steering WheelF Buttons
Power Mirror/ Window Controls
Audio Volume Controls (behind steering wheel)
Driver Information Center Controls/Voice Recognition Buttons
Audio Next-Previous Favorite Station Controls (behind steering wheel)
Steering Wheel Adjustment Lever
Electric Parking Brake Switch
INSTRUMENT PANEL
Check Engine
Engine Oil Pressure
Lane Keep Assist
Airbag Readiness
Cruise Control Set
Service Electric Parking Brake
Traction Control/StabiliTrak Active
Charging System
Security
Safety Belt Reminder
Brake System Warning
BRAKE Electric Parking Brake
Symbols
Page 3 of 20
3
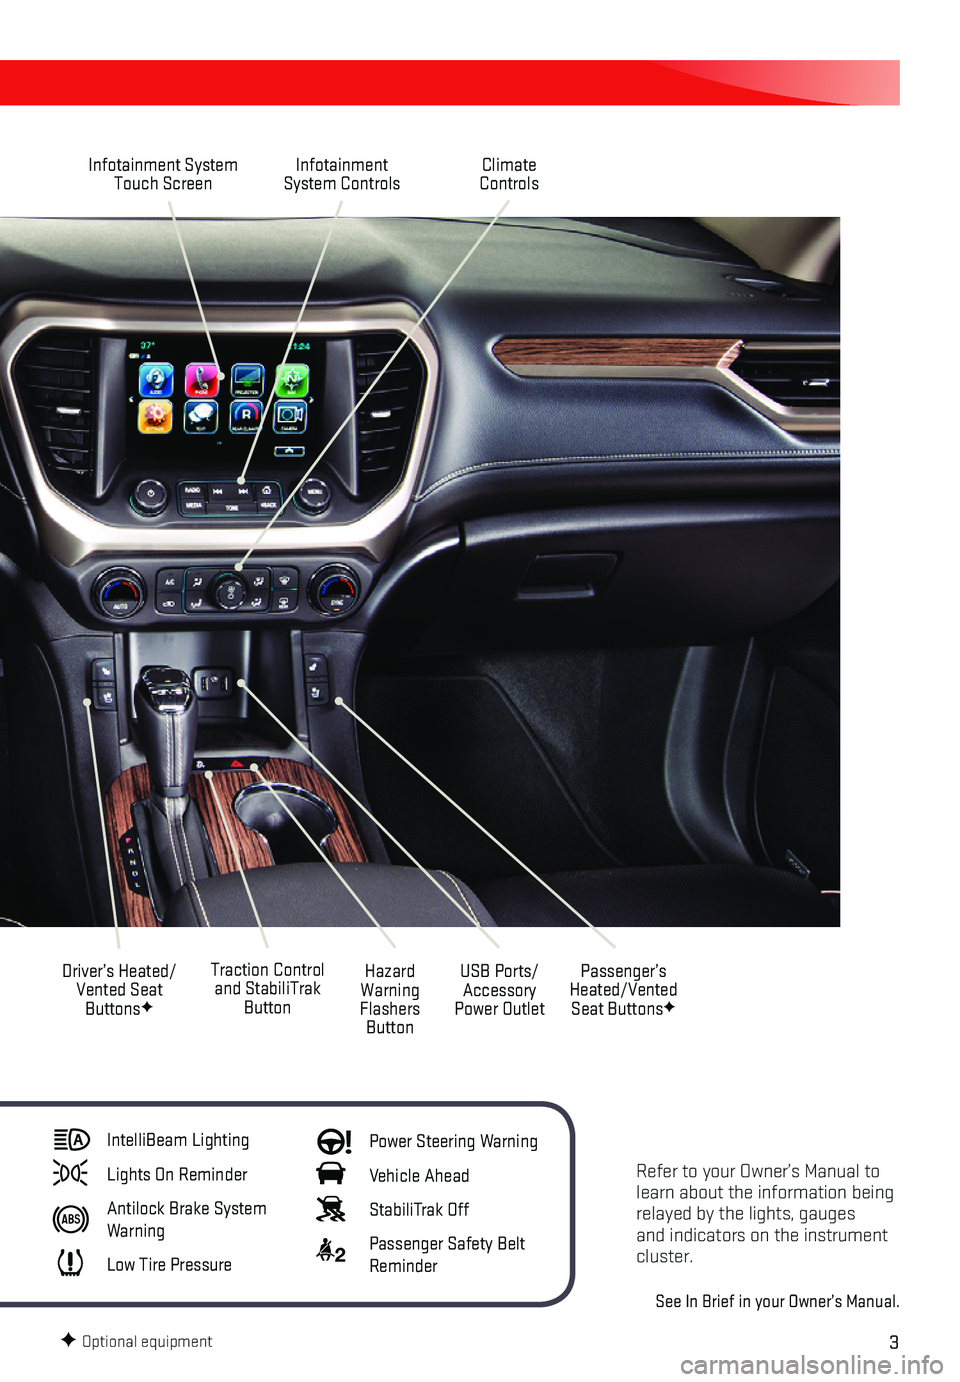
Refer to your Owner’s Manual to learn about the information being relayed by the lights, gauges and indicators on the instrument cluster.
See In Brief in your Owner’s Manual.
Infotainment System Touch ScreenInfotainment System Controls
Traction Control and StabiliTrak Button
Driver’s Heated/Vented Seat ButtonsF
Hazard Warning Flashers Button
USB Ports/Accessory Power Outlet
Climate Controls
Passenger’s Heated/Vented Seat ButtonsF
IntelliBeam Lighting
Lights On Reminder
Antilock Brake System Warning
Low Tire Pressure
Power Steering Warning
Vehicle Ahead
StabiliTrak Off
2 Passenger Safety Belt Reminder
F Optional equipment
Page 6 of 20
6
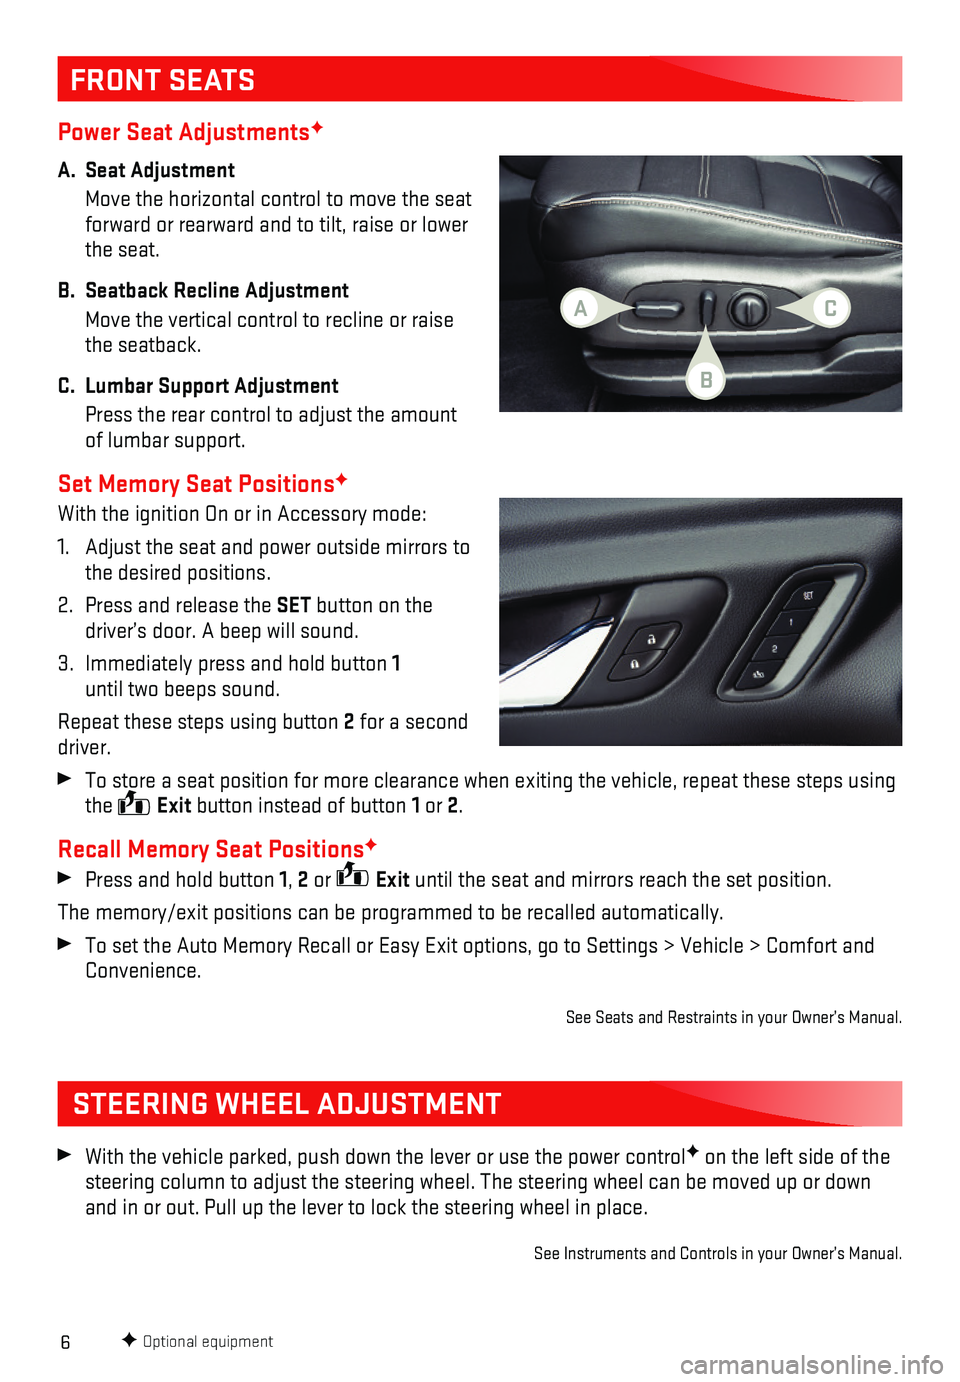
Power Seat AdjustmentsF
A. Seat Adjustment
Move the horizontal control to move the seat forward or rearward and to tilt, raise or lower the seat.
B. Seatback Recline Adjustment
Move the vertical control to recline or raise the seatback.
C. Lumbar Support Adjustment
Press the rear control to adjust the amount of lumbar support.
Set Memory Seat PositionsF
With the ignition On or in Accessory mode:
1. Adjust the seat and power outside mirrors to the desired positions.
2. Press and release the SET button on the driver’s door. A beep will sound.
3. Immediately press and hold button 1 until two beeps sound.
Repeat these steps using button 2 for a second driver.
To store a seat position for more clearance when exiting the vehicle, re\
peat these steps using the Exit button instead of button 1 or 2.
Recall Memory Seat PositionsF
Press and hold button 1, 2 or Exit until the seat and mirrors reach the set position.
The memory/exit positions can be programmed to be recalled automatically\
.
To set the Auto Memory Recall or Easy Exit options, go to Settings > Veh\
icle > Comfort and Convenience.
See Seats and Restraints in your Owner’s Manual.
FRONT SEATS
STEERING WHEEL ADJUSTMENT
With the vehicle parked, push down the lever or use the power controlF on the left side of the steering column to adjust the steering wheel. The steering wheel can be \
moved up or down and in or out. Pull up the lever to lock the steering wheel in place.
See Instruments and Controls in your Owner’s Manual.
F Optional equipment
AC
B
Page 10 of 20
10
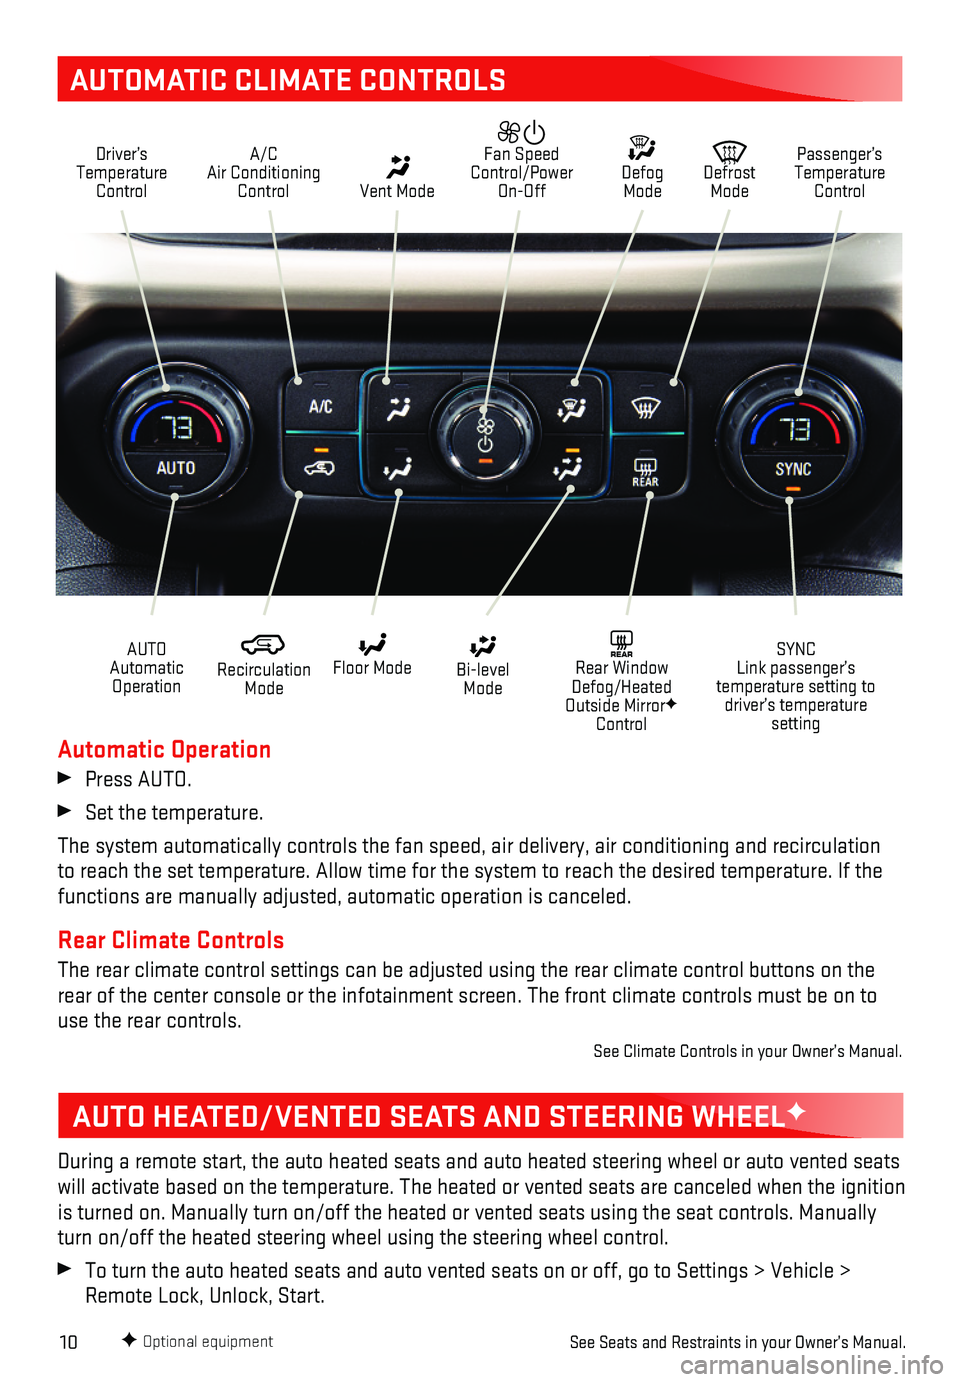
AUTOMATIC CLIMATE CONTROLS
Driver’s Temperature Control
A/C Air Conditioning Control Vent Mode
Defrost Mode
Defog Mode
Passenger’s Temperature Control
Fan Speed Control/Power On-Off
Recirculation Mode
Floor Mode Bi-level Mode
SYNC Link passenger’s temperature setting to driver’s temperature setting
REAR Rear Window Defog/Heated Outside MirrorF Control
AUTO Automatic Operation
F Optional equipment
Automatic Operation
Press AUTO.
Set the temperature.
The system automatically controls the fan speed, air delivery, air condi\
tioning and recirculation to reach the set temperature. Allow time for the system to reach the des\
ired temperature. If the functions are manually adjusted, automatic operation is canceled.
Rear Climate Controls
The rear climate control settings can be adjusted using the rear climate\
control buttons on the rear of the center console or the infotainment screen. The front climate\
controls must be on to use the rear controls.
See Climate Controls in your Owner’s Manual.
AUTO HEATED/VENTED SEATS AND STEERING WHEELF
During a remote start, the auto heated seats and auto heated steering wh\
eel or auto vented seats will activate based on the temperature. The heated or vented seats are c\
anceled when the ignition is turned on. Manually turn on/off the heated or vented seats using the \
seat controls. Manually turn on/off the heated steering wheel using the steering wheel control.
To turn the auto heated seats and auto vented seats on or off, go to Set\
tings > Vehicle > Remote Lock, Unlock, Start.
See Seats and Restraints in your Owner’s Manual.
Page 13 of 20
13
GMC INFOTAINMENT SYSTEM
Setting the Time
1. Touch Settings on the Home page.
2. Touch Time and Date.
3. Touch Set Time.
4. Touch the arrows to adjust the hours and minutes.
5. Press the BACK button to exit the menu.
Storing Favorites
Radio stations from all bands (AM, FM or SiriusXMF), media (song, artist, etc.), phone contacts and navigation destinationsF can be stored in any order on the favorites list.
1. Display the desired radio station, media favorite, contact or destinatio\
n.
2. Touch the Interaction Selector at the bottom of the screen to display the favorite screen buttons.
3. Touch and hold one of the favorite screen buttons until a beep is heard.\
4. Repeat the steps to store another favorite item.
Note: To change the number of favorites displayed, go to Settings > Radio.
Voice Pass-Thru
Voice Pass-Thru allows access to the voice recognition commands on a com\
patible cell phone; i.e. Siri or Voice Command. Visit my.gmc.com/learn for more information.
To activate phone voice recognition, press and hold the Push to Talk button on the steer-ing wheel for 2 seconds.
Natural Voice RecognitionF
Control the music source and make phone calls hands-free (after pairing\
your Bluetooth-enabled phone) using the natural voice recognition system.
1. Press the Push to Talk button on the steering wheel.
2. The radio will play a prompt followed by a beep.
3. After the beep, say what you want it to do using natural speech.
• Example Phone command (using your paired phone): “Call Amanda” o\
r “Call 555-1212”
• Example Media Music Device Search command (when connected to USB only)\
: “Play
artist [name]” or “Play song [name]”
• Example Radio command: “Tune FM 104.3” or “Tune XM Classic Viny\
l”
• Help: Say “Help” for voice recognition assistance
Portable Audio Devices
USB ports and accessory power outlets are located in the vehicle to conn\
ect portable audio devices. Use the USB ports to connect and charge mobile devices.
Connect an iPod®, iPhone®, MP3 Player, or a USB flash drive to a\
USB port. Search for music on-screen or by voice commands. Some USB ports are for charging only.
Touch the Audio icon or press the MEDIA buttonF to select a portable device as the audio source.
See Infotainment System in your Owner’s Manual.
F Optional equipment