remote start GMC ACADIA 2018 User Guide
[x] Cancel search | Manufacturer: GMC, Model Year: 2018, Model line: ACADIA, Model: GMC ACADIA 2018Pages: 423, PDF Size: 7.26 MB
Page 36 of 423
GMC Acadia/Acadia Denali Owner Manual (GMNA-Localizing-U.S./Canada/
Mexico-11349114) - 2018 - crc - 9/21/17
Keys, Doors, and Windows 35
vehicle. Remaining transmitters
can be relearned during the
next steps.
The DIC display should now
show READY FOR REMOTE
# 1.
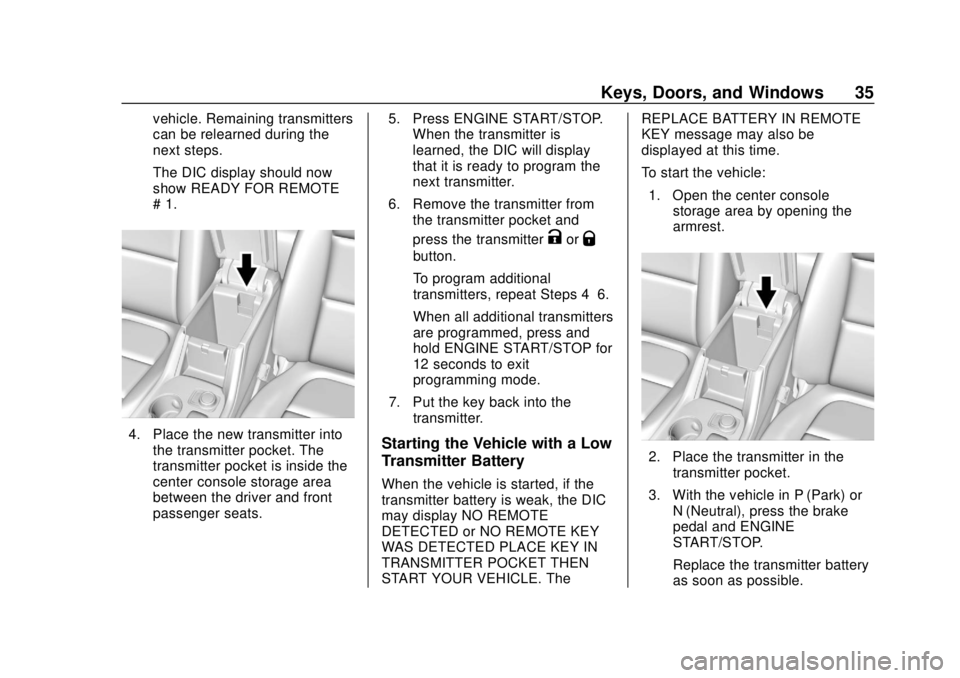
4. Place the new transmitter intothe transmitter pocket. The
transmitter pocket is inside the
center console storage area
between the driver and front
passenger seats. 5. Press ENGINE START/STOP.
When the transmitter is
learned, the DIC will display
that it is ready to program the
next transmitter.
6. Remove the transmitter from the transmitter pocket and
press the transmitter
KorQ
button.
To program additional
transmitters, repeat Steps 4–6.
When all additional transmitters
are programmed, press and
hold ENGINE START/STOP for
12 seconds to exit
programming mode.
7. Put the key back into the transmitter.
Starting the Vehicle with a Low
Transmitter Battery
When the vehicle is started, if the
transmitter battery is weak, the DIC
may display NO REMOTE
DETECTED or NO REMOTE KEY
WAS DETECTED PLACE KEY IN
TRANSMITTER POCKET THEN
START YOUR VEHICLE. The REPLACE BATTERY IN REMOTE
KEY message may also be
displayed at this time.
To start the vehicle:
1. Open the center console storage area by opening the
armrest.
2. Place the transmitter in the
transmitter pocket.
3. With the vehicle in P (Park) or N (Neutral), press the brake
pedal and ENGINE
START/STOP.
Replace the transmitter battery
as soon as possible.
Page 37 of 423
GMC Acadia/Acadia Denali Owner Manual (GMNA-Localizing-U.S./Canada/
Mexico-11349114) - 2018 - crc - 9/21/17
36 Keys, Doors, and Windows
Battery Replacement
Replace the battery in the
transmitter soon if the REPLACE
BATTERY IN REMOTE KEY
message displays in the DIC.
Caution
When replacing the battery, do
not touch any of the circuitry on
the transmitter. Static from your
body could damage the
transmitter.
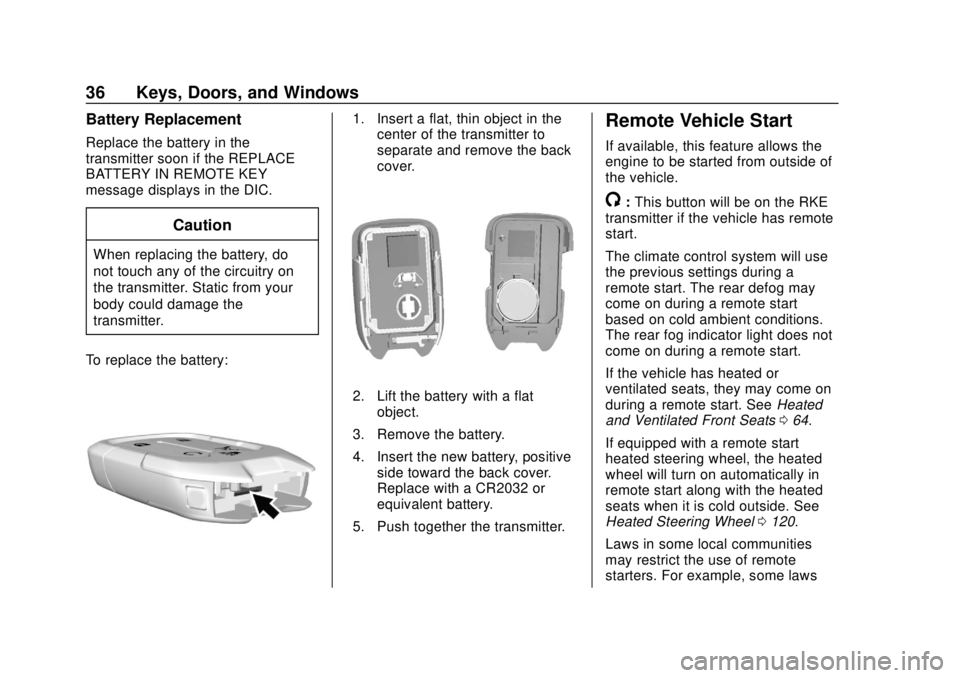
To replace the battery:
1. Insert a flat, thin object in the center of the transmitter to
separate and remove the back
cover.
2. Lift the battery with a flat
object.
3. Remove the battery.
4. Insert the new battery, positive side toward the back cover.
Replace with a CR2032 or
equivalent battery.
5. Push together the transmitter.
Remote Vehicle Start
If available, this feature allows the
engine to be started from outside of
the vehicle.
/: This button will be on the RKE
transmitter if the vehicle has remote
start.
The climate control system will use
the previous settings during a
remote start. The rear defog may
come on during a remote start
based on cold ambient conditions.
The rear fog indicator light does not
come on during a remote start.
If the vehicle has heated or
ventilated seats, they may come on
during a remote start. See Heated
and Ventilated Front Seats 064.
If equipped with a remote start
heated steering wheel, the heated
wheel will turn on automatically in
remote start along with the heated
seats when it is cold outside. See
Heated Steering Wheel 0120.
Laws in some local communities
may restrict the use of remote
starters. For example, some laws
Page 38 of 423
GMC Acadia/Acadia Denali Owner Manual (GMNA-Localizing-U.S./Canada/
Mexico-11349114) - 2018 - crc - 9/21/17
Keys, Doors, and Windows 37
may require a person using remote
start to have the vehicle in view.
Check local regulations for any
requirements.
Other conditions can affect the
performance of the transmitter. See
Remote Keyless Entry (RKE)
System030.
Starting the Engine Using Remote
Start
1. Press and release
Qon the
RKE transmitter.
2. Immediately press and hold
/
for at least four seconds or until
the turn signal lamps flash. The
turn signal lamps flashing
confirms the request to remote
start the vehicle has been
received.
During the remote start the
doors will be locked and the
parking lamps will remain on as
long as the engine is running.
The engine will shut off after
15 minutes unless a time
extension is done or the
vehicle is started. 3. With the RKE transmitter in the
vehicle, press the brake pedal
and start the vehicle to drive.
Extending Engine Run Time
The engine run time can also be
extended by another 15 minutes,
if during the first 15 minutes
Steps 1 and 2 are repeated while
the engine is still running. An
extension can be requested
30 seconds after starting. This
provides a total of 30 minutes.
The remote start can only be
extended once.
When the remote start is extended,
the second 15-minute period is
added on to the first 15 minutes for
a total of 30 minutes.
A maximum of two remote starts,
or a remote start with an extension,
are allowed between ignition cycles.
The vehicle must be started and
then turned off before the remote
start procedure can be used again. Canceling a Remote Start
To cancel a remote start, do any of
the following:
.
Press and hold
/until the
parking lamps turn off.
. Turn on the hazard warning
flashers.
. Turn the vehicle on and then off.
Conditions in Which Remote Start
Will Not Work
The remote start will not operate if
any of the following occur:
. A transmitter is in the vehicle.
. The hood is not closed.
. The hazard warning flashers
are on.
. There is an emission control
system malfunction.
. The engine coolant temperature
is too high.
. The oil pressure is low.
. Two remote vehicle starts or a
start with an extension have
already been used.
Page 50 of 423
GMC Acadia/Acadia Denali Owner Manual (GMNA-Localizing-U.S./Canada/
Mexico-11349114) - 2018 - crc - 9/21/17
Keys, Doors, and Windows 49
The security light, in the instrument
cluster, comes on if there is a
problem with arming or disarming
the theft-deterrent system.
The system has one or more RKE
transmitters matched to an
immobilizer control unit in your
vehicle. Only a correctly matched
RKE transmitter will start the
vehicle. If the transmitter is ever
damaged, you may not be able to
start your vehicle.
When trying to start the vehicle, the
security light may come on briefly
when the ignition is turned on.
If the engine does not start and the
security light stays on, there is a
problem with the system. Turn the
ignition off and try again.
If the vehicle will not change ignition
modes (ACC/ACCESSORY, on, off),
and the RKE transmitter appears to
be undamaged, try another
transmitter. Or, you may try placing
the transmitter in the transmitter
pocket located in the center
console.If the ignition mode will not change
with the other transmitter or in the
transmitter pocket, your vehicle
needs service. If the ignition does
change modes, the first transmitter
may be faulty. See your dealer who
can service the theft-deterrent
system and have a new RKE
transmitter programmed to the
vehicle.
It is possible for the immobilizer
system to learn new or replacement
RKE transmitters. Up to eight
transmitters can be programmed for
the vehicle. To program additional
transmitters, see
“Programming
Transmitters to the Vehicle” under
Remote Keyless Entry (RKE)
System Operation 030.
Do not leave the key or device that
disarms or deactivates the
theft-deterrent system in the vehicle.Exterior Mirrors
Convex Mirrors
{Warning
A convex mirror can make things,
like other vehicles, look farther
away than they really are. If you
cut too sharply into the right lane,
you could hit a vehicle on the
right. Check the inside mirror or
glance over your shoulder before
changing lanes.
The passenger side mirror is convex
shaped. A convex mirror's surface is
curved so more can be seen from
the driver seat.
Page 52 of 423
GMC Acadia/Acadia Denali Owner Manual (GMNA-Localizing-U.S./Canada/
Mexico-11349114) - 2018 - crc - 9/21/17
Keys, Doors, and Windows 51
Interior Mirrors
Interior Rearview Mirrors
Adjust the rearview mirror for a clear
view of the area behind the vehicle.
Do not spray glass cleaner directly
on the mirror. Use a soft towel
dampened with water.
Manual Rearview Mirror
If equipped, push the tab forward for
daytime use and pull it rearward for
nighttime use to avoid glare of the
headlamps from behind.
Automatic Dimming
Rearview Mirror
If equipped, automatic dimming
reduces the glare of headlamps
from behind. The dimming feature
comes on when the vehicle is
started.
Windows
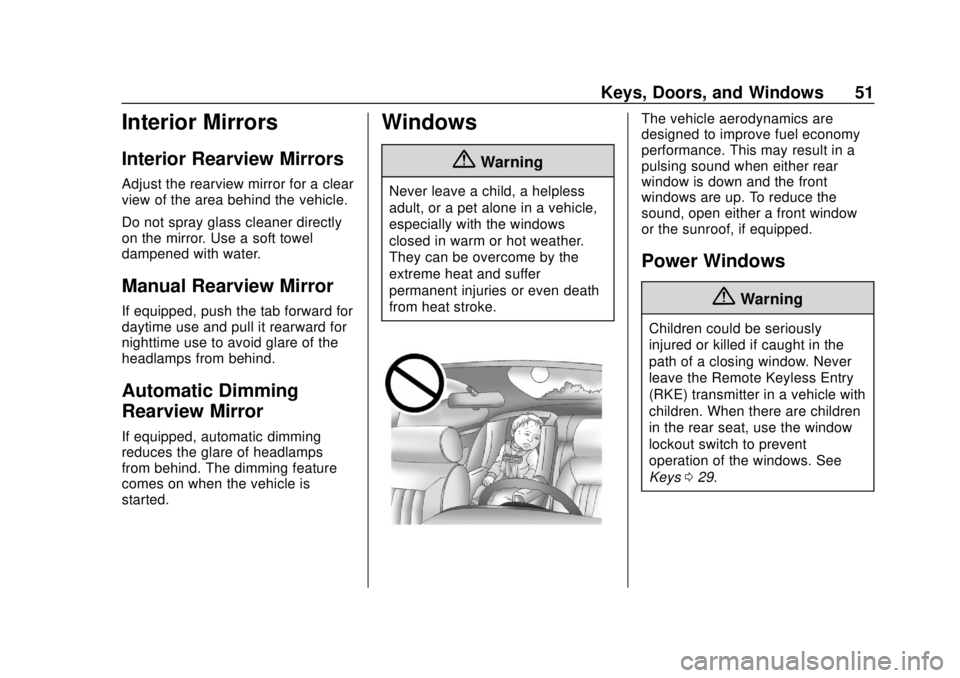
{Warning
Never leave a child, a helpless
adult, or a pet alone in a vehicle,
especially with the windows
closed in warm or hot weather.
They can be overcome by the
extreme heat and suffer
permanent injuries or even death
from heat stroke.
The vehicle aerodynamics are
designed to improve fuel economy
performance. This may result in a
pulsing sound when either rear
window is down and the front
windows are up. To reduce the
sound, open either a front window
or the sunroof, if equipped.
Power Windows
{Warning
Children could be seriously
injured or killed if caught in the
path of a closing window. Never
leave the Remote Keyless Entry
(RKE) transmitter in a vehicle with
children. When there are children
in the rear seat, use the window
lockout switch to prevent
operation of the windows. See
Keys029.
Page 63 of 423
GMC Acadia/Acadia Denali Owner Manual (GMNA-Localizing-U.S./Canada/
Mexico-11349114) - 2018 - crc - 9/21/17
62 Seats and Restraints
Memory Seats
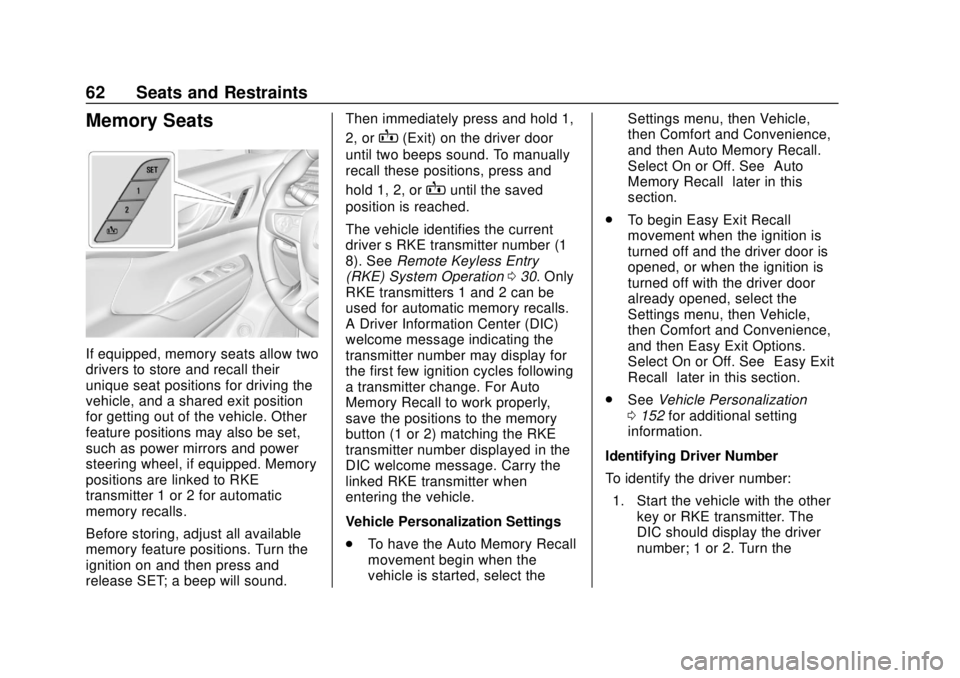
If equipped, memory seats allow two
drivers to store and recall their
unique seat positions for driving the
vehicle, and a shared exit position
for getting out of the vehicle. Other
feature positions may also be set,
such as power mirrors and power
steering wheel, if equipped. Memory
positions are linked to RKE
transmitter 1 or 2 for automatic
memory recalls.
Before storing, adjust all available
memory feature positions. Turn the
ignition on and then press and
release SET; a beep will sound.Then immediately press and hold 1,
2, or
B(Exit) on the driver door
until two beeps sound. To manually
recall these positions, press and
hold 1, 2, or
Buntil the saved
position is reached.
The vehicle identifies the current
driver ’s RKE transmitter number (1–
8). See Remote Keyless Entry
(RKE) System Operation 030. Only
RKE transmitters 1 and 2 can be
used for automatic memory recalls.
A Driver Information Center (DIC)
welcome message indicating the
transmitter number may display for
the first few ignition cycles following
a transmitter change. For Auto
Memory Recall to work properly,
save the positions to the memory
button (1 or 2) matching the RKE
transmitter number displayed in the
DIC welcome message. Carry the
linked RKE transmitter when
entering the vehicle.
Vehicle Personalization Settings
. To have the Auto Memory Recall
movement begin when the
vehicle is started, select the Settings menu, then Vehicle,
then Comfort and Convenience,
and then Auto Memory Recall.
Select On or Off. See
“Auto
Memory Recall” later in this
section.
. To begin Easy Exit Recall
movement when the ignition is
turned off and the driver door is
opened, or when the ignition is
turned off with the driver door
already opened, select the
Settings menu, then Vehicle,
then Comfort and Convenience,
and then Easy Exit Options.
Select On or Off. See “Easy Exit
Recall” later in this section.
. See Vehicle Personalization
0 152 for additional setting
information.
Identifying Driver Number
To identify the driver number: 1. Start the vehicle with the other key or RKE transmitter. The
DIC should display the driver
number; 1 or 2. Turn the
Page 64 of 423
GMC Acadia/Acadia Denali Owner Manual (GMNA-Localizing-U.S./Canada/
Mexico-11349114) - 2018 - crc - 9/21/17
Seats and Restraints 63
ignition off and remove the key
or RKE transmitter from the
vehicle.
2. Start the vehicle with the initial key or RKE transmitter. The
DIC should display the other
driver number not shown in
step 1.
Saving Memory Positions
Read these instructions completely
before saving memory positions.
To save preferred driving positions
1 and 2: 1. Turn the ignition on or to ACC/ ACCESSORY.
A DIC welcome message may
be displayed indicating number
1 or 2 for memory recalls.
2. Adjust all available memory features to the desired driving
position.
3. Press and release SET; a beep will sound. 4. Immediately press and hold the
1 or 2 memory button matching
the above DIC welcome
message until two beeps
sound.
If too much time passes
between releasing SET and
pressing 1, the memory
position will not be saved and
two beeps will not sound.
Repeat Steps 3 and 4.
1 or 2 corresponds to the driver
number. See “Identifying Driver
Number” in this section.
5. Repeat Steps 1–4 for a second driver using 1 or 2.
To save the position for
Band
easy exit features, repeat Steps 1–4
using
B. This stores the position
for getting out of the vehicle.
Save preferred memory feature
positions to both 1 and 2 if you are
the only driver. Manually Recalling Memory
Positions
Press and hold 1, 2, or
Bto recall
the previously stored memory
positions.
To stop manual recall movement,
release 1, 2, or
B. Recall can also
be stopped by pressing a power
seat, SET, power mirror, or power
steering wheel control, if memory
equipped. The driver or passenger
side mirror must be selected.
Auto Memory Recall
The vehicle identifies the number of
the current driver ’s RKE transmitter
(1–8). See Remote Keyless Entry
(RKE) System Operation 030. If the
RKE transmitter is 1 or 2, and Auto
Memory Recall is programmed on in
vehicle personalization, the
positions saved to the same
memory button number 1 or 2 are
automatically recalled when the
ignition is turned on, or turned from
off to ACC/ACCESSORY. RKE
transmitters 3–8 will not provide
automatic memory recalls.
Page 66 of 423
GMC Acadia/Acadia Denali Owner Manual (GMNA-Localizing-U.S./Canada/
Mexico-11349114) - 2018 - crc - 9/21/17
Seats and Restraints 65
Warning (Continued)
heat, such as a blanket, cushion,
cover, or similar item. This may
cause the seat heater to
overheat. An overheated seat
heater may cause a burn or may
damage the seat.
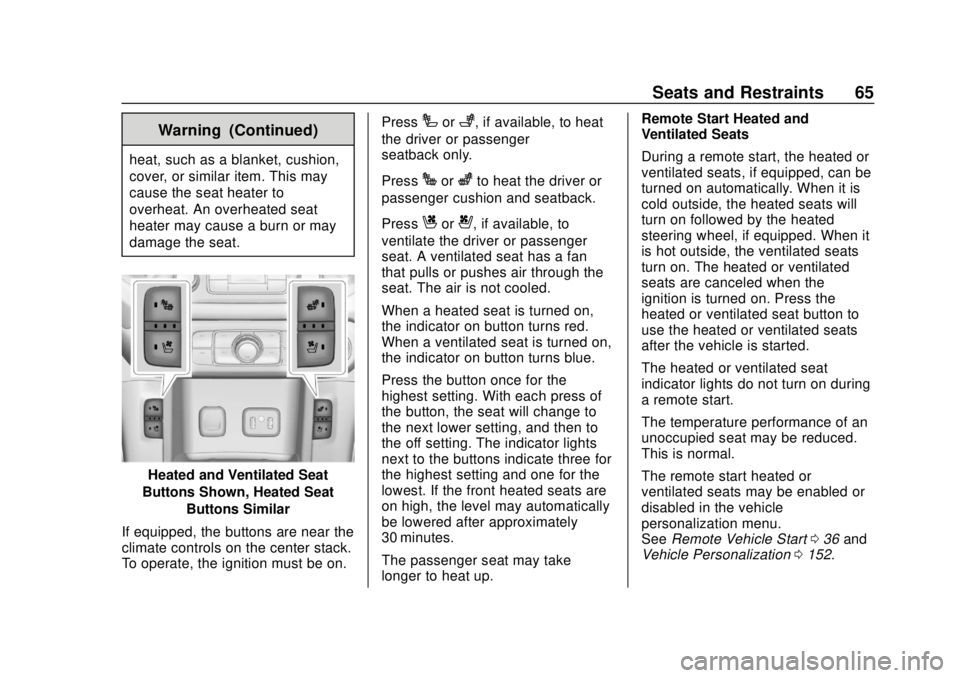
Heated and Ventilated Seat
Buttons Shown, Heated Seat Buttons Similar
If equipped, the buttons are near the
climate controls on the center stack.
To operate, the ignition must be on. Press
Ior+, if available, to heat
the driver or passenger
seatback only.
Press
Jorzto heat the driver or
passenger cushion and seatback.
Press
Cor{, if available, to
ventilate the driver or passenger
seat. A ventilated seat has a fan
that pulls or pushes air through the
seat. The air is not cooled.
When a heated seat is turned on,
the indicator on button turns red.
When a ventilated seat is turned on,
the indicator on button turns blue.
Press the button once for the
highest setting. With each press of
the button, the seat will change to
the next lower setting, and then to
the off setting. The indicator lights
next to the buttons indicate three for
the highest setting and one for the
lowest. If the front heated seats are
on high, the level may automatically
be lowered after approximately
30 minutes.
The passenger seat may take
longer to heat up. Remote Start Heated and
Ventilated Seats
During a remote start, the heated or
ventilated seats, if equipped, can be
turned on automatically. When it is
cold outside, the heated seats will
turn on followed by the heated
steering wheel, if equipped. When it
is hot outside, the ventilated seats
turn on. The heated or ventilated
seats are canceled when the
ignition is turned on. Press the
heated or ventilated seat button to
use the heated or ventilated seats
after the vehicle is started.
The heated or ventilated seat
indicator lights do not turn on during
a remote start.
The temperature performance of an
unoccupied seat may be reduced.
This is normal.
The remote start heated or
ventilated seats may be enabled or
disabled in the vehicle
personalization menu.
See
Remote Vehicle Start 036 and
Vehicle Personalization 0152.
Page 121 of 423
GMC Acadia/Acadia Denali Owner Manual (GMNA-Localizing-U.S./Canada/
Mexico-11349114) - 2018 - crc - 9/21/17
120 Instruments and Controls
oorp:Press to go to the
previous or next menu option.
worx: Press to go to the next or
previous selection.
V: Press to select a highlighted
menu option.
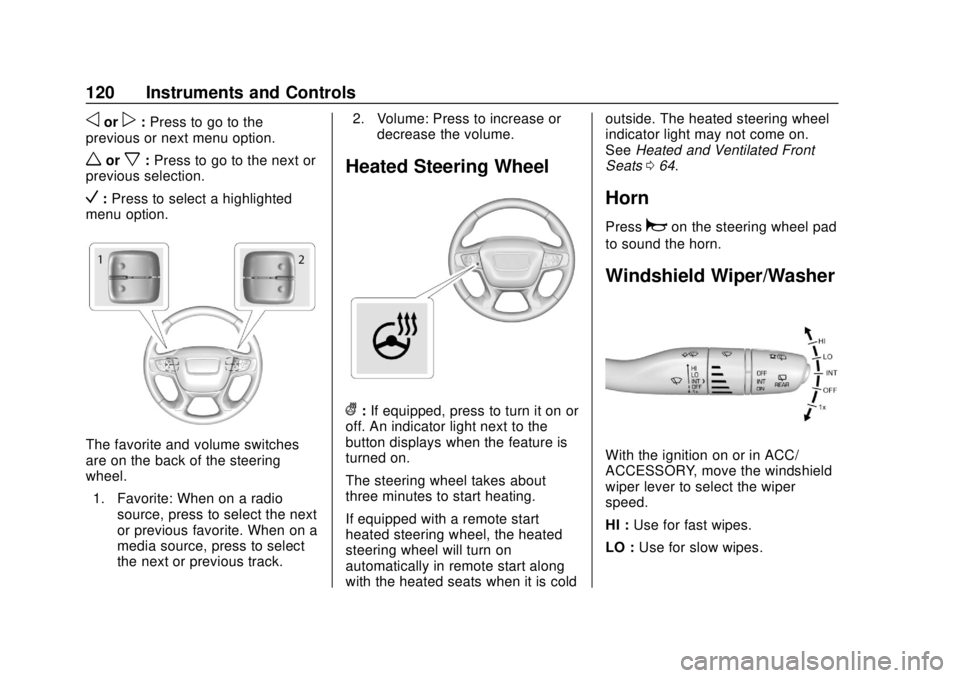
The favorite and volume switches
are on the back of the steering
wheel.
1. Favorite: When on a radio source, press to select the next
or previous favorite. When on a
media source, press to select
the next or previous track. 2. Volume: Press to increase or
decrease the volume.
Heated Steering Wheel
(:If equipped, press to turn it on or
off. An indicator light next to the
button displays when the feature is
turned on.
The steering wheel takes about
three minutes to start heating.
If equipped with a remote start
heated steering wheel, the heated
steering wheel will turn on
automatically in remote start along
with the heated seats when it is cold outside. The heated steering wheel
indicator light may not come on.
See
Heated and Ventilated Front
Seats 064.
Horn
Pressaon the steering wheel pad
to sound the horn.
Windshield Wiper/Washer
With the ignition on or in ACC/
ACCESSORY, move the windshield
wiper lever to select the wiper
speed.
HI : Use for fast wipes.
LO : Use for slow wipes.
Page 155 of 423
GMC Acadia/Acadia Denali Owner Manual (GMNA-Localizing-U.S./Canada/
Mexico-11349114) - 2018 - crc - 9/21/17
154 Instruments and Controls
Tone Settings
Select to adjust the radio tone. See
Operation0176 or“Tone Settings”
under “AM-FM Radio” in the
infotainment manual.
Auto Volume
This feature adjusts the volume
based on vehicle speed and
ambient noise.
Select Off, Low, Medium-Low,
Medium, Medium-High, or High.
Bose Audio Pilot
This feature adjusts the volume
based on the noise in the vehicle.
See “Bose AudioPilot Noise
Compensation Technology” under
“Infotainment System Settings” in
the infotainment manual.
Select Off or On.
Maximum Startup Volume
This feature sets the maximum
startup volume. If the vehicle is
started and the volume is greater
than this level, the volume is
adjusted to this level. To set the maximum startup volume,
touch + or
−to increase or
decrease.
Vehicle
Select and the following may
display:
. Climate and Air Quality
. Collision/Detection Systems
. Comfort and Convenience
. Lighting
. Power Door Locks
. Remote Lock, Unlock, Start
Climate and Air Quality
Select and the following may
display:
.Auto Fan Speed
. Auto Defog
. Auto Rear Defog
Auto Fan Speed
This feature will set the maximum
auto fan speed.
Select Low, Medium, or High. Auto Defog
When set to On, the front defog will
automatically react to temperature
and humidity conditions that may
cause fogging.
Select Off or On.
Auto Rear Defog
If equipped, this allows the Auto
Rear Defog to be turned on or off.
This feature will automatically turn
on the rear window defogger when it
is cold outside.
Select Off or On.
Collision/Detection Systems
Select the Collision/Detection
Systems menu and the following
may be displayed if equipped:
.
Alert Type
. Forward Collision System
. Front Pedestrian Detection
. Rear Cross Traffic Alert
. Adaptive Cruise Go Notifier
. Lane Change Alert