service indicator GMC ACADIA 2023 User Guide
[x] Cancel search | Manufacturer: GMC, Model Year: 2023, Model line: ACADIA, Model: GMC ACADIA 2023Pages: 384, PDF Size: 17.04 MB
Page 114 of 384
GMC Acadia/Acadia Denali Owner Manual (GMNA-Localizing-U.S./Canada/
Mexico-16402009) - 2023 - CRC - 3/28/22
Instruments and Controls 113
This light should come on briefly when the
engine starts. When the engine is off and
the vehicle is on, the light should remain
illuminated. If it does not come on under
either condition, contact your dealer.
If the light comes on and stays on when the
engine is running, it may not have adequate
oil pressure. The oil level may be low or
there may be some other oil system
problem. Turn the engine off when it is safe
to do so and contact your dealer.
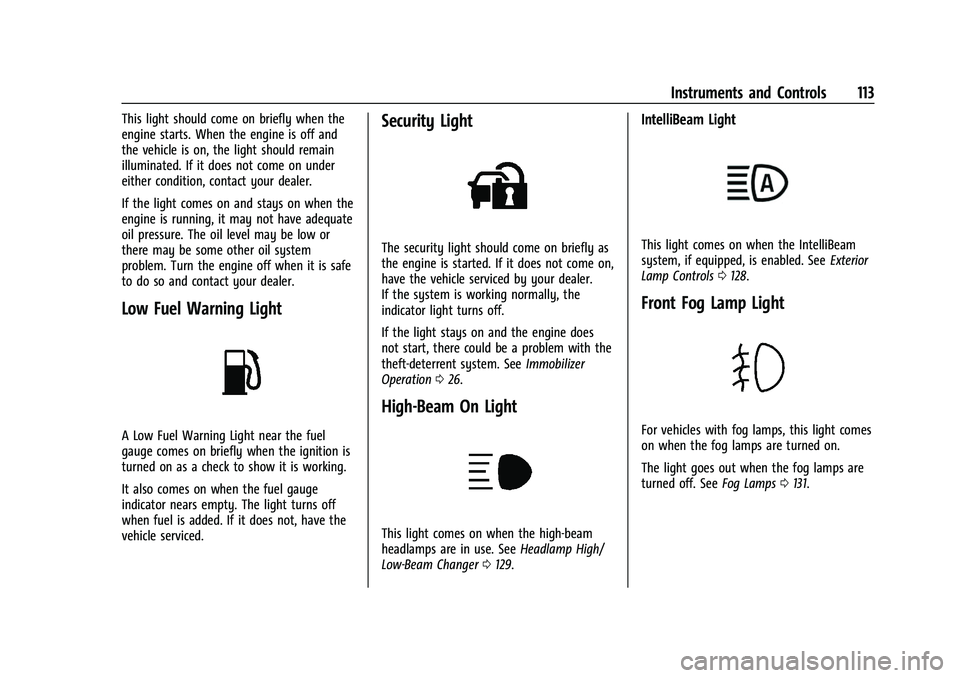
Low Fuel Warning Light
A Low Fuel Warning Light near the fuel
gauge comes on briefly when the ignition is
turned on as a check to show it is working.
It also comes on when the fuel gauge
indicator nears empty. The light turns off
when fuel is added. If it does not, have the
vehicle serviced.
Security Light
The security light should come on briefly as
the engine is started. If it does not come on,
have the vehicle serviced by your dealer.
If the system is working normally, the
indicator light turns off.
If the light stays on and the engine does
not start, there could be a problem with the
theft-deterrent system. SeeImmobilizer
Operation 026.
High-Beam On Light
This light comes on when the high-beam
headlamps are in use. See Headlamp High/
Low-Beam Changer 0129.
IntelliBeam Light
This light comes on when the IntelliBeam
system, if equipped, is enabled. See Exterior
Lamp Controls 0128.
Front Fog Lamp Light
For vehicles with fog lamps, this light comes
on when the fog lamps are turned on.
The light goes out when the fog lamps are
turned off. See Fog Lamps0131.
Page 125 of 384
GMC Acadia/Acadia Denali Owner Manual (GMNA-Localizing-U.S./Canada/
Mexico-16402009) - 2023 - CRC - 3/28/22
124 Instruments and Controls
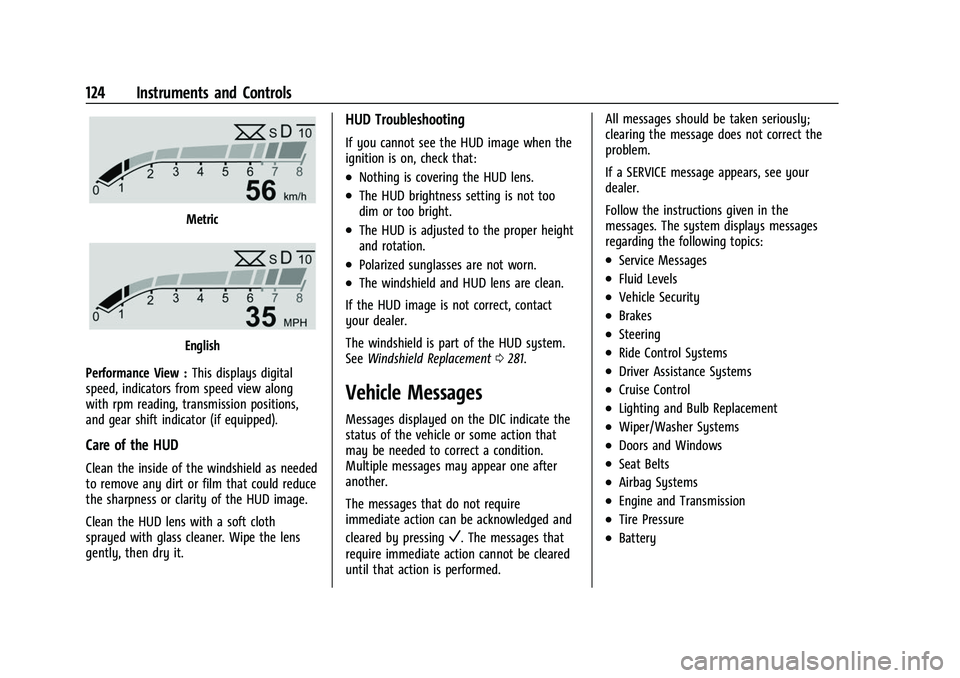
Metric
English
Performance View : This displays digital
speed, indicators from speed view along
with rpm reading, transmission positions,
and gear shift indicator (if equipped).
Care of the HUD
Clean the inside of the windshield as needed
to remove any dirt or film that could reduce
the sharpness or clarity of the HUD image.
Clean the HUD lens with a soft cloth
sprayed with glass cleaner. Wipe the lens
gently, then dry it.
HUD Troubleshooting
If you cannot see the HUD image when the
ignition is on, check that:
.Nothing is covering the HUD lens.
.The HUD brightness setting is not too
dim or too bright.
.The HUD is adjusted to the proper height
and rotation.
.Polarized sunglasses are not worn.
.The windshield and HUD lens are clean.
If the HUD image is not correct, contact
your dealer.
The windshield is part of the HUD system.
See Windshield Replacement 0281.
Vehicle Messages
Messages displayed on the DIC indicate the
status of the vehicle or some action that
may be needed to correct a condition.
Multiple messages may appear one after
another.
The messages that do not require
immediate action can be acknowledged and
cleared by pressing
V. The messages that
require immediate action cannot be cleared
until that action is performed. All messages should be taken seriously;
clearing the message does not correct the
problem.
If a SERVICE message appears, see your
dealer.
Follow the instructions given in the
messages. The system displays messages
regarding the following topics:
.Service Messages
.Fluid Levels
.Vehicle Security
.Brakes
.Steering
.Ride Control Systems
.Driver Assistance Systems
.Cruise Control
.Lighting and Bulb Replacement
.Wiper/Washer Systems
.Doors and Windows
.Seat Belts
.Airbag Systems
.Engine and Transmission
.Tire Pressure
.Battery
Page 189 of 384
GMC Acadia/Acadia Denali Owner Manual (GMNA-Localizing-U.S./Canada/
Mexico-16402009) - 2023 - CRC - 3/28/22
188 Climate Controls
If the air delivery mode or fan speed is
manually adjusted, this cancels full
automatic operation.
Manual Operation
]:Turn the knob clockwise or
counterclockwise to increase or decrease the
airflow to the rear panel outlets.
Temperature Controls : Turn the knob
clockwise or counterclockwise to adjust the
rear passenger temperature.
Air Delivery Mode Control : Press to select
the desired air delivery mode. This changes
the direction of the airflow in the rear
seating area.
If the rear floor air delivery mode is
selected, the rear fan speed indicator will
change when adjusted, but the airflow
amount directed to the floor will not. This is
normal operation for the system.
M: If equipped, press to turn on the driver
side or passenger side rear seat heater.
Press again to lower the temperature.
Indicator lights show the level of heat
activated.
Air Vents
To adjust the center and side air outlets on
the instrument panel, use the slider switch
in the center of the outlet to change the
direction of the airflow and also to shut off
the airflow.
There may be outlets overhead in the rear
passenger area; adjust as needed.
Keep all outlets open whenever possible for
best system performance.
Operation Tips
.Clear away any ice, snow, or leaves from
the air inlets at the base of the
windshield that can block the flow of air
into the vehicle.
.Clear snow off the hood to improve
visibility and help decrease moisture
drawn into the vehicle.
.Use of non-GM approved hood deflectors
can adversely affect the performance of
the system.
.Keep the path under all seats clear of
objects to help circulate the air inside the
vehicle more effectively.
.If fogging reoccurs while inYor\
modes with mild temperature throughout
the vehicle, turn on the air conditioner to
reduce windshield fogging.
Maintenance
Passenger Compartment Air Filter
The passenger compartment air filter
reduces dust, pollen, and other airborne
irritants from outside air that is pulled into
the vehicle. The filter will need to be
replaced periodically. See Maintenance
Schedule 0339.
Using the climate control system without an
air filter installed is not recommended.
Water or other debris could enter the
system and result in leaks or noises. Always
install a new filter when removing the old
filter.
For more information on filter replacement,
see your dealer.
Service
All vehicles have a label underhood that
identifies the refrigerant used in the vehicle.
The refrigerant system should only be
serviced by trained and certified technicians.
Page 206 of 384
GMC Acadia/Acadia Denali Owner Manual (GMNA-Localizing-U.S./Canada/
Mexico-16402009) - 2023 - CRC - 3/29/22
Driving and Operating 205
2. Shift the vehicle to N (Neutral). This canbe done while the vehicle is moving.
After shifting to N (Neutral), firmly apply
the brakes and steer the vehicle to a
safe location.
3. Come to a complete stop and shift to P (Park).
4. Set the parking brake. See Electric
Parking Brake 0216. And press ENGINE
START/STOP to turn the vehicle off.
{Warning
Turning off the vehicle while moving may
cause loss of power assist in the brake
and steering systems and disable the
airbags. While driving, only shut the
vehicle off in an emergency.
If the vehicle cannot be pulled over, and
must be shut off while driving, press and
hold ENGINE START/STOP for longer than
two seconds, or press twice in five seconds.
Accessory Mode (Amber Indicator Light) :
This mode allows some electrical accessories
to be used when the engine is off. With the ignition off, pressing the button
one time without the brake pedal applied
will place the ignition system in
accessory mode.
The ignition will switch from accessory
mode to off after five minutes to prevent
battery rundown.
ON/RUN/START (Green Indicator Light) :
This
mode is for driving and starting. With the
ignition off, and the brake pedal applied,
pressing the button once will place the
ignition system in ON/RUN/START. Once
engine cranking begins, release the button.
Engine cranking will continue until the
engine starts. See Starting the Engine 0205.
The ignition will then remain in ON/RUN.
Service Mode
This power mode is available for service and
diagnostics, and to verify the proper
operation of the malfunction indicator lamp
as may be required for emission inspection
purposes. With the vehicle off, and the
brake pedal not applied, pressing and
holding the button for more than
five seconds will place the vehicle in Service
Mode. The instruments and audio systems
will operate as they do in ON/RUN, but the vehicle will not be able to be driven. The
engine will not start in Service Mode. Press
the button again to turn the vehicle off.
Starting the Engine
Shift the vehicle into P (Park) or N (Neutral).
To restart the engine when the vehicle is
already moving, use N (Neutral) only.
Caution
Do not try to shift to P (Park) if the
vehicle is moving. If you do, you could
damage the transmission. Shift to P (Park)
only when the vehicle is stopped.
Caution
If you add electrical parts or accessories,
you could change the way the engine
operates. Any resulting damage would
not be covered by the vehicle warranty.
See
Add-On Electrical Equipment 0259.
Starting Procedure
1. With the Keyless Access system, the
remote key must be in the vehicle. Press
ENGINE START/STOP with the brake pedal
applied. When the engine begins
cranking, let go of the button.
Page 211 of 384
GMC Acadia/Acadia Denali Owner Manual (GMNA-Localizing-U.S./Canada/
Mexico-16402009) - 2023 - CRC - 3/29/22
210 Driving and Operating
voltage, try charging or jump starting the
battery. SeeJump Starting - North America
0 324.
To shift out of P (Park): 1. Ensure the engine is running.
2. Apply the brake pedal.
3. Press or pull the desired shift switch on the center stack.
The P indicator will turn white and the gear
indicator will turn red when the vehicle is
no longer in P (Park).
If the vehicle cannot shift from P (Park), a
Driver Information Center (DIC) message will
be displayed. Check that the ignitionis on,
the engine is running, and the brake pedal
is applied when you are attempting to shift
out of P (Park). If all of these are met but
the vehicle will not shift out of P (Park), see
your dealer for service.
Parking over Things That Burn
{Warning
Things that can burn could touch hot
exhaust parts under the vehicle and
ignite. Do not park over papers, leaves,
dry grass, or other things that can burn.
Active Fuel Management
This vehicle's engine may be equipped with
Active Fuel Management, which allows the
engine to operate on either all of its
cylinders, or in reduced cylinder operation
mode, depending on the driving conditions.
When less power is required, such as
cruising at a constant vehicle speed, the
system will operate in reduced cylinder
operation mode, allowing the vehicle to
achieve better fuel economy. When greater
power demands are required, such as
accelerating from a stop, passing,
or merging onto a freeway, the system will
maintain full-cylinder operation.
If the vehicle has an Active Fuel
Management indicator, see Driver
Information Center (DIC) for more
information on using this display.
Extended Parking
It is best not to park with the vehicle
running. If the vehicle is left running, be
sure it will not move and there is adequate
ventilation.
See Shifting Into Park 0209 and
Engine Exhaust 0210. If the vehicle is left parked and running with
the remote key outside the vehicle, it will
continue to run for up to 15 minutes.
If the vehicle is left parked and running with
the remote key inside the vehicle, it will
continue to run for up to 30 minutes.
The vehicle could turn off sooner if it is
parked on a hill, due to lack of
available fuel.
The timer will reset if the vehicle is taken
out of P (Park) while it is running.
Engine Exhaust
{
Warning
Engine exhaust contains carbon monoxide
(CO), which cannot be seen or smelled.
Exposure to CO can cause
unconsciousness and even death.
Exhaust may enter the vehicle if:
.The vehicle idles in areas with poor
ventilation (parking garages, tunnels,
deep snow that may block underbody
airflow or tail pipes).
.The exhaust smells or sounds strange
or different. (Continued)
Page 240 of 384
GMC Acadia/Acadia Denali Owner Manual (GMNA-Localizing-U.S./Canada/
Mexico-16402009) - 2023 - CRC - 3/29/22
Driving and Operating 239
Tailgating Alert
The vehicle ahead indicator will display
amber when you are following a vehicle
ahead too closely.
Selecting the Alert Timing
The Collision Alert control is on the steering
wheel. Press
[to set the FCA timing to
Far, Medium, or Near. The first button press
shows the current setting on the DIC.
Additional button presses will change this
setting. The chosen setting will remain until
it is changed and will affect the timing of
both the Collision Alert and the Tailgating
Alert features. The timing of both alerts will
vary based on vehicle speed. The faster the
vehicle speed, the farther away the alert will occur. Consider traffic and weather
conditions when selecting the alert timing.
The range of selectable alert timings may
not be appropriate for all drivers and driving
conditions.
If your vehicle is equipped with Adaptive
Cruise Control (ACC), changing the FCA
timing setting automatically changes the
following gap setting (Far, Medium,
or Near).
Following Distance Indicator
The following distance to a moving vehicle
ahead in your path is indicated in following
time in seconds on the Driver Information
Center (DIC). See
Driver Information Center
(DIC) (Base Level) 0114 or
Driver Information Center (DIC) (Midlevel)
0 116 orDriver Information Center (DIC)
(Uplevel) 0119. The minimum following time
is 0.5 seconds away. If there is no vehicle
detected ahead, or the vehicle ahead is out
of sensor range, dashes will be displayed.
Unnecessary Alerts
FCA may provide unnecessary alerts for
turning vehicles, vehicles in other lanes,
objects that are not vehicles, or shadows.
These alerts are normal operation and the
vehicle does not need service.
Cleaning the System
If the FCA system does not seem to operate
properly, this may correct the issue:
.Clean the outside of the windshield in
front of the rearview mirror.
.Clean the entire front of the vehicle.
.Clean the headlamps.
Automatic Emergency
Braking (AEB)
The AEB system may help avoid or reduce
the harm caused by front-end crashes. AEB
also includes Intelligent Brake Assist (IBA).
When the system detects a vehicle ahead in
your path that is traveling in the same
direction that you may be about to crash
into, it can provide a boost to braking or
automatically brake the vehicle. This can
help avoid or lessen the severity of crashes
when driving in a forward gear. Depending
on the situation, the vehicle may
automatically brake moderately or hard. This
automatic emergency braking can only occur
if a vehicle is detected. This is shown by the
FCA vehicle ahead indicator being lit. See
Forward Collision Alert (FCA) System 0237.
Page 242 of 384
GMC Acadia/Acadia Denali Owner Manual (GMNA-Localizing-U.S./Canada/
Mexico-16402009) - 2023 - CRC - 3/29/22
Driving and Operating 241
A system unavailable message may
display if:
.The front of the vehicle or windshield is
not clean.
.Heavy rain or snow is interfering with
object detection.
.There is a problem with the StabiliTrak/
Electronic Stability Control (ESC) system.
The AEB system does not need service.
Front Pedestrian Braking (FPB)
System
If equipped, the FPB system may help avoid
or reduce the harm caused by front-end
crashes with nearby pedestrians when
driving in a forward gear. FPB displays an
amber indicator,
~, when a nearby
pedestrian is detected ahead. When
approaching a detected pedestrian too
quickly, FPB provides a red flashing alert on
the windshield and rapidly beeps or pulses
the driver seat. FPB can provide a boost to
braking or automatically brake the vehicle.
This system includes Intelligent Brake Assist
(IBA), and the Automatic Emergency Braking
(AEB) system may also respond to
pedestrians. See Automatic Emergency
Braking (AEB) 0239. The FPB system can detect and alert to
pedestrians in a forward gear at speeds
between 8 km/h (5 mph) and 80 km/h
(50 mph). During daytime driving, the
system detects pedestrians up to a distance
of approximately 40 m (131 ft). During
nighttime driving, system performance is
very limited.
{Warning
FPB does not provide an alert or
automatically brake the vehicle, unless it
detects a pedestrian. FPB may not detect
pedestrians, including children:
.When the pedestrian is not directly
ahead, fully visible, or standing
upright, or when part of a group.
.Due to poor visibility, including
nighttime conditions, fog, rain,
or snow.
.If the FPB sensor is blocked by dirt,
snow, or ice.
.If the headlamps or windshield are not
cleaned or in proper condition.
(Continued)
Warning (Continued)
Be ready to take action and apply the
brakes. For more information, see
Defensive Driving0192. Keep the
windshield, headlamps, and FPB sensor
clean and in good repair.
FPB can be set to Off, Alert, or Alert and
Brake through vehicle settings. To view
available settings from the infotainment
screen, touch Settings > Vehicle > Collision/
Detection Systems.
Detecting the Pedestrian Ahead
FPB alerts and automatic braking will not
occur unless the FPB system detects a
pedestrian. When a pedestrian that may
enter the vehicle’s forward path is detected,
the pedestrian ahead indicator will display
amber.
Page 260 of 384

GMC Acadia/Acadia Denali Owner Manual (GMNA-Localizing-U.S./Canada/
Mexico-16402009) - 2023 - CRC - 3/29/22
Driving and Operating 259
{Warning
Trailer sway can result in a crash and in
serious injury or death, even if the
vehicle is equipped with TSC.
If the trailer begins to sway, reduce
vehicle speed by gradually removing your
foot from the accelerator. Then pull over
to check the trailer and vehicle to help
correct possible causes, including an
improperly or overloaded trailer,
unrestrained cargo, improper trailer hitch
configuration, or improperly inflated or
incorrect vehicle or trailer tires. See
Towing Equipment0255 for trailer
ratings and hitch setup recommendations.
Trailer Tires
Special Trailer (ST) tires differ from vehicle
tires. Trailer tires are designed with stiff
sidewalls to help prevent sway and to
support heavy loads. These features can
make it difficult to determine if the trailer
tire pressures are low only based on a visual
inspection. Always check all trailer tire pressures before
each trip when the tires are cool. Low trailer
tire pressure is a leading cause of trailer tire
blow-outs.
Trailer tires deteriorate over time. The trailer
tire sidewall will show the week and year
the tire was manufactured. Many trailer tire
manufacturers recommend replacing tires
more than six years old.
Overloading is another leading cause of
trailer tire blow-outs. Never load your trailer
with more weight than the tires are
designed to support. The load rating is
located on the trailer tire sidewall.
Always know the maximum speed rating for
the trailer tires before driving. This may be
significantly lower than the vehicle tire
speed rating. The speed rating may be on
the trailer tire sidewall. If the speed rating is
not shown, the default trailer tire speed
rating is 105 km/h (65 mph).
Conversions and Add-Ons
Add-On Electrical Equipment
{Warning
The Data Link Connector (DLC) is used
for vehicle service and Emission
Inspection/Maintenance testing. See
Malfunction Indicator Lamp (Check Engine
Light)
0106. A device connected to the
DLC —such as an aftermarket fleet or
driver-behavior tracking device —may
interfere with vehicle systems. This could
affect vehicle operation and cause a
crash. Such devices may also access
information stored in the vehicle’s
systems.
Caution
Some electrical equipment can damage
the vehicle or cause components to not
work and would not be covered by the
vehicle warranty. Always check with your
dealer before adding electrical equipment.
Page 277 of 384

GMC Acadia/Acadia Denali Owner Manual (GMNA-Localizing-U.S./Canada/
Mexico-16402009) - 2023 - CRC - 3/28/22
276 Vehicle Care
6. Verify coolant level after the engine isshut off and the coolant is cold.
If necessary, repeat coolant fill procedure
Steps 1–6.
If the coolant still is not at the proper
level when the system cools down again,
see your dealer.
Caution
If the pressure cap is not tightly installed,
coolant loss and engine damage may
occur. Be sure the cap is properly and
tightly secured.
Automatic Coolant Service Fill (2.0L L4
Engine Only)
If equipped, this feature assists in filling and
removing air from the cooling system after
service of components or when coolant is
added after being too low.
To activate the fill and air removal process:
1. With a cold system, disconnect the vent line from the port near the cap on the
surge tank. Add coolant to the indicated
mark on the surge tank.
2. Reconnect the vent line to the surge tank and replace the cap on the
surge tank. 3. Connect the vehicle to a battery charger.
4. Put the vehicle in Service Mode. See
Ignition Positions 0204.
5. Turn off the air conditioning.
6. Set the parking brake.
7. At the same time, press the accelerator and the brake for automatic transmission
vehicles for two seconds, then release.
At the end of the cycle, check the coolant
level in the surge tank and add coolant, if it
is low. Turn off the vehicle, allow the Engine
Control Module (ECM) to go to sleep, about
two minutes, and repeat steps 3-7.
Listen for pump activation and movement of
the control valves while watching the level
of the tank. If the tank empties, turn the
ignition off, carefully remove the surge tank
cap, refill to the indicated mark and repeat
steps 3-6. The fill and air removal process
will run for approximately 10 minutes.
Engine Overheating
The vehicle has several indicators to warn of
the engine overheating. There is an engine coolant temperature
gauge on the instrument cluster. See
Engine
Coolant Temperature Gauge 0103. The
vehicle may also display a message on the
Driver Information Center (DIC).
If the decision is made not to lift the hood
when this warning appears, get service help
right away. See Roadside Assistance Program
0 354.
If the decision is made to lift the hood,
make sure the vehicle is parked on a level
surface. Then check to see if the engine
cooling fan is running. If the engine is
overheating, the fan should be running. If it
is not, do not continue to run the engine.
Have the vehicle serviced.
Caution
Do not run the engine if there is a leak
in the engine cooling system. This can
cause a loss of all coolant and can
damage the system and vehicle. Have
any leaks fixed right away.
Page 279 of 384
GMC Acadia/Acadia Denali Owner Manual (GMNA-Localizing-U.S./Canada/
Mexico-16402009) - 2023 - CRC - 3/28/22
278 Vehicle Care
Caution (Continued)
.Do not mix water with ready-to-use
washer fluid. Water can cause the
solution to freeze and damage the
washer fluid tank and other parts of
the washer system.
.When using concentrated washer fluid,
follow the manufacturer instructions
for adding water.
.Fill the washer fluid tank only
three-quarters full when it is very cold.
This allows for fluid expansion if
freezing occurs, which could damage
the tank if it is completely full.
Brakes
Disc brake linings have built-in wear
indicators that make a high-pitched warning
sound when the brake linings are worn and
new linings are needed. The sound can come
and go or can be heard all the time when
the vehicle is moving, except when applying
the brake pedal firmly.
{Warning
The brake wear warning sound means
that soon the brakes will not work well.
That could lead to a crash. When the
brake wear warning sound is heard, have
the vehicle serviced.
Caution
Continuing to drive with worn-out brake
linings could result in costly brake
repairs.
Some driving conditions or climates can
cause a brake squeal when the brakes are
first applied, clearing up following several
applications. This does not mean something
is wrong with the brakes.
Properly torqued wheel nuts are necessary
to help prevent brake pulsation. When tires
are rotated, inspect brake linings for wear
and evenly tighten wheel nuts in the proper
sequence to torque specifications. See
Capacities and Specifications 0348.
Brake pads should be replaced as complete
axle sets.
Brake Pedal Travel
See your dealer if the brake pedal does not
return to normal height, or if there is a
rapid increase in pedal travel. This could be
a sign that brake service may be required.
Replacing Brake System Parts
Always replace brake system parts with
new, approved replacement parts. If this is
not done, the brakes may not work
properly. The braking performance can
change in many ways if the wrong brake
parts are installed or if parts are improperly
installed.
Brake Fluid
The brake master cylinder reservoir is filled
with GM approved DOT 4 brake fluid as
indicated on the reservoir cap. See Engine
Compartment Overview 0265 for the
location of the reservoir.