manual transmission GMC ACADIA 2023 Owner's Guide
[x] Cancel search | Manufacturer: GMC, Model Year: 2023, Model line: ACADIA, Model: GMC ACADIA 2023Pages: 384, PDF Size: 17.04 MB
Page 259 of 384
GMC Acadia/Acadia Denali Owner Manual (GMNA-Localizing-U.S./Canada/
Mexico-16402009) - 2023 - CRC - 3/29/22
258 Driving and Operating
Battery FeedRed/Black or
Red/Blue
Brake Apply Signal White/Blue
Ground Black
Refer to the aftermarket electric trailer brake
controller owner's manual to determine wire
color coding of the electric trailer brake
controller. The wire colors on the brake
controller may be different from the vehicle.
It may be necessary to have a technician
connect the 12-volt power to the engine
compartment fuse block. The electric trailer
brake controller should be installed by your
dealer or a qualified service center.
Trailer Lamps
Always check all trailer lamps are working at
the beginning of each trip, and periodically
on longer trips.
Turn Signals When Towing a Trailer
When properly connected, the trailer turn
signals should will illuminate to indicate the
vehicle is turning, changing lanes,
or stopping. When towing a trailer, the
arrows on the instrument cluster will
illuminate even if the trailer is not properly
connected or the bulbs are burned out.
Tow/Haul Mode
For instructions on how to enter Tow/Haul
mode, see Driver Mode Control 0220.
Tow/Haul assists when pulling a heavy
trailer or a large or heavy load.
Tow/Haul Mode is designed to be most
effective when the vehicle and trailer
combined weight is at least 75% of the
vehicle's Gross Combined Weight Rating
(GCWR). See “Weight of the Trailer” under
Trailer Towing 0252.
Tow/Haul Mode is most useful when towing
a heavy trailer or carrying a large or
heavy load:
.through rolling terrain
.in stop-and-go traffic
.in busy parking lots
Operating the vehicle in Tow/Haul Mode
when lightly loaded or not towing will not
cause damage; however, it is not
recommended and may result in unpleasant
engine and transmission driving
characteristics and reduced fuel economy.
Trailer Sway Control (TSC)
Vehicles with StabiliTrak/Electronic Stability
Control (ESC) have a Trailer Sway Control
(TSC) feature. Trailer sway is unintended
side-to-side motion of a trailer while towing.
If the vehicle is towing a trailer and the TSC
detects that sway is increasing, the vehicle
brakes are selectively applied at each wheel,
to help reduce excessive trailer sway.
If equipped with the Integrated Trailer Brake
Control (ITBC) system, and the trailer has an
electric brake system, StabiliTrak/ESC may
also apply the trailer brakes.
If TSC is enabled, the Traction Control
System (TCS)/StabiliTrak/ESC warning light
will flash on the instrument cluster. Reduce
vehicle speed by gradually removing your
foot from the accelerator. If trailer sway
continues, StabiliTrak/ESC can reduce engine
torque to help slow the vehicle. TSC will not
function if StabiliTrak/ESC is turned off. See
Traction Control/Electronic Stability Control
0 218.
Page 262 of 384
GMC Acadia/Acadia Denali Owner Manual (GMNA-Localizing-U.S./Canada/
Mexico-16402009) - 2023 - CRC - 3/28/22
Vehicle Care 261
Vehicle Care
General Information
General Information . . . . . . . . . . . . . . . . . . . 262
California Perchlorate MaterialsRequirements . . . . . . . . . . . . . . . . . . . . . . . . 262
Accessories and Modifications . . . . . . . . . 262
Vehicle Checks
Doing Your Own Service Work . . . . . . . . 262
Doing Your Own Service Work . . . . . . . . 263
Hood . . . . . . . . . . . . . . . . . . . . . . . . . . . . . . . . . . 263
Engine Compartment Overview . . . . . . . . 265
Engine Oil . . . . . . . . . . . . . . . . . . . . . . . . . . . . . 268
Engine Oil Life System . . . . . . . . . . . . . . . . 270
Automatic Transmission Fluid . . . . . . . . . 270
Engine Air Filter Life System . . . . . . . . . . . 271
Engine Air Cleaner/Filter . . . . . . . . . . . . . . . 271
Cooling System . . . . . . . . . . . . . . . . . . . . . . . . 272
Engine Overheating . . . . . . . . . . . . . . . . . . . 276
Washer Fluid . . . . . . . . . . . . . . . . . . . . . . . . . . 277
Brakes . . . . . . . . . . . . . . . . . . . . . . . . . . . . . . . . . 278
Brake Fluid . . . . . . . . . . . . . . . . . . . . . . . . . . . . 278
Battery - North America . . . . . . . . . . . . . . . 279
All-Wheel Drive . . . . . . . . . . . . . . . . . . . . . . . 280
Park Brake and P (Park) Mechanism Check . . . . . . . . . . . . . . . . . . . . . . . . . . . . . . . 280
Wiper Blade Replacement . . . . . . . . . . . . . 281
Windshield Replacement . . . . . . . . . . . . . . . 281
Gas Strut(s) . . . . . . . . . . . . . . . . . . . . . . . . . . . 282
Headlamp Aiming
Front Headlamp Aiming . . . . . . . . . . . . . . . 283
Bulb Replacement
Bulb Replacement . . . . . . . . . . . . . . . . . . . . . 283
Halogen Bulbs . . . . . . . . . . . . . . . . . . . . . . . . . 283
LED Lighting . . . . . . . . . . . . . . . . . . . . . . . . . . . 283
Electrical System
Electrical System Overload . . . . . . . . . . . . 283
Fuses and Circuit Breakers . . . . . . . . . . . . . 285
Engine Compartment Fuse Block . . . . . . 285
Instrument Panel Fuse Block . . . . . . . . . . 288
Rear Compartment Fuse Block . . . . . . . . 290
Wheels and Tires
Tires . . . . . . . . . . . . . . . . . . . . . . . . . . . . . . . . . . 293
All-Season Tires . . . . . . . . . . . . . . . . . . . . . . . 293
Winter Tires . . . . . . . . . . . . . . . . . . . . . . . . . . . 294
Summer Tires . . . . . . . . . . . . . . . . . . . . . . . . . 294
All-Terrain Tires . . . . . . . . . . . . . . . . . . . . . . . 294
Tire Sidewall Labeling . . . . . . . . . . . . . . . . . 294
Tire Designations . . . . . . . . . . . . . . . . . . . . . . 296
Tire Terminology and Definitions . . . . . . 297
Tire Pressure . . . . . . . . . . . . . . . . . . . . . . . . . . 299
Tire Pressure for High-Speed Operation . . . . . . . . . . . . . . . . . . . . . . . . . . . 300
Tire Pressure Monitor System . . . . . . . . . 301
Tire Pressure Monitor Operation . . . . . . 302
Tire Inspection . . . . . . . . . . . . . . . . . . . . . . . . 305
Tire Rotation . . . . . . . . . . . . . . . . . . . . . . . . . . 305 When It Is Time for New Tires . . . . . . . . 306
Buying New Tires . . . . . . . . . . . . . . . . . . . . . 307
Different Size Tires and Wheels . . . . . . . 308
Uniform Tire Quality Grading . . . . . . . . . 308
Wheel Alignment and Tire Balance . . . . 309
Wheel Replacement . . . . . . . . . . . . . . . . . . . 310
Tire Chains . . . . . . . . . . . . . . . . . . . . . . . . . . . . 310
If a Tire Goes Flat . . . . . . . . . . . . . . . . . . . . . . 311
Tire Sealant and Compressor Kit . . . . . . . 312
Storing the Tire Sealant and
Compressor Kit . . . . . . . . . . . . . . . . . . . . . . 318
Tire Changing . . . . . . . . . . . . . . . . . . . . . . . . . . 318
Compact Spare Tire . . . . . . . . . . . . . . . . . . . . 323
Jump Starting
Jump Starting - North America . . . . . . . . 324
Towing the Vehicle
Transporting a Disabled Vehicle . . . . . . . 326
Recreational Vehicle Towing . . . . . . . . . . . 327
Appearance Care
Exterior Care . . . . . . . . . . . . . . . . . . . . . . . . . . 329
Interior Care . . . . . . . . . . . . . . . . . . . . . . . . . . . 333
Floor Mats . . . . . . . . . . . . . . . . . . . . . . . . . . . . 336
Page 271 of 384
GMC Acadia/Acadia Denali Owner Manual (GMNA-Localizing-U.S./Canada/
Mexico-16402009) - 2023 - CRC - 3/28/22
270 Vehicle Care
Used oil can be a threat to the environment.
If you change your own oil, be sure to drain
all the oil from the filter before disposal.
Never dispose of oil by putting it in the
trash or pouring it on the ground, into
sewers, or into streams or bodies of water.
Recycle it by taking it to a place that
collects used oil.
Engine Oil Life System
When to Change Engine Oil
This vehicle has a computer system that
indicates when to change the engine oil and
filter. This is based on a combination of
factors which include engine revolutions,
engine temperature, and miles driven. Based
on driving conditions, the mileage at which
an oil change is indicated can vary
considerably. For the oil life system to work
properly, the system must be reset every
time the oil is changed.
When the system has calculated that oil life
has been diminished, it indicates that an oil
change is necessary. A CHANGE ENGINE OIL
SOON message comes on. Change the oil as
soon as possible within the next 1 000 km
(600 mi). It is possible that, if driving under
the best conditions, the oil life system
might indicate that an oil change is notnecessary for up to a year. The engine oil
and filter must be changed at least once a
year and, at this time, the system must be
reset. Your dealer has trained service people
who will perform this work and reset the
system. It is also important to check the oil
regularly over the course of an oil drain
interval and keep it at the proper level.
If the system is ever reset accidentally, the
oil must be changed at 5 000 km (3,000 mi)
since the last oil change. Remember to reset
the oil life system whenever the oil is
changed.
How to Reset the Engine Oil Life System
Reset the system whenever the engine oil is
changed so that the system can calculate
the next engine oil change. To reset the
system:
1. Display the REMAINING OIL LIFE on the DIC. See Driver Information Center (DIC)
(Base Level) 0114 orDriver Information
Center (DIC) (Midlevel) 0116 or
Driver Information Center (DIC) (Uplevel)
0 119.
2. Press and hold
Von the DIC while the
Oil Life display is active. The oil life will
change to 100%. If the CHANGE ENGINE OIL SOON message
comes back on when the vehicle is started,
the engine oil life system has not been
reset. Repeat the procedure.
Automatic Transmission Fluid
It is not necessary to check the transmission
fluid level. A transmission fluid leak is the
only reason for fluid loss. If a leak occurs,
take the vehicle to the dealer and have it
repaired as soon as possible.
Change the fluid at the intervals listed in
Maintenance Schedule
0339, and be sure to
use the transmission fluid listed in
Recommended Fluids and Lubricants 0343.
Caution
Use of the incorrect automatic
transmission fluid may damage the
vehicle, and the damage may not be
covered by the vehicle warranty. Always
use the correct automatic transmission
fluid. See Recommended Fluids and
Lubricants 0343.
If you need to check the transmission fluid
level, take the vehicle to your dealer.
Page 277 of 384

GMC Acadia/Acadia Denali Owner Manual (GMNA-Localizing-U.S./Canada/
Mexico-16402009) - 2023 - CRC - 3/28/22
276 Vehicle Care
6. Verify coolant level after the engine isshut off and the coolant is cold.
If necessary, repeat coolant fill procedure
Steps 1–6.
If the coolant still is not at the proper
level when the system cools down again,
see your dealer.
Caution
If the pressure cap is not tightly installed,
coolant loss and engine damage may
occur. Be sure the cap is properly and
tightly secured.
Automatic Coolant Service Fill (2.0L L4
Engine Only)
If equipped, this feature assists in filling and
removing air from the cooling system after
service of components or when coolant is
added after being too low.
To activate the fill and air removal process:
1. With a cold system, disconnect the vent line from the port near the cap on the
surge tank. Add coolant to the indicated
mark on the surge tank.
2. Reconnect the vent line to the surge tank and replace the cap on the
surge tank. 3. Connect the vehicle to a battery charger.
4. Put the vehicle in Service Mode. See
Ignition Positions 0204.
5. Turn off the air conditioning.
6. Set the parking brake.
7. At the same time, press the accelerator and the brake for automatic transmission
vehicles for two seconds, then release.
At the end of the cycle, check the coolant
level in the surge tank and add coolant, if it
is low. Turn off the vehicle, allow the Engine
Control Module (ECM) to go to sleep, about
two minutes, and repeat steps 3-7.
Listen for pump activation and movement of
the control valves while watching the level
of the tank. If the tank empties, turn the
ignition off, carefully remove the surge tank
cap, refill to the indicated mark and repeat
steps 3-6. The fill and air removal process
will run for approximately 10 minutes.
Engine Overheating
The vehicle has several indicators to warn of
the engine overheating. There is an engine coolant temperature
gauge on the instrument cluster. See
Engine
Coolant Temperature Gauge 0103. The
vehicle may also display a message on the
Driver Information Center (DIC).
If the decision is made not to lift the hood
when this warning appears, get service help
right away. See Roadside Assistance Program
0 354.
If the decision is made to lift the hood,
make sure the vehicle is parked on a level
surface. Then check to see if the engine
cooling fan is running. If the engine is
overheating, the fan should be running. If it
is not, do not continue to run the engine.
Have the vehicle serviced.
Caution
Do not run the engine if there is a leak
in the engine cooling system. This can
cause a loss of all coolant and can
damage the system and vehicle. Have
any leaks fixed right away.
Page 281 of 384
GMC Acadia/Acadia Denali Owner Manual (GMNA-Localizing-U.S./Canada/
Mexico-16402009) - 2023 - CRC - 3/28/22
280 Vehicle Care
Some 12-volt battery chargers have an AGM
battery setting on the charger. If available,
use the AGM setting on the charger to limit
charge voltage to 14.8 volts. Follow the
charger manufacturer's instructions.
Stop/Start System
The vehicle has a Stop/Start system to shut
off the engine to help conserve fuel. See
Stop/Start System0206.
{Warning
WARNING: Battery posts, terminals and
related accessories can expose you to
chemicals including lead and lead
compounds, which are known to the
State of California to cause cancer and
birth defects or other reproductive harm.
Wash hands after handling. For more
information go to
www.P65Warnings.ca.gov.
See California Proposition 65 Warning 01.
Vehicle Storage
{Warning
Batteries have acid that can burn you and
gas that can explode. You can be badly
hurt if you are not careful. Always wear
eye protection. See Jump Starting - North
America 0324 for tips on working around
a battery without getting hurt.
Infrequent Usage: Remove the black,
negative (−) cable from the battery to keep
the battery from running down.
Extended Storage: Remove the black,
negative (−) cable from the battery or use a
battery trickle charger.
All-Wheel Drive
Transfer Case
Under normal driving conditions, transfer
case fluid does not require maintenance
unless there is a fluid leak or unusual noise.
If required, have the transfer case serviced
by your dealer.
Park Brake and P (Park)
Mechanism Check
{Warning
When you are doing this check, the
vehicle could begin to move. You or
others could be injured and property
could be damaged. Make sure there is
room in front of the vehicle in case it
begins to roll. Be ready to apply the
regular brake at once should the vehicle
begin to move.
Park on a fairly steep hill, with the vehicle
facing downhill. Keeping your foot on the
regular brake, set the parking brake.
.To check the parking brake's holding
ability: With the engine running and the
transmission in N (Neutral), slowly remove
foot pressure from the regular brake
pedal. Do this until the vehicle is held by
the parking brake only.
.To check the P (Park) mechanism's holding
ability: With the engine running, shift to
P (Park). Then release the parking brake
followed by the regular brake.
Contact your dealer if service is required.
Page 288 of 384
GMC Acadia/Acadia Denali Owner Manual (GMNA-Localizing-U.S./Canada/
Mexico-16402009) - 2023 - CRC - 3/28/22
Vehicle Care 287
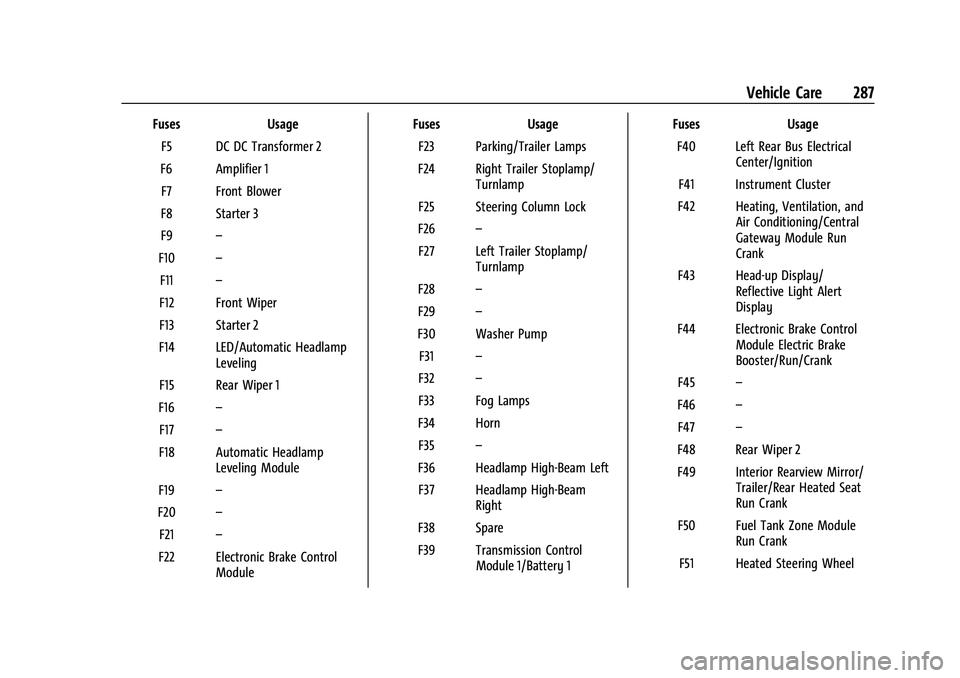
FusesUsage
F5 DC DC Transformer 2
F6 Amplifier 1 F7 Front Blower
F8 Starter 3
F9 –
F10 –
F11 –
F12 Front Wiper
F13 Starter 2
F14 LED/Automatic Headlamp Leveling
F15 Rear Wiper 1
F16 –
F17 –
F18 Automatic Headlamp Leveling Module
F19 –
F20 –
F21 –
F22 Electronic Brake Control Module Fuses
Usage
F23 Parking/Trailer Lamps
F24 Right Trailer Stoplamp/ Turnlamp
F25 Steering Column Lock
F26 –
F27 Left Trailer Stoplamp/ Turnlamp
F28 –
F29 –
F30 Washer Pump F31 –
F32 –
F33 Fog Lamps
F34 Horn F35 –
F36 Headlamp High-Beam Left F37 Headlamp High-Beam Right
F38 Spare
F39 Transmission Control Module 1/Battery 1 Fuses
Usage
F40 Left Rear Bus Electrical Center/Ignition
F41 Instrument Cluster
F42 Heating, Ventilation, and Air Conditioning/Central
Gateway Module Run
Crank
F43 Head-up Display/ Reflective Light Alert
Display
F44 Electronic Brake Control Module Electric Brake
Booster/Run/Crank
F45 –
F46 –
F47 –
F48 Rear Wiper 2
F49 Interior Rearview Mirror/ Trailer/Rear Heated Seat
Run Crank
F50 Fuel Tank Zone Module Run Crank
F51 Heated Steering Wheel
Page 289 of 384

GMC Acadia/Acadia Denali Owner Manual (GMNA-Localizing-U.S./Canada/
Mexico-16402009) - 2023 - CRC - 3/28/22
288 Vehicle Care
FusesUsage
F52 Air Conditioning Clutch
F53 Coolant Pump
F54 –
F55 –
F56 Spare F57 Engine Control Module/ Ignition
F58 Transmission Control Module/Ignition
F59 Engine Control Module Battery
F60 –
F61 O2 Sensor 1/Aeroshutter/ Mass Air Flow Sensor
F62 Engine Control Module–Odd
F63 O2 Sensor 2
F64 Engine Control Module–Even
F65 Engine Control Module Powertrain 1 Fuses
Usage
F66 Engine Control Module Powertrain 2
F67 Engine Control Module Powertrain 3
F68 –
F69 –
F70 –
F71 –
F72 –
F73 –
F74 –
F75 –
F76 –
F77 –
Relays Usage
K1 Starter 1
K2 Run/Crank
K3 Starter 3
K4 LED/Automatic Headlamps Relays
Usage
K5 –
K6 –
K7 Engine Control Module
K8 Air Conditioning
K9 –
K10 Starter 2
Instrument Panel Fuse Block
The instrument panel fuse block is inside the
center console on the passenger side of the
vehicle.
Page 291 of 384
GMC Acadia/Acadia Denali Owner Manual (GMNA-Localizing-U.S./Canada/
Mexico-16402009) - 2023 - CRC - 3/28/22
290 Vehicle Care
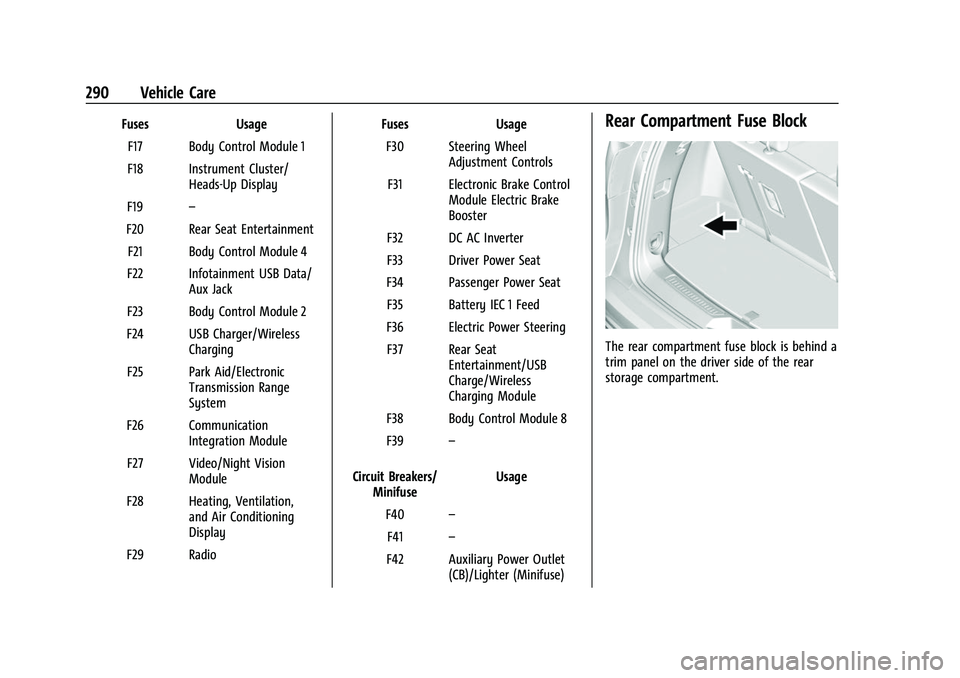
FusesUsage
F17 Body Control Module 1
F18 Instrument Cluster/ Heads-Up Display
F19 –
F20 Rear Seat Entertainment F21 Body Control Module 4
F22 Infotainment USB Data/ Aux Jack
F23 Body Control Module 2
F24 USB Charger/Wireless Charging
F25 Park Aid/Electronic Transmission Range
System
F26 Communication Integration Module
F27 Video/Night Vision Module
F28 Heating, Ventilation, and Air Conditioning
Display
F29 Radio Fuses
Usage
F30 Steering Wheel Adjustment Controls
F31 Electronic Brake Control Module Electric Brake
Booster
F32 DC AC Inverter
F33 Driver Power Seat
F34 Passenger Power Seat F35 Battery IEC 1 Feed
F36 Electric Power Steering F37 Rear Seat Entertainment/USB
Charge/Wireless
Charging Module
F38 Body Control Module 8
F39 –
Circuit Breakers/ Minifuse Usage
F40 –
F41 –
F42 Auxiliary Power Outlet (CB)/Lighter (Minifuse)Rear Compartment Fuse Block
The rear compartment fuse block is behind a
trim panel on the driver side of the rear
storage compartment.
Page 326 of 384
GMC Acadia/Acadia Denali Owner Manual (GMNA-Localizing-U.S./Canada/
Mexico-16402009) - 2023 - CRC - 3/28/22
Vehicle Care 325
Caution
If the jumper cables are connected or
removed in the wrong order, electrical
shorting may occur and damage the
vehicle. The repairs would not be covered
by the vehicle warranty. Always connect
and remove the jumper cables in the
correct order, making sure that the cables
do not touch each other or other metal.
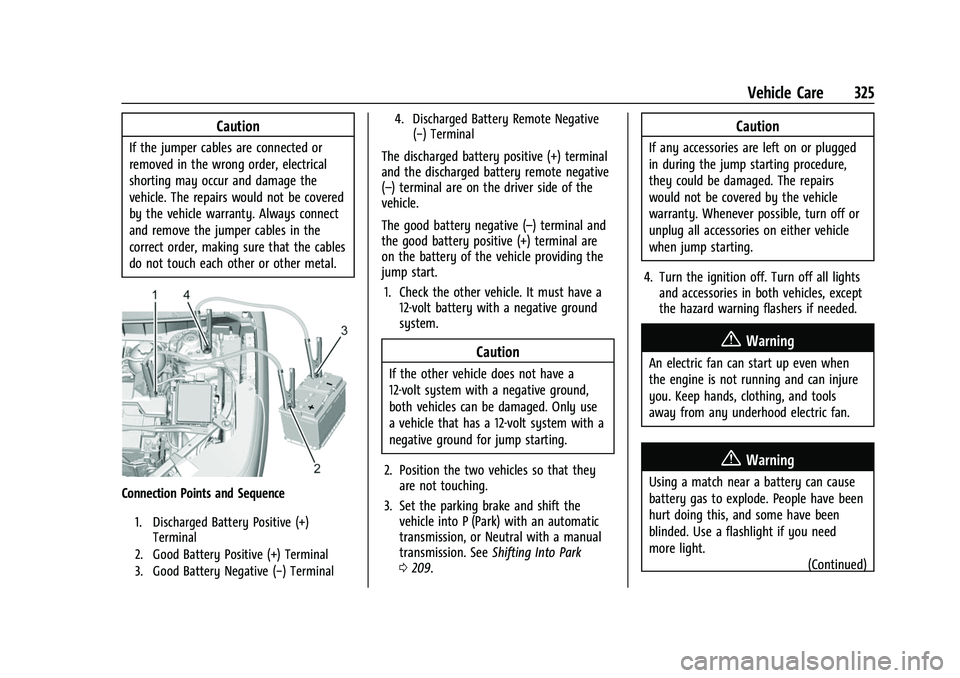
Connection Points and Sequence
1. Discharged Battery Positive (+)Terminal
2. Good Battery Positive (+) Terminal
3. Good Battery Negative (−) Terminal 4. Discharged Battery Remote Negative
(−) Terminal
The discharged battery positive (+) terminal
and the discharged battery remote negative
(–) terminal are on the driver side of the
vehicle.
The good battery negative (–) terminal and
the good battery positive (+) terminal are
on the battery of the vehicle providing the
jump start.
1. Check the other vehicle. It must have a 12-volt battery with a negative ground
system.
Caution
If the other vehicle does not have a
12-volt system with a negative ground,
both vehicles can be damaged. Only use
a vehicle that has a 12-volt system with a
negative ground for jump starting.
2. Position the two vehicles so that they are not touching.
3. Set the parking brake and shift the vehicle into P (Park) with an automatic
transmission, or Neutral with a manual
transmission. See Shifting Into Park
0 209.
Caution
If any accessories are left on or plugged
in during the jump starting procedure,
they could be damaged. The repairs
would not be covered by the vehicle
warranty. Whenever possible, turn off or
unplug all accessories on either vehicle
when jump starting.
4. Turn the ignition off. Turn off all lights and accessories in both vehicles, except
the hazard warning flashers if needed.
{Warning
An electric fan can start up even when
the engine is not running and can injure
you. Keep hands, clothing, and tools
away from any underhood electric fan.
{Warning
Using a match near a battery can cause
battery gas to explode. People have been
hurt doing this, and some have been
blinded. Use a flashlight if you need
more light.
(Continued)
Page 328 of 384
GMC Acadia/Acadia Denali Owner Manual (GMNA-Localizing-U.S./Canada/
Mexico-16402009) - 2023 - CRC - 3/28/22
Vehicle Care 327
Contact a professional towing service if the
disabled vehicle must be transported. GM
recommends a flatbed tow truck to
transport a disabled vehicle. Use ramps to
help reduce approach angles, if necessary.
If equipped, a tow eye may be located near
the spare tire or emergency jack. Do not use
the tow eye to pull the vehicle from the
snow, mud, sand, or ditch. Tow eye threads
may have right or left-hand threads. Use
caution when installing or removing the
tow eye.
The vehicle must be in N (Neutral) and the
electric parking brake must be released
when loading the vehicle onto a flatbed tow
truck.
.If the vehicle is equipped with car wash
mode and has 12-volt battery power, refer
to“Car Wash Mode” underAutomatic
Transmission 0211 to place the vehicle in
N (Neutral).
.If the 12-volt battery is dead and/or the
engine will not start, the vehicle will not
move. Try to jump start the vehicle. Refer
to Jump Starting - North America 0324
and if the jump start is successful, retry
the “Car Wash Mode” procedure.
.If jump starting is unsuccessful, the
vehicle will not move. Tire skates or
dollies must be used under the non-rolling
tires to prevent vehicle damage.
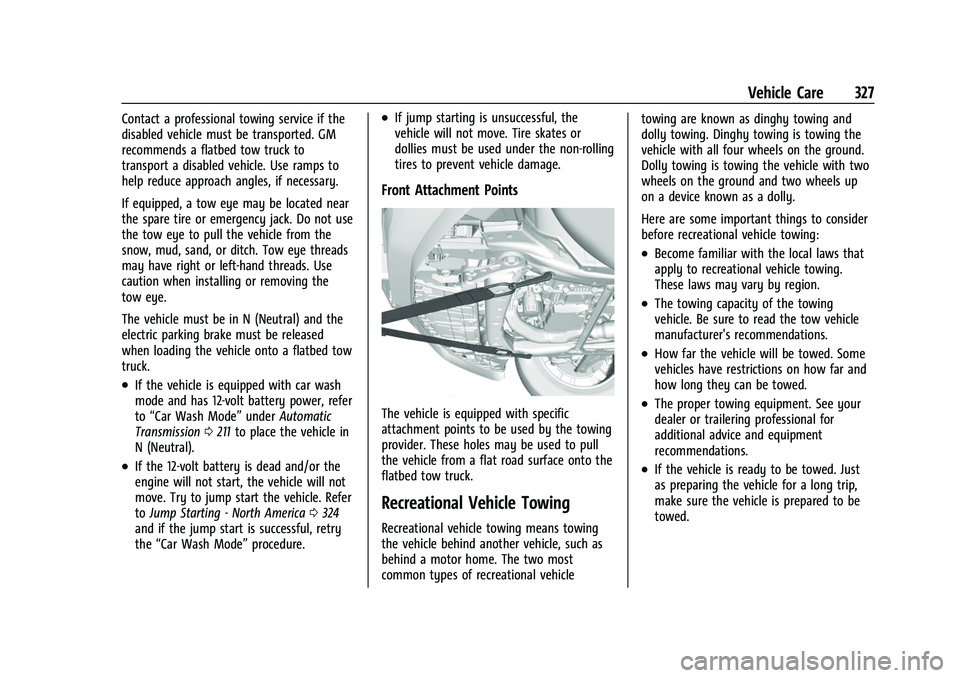
Front Attachment Points
The vehicle is equipped with specific
attachment points to be used by the towing
provider. These holes may be used to pull
the vehicle from a flat road surface onto the
flatbed tow truck.
Recreational Vehicle Towing
Recreational vehicle towing means towing
the vehicle behind another vehicle, such as
behind a motor home. The two most
common types of recreational vehicle towing are known as dinghy towing and
dolly towing. Dinghy towing is towing the
vehicle with all four wheels on the ground.
Dolly towing is towing the vehicle with two
wheels on the ground and two wheels up
on a device known as a dolly.
Here are some important things to consider
before recreational vehicle towing:
.Become familiar with the local laws that
apply to recreational vehicle towing.
These laws may vary by region.
.The towing capacity of the towing
vehicle. Be sure to read the tow vehicle
manufacturer's recommendations.
.How far the vehicle will be towed. Some
vehicles have restrictions on how far and
how long they can be towed.
.The proper towing equipment. See your
dealer or trailering professional for
additional advice and equipment
recommendations.
.If the vehicle is ready to be towed. Just
as preparing the vehicle for a long trip,
make sure the vehicle is prepared to be
towed.