stop start GMC ACADIA 2023 Workshop Manual
[x] Cancel search | Manufacturer: GMC, Model Year: 2023, Model line: ACADIA, Model: GMC ACADIA 2023Pages: 384, PDF Size: 17.04 MB
Page 288 of 384
GMC Acadia/Acadia Denali Owner Manual (GMNA-Localizing-U.S./Canada/
Mexico-16402009) - 2023 - CRC - 3/28/22
Vehicle Care 287
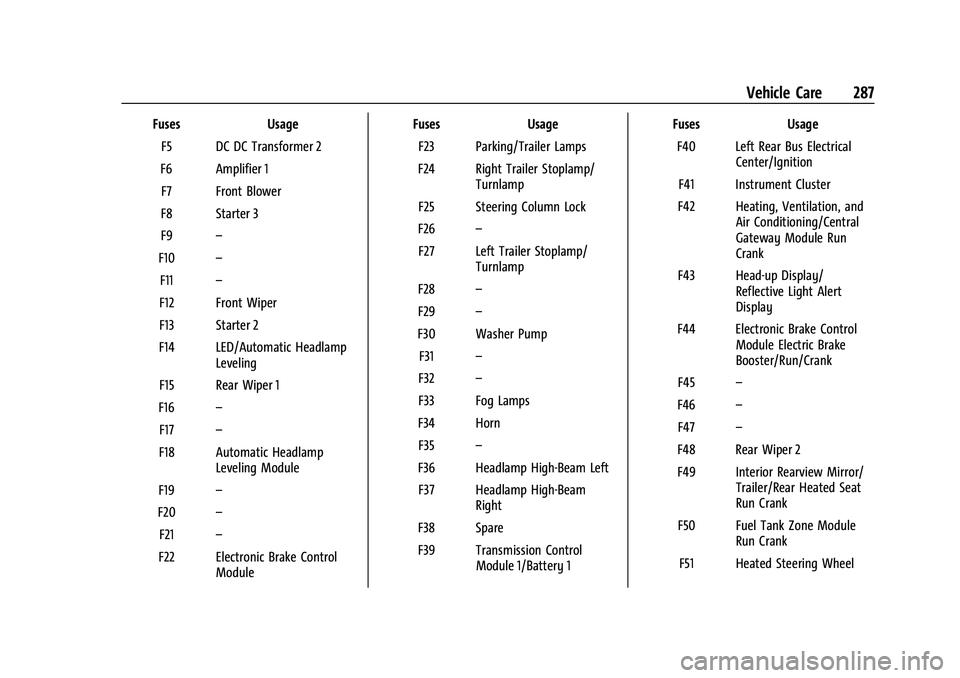
FusesUsage
F5 DC DC Transformer 2
F6 Amplifier 1 F7 Front Blower
F8 Starter 3
F9 –
F10 –
F11 –
F12 Front Wiper
F13 Starter 2
F14 LED/Automatic Headlamp Leveling
F15 Rear Wiper 1
F16 –
F17 –
F18 Automatic Headlamp Leveling Module
F19 –
F20 –
F21 –
F22 Electronic Brake Control Module Fuses
Usage
F23 Parking/Trailer Lamps
F24 Right Trailer Stoplamp/ Turnlamp
F25 Steering Column Lock
F26 –
F27 Left Trailer Stoplamp/ Turnlamp
F28 –
F29 –
F30 Washer Pump F31 –
F32 –
F33 Fog Lamps
F34 Horn F35 –
F36 Headlamp High-Beam Left F37 Headlamp High-Beam Right
F38 Spare
F39 Transmission Control Module 1/Battery 1 Fuses
Usage
F40 Left Rear Bus Electrical Center/Ignition
F41 Instrument Cluster
F42 Heating, Ventilation, and Air Conditioning/Central
Gateway Module Run
Crank
F43 Head-up Display/ Reflective Light Alert
Display
F44 Electronic Brake Control Module Electric Brake
Booster/Run/Crank
F45 –
F46 –
F47 –
F48 Rear Wiper 2
F49 Interior Rearview Mirror/ Trailer/Rear Heated Seat
Run Crank
F50 Fuel Tank Zone Module Run Crank
F51 Heated Steering Wheel
Page 302 of 384
GMC Acadia/Acadia Denali Owner Manual (GMNA-Localizing-U.S./Canada/
Mexico-16402009) - 2023 - CRC - 3/28/22
Vehicle Care 301
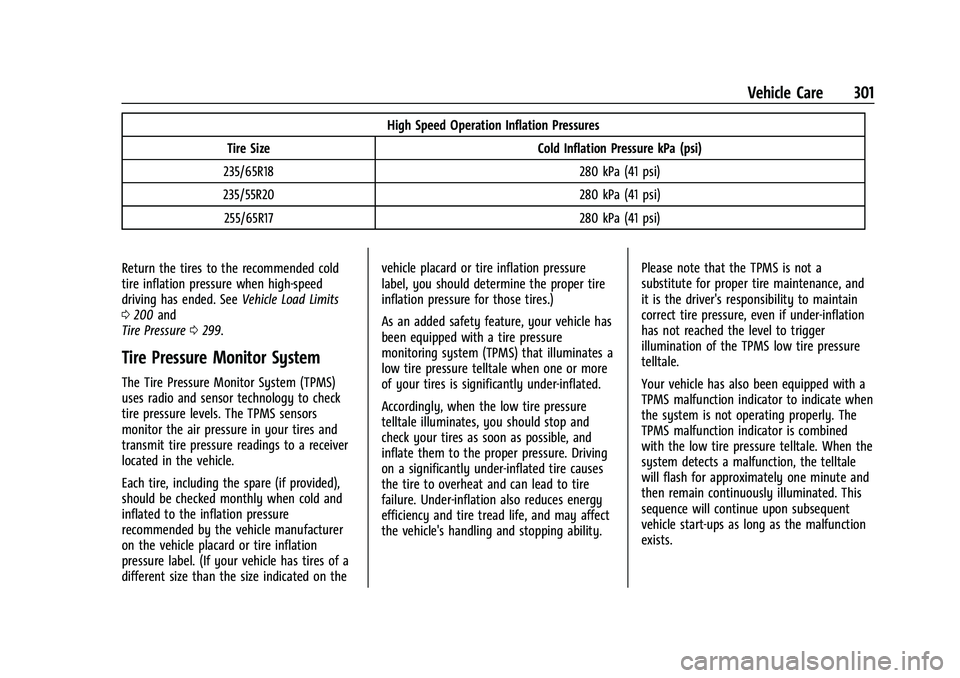
High Speed Operation Inflation Pressures
Tire Size Cold Inflation Pressure kPa (psi)
235/65R18 280 kPa (41 psi)
235/55R20 280 kPa (41 psi) 255/65R17 280 kPa (41 psi)
Return the tires to the recommended cold
tire inflation pressure when high-speed
driving has ended. See Vehicle Load Limits
0 200 and
Tire Pressure 0299.
Tire Pressure Monitor System
The Tire Pressure Monitor System (TPMS)
uses radio and sensor technology to check
tire pressure levels. The TPMS sensors
monitor the air pressure in your tires and
transmit tire pressure readings to a receiver
located in the vehicle.
Each tire, including the spare (if provided),
should be checked monthly when cold and
inflated to the inflation pressure
recommended by the vehicle manufacturer
on the vehicle placard or tire inflation
pressure label. (If your vehicle has tires of a
different size than the size indicated on the vehicle placard or tire inflation pressure
label, you should determine the proper tire
inflation pressure for those tires.)
As an added safety feature, your vehicle has
been equipped with a tire pressure
monitoring system (TPMS) that illuminates a
low tire pressure telltale when one or more
of your tires is significantly under-inflated.
Accordingly, when the low tire pressure
telltale illuminates, you should stop and
check your tires as soon as possible, and
inflate them to the proper pressure. Driving
on a significantly under-inflated tire causes
the tire to overheat and can lead to tire
failure. Under-inflation also reduces energy
efficiency and tire tread life, and may affect
the vehicle's handling and stopping ability.
Please note that the TPMS is not a
substitute for proper tire maintenance, and
it is the driver's responsibility to maintain
correct tire pressure, even if under-inflation
has not reached the level to trigger
illumination of the TPMS low tire pressure
telltale.
Your vehicle has also been equipped with a
TPMS malfunction indicator to indicate when
the system is not operating properly. The
TPMS malfunction indicator is combined
with the low tire pressure telltale. When the
system detects a malfunction, the telltale
will flash for approximately one minute and
then remain continuously illuminated. This
sequence will continue upon subsequent
vehicle start-ups as long as the malfunction
exists.
Page 303 of 384
GMC Acadia/Acadia Denali Owner Manual (GMNA-Localizing-U.S./Canada/
Mexico-16402009) - 2023 - CRC - 3/28/22
302 Vehicle Care
When the malfunction indicator is
illuminated, the system may not be able to
detect or signal low tire pressure as
intended. TPMS malfunctions may occur for
a variety of reasons, including the
installation of replacement or alternate tires
or wheels on the vehicle that prevent the
TPMS from functioning properly. Always
check the TPMS malfunction telltale after
replacing one or more tires or wheels on
your vehicle to ensure that the replacement
or alternate tires and wheels allow the
TPMS to continue to function properly.
SeeTire Pressure Monitor Operation 0302.
See Radio Frequency Statement 0359 or
Radio Frequency Statement 0359.
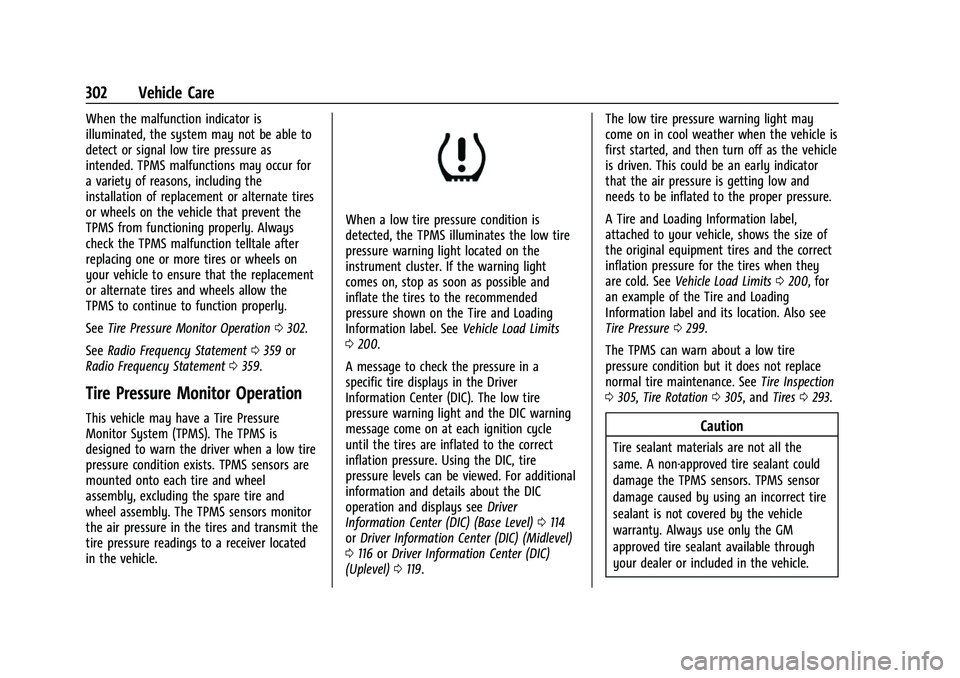
Tire Pressure Monitor Operation
This vehicle may have a Tire Pressure
Monitor System (TPMS). The TPMS is
designed to warn the driver when a low tire
pressure condition exists. TPMS sensors are
mounted onto each tire and wheel
assembly, excluding the spare tire and
wheel assembly. The TPMS sensors monitor
the air pressure in the tires and transmit the
tire pressure readings to a receiver located
in the vehicle.
When a low tire pressure condition is
detected, the TPMS illuminates the low tire
pressure warning light located on the
instrument cluster. If the warning light
comes on, stop as soon as possible and
inflate the tires to the recommended
pressure shown on the Tire and Loading
Information label. See Vehicle Load Limits
0 200.
A message to check the pressure in a
specific tire displays in the Driver
Information Center (DIC). The low tire
pressure warning light and the DIC warning
message come on at each ignition cycle
until the tires are inflated to the correct
inflation pressure. Using the DIC, tire
pressure levels can be viewed. For additional
information and details about the DIC
operation and displays see Driver
Information Center (DIC) (Base Level) 0114
or Driver Information Center (DIC) (Midlevel)
0 116 orDriver Information Center (DIC)
(Uplevel) 0119. The low tire pressure warning light may
come on in cool weather when the vehicle is
first started, and then turn off as the vehicle
is driven. This could be an early indicator
that the air pressure is getting low and
needs to be inflated to the proper pressure.
A Tire and Loading Information label,
attached to your vehicle, shows the size of
the original equipment tires and the correct
inflation pressure for the tires when they
are cold. See
Vehicle Load Limits 0200, for
an example of the Tire and Loading
Information label and its location. Also see
Tire Pressure 0299.
The TPMS can warn about a low tire
pressure condition but it does not replace
normal tire maintenance. See Tire Inspection
0 305, Tire Rotation 0305, and Tires0293.
Caution
Tire sealant materials are not all the
same. A non-approved tire sealant could
damage the TPMS sensors. TPMS sensor
damage caused by using an incorrect tire
sealant is not covered by the vehicle
warranty. Always use only the GM
approved tire sealant available through
your dealer or included in the vehicle.
Page 305 of 384
GMC Acadia/Acadia Denali Owner Manual (GMNA-Localizing-U.S./Canada/
Mexico-16402009) - 2023 - CRC - 3/28/22
304 Vehicle Care
Warning (Continued)
pressure listed on the tire sidewall. See
Tire Sidewall Labeling0294 and
Vehicle Load Limits 0200.
If the tire is overinflated by more than
35 kPa (5 psi), the horn will sound multiple
times and the turn signal lamp will continue
to flash for several seconds after filling
stops. To release and correct the pressure,
while the turn signal lamp is still flashing,
briefly press the center of the valve stem.
When the recommended pressure is reached,
the horn sounds once.
If the turn signal lamp does not flash within
15 seconds after starting to inflate the tire,
the tire fill alert has not been activated or is
not working.
If the hazard warning flashers are on, the
tire fill alert visual feedback will not work
properly.
The TPMS will not activate the tire fill alert
properly under the following conditions:
.There is interference from an external
device or transmitter.
.The air pressure from the inflation device
is not sufficient to inflate the tire.
.There is a malfunction in the TPMS.
.There is a malfunction in the horn or turn
signal lamps.
.The identification code of the TPMS
sensor is not registered to the system.
.The battery of the TPMS sensor is low.
If the tire fill alert does not operate due to
TPMS interference, move the vehicle about
1 m (3 ft) back or forward and try again.
If the tire fill alert feature is not working,
use a tire pressure gauge.
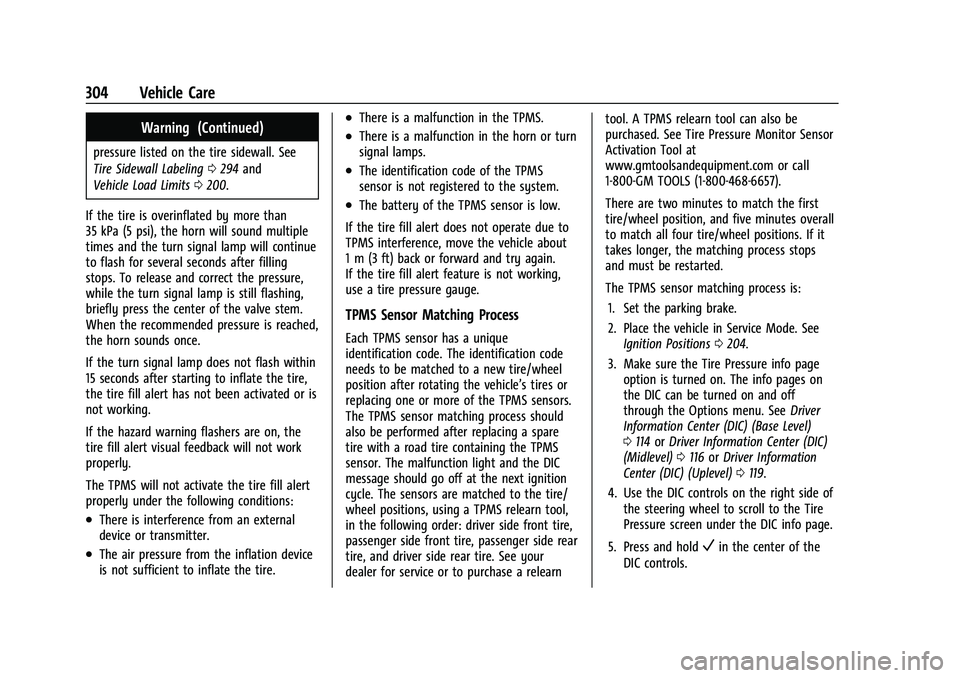
TPMS Sensor Matching Process
Each TPMS sensor has a unique
identification code. The identification code
needs to be matched to a new tire/wheel
position after rotating the vehicle’s tires or
replacing one or more of the TPMS sensors.
The TPMS sensor matching process should
also be performed after replacing a spare
tire with a road tire containing the TPMS
sensor. The malfunction light and the DIC
message should go off at the next ignition
cycle. The sensors are matched to the tire/
wheel positions, using a TPMS relearn tool,
in the following order: driver side front tire,
passenger side front tire, passenger side rear
tire, and driver side rear tire. See your
dealer for service or to purchase a relearn tool. A TPMS relearn tool can also be
purchased. See Tire Pressure Monitor Sensor
Activation Tool at
www.gmtoolsandequipment.com or call
1-800-GM TOOLS (1-800-468-6657).
There are two minutes to match the first
tire/wheel position, and five minutes overall
to match all four tire/wheel positions. If it
takes longer, the matching process stops
and must be restarted.
The TPMS sensor matching process is:
1. Set the parking brake.
2. Place the vehicle in Service Mode. See Ignition Positions 0204.
3. Make sure the Tire Pressure info page option is turned on. The info pages on
the DIC can be turned on and off
through the Options menu. See Driver
Information Center (DIC) (Base Level)
0 114 orDriver Information Center (DIC)
(Midlevel) 0116 orDriver Information
Center (DIC) (Uplevel) 0119.
4. Use the DIC controls on the right side of the steering wheel to scroll to the Tire
Pressure screen under the DIC info page.
5. Press and hold
Vin the center of the
DIC controls.
Page 313 of 384
GMC Acadia/Acadia Denali Owner Manual (GMNA-Localizing-U.S./Canada/
Mexico-16402009) - 2023 - CRC - 3/28/22
312 Vehicle Care
{Warning
Changing a tire can be dangerous. The
vehicle can slip off the jack and roll over
or fall causing injury or death. Find a
level place to change the tire. To help
prevent the vehicle from moving:1. Set the parking brake firmly.
2. Put the vehicle in P (Park).
3. Turn the vehicle off and do not restart the vehicle while it is raised.
4. Do not allow passengers to remain in the vehicle.
5. Place wheel blocks, if equipped, on both sides of the tire at the opposite
corner of the tire being changed.
This vehicle may come with a jack and spare
tire or a tire sealant and compressor kit. To
use the jacking equipment to change a spare
tire safely, follow the instructions below.
Then see Tire Changing 0318. To use the
tire sealant and compressor kit, see Tire
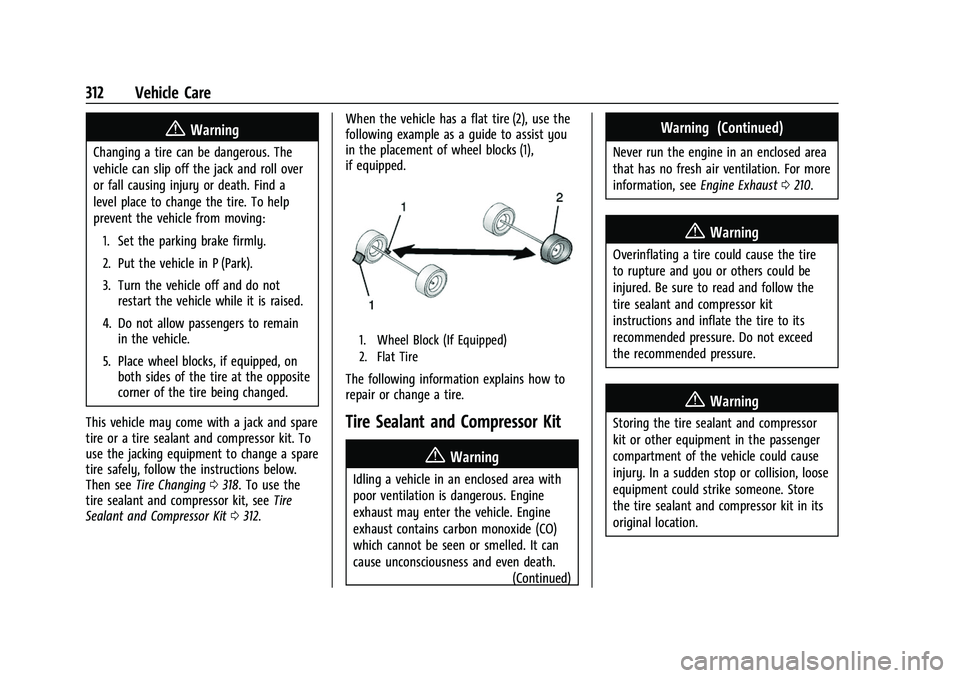
Sealant and Compressor Kit 0312. When the vehicle has a flat tire (2), use the
following example as a guide to assist you
in the placement of wheel blocks (1),
if equipped.
1. Wheel Block (If Equipped)
2. Flat Tire
The following information explains how to
repair or change a tire.
Tire Sealant and Compressor Kit
{Warning
Idling a vehicle in an enclosed area with
poor ventilation is dangerous. Engine
exhaust may enter the vehicle. Engine
exhaust contains carbon monoxide (CO)
which cannot be seen or smelled. It can
cause unconsciousness and even death.
(Continued)
Warning (Continued)
Never run the engine in an enclosed area
that has no fresh air ventilation. For more
information, seeEngine Exhaust0210.
{Warning
Overinflating a tire could cause the tire
to rupture and you or others could be
injured. Be sure to read and follow the
tire sealant and compressor kit
instructions and inflate the tire to its
recommended pressure. Do not exceed
the recommended pressure.
{Warning
Storing the tire sealant and compressor
kit or other equipment in the passenger
compartment of the vehicle could cause
injury. In a sudden stop or collision, loose
equipment could strike someone. Store
the tire sealant and compressor kit in its
original location.
Page 329 of 384
GMC Acadia/Acadia Denali Owner Manual (GMNA-Localizing-U.S./Canada/
Mexico-16402009) - 2023 - CRC - 3/28/22
328 Vehicle Care
Caution
Use of a shield mounted in front of the
vehicle grille could restrict airflow and
cause damage to the transmission. The
repairs would not be covered by the
vehicle warranty. If using a shield, only
use one that attaches to the towing
vehicle.
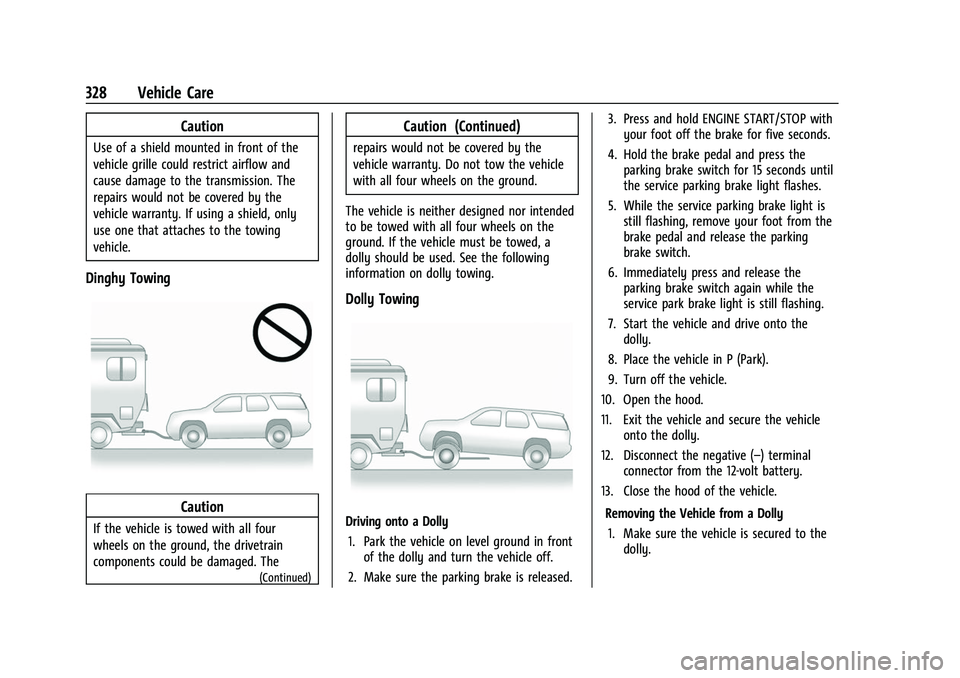
Dinghy Towing
Caution
If the vehicle is towed with all four
wheels on the ground, the drivetrain
components could be damaged. The
(Continued)
Caution (Continued)
repairs would not be covered by the
vehicle warranty. Do not tow the vehicle
with all four wheels on the ground.
The vehicle is neither designed nor intended
to be towed with all four wheels on the
ground. If the vehicle must be towed, a
dolly should be used. See the following
information on dolly towing.
Dolly Towing
Driving onto a Dolly 1. Park the vehicle on level ground in front of the dolly and turn the vehicle off.
2. Make sure the parking brake is released. 3. Press and hold ENGINE START/STOP with
your foot off the brake for five seconds.
4. Hold the brake pedal and press the parking brake switch for 15 seconds until
the service parking brake light flashes.
5. While the service parking brake light is still flashing, remove your foot from the
brake pedal and release the parking
brake switch.
6. Immediately press and release the parking brake switch again while the
service park brake light is still flashing.
7. Start the vehicle and drive onto the dolly.
8. Place the vehicle in P (Park).
9. Turn off the vehicle.
10. Open the hood.
11. Exit the vehicle and secure the vehicle onto the dolly.
12. Disconnect the negative (–) terminal connector from the 12-volt battery.
13. Close the hood of the vehicle.
Removing the Vehicle from a Dolly1. Make sure the vehicle is secured to the dolly.
Page 330 of 384
GMC Acadia/Acadia Denali Owner Manual (GMNA-Localizing-U.S./Canada/
Mexico-16402009) - 2023 - CRC - 3/28/22
Vehicle Care 329
2. Open the door and open the hood of thevehicle.
3. Connect the negative (–) terminal connector from the 12-volt battery.
4. Press and hold ENGINE START/STOP with your foot off the brake for five seconds.
5. Hold the brake pedal and press the parking brake switch for five seconds
until the parking brake light flashes.
6. Turn the vehicle off.
7. Unsecure the vehicle and remove it from the dolly.
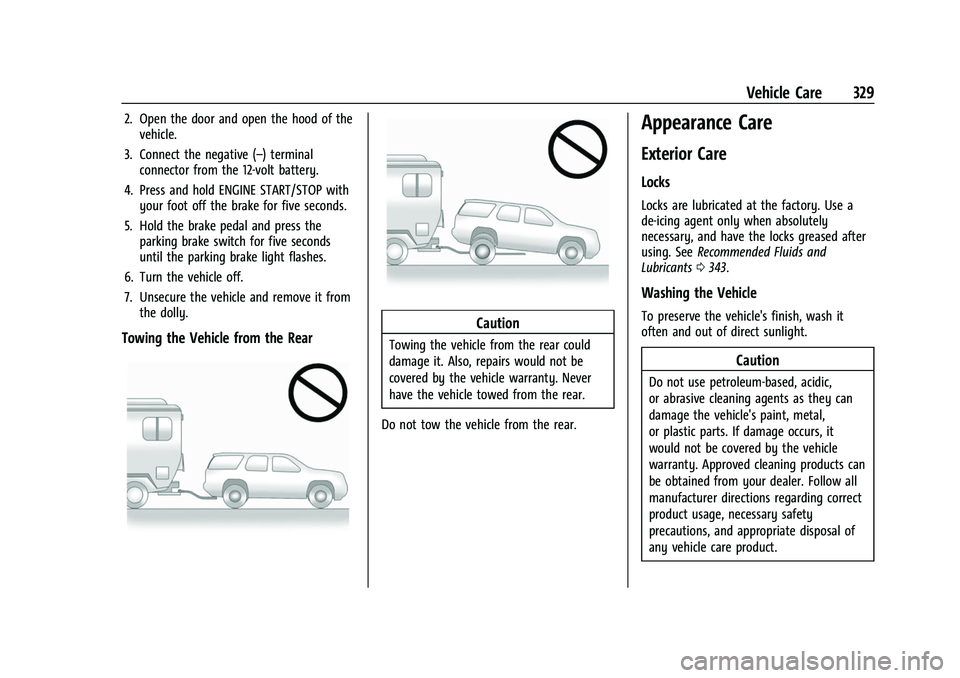
Towing the Vehicle from the RearCaution
Towing the vehicle from the rear could
damage it. Also, repairs would not be
covered by the vehicle warranty. Never
have the vehicle towed from the rear.
Do not tow the vehicle from the rear.
Appearance Care
Exterior Care
Locks
Locks are lubricated at the factory. Use a
de-icing agent only when absolutely
necessary, and have the locks greased after
using. See Recommended Fluids and
Lubricants 0343.
Washing the Vehicle
To preserve the vehicle's finish, wash it
often and out of direct sunlight.
Caution
Do not use petroleum-based, acidic,
or abrasive cleaning agents as they can
damage the vehicle's paint, metal,
or plastic parts. If damage occurs, it
would not be covered by the vehicle
warranty. Approved cleaning products can
be obtained from your dealer. Follow all
manufacturer directions regarding correct
product usage, necessary safety
precautions, and appropriate disposal of
any vehicle care product.
Page 370 of 384
GMC Acadia/Acadia Denali Owner Manual (GMNA-Localizing-U.S./Canada/
Mexico-16402009) - 2023 - CRC - 3/28/22
Connected Services 369
Ensuring Security
.Change the default passwords for the
Wi-Fi hotspot and myGMC mobile
application. Make these passwords
different from each other and use a
combination of letters and numbers to
increase the security.
.Change the default name of the SSID
(Service Set Identifier). This is your
network’s name that is visible to other
wireless devices. Choose a unique name
and avoid family names or vehicle
descriptions.
Wi-Fi Hotspot (If Equipped)
The vehicle may have a built-in Wi-Fi
hotspot that provides access to the Internet
and web content at 4G LTE speed. Up to
seven mobile devices can be connected.
A data plan is required. Use the in-vehicle
controls only when it is safe to do so. 1. To retrieve Wi-Fi hotspot information, press
=to open the OnStar app on the
infotainment display, then select Wi-Fi
Hotspot. On some vehicles, touch Wi-Fi
or Wi-Fi Settings on the screen.
2. The Wi-Fi settings will display the Wi-Fi hotspot name (SSID), password, and on
some vehicles, the connection type (no Internet connection, 3G, 4G, 4G LTE), and
signal quality (poor, good, excellent). The
LTE icon shows connection to Wi-Fi. It is
possible that the icon may not illuminate
even though the vehicle has an active
connection.
3. To change the SSID or password, press
Qor call 1-888-4ONSTAR to connect
with an Advisor. On some vehicles, the
SSID and password can be changed in
the Wi-Fi Hotspot menu.
After initial set-up, your vehicle’s Wi-Fi
hotspot will connect automatically to your
mobile devices. Manage data usage by
turning Wi-Fi on or off on your mobile
device, using the myGMC mobile app, or by
contacting an OnStar Advisor. On some
vehicles, Wi-Fi can also be managed from
the Wi-Fi Hotspot menu.
MyGMC Mobile App (If Available)
Download the myGMC mobile app to
compatible Apple and Android smartphones.
GMC users can access the following services
from a smartphone:
.Remotely start/stop the vehicle,
if factory-equipped.
.Lock/unlock doors, if equipped with
automatic locks.
.Activate the horn and lamps.
.Check the vehicle’s fuel level, oil life,
or tire pressure, if factory-equipped
with the Tire Pressure Monitor System.
.Send destinations to the vehicle.
.Locate the vehicle on a map (U.S.
market only).
.Turn the vehicle's Wi-Fi hotspot on/off,
manage settings, and monitor data
consumption, if equipped.
.Locate a dealer and schedule service.
.Request Roadside Assistance.
.Set a parking reminder with pin drop,
take a photo, make a note, and set a
timer.
.Connect with GMC on social media.
Features are subject to change. For myGMC
mobile app information and compatibility,
see my.gmc.com.
An active OnStar or connected service plan
may be required. A compatible device,
factory-installed remote start, and power
locks are required. Data rates apply. See
www.onstar.com for details and system
limitations.
Page 381 of 384
GMC Acadia/Acadia Denali Owner Manual (GMNA-Localizing-U.S./Canada/-
Mexico-16402009) - 2023 - CRC - 3/28/22
380 Index
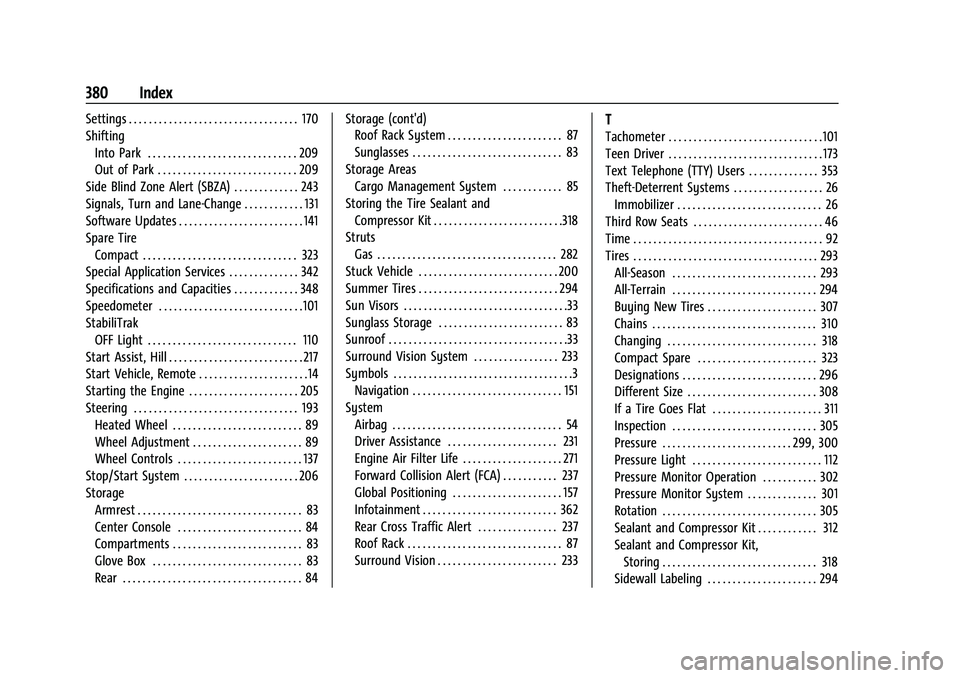
Settings . . . . . . . . . . . . . . . . . . . . . . . . . . . . . . . . . . 170
ShiftingInto Park . . . . . . . . . . . . . . . . . . . . . . . . . . . . . . 209
Out of Park . . . . . . . . . . . . . . . . . . . . . . . . . . . . 209
Side Blind Zone Alert (SBZA) . . . . . . . . . . . . . 243
Signals, Turn and Lane-Change . . . . . . . . . . . . 131
Software Updates . . . . . . . . . . . . . . . . . . . . . . . . . 141
Spare Tire Compact . . . . . . . . . . . . . . . . . . . . . . . . . . . . . . . 323
Special Application Services . . . . . . . . . . . . . . 342
Specifications and Capacities . . . . . . . . . . . . . 348
Speedometer . . . . . . . . . . . . . . . . . . . . . . . . . . . . .101
StabiliTrak OFF Light . . . . . . . . . . . . . . . . . . . . . . . . . . . . . . 110
Start Assist, Hill . . . . . . . . . . . . . . . . . . . . . . . . . . . 217
Start Vehicle, Remote . . . . . . . . . . . . . . . . . . . . . .14
Starting the Engine . . . . . . . . . . . . . . . . . . . . . . 205
Steering . . . . . . . . . . . . . . . . . . . . . . . . . . . . . . . . . 193 Heated Wheel . . . . . . . . . . . . . . . . . . . . . . . . . . 89
Wheel Adjustment . . . . . . . . . . . . . . . . . . . . . . 89
Wheel Controls . . . . . . . . . . . . . . . . . . . . . . . . . 137
Stop/Start System . . . . . . . . . . . . . . . . . . . . . . . 206
Storage Armrest . . . . . . . . . . . . . . . . . . . . . . . . . . . . . . . . . 83
Center Console . . . . . . . . . . . . . . . . . . . . . . . . . 84
Compartments . . . . . . . . . . . . . . . . . . . . . . . . . . 83
Glove Box . . . . . . . . . . . . . . . . . . . . . . . . . . . . . . 83
Rear . . . . . . . . . . . . . . . . . . . . . . . . . . . . . . . . . . . . 84 Storage (cont'd)
Roof Rack System . . . . . . . . . . . . . . . . . . . . . . . 87
Sunglasses . . . . . . . . . . . . . . . . . . . . . . . . . . . . . . 83
Storage Areas Cargo Management System . . . . . . . . . . . . 85
Storing the Tire Sealant and Compressor Kit . . . . . . . . . . . . . . . . . . . . . . . . . .318
Struts Gas . . . . . . . . . . . . . . . . . . . . . . . . . . . . . . . . . . . . 282
Stuck Vehicle . . . . . . . . . . . . . . . . . . . . . . . . . . . . 200
Summer Tires . . . . . . . . . . . . . . . . . . . . . . . . . . . . 294
Sun Visors . . . . . . . . . . . . . . . . . . . . . . . . . . . . . . . . .33
Sunglass Storage . . . . . . . . . . . . . . . . . . . . . . . . . 83
Sunroof . . . . . . . . . . . . . . . . . . . . . . . . . . . . . . . . . . . .33
Surround Vision System . . . . . . . . . . . . . . . . . 233
Symbols . . . . . . . . . . . . . . . . . . . . . . . . . . . . . . . . . . . .3 Navigation . . . . . . . . . . . . . . . . . . . . . . . . . . . . . . 151
System Airbag . . . . . . . . . . . . . . . . . . . . . . . . . . . . . . . . . . 54
Driver Assistance . . . . . . . . . . . . . . . . . . . . . . 231
Engine Air Filter Life . . . . . . . . . . . . . . . . . . . . 271
Forward Collision Alert (FCA) . . . . . . . . . . . 237
Global Positioning . . . . . . . . . . . . . . . . . . . . . . 157
Infotainment . . . . . . . . . . . . . . . . . . . . . . . . . . . 362
Rear Cross Traffic Alert . . . . . . . . . . . . . . . . 237
Roof Rack . . . . . . . . . . . . . . . . . . . . . . . . . . . . . . . 87
Surround Vision . . . . . . . . . . . . . . . . . . . . . . . . 233T
Tachometer . . . . . . . . . . . . . . . . . . . . . . . . . . . . . . .101
Teen Driver . . . . . . . . . . . . . . . . . . . . . . . . . . . . . . . 173
Text Telephone (TTY) Users . . . . . . . . . . . . . . 353
Theft-Deterrent Systems . . . . . . . . . . . . . . . . . . 26Immobilizer . . . . . . . . . . . . . . . . . . . . . . . . . . . . . 26
Third Row Seats . . . . . . . . . . . . . . . . . . . . . . . . . . 46
Time . . . . . . . . . . . . . . . . . . . . . . . . . . . . . . . . . . . . . . 92
Tires . . . . . . . . . . . . . . . . . . . . . . . . . . . . . . . . . . . . . 293 All-Season . . . . . . . . . . . . . . . . . . . . . . . . . . . . . 293
All-Terrain . . . . . . . . . . . . . . . . . . . . . . . . . . . . . 294
Buying New Tires . . . . . . . . . . . . . . . . . . . . . . 307
Chains . . . . . . . . . . . . . . . . . . . . . . . . . . . . . . . . . 310
Changing . . . . . . . . . . . . . . . . . . . . . . . . . . . . . . 318
Compact Spare . . . . . . . . . . . . . . . . . . . . . . . . 323
Designations . . . . . . . . . . . . . . . . . . . . . . . . . . . 296
Different Size . . . . . . . . . . . . . . . . . . . . . . . . . . 308
If a Tire Goes Flat . . . . . . . . . . . . . . . . . . . . . . 311
Inspection . . . . . . . . . . . . . . . . . . . . . . . . . . . . . 305
Pressure . . . . . . . . . . . . . . . . . . . . . . . . . . 299, 300
Pressure Light . . . . . . . . . . . . . . . . . . . . . . . . . . 112
Pressure Monitor Operation . . . . . . . . . . . 302
Pressure Monitor System . . . . . . . . . . . . . . 301
Rotation . . . . . . . . . . . . . . . . . . . . . . . . . . . . . . . 305
Sealant and Compressor Kit . . . . . . . . . . . . 312
Sealant and Compressor Kit,
Storing . . . . . . . . . . . . . . . . . . . . . . . . . . . . . . . 318
Sidewall Labeling . . . . . . . . . . . . . . . . . . . . . . 294