turn signal GMC ACADIA 2023 Owners Manual
[x] Cancel search | Manufacturer: GMC, Model Year: 2023, Model line: ACADIA, Model: GMC ACADIA 2023Pages: 384, PDF Size: 17.04 MB
Page 6 of 384
GMC Acadia/Acadia Denali Owner Manual (GMNA-Localizing-U.S./Canada/
Mexico-16402009) - 2023 - CRC - 3/28/22
Introduction 5
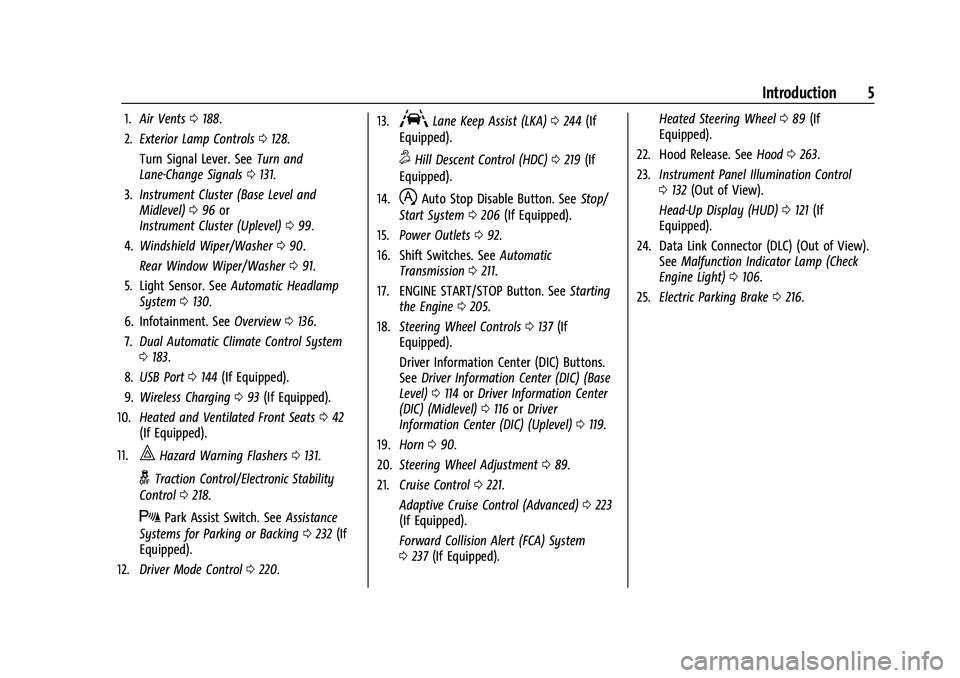
1.Air Vents 0188.
2. Exterior Lamp Controls 0128.
Turn Signal Lever. See Turn and
Lane-Change Signals 0131.
3. Instrument Cluster (Base Level and
Midlevel) 096 or
Instrument Cluster (Uplevel) 099.
4. Windshield Wiper/Washer 090.
Rear Window Wiper/Washer 091.
5. Light Sensor. See Automatic Headlamp
System 0130.
6. Infotainment. See Overview0136.
7. Dual Automatic Climate Control System
0183.
8. USB Port 0144 (If Equipped).
9. Wireless Charging 093 (If Equipped).
10. Heated and Ventilated Front Seats 042
(If Equipped).
11.
|Hazard Warning Flashers 0131.
gTraction Control/Electronic Stability
Control 0218.
XPark Assist Switch. See Assistance
Systems for Parking or Backing 0232 (If
Equipped).
12. Driver Mode Control 0220. 13.
ALane Keep Assist (LKA)
0244 (If
Equipped).
5Hill Descent Control (HDC) 0219 (If
Equipped).
14.
hAuto Stop Disable Button. See Stop/
Start System 0206 (If Equipped).
15. Power Outlets 092.
16. Shift Switches. See Automatic
Transmission 0211.
17. ENGINE START/STOP Button. See Starting
the Engine 0205.
18. Steering Wheel Controls 0137 (If
Equipped).
Driver Information Center (DIC) Buttons.
See Driver Information Center (DIC) (Base
Level) 0114 orDriver Information Center
(DIC) (Midlevel) 0116 orDriver
Information Center (DIC) (Uplevel) 0119.
19. Horn 090.
20. Steering Wheel Adjustment 089.
21. Cruise Control 0221.
Adaptive Cruise Control (Advanced) 0223
(If Equipped).
Forward Collision Alert (FCA) System
0 237 (If Equipped). Heated Steering Wheel
089 (If
Equipped).
22. Hood Release. See Hood0263.
23. Instrument Panel Illumination Control
0132 (Out of View).
Head-Up Display (HUD) 0121 (If
Equipped).
24. Data Link Connector (DLC) (Out of View). SeeMalfunction Indicator Lamp (Check
Engine Light) 0106.
25. Electric Parking Brake 0216.
Page 8 of 384
GMC Acadia/Acadia Denali Owner Manual (GMNA-Localizing-U.S./Canada/
Mexico-16402009) - 2023 - CRC - 3/28/22
Keys, Doors, and Windows 7
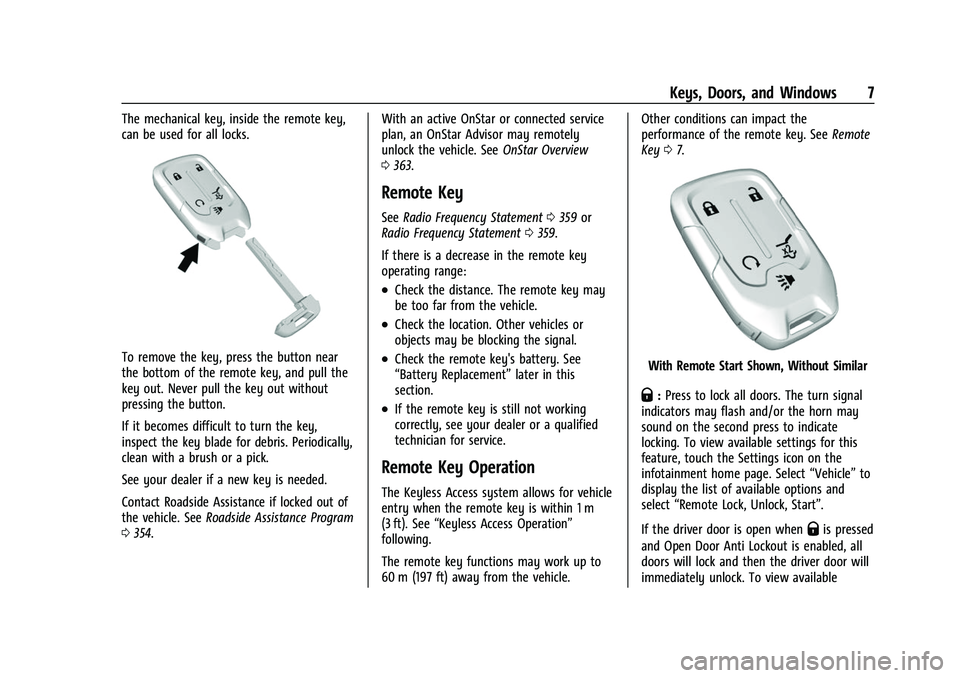
The mechanical key, inside the remote key,
can be used for all locks.
To remove the key, press the button near
the bottom of the remote key, and pull the
key out. Never pull the key out without
pressing the button.
If it becomes difficult to turn the key,
inspect the key blade for debris. Periodically,
clean with a brush or a pick.
See your dealer if a new key is needed.
Contact Roadside Assistance if locked out of
the vehicle. SeeRoadside Assistance Program
0 354. With an active OnStar or connected service
plan, an OnStar Advisor may remotely
unlock the vehicle. See
OnStar Overview
0 363.
Remote Key
See Radio Frequency Statement 0359 or
Radio Frequency Statement 0359.
If there is a decrease in the remote key
operating range:
.Check the distance. The remote key may
be too far from the vehicle.
.Check the location. Other vehicles or
objects may be blocking the signal.
.Check the remote key's battery. See
“Battery Replacement” later in this
section.
.If the remote key is still not working
correctly, see your dealer or a qualified
technician for service.
Remote Key Operation
The Keyless Access system allows for vehicle
entry when the remote key is within 1 m
(3 ft). See “Keyless Access Operation”
following.
The remote key functions may work up to
60 m (197 ft) away from the vehicle. Other conditions can impact the
performance of the remote key. See
Remote
Key 07.
With Remote Start Shown, Without Similar
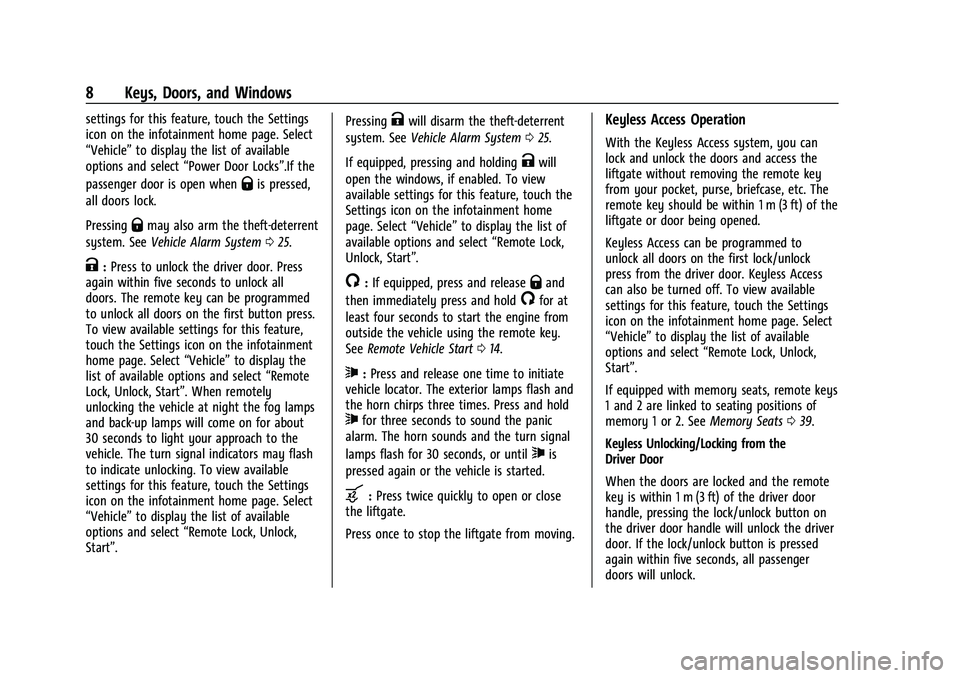
Q:Press to lock all doors. The turn signal
indicators may flash and/or the horn may
sound on the second press to indicate
locking. To view available settings for this
feature, touch the Settings icon on the
infotainment home page. Select “Vehicle”to
display the list of available options and
select “Remote Lock, Unlock, Start”.
If the driver door is open when
Qis pressed
and Open Door Anti Lockout is enabled, all
doors will lock and then the driver door will
immediately unlock. To view available
Page 9 of 384
GMC Acadia/Acadia Denali Owner Manual (GMNA-Localizing-U.S./Canada/
Mexico-16402009) - 2023 - CRC - 3/28/22
8 Keys, Doors, and Windows
settings for this feature, touch the Settings
icon on the infotainment home page. Select
“Vehicle”to display the list of available
options and select “Power Door Locks”.If the
passenger door is open when
Qis pressed,
all doors lock.
Pressing
Qmay also arm the theft-deterrent
system. See Vehicle Alarm System 025.
K:Press to unlock the driver door. Press
again within five seconds to unlock all
doors. The remote key can be programmed
to unlock all doors on the first button press.
To view available settings for this feature,
touch the Settings icon on the infotainment
home page. Select “Vehicle”to display the
list of available options and select “Remote
Lock, Unlock, Start”. When remotely
unlocking the vehicle at night the fog lamps
and back-up lamps will come on for about
30 seconds to light your approach to the
vehicle. The turn signal indicators may flash
to indicate unlocking. To view available
settings for this feature, touch the Settings
icon on the infotainment home page. Select
“Vehicle” to display the list of available
options and select “Remote Lock, Unlock,
Start”. Pressing
Kwill disarm the theft-deterrent
system. See Vehicle Alarm System 025.
If equipped, pressing and holding
Kwill
open the windows, if enabled. To view
available settings for this feature, touch the
Settings icon on the infotainment home
page. Select “Vehicle”to display the list of
available options and select “Remote Lock,
Unlock, Start”.
/: If equipped, press and releaseQand
then immediately press and hold
/for at
least four seconds to start the engine from
outside the vehicle using the remote key.
See Remote Vehicle Start 014.
7:Press and release one time to initiate
vehicle locator. The exterior lamps flash and
the horn chirps three times. Press and hold
7for three seconds to sound the panic
alarm. The horn sounds and the turn signal
lamps flash for 30 seconds, or until
7is
pressed again or the vehicle is started.
b: Press twice quickly to open or close
the liftgate.
Press once to stop the liftgate from moving.
Keyless Access Operation
With the Keyless Access system, you can
lock and unlock the doors and access the
liftgate without removing the remote key
from your pocket, purse, briefcase, etc. The
remote key should be within 1 m (3 ft) of the
liftgate or door being opened.
Keyless Access can be programmed to
unlock all doors on the first lock/unlock
press from the driver door. Keyless Access
can also be turned off. To view available
settings for this feature, touch the Settings
icon on the infotainment home page. Select
“Vehicle” to display the list of available
options and select “Remote Lock, Unlock,
Start”.
If equipped with memory seats, remote keys
1 and 2 are linked to seating positions of
memory 1 or 2. See Memory Seats039.
Keyless Unlocking/Locking from the
Driver Door
When the doors are locked and the remote
key is within 1 m (3 ft) of the driver door
handle, pressing the lock/unlock button on
the driver door handle will unlock the driver
door. If the lock/unlock button is pressed
again within five seconds, all passenger
doors will unlock.
Page 10 of 384
GMC Acadia/Acadia Denali Owner Manual (GMNA-Localizing-U.S./Canada/
Mexico-16402009) - 2023 - CRC - 3/28/22
Keys, Doors, and Windows 9
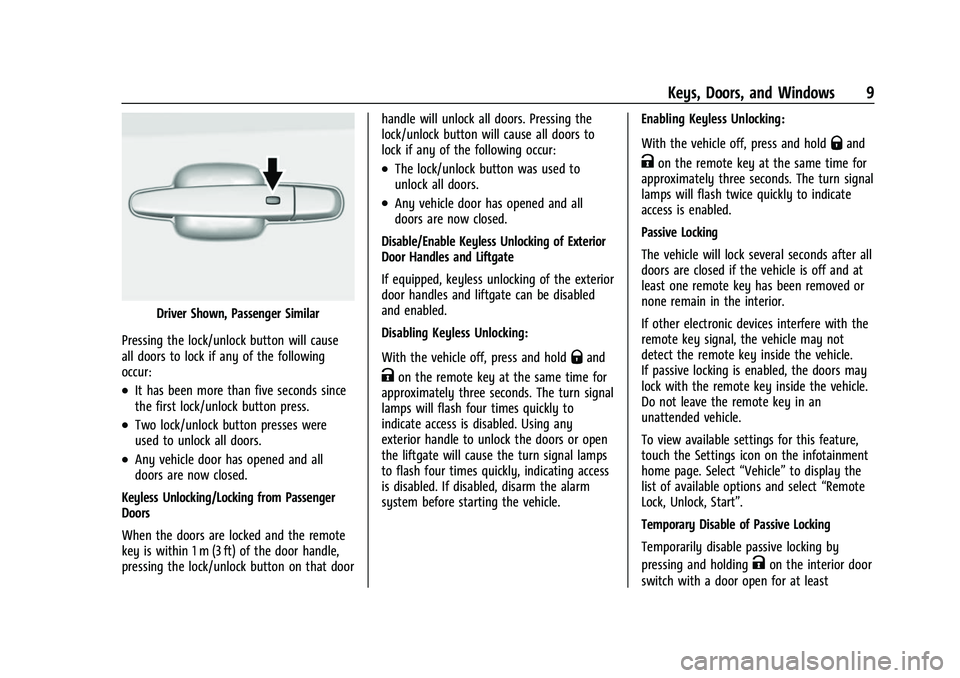
Driver Shown, Passenger Similar
Pressing the lock/unlock button will cause
all doors to lock if any of the following
occur:
.It has been more than five seconds since
the first lock/unlock button press.
.Two lock/unlock button presses were
used to unlock all doors.
.Any vehicle door has opened and all
doors are now closed.
Keyless Unlocking/Locking from Passenger
Doors
When the doors are locked and the remote
key is within 1 m (3 ft) of the door handle,
pressing the lock/unlock button on that door handle will unlock all doors. Pressing the
lock/unlock button will cause all doors to
lock if any of the following occur:
.The lock/unlock button was used to
unlock all doors.
.Any vehicle door has opened and all
doors are now closed.
Disable/Enable Keyless Unlocking of Exterior
Door Handles and Liftgate
If equipped, keyless unlocking of the exterior
door handles and liftgate can be disabled
and enabled.
Disabling Keyless Unlocking:
With the vehicle off, press and hold
Qand
Kon the remote key at the same time for
approximately three seconds. The turn signal
lamps will flash four times quickly to
indicate access is disabled. Using any
exterior handle to unlock the doors or open
the liftgate will cause the turn signal lamps
to flash four times quickly, indicating access
is disabled. If disabled, disarm the alarm
system before starting the vehicle. Enabling Keyless Unlocking:
With the vehicle off, press and hold
Qand
Kon the remote key at the same time for
approximately three seconds. The turn signal
lamps will flash twice quickly to indicate
access is enabled.
Passive Locking
The vehicle will lock several seconds after all
doors are closed if the vehicle is off and at
least one remote key has been removed or
none remain in the interior.
If other electronic devices interfere with the
remote key signal, the vehicle may not
detect the remote key inside the vehicle.
If passive locking is enabled, the doors may
lock with the remote key inside the vehicle.
Do not leave the remote key in an
unattended vehicle.
To view available settings for this feature,
touch the Settings icon on the infotainment
home page. Select “Vehicle”to display the
list of available options and select “Remote
Lock, Unlock, Start”.
Temporary Disable of Passive Locking
Temporarily disable passive locking by
pressing and holding
Kon the interior door
switch with a door open for at least
Page 15 of 384
GMC Acadia/Acadia Denali Owner Manual (GMNA-Localizing-U.S./Canada/
Mexico-16402009) - 2023 - CRC - 3/28/22
14 Keys, Doors, and Windows
Remote Vehicle Start
If equipped, this feature allows the engine
to be started from outside of the vehicle.
/:This button will be on the remote key
if the vehicle has remote start.
The climate control system will use the
previous settings during a remote start. The
rear defog may come on during a remote
start based on cold ambient conditions. The
rear fog indicator light does not come on
during a remote start.
If the vehicle has heated or ventilated seats,
they may come on during a remote start.
See Heated and Ventilated Front Seats 042.
If equipped with a remote start heated
steering wheel, the heated wheel will turn
on automatically in remote start along with
the heated seats when it is cold outside. See
Heated Steering Wheel 089.
Laws in some local communities may restrict
the use of remote starters. For example,
some laws may require a person using
remote start to have the vehicle in view.
Check local regulations for any
requirements.
Do not use remote start if the vehicle is low
on fuel as it may run out of fuel. Other conditions can affect the performance
of the remote key. See
Remote Key07.
Starting the Engine Using Remote Start
1. Press and releaseQon the remote key.
2. Immediately press and hold
/for at
least four seconds or until the turn
signal lamps flash. The turn signal lamps
flashing confirms the request to remote
start the vehicle has been received.
During the remote start the doors will be
locked and the parking lamps will remain
on as long as the engine is running.
The engine will shut off after 15 minutes
unless a time extension is done or the
vehicle is started.
3. With the remote key in the vehicle, press the brake pedal and start the
vehicle to drive.
Extending Engine Run Time
The engine run time can also be extended
by another 15 minutes, if during the first
15 minutes Steps 1 and 2 are repeated while
the engine is still running. An extension can
be requested 30 seconds after starting. This
provides a total of 30 minutes.
The remote start can only be extended once. When the remote start is extended, the
second 15-minute period is added on to the
first 15 minutes for a total of 30 minutes.
A maximum of two remote starts, or a
remote start with an extension, are allowed
between ignition cycles.
The vehicle must be started and then turned
off before the remote start procedure can be
used again.
Canceling a Remote Start
To cancel a remote start, do any of the
following:
.Press and hold/until the parking lamps
turn off.
.Turn on the hazard warning flashers.
.Turn the vehicle on and then off.
Conditions in Which Remote Start Will
Not Work
The remote start will not operate if any of
the following occur:
.A remote key is in the vehicle.
.The ignition is on.
.The hood is not closed.
.The hazard warning flashers are on.
.There is an emission control system
malfunction.
Page 22 of 384
GMC Acadia/Acadia Denali Owner Manual (GMNA-Localizing-U.S./Canada/
Mexico-16402009) - 2023 - CRC - 3/28/22
Keys, Doors, and Windows 21
liftgate continues to automatically close
after opening, see your dealer for service
before using the power liftgate.
Interfering with the power liftgate motion
or manually closing the liftgate too quickly
after power opening may resemble a
support strut failure. This could also activate
the falling liftgate detection feature. Allow
the liftgate to complete its operation and
wait a few seconds before manually closing
the liftgate.
Obstacle Detection Features
If the liftgate encounters an obstacle during
a power open or close cycle, the liftgate will
automatically reverse direction and move a
short distance away from the obstacle. After
removing the obstruction, the power liftgate
operation can be used again. If the liftgate
encounters multiple obstacles on the same
power cycle, the power function will
deactivate. After removing the obstructions,
manually close the liftgate which will allow
normal power operation functions to
resume.If the vehicle is locked while the liftgate is
closing, and an obstacle is encountered that
prevents the liftgate from completely
closing, the horn will sound as an alert that
the liftgate did not close.
Setting the 3/4 Mode
To change the position the liftgate stops at
when opening:
1. Select MAX or 3/4 mode and power open the liftgate.
2. Stop the liftgate movement at the desired height by pressing any liftgate
button. Manually adjust the liftgate
position if needed.
3. Press and hold
lnext to the pull cup
on the outside of the liftgate until the
turn signals flash and a beep sounds.
This indicates the setting has been
recorded.
The liftgate cannot be set below a minimum
programmable height. If there is no light
flash or sound, then the height adjustment
may be too low.
Manual Operation
Select OFF to manually operate the liftgate.
See “Manual Liftgate” at the beginning of
this section.
Caution
Attempting to move the liftgate too
quickly and with excessive force may
result in damage to the vehicle.
Operate the liftgate manually with a
smooth motion and moderate speed. The
system includes a feature which limits the
manual closing speed to protect the
components.
Hands-Free Operation
If equipped, the liftgate may be operated
with a kicking motion under the left side of
the rear bumper.
The remote key must be within 1 m (3 ft) of
the rear bumper to operate the power
liftgate hands-free.
The hands-free feature will not work while
the liftgate is moving. To stop the liftgate
while in motion use one of the liftgate
buttons.
The hands-free feature can be customized.
To view available settings for this feature,
touch the Settings icon on the infotainment
home page. Select “Vehicle”to display the
Page 26 of 384
GMC Acadia/Acadia Denali Owner Manual (GMNA-Localizing-U.S./Canada/
Mexico-16402009) - 2023 - CRC - 3/28/22
Keys, Doors, and Windows 25
Vehicle Security
This vehicle has theft-deterrent features;
however, they do not make the vehicle
impossible to steal.
Vehicle Alarm System
This vehicle has an anti-theft alarm system.
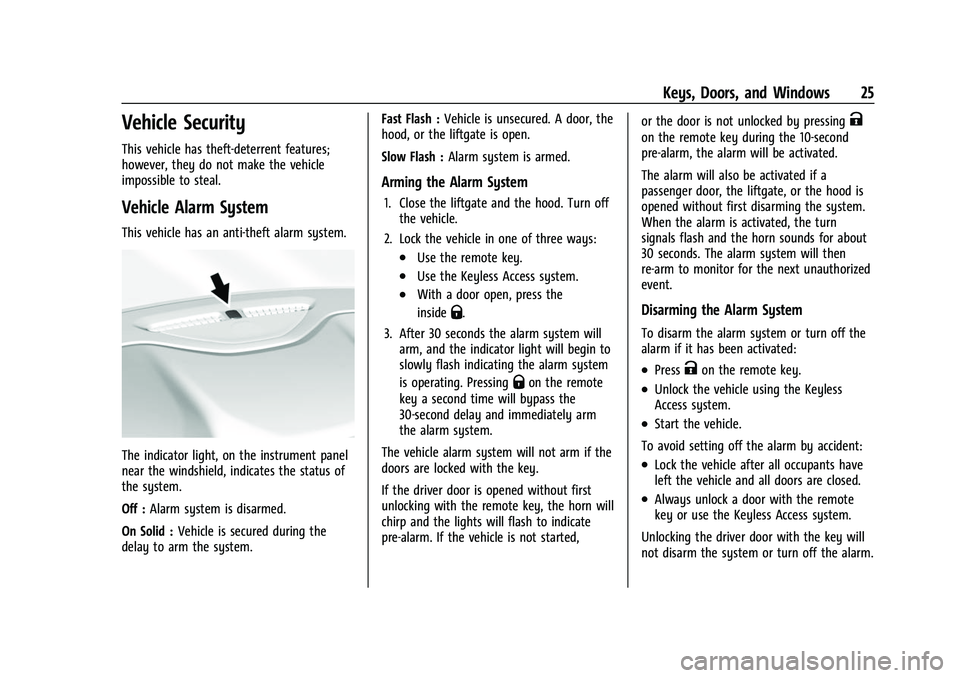
The indicator light, on the instrument panel
near the windshield, indicates the status of
the system.
Off :Alarm system is disarmed.
On Solid : Vehicle is secured during the
delay to arm the system. Fast Flash :
Vehicle is unsecured. A door, the
hood, or the liftgate is open.
Slow Flash : Alarm system is armed.
Arming the Alarm System
1. Close the liftgate and the hood. Turn off
the vehicle.
2. Lock the vehicle in one of three ways:
.Use the remote key.
.Use the Keyless Access system.
.With a door open, press the
inside
Q.
3. After 30 seconds the alarm system will arm, and the indicator light will begin to
slowly flash indicating the alarm system
is operating. Pressing
Qon the remote
key a second time will bypass the
30-second delay and immediately arm
the alarm system.
The vehicle alarm system will not arm if the
doors are locked with the key.
If the driver door is opened without first
unlocking with the remote key, the horn will
chirp and the lights will flash to indicate
pre-alarm. If the vehicle is not started, or the door is not unlocked by pressing
K
on the remote key during the 10-second
pre-alarm, the alarm will be activated.
The alarm will also be activated if a
passenger door, the liftgate, or the hood is
opened without first disarming the system.
When the alarm is activated, the turn
signals flash and the horn sounds for about
30 seconds. The alarm system will then
re-arm to monitor for the next unauthorized
event.
Disarming the Alarm System
To disarm the alarm system or turn off the
alarm if it has been activated:
.PressKon the remote key.
.Unlock the vehicle using the Keyless
Access system.
.Start the vehicle.
To avoid setting off the alarm by accident:
.Lock the vehicle after all occupants have
left the vehicle and all doors are closed.
.Always unlock a door with the remote
key or use the Keyless Access system.
Unlocking the driver door with the key will
not disarm the system or turn off the alarm.
Page 93 of 384
GMC Acadia/Acadia Denali Owner Manual (GMNA-Localizing-U.S./Canada/
Mexico-16402009) - 2023 - CRC - 3/28/22
92 Instruments and Controls
Compass
The vehicle may have a compass display on
the Driver Information Center (DIC). The
compass receives its heading and other
information from the Global Positioning
System (GPS) antenna, StabiliTrak/Electronic
Stability Control (ESC), and vehicle speed
information.
The compass system is designed to operate
for a certain number of miles or degrees of
turn before needing a signal from the GPS
satellites. When the compass display shows
CAL, drive the vehicle for a short distance in
an open area where it can receive a GPS
signal. The compass system will
automatically determine when a GPS signal
is restored and provide a heading again.
Clock
Set the time and date using the
infotainment system. See "Time/Date" under
Settings0170.
Power Outlets
Power Outlets 12 Volt Direct Current
The vehicle has two 12-volt outlets that can
be used to plug in electrical equipment, such
as a cell phone or MP3 player. The power outlets are located:
.On the center stack below the climate
controls.
.In the rear cargo area.
Lift the cover to access the outlet and
replace when not in use.
{Warning
Power is always supplied to the rear
cargo power outlet. Do not leave
electrical equipment plugged in when the
vehicle is not in use because the vehicle
could catch fire and cause injury or
death.
Caution
Leaving electrical equipment plugged in
for an extended period of time while the
ignition is off will drain the battery.
Always unplug electrical equipment when
not in use and do not plug in equipment
that exceeds the maximum 15 amp
rating. Certain accessory plugs may not be
compatible with the accessory power outlet
and could overload vehicle and adapter
fuses. If a problem is experienced, see your
dealer.
When adding electrical equipment, be sure
to follow the proper installation instructions
included with the equipment. See
Add-On
Electrical Equipment 0259.
Caution
Hanging heavy equipment from the
power outlet can cause damage not
covered by the vehicle warranty. The
power outlets are designed for accessory
power plugs only, such as cell phone
charge cords.
Power Outlet 110V/120V Alternating
Current
If equipped with this power outlet it can be
used to plug in electrical equipment that
uses a maximum limit of 150 watts.
Page 111 of 384
GMC Acadia/Acadia Denali Owner Manual (GMNA-Localizing-U.S./Canada/
Mexico-16402009) - 2023 - CRC - 3/28/22
110 Instruments and Controls
LKA will not assist or alert if the turn signal
is active in the direction of lane departure,
or if LKA detects that you are accelerating,
braking, or actively steering. SeeLane Keep
Assist (LKA) 0244.
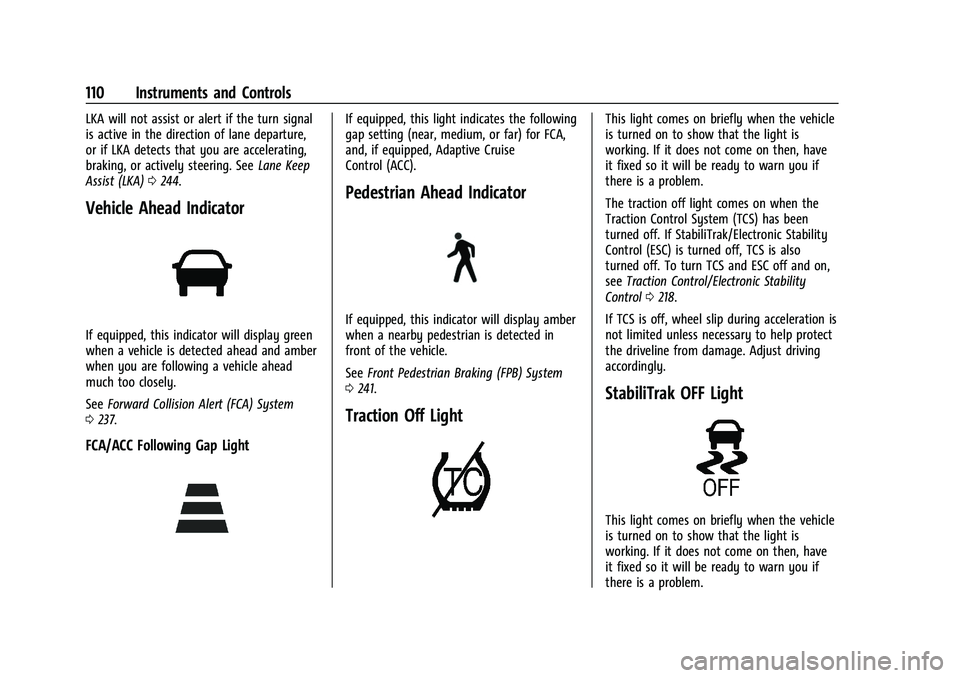
Vehicle Ahead Indicator
If equipped, this indicator will display green
when a vehicle is detected ahead and amber
when you are following a vehicle ahead
much too closely.
See Forward Collision Alert (FCA) System
0 237.
FCA/ACC Following Gap Light
If equipped, this light indicates the following
gap setting (near, medium, or far) for FCA,
and, if equipped, Adaptive Cruise
Control (ACC).
Pedestrian Ahead Indicator
If equipped, this indicator will display amber
when a nearby pedestrian is detected in
front of the vehicle.
See Front Pedestrian Braking (FPB) System
0 241.
Traction Off Light
This light comes on briefly when the vehicle
is turned on to show that the light is
working. If it does not come on then, have
it fixed so it will be ready to warn you if
there is a problem.
The traction off light comes on when the
Traction Control System (TCS) has been
turned off. If StabiliTrak/Electronic Stability
Control (ESC) is turned off, TCS is also
turned off. To turn TCS and ESC off and on,
see Traction Control/Electronic Stability
Control 0218.
If TCS is off, wheel slip during acceleration is
not limited unless necessary to help protect
the driveline from damage. Adjust driving
accordingly.
StabiliTrak OFF Light
This light comes on briefly when the vehicle
is turned on to show that the light is
working. If it does not come on then, have
it fixed so it will be ready to warn you if
there is a problem.
Page 127 of 384
GMC Acadia/Acadia Denali Owner Manual (GMNA-Localizing-U.S./Canada/
Mexico-16402009) - 2023 - CRC - 3/28/22
126 Instruments and Controls
Programming the Universal Remote
System
For questions or programming help, see
www.homelink.com/gm or call
1-800-355-3515. For calls placed outside the
U.S., Canada, or Puerto Rico, international
rates will apply and may differ based on
landline or mobile phone.
Programming involves time-sensitive actions,
and may time out causing the procedure to
be repeated.
To program up to three devices:1. Hold the end of the hand-held transmitter about 3 to 8 cm (1 to 3 in)
away from the Universal Remote system
buttons with the indicator light in view.
The hand-held transmitter was supplied
by the manufacturer of the garage door
opener receiver.
2. Press and release one of the three Universal Remote system buttons to be
programmed. Press and hold the
hand-held transmitter button. Do not
release the hand-held transmitter button
until the indicator light changes from a
slow to a rapid flash or continuous light.
Then release the hand-held transmitter
button. Some garage door openers may require
substitution of Step 2 with the procedure
under
“Radio Signals for Some Gate
Operators” later in this section.
3. Press and hold the newly programmed Universal Remote system button for
five seconds while watching the indicator
light and garage door activation.
.If the indicator light stays on
continuously or the garage door
moves when the button is pressed,
then programming is complete. There
is no need to complete Steps 4–6.
.If the indicator light does not come
on or the garage door does not
move, a second button press may be
required. For a second time, press
and hold the newly programmed
button for five seconds. If the
indicator light is continuously lit,
or the garage door moves,
programming is complete.
.If the indicator light flashes rapidly
and the garage door does not move,
continue with programming
Steps 4–6.
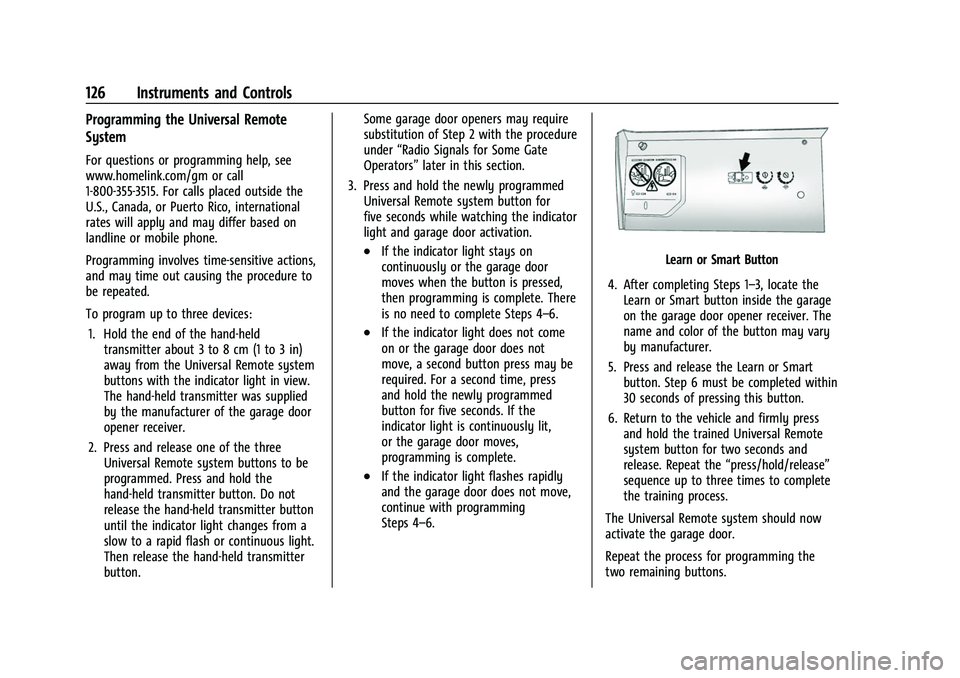
Learn or Smart Button
4. After completing Steps 1–3, locate the Learn or Smart button inside the garage
on the garage door opener receiver. The
name and color of the button may vary
by manufacturer.
5. Press and release the Learn or Smart button. Step 6 must be completed within
30 seconds of pressing this button.
6. Return to the vehicle and firmly press and hold the trained Universal Remote
system button for two seconds and
release. Repeat the “press/hold/release”
sequence up to three times to complete
the training process.
The Universal Remote system should now
activate the garage door.
Repeat the process for programming the
two remaining buttons.