battery GMC ACADIA LIMITED 2017 Owner's Manual
[x] Cancel search | Manufacturer: GMC, Model Year: 2017, Model line: ACADIA LIMITED, Model: GMC ACADIA LIMITED 2017Pages: 339, PDF Size: 4.75 MB
Page 26 of 339
GMC Acadia Limited Owner Manual (GMNA-Localizing-U.S.-10283134) -
2017 - crc - 3/30/16
Keys, Doors, and Windows 25
If locked out of the vehicle, call
Roadside Assistance. SeeRoadside
Assistance Program 0308.
If equipped with an active OnStar
subscription, an OnStar Advisor
may remotely unlock the vehicle.
See OnStar Overview 0318.
Remote Keyless Entry
(RKE) System
See Radio Frequency
Statement 0314.
If there is a decrease in the Remote
Keyless Entry (RKE) operating
range:
. Check the distance. The
transmitter may be too far from
the vehicle.
. Check the location. Other
vehicles or objects may be
blocking the signal.
. Check the transmitter's battery.
See “Battery Replacement” later
in this section. .
If the transmitter is still not
working correctly, see your
dealer or a qualified technician
for service.
Remote Keyless Entry
(RKE) System Operation
The RKE transmitter functions work
up to 60 m (195 ft) away from the
vehicle.
Other conditions can affect the
performance of the transmitter. See
Remote Keyless Entry (RKE)
System 025.
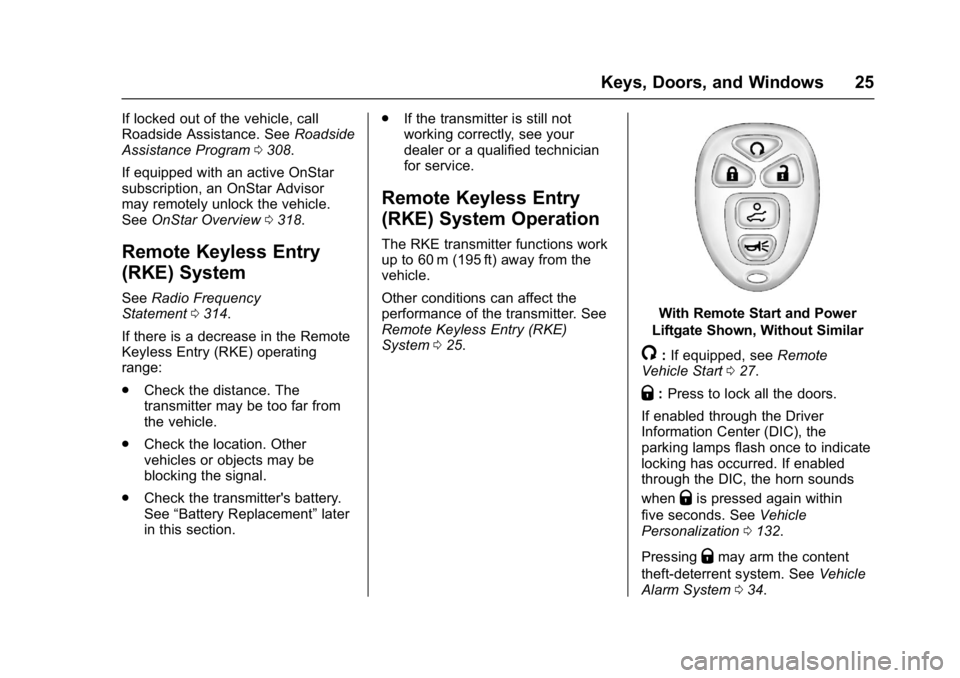
With Remote Start and Power
Liftgate Shown, Without Similar
/: If equipped, see Remote
Vehicle Start 027.
Q:Press to lock all the doors.
If enabled through the Driver
Information Center (DIC), the
parking lamps flash once to indicate
locking has occurred. If enabled
through the DIC, the horn sounds
when
Qis pressed again within
five seconds. See Vehicle
Personalization 0132.
Pressing
Qmay arm the content
theft-deterrent system. See Vehicle
Alarm System 034.
Page 27 of 339
GMC Acadia Limited Owner Manual (GMNA-Localizing-U.S.-10283134) -
2017 - crc - 3/30/16
26 Keys, Doors, and Windows
K:Press once to unlock only the
driver door. If
Kis pressed again
within five seconds, all remaining
doors unlock. The interior lamps
come on and stay on for 20 seconds
or until the ignition is turned on.
If enabled through the DIC, the
parking lamps flash twice to indicate
unlocking has occurred. See Vehicle
Personalization 0132.
Pressing
Kon the RKE transmitter
disarms the content theft-deterrent
system. See Vehicle Alarm
System 034.
8:Press and hold until the
liftgate begins to move to open or
close the liftgate. The taillamps flash
and a chime sounds to indicate
when the liftgate is opening or
closing.
L: Press and release to locate
the vehicle. The parking lamps flash
and the horn sounds three times.
Press and hold
Lfor more than
two seconds to activate the panic
alarm. The parking lamps flash and
the horn sounds repeatedly for 30 seconds. The alarm turns off
when the ignition is moved to ON/
RUN or
Lis pressed again. The
ignition must be in LOCK/OFF for
the panic alarm to work.
Programming Transmitters to
the Vehicle
Only RKE transmitters programmed
to this vehicle will work. If a
transmitter is lost or stolen, a
replacement can be purchased and
programmed through your dealer.
When the replacement transmitter is
programmed to this vehicle, all
remaining transmitters must also be
reprogrammed. Any lost or stolen
transmitters will no longer work
once the new transmitter is
programmed. Each vehicle can
have up to eight transmitters
programmed to it. See your dealer
to program transmitters to this
vehicle.
Battery Replacement
Replace the battery if the REPLACE
BATTERY IN REMOTE KEY
message displays in the DIC.
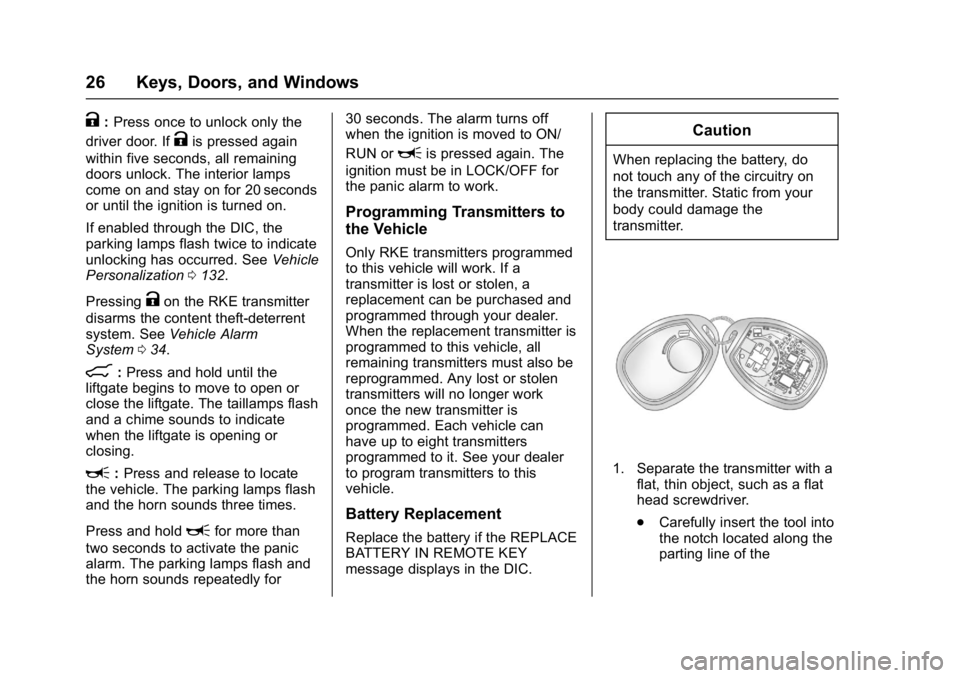
Caution
When replacing the battery, do
not touch any of the circuitry on
the transmitter. Static from your
body could damage the
transmitter.
1. Separate the transmitter with a flat, thin object, such as a flat
head screwdriver.
.Carefully insert the tool into
the notch located along the
parting line of the
Page 28 of 339
GMC Acadia Limited Owner Manual (GMNA-Localizing-U.S.-10283134) -
2017 - crc - 3/30/16
Keys, Doors, and Windows 27
transmitter. Do not insert
the tool too far. Stop as
soon as resistance is felt.
. Twist the tool until the
transmitter is separated.
2. Remove the old battery. Do not use a metal object.
3. Insert the new battery, positive side facing down. Replace with
a CR2032 or equivalent
battery.
4. Snap the transmitter back together.
Remote Vehicle Start
This vehicle may have a remote
starting feature that starts the
engine from outside of the vehicle.
/:This button is on the RKE
transmitter if the vehicle has remote
start.
Laws in some communities may
restrict the use of remote starters.
For example, some laws may
require a person using the remote
start to have the vehicle in view when doing so. Check local
regulations for any requirements on
remote starting of vehicles.
Do not use the remote start feature
if the vehicle is low on fuel. The
vehicle could run out of fuel.
If the vehicle has the remote start
feature, the RKE transmitter range
may be less while the vehicle is
running.
Other conditions can affect the
performance of the transmitter. See
Remote Keyless Entry (RKE)
System
025.
Starting the Engine Using
Remote Start
To start the vehicle:
1. Press and release
Qon the
RKE transmitter.
2. Immediately after completing Step 1, press and hold
/until
the parking lamps flash. If the
vehicle's lights cannot be seen,
press and hold
/for at least
four seconds. When the vehicle starts, the parking
lamps will turn on and remain on as
long as the engine is running. The
doors will be locked and the climate
control system will operate
automatically if the vehicle has the
automatic system, or at the same
setting as when the vehicle was last
turned off.
If the vehicle has an automatic
climate control system and heated
seats, the heated seats turn on
during colder outside temperatures
and shut off when the key is turned
to ON/RUN. See
Heated and
Cooled Front Seats 048.
The rear window defogger and
heated mirrors, if the vehicle has
them, turn on during colder outside
temperatures and turn off when the
key is turned to ON/RUN.
After entering the vehicle during a
remote start, insert and turn the key
to the ON/RUN position to drive the
vehicle.
If the vehicle is left running it
automatically shuts off after
10 minutes unless a time extension
has been done.
Page 33 of 339
GMC Acadia Limited Owner Manual (GMNA-Localizing-U.S.-10283134) -
2017 - crc - 3/30/16
32 Keys, Doors, and Windows
.PressO.
. Press the touch pad on the
outside liftgate handle.
Pressing the buttons or touch pad a
second time while the liftgate is
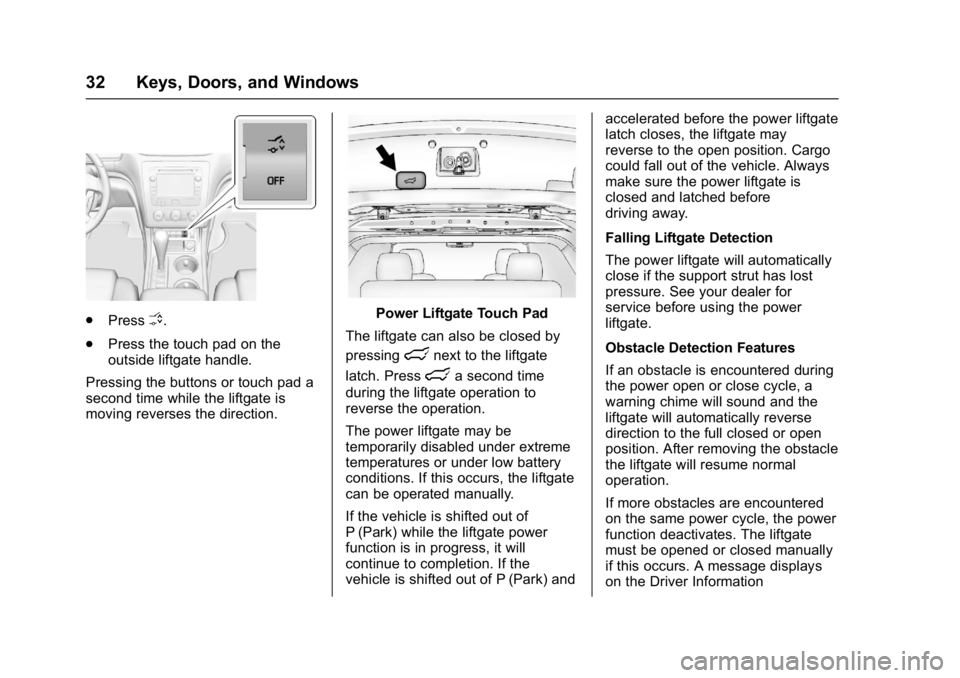
moving reverses the direction.Power Liftgate Touch Pad
The liftgate can also be closed by
pressing
lnext to the liftgate
latch. Press
la second time
during the liftgate operation to
reverse the operation.
The power liftgate may be
temporarily disabled under extreme
temperatures or under low battery
conditions. If this occurs, the liftgate
can be operated manually.
If the vehicle is shifted out of
P (Park) while the liftgate power
function is in progress, it will
continue to completion. If the
vehicle is shifted out of P (Park) and accelerated before the power liftgate
latch closes, the liftgate may
reverse to the open position. Cargo
could fall out of the vehicle. Always
make sure the power liftgate is
closed and latched before
driving away.
Falling Liftgate Detection
The power liftgate will automatically
close if the support strut has lost
pressure. See your dealer for
service before using the power
liftgate.
Obstacle Detection Features
If an obstacle is encountered during
the power open or close cycle, a
warning chime will sound and the
liftgate will automatically reverse
direction to the full closed or open
position. After removing the obstacle
the liftgate will resume normal
operation.
If more obstacles are encountered
on the same power cycle, the power
function deactivates. The liftgate
must be opened or closed manually
if this occurs. A message displays
on the Driver Information
Page 40 of 339
GMC Acadia Limited Owner Manual (GMNA-Localizing-U.S.-10283134) -
2017 - crc - 3/30/16
Keys, Doors, and Windows 39
pulsing sound when either rear
window is down and the front
windows are up. To reduce the
sound, open either a front window
or the sunroof, if equipped.
Power Windows
{Warning
Children could be seriously
injured or killed if caught in the
path of a closing window. Never
leave keys in a vehicle with
children. When there are children
in the rear seat, use the window
lockout button to prevent
operation of the windows. See
Keys023.
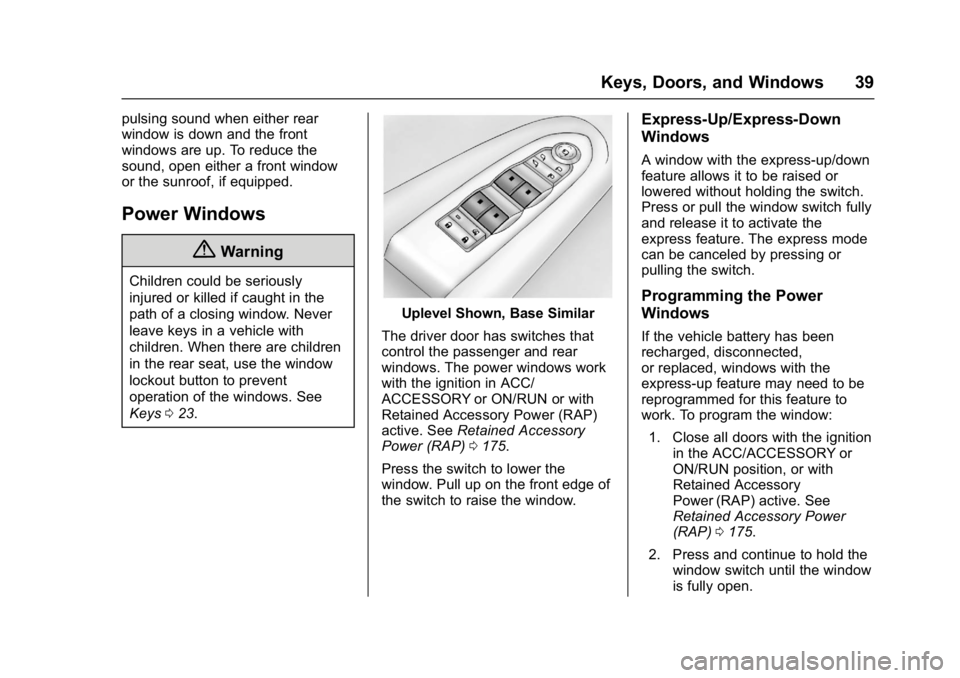
Uplevel Shown, Base Similar
The driver door has switches that
control the passenger and rear
windows. The power windows work
with the ignition in ACC/
ACCESSORY or ON/RUN or with
Retained Accessory Power (RAP)
active. See Retained Accessory
Power (RAP) 0175.
Press the switch to lower the
window. Pull up on the front edge of
the switch to raise the window.
Express-Up/Express-Down
Windows
A window with the express-up/down
feature allows it to be raised or
lowered without holding the switch.
Press or pull the window switch fully
and release it to activate the
express feature. The express mode
can be canceled by pressing or
pulling the switch.
Programming the Power
Windows
If the vehicle battery has been
recharged, disconnected,
or replaced, windows with the
express-up feature may need to be
reprogrammed for this feature to
work. To program the window: 1. Close all doors with the ignition in the ACC/ACCESSORY or
ON/RUN position, or with
Retained Accessory
Power (RAP) active. See
Retained Accessory Power
(RAP) 0175.
2. Press and continue to hold the window switch until the window
is fully open.
Page 73 of 339
GMC Acadia Limited Owner Manual (GMNA-Localizing-U.S.-10283134) -
2017 - crc - 3/30/16
72 Seats and Restraints
Servicing the
Airbag-Equipped Vehicle
Airbags affect how the vehicle
should be serviced. There are parts
of the airbag system in several
places around the vehicle. Your
dealer and the service manual have
information about servicing the
vehicle and the airbag system. To
purchase a service manual, see
Service Publications Ordering
Information0313.
{Warning
For up to 10 seconds after the
vehicle is turned off and the
battery is disconnected, an airbag
can still inflate during improper
service. You can be injured if you
are close to an airbag when it
inflates. Avoid yellow connectors.
They are probably part of the
airbag system. Be sure to follow
proper service procedures, and
make sure the person performing
work for you is qualified to do so.
Adding Equipment to the
Airbag-Equipped Vehicle
Adding accessories that change the
vehicle's frame, bumper system,
height, front end, or side sheet
metal may keep the airbag system
from working properly.
The operation of the airbag system
can also be affected by changing
any parts of the front seats, safety
belts, airbag sensing and diagnostic
module, steering wheel, instrument
panel, roof-rail airbag modules,
ceiling or pillar garnish trim,
overhead console, front sensors,
side impact sensors, airbag wiring,
or the front center console if the
vehicle has a front center airbag.
Your dealer and the service manual
have information about the location
of the airbag sensors, sensing and
diagnostic module, and airbag
wiring.
In addition, the vehicle has a
passenger sensing system for the
front outboard passenger position,
which includes sensors that are part
of the passenger's seat. The passenger sensing system may not
operate properly if the original seat
trim is replaced with non-GM
covers, upholstery, or trim, or; with
GM covers, upholstery, or trim
designed for a different vehicle. Any
object, such as an aftermarket seat
heater or a comfort-enhancing pad
or device, installed under or on top
of the seat fabric, could also
interfere with the operation of the
passenger sensing system. This
could either prevent proper
deployment of the passenger
airbag(s) or prevent the passenger
sensing system from properly
turning off the passenger airbag(s).
See
Passenger Sensing
System 068.
If the vehicle has rollover roof-rail
airbags, see Different Size Tires
and Wheels 0258 for additional
important information.
If you have to modify your vehicle
because you have a disability and
you have questions about whether
the modifications will affect the
vehicle's airbag system, or if you
have questions about whether the
airbag system will be affected if the
Page 98 of 339
GMC Acadia Limited Owner Manual (GMNA-Localizing-U.S.-10283134) -
2017 - crc - 3/30/16
Instruments and Controls 97
Instruments and
Controls
Controls
Steering Wheel Adjustment . . . . 98
Steering Wheel Controls . . . . . . . 98
Horn . . . . . . . . . . . . . . . . . . . . . . . . . . . 98
Windshield Wiper/Washer . . . . . . 98
Rear Window Wiper/Washer . . . 99
Compass . . . . . . . . . . . . . . . . . . . . . . 99
Clock . . . . . . . . . . . . . . . . . . . . . . . . . 101
Power Outlets . . . . . . . . . . . . . . . . 101
Warning Lights, Gauges, and
Indicators
Warning Lights, Gauges, andIndicators . . . . . . . . . . . . . . . . . . . 103
Instrument Cluster . . . . . . . . . . . . 104
Speedometer . . . . . . . . . . . . . . . . . 105
Odometer . . . . . . . . . . . . . . . . . . . . . 105
Tachometer . . . . . . . . . . . . . . . . . . . 105
Fuel Gauge . . . . . . . . . . . . . . . . . . . 105
Engine Coolant Temperature Gauge . . . . . . . . . . . . . . . . . . . . . . 106
Voltmeter Gauge . . . . . . . . . . . . . 107 Safety Belt Reminders . . . . . . . . 107
Airbag Readiness Light . . . . . . . 108
Passenger Airbag Status
Indicator . . . . . . . . . . . . . . . . . . . . 108
Charging System Light . . . . . . . 109
Malfunction Indicator Lamp
(Check Engine Light) . . . . . . . . 109
Brake System Warning Light . . . . . . . . . . . . . . . . . . . . . . . . . 111
Antilock Brake System (ABS) Warning Light . . . . . . . . . . . . . . . 112
Tow/Haul Mode Light . . . . . . . . . 112
Lane Departure Warning (LDW) Light . . . . . . . . . . . . . . . . . 113
Vehicle Ahead Indicator . . . . . . . 113
StabiliTrak
®Indicator Light . . . 113
Engine Coolant Temperature Warning Light . . . . . . . . . . . . . . . 113
Tire Pressure Light . . . . . . . . . . . 114
Engine Oil Pressure Light . . . . . 114
Security Light . . . . . . . . . . . . . . . . . 115
High-Beam On Light . . . . . . . . . . 115
Front Fog Lamp Light . . . . . . . . . 115
Cruise Control Light . . . . . . . . . . 115
Information Displays
Driver Information Center (DIC) . . . . . . . . . . . . . . . . 116
Head-Up Display (HUD) . . . . . . 120
Vehicle Messages
Vehicle Messages . . . . . . . . . . . . 123
Battery Voltage and Charging Messages . . . . . . . . . . . . . . . . . . . 124
Brake System Messages . . . . . 124
Cruise Control Messages . . . . . 124
Door Ajar Messages . . . . . . . . . . 124
Engine Cooling System Messages . . . . . . . . . . . . . . . . . . . 125
Engine Oil Messages . . . . . . . . . 126
Engine Power Messages . . . . . 126
Fuel System Messages . . . . . . . 126
Key and Lock Messages . . . . . 127
Lamp Messages . . . . . . . . . . . . . . 127
Object Detection System Messages . . . . . . . . . . . . . . . . . . . 127
Ride Control System Messages . . . . . . . . . . . . . . . . . . . 129
Airbag System Messages . . . . 129
Security Messages . . . . . . . . . . . 129
Service Vehicle Messages . . . . 130
Tire Messages . . . . . . . . . . . . . . . . 130
Transmission Messages . . . . . . 131
Vehicle Reminder Messages . . . . . . . . . . . . . . . . . . . 132
Vehicle Speed Messages . . . . . 132
Washer Fluid Messages . . . . . . 132
Page 103 of 339
GMC Acadia Limited Owner Manual (GMNA-Localizing-U.S.-10283134) -
2017 - crc - 3/30/16
102 Instruments and Controls
{Warning
Power is always supplied to the
outlets. Do not leave electrical
equipment plugged in when the
vehicle is not in use because the
vehicle could catch fire and cause
injury or death.
Caution
Leaving electrical equipment
plugged in for an extended period
of time while the vehicle is off will
drain the battery. Always unplug
electrical equipment when not in
use and do not plug in equipment
that exceeds the maximum
20 amp rating.
Certain accessory plugs may not be
compatible with the accessory
power outlet and could overload
vehicle and adapter fuses. If a
problem is experienced, see your
dealer. When adding electrical equipment,
be sure to follow the proper
installation instructions included with
the equipment. See
Add-On
Electrical Equipment 0207.
Caution
Hanging heavy equipment from
the power outlet can cause
damage not covered by the
vehicle warranty. The power
outlets are designed for
accessory power plugs only, such
as cell phone charge cords.
Power Outlet 110V/120V
Alternating Current
If equipped with this power outlet it
can be used to plug in electrical
equipment that uses a maximum
limit of 150 watts.
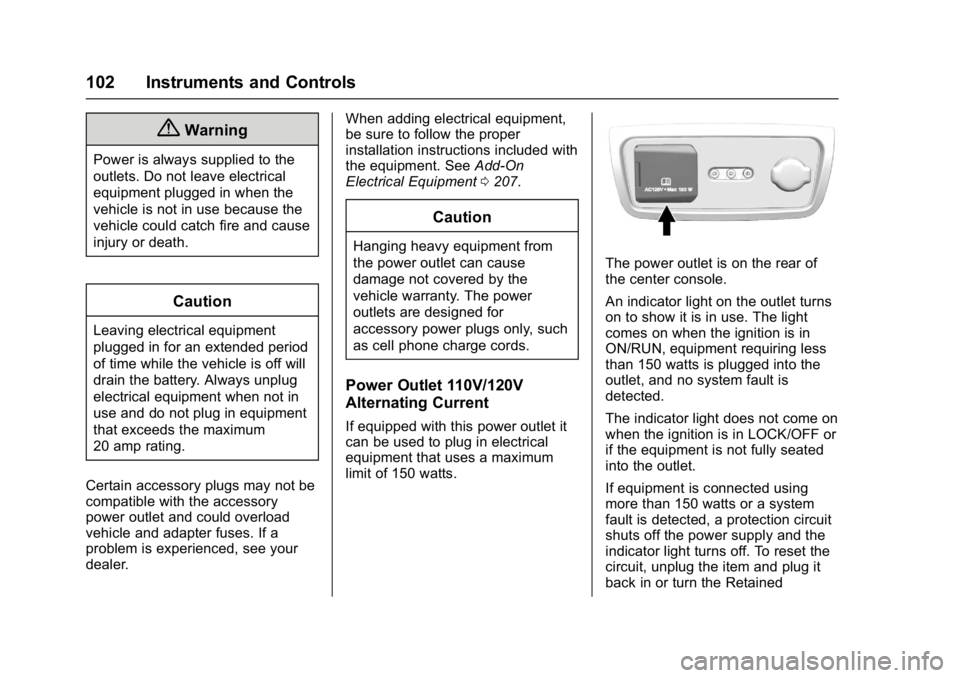
The power outlet is on the rear of
the center console.
An indicator light on the outlet turns
on to show it is in use. The light
comes on when the ignition is in
ON/RUN, equipment requiring less
than 150 watts is plugged into the
outlet, and no system fault is
detected.
The indicator light does not come on
when the ignition is in LOCK/OFF or
if the equipment is not fully seated
into the outlet.
If equipment is connected using
more than 150 watts or a system
fault is detected, a protection circuit
shuts off the power supply and the
indicator light turns off. To reset the
circuit, unplug the item and plug it
back in or turn the Retained
Page 108 of 339
GMC Acadia Limited Owner Manual (GMNA-Localizing-U.S.-10283134) -
2017 - crc - 3/30/16
Instruments and Controls 107
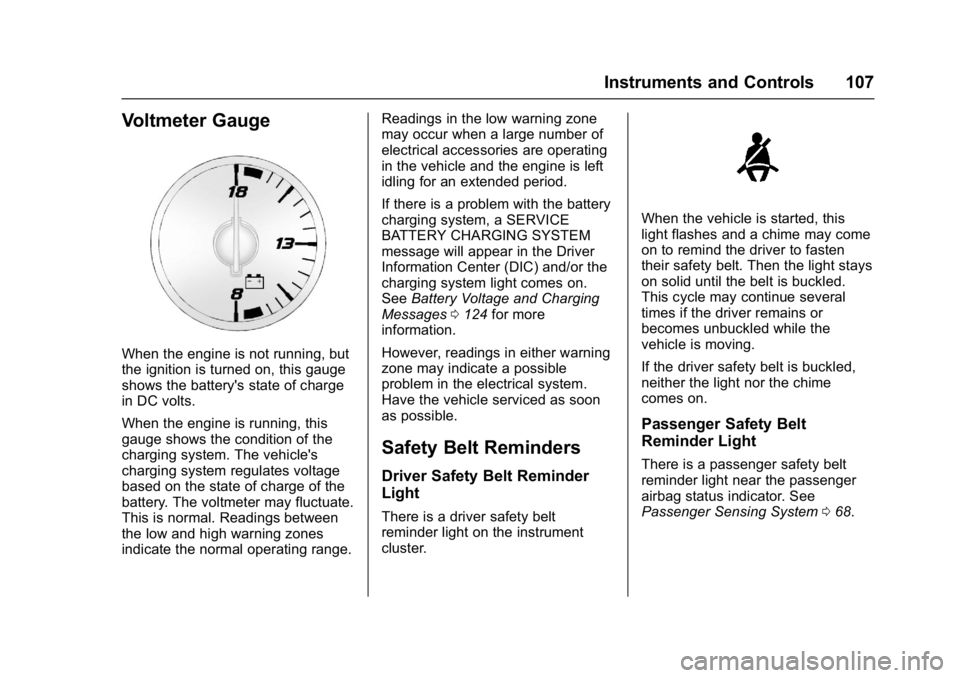
Voltmeter Gauge
When the engine is not running, but
the ignition is turned on, this gauge
shows the battery's state of charge
in DC volts.
When the engine is running, this
gauge shows the condition of the
charging system. The vehicle's
charging system regulates voltage
based on the state of charge of the
battery. The voltmeter may fluctuate.
This is normal. Readings between
the low and high warning zones
indicate the normal operating range.Readings in the low warning zone
may occur when a large number of
electrical accessories are operating
in the vehicle and the engine is left
idling for an extended period.
If there is a problem with the battery
charging system, a SERVICE
BATTERY CHARGING SYSTEM
message will appear in the Driver
Information Center (DIC) and/or the
charging system light comes on.
See
Battery Voltage and Charging
Messages 0124 for more
information.
However, readings in either warning
zone may indicate a possible
problem in the electrical system.
Have the vehicle serviced as soon
as possible.
Safety Belt Reminders
Driver Safety Belt Reminder
Light
There is a driver safety belt
reminder light on the instrument
cluster.
When the vehicle is started, this
light flashes and a chime may come
on to remind the driver to fasten
their safety belt. Then the light stays
on solid until the belt is buckled.
This cycle may continue several
times if the driver remains or
becomes unbuckled while the
vehicle is moving.
If the driver safety belt is buckled,
neither the light nor the chime
comes on.
Passenger Safety Belt
Reminder Light
There is a passenger safety belt
reminder light near the passenger
airbag status indicator. See
Passenger Sensing System 068.
Page 110 of 339
GMC Acadia Limited Owner Manual (GMNA-Localizing-U.S.-10283134) -
2017 - crc - 3/30/16
Instruments and Controls 109
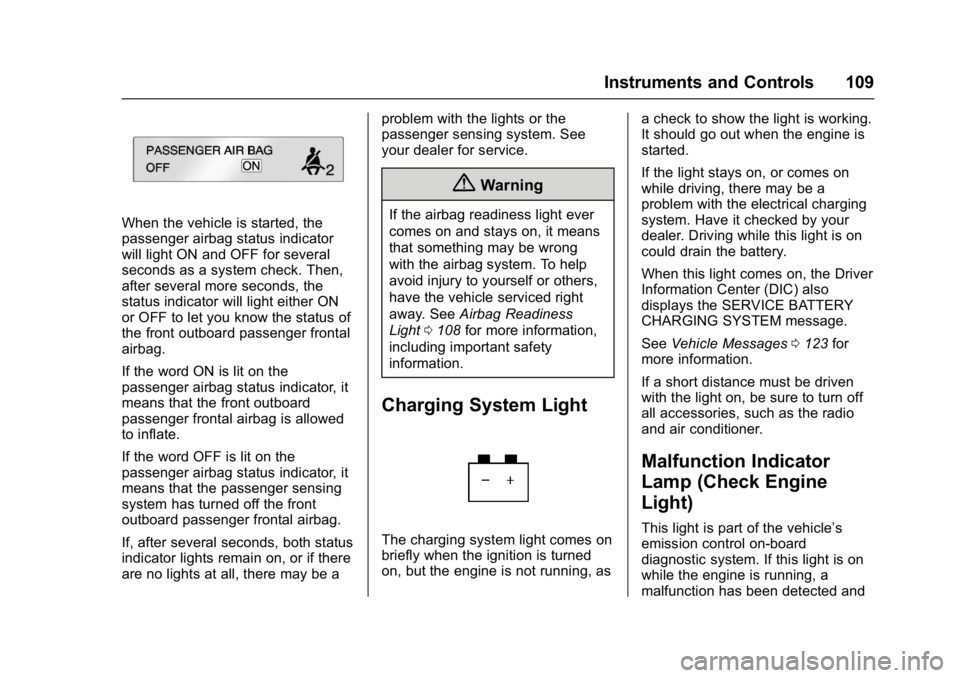
When the vehicle is started, the
passenger airbag status indicator
will light ON and OFF for several
seconds as a system check. Then,
after several more seconds, the
status indicator will light either ON
or OFF to let you know the status of
the front outboard passenger frontal
airbag.
If the word ON is lit on the
passenger airbag status indicator, it
means that the front outboard
passenger frontal airbag is allowed
to inflate.
If the word OFF is lit on the
passenger airbag status indicator, it
means that the passenger sensing
system has turned off the front
outboard passenger frontal airbag.
If, after several seconds, both status
indicator lights remain on, or if there
are no lights at all, there may be aproblem with the lights or the
passenger sensing system. See
your dealer for service.
{Warning
If the airbag readiness light ever
comes on and stays on, it means
that something may be wrong
with the airbag system. To help
avoid injury to yourself or others,
have the vehicle serviced right
away. See
Airbag Readiness
Light 0108 for more information,
including important safety
information.
Charging System Light
The charging system light comes on
briefly when the ignition is turned
on, but the engine is not running, as a check to show the light is working.
It should go out when the engine is
started.
If the light stays on, or comes on
while driving, there may be a
problem with the electrical charging
system. Have it checked by your
dealer. Driving while this light is on
could drain the battery.
When this light comes on, the Driver
Information Center (DIC) also
displays the SERVICE BATTERY
CHARGING SYSTEM message.
See
Vehicle Messages 0123 for
more information.
If a short distance must be driven
with the light on, be sure to turn off
all accessories, such as the radio
and air conditioner.
Malfunction Indicator
Lamp (Check Engine
Light)
This light is part of the vehicle’s
emission control on-board
diagnostic system. If this light is on
while the engine is running, a
malfunction has been detected and