ABS GMC CANYON 2004 Owner's Manual
[x] Cancel search | Manufacturer: GMC, Model Year: 2004, Model line: CANYON, Model: GMC CANYON 2004Pages: 420, PDF Size: 2.84 MB
Page 163 of 420
Language
You can choose the language in which the DIC
information is displayed. Press the reset stem until
LANGUAGE is displayed. While LANGUAGE is on
the display, press and hold the reset stem until
the language changes from ENGLISH to the language
you desire. You can choose from English, Spanish,
or French.
DIC Warnings and Messages
Warning messages are displayed on the DIC to notify
the driver that the status of the vehicle has changed and
that some action may be needed by the driver to
correct the condition. More than one message may
appear at one time. They will appear one after the other.
The messages are displayed for three seconds each.
Some messages may not require immediate action
but you should press and release the trip odometer reset
stem to acknowledge that you received the message
and clear it from the display. Each message must
be acknowledged individually. Some messages cannot
be cleared from the display because they are more
urgent. These messages require action before they can
be removed from the DIC display. The following are
the possible messages that can be displayed and some
information about them.
AC (Air Conditioning) OFF
This message will be displayed when the engine coolant
temperature is too high and the air conditioning in
your vehicle needs to be turned off. See andEngine
Overheating on page 5-28andClimate Control System
on page 3-18for more information. It will be displayed
along with the ENG HOT message.
ABS (Anti-Lock Brake System)
This message will be displayed on the DIC if there is a
problem with your antilock brake system. Check your
antilock brake system as soon as possible and have
your vehicle serviced. SeeBrakes on page 5-38
andAnti-Lock Brake System Warning Light on
page 3-29for more information. Pressing the reset
stem to acknowledge this message and clear it from
the DIC display.
BATTERY
This message will be displayed when there is a problem
with your vehicle’s battery. SeeBattery on page 5-41
andBattery Warning Light on page 3-27for more
information.
3-39
Page 199 of 420
Avoid needless heavy braking. Some people drive
in spurts — heavy acceleration followed by heavy
braking — rather than keeping pace with traffic. This is
a mistake. Your brakes may not have time to cool
between hard stops. Your brakes will wear out much
faster if you do a lot of heavy braking. If you keep pace
with the traffic and allow realistic following distances,
you will eliminate a lot of unnecessary braking.
That means better braking and longer brake life.
If your engine ever stops while you are driving, brake
normally but do not pump your brakes. If you do,
the pedal may get harder to push down. If your engine
stops, you will still have some power brake assist.
But you will use it when you brake. Once the power
assist is used up, it may take longer to stop and
the brake pedal will be harder to push.Anti-lock Brake System
Your vehicle has anti-lock brakes. ABS is an advanced
electronic braking system that will help prevent a
braking skid.
When you start your engine and begin to drive away,
your anti-lock brake system will check itself. You
may hear a momentary motor or clicking noise while
this test is going on. This is normal.
If there is a problem with
the anti-lock brake system,
this warning light will
stay on. SeeAnti-Lock
Brake System Warning
Light on page 3-29.
4-7
Page 200 of 420
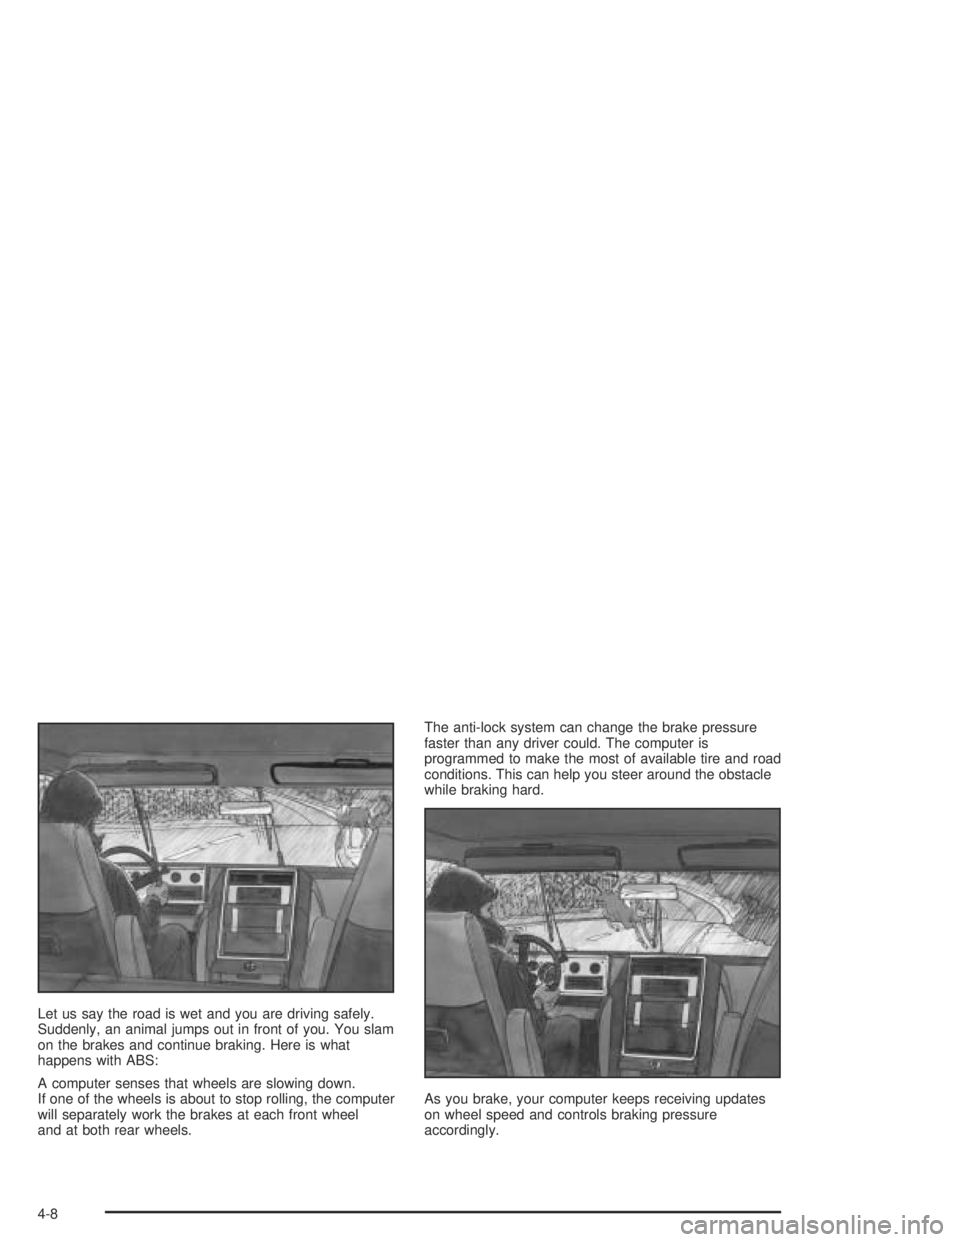
Let us say the road is wet and you are driving safely.
Suddenly, an animal jumps out in front of you. You slam
on the brakes and continue braking. Here is what
happens with ABS:
A computer senses that wheels are slowing down.
If one of the wheels is about to stop rolling, the computer
will separately work the brakes at each front wheel
and at both rear wheels.The anti-lock system can change the brake pressure
faster than any driver could. The computer is
programmed to make the most of available tire and road
conditions. This can help you steer around the obstacle
while braking hard.
As you brake, your computer keeps receiving updates
on wheel speed and controls braking pressure
accordingly.
4-8
Page 207 of 420
If your vehicle starts to slide, ease your foot off the
accelerator pedal and quickly steer the way you want
the vehicle to go. If you start steering quickly enough,
your vehicle may straighten out. Always be ready
for a second skid if it occurs.
Of course, traction is reduced when water, snow, ice,
gravel or other material is on the road. For safety,
you will want to slow down and adjust your driving to
these conditions. It is important to slow down on slippery
surfaces because stopping distance will be longer and
vehicle control more limited.
While driving on a surface with reduced traction,
try your best to avoid sudden steering, acceleration or
braking (including engine braking by shifting to a
lower gear). Any sudden changes could cause the tires
to slide. You may not realize the surface is slippery
until your vehicle is skidding. Learn to recognize warning
clues — such as enough water, ice or packed snow
on the road to make a “mirrored surface” — and slow
down when you have any doubt.
Remember: Any anti-lock brake system (ABS) helps
avoid only the braking skid.Off-Road Driving with Your
Four-Wheel-Drive Vehicle
This off-road guide is for vehicles that have
four-wheel drive.
Also, seeAnti-Lock BrakesunderBraking on page 4-6.
If your vehicle does not have four-wheel drive, you
should not drive off-road unless you are on a level,
solid surface.
Off-road driving can be great fun. But it does have
some de�nite hazards. The greatest of these is
the terrain itself.
“Off-roading” means you have left the great North
American road system behind. Traffic lanes are not
marked. Curves are not banked. There are no
road signs. Surfaces can be slippery, rough, uphill or
downhill. In short, you have gone right back to nature.
Off-road driving involves some new skills. And that
is why it is very important that you read this guide.
You will �nd many driving tips and suggestions.
These will help make your off-road driving safer and
more enjoyable.
4-15
Page 263 of 420
Driving On Grades
Reduce speed and shift to a lower gear before you start
down a long or steep downgrade. If you don’t shift
down, you might have to use your brakes so much that
they would get hot and no longer work well.
When towing at high altitude on steep uphill grades,
consider the following: Engine coolant will boil at a lower
temperature than at normal altitudes. If you turn your
engine off immediately after towing at high altitude
on steep uphill grades, your vehicle may show signs
similar to engine overheating. To avoid this, let the
engine run while parked (preferably on level ground)
with the automatic transmission in PARK (P) (or the
manual transmission out of gear and the parking brake
applied) for a few minutes before turning the engine
off. If you do get the overheat warning, seeEngine
Overheating on page 5-28.
Parking on Hills
{CAUTION:
You really should not park your vehicle, with a
trailer attached, on a hill. If something goes
wrong, your rig could start to move. People
can be injured, and both your vehicle and the
trailer can be damaged.
But if you ever have to park your rig on a hill, here’s
how to do it:
1. Apply your regular brakes, but don’t shift into
PARK (P) yet, or into gear for a manual
transmission. When parking uphill, turn your
wheels away from the curb. When parking downhill,
turn your wheels into the curb.
2. Have someone place chocks under the trailer
wheels.
3. When the wheel chocks are in place, release the
regular brakes until the chocks absorb the load.
4-71
Page 340 of 420
2. Move the seats forward and turn the wing nut on
the cover counterclockwise to remove it. For crew
cab models, reach under the rear seat to access the
jack and wheel blocks. To reinstall the jack and
wheel block assembly in the mounting bracket,
insert the tabs into the jack base by pushing the
blocks up into the assembly. The outer hole in
the jack base aligns with the tab on the bracket.
When reinstalling, make sure the jack is secure,
but do not overtighten the jack in the bracket.
3. The wheel blocks and the wheel block retainer can
be removed by turning the wing nut
counterclockwise.
Put the wheel blocks at the front and rear of the tire
farthest away from the one being changed. That
would be the tire on the other side, at the opposite
end of the vehicle.
4. There is also a wing nut used to retain the storage
bag and tools located under the front passenger’s
seat. To remove it, turn the wing nut
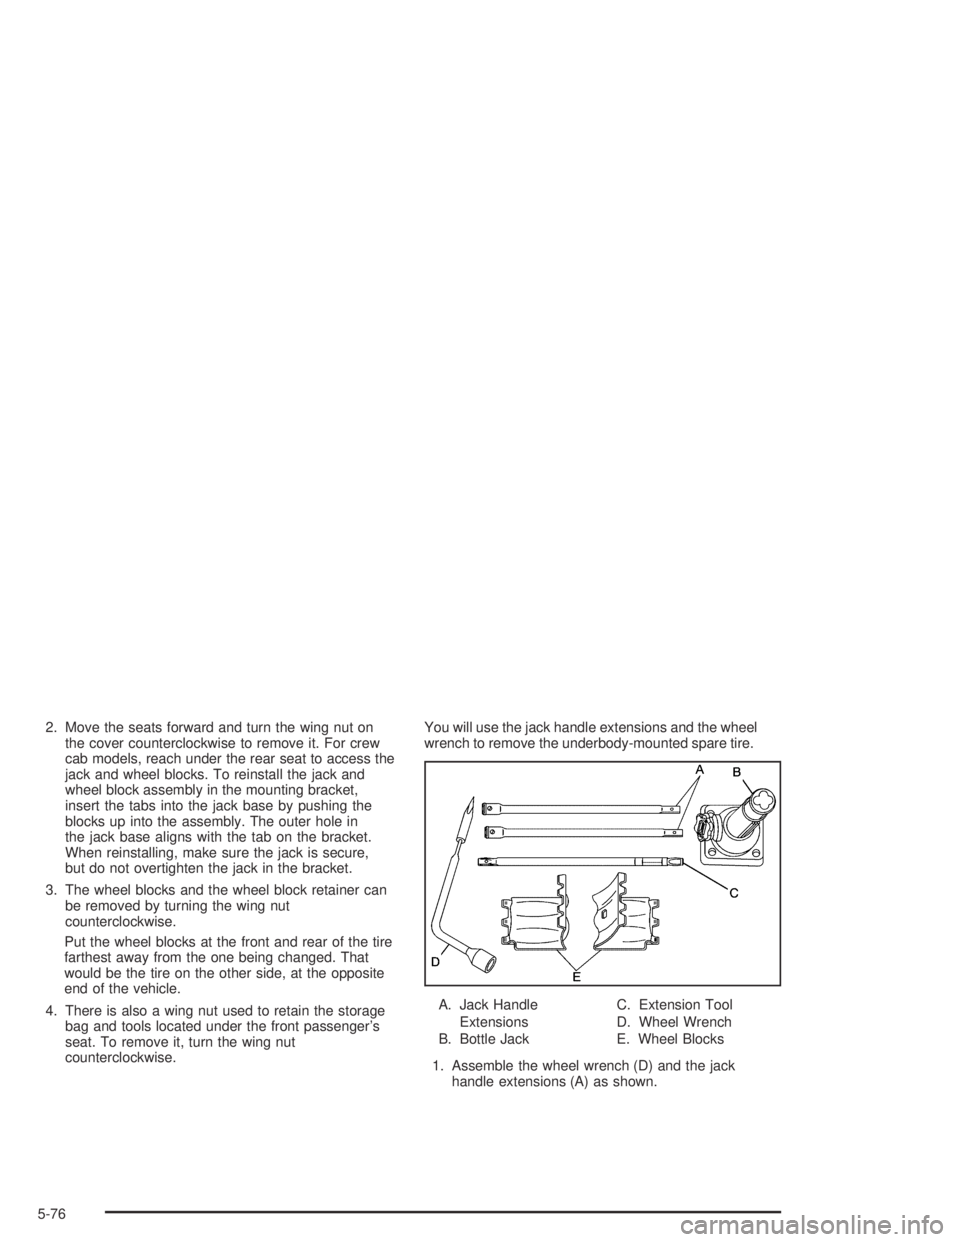
counterclockwise.You will use the jack handle extensions and the wheel
wrench to remove the underbody-mounted spare tire.
A. Jack Handle
Extensions
B. Bottle JackC. Extension Tool
D. Wheel Wrench
E. Wheel Blocks
1. Assemble the wheel wrench (D) and the jack
handle extensions (A) as shown.
5-76
Page 345 of 420
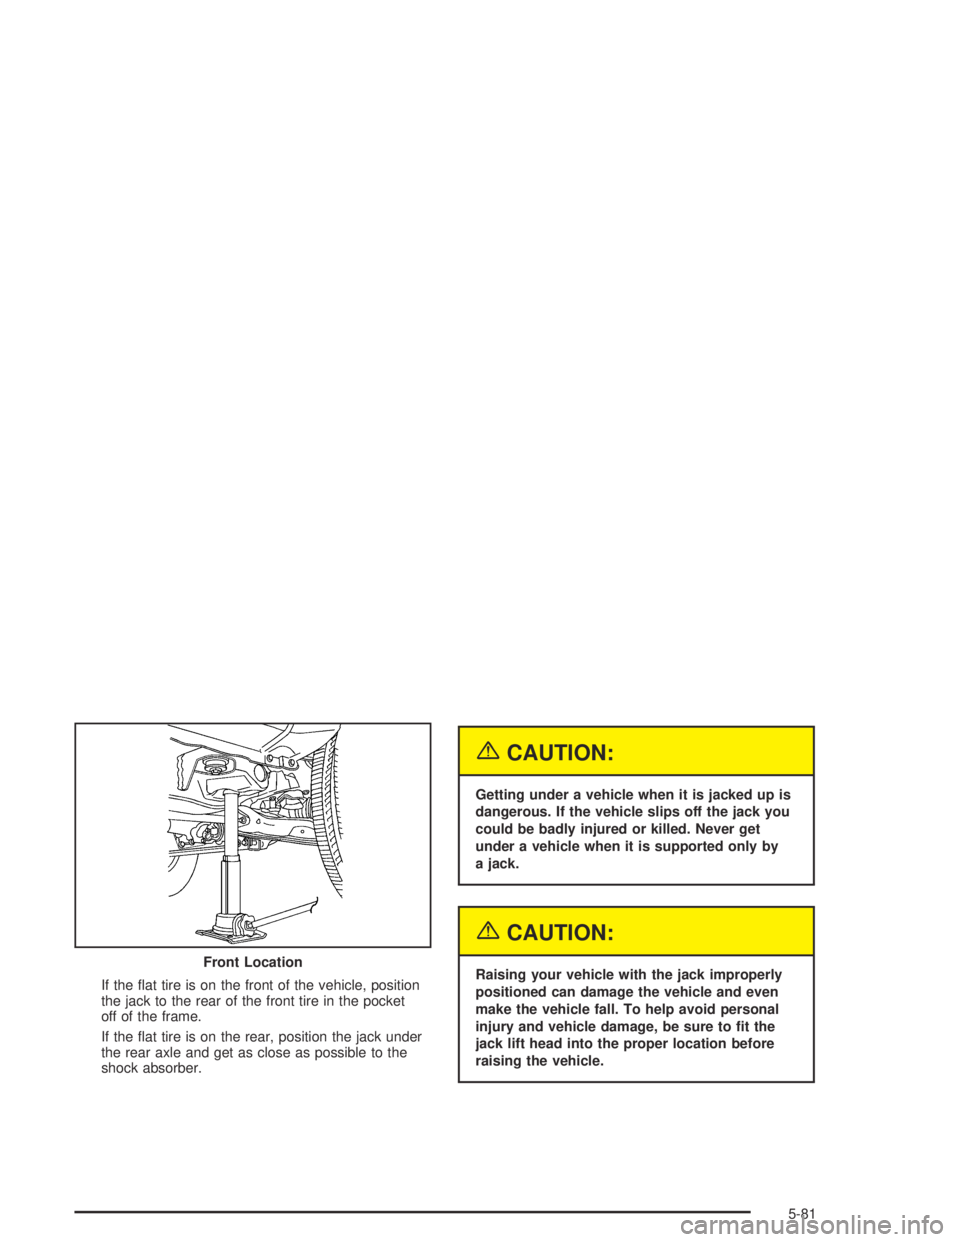
If the �at tire is on the front of the vehicle, position
the jack to the rear of the front tire in the pocket
off of the frame.
If the �at tire is on the rear, position the jack under
the rear axle and get as close as possible to the
shock absorber.
{CAUTION:
Getting under a vehicle when it is jacked up is
dangerous. If the vehicle slips off the jack you
could be badly injured or killed. Never get
under a vehicle when it is supported only by
a jack.
{CAUTION:
Raising your vehicle with the jack improperly
positioned can damage the vehicle and even
make the vehicle fall. To help avoid personal
injury and vehicle damage, be sure to �t the
jack lift head into the proper location before
raising the vehicle. Front Location
5-81
Page 370 of 420
Fuse Usage
15 Front Axle Actuator
16Antilock Brake System (ABS),
ABS module, Four-Wheel Drive,
Gravity Sensor
17Supplemental In�atable Restraint
System, Sensing and Diagnostic
Module, Air Bag Off Switch
18 Heated Seat
19Cruise Control Switch, Inside
Rearview Mirror, Transfer Case
Control Module, Brake Switch,
Clutch Disable
20 Electronic Throttle Control (ETC)
21 Power Door Locks
22 Injectors
23Ignition, Clutch Starter Switch,
Neutral Safety Back-Up Switch,
Ignition Coils 1-5, Air Conditioning
Relay
24 Transmission Solenoid
25 Powertrain Control Module (PCM)
26 Back-up Lights
27ERLS, Map Sensor, Can Purge
SolenoidFuse Usage
28 Rear Turn/Hazard Lights
29Driver’s Side RearTaillamp,
Passenger Side Air Bag Indicator
Lighting, Instrument Panel Dimming
Power (2WD/4WD switch lighting)
30 Powertrain Control Module (PCM) B
31 OnStar
32 Radio
33 Auxiliary Power 2
34 Truck Body Controller
35 Horn
36 Transfer Case Control Module
37Turn/Hazard/Courtesy/Cargo Lamps/
Mirrors
38 Cluster
39Rear Parking Lamp 1, Passenger’s
Side Taillamp, License Plate Lamps
40Front Park/Turn Lamps, Driver and
Passenger’s Side Power Window
Switches Lighting
41 Climate Control Fan
42 Power Windows
5-106
Page 371 of 420
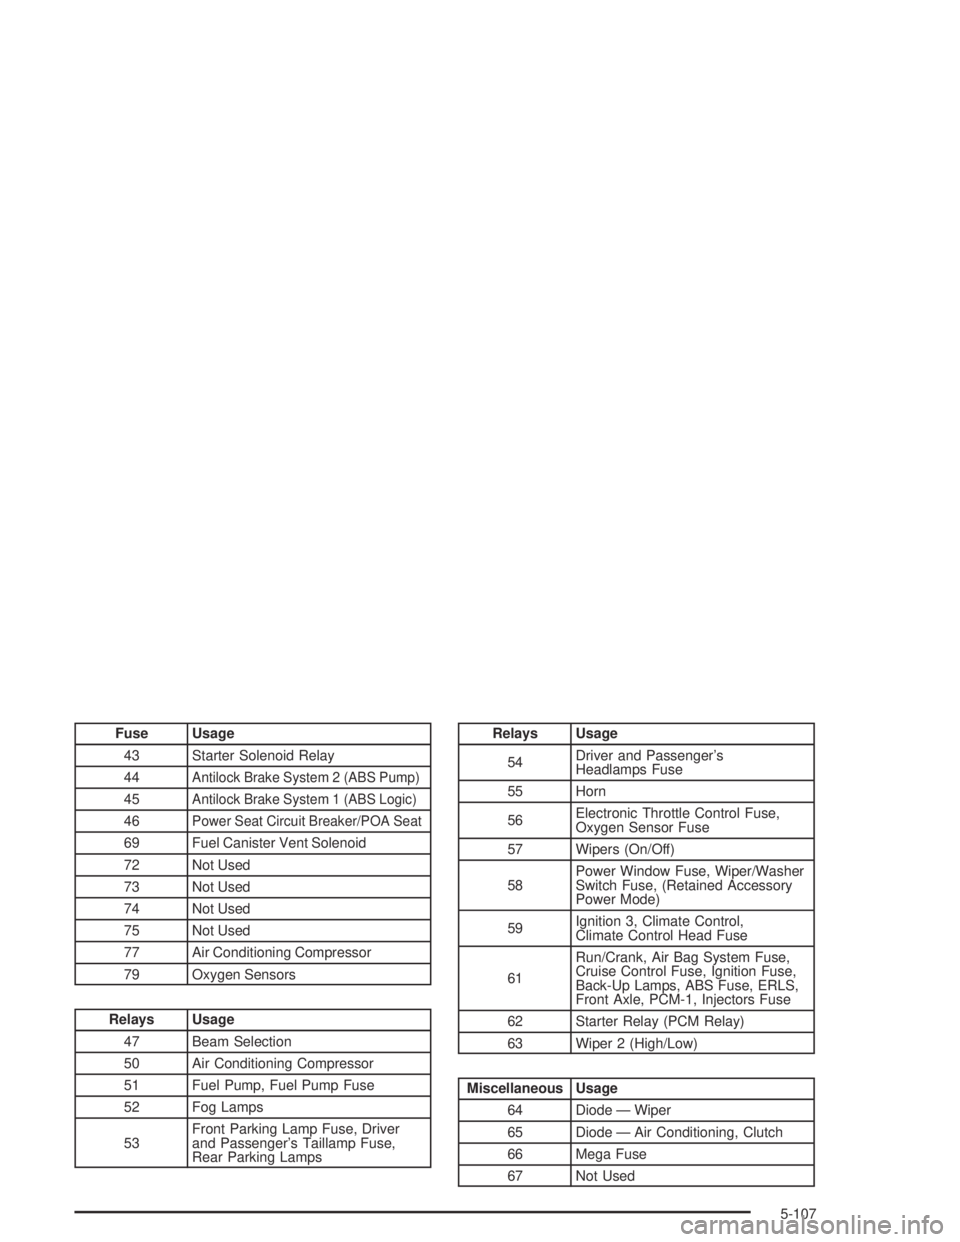
Fuse Usage
43 Starter Solenoid Relay
44
Antilock Brake System 2 (ABS Pump)
45Antilock Brake System 1 (ABS Logic)
46Power Seat Circuit Breaker/POA Seat
69 Fuel Canister Vent Solenoid
72 Not Used
73 Not Used
74 Not Used
75 Not Used
77 Air Conditioning Compressor
79 Oxygen Sensors
Relays Usage
47 Beam Selection
50 Air Conditioning Compressor
51 Fuel Pump, Fuel Pump Fuse
52 Fog Lamps
53Front Parking Lamp Fuse, Driver
and Passenger’s Taillamp Fuse,
Rear Parking Lamps
Relays Usage
54Driver and Passenger’s
Headlamps Fuse
55 Horn
56Electronic Throttle Control Fuse,
Oxygen Sensor Fuse
57 Wipers (On/Off)
58Power Window Fuse, Wiper/Washer
Switch Fuse, (Retained Accessory
Power Mode)
59Ignition 3, Climate Control,
Climate Control Head Fuse
61Run/Crank, Air Bag System Fuse,
Cruise Control Fuse, Ignition Fuse,
Back-Up Lamps, ABS Fuse, ERLS,
Front Axle, PCM-1, Injectors Fuse
62 Starter Relay (PCM Relay)
63 Wiper 2 (High/Low)
Miscellaneous Usage
64 Diode — Wiper
65 Diode — Air Conditioning, Clutch
66 Mega Fuse
67 Not Used
5-107
Page 405 of 420

A
ABS (Anti-Lock Brake System)..........................3-39
AC (Air Conditioning) OFF...............................3-39
Accessory Power Outlets.................................3-16
Adding Washer Fluid.......................................5-37
Additional Program Information........................... 7-9
Additives, Fuel................................................. 5-6
Add-On Electrical Equipment...........................5-103
Add-On Equipment..........................................4-58
Adjusting the Speakers
(Balance/Fade)............................3-46, 3-49, 3-58
After Off-Road Driving.....................................4-29
Air Bag
Off Light.....................................................3-26
Readiness Light..........................................3-25
Air Bag Systems.............................................1-60
Adding Equipment to Your
Air Bag-Equipped Vehicle..........................1-73
Air Bag Off Switch.......................................1-70
How Does an Air Bag Restrain?....................1-67
Servicing Your Air Bag-Equipped Vehicle.........1-72
What Makes an Air Bag In�ate?....................1-67
What Will You See After an
Air Bag In�ates?......................................1-68
When Should an Air Bag In�ate?...................1-66
Where Are the Air Bags?..............................1-63
Air Cleaner/Filter, Engine.................................5-18Airbag Sensing and Diagnostic Module (SDM)......... 7-9
All Overseas Locations...................................... 7-5
AM ...............................................................3-68
AM-FM Radio.................................................3-44
Antenna, Fixed Mast.......................................3-68
Anti-lock Brake System..................................... 4-7
Anti-Lock Brake, System Warning Light..............3-29
Appearance Care............................................5-94
Care of Safety Belts....................................5-97
Chemical Paint Spotting..............................5-101
Cleaning the Inside of Your Vehicle................5-95
Cleaning the Outside of Your Vehicle..............5-98
Finish Damage..........................................5-100
Sheet Metal Damage..................................5-100
Underbody Maintenance.............................5-101
Vehicle Care/Appearance Materials...............5-102
Weatherstrips..............................................5-97
Approaching a Hill..........................................4-20
Ashtrays........................................................3-17
Assist Handles...............................................2-43
Audio System(s).............................................3-42
AM-FM Radio.............................................3-44
Care of Your CD Player...............................3-68
Care of Your CDs........................................3-68
Chime Level Adjustment...............................3-68
Fixed Mast Antenna.....................................3-68
Radio with CD............................................3-47
Radio with Six-Disc CD................................3-56
1