horn GMC CANYON 2004 Owner's Manual
[x] Cancel search | Manufacturer: GMC, Model Year: 2004, Model line: CANYON, Model: GMC CANYON 2004Pages: 420, PDF Size: 2.84 MB
Page 85 of 420
Remote Keyless Entry System
Operation
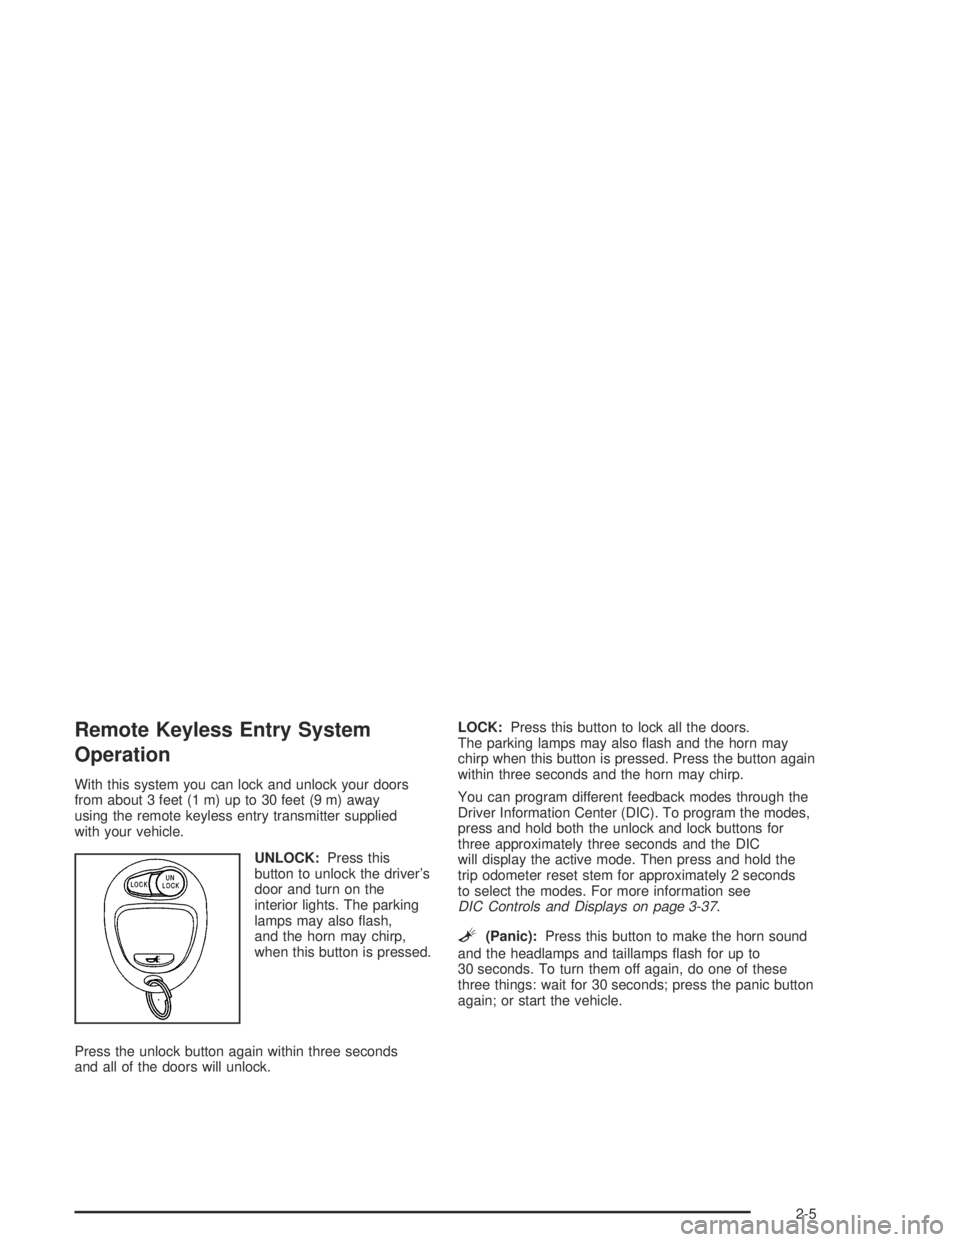
With this system you can lock and unlock your doors
from about 3 feet (1 m) up to 30 feet (9 m) away
using the remote keyless entry transmitter supplied
with your vehicle.
UNLOCK:Press this
button to unlock the driver’s
door and turn on the
interior lights. The parking
lamps may also �ash,
and the horn may chirp,
when this button is pressed.
Press the unlock button again within three seconds
and all of the doors will unlock.LOCK:Press this button to lock all the doors.
The parking lamps may also �ash and the horn may
chirp when this button is pressed. Press the button again
within three seconds and the horn may chirp.
You can program different feedback modes through the
Driver Information Center (DIC). To program the modes,
press and hold both the unlock and lock buttons for
three approximately three seconds and the DIC
will display the active mode. Then press and hold the
trip odometer reset stem for approximately 2 seconds
to select the modes. For more information see
DIC Controls and Displays on page 3-37.
L(Panic):Press this button to make the horn sound
and the headlamps and taillamps �ash for up to
30 seconds. To turn them off again, do one of these
three things: wait for 30 seconds; press the panic button
again; or start the vehicle.
2-5
Page 95 of 420
If the lock button on the remote keyless entry transmitter
is pressed, but a door is open, the horn will chirp six
times. Close the open door and the system will be
activated.
If a locked door is not opened with the remote keyless
entry transmitter, or OnStar
®, the alarm will go off.
The front turn signal lamps will �ash for two minutes,
and the horn will sound for two minutes, then will turn off
to save the battery power.
Remember, the theft-deterrent system won’t activate if
you lock the doors with a key, the manual door lock, or
power door lock switch. The system can only be activated
with the remote keyless entry transmitter, or OnStar
®.
You should also remember that you can start your vehicle
with the correct ignition key if the alarm has been set off.
Here’s how to avoid setting off the alarm by accident:
If you don’t want to activate the theft-deterrent
system, the vehicle should be locked with the door
key after the doors are closed.
Always unlock a door with a the remote keyless
entry transmitter. Unlocking a door any other
way will set off the alarm.
If you set off the alarm by accident, you can turn off
the alarm by pressing unlock on the remote keyless
entry transmitter. The alarm won’t stop if you try
to unlock a door any other way.
Testing the Alarm
The alarm can be tested by following these steps:
1. From inside the vehicle, activate the system by
locking the doors with the remote keyless entry
transmitter.
2. Unlock the door with the manual door lock and
open the door. This should set off the alarm.
3. To turn the alarm off, press the unlock button on
the remote keyless entry transmitter or start the
engine.
If the alarm does not sound when it should but the lights
�ash, check to see if the horn works. The horn fuse
may be blown. To replace the fuse, seeFuses and
Circuit Breakers on page 5-104.
If the alarm does not sound or the headlamps do not
�ash, see your dealer for service.
2-15
Page 125 of 420
Instrument Panel Overview...............................3-2
Hazard Warning Flashers................................3-4
Other Warning Devices...................................3-4
Horn.............................................................3-4
Tilt Wheel.....................................................3-5
Turn Signal/Multifunction Lever.........................3-5
Exterior Lamps.............................................3-12
Interior Lamps..............................................3-15
Accessory Power Outlets...............................3-16
Ashtrays and Cigarette Lighter........................3-17
Climate Controls............................................3-18
Climate Control System.................................3-18
Outlet Adjustment.........................................3-21
Warning Lights, Gages, and Indicators............3-22
Instrument Panel Cluster................................3-23
Speedometer and Odometer...........................3-24
Trip Odometer..............................................3-24
Tachometer.................................................3-24
Safety Belt Reminder Light.............................3-24
Air Bag Readiness Light................................3-25
Air Bag Off Light..........................................3-26
Battery Warning Light....................................3-27
Up-Shift Light (Manual Transmission)...............3-28
Brake System Warning Light..........................3-28
Anti-Lock Brake System Warning Light.............3-29Engine Coolant Temperature Gage..................3-30
Malfunction Indicator Lamp.............................3-30
Oil Pressure Light.........................................3-34
Security Light...............................................3-35
Cruise Control Light......................................3-35
Highbeam On Light.......................................3-35
Daytime Running Lamps Indicator Light...........3-36
Fuel Gage...................................................3-36
Driver Information Center (DIC).......................3-37
DIC Controls and Displays.............................3-37
DIC Warnings and Messages.........................3-39
Audio System(s).............................................3-42
Setting the Time for Radios without Radio
Data Systems (RDS)..................................3-43
Setting the Time for Radios with Radio Data
Systems (RDS).........................................3-43
AM-FM Radio...............................................3-44
Radio with CD..............................................3-47
Radio with Six-Disc CD.................................3-56
Theft-Deterrent Feature (Non-RDS Radios).......3-67
Theft-Deterrent Feature (RDS Radios).............3-67
Radio Reception...........................................3-68
Care of Your CDs.........................................3-68
Care of Your CD Player................................3-68
Fixed Mast Antenna......................................3-68
Chime Level Adjustment................................3-68
Section 3 Instrument Panel
3-1
Page 127 of 420
The main components of your vehicle’s instrument
panel are the following:
A. Air Outlets. SeeOutlet Adjustment on page 3-21.
B. Turn Signal/Multifunction Lever. SeeTurn
Signal/Multifunction Lever on page 3-5.
C. Instrument Panel Cluster. SeeInstrument Panel
Cluster on page 3-23.
D. Hazard Warning Flasher Button. SeeHazard
Warning Flashers on page 3-4.
E. Passenger Side Air Bag. SeeAir Bag Systems
on page 1-60.
F. Park Brake Release. SeeParking Brake on
page 2-29.
G. Horn. SeeHorn on page 3-4.H. Traction Control Button or Four-Wheel Drive Buttons.
SeeTraction Control System (TCS) on page 4-9
andFour-Wheel Drive on page 2-26.
I. Audio System. SeeAudio System(s) on page 3-42.
J. Cigarette Lighter (If Equipped). SeeAshtrays
and Cigarette Lighter on page 3-17.
K. Climate Control System. SeeClimate Control
System on page 3-18.
L. Accessory Power Outlet. SeeAccessory Power
Outlets on page 3-16.
M. Air Bag Off Switch (Regular cab and rear seat
delete only). See “Air Bag Off Switch” under
Air Bag Systems on page 1-60.
N. Glove Box. SeeGlove Box on page 2-42.
3-3
Page 128 of 420
Hazard Warning Flashers
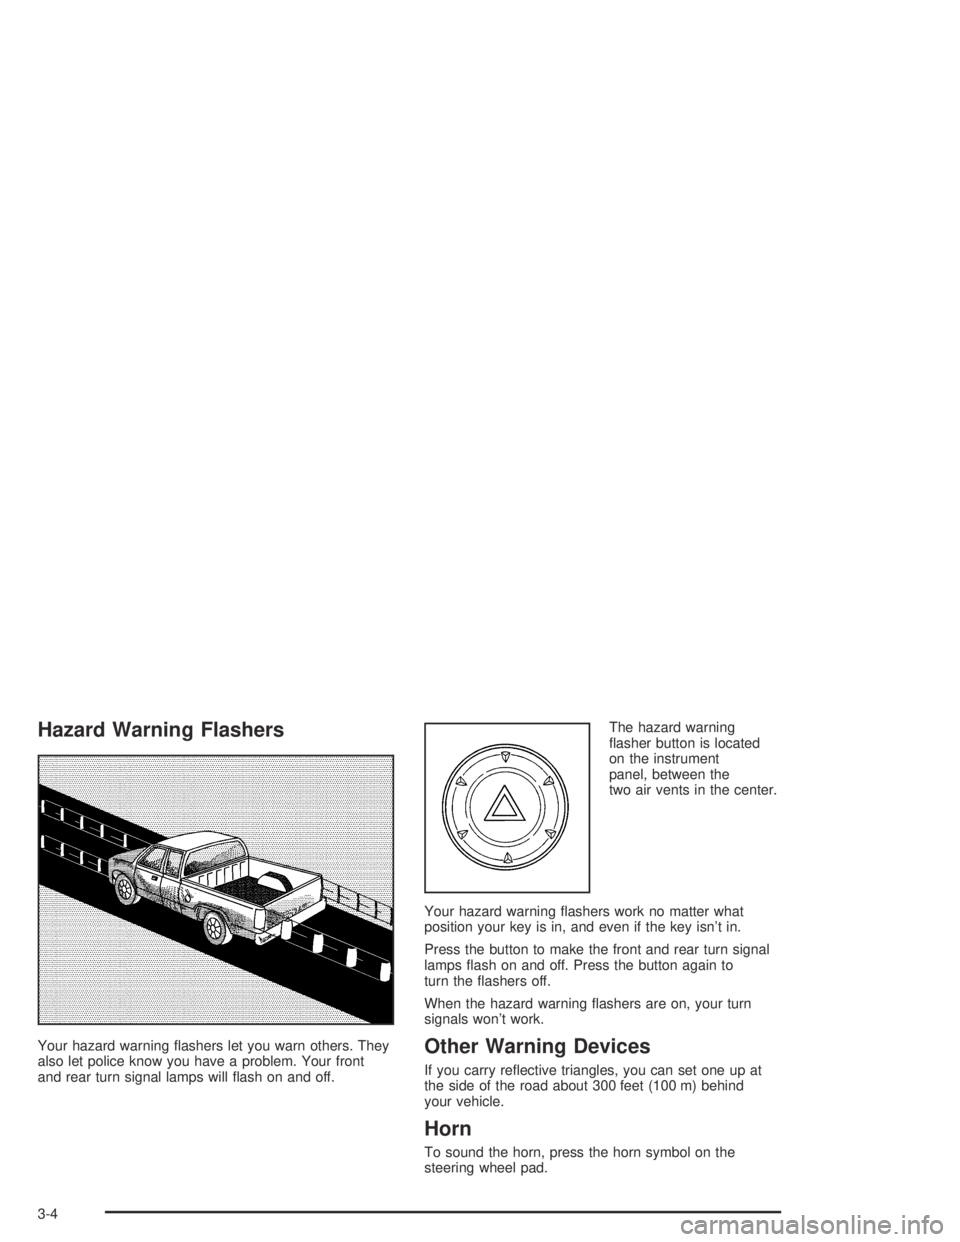
Your hazard warning �ashers let you warn others. They
also let police know you have a problem. Your front
and rear turn signal lamps will �ash on and off.The hazard warning
�asher button is located
on the instrument
panel, between the
two air vents in the center.
Your hazard warning �ashers work no matter what
position your key is in, and even if the key isn’t in.
Press the button to make the front and rear turn signal
lamps �ash on and off. Press the button again to
turn the �ashers off.
When the hazard warning �ashers are on, your turn
signals won’t work.Other Warning Devices
If you carry re�ective triangles, you can set one up at
the side of the road about 300 feet (100 m) behind
your vehicle.
Horn
To sound the horn, press the horn symbol on the
steering wheel pad.
3-4
Page 213 of 420
Driving Uphill
Once you decide you can safely drive up the hill,
you need to take some special steps.
Use a low gear and get a �rm grip on the steering
wheel.
Get a smooth start up the hill and try to maintain
your speed. Do not use more power than you
need, because you do not want your wheels to start
spinning or sliding.
Try to drive straight up the hill if at all possible.
If the path twists and turns, you might want to
�nd another route.
{CAUTION:
Turning or driving across steep hills can be
dangerous. You could lose traction, slide
sideways, and possibly roll over. You could be
seriously injured or killed. When driving up
hills, always try to go straight up.
Ease up on your speed as you approach the top of
the hill.
Attach a �ag to the vehicle to make you more
visible to approaching traffic on trails or hills.
Sound the horn as you approach the top of the hill
to let opposing traffic know you are there.
Use your headlamps even during the day.
They make you more visible to oncoming traffic.
{CAUTION:
Driving to the top (crest) of a hill at full speed
can cause an accident. There could be a
drop-off, embankment, cliff, or even another
vehicle. You could be seriously injured or
killed. As you near the top of a hill, slow down
and stay alert.
4-21
Page 370 of 420
Fuse Usage
15 Front Axle Actuator
16Antilock Brake System (ABS),
ABS module, Four-Wheel Drive,
Gravity Sensor
17Supplemental In�atable Restraint
System, Sensing and Diagnostic
Module, Air Bag Off Switch
18 Heated Seat
19Cruise Control Switch, Inside
Rearview Mirror, Transfer Case
Control Module, Brake Switch,
Clutch Disable
20 Electronic Throttle Control (ETC)
21 Power Door Locks
22 Injectors
23Ignition, Clutch Starter Switch,
Neutral Safety Back-Up Switch,
Ignition Coils 1-5, Air Conditioning
Relay
24 Transmission Solenoid
25 Powertrain Control Module (PCM)
26 Back-up Lights
27ERLS, Map Sensor, Can Purge
SolenoidFuse Usage
28 Rear Turn/Hazard Lights
29Driver’s Side RearTaillamp,
Passenger Side Air Bag Indicator
Lighting, Instrument Panel Dimming
Power (2WD/4WD switch lighting)
30 Powertrain Control Module (PCM) B
31 OnStar
32 Radio
33 Auxiliary Power 2
34 Truck Body Controller
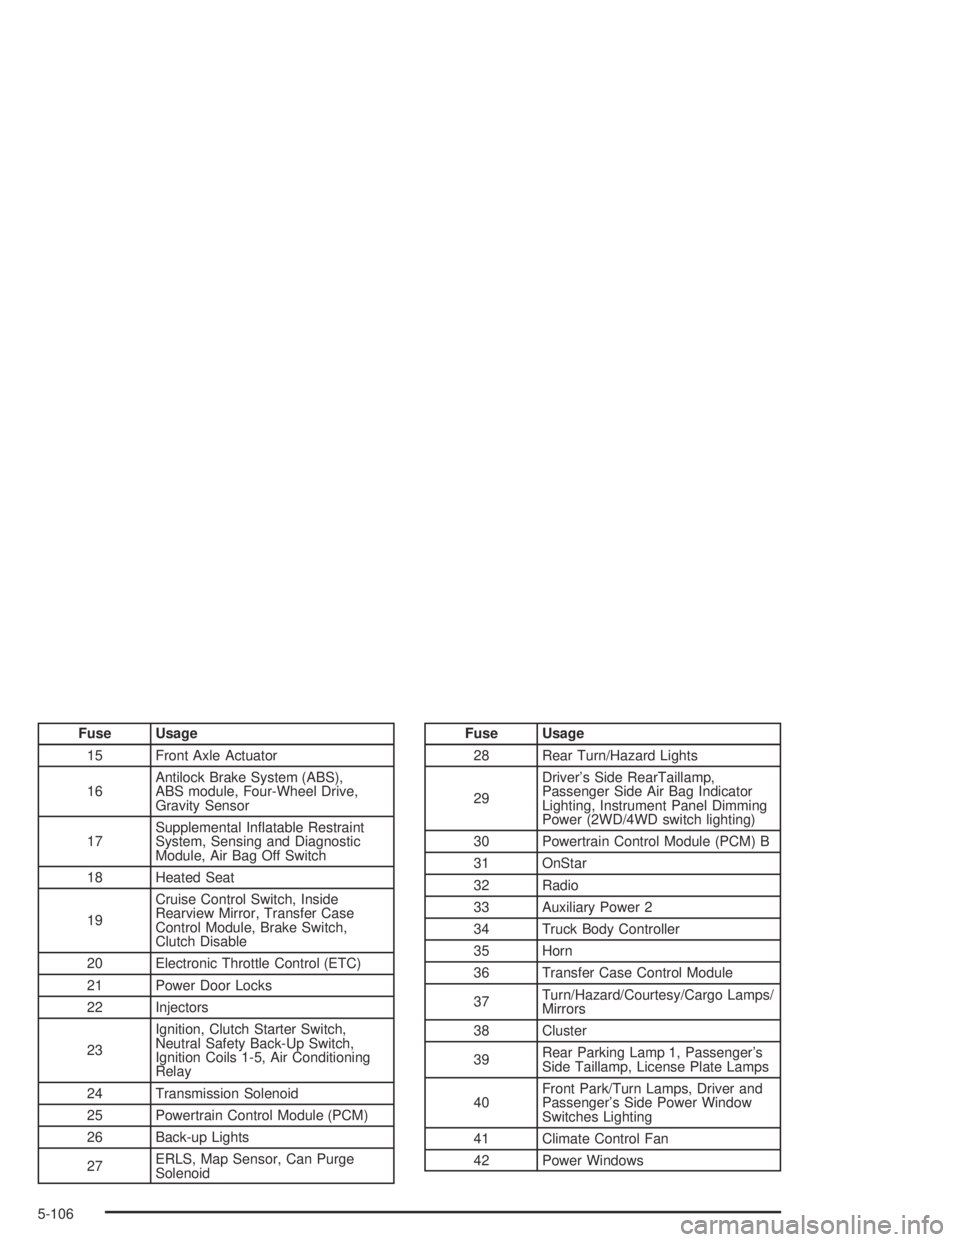
35 Horn
36 Transfer Case Control Module
37Turn/Hazard/Courtesy/Cargo Lamps/
Mirrors
38 Cluster
39Rear Parking Lamp 1, Passenger’s
Side Taillamp, License Plate Lamps
40Front Park/Turn Lamps, Driver and
Passenger’s Side Power Window
Switches Lighting
41 Climate Control Fan
42 Power Windows
5-106
Page 371 of 420
Fuse Usage
43 Starter Solenoid Relay
44
Antilock Brake System 2 (ABS Pump)
45Antilock Brake System 1 (ABS Logic)
46Power Seat Circuit Breaker/POA Seat
69 Fuel Canister Vent Solenoid
72 Not Used
73 Not Used
74 Not Used
75 Not Used
77 Air Conditioning Compressor
79 Oxygen Sensors
Relays Usage
47 Beam Selection
50 Air Conditioning Compressor
51 Fuel Pump, Fuel Pump Fuse
52 Fog Lamps
53Front Parking Lamp Fuse, Driver
and Passenger’s Taillamp Fuse,
Rear Parking Lamps
Relays Usage
54Driver and Passenger’s
Headlamps Fuse
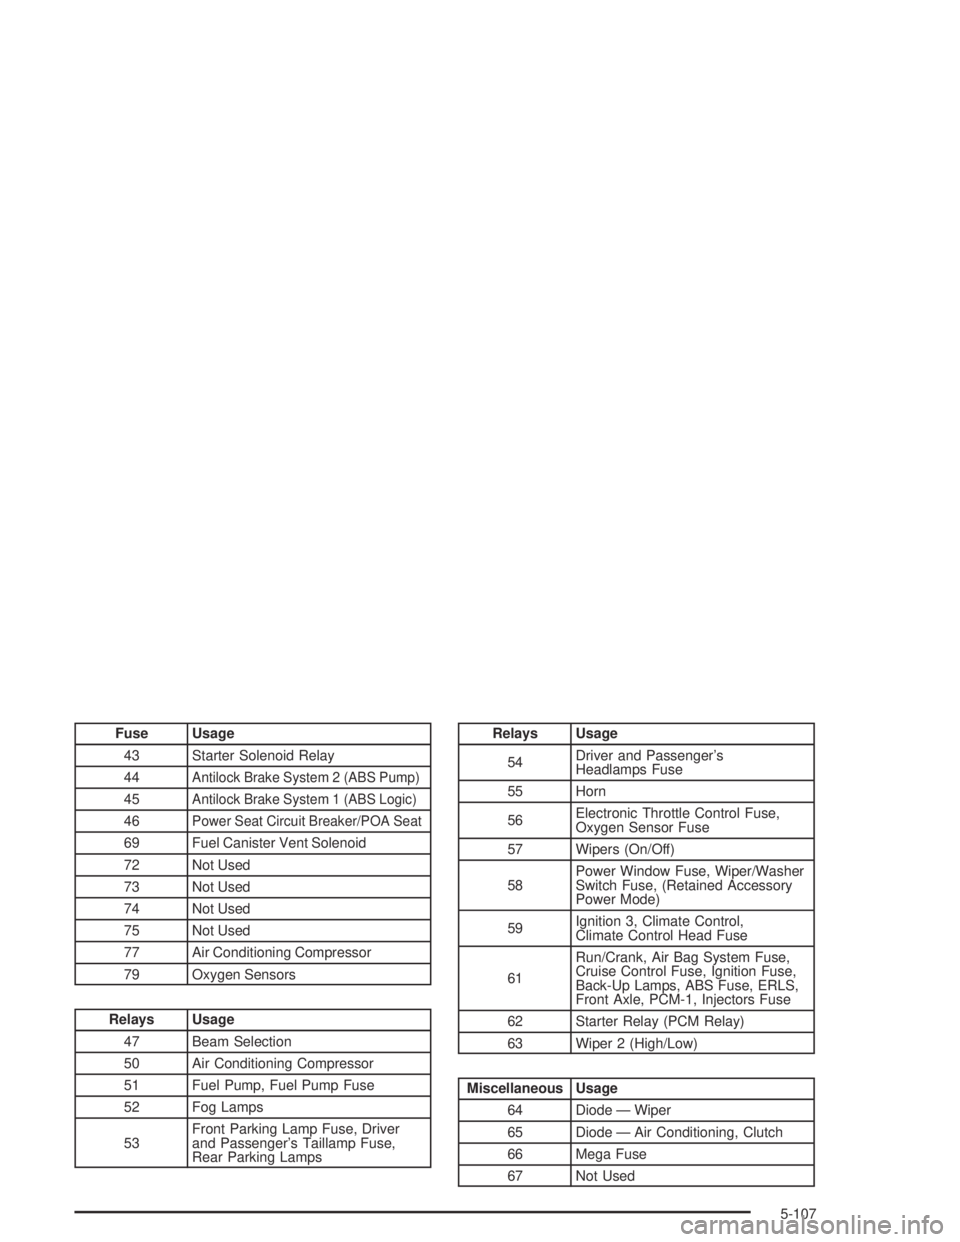
55 Horn
56Electronic Throttle Control Fuse,
Oxygen Sensor Fuse
57 Wipers (On/Off)
58Power Window Fuse, Wiper/Washer
Switch Fuse, (Retained Accessory
Power Mode)
59Ignition 3, Climate Control,
Climate Control Head Fuse
61Run/Crank, Air Bag System Fuse,
Cruise Control Fuse, Ignition Fuse,
Back-Up Lamps, ABS Fuse, ERLS,
Front Axle, PCM-1, Injectors Fuse
62 Starter Relay (PCM Relay)
63 Wiper 2 (High/Low)
Miscellaneous Usage
64 Diode — Wiper
65 Diode — Air Conditioning, Clutch
66 Mega Fuse
67 Not Used
5-107
Page 411 of 420
Getting Familiar with Off-Road Driving................4-18
Glove Box.....................................................2-42
GM Mobility Program for Persons with
Disabilities.................................................... 7-5
GM Oil Life System™......................................3-38
H
Hazard Warning Flashers................................... 3-4
Head Restraints............................................... 1-7
Headlamp High/Low-Beam Changer.................... 3-7
Headlamps....................................................5-50
Bulb Replacement.......................................5-50
Front Turn Signal, Sidemarker and
Daytime Running Lamps...........................5-52
Halogen Bulbs............................................5-50
Heated Seats................................................... 1-5
Highbeam On Light.........................................3-35
Highway Hypnosis...........................................4-37
Hill and Mountain Roads..................................4-38
Hitches..........................................................4-68
Hood
Checking Things Under................................5-10
Release.....................................................5-11
Horn............................................................... 3-4
How to Add Coolant to the Coolant
Recovery Tank............................................5-32
How to Add Coolant to the Radiator..................5-34How to Add Fluid....................................5-22, 5-23
How to Check................................5-20, 5-22, 5-65
How to Check and Add Fluid............................5-24
How to Check Lubricant..........................5-47, 5-49
How to Check Power Steering Fluid..................5-36
How to Inspect the Engine Air Cleaner/Filter.......5-18
How to Use This Manual...................................... ii
How to Wear Safety Belts Properly...................1-16
Hydraulic Clutch.............................................5-24
Hydroplaning..................................................4-33
I
If No Steam Is Coming From Your Engine..........5-29
If Steam Is Coming From Your Engine...............5-28
If the Light is Flashing.....................................3-32
If the Light Is On Steady.................................3-32
If You Are Caught in a Blizzard.........................4-42
If You Are Stuck in Sand, Mud, Ice or Snow.......4-44
If You Do Decide To Pull A Trailer.....................4-61
Ignition Positions.............................................2-17
Infants and Young Children, Restraints...............1-34
In�ation - Tire Pressure...................................5-64
Instrument Panel
Cluster.......................................................3-23
Overview..................................................... 3-2
Instrument Panel Brightness.............................3-15
Interior Lamps................................................3-15
7