GMC CANYON 2010 Owner's Manual
Manufacturer: GMC, Model Year: 2010, Model line: CANYON, Model: GMC CANYON 2010Pages: 448, PDF Size: 2.62 MB
Page 141 of 448
Shifting Into Park
(Automatic Transmission)
{WARNING:
It can be dangerous to get out of the vehicle if the
shift lever is not fully in P (Park) with the parking
brake firmly set. The vehicle can roll. If you have
left the engine running, the vehicle can move
suddenly. You or others could be injured. To be
sure the vehicle will not move, even when you are
on fairly level ground, use the steps that follow.
If you are pulling a trailer, seeTowing a Trailer on
page 5-48.
1. Hold the brake pedal down with your right foot and
set the parking brake.
SeeParking Brake on page 3-30for more
information.
{WARNING:
If you have four-wheel drive, the vehicle will be free
to roll — even if the shift lever is in P (Park) — if the
transfer case is in Neutral. So, be sure the transfer
case is in a drive gear, two-wheel high (2H) or
four-wheel high (4H) or four-wheel low (4L) — not in
Neutral.
2. Move the shift lever into P (Park) by pulling the
lever toward you and moving it up as far as it
will go.
3. Turn the ignition key to LOCK/OFF.
4. Remove the key and take it with you. If you can
leave the vehicle with the key, the vehicle is in
P (Park).
3-31
Page 142 of 448
Leaving the Vehicle With the Engine
Running (Automatic Transmission)
{WARNING:
It can be dangerous to leave the vehicle with the
engine running. The vehicle could move suddenly
if the shift lever is not fully in P (Park) with the
parking brake firmly set. And, if you leave the
vehicle with the engine running, it could overheat
and even catch fire. You or others could be
injured. Do not leave the vehicle with the engine
running.
If you have to leave the vehicle with the engine running,
be sure the vehicle is in P (Park) and the parking
brake is firmly set before you leave it. After you have
moved the shift lever into P (Park), hold the regular
brake pedal down. Then, see if you can move the shift
lever away from P (Park) without first pulling it toward
you. If you can, the shift lever was not fully locked
into P (Park).
Torque Lock (Automatic Transmission)
If you are parking on a hill and you do not shift the
transmission into P (Park) properly, the weight of the
vehicle may put too much force on the parking pawl in
the transmission. You may find it difficult to pull the
shift lever out of P (Park). This is called torque lock.
To prevent torque lock, set the parking brake and then
shift into P (Park) properly before you leave the
driver seat. To find out how, seeShifting Into Park
(Automatic Transmission) on page 3-31.
When you are ready to drive, move the shift lever out of
P (Park) before you release the parking brake.
If torque lock does occur, you may need to have another
vehicle push yours a little uphill to take some of the
pressure from the parking pawl in the transmission,
so you can pull the shift lever out of P (Park).
Shifting Out of Park
(Automatic Transmission)
The vehicle has an automatic transmission shift lock
control system. You have to fully apply the brake pedal
before you can shift from P (Park) when the ignition
is ON/RUN. SeeAutomatic Transmission Operation on
page 3-21.
3-32
Page 143 of 448
The shift lock control system is designed to do the
following:
•Prevent the ignition key from being removed unless
the shift lever is in P (Park).
•Prevent movement of the shift lever out of P (Park),
unless the ignition is in ON/RUN and the brake
pedal is applied.
The shift lock control system is always functional
except in the case of a dead battery or low voltage
(less than 9 V) battery.
If the vehicle has an uncharged battery or a battery with
low voltage, try charging or jump starting the battery.
SeeJump Starting on page 6-43for more information.
To shift out of P (Park) use the following:
1. Apply the brake pedal.
2. Move the shift lever to the desired position.
If you still are unable to shift out of P (Park):
1. Ease the pressure on the shift lever.
2. While holding down the brake pedal, push the shift
lever all the way into P (Park)
3. Move the shift lever to the desired position.
If you are still having a problem shifting, then have the
vehicle serviced.
Parking the Vehicle
(Manual Transmission)
If the vehicle has a manual transmission, before you get
out of the vehicle, move the shift lever into R (Reverse),
and firmly apply the parking brake. Once the shift
lever has been placed into R (Reverse) with the clutch
pedal pressed in, turn the ignition key to LOCK/OFF,
remove the key and release the clutch.
If you are parking on a hill, or if the vehicle is pulling a
trailer, seeTowing a Trailer on page 5-48.
Parking Over Things That Burn
{WARNING:
Things that can burn could touch hot exhaust
parts under the vehicle and ignite. Do not park
over papers, leaves, dry grass, or other things that
can burn.
3-33
Page 144 of 448
Engine Exhaust
{WARNING:
Engine exhaust contains Carbon Monoxide (CO)
which cannot be seen or smelled. Exposure to CO
can cause unconsciousness and even death.
Exhaust may enter the vehicle if:
•The vehicle idles in areas with poor ventilation
(parking garages, tunnels, deep snow that
may block underbody airflow or tail pipes).
•The exhaust smells or sounds strange or
different.
•The exhaust system leaks due to corrosion
or damage.
•The vehicle’s exhaust system has been
modified, damaged or improperly repaired.
•There are holes or openings in the vehicle
body from damage or after-market
modifications that are not completely sealed.
WARNING: (Continued)
WARNING: (Continued)
If unusual fumes are detected or if it is suspected
that exhaust is coming into the vehicle:
•Drive it only with the windows
completely down.
•Have the vehicle repaired immediately.
Never park the vehicle with the engine running in
an enclosed area such as a garage or a building
that has no fresh air ventilation.
Running the Vehicle While Parked
It is better not to park with the engine running. But if you
ever have to, here are some things to know.
{WARNING:
Idling a vehicle in an enclosed area with poor
ventilation is dangerous. Engine exhaust may
enter the vehicle. Engine exhaust contains Carbon
WARNING: (Continued)
3-34
Page 145 of 448
WARNING: (Continued)
Monoxide (CO) which cannot be seen or smelled.
It can cause unconsciousness and even death.
Never run the engine in an enclosed area that has
no fresh air ventilation. For more information,
seeEngine Exhaust on page 3-34.
{WARNING:
It can be dangerous to get out of the vehicle if
the automatic transmission shift lever is not fully
in P (Park) with the parking brake firmly set.
The vehicle can roll. Do not leave the vehicle
when the engine is running unless you have to.
If you have left the engine running, the vehicle can
move suddenly. You or others could be injured.
To be sure the vehicle will not move, even when it
is on fairly level ground, always set the parking
brake and move the automatic transmission shift
lever to P (Park), or the manual transmission shift
lever to Neutral.
{WARNING:
Four-wheel drive vehicles with the transfer case
in N (Neutral) will allow the vehicle to roll, even if
the automatic transmission shift lever is in
P (Park). So, be sure the transfer case is in a
drive gear — not in N (Neutral). Always set the
parking brake.
Follow the proper steps to be sure the vehicle will not
move. SeeShifting Into Park (Automatic Transmission)
on page 3-31.
If pulling a trailer, seeTowing a Trailer on page 5-48.
3-35
Page 146 of 448
Mirrors
Manual Rearview Mirror
Hold the inside rearview mirror in the center to move it
for a clearer view of behind your vehicle. Adjust the
mirror to avoid glare from the headlamps behind you.
Push the tab forward for daytime use and pull it for
nighttime use.
Vehicles with OnStar
®have three additional control
buttons located at the bottom of the mirror. See
your dealer/retailer for more information on the system
and how to subscribe to OnStar. See the OnStar
®
owners guide for more information about the services
OnStar provides.
Adjust this type of mirror to avoid glare from the
headlamps behind you by turning the knob
counterclockwise for nighttime driving and clockwise for
daytime driving.
Cleaning the Mirror
Do not spray glass cleaner directly on the mirror. Use a
soft towel dampened with water.
Automatic Dimming Rearview Mirror
The vehicle may have an automatic dimming inside
rearview mirror. Automatic dimming reduces the glare of
lights from behind the vehicle.
The mirror may also have OnStar
®and/or a compass
and outside temperature display.
Control buttons for the OnStar
®system are at the
bottom of the mirror. See the OnStar®owners guide for
more information about the services OnStar®provides.
SeeCompass on page 3-37for more information
about the compass display. See “Temperature Display”
after, for more information about the outside
temperature display.
AUTO/
(/O(On/Off):Press and hold AUTO /(for
about three seconds or depending on the mirror,
press
Oto turn automatic dimming on or off.
The automatic dimming feature comes on and the
indicator light illuminates each time the vehicle is
started.
3-36
Page 147 of 448
Temperature Display
Yb
/O(On/Off):PressYbor depending on the
mirror, press
Oto turn the display on or off.
To adjust between Fahrenheit and Celsius:
1. Press and hold
Yb/Ofor a few seconds.
The current unit of measure (F or C) flashes.
2. Press
Yb/Oagain and release to change the
unit of measure. Wait several seconds and the
compass/temperature display returns with the
selected unit of measure.
It is normal under certain conditions for the temperature
update to be delayed. If an incorrect temperature
displays for an extended period, see your dealer/retailer.
Cleaning the Mirror
Do not spray glass cleaner directly on the mirror. Use a
soft towel dampened with water.
Compass
Compass Operation
PressYbor depending on the mirror, pressOonce to
turn the display on or off.
Compass Calibration
The compass may need calibration if:
•CAL is displayed while driving in the vehicle.
•After approximately five seconds, the display does
not show a compass heading, N for North, for
example, there may be a strong magnetic field
interfering with the compass. Interference can be
caused by a magnetic antenna mount, magnetic
note pad holder, or a similar magnetic item.
•The compass does not display the correct heading
and the compass zone variance is set correctly.
To calibrate, CAL must be displayed in the mirror
compass windows. If CAL is not displayed, press and
hold
Yb/Ofor several seconds or until CAL is
displayed.
The compass can be calibrated by driving the vehicle in
circles at 5 mph (8 km/h) or less until the display
reads a direction.
3-37
Page 148 of 448
Compass Variance
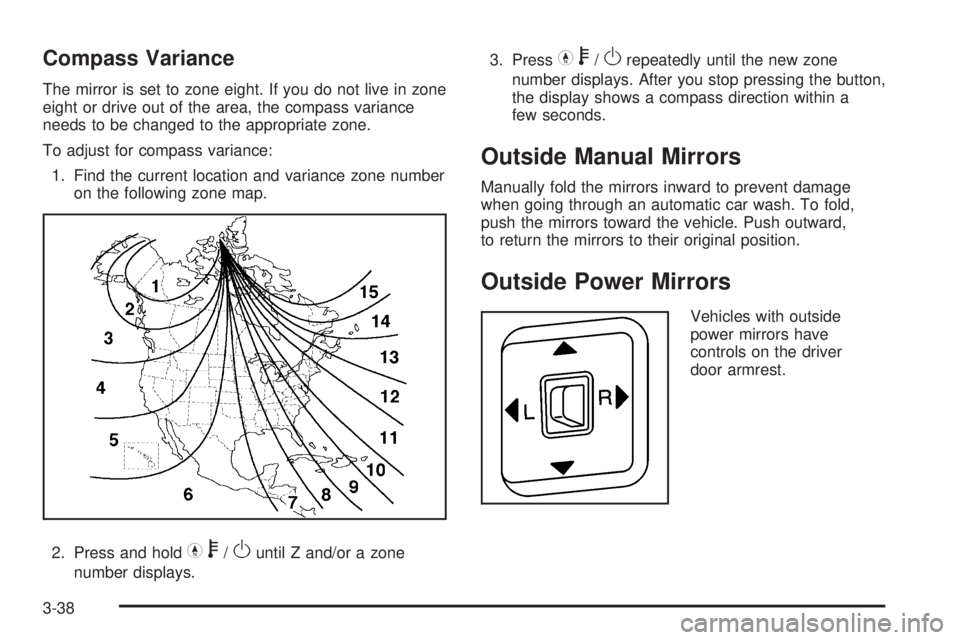
The mirror is set to zone eight. If you do not live in zone
eight or drive out of the area, the compass variance
needs to be changed to the appropriate zone.
To adjust for compass variance:
1. Find the current location and variance zone number
on the following zone map.
2. Press and hold
Yb/Ountil Z and/or a zone
number displays.3. Press
Yb/Orepeatedly until the new zone
number displays. After you stop pressing the button,
the display shows a compass direction within a
few seconds.
Outside Manual Mirrors
Manually fold the mirrors inward to prevent damage
when going through an automatic car wash. To fold,
push the mirrors toward the vehicle. Push outward,
to return the mirrors to their original position.
Outside Power Mirrors
Vehicles with outside
power mirrors have
controls on the driver
door armrest.
3-38
Page 149 of 448
To adjust the power mirrors:
1. Move the selector switch to the L (left) or R (right)
to choose the driver or passenger mirror.
2. Press one of the four buttons located on the control
pad to move the mirror to the desired direction.
3. Return the selector switch to the center position
once the mirrors are adjusted.
If the mirror begins making a ratcheting sound, the
mirror has reached the end of its travel and can go no
farther in that direction. To stop the sound, reverse
the mirror direction using the control pad.
Manually fold the mirrors inward to prevent damage
when going through an automatic car wash. To fold,
push the mirror toward the vehicle. Push outward,
to return the mirror to its original position.Outside Convex Mirror
{WARNING:
A convex mirror can make things, like other
vehicles, look farther away than they really are.
If you cut too sharply into the right lane, you could
hit a vehicle on the right. Check the inside mirror
or glance over your shoulder before changing
lanes.
The passenger side mirror is convex shaped. A convex
mirror’s surface is curved so more can be seen from
the driver seat.
3-39
Page 150 of 448
Storage Areas
Glove Box
Lift up on the glove box lever to open it.
Cupholders
This vehicle may have two cupholders located on the
lower part of the front doors as well as two cupholders
located at the front end of the console. Vehicles with
bench seats may have cupholders attached to the front
of the center seat.
For vehicles that are an extended cab or crew cab
model, the vehicle also has two rear cupholders.
On crew cab models, the cupholders are located at the
front end of the rear center seat cushion. On extended
cab models, the rear seat cupholders are located on top
of the rear center console.
Vehicles with ashtrays will use one of the cupholders.
Center Console Storage
For vehicles with bench seats, there may be a center
armrest storage area. Lift up on the upper tab located at
the front of the armrest to release the latch. Lift the lid
to open the storage area.
For vehicles with bucket seats or uplevel packages, the
vehicle may have a two-tiered center armrest storage
area. Lift up on the upper tab located at the front of the
armrest to release the latch. Lift the lid to the top
storage area. A second tab is located below the top one
and allows you to access the bottom storage area.
Lift up on the lower tab to release the latch. Then, raise
the lid of the lower storage area. The upper storage
area will lift up with the lid of the lower storage area.
To close the storage area(s), lower the lid(s) until
you feel the latch close.
Assist Handles
This vehicle may have assist handles to be used when
getting out of the vehicle. The assist handles are
located above the doors.
If the vehicle has roof-mounted side impact air bags,
there are assist handles located above both the
driver and front passenger doors.
3-40