stop start GMC CANYON 2010 User Guide
[x] Cancel search | Manufacturer: GMC, Model Year: 2010, Model line: CANYON, Model: GMC CANYON 2010Pages: 448, PDF Size: 2.62 MB
Page 138 of 448
Shifting from Two-Wheel High or
Four-Wheel High to Four-Wheel Low
To shift from Two-Wheel High or Four-Wheel High to
Four-Wheel Low, the vehicle must be stopped or moving
less than 3 mph (5 km/h) with the transmission in
N (Neutral) for an automatic transmission or the clutch
pedal pressed for a manual transmission. The preferred
method for shifting into Four-Wheel Low is to have
your vehicle moving 1 to 2 mph (1.6 to 3.2 km/h).
Press and release the Four-Wheel Low button.
You must wait for the Four-Wheel Low indicator light
to stop flashing and stay on before shifting the
transmission into gear or releasing the clutch pedal.
If the Four-Wheel Low button is pressed when the
vehicle is in gear and/or moving faster than 3 mph
(5 km/h), the four-wheel low indicator light will flash for
30 seconds and not complete the shift.
Shifting from Four-Wheel Low to
Two-Wheel High or Four-Wheel High
To shift from Four-Wheel Low to Two-Wheel High or
Four-Wheel High, the vehicle must be stopped or
moving less than 3 mph (5 km/h) with the transmission
in N (Neutral) for an automatic transmission or the
clutch pedal pressed for a manual transmission.The preferred method for shifting out of four-wheel
low is to have your vehicle moving 1 to 2 mph
(1.6 to 3.2 km/h).
Press and release the Four-Wheel High or Two-Wheel
High button. You must wait for the Four-Wheel High
or Two-Wheel High indicator light to stop flashing and
stay on before shifting the transmission into gear or
releasing the clutch pedal.
If the Four-Wheel High or Two-Wheel High button is
pressed when the vehicle is in gear and/or moving
faster than 3 mph (5 km/h), the Four-Wheel High or
Two Wheel High indicator light will flash for 30 seconds
but not complete the shift.
Shifting to Neutral
Use N (Neutral) when you plan to tow the vehicle.
SeeRecreational Vehicle Towing on page 5-41for towing
instructions. To shift the transfer case into N (Neutral)
do the following:
1. Set the parking brake.
2. Start the vehicle.
3. Press the regular brake pedal and shift the
transmission in N (Neutral), or press in the clutch
for vehicles with a manual transmission.
3-28
Page 156 of 448
Turn Signal/Multifunction Lever
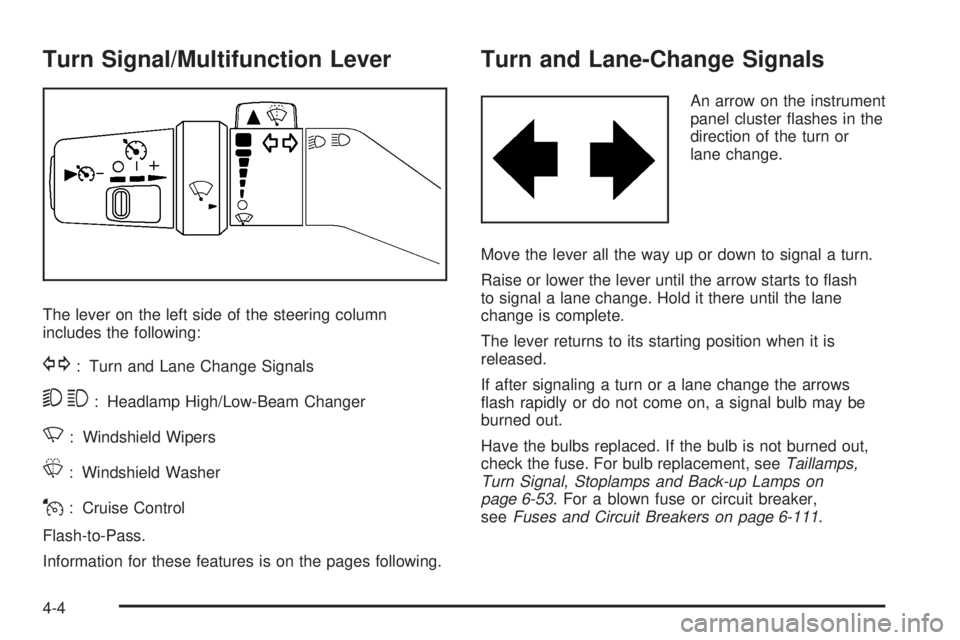
The lever on the left side of the steering column
includes the following:
G: Turn and Lane Change Signals
53: Headlamp High/Low-Beam Changer
N: Windshield Wipers
L: Windshield Washer
J: Cruise Control
Flash-to-Pass.
Information for these features is on the pages following.
Turn and Lane-Change Signals
An arrow on the instrument
panel cluster flashes in the
direction of the turn or
lane change.
Move the lever all the way up or down to signal a turn.
Raise or lower the lever until the arrow starts to flash
to signal a lane change. Hold it there until the lane
change is complete.
The lever returns to its starting position when it is
released.
If after signaling a turn or a lane change the arrows
flash rapidly or do not come on, a signal bulb may be
burned out.
Have the bulbs replaced. If the bulb is not burned out,
check the fuse. For bulb replacement, seeTaillamps,
Turn Signal, Stoplamps and Back-up Lamps on
page 6-53. For a blown fuse or circuit breaker,
seeFuses and Circuit Breakers on page 6-111.
4-4
Page 178 of 448
Antilock Brake System (ABS)
Warning Light
The Antilock Brake
System (ABS) light
comes on briefly when
the engine is started.
If it does not, have the vehicle serviced by your
dealer/retailer. If the system is working normally the
indicator light then goes off.
If the ABS light stays on, turn the ignition off. If the light
comes on while driving, stop as soon as it is safely
possible and turn the ignition off. Then start the engine
again to reset the system. If the ABS light stays on, or
comes on again while driving, the vehicle needs service.
If the regular brake system warning light is not on, the
vehicle still has brakes, but not antilock brakes. If the
regular brake system warning light is also on, the vehicle
does not have antilock brakes and there is a problem with
the regular brakes. SeeBrake System Warning Light on
page 4-25.
SeeDIC Warnings and Messages on page 4-37for all
brake related DIC messages.
StabiliTrak®/Traction Control
System (TCS) Warning Light
The StabiliTrak and
Traction Control System
(TCS) indicator/warning
light comes on briefly while
starting the engine.
If it does not, have the vehicle serviced by your
dealer/retailer. If the system is working normally
the indicator light then goes off.
The light flashes while the StabiliTrak system and TCS
are working to assist the driver with directional control
of the vehicle in difficult driving conditions.
4-26
Page 180 of 448
Tire Pressure Light
For vehicles with a tire pressure monitoring system,
this light comes on briefly when the engine is started.
It provides information about tire pressures and the
Tire Pressure Monitoring System.
When the Light is On Steady
This indicates that one or more of the tires are
significantly underinflated.
A tire pressure message in the Driver Information
Center (DIC), can accompany the light. SeeDriver
Information Center (DIC) on page 4-33for more
information. Stop and check the tires as soon as
it is safe to do so. If underinflated, inflate to the proper
pressure. SeeIn�ation - Tire Pressure on page 6-64
for more information.
When the Light Flashes First and Then is
On Steady
This indicates that there may be a problem with the Tire
Pressure Monitor System. The light flashes for about a
minute and stays on steady for the remainder of the
ignition cycle. This sequence repeats with every ignition
cycle. SeeTire Pressure Monitor Operation on page 6-67
for more information.
Malfunction Indicator Lamp
Check Engine Light
A computer system called OBD II (On-Board
Diagnostics-Second Generation) monitors operation
of the fuel, ignition, and emission control systems.
It ensures that emissions are at acceptable levels
for the life of the vehicle, helping to produce a cleaner
environment.
This light should come on
when the ignition is on, but
the engine is not running,
as a check to show it
is working. If it does not,
have the vehicle serviced
by your dealer/retailer.
4-28
Page 181 of 448
If the check engine light comes on and stays on, while
the engine is running, this indicates that there is an
OBD II problem and service is required.
Malfunctions often are indicated by the system before
any problem is apparent. Being aware of the light
can prevent more serious damage to the vehicle.
This system assists the service technician in correctly
diagnosing any malfunction.
Notice:If the vehicle is continually driven with
this light on, after a while, the emission controls
might not work as well, the vehicle’s fuel economy
might not be as good, and the engine might not
run as smoothly. This could lead to costly repairs
that might not be covered by the vehicle warranty.
Notice:Modi�cations made to the engine,
transmission, exhaust, intake, or fuel system
of the vehicle or the replacement of the original
tires with other than those of the same Tire
Performance Criteria (TPC) can affect the vehicle’s
emission controls and can cause this light to come
on. Modi�cations to these systems could lead to
costly repairs not covered by the vehicle warranty.
This could also result in a failure to pass a required
Emission Inspection/Maintenance test. See
Accessories and Modifications on page 6-3.This light comes on during a malfunction in one of
two ways:
Light Flashing:A misfire condition has been detected.
A misfire increases vehicle emissions and could
damage the emission control system on the vehicle.
Diagnosis and service might be required.
To prevent more serious damage to the vehicle:
•Reduce vehicle speed.
•Avoid hard accelerations.
•Avoid steep uphill grades.
•If towing a trailer, reduce the amount of cargo being
hauled as soon as it is possible.
If the light continues to flash, when it is safe to do so,
stop the vehicle. Find a safe place to park the vehicle.
Turn the key off, wait at least 10 seconds, and restart
the engine. If the light is still flashing, follow the previous
steps and see your dealer/retailer for service as soon
as possible.
4-29
Page 204 of 448
Radio Messages
CAL ERR or CAL (Calibration Error):The audio
system has been calibrated for the vehicle from the
factory. If CAL or CAL ERR displays it means that the
radio has not been configured properly for the vehicle
and it must be returned to your dealer/retailer for service.
LOC or LOCKED:This message displays when the
THEFTLOCK
®system has locked up. Take the vehicle
to your dealer/retailer for service.
If any error occurs repeatedly or if an error cannot be
corrected, contact your dealer/retailer.
XM™ Satellite Radio Service
XM is a satellite radio service that is based in the
48 contiguous United States and 10 Canadian provinces.
XM Satellite Radio has a wide variety of programming
and commercial-free music, coast-to-coast, and in
digital-quality sound. A service fee is required to receive
the XM service. For more information, contact XM at
xmradio.com or call 1-800-929-2100 in the U.S. and
xmradio.ca or call 1-877-438-9677 in Canada.
Radio Messages for XM Only
SeeXM Radio Messages on page 4-60later in this
section for further detail.
Playing a CD (Radio with Single CD
Player)
Insert a CD partway into the slot, label side up. The
player pulls it in, and READING displays. The CD should
begin playing. To insert a CD with the ignition off, first
press the
Z(eject) button or the DISPL knob.
If the ignition or radio is turned off with a CD in the
player it stays in the player. When the ignition or radio
is turned on, the CD starts to play where it stopped,
if it was the last selected audio source.
When the CD is inserted, the CD symbol displays.
As each new track starts to play, the track number
displays.
The CD player can play the smaller 3 inch (8 cm)
single CDs with an adapter ring. Full-size CDs and
the smaller CDs are loaded in the same manner.
4-52
Page 206 of 448
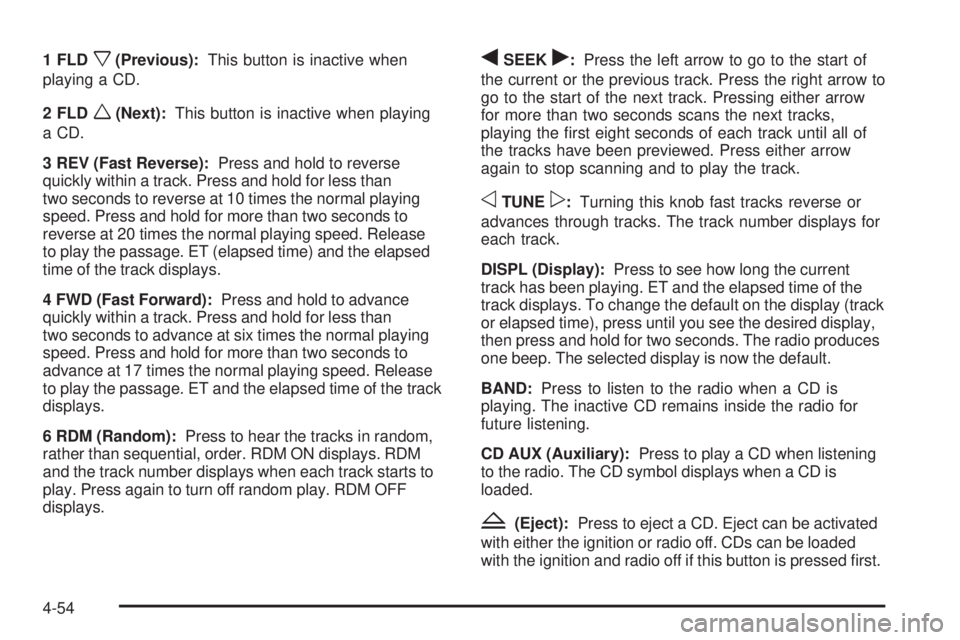
1 FLDx(Previous):This button is inactive when
playing a CD.
2 FLD
w(Next):This button is inactive when playing
a CD.
3 REV (Fast Reverse):Press and hold to reverse
quickly within a track. Press and hold for less than
two seconds to reverse at 10 times the normal playing
speed. Press and hold for more than two seconds to
reverse at 20 times the normal playing speed. Release
to play the passage. ET (elapsed time) and the elapsed
time of the track displays.
4 FWD (Fast Forward):Press and hold to advance
quickly within a track. Press and hold for less than
two seconds to advance at six times the normal playing
speed. Press and hold for more than two seconds to
advance at 17 times the normal playing speed. Release
to play the passage. ET and the elapsed time of the track
displays.
6 RDM (Random):Press to hear the tracks in random,
rather than sequential, order. RDM ON displays. RDM
and the track number displays when each track starts to
play. Press again to turn off random play. RDM OFF
displays.
qSEEKr:Press the left arrow to go to the start of
the current or the previous track. Press the right arrow to
go to the start of the next track. Pressing either arrow
for more than two seconds scans the next tracks,
playing the first eight seconds of each track until all of
the tracks have been previewed. Press either arrow
again to stop scanning and to play the track.
oTUNEp:Turning this knob fast tracks reverse or
advances through tracks. The track number displays for
each track.
DISPL (Display):Press to see how long the current
track has been playing. ET and the elapsed time of the
track displays. To change the default on the display (track
or elapsed time), press until you see the desired display,
then press and hold for two seconds. The radio produces
one beep. The selected display is now the default.
BAND:Press to listen to the radio when a CD is
playing. The inactive CD remains inside the radio for
future listening.
CD AUX (Auxiliary):Press to play a CD when listening
to the radio. The CD symbol displays when a CD is
loaded.
Z(Eject):Press to eject a CD. Eject can be activated
with either the ignition or radio off. CDs can be loaded
with the ignition and radio off if this button is pressed first.
4-54
Page 210 of 448
Playing an MP3/WMA
Insert a CD partway into the slot, label side up. The
player pulls it in, and READING displays. The CD should
begin playing and the CD symbol displays. If you want to
insert a CD with the ignition off, first press the
Zbutton
or the DISPL knob.
If the ignition or radio is turned off with a CD in the
player it stays in the player. When the ignition or radio
is turned on, the CD starts to play where it stopped,
if it was the last selected audio source.
As each new track starts to play, the track number
displays.
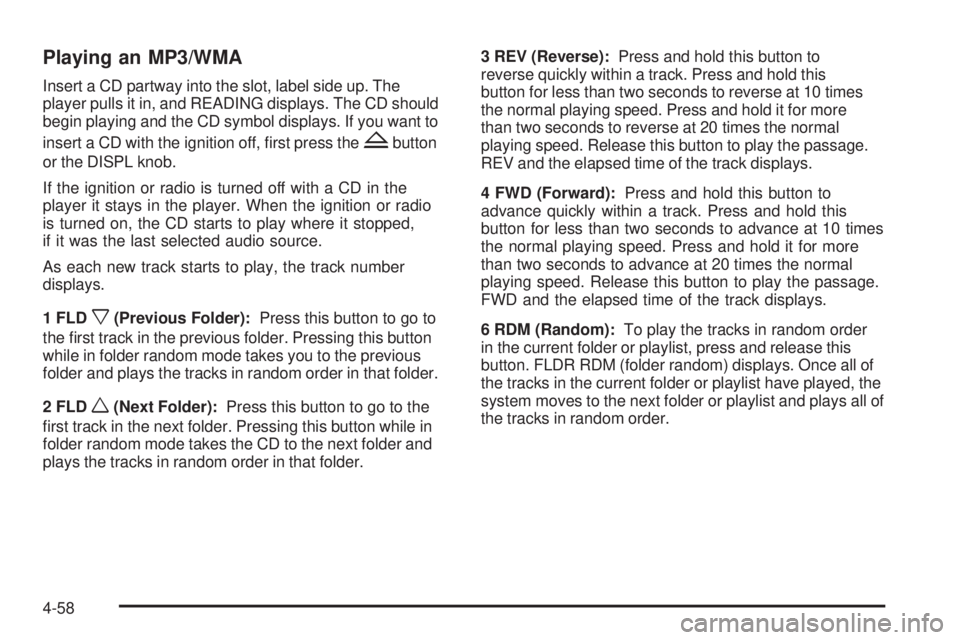
1 FLD
x(Previous Folder):Press this button to go to
the first track in the previous folder. Pressing this button
while in folder random mode takes you to the previous
folder and plays the tracks in random order in that folder.
2 FLD
w(Next Folder):Press this button to go to the
first track in the next folder. Pressing this button while in
folder random mode takes the CD to the next folder and
plays the tracks in random order in that folder.3 REV (Reverse):Press and hold this button to
reverse quickly within a track. Press and hold this
button for less than two seconds to reverse at 10 times
the normal playing speed. Press and hold it for more
than two seconds to reverse at 20 times the normal
playing speed. Release this button to play the passage.
REV and the elapsed time of the track displays.
4 FWD (Forward):Press and hold this button to
advance quickly within a track. Press and hold this
button for less than two seconds to advance at 10 times
the normal playing speed. Press and hold it for more
than two seconds to advance at 20 times the normal
playing speed. Release this button to play the passage.
FWD and the elapsed time of the track displays.
6 RDM (Random):To play the tracks in random order
in the current folder or playlist, press and release this
button. FLDR RDM (folder random) displays. Once all of
the tracks in the current folder or playlist have played, the
system moves to the next folder or playlist and plays all of
the tracks in random order.
4-58
Page 211 of 448
To play all the tracks in random order on the CD, press
and hold this button for two seconds. A beep sounds and
DISC RDM (disc random) displays. This feature does not
work with playlists.
When in random, pressing and releasing either SEEK
arrow takes the CD to the previous or to the next
random track.
Press and release this button again to turn off random
play. NO RDM (no random) displays.
qSEEKr:Press the left SEEK arrow to go to the
start of the previous track. Press the right SEEK arrow to
go to the start of the next track. Pressing either SEEK
arrow for more than two seconds searches the previous
or next tracks at two tracks per second. Release the
button to stop searching and to play the track.
oTUNEp:Turning this knob fast tracks reverse or
advances through the tracks in all folders or playlists.
The track number and file name displays for each track.
Turning this knob while in random fast tracks reverse
or advances the tracks in sequential order.DISPL (Display):Press this knob to switch between
track mode, folder/playlist mode, and time of day mode.
The display shows only eight characters, but there can
be up to four pages of text. If there are more than eight
characters in the song, folder, or playlist name, pressing
this knob within two seconds takes you to the next page
of text. If there are no other pages to be shown, pressing
this knob within two seconds takes you to the next
display mode.
•Track mode displays the current track number and
the ID3 tag song name.
•Folder/playlist mode displays the current folder or
playlist number and the folder/playlist name.
•Time of day mode displays the time of day and the
ID3 tag song name.
To change the default on the display, press the DISPL
knob until you see the desired display, then press
and hold this knob for two seconds. The radio produces
one beep and the selected display is now the default.
INFO (Information):INFO displays when a current
track has ID3 tag information. Press this button to
display the artist name and album contained in the tag.
INFO disappears from the display when the information
in the ID3 tag has finished being read.
4-59
Page 221 of 448
Antilock Brake System (ABS)
This vehicle has the Antilock Brake System (ABS), an
advanced electronic braking system that helps prevent a
braking skid.
When the engine is started and the vehicle begins to
drive away, ABS checks itself. A momentary motor
or clicking noise might be heard while this test is going
on. This is normal.
If there is a problem with
the ABS, this warning light
stays on. SeeAntilock
Brake System (ABS)
Warning Light on
page 4-26.
Let us say the road is wet and you are driving safely.
Suddenly, an animal jumps out in front of you. You slam
on the brakes and continue braking. Here is what
happens with ABS:
A computer senses that the wheels are slowing down.
If one of the wheels is about to stop rolling, the computer
will separately work the brakes at each front wheel
and at both rear wheels.ABS can change the brake pressure to each wheel, as
required, faster than any driver could. This can help
the driver steer around the obstacle while braking hard.
As the brakes are applied, the computer keeps
receiving updates on wheel speed and controls braking
pressure accordingly.
Remember: ABS does not change the time needed to
get a foot up to the brake pedal or always decrease
stopping distance. If you get too close to the vehicle in
front of you, there will not be enough time to apply
the brakes if that vehicle suddenly slows or stops.
Always leave enough room up ahead to stop, even
with ABS.
Using ABS
Do not pump the brakes. Just hold the brake pedal
down firmly and let antilock work. The brakes might
vibrate or some noise might be heard, but this is normal.
Braking in Emergencies
ABS allows the driver to steer and brake at the same
time. In many emergencies, steering can help more than
even the very best braking.
5-5