seat adjustment GMC CANYON 2018 Owner's Manual
[x] Cancel search | Manufacturer: GMC, Model Year: 2018, Model line: CANYON, Model: GMC CANYON 2018Pages: 417, PDF Size: 5.47 MB
Page 6 of 417
GMC Canyon/Canyon Denali Owner Manual (GMNA-Localizing-U.S./Canada-
11354423) - 2018 - crc - 10/12/17
In Brief 5
In Brief
Instrument Panel
Instrument Panel . . . . . . . . . . . . . . . . 6
Initial Drive Information
Initial Drive Information . . . . . . . . . . 8
Remote Keyless Entry (RKE)System . . . . . . . . . . . . . . . . . . . . . . . . 8
Remote Vehicle Start . . . . . . . . . . . 9
Door Locks . . . . . . . . . . . . . . . . . . . . . 9
Windows . . . . . . . . . . . . . . . . . . . . . . . . 9
Seat Adjustment . . . . . . . . . . . . . . . 10
Heated and Ventilated Seats . . . 11
Head Restraint Adjustment . . . . 11
Seat Belts . . . . . . . . . . . . . . . . . . . . . 12
Passenger Sensing System . . . 12
Mirror Adjustment . . . . . . . . . . . . . . 12
Steering Wheel Adjustment . . . . 13
Interior Lighting . . . . . . . . . . . . . . . . 14
Exterior Lighting . . . . . . . . . . . . . . . 15
Windshield Wiper/Washer . . . . . . 15
Climate Controls . . . . . . . . . . . . . . . 16
Transmission . . . . . . . . . . . . . . . . . . 17
Four-Wheel Drive . . . . . . . . . . . . . . 18
Vehicle Features
Infotainment System . . . . . . . . . . . 19
Radio(s) . . . . . . . . . . . . . . . . . . . . . . . 19 Satellite Radio . . . . . . . . . . . . . . . . . 19
Portable Audio Devices . . . . . . . . 20
Bluetooth
®. . . . . . . . . . . . . . . . . . . . . 20
Steering Wheel Controls . . . . . . . 20
Cruise Control . . . . . . . . . . . . . . . . . 21
Driver Information Center (DIC) (Base Level) . . . . . . . . . . . . . . . . . 21
Driver Information Center (DIC) (Uplevel) . . . . . . . . . . . . . . . . . . . . . 22
Forward Collision Alert (FCA) System . . . . . . . . . . . . . . . . . . . . . . . 22
Lane Departure Warning (LDW) . . . . . . . . . . . . . . . 22
Rear Vision Camera (RVC) . . . . 22
Power Outlets . . . . . . . . . . . . . . . . . 23
Performance and Maintenance
Traction Control/Electronic Stability Control . . . . . . . . . . . . . . 23
Tire Pressure Monitor . . . . . . . . . . 23
Fuel (Gasoline) . . . . . . . . . . . . . . . . 24
Fuel (Diesel) . . . . . . . . . . . . . . . . . . . 24
E85 or FlexFuel . . . . . . . . . . . . . . . . 24
Engine Oil Life System . . . . . . . . 24
Driving for Better Fuel Economy . . . . . . . . . . . . . . . . . . . . . 25
Roadside Assistance Program . . . . . . . . . . . . . . . . . . . . . . 25
Page 8 of 417

GMC Canyon/Canyon Denali Owner Manual (GMNA-Localizing-U.S./Canada-
11354423) - 2018 - crc - 10/12/17
In Brief 7
1.Air Vents 0196.
2. Turn Signal Lever. See Turn
and Lane-Change Signals
0 146.
Driver Information Center (DIC)
(Base Level) Controls (If
Equipped).
See Driver Information Center
(DIC) (Base Level) 0129 or
Driver Information Center (DIC)
(Uplevel) 0131.
3. Instrument Cluster (Uplevel)
0112 orInstrument Cluster
(Base Level) 0115.
4. Windshield Wiper/Washer
0106.
5. Light Sensor. See Automatic
Headlamp System 0145.
Vehicle Alarm System Indicator
(If Equipped). See Vehicle
Alarm System 035.
6. Infotainment 0151.
7. Climate Control Systems 0192
(If Equipped).
Automatic Climate Control
System 0194 (If Equipped). 8.
Heated and Ventilated Front
Seats 048 (If Equipped).
9. Power Outlets 0108 (If
Equipped).
10. Shift Lever. SeeAutomatic Transmission
0 225 orManual Transmission
0 230.
11. Auxiliary Jack 0166.
USB Port 0160.
12. Hazard Warning Flashers
0146.
Traction Control/Electronic
Stability Control 0241.
Cargo Lamp 0148.
Lane Departure Warning
(LDW) 0250 (If Equipped).
Hill Descent Control (HDC)
0 243 (If Equipped).
Tow/Haul Mode 0230 (If
Equipped).
13. Steering Wheel Controls 0105
(If Equipped). Driver Information Center (DIC)
(Uplevel) Controls (If
Equipped).
See
Driver Information Center
(DIC) (Base Level) 0129 or
Driver Information Center (DIC)
(Uplevel) 0131.
14. Horn 0106.
15. Steering Wheel Adjustment
0105 (Out of View).
16. Cruise Control 0244.
Forward Collision Alert (FCA)
System 0249 (If Equipped).
17. Transfer Case Knob (If Equipped). See Four-Wheel
Drive 0232.
18. Hood Release. See Hood
0 274.
19. Parking Brake 0240.
20. Data Link Connector (DLC) (Out of View). See Malfunction
Indicator Lamp (Check Engine
Light) 0120.
21. Exterior Lamp Controls 0143.
Fog Lamps 0147 (If
Equipped).
Page 11 of 417
GMC Canyon/Canyon Denali Owner Manual (GMNA-Localizing-U.S./Canada-
11354423) - 2018 - crc - 10/12/17
10 In Brief
Using the window switch, press to
open or pull to close the window.
The windows may be temporarily
disabled if they are used repeatedly
within a short time.
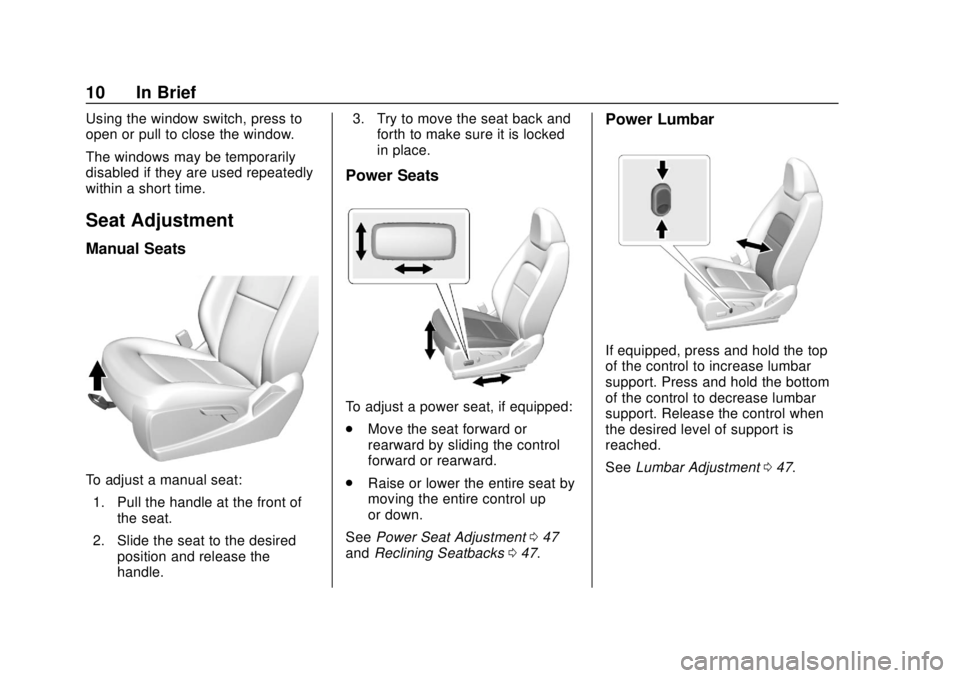
Seat Adjustment
Manual Seats
To adjust a manual seat:1. Pull the handle at the front of the seat.
2. Slide the seat to the desired position and release the
handle. 3. Try to move the seat back and
forth to make sure it is locked
in place.
Power Seats
To adjust a power seat, if equipped:
.Move the seat forward or
rearward by sliding the control
forward or rearward.
. Raise or lower the entire seat by
moving the entire control up
or down.
See Power Seat Adjustment 047
and Reclining Seatbacks 047.
Power Lumbar
If equipped, press and hold the top
of the control to increase lumbar
support. Press and hold the bottom
of the control to decrease lumbar
support. Release the control when
the desired level of support is
reached.
See Lumbar Adjustment 047.
Page 12 of 417
GMC Canyon/Canyon Denali Owner Manual (GMNA-Localizing-U.S./Canada-
11354423) - 2018 - crc - 10/12/17
In Brief 11
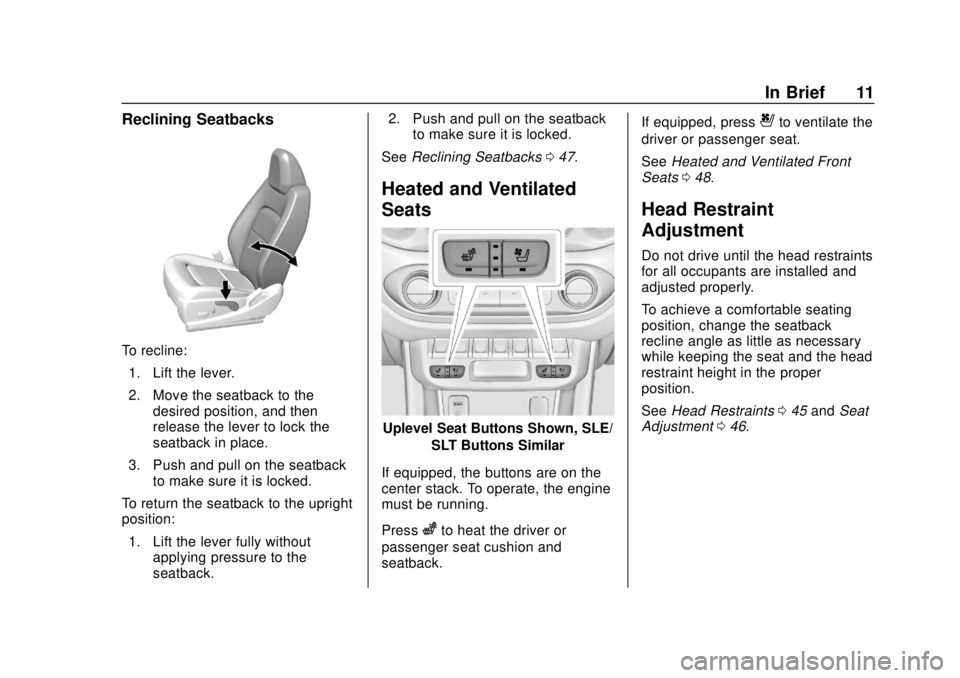
Reclining Seatbacks
To recline:1. Lift the lever.
2. Move the seatback to the desired position, and then
release the lever to lock the
seatback in place.
3. Push and pull on the seatback to make sure it is locked.
To return the seatback to the upright
position:
1. Lift the lever fully without applying pressure to the
seatback. 2. Push and pull on the seatback
to make sure it is locked.
See Reclining Seatbacks 047.
Heated and Ventilated
Seats
Uplevel Seat Buttons Shown, SLE/
SLT Buttons Similar
If equipped, the buttons are on the
center stack. To operate, the engine
must be running.
Press
zto heat the driver or
passenger seat cushion and
seatback. If equipped, press
{to ventilate the
driver or passenger seat.
See Heated and Ventilated Front
Seats 048.
Head Restraint
Adjustment
Do not drive until the head restraints
for all occupants are installed and
adjusted properly.
To achieve a comfortable seating
position, change the seatback
recline angle as little as necessary
while keeping the seat and the head
restraint height in the proper
position.
See Head Restraints 045 and Seat
Adjustment 046.
Page 13 of 417
GMC Canyon/Canyon Denali Owner Manual (GMNA-Localizing-U.S./Canada-
11354423) - 2018 - crc - 10/12/17
12 In Brief
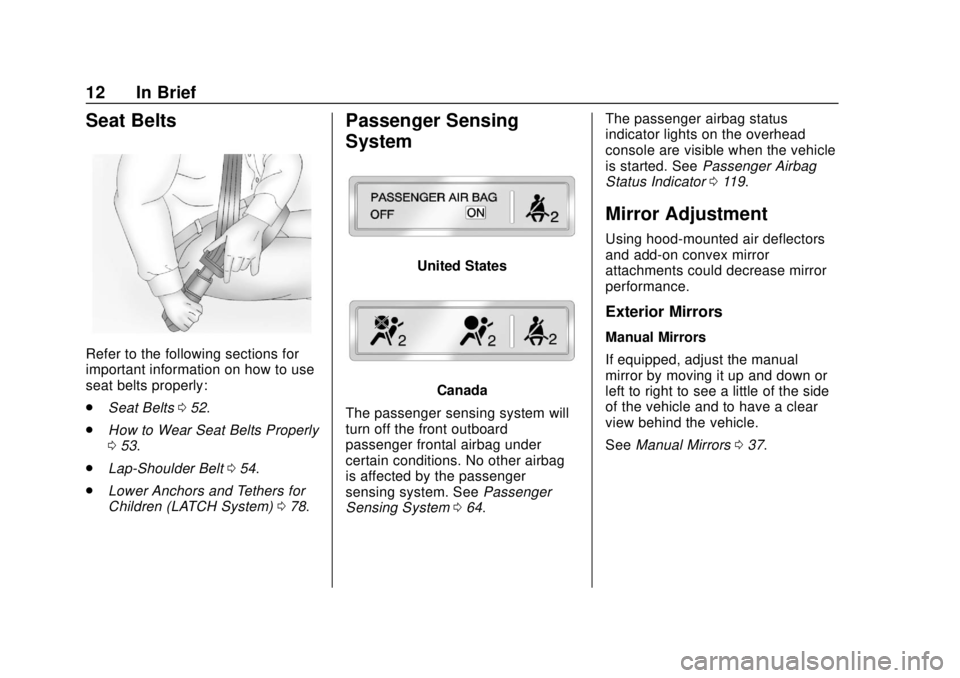
Seat Belts
Refer to the following sections for
important information on how to use
seat belts properly:
.Seat Belts 052.
. How to Wear Seat Belts Properly
053.
. Lap-Shoulder Belt 054.
. Lower Anchors and Tethers for
Children (LATCH System) 078.
Passenger Sensing
System
United States
Canada
The passenger sensing system will
turn off the front outboard
passenger frontal airbag under
certain conditions. No other airbag
is affected by the passenger
sensing system. See Passenger
Sensing System 064. The passenger airbag status
indicator lights on the overhead
console are visible when the vehicle
is started. See
Passenger Airbag
Status Indicator 0119.
Mirror Adjustment
Using hood-mounted air deflectors
and add-on convex mirror
attachments could decrease mirror
performance.
Exterior Mirrors
Manual Mirrors
If equipped, adjust the manual
mirror by moving it up and down or
left to right to see a little of the side
of the vehicle and to have a clear
view behind the vehicle.
See Manual Mirrors 037.
Page 45 of 417
GMC Canyon/Canyon Denali Owner Manual (GMNA-Localizing-U.S./Canada-
11354423) - 2018 - crc - 10/12/17
44 Seats and Restraints
Seats and
Restraints
Head Restraints
Head Restraints . . . . . . . . . . . . . . . 45
Front Seats
Seat Adjustment . . . . . . . . . . . . . . . 46
Power Seat Adjustment . . . . . . . . 47
Lumbar Adjustment . . . . . . . . . . . . 47
Reclining Seatbacks . . . . . . . . . . . 47
Heated and Ventilated FrontSeats . . . . . . . . . . . . . . . . . . . . . . . . . 48
Rear Seats
Rear Seats . . . . . . . . . . . . . . . . . . . . 50
Seat Belts
Seat Belts . . . . . . . . . . . . . . . . . . . . . 52
How to Wear Seat BeltsProperly . . . . . . . . . . . . . . . . . . . . . . 53
Lap-Shoulder Belt . . . . . . . . . . . . . 54
Seat Belt Use During Pregnancy . . . . . . . . . . . . . . . . . . . . 56
Seat Belt Extender . . . . . . . . . . . . . 57
Safety System Check . . . . . . . . . . 57
Seat Belt Care . . . . . . . . . . . . . . . . . 57
Replacing Seat Belt System Parts after a Crash . . . . . . . . . . . 58
Airbag System
Airbag System . . . . . . . . . . . . . . . . . 58
Where Are the Airbags? . . . . . . . 60
When Should an AirbagInflate? . . . . . . . . . . . . . . . . . . . . . . . 62
What Makes an Airbag
Inflate? . . . . . . . . . . . . . . . . . . . . . . . 62
How Does an Airbag Restrain? . . . . . . . . . . . . . . . . . . . . . 63
What Will You See after an Airbag Inflates? . . . . . . . . . . . . . . 63
Passenger Sensing System . . . 64
Servicing the Airbag-Equipped Vehicle . . . . . . . . . . . . . . . . . . . . . . . 69
Adding Equipment to the Airbag-Equipped Vehicle . . . . . 69
Airbag System Check . . . . . . . . . . 70
Replacing Airbag System Parts after a Crash . . . . . . . . . . . . . . . . . 70
Child Restraints
Older Children . . . . . . . . . . . . . . . . . 71
Infants and Young Children . . . . 73
Child Restraint Systems . . . . . . . 75
Where to Put the Restraint . . . . . 77
Lower Anchors and Tethers forChildren (LATCH System) . . . . 78
Replacing LATCH System Parts After a Crash . . . . . . . . . . . . . . . . . 92 Securing Child Restraints (With
the Seat Belt in the
Rear Seat) . . . . . . . . . . . . . . . . . . . 92
Securing Child Restraints (With the Seat Belt in the
Front Seat) . . . . . . . . . . . . . . . . . . . 98
Page 47 of 417
GMC Canyon/Canyon Denali Owner Manual (GMNA-Localizing-U.S./Canada-
11354423) - 2018 - crc - 10/12/17
46 Seats and Restraints
Rear Head Restraints
Crew Cab
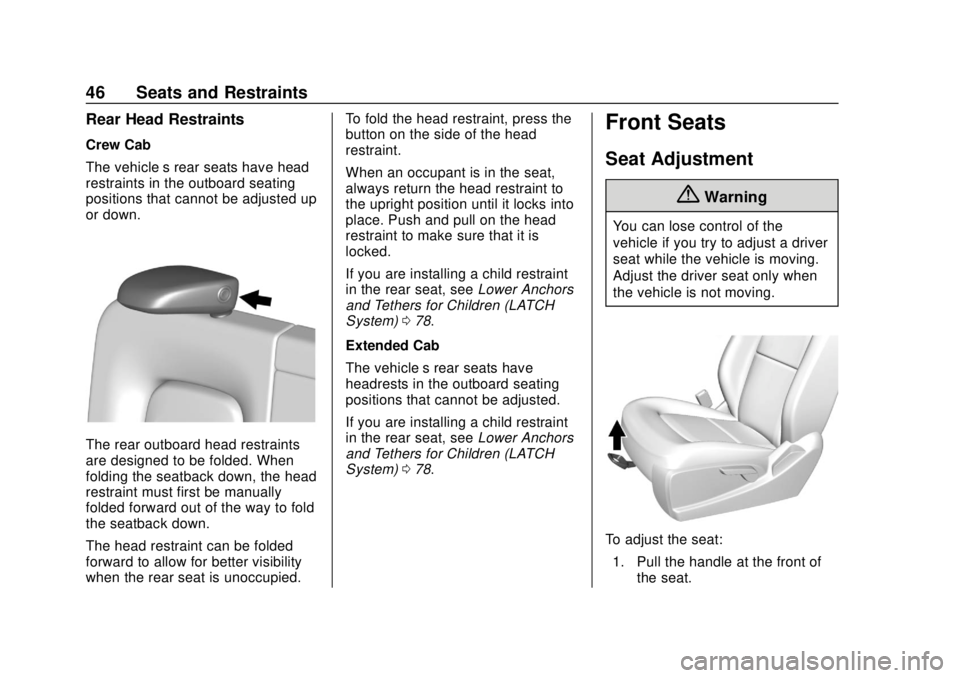
The vehicle’s rear seats have head
restraints in the outboard seating
positions that cannot be adjusted up
or down.
The rear outboard head restraints
are designed to be folded. When
folding the seatback down, the head
restraint must first be manually
folded forward out of the way to fold
the seatback down.
The head restraint can be folded
forward to allow for better visibility
when the rear seat is unoccupied.To fold the head restraint, press the
button on the side of the head
restraint.
When an occupant is in the seat,
always return the head restraint to
the upright position until it locks into
place. Push and pull on the head
restraint to make sure that it is
locked.
If you are installing a child restraint
in the rear seat, see
Lower Anchors
and Tethers for Children (LATCH
System) 078.
Extended Cab
The vehicle’s rear seats have
headrests in the outboard seating
positions that cannot be adjusted.
If you are installing a child restraint
in the rear seat, see Lower Anchors
and Tethers for Children (LATCH
System) 078.
Front Seats
Seat Adjustment
{Warning
You can lose control of the
vehicle if you try to adjust a driver
seat while the vehicle is moving.
Adjust the driver seat only when
the vehicle is not moving.
To adjust the seat:
1. Pull the handle at the front of the seat.
Page 48 of 417
GMC Canyon/Canyon Denali Owner Manual (GMNA-Localizing-U.S./Canada-
11354423) - 2018 - crc - 10/12/17
Seats and Restraints 47
2. Slide the seat to the desiredposition and release the
handle.
3. Try to move the seat back and forth to be sure the seat is
locked in place.
Power Seat Adjustment
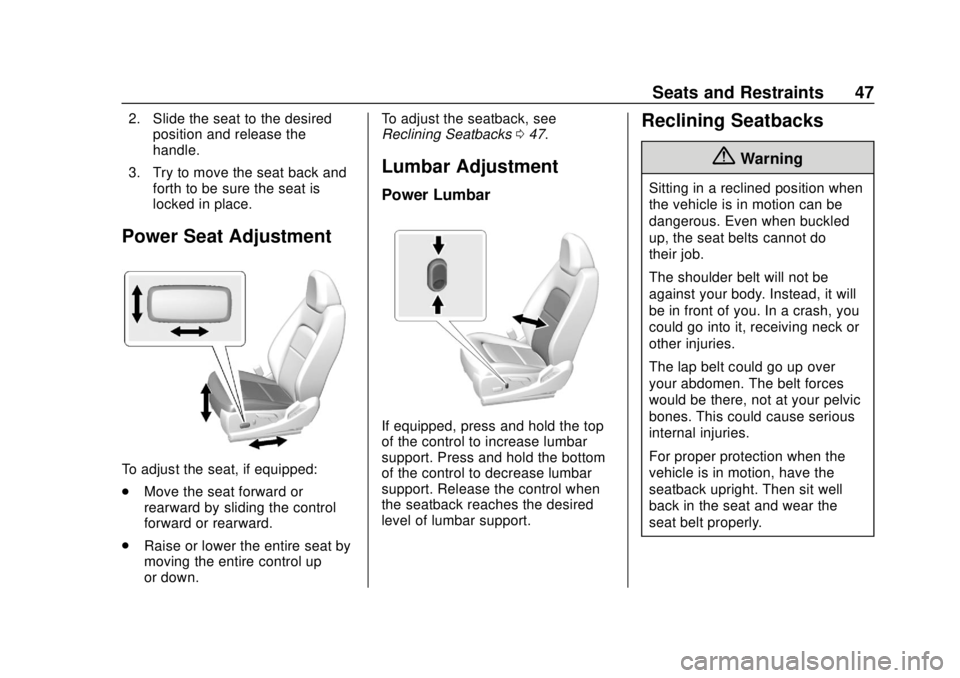
To adjust the seat, if equipped:
.Move the seat forward or
rearward by sliding the control
forward or rearward.
. Raise or lower the entire seat by
moving the entire control up
or down. To adjust the seatback, see
Reclining Seatbacks
047.
Lumbar Adjustment
Power Lumbar
If equipped, press and hold the top
of the control to increase lumbar
support. Press and hold the bottom
of the control to decrease lumbar
support. Release the control when
the seatback reaches the desired
level of lumbar support.
Reclining Seatbacks
{Warning
Sitting in a reclined position when
the vehicle is in motion can be
dangerous. Even when buckled
up, the seat belts cannot do
their job.
The shoulder belt will not be
against your body. Instead, it will
be in front of you. In a crash, you
could go into it, receiving neck or
other injuries.
The lap belt could go up over
your abdomen. The belt forces
would be there, not at your pelvic
bones. This could cause serious
internal injuries.
For proper protection when the
vehicle is in motion, have the
seatback upright. Then sit well
back in the seat and wear the
seat belt properly.
Page 56 of 417
GMC Canyon/Canyon Denali Owner Manual (GMNA-Localizing-U.S./Canada-
11354423) - 2018 - crc - 10/12/17
Seats and Restraints 55
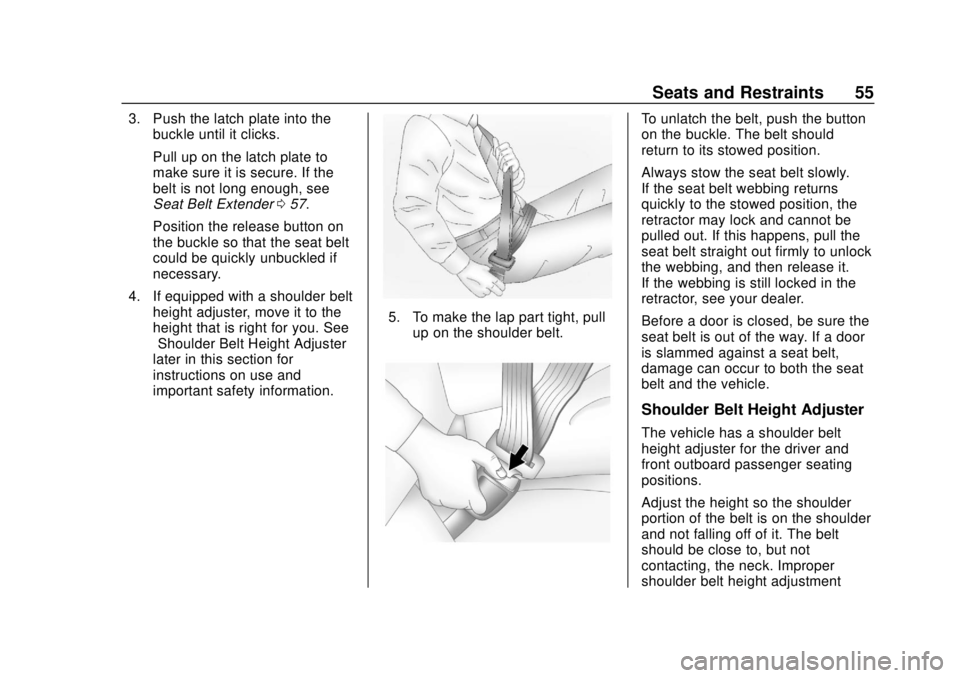
3. Push the latch plate into thebuckle until it clicks.
Pull up on the latch plate to
make sure it is secure. If the
belt is not long enough, see
Seat Belt Extender 057.
Position the release button on
the buckle so that the seat belt
could be quickly unbuckled if
necessary.
4. If equipped with a shoulder belt height adjuster, move it to the
height that is right for you. See
“Shoulder Belt Height Adjuster”
later in this section for
instructions on use and
important safety information.
5. To make the lap part tight, pullup on the shoulder belt.
To unlatch the belt, push the button
on the buckle. The belt should
return to its stowed position.
Always stow the seat belt slowly.
If the seat belt webbing returns
quickly to the stowed position, the
retractor may lock and cannot be
pulled out. If this happens, pull the
seat belt straight out firmly to unlock
the webbing, and then release it.
If the webbing is still locked in the
retractor, see your dealer.
Before a door is closed, be sure the
seat belt is out of the way. If a door
is slammed against a seat belt,
damage can occur to both the seat
belt and the vehicle.
Shoulder Belt Height Adjuster
The vehicle has a shoulder belt
height adjuster for the driver and
front outboard passenger seating
positions.
Adjust the height so the shoulder
portion of the belt is on the shoulder
and not falling off of it. The belt
should be close to, but not
contacting, the neck. Improper
shoulder belt height adjustment
Page 84 of 417

GMC Canyon/Canyon Denali Owner Manual (GMNA-Localizing-U.S./Canada-
11354423) - 2018 - crc - 10/12/17
Seats and Restraints 83
{Warning
To reduce the risk of serious or
fatal injuries during a crash, do
not attach more than one child
restraint to a single anchor.
Attaching more than one child
restraint to a single anchor could
cause the anchor or attachment
to come loose or even break
during a crash. A child or others
could be injured.
{Warning
Children can be seriously injured
or strangled if a shoulder belt is
wrapped around their neck. The
shoulder belt can tighten but
cannot be loosened if it is locked.
The shoulder belt locks when it is
pulled all the way out of the
retractor. It unlocks when the
shoulder belt is allowed to go all
the way back into the retractor,(Continued)
Warning (Continued)
but it cannot do this if it is
wrapped around a child’s neck.
If the shoulder belt is locked and
tightened around a child’s neck,
the only way to loosen the belt is
to cut it.
Buckle any unused seat belts
behind the child restraint so
children cannot reach them. Pull
the shoulder belt all the way out
of the retractor to set the lock,
and tighten the belt behind the
child restraint after the child
restraint has been installed.
Caution
Do not let the LATCH
attachments rub against the
vehicle’s seat belts. This may
damage these parts. If necessary,
move buckled seat belts to avoid
rubbing the LATCH attachments.(Continued)
Caution (Continued)
Do not fold the rear seatback
when the seat is occupied. Do not
fold the empty rear seat with a
seat belt buckled. This could
damage the seat belt or the seat.
Unbuckle and return the seat belt
to its stowed position, before
folding the seat.
If you need to secure more than one
child restraint in the rear seat, see
Where to Put the Restraint 077.
Crew Cab
1. When installing a rear-facing
child restraint, it may be
necessary to move the front
seat forward to properly install
per the child restraint
manufacturer instructions.
See Seat Adjustment 046 or
Power Seat Adjustment 047.
2. For rear outboard seating positions, if the head restraint
interferes with the proper
installation of the child