turn signal GMC CANYON 2020 Owner's Guide
[x] Cancel search | Manufacturer: GMC, Model Year: 2020, Model line: CANYON, Model: GMC CANYON 2020Pages: 364, PDF Size: 5.59 MB
Page 212 of 364
GMC Canyon/Canyon Denali Owner Manual (GMNA-Localizing-U.S./Canada-
13566643) - 2020 - CRC - 10/4/19
Driving and Operating 211
Trailer Brake Control Wiring
Harness
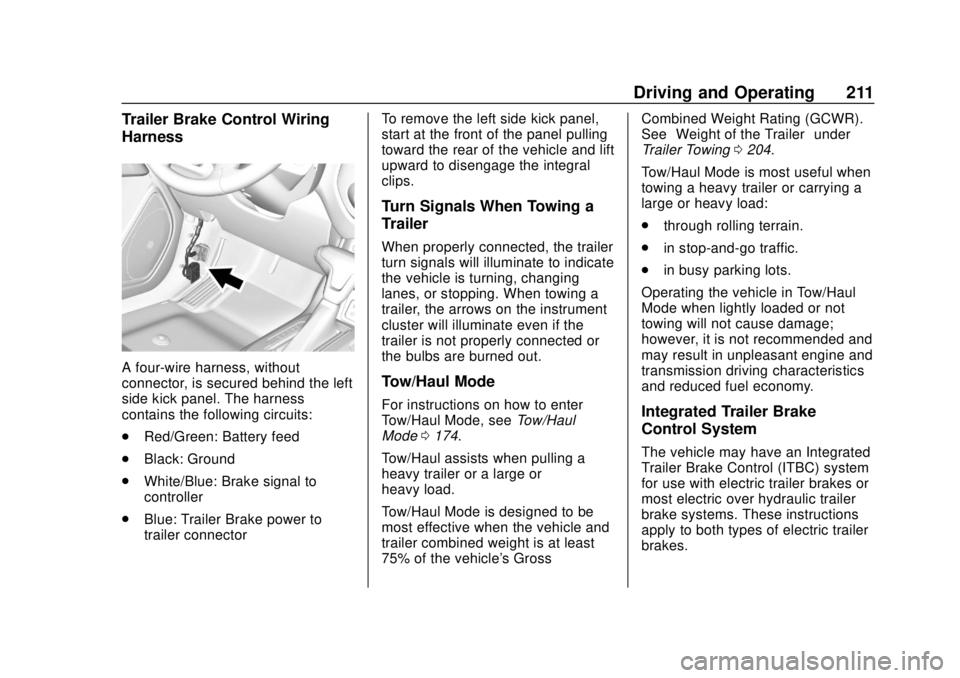
A four-wire harness, without
connector, is secured behind the left
side kick panel. The harness
contains the following circuits:
.Red/Green: Battery feed
. Black: Ground
. White/Blue: Brake signal to
controller
. Blue: Trailer Brake power to
trailer connector To remove the left side kick panel,
start at the front of the panel pulling
toward the rear of the vehicle and lift
upward to disengage the integral
clips.
Turn Signals When Towing a
Trailer
When properly connected, the trailer
turn signals will illuminate to indicate
the vehicle is turning, changing
lanes, or stopping. When towing a
trailer, the arrows on the instrument
cluster will illuminate even if the
trailer is not properly connected or
the bulbs are burned out.
Tow/Haul Mode
For instructions on how to enter
Tow/Haul Mode, see
Tow/Haul
Mode 0174.
Tow/Haul assists when pulling a
heavy trailer or a large or
heavy load.
Tow/Haul Mode is designed to be
most effective when the vehicle and
trailer combined weight is at least
75% of the vehicle's Gross Combined Weight Rating (GCWR).
See
“Weight of the Trailer” under
Trailer Towing 0204.
Tow/Haul Mode is most useful when
towing a heavy trailer or carrying a
large or heavy load:
. through rolling terrain.
. in stop-and-go traffic.
. in busy parking lots.
Operating the vehicle in Tow/Haul
Mode when lightly loaded or not
towing will not cause damage;
however, it is not recommended and
may result in unpleasant engine and
transmission driving characteristics
and reduced fuel economy.Integrated Trailer Brake
Control System
The vehicle may have an Integrated
Trailer Brake Control (ITBC) system
for use with electric trailer brakes or
most electric over hydraulic trailer
brake systems. These instructions
apply to both types of electric trailer
brakes.
Page 220 of 364
GMC Canyon/Canyon Denali Owner Manual (GMNA-Localizing-U.S./Canada-
13566643) - 2020 - CRC - 10/4/19
Vehicle Care 219
Vehicle Care
General Information
General Information . . . . . . . . . . 220
California Proposition65 Warning . . . . . . . . . . . . . . . . . 220
California Perchlorate Materials Requirements . . . . . 221
Accessories and Modifications . . . . . . . . . . . . . . . . 221
Vehicle Checks
Doing Your OwnService Work . . . . . . . . . . . . . . . 221
Hood . . . . . . . . . . . . . . . . . . . . . . . . . 222
Engine Compartment Overview . . . . . . . . . . . . . . . . . . . . 224
Engine Oil . . . . . . . . . . . . . . . . . . . . 227
Engine Oil Life System . . . . . . . 229
Automatic Transmission Fluid . . . . . . . . . . . . . . . . . . . . . . . . 231
Engine Air Cleaner/Filter . . . . . . 231
Cooling System . . . . . . . . . . . . . . 233
Engine Overheating . . . . . . . . . . 236
Engine Fan . . . . . . . . . . . . . . . . . . . 237
Washer Fluid . . . . . . . . . . . . . . . . . 238
Brakes . . . . . . . . . . . . . . . . . . . . . . . 239
Brake Fluid . . . . . . . . . . . . . . . . . . . 239
Battery - North America . . . . . . 240 Four-Wheel Drive . . . . . . . . . . . . . 241
Front Axle . . . . . . . . . . . . . . . . . . . . 242
Rear Axle . . . . . . . . . . . . . . . . . . . . 242
Starter Switch Check . . . . . . . . . 242
Automatic Transmission Shift
Lock Control Function
Check . . . . . . . . . . . . . . . . . . . . . . . 242
Ignition Transmission Lock Check . . . . . . . . . . . . . . . . . . . . . . . 243
Park Brake and P (Park) Mechanism Check . . . . . . . . . . 243
Wiper Blade Replacement . . . . 243
Windshield Replacement . . . . . 244
Gas Strut(s) . . . . . . . . . . . . . . . . . . 244
Headlamp Aiming
Front Headlamp Aiming . . . . . . 246
Bulb Replacement
Bulb Replacement . . . . . . . . . . . . 246
Halogen Bulbs . . . . . . . . . . . . . . . . 246
Headlamps, Front Turn Signal, Sidemarker, and Parking
Lamps . . . . . . . . . . . . . . . . . . . . . . 246
Taillamps, Turn Signal, Stoplamps, and Back-Up
Lamps . . . . . . . . . . . . . . . . . . . . . . 247
Center High-Mounted Stoplamp (CHMSL) and
Cargo Lamp . . . . . . . . . . . . . . . . . 248
Electrical System
Electrical System Overload . . . 249
Fuses and Circuit Breakers . . . 249
Engine Compartment Fuse
Block . . . . . . . . . . . . . . . . . . . . . . . . 250
Instrument Panel Fuse
Block . . . . . . . . . . . . . . . . . . . . . . . . 254
Wheels and Tires
Tires . . . . . . . . . . . . . . . . . . . . . . . . . . 257
All-Season Tires . . . . . . . . . . . . . . 258
Winter Tires . . . . . . . . . . . . . . . . . . 258
All-Terrain Tires . . . . . . . . . . . . . . . 259
Tire Sidewall Labeling . . . . . . . . 259
Tire Designations . . . . . . . . . . . . . 261
Tire Terminology andDefinitions . . . . . . . . . . . . . . . . . . 262
Tire Pressure . . . . . . . . . . . . . . . . . 264
Tire Pressure Monitor
System . . . . . . . . . . . . . . . . . . . . . . 265
Tire Pressure Monitor Operation . . . . . . . . . . . . . . . . . . . 266
Tire Inspection . . . . . . . . . . . . . . . . 271
Tire Rotation . . . . . . . . . . . . . . . . . 271
When It Is Time for New Tires . . . . . . . . . . . . . . . . . . . . . . . . 272
Buying New Tires . . . . . . . . . . . . . 273
Different Size Tires and Wheels . . . . . . . . . . . . . . . . . . . . . . 274
Page 231 of 364
GMC Canyon/Canyon Denali Owner Manual (GMNA-Localizing-U.S./Canada-
13566643) - 2020 - CRC - 10/4/19
230 Vehicle Care
include engine revolutions, engine
temperature, and miles driven.
Based on driving conditions, the
mileage at which an oil change is
indicated can vary considerably. For
the oil life system to work properly,
the system must be reset every time
the oil is changed.
On some vehicles, when the system
has calculated that oil life has been
diminished, a CHANGE ENGINE
OIL SOON message comes on to
indicate that an oil change is
necessary. Change the oil as soon
as possible within the next 1 000 km
(600 mi). It is possible that, if driving
under the best conditions, the oil life
system might indicate that an oil
change is not necessary for up to a
year. The engine oil and filter must
be changed at least once a year
and, at this time, the system must
be reset. For vehicles without the
CHANGE ENGINE OIL SOON
message, an oil change is needed
when the OIL LIFE REMAINING
percentage is near 0%. Your dealer
has trained service people who will
perform this work and reset the
system. It is also important to checkthe oil regularly over the course of
an oil drain interval and keep it at
the proper level.
If the system is ever reset
accidentally, the oil must be
changed at 5 000 km (3,000 mi)
since the last oil change.
Remember to reset the oil life
system whenever the oil is changed.
How to Reset the Engine Oil
Life System
Reset the system whenever the
engine oil is changed so that the
system can calculate the next
engine oil change. Always reset the
engine oil life to 100% after every oil
change. It will not reset itself. To
reset the engine oil life system:
1. Display OIL LIFE REMAINING on the DIC. See Driver
Information Center (DIC) (Base
Level) 0115 or
Driver Information Center (DIC)
(Uplevel) 0117. If the vehicle
does not have DIC buttons, the
vehicle must be in P (Park) to
access this display. 2. Press and hold
Von the DIC,
or SET/CLR on the turn signal
lever if the vehicle does not
have DIC buttons, for several
seconds. The oil life will
change to 100%.
The oil life system can also be reset
as follows: 1. Display OIL LIFE REMAINING on the DIC. See Driver
Information Center (DIC) (Base
Level) 0115 or
Driver Information Center (DIC)
(Uplevel) 0117.
2. Fully press the accelerator pedal slowly three times within
five seconds.
If the display shows 100%, the
system is reset.
If the vehicle has a CHANGE
ENGINE OIL SOON message and it
comes back on when the vehicle is
started and/or the OIL LIFE
REMAINING is near 0%, the engine
oil life system has not been reset.
Repeat the procedure.
Page 247 of 364
GMC Canyon/Canyon Denali Owner Manual (GMNA-Localizing-U.S./Canada-
13566643) - 2020 - CRC - 10/4/19
246 Vehicle Care
Headlamp Aiming
Front Headlamp Aiming
Headlamp aim has been preset and
should need no further adjustment.
If the vehicle is damaged in a crash,
the headlamp aim may be affected.
If adjustment to the headlamps is
necessary, see your dealer.
Bulb Replacement
For the proper type of replacement
bulbs, or any bulb changing
procedure not listed in this section,
contact your dealer.
Caution
Do not replace incandescent
bulbs with aftermarket LED
replacement bulbs. This can
cause damage to the vehicle
electrical system.
Halogen Bulbs
{Warning
Halogen bulbs have pressurized
gas inside and can burst if you
drop or scratch the bulb. You or
others could be injured. Be sure
to read and follow the instructions
on the bulb package.
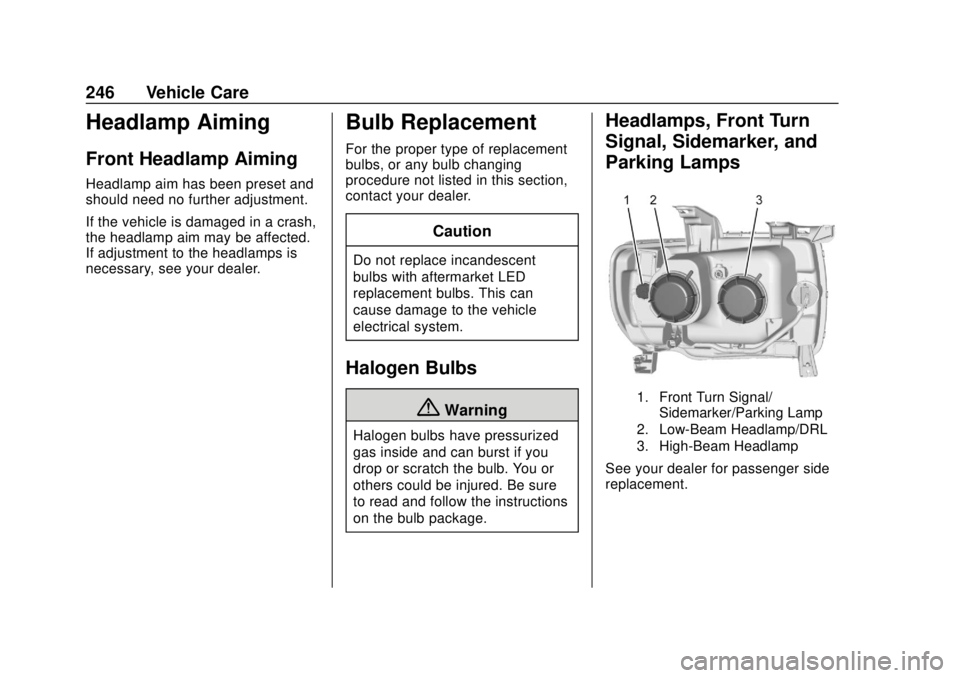
Headlamps, Front Turn
Signal, Sidemarker, and
Parking Lamps
1. Front Turn Signal/Sidemarker/Parking Lamp
2. Low-Beam Headlamp/DRL
3. High-Beam Headlamp
See your dealer for passenger side
replacement.
Page 248 of 364
GMC Canyon/Canyon Denali Owner Manual (GMNA-Localizing-U.S./Canada-
13566643) - 2020 - CRC - 10/4/19
Vehicle Care 247
Headlamp
1. Open the hood.
2. Remove the headlamp bulbcover by turning it
counterclockwise.
3. Turn the bulb socket counterclockwise to remove it
from the headlamp assembly
and pull it straight out.
4. Unplug the electrical connector from the old bulb by releasing
the clip on the bulb socket.
5. Replace the bulb and reverse Steps 1–4 to reinstall.
Turn Signal/Sidemarker/
Parking Lamp
1. Open the hood.
2. Turn the bulb socketcounterclockwise to remove it
from the headlamp assembly
and pull it straight out.
3. Remove the bulb by pulling it straight out of the bulb socket.
4. Replace the bulb and reverse Steps 1–3 to reinstall.
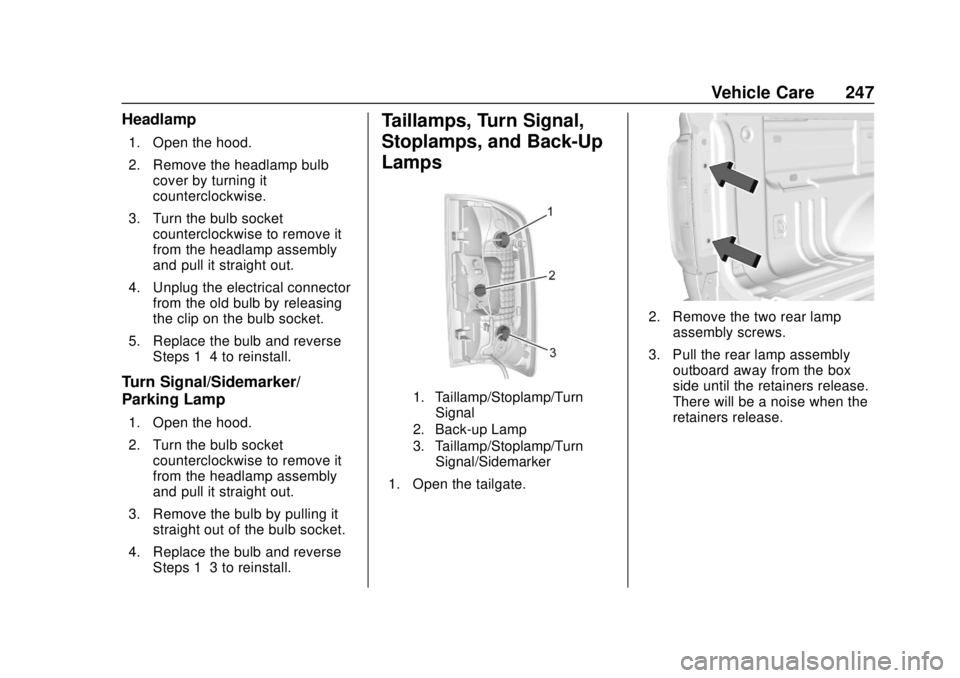
Taillamps, Turn Signal,
Stoplamps, and Back-Up
Lamps
1. Taillamp/Stoplamp/TurnSignal
2. Back-up Lamp
3. Taillamp/Stoplamp/Turn Signal/Sidemarker
1. Open the tailgate.
2. Remove the two rear lamp assembly screws.
3. Pull the rear lamp assembly outboard away from the box
side until the retainers release.
There will be a noise when the
retainers release.
Page 254 of 364
GMC Canyon/Canyon Denali Owner Manual (GMNA-Localizing-U.S./Canada-
13566643) - 2020 - CRC - 10/4/19
Vehicle Care 253
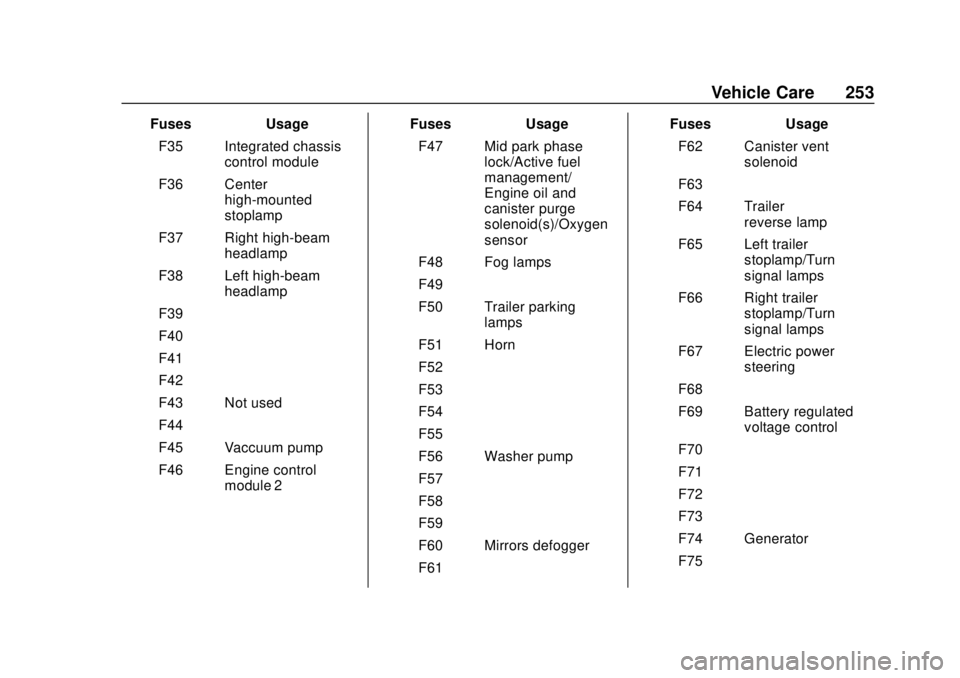
FusesUsage
F35 Integrated chassis control module
F36 Center high-mounted
stoplamp
F37 Right high-beam headlamp
F38 Left high-beam headlamp
F39 –
F40 –
F41 –
F42 –
F43 Not used
F44 –
F45 Vaccuum pump
F46 Engine control module 2 Fuses
Usage
F47 Mid park phase lock/Active fuel
management/
Engine oil and
canister purge
solenoid(s)/Oxygen
sensor
F48 Fog lamps
F49 –
F50 Trailer parking lamps
F51 Horn
F52 –
F53 –
F54 –
F55 –
F56 Washer pump
F57 –
F58 –
F59 –
F60 Mirrors defogger
F61 – Fuses
Usage
F62 Canister vent solenoid
F63 –
F64 Trailer reverse lamp
F65 Left trailer stoplamp/Turn
signal lamps
F66 Right trailer stoplamp/Turn
signal lamps
F67 Electric power steering
F68 –
F69 Battery regulated voltage control
F70 –
F71 –
F72 –
F73 –
F74 Generator
F75 –
Page 269 of 364
GMC Canyon/Canyon Denali Owner Manual (GMNA-Localizing-U.S./Canada-
13566643) - 2020 - CRC - 10/4/19
268 Vehicle Care
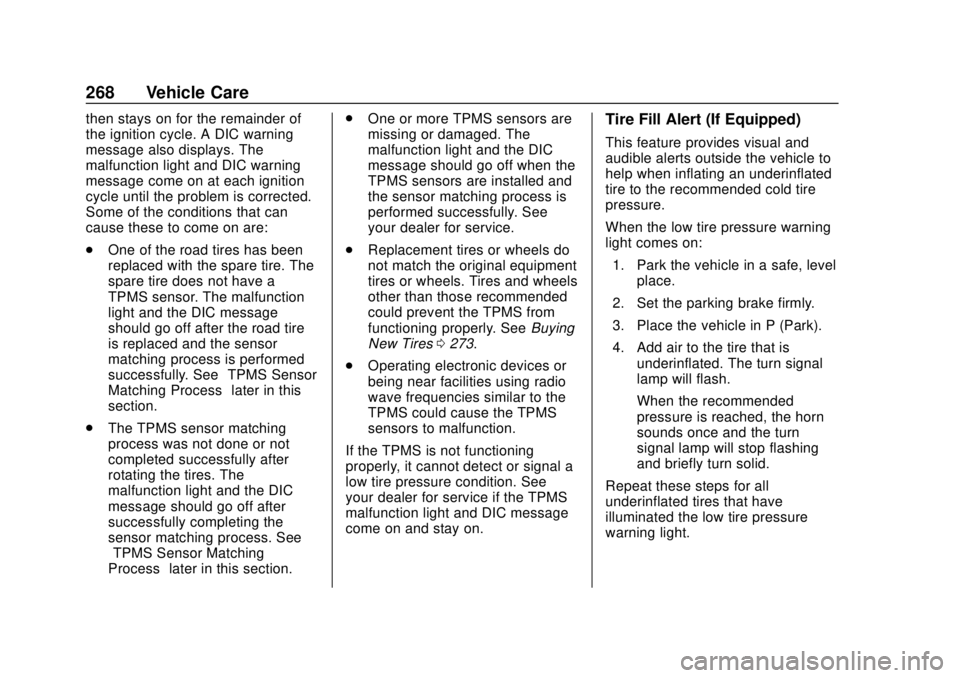
then stays on for the remainder of
the ignition cycle. A DIC warning
message also displays. The
malfunction light and DIC warning
message come on at each ignition
cycle until the problem is corrected.
Some of the conditions that can
cause these to come on are:
.One of the road tires has been
replaced with the spare tire. The
spare tire does not have a
TPMS sensor. The malfunction
light and the DIC message
should go off after the road tire
is replaced and the sensor
matching process is performed
successfully. See “TPMS Sensor
Matching Process” later in this
section.
. The TPMS sensor matching
process was not done or not
completed successfully after
rotating the tires. The
malfunction light and the DIC
message should go off after
successfully completing the
sensor matching process. See
“TPMS Sensor Matching
Process” later in this section. .
One or more TPMS sensors are
missing or damaged. The
malfunction light and the DIC
message should go off when the
TPMS sensors are installed and
the sensor matching process is
performed successfully. See
your dealer for service.
. Replacement tires or wheels do
not match the original equipment
tires or wheels. Tires and wheels
other than those recommended
could prevent the TPMS from
functioning properly. See Buying
New Tires 0273.
. Operating electronic devices or
being near facilities using radio
wave frequencies similar to the
TPMS could cause the TPMS
sensors to malfunction.
If the TPMS is not functioning
properly, it cannot detect or signal a
low tire pressure condition. See
your dealer for service if the TPMS
malfunction light and DIC message
come on and stay on.Tire Fill Alert (If Equipped)
This feature provides visual and
audible alerts outside the vehicle to
help when inflating an underinflated
tire to the recommended cold tire
pressure.
When the low tire pressure warning
light comes on: 1. Park the vehicle in a safe, level place.
2. Set the parking brake firmly.
3. Place the vehicle in P (Park).
4. Add air to the tire that is underinflated. The turn signal
lamp will flash.
When the recommended
pressure is reached, the horn
sounds once and the turn
signal lamp will stop flashing
and briefly turn solid.
Repeat these steps for all
underinflated tires that have
illuminated the low tire pressure
warning light.
Page 270 of 364
GMC Canyon/Canyon Denali Owner Manual (GMNA-Localizing-U.S./Canada-
13566643) - 2020 - CRC - 10/4/19
Vehicle Care 269
{Warning
Overinflating a tire could cause
the tire to rupture and you or
others could be injured. Do not
exceed the maximum pressure
listed on the tire sidewall. See
Tire Sidewall Labeling0259 and
Vehicle Load Limits 0154.
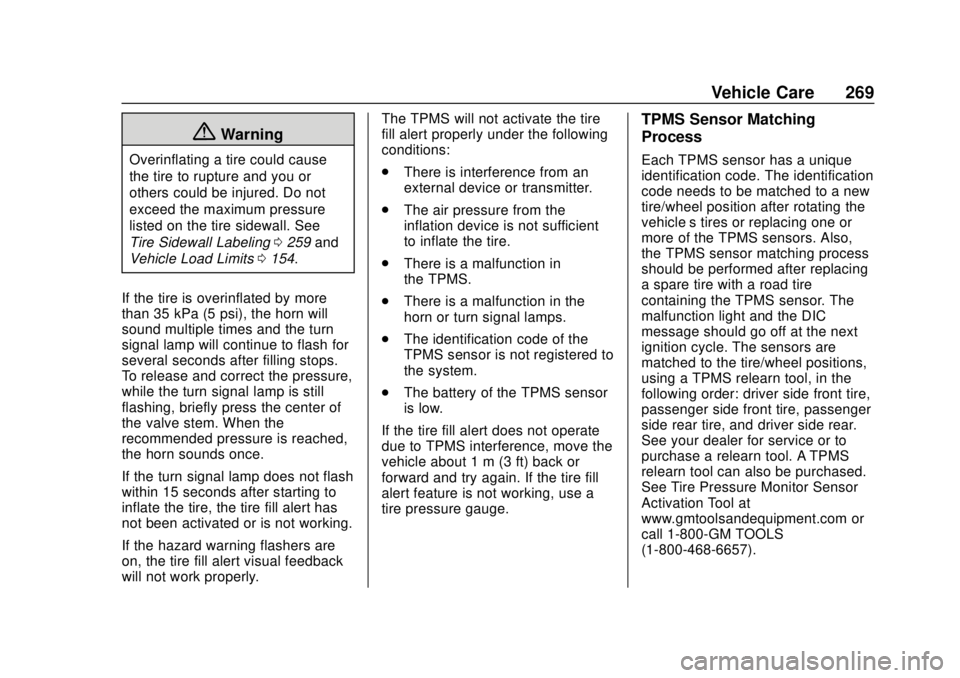
If the tire is overinflated by more
than 35 kPa (5 psi), the horn will
sound multiple times and the turn
signal lamp will continue to flash for
several seconds after filling stops.
To release and correct the pressure,
while the turn signal lamp is still
flashing, briefly press the center of
the valve stem. When the
recommended pressure is reached,
the horn sounds once.
If the turn signal lamp does not flash
within 15 seconds after starting to
inflate the tire, the tire fill alert has
not been activated or is not working.
If the hazard warning flashers are
on, the tire fill alert visual feedback
will not work properly. The TPMS will not activate the tire
fill alert properly under the following
conditions:
.
There is interference from an
external device or transmitter.
. The air pressure from the
inflation device is not sufficient
to inflate the tire.
. There is a malfunction in
the TPMS.
. There is a malfunction in the
horn or turn signal lamps.
. The identification code of the
TPMS sensor is not registered to
the system.
. The battery of the TPMS sensor
is low.
If the tire fill alert does not operate
due to TPMS interference, move the
vehicle about 1 m (3 ft) back or
forward and try again. If the tire fill
alert feature is not working, use a
tire pressure gauge.
TPMS Sensor Matching
Process
Each TPMS sensor has a unique
identification code. The identification
code needs to be matched to a new
tire/wheel position after rotating the
vehicle’s tires or replacing one or
more of the TPMS sensors. Also,
the TPMS sensor matching process
should be performed after replacing
a spare tire with a road tire
containing the TPMS sensor. The
malfunction light and the DIC
message should go off at the next
ignition cycle. The sensors are
matched to the tire/wheel positions,
using a TPMS relearn tool, in the
following order: driver side front tire,
passenger side front tire, passenger
side rear tire, and driver side rear.
See your dealer for service or to
purchase a relearn tool. A TPMS
relearn tool can also be purchased.
See Tire Pressure Monitor Sensor
Activation Tool at
www.gmtoolsandequipment.com or
call 1-800-GM TOOLS
(1-800-468-6657).
Page 271 of 364
GMC Canyon/Canyon Denali Owner Manual (GMNA-Localizing-U.S./Canada-
13566643) - 2020 - CRC - 10/4/19
270 Vehicle Care
There are two minutes to match the
first tire/wheel position, and
five minutes overall to match all four
tire/wheel positions. If it takes
longer, the matching process stops
and must be restarted.
The TPMS sensor matching
process is:1. Set the parking brake.
2. Turn the ignition on without starting the vehicle.
3. If the vehicle has an uplevel DIC, make sure the Tire
Pressure info page option is
turned on. The info pages on
the DIC can be turned on and
off through the Options menu.
See Driver Information Center
(DIC) (Base Level) 0115 or
Driver Information Center (DIC)
(Uplevel) 0117.
4. If the vehicle has an uplevel DIC, use the DIC controls on
the right side of the steering
wheel to scroll to the Tire
Pressure screen under the DIC
info page. If the vehicle has a base level
DIC, use the MENU button to
select the Vehicle Information
menu in the DIC. Use the
thumbwheel to scroll to the Tire
Pressure Menu item screen.
5. If the vehicle has an uplevel DIC, press and hold
Vin the
center of the DIC controls.
If the vehicle has a base level
DIC, press SET/CLR on the
turn signal lever to begin the
sensor matching process.
A message asking if the
process should begin should
appear. Press SET/CLR again
to confirm the selection.
The horn sounds twice to
signal the receiver is in relearn
mode and the TIRE
LEARNING ACTIVE message
displays on the DIC screen.
6. Start with the driver side front tire.
7. Place the relearn tool against the tire sidewall, near the valve
stem. Then press the button to activate the TPMS sensor.
A horn chirp confirms that the
sensor identification code has
been matched to this tire and
wheel position.
8. Proceed to the passenger side front tire, and repeat the
procedure in Step 7.
9. Proceed to the passenger side rear tire, and repeat the
procedure in Step 7.
10. Proceed to the driver side rear tire, and repeat the procedure
in Step 7. The horn sounds two
times to indicate the sensor
identification code has been
matched to the driver side rear
tire, and the TPMS sensor
matching process is no longer
active. The TIRE LEARNING
ACTIVE message on the DIC
display screen goes off.
11. Turn the vehicle off.
12. Set all four tires to the recommended air pressure
level as indicated on the Tire
and Loading Information label.
Page 347 of 364
GMC Canyon/Canyon Denali Owner Manual (GMNA-Localizing-U.S./Canada-
13566643) - 2020 - CRC - 10/4/19
346 OnStar
.PressQto speak with an
Advisor.
OnStar or connected services
cannot work unless the vehicle is in
a place where OnStar has an
agreement with a wireless service
provider for service in that area. The
wireless service provider must also
have coverage, network capacity,
reception, and technology
compatible with OnStar or
connected services. Service
involving location information about
the vehicle cannot work unless GPS
signals are available, unobstructed,
and compatible with the OnStar
hardware. OnStar or connected
services may not work if the OnStar
equipment is not properly installed
or it has not been properly
maintained. If equipment or software
is added, connected, or modified,
OnStar or connected services may
not work. Other problems beyond
the control of OnStar —such as
hills, tall buildings, tunnels, weather,
electrical system design and
architecture of the vehicle, damage to the vehicle in a crash, or wireless
phone network congestion or
jamming
—may prevent service.
See Radio Frequency Statement
0 339.
Services for People with
Disabilities
Advisors provide services to help
with physical disabilities and
medical conditions.
Press
Qto help:
. Locate a gas station with an
attendant to pump gas.
. Find a hotel, restaurant, etc.,
that meets accessibility needs.
. Provide directions to the closest
hospital or pharmacy in urgent
situations.
TTY Users
OnStar has the ability to
communicate to deaf,
hard-of-hearing, or speech-impaired
customers while in the vehicle. The
available dealer-installed TTY
system can provide in-vehicle access to all OnStar services,
except Virtual Advisor and OnStar
Turn-by-Turn Navigation.
If equipped, TTY mode can be
turned on or off by touching
Settings, then Apps, and then
Phone. When TTY mode is on,
phone calls can be made or
received with OnStar using the
infotainment display.
OnStar Personal Identification
Number (PIN)
A PIN is needed to access some
OnStar services. The PIN will need
to be changed the first time when
speaking with an Advisor. To
change the OnStar PIN, contact an
OnStar Advisor by pressing
Qor
calling 1-888-4ONSTAR.
Warranty
OnStar equipment may be
warranted as part of the vehicle
warranty.