jack GMC CANYON 2022 Owners Manual
[x] Cancel search | Manufacturer: GMC, Model Year: 2022, Model line: CANYON, Model: GMC CANYON 2022Pages: 361, PDF Size: 6.48 MB
Page 7 of 361
GMC Canyon/Canyon Denali Owner Manual (GMNA-Localizing-U.S./Canada-
15275607) - 2022 - CRC - 11/2/21
Introduction 5
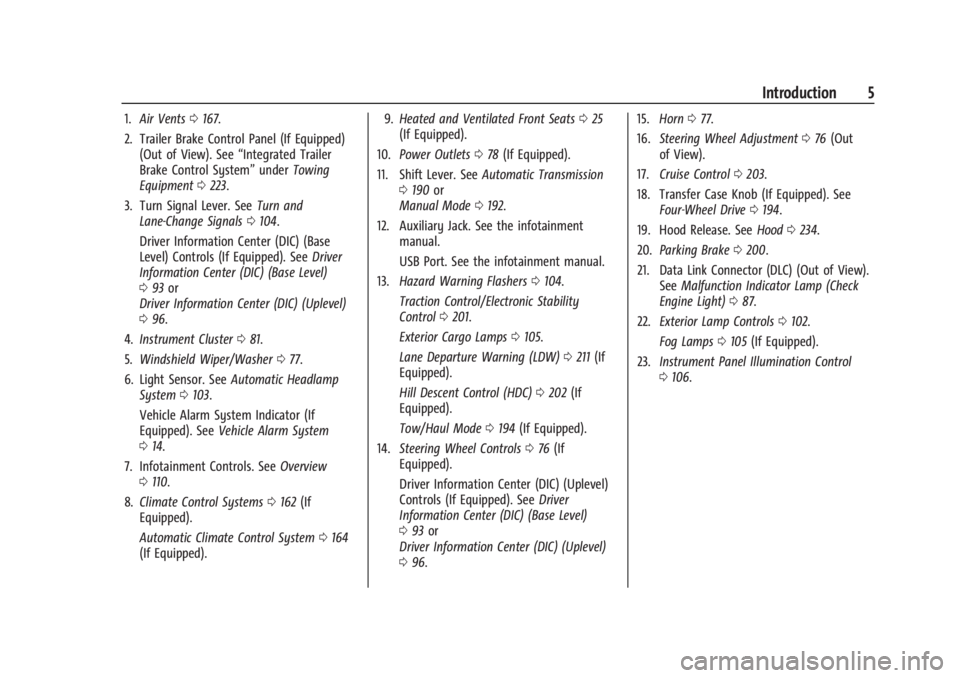
1.Air Vents 0167.
2. Trailer Brake Control Panel (If Equipped) (Out of View). See “Integrated Trailer
Brake Control System” underTowing
Equipment 0223.
3. Turn Signal Lever. See Turn and
Lane-Change Signals 0104.
Driver Information Center (DIC) (Base
Level) Controls (If Equipped). See Driver
Information Center (DIC) (Base Level)
0 93 or
Driver Information Center (DIC) (Uplevel)
0 96.
4. Instrument Cluster 081.
5. Windshield Wiper/Washer 077.
6. Light Sensor. See Automatic Headlamp
System 0103.
Vehicle Alarm System Indicator (If
Equipped). See Vehicle Alarm System
0 14.
7. Infotainment Controls. See Overview
0 110.
8. Climate Control Systems 0162 (If
Equipped).
Automatic Climate Control System 0164
(If Equipped). 9.
Heated and Ventilated Front Seats 025
(If Equipped).
10. Power Outlets 078 (If Equipped).
11. Shift Lever. See Automatic Transmission
0 190 or
Manual Mode 0192.
12. Auxiliary Jack. See the infotainment manual.
USB Port. See the infotainment manual.
13. Hazard Warning Flashers 0104.
Traction Control/Electronic Stability
Control 0201.
Exterior Cargo Lamps 0105.
Lane Departure Warning (LDW) 0211 (If
Equipped).
Hill Descent Control (HDC) 0202 (If
Equipped).
Tow/Haul Mode 0194 (If Equipped).
14. Steering Wheel Controls 076 (If
Equipped).
Driver Information Center (DIC) (Uplevel)
Controls (If Equipped). See Driver
Information Center (DIC) (Base Level)
0 93 or
Driver Information Center (DIC) (Uplevel)
0 96. 15.
Horn 077.
16. Steering Wheel Adjustment 076 (Out
of View).
17. Cruise Control 0203.
18. Transfer Case Knob (If Equipped). See Four-Wheel Drive 0194.
19. Hood Release. See Hood0234.
20. Parking Brake 0200.
21. Data Link Connector (DLC) (Out of View). SeeMalfunction Indicator Lamp (Check
Engine Light) 087.
22. Exterior Lamp Controls 0102.
Fog Lamps 0105 (If Equipped).
23. Instrument Panel Illumination Control
0106.
Page 76 of 361
GMC Canyon/Canyon Denali Owner Manual (GMNA-Localizing-U.S./Canada-
15275607) - 2022 - CRC - 11/2/21
74 Storage
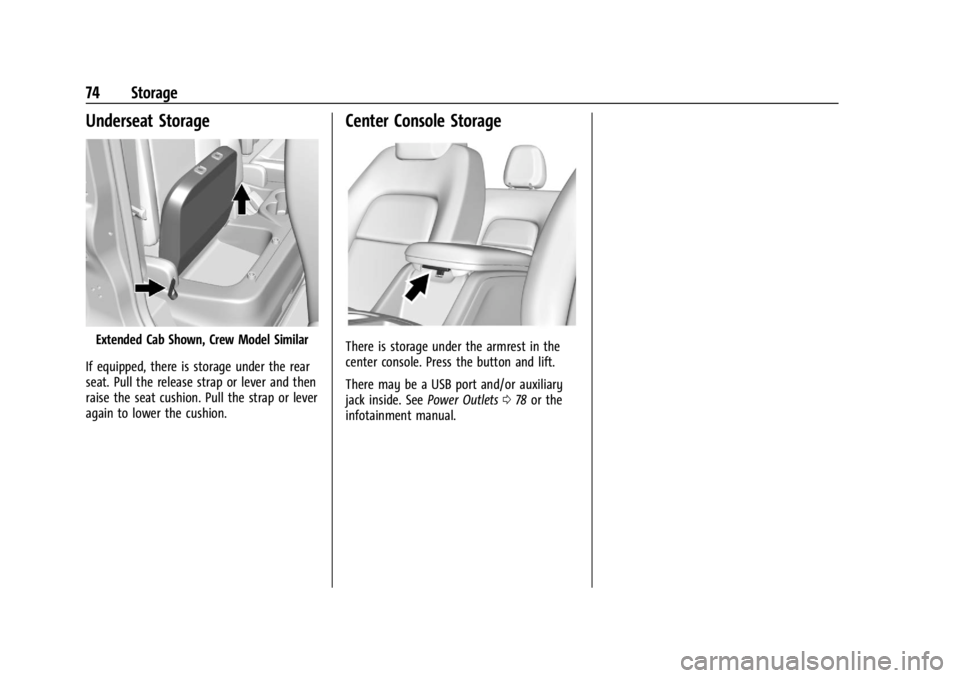
Underseat Storage
Extended Cab Shown, Crew Model Similar
If equipped, there is storage under the rear
seat. Pull the release strap or lever and then
raise the seat cushion. Pull the strap or lever
again to lower the cushion.
Center Console Storage
There is storage under the armrest in the
center console. Press the button and lift.
There may be a USB port and/or auxiliary
jack inside. See Power Outlets078 or the
infotainment manual.
Page 111 of 361
GMC Canyon/Canyon Denali Owner Manual (GMNA-Localizing-U.S./Canada-
15275607) - 2022 - CRC - 11/2/21
Infotainment System 109
Infotainment System
Introduction
Introduction . . . . . . . . . . . . . . . . . . . . . . . . . . . 109
Overview . . . . . . . . . . . . . . . . . . . . . . . . . . . . . . 110
Steering Wheel Controls . . . . . . . . . . . . . . . 112
Using the System . . . . . . . . . . . . . . . . . . . . . . 113
Software Updates . . . . . . . . . . . . . . . . . . . . . . 116
Radio
AM-FM Radio . . . . . . . . . . . . . . . . . . . . . . . . . . 116
HD Radio Technology . . . . . . . . . . . . . . . . . . 117
Radio Data System (RDS) . . . . . . . . . . . . . . 118
Satellite Radio . . . . . . . . . . . . . . . . . . . . . . . . . 118
Radio Reception . . . . . . . . . . . . . . . . . . . . . . . . 119
Multi-Band Antenna . . . . . . . . . . . . . . . . . . . 119
Audio Players
Avoiding Untrusted Media Devices . . . . . 119
USB Port . . . . . . . . . . . . . . . . . . . . . . . . . . . . . . . 119
Auxiliary Jack . . . . . . . . . . . . . . . . . . . . . . . . . . 122
Bluetooth Audio . . . . . . . . . . . . . . . . . . . . . . . 123
Navigation
Using the Navigation System . . . . . . . . . . 123
Maps . . . . . . . . . . . . . . . . . . . . . . . . . . . . . . . . . . 126
Navigation Symbols . . . . . . . . . . . . . . . . . . . 126
Destination . . . . . . . . . . . . . . . . . . . . . . . . . . . . 127
Global Positioning System (GPS) . . . . . . . 133
Vehicle Positioning . . . . . . . . . . . . . . . . . . . . . 133
Problems with Route Guidance . . . . . . . . 133If the System Needs Service . . . . . . . . . . . 134
Map Data Updates . . . . . . . . . . . . . . . . . . . . 134
Database Coverage Explanations . . . . . . . 134
Voice Recognition
Voice Recognition . . . . . . . . . . . . . . . . . . . . . . 134
Phone
Bluetooth (Overview) . . . . . . . . . . . . . . . . . . 139
Bluetooth (Pairing and Using a
Phone) . . . . . . . . . . . . . . . . . . . . . . . . . . . . . . . 140
Apple CarPlay and Android Auto . . . . . . 144
Settings
Settings . . . . . . . . . . . . . . . . . . . . . . . . . . . . . . . 144
Teen Driver . . . . . . . . . . . . . . . . . . . . . . . . . . . . 151
Trademarks and License Agreements
Trademarks and License Agreements . . . . . . . . . . . . . . . . . . . . . . . . . . 154
Introduction
Read the following pages to become familiar
with the features.
{Warning
Taking your eyes off the road for too
long or too often while using any
infotainment feature can cause a crash.
You or others could be injured or killed.
Do not give extended attention to
infotainment tasks while driving. Limit
your glances at the vehicle displays and
focus your attention on driving. Use voice
commands whenever possible.
The infotainment system has built-in
features intended to help avoid distraction
by disabling some features when driving.
These features may gray out when they are
unavailable. Many infotainment features are
also available through the instrument cluster
and steering wheel controls.
Before driving:
.Become familiar with the operation,
center stack controls, steering wheel
controls, and infotainment display.
Page 124 of 361
GMC Canyon/Canyon Denali Owner Manual (GMNA-Localizing-U.S./Canada-
15275607) - 2022 - CRC - 11/2/21
122 Infotainment System
The songs, artists, albums, and genres are
taken from the file’s song information and
are only displayed if present. The radio
displays the file name as the track name if
the song information is not available.
Supported Apple Devices
To view supported devices, see
my.gmc.com/learn.
Storing and Recalling Media Favorites
To store media favorites, touch Browse to
display a list of media types.
Touch one of the following Browse options
to save a favorite:
Playlists :Touch
Hnext to any playlist to
store the playlist as a favorite. Touch a
saved favorite to recall a favorite playlist.
The first song in the playlist begins to play.
Artists : Touch
Hnext to any artist to
store the artist as a favorite. Touch a saved
favorite to recall a favorite artist. The first
song in the artist list begins to play.
Songs : Touch
Hnext to any song to store
the song as a favorite. Touch a saved
favorite to recall a favorite song. Albums :
Touch
Hnext to any album to
store the album as a favorite. Touch a saved
favorite to recall a favorite album. The first
song in the album list begins to play.
Genres : Touch
Hnext to any genre to
store the genre as a favorite. Touch a saved
favorite to recall a favorite genre. The first
song of the genre begins to play.
Podcasts : Touch
Hnext to any podcast to
store the podcast as a favorite. Touch a
saved favorite to recall a favorite podcast.
The podcast begins to play.
Audiobooks : Touch
Hnext to any
audiobook to store the audiobook as a
favorite. Touch a saved favorite to recall a
favorite audiobook. The first chapter in the
audiobook begins to play.
Media Playback and Mute
USB playback will be paused if the system is
muted. If the steering wheel mute control is
pressed again, playback will resume.
If the source is changed while in mute,
playback resumes and audio will unmute.
Auxiliary Jack
If equipped, this vehicle has an auxiliary
input jack in the center stack. Possible
auxiliary audio sources include:
.Laptop computer
.Audio music player
This jack is not an audio output. Do not
plug headphones into the auxiliary input
jack. Set up an auxiliary device while the
vehicle is in P (Park).
Connect a 3.5 mm (1/8 in) cable from the
auxiliary device to the auxiliary input jack.
When a device is connected, the system can
play audio from the device over the vehicle
speakers.
If an auxiliary device has already been
connected, but a different source is currently
active, touch More and then touch AUX to
make the source active.
Shuffle and Browse are not available in the
AUX source menu.
Page 286 of 361
GMC Canyon/Canyon Denali Owner Manual (GMNA-Localizing-U.S./Canada-
15275607) - 2022 - CRC - 11/2/21
284 Vehicle Care
{Warning
Driving on a flat tire will cause
permanent damage to the tire.
Re-inflating a tire after it has been driven
on while severely underinflated or flat
may cause a blowout and a serious crash.
Never attempt to re-inflate a tire that has
been driven on while severely
underinflated or flat. Have your dealer or
an authorized tire service center repair or
replace the flat tire as soon as possible.
{Warning
Lifting a vehicle and getting under it to
do maintenance or repairs is dangerous
without the appropriate safety equipment
and training. If a jack is provided with
the vehicle, it is designed only for
changing a flat tire. If it is used for
anything else, you or others could be
badly injured or killed if the vehicle slips
off the jack. If a jack is provided with the
vehicle, only use it for changing a
flat tire.If a tire goes flat, avoid further tire and
wheel damage by driving slowly to a level
place, well off the road, if possible. Turn on
the hazard warning flashers. See
Hazard
Warning Flashers 0104.
{Warning
Changing a tire can be dangerous. The
vehicle can slip off the jack and roll over
or fall causing injury or death. Find a
level place to change the tire. To help
prevent the vehicle from moving:
1. Set the parking brake firmly.
2. Put the shift lever in P (Park).
3. For vehicles with four-wheel drive with an N (Neutral) transfer case
position, be sure the transfer case is
in a drive gear —not in N (Neutral).
4. Turn off the engine and do not restart while the vehicle is raised.
5. Do not allow passengers to remain in the vehicle.
6. Place wheel blocks, if equipped, on both sides of the tire at the opposite
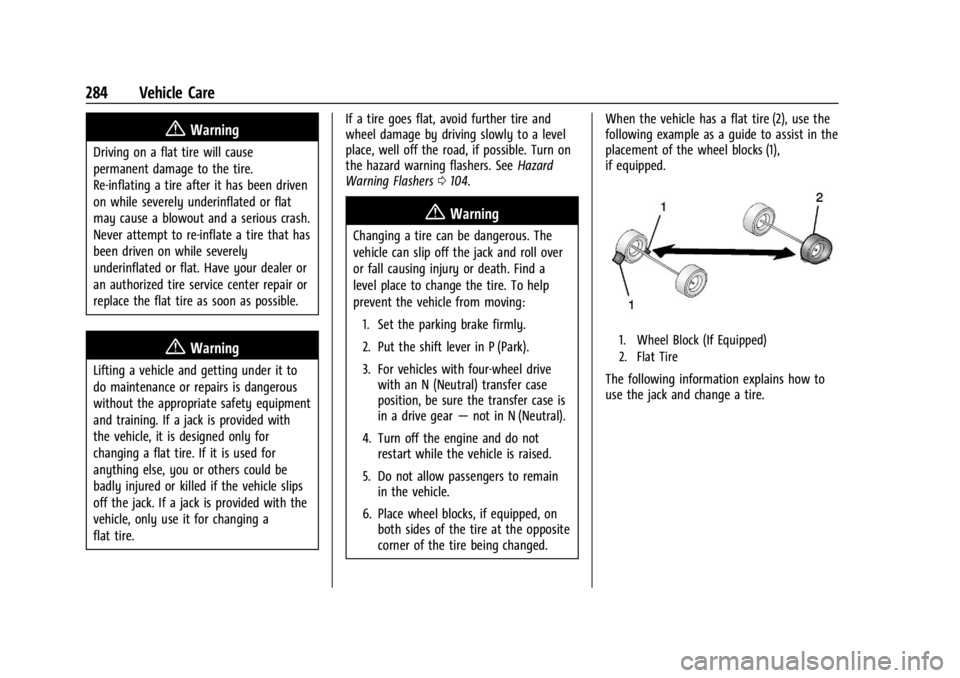
corner of the tire being changed. When the vehicle has a flat tire (2), use the
following example as a guide to assist in the
placement of the wheel blocks (1),
if equipped.
1. Wheel Block (If Equipped)
2. Flat Tire
The following information explains how to
use the jack and change a tire.
Page 287 of 361
GMC Canyon/Canyon Denali Owner Manual (GMNA-Localizing-U.S./Canada-
15275607) - 2022 - CRC - 11/2/21
Vehicle Care 285
Tire Changing
Removing the Spare Tire and Tools
Crew Cab
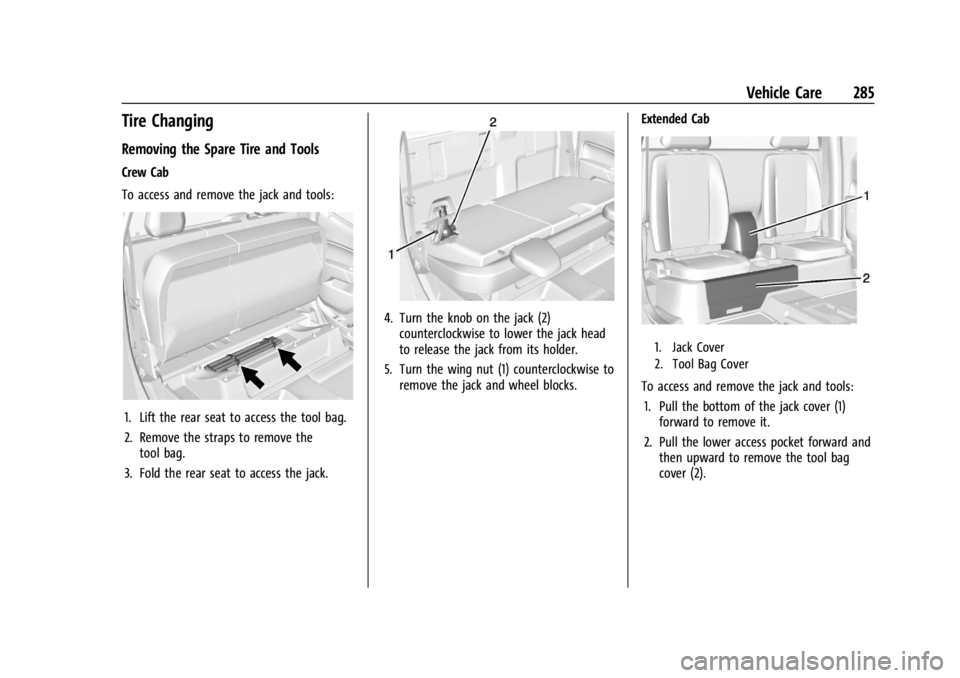
To access and remove the jack and tools:
1. Lift the rear seat to access the tool bag.
2. Remove the straps to remove thetool bag.
3. Fold the rear seat to access the jack.
4. Turn the knob on the jack (2) counterclockwise to lower the jack head
to release the jack from its holder.
5. Turn the wing nut (1) counterclockwise to remove the jack and wheel blocks. Extended Cab
1. Jack Cover
2. Tool Bag Cover
To access and remove the jack and tools:
1. Pull the bottom of the jack cover (1) forward to remove it.
2. Pull the lower access pocket forward and then upward to remove the tool bag
cover (2).
Page 288 of 361
GMC Canyon/Canyon Denali Owner Manual (GMNA-Localizing-U.S./Canada-
15275607) - 2022 - CRC - 11/2/21
286 Vehicle Care
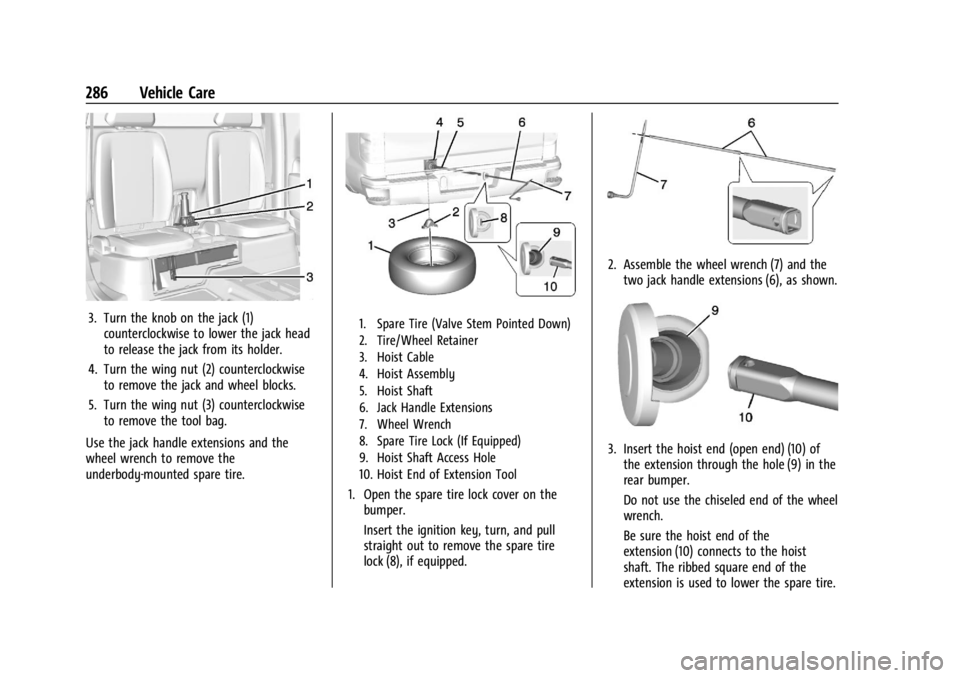
3. Turn the knob on the jack (1)counterclockwise to lower the jack head
to release the jack from its holder.
4. Turn the wing nut (2) counterclockwise to remove the jack and wheel blocks.
5. Turn the wing nut (3) counterclockwise to remove the tool bag.
Use the jack handle extensions and the
wheel wrench to remove the
underbody-mounted spare tire.1. Spare Tire (Valve Stem Pointed Down)
2. Tire/Wheel Retainer
3. Hoist Cable
4. Hoist Assembly
5. Hoist Shaft
6. Jack Handle Extensions
7. Wheel Wrench
8. Spare Tire Lock (If Equipped)
9. Hoist Shaft Access Hole
10. Hoist End of Extension Tool
1. Open the spare tire lock cover on the bumper.
Insert the ignition key, turn, and pull
straight out to remove the spare tire
lock (8), if equipped.
2. Assemble the wheel wrench (7) and thetwo jack handle extensions (6), as shown.
3. Insert the hoist end (open end) (10) ofthe extension through the hole (9) in the
rear bumper.
Do not use the chiseled end of the wheel
wrench.
Be sure the hoist end of the
extension (10) connects to the hoist
shaft. The ribbed square end of the
extension is used to lower the spare tire.
Page 289 of 361
GMC Canyon/Canyon Denali Owner Manual (GMNA-Localizing-U.S./Canada-
15275607) - 2022 - CRC - 11/2/21
Vehicle Care 287
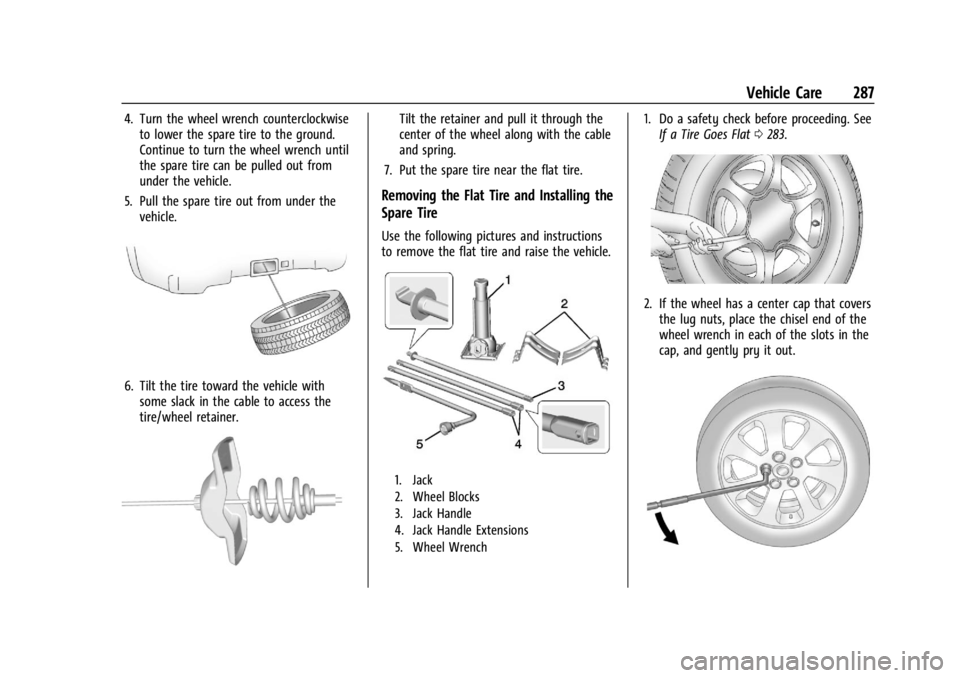
4. Turn the wheel wrench counterclockwiseto lower the spare tire to the ground.
Continue to turn the wheel wrench until
the spare tire can be pulled out from
under the vehicle.
5. Pull the spare tire out from under the vehicle.
6. Tilt the tire toward the vehicle withsome slack in the cable to access the
tire/wheel retainer.
Tilt the retainer and pull it through the
center of the wheel along with the cable
and spring.
7. Put the spare tire near the flat tire.
Removing the Flat Tire and Installing the
Spare Tire
Use the following pictures and instructions
to remove the flat tire and raise the vehicle.
1. Jack
2. Wheel Blocks
3. Jack Handle
4. Jack Handle Extensions
5. Wheel Wrench
1. Do a safety check before proceeding. See If a Tire Goes Flat 0283.
2. If the wheel has a center cap that covers
the lug nuts, place the chisel end of the
wheel wrench in each of the slots in the
cap, and gently pry it out.
Page 290 of 361
GMC Canyon/Canyon Denali Owner Manual (GMNA-Localizing-U.S./Canada-
15275607) - 2022 - CRC - 11/2/21
288 Vehicle Care
3. Use the wheel wrench and turn itcounterclockwise to loosen the wheel
nuts. Do not remove the wheel nuts yet.
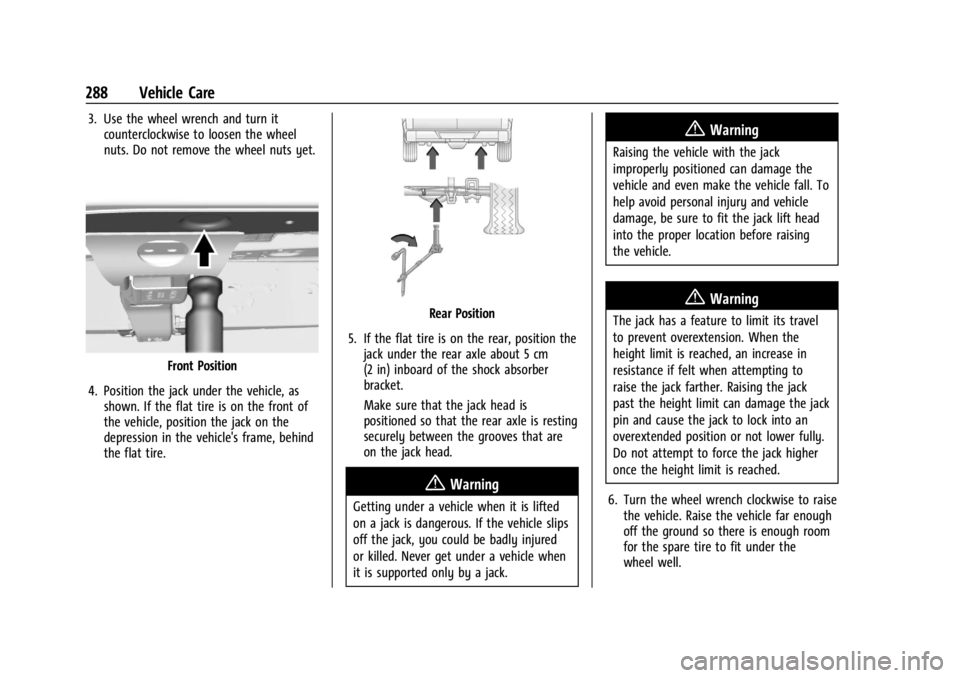
Front Position
4. Position the jack under the vehicle, as shown. If the flat tire is on the front of
the vehicle, position the jack on the
depression in the vehicle's frame, behind
the flat tire.
Rear Position
5. If the flat tire is on the rear, position the jack under the rear axle about 5 cm
(2 in) inboard of the shock absorber
bracket.
Make sure that the jack head is
positioned so that the rear axle is resting
securely between the grooves that are
on the jack head.
{Warning
Getting under a vehicle when it is lifted
on a jack is dangerous. If the vehicle slips
off the jack, you could be badly injured
or killed. Never get under a vehicle when
it is supported only by a jack.
{Warning
Raising the vehicle with the jack
improperly positioned can damage the
vehicle and even make the vehicle fall. To
help avoid personal injury and vehicle
damage, be sure to fit the jack lift head
into the proper location before raising
the vehicle.
{Warning
The jack has a feature to limit its travel
to prevent overextension. When the
height limit is reached, an increase in
resistance if felt when attempting to
raise the jack farther. Raising the jack
past the height limit can damage the jack
pin and cause the jack to lock into an
overextended position or not lower fully.
Do not attempt to force the jack higher
once the height limit is reached.
6. Turn the wheel wrench clockwise to raise the vehicle. Raise the vehicle far enough
off the ground so there is enough room
for the spare tire to fit under the
wheel well.
Page 291 of 361
GMC Canyon/Canyon Denali Owner Manual (GMNA-Localizing-U.S./Canada-
15275607) - 2022 - CRC - 11/2/21
Vehicle Care 289
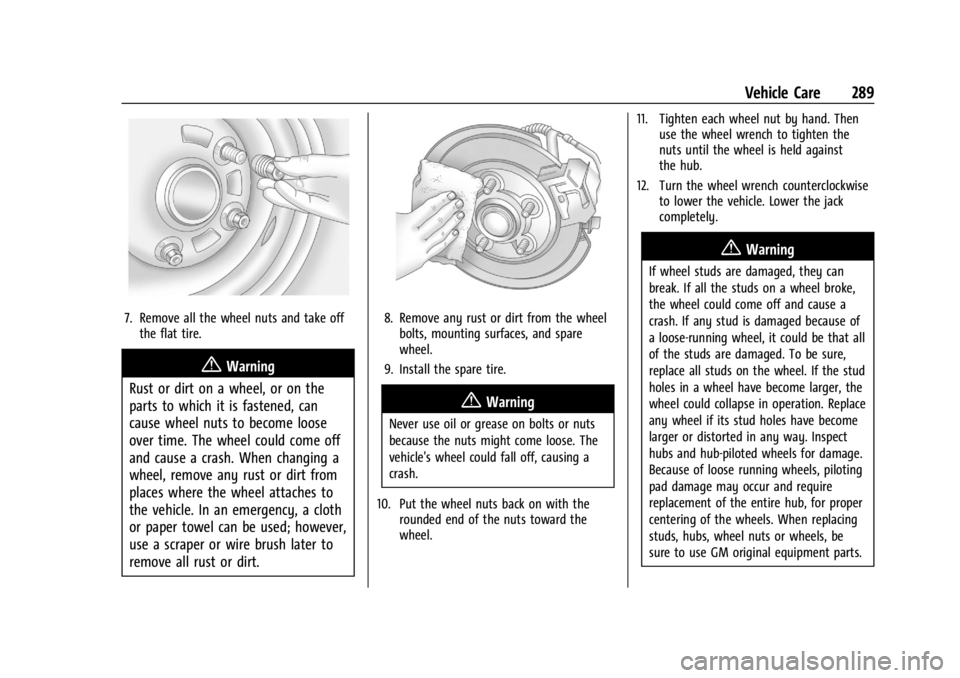
7. Remove all the wheel nuts and take offthe flat tire.
{Warning
Rust or dirt on a wheel, or on the
parts to which it is fastened, can
cause wheel nuts to become loose
over time. The wheel could come off
and cause a crash. When changing a
wheel, remove any rust or dirt from
places where the wheel attaches to
the vehicle. In an emergency, a cloth
or paper towel can be used; however,
use a scraper or wire brush later to
remove all rust or dirt.
8. Remove any rust or dirt from the wheel bolts, mounting surfaces, and spare
wheel.
9. Install the spare tire.
{Warning
Never use oil or grease on bolts or nuts
because the nuts might come loose. The
vehicle's wheel could fall off, causing a
crash.
10. Put the wheel nuts back on with the rounded end of the nuts toward the
wheel. 11. Tighten each wheel nut by hand. Then
use the wheel wrench to tighten the
nuts until the wheel is held against
the hub.
12. Turn the wheel wrench counterclockwise to lower the vehicle. Lower the jack
completely.
{Warning
If wheel studs are damaged, they can
break. If all the studs on a wheel broke,
the wheel could come off and cause a
crash. If any stud is damaged because of
a loose-running wheel, it could be that all
of the studs are damaged. To be sure,
replace all studs on the wheel. If the stud
holes in a wheel have become larger, the
wheel could collapse in operation. Replace
any wheel if its stud holes have become
larger or distorted in any way. Inspect
hubs and hub‐piloted wheels for damage.
Because of loose running wheels, piloting
pad damage may occur and require
replacement of the entire hub, for proper
centering of the wheels. When replacing
studs, hubs, wheel nuts or wheels, be
sure to use GM original equipment parts.