check engine GMC CANYON 2023 Owner's Guide
[x] Cancel search | Manufacturer: GMC, Model Year: 2023, Model line: CANYON, Model: GMC CANYON 2023Pages: 371, PDF Size: 7.41 MB
Page 269 of 371
GMC Canyon/Canyon Denali Owner Manual (GMNA-Localizing-U.S./Canada/
Mexico-16510661) - 2023 - CRC - 11/29/22
268 Vehicle Care
How to Disable the Brake Pad Life
System
The brake pad life system can be turned off.
This may be necessary if aftermarket brake
pads without wear sensors are installed.
When the system is turned off, the front
and rear brake pad life percentages will not
display. However, the built-in wear
indicators that make a high-pitched warning
sound when the brake pads are worn can
still determine when the pads should be
replaced. SeeBrakes0266.
To turn off the brake pad life system: 1. Display Brake Pad Life on the DIC. See Driver Information Center (DIC) (Base
Level) 098 or
Driver Information Center (DIC) (Uplevel)
0 100.
2. Select DISABLE.
To turn the brake pad life system back on,
follow the above steps but select ENABLE in
Step 2.
Brake Fluid
The brake master cylinder reservoir is filled
with GM approved DOT 4 brake fluid as
indicated on the reservoir cap. See Engine
Compartment Overview 0256 for the
location of the reservoir.
Checking Brake Fluid
With the vehicle in P (Park) on a level
surface, the brake fluid level should be
between the minimum and maximum marks
on the brake fluid reservoir.
There are only two reasons why the brake
fluid level in the reservoir may go down:
.Normal brake lining wear. When new
linings are installed, the fluid level goes
back up.
.A fluid leak in the brake hydraulic system.
Have the brake hydraulic system fixed.
With a leak, the brakes will not
work well. Always clean the brake fluid reservoir cap
and the area around the cap before
removing it.
Do not top off the brake fluid. Adding fluid
does not correct a leak. If fluid is added
when the linings are worn, there will be too
much fluid when new brake linings are
installed. Add or remove fluid, as necessary,
only when work is done on the brake
hydraulic system.
{Warning
If too much brake fluid is added, it can
spill on the engine and burn, if the
engine is hot enough. You or others could
be burned, and the vehicle could be
damaged. Add brake fluid only when
work is done on the brake hydraulic
system.
When the brake fluid falls to a low level,
the brake warning light comes on. See Brake
System Warning Light 091.
Brake fluid absorbs water over time which
degrades the effectiveness of the brake fluid.
Replace brake fluid at the specified intervals
to prevent increased stopping distance. See
Maintenance Schedule 0328.
Page 272 of 371
GMC Canyon/Canyon Denali Owner Manual (GMNA-Localizing-U.S./Canada/
Mexico-16510661) - 2023 - CRC - 11/29/22
Vehicle Care 271
Rear Axle
When to Check Lubricant
It is not necessary to regularly check the
rear axle fluid unless a leak is suspected or
an unusual noise is heard. A fluid loss could
indicate a problem. Have it inspected and
repaired. This service can be complex. See
your dealer.
Do not directly power wash the transfer
case and/or front/rear axle output seals.
High pressure water can overcome the seals
and contaminate the fluid. Contaminated
fluid will decrease the life of the transfer
case and/or drive axles and should be
replaced.
Park Brake and P (Park)
Mechanism Check
{Warning
When you are doing this check, the
vehicle could begin to move. You or
others could be injured and property
could be damaged. Make sure there is
room in front of the vehicle in case it(Continued)
Warning (Continued)
begins to roll. Be ready to apply the
regular brake at once should the vehicle
begin to move.
Park on a fairly steep hill, with the vehicle
facing downhill. Keeping your foot on the
regular brake, set the parking brake.
.To check the parking brake's holding
ability: With the engine running and the
transmission in N (Neutral), slowly remove
foot pressure from the regular brake
pedal. Do this until the vehicle is held by
the parking brake only.
.To check the P (Park) mechanism's holding
ability: With the engine running, shift to
P (Park). Then release the parking brake
followed by the regular brake.
Contact your dealer if service is required.
Wiper Blade Replacement
Windshield wiper blades should be inspected
for wear or cracking. Replacement blades come in different types
and are removed in different ways. For
proper windshield wiper blade length and
type, see
Maintenance Replacement Parts
0 333.
Caution
Allowing the wiper arm to touch the
windshield when no wiper blade is
installed could damage the windshield.
Any damage that occurs would not be
covered by the vehicle warranty. Do not
allow the wiper arm to touch the
windshield.
To replace the windshield wiper blade: 1. Pull the windshield wiper assembly away from the windshield.
Page 277 of 371
GMC Canyon/Canyon Denali Owner Manual (GMNA-Localizing-U.S./Canada/
Mexico-16510661) - 2023 - CRC - 11/29/22
276 Vehicle Care
Electrical System
Electrical System Overload
The vehicle has fuses and circuit breakers to
protect against an electrical system
overload.
When the current electrical load is too
heavy, the circuit breaker opens and closes,
protecting the circuit until the current load
returns to normal or the problem is fixed.
This greatly reduces the chance of circuit
overload and fire caused by electrical
problems.
Fuses and circuit breakers protect power
devices in the vehicle.
If there is a problem on the road and a fuse
needs to be replaced, the same amperage
fuse can be borrowed.
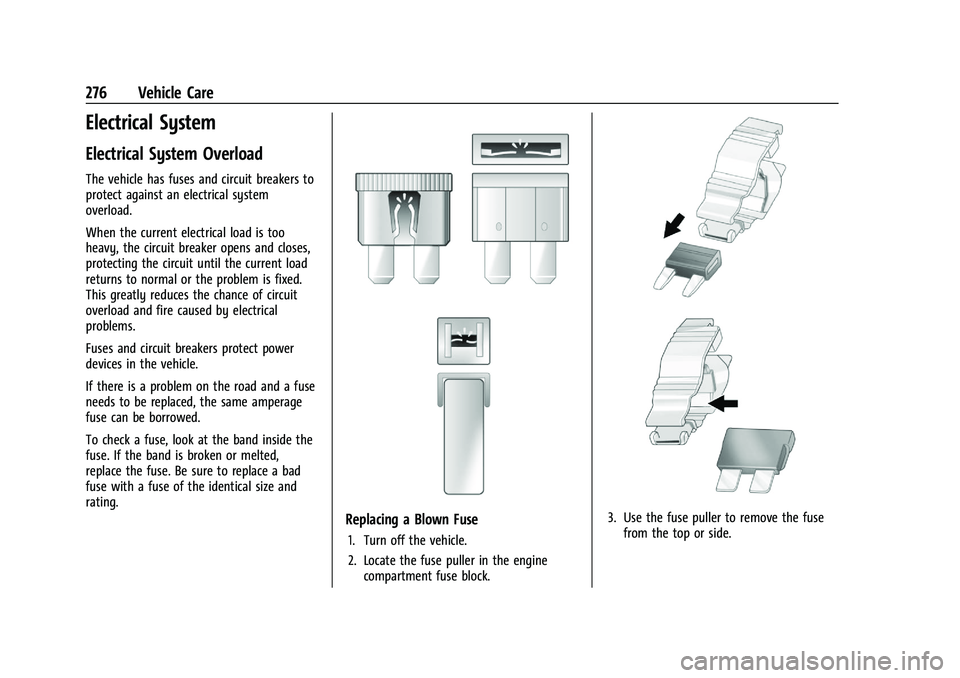
To check a fuse, look at the band inside the
fuse. If the band is broken or melted,
replace the fuse. Be sure to replace a bad
fuse with a fuse of the identical size and
rating.
Replacing a Blown Fuse
1. Turn off the vehicle.
2. Locate the fuse puller in the enginecompartment fuse block.
3. Use the fuse puller to remove the fusefrom the top or side.
Page 278 of 371
GMC Canyon/Canyon Denali Owner Manual (GMNA-Localizing-U.S./Canada/
Mexico-16510661) - 2023 - CRC - 11/29/22
Vehicle Care 277
4. If the fuse must be replacedimmediately, borrow a replacement fuse
with the same amperage from the fuse
block. Choose a vehicle feature that is
not needed to safely operate the vehicle.
Repeat Steps 2-3.
5. Insert the replacement fuse into the empty slot of the blown fuse.
At the next opportunity, see your dealer to
replace the blown fuse.
Headlamp Wiring
An electrical overload may cause the lamps
to go on and off, or in some cases to
remain off. Have the headlamp wiring
checked right away if the lamps go on and
off or remain off.
Windshield Wipers
If the wiper motor overheats due to heavy
snow or ice, the windshield wipers will stop
until the motor cools and will then restart.
Although the circuit is protected from
electrical overload, overload due to heavy
snow or ice may cause wiper linkage
damage. Always clear ice and heavy snow
from the windshield before using the
windshield wipers. If the overload is caused by an electrical
problem and not snow or ice, be sure to get
it fixed.
Fuses and Circuit Breakers
The wiring circuits in the vehicle are
protected from short circuits by a
combination of fuses and circuit breakers.
This greatly reduces the chance of damage
caused by electrical problems.
{Danger
Fuses and circuit breakers are marked
with their ampere rating. Do not exceed
the specified amperage rating when
replacing fuses and circuit breakers. Use
of an oversized fuse or circuit breaker can
result in a vehicle fire. You and others
could be seriously injured or killed.
{Warning
Installation or use of fuses that do not
meet GM’s original fuse specifications is
dangerous. The fuses could fail, and result
in a fire. You or others could be injured
or killed, and the vehicle could be
damaged.
See Accessories and Modifications 0253 and
General Information 0253.
To check or replace a blown fuse, see
Electrical System Overload 0276.
Engine Compartment Fuse Block
The engine compartment fuse block is in the
engine compartment, on the driver side of
the vehicle. See Engine Compartment
Overview 0256
Page 291 of 371
GMC Canyon/Canyon Denali Owner Manual (GMNA-Localizing-U.S./Canada/
Mexico-16510661) - 2023 - CRC - 11/29/22
290 Vehicle Care
molded into the sidewall of the tire.
SeeUniform Tire Quality Grading
0 300.
Vehicle Capacity Weight
:The number
of designated seating positions
multiplied by 68 kg (150 lbs) plus the
rated cargo load. See Vehicle Load
Limits 0162.
Vehicle Maximum Load on the Tire
:
Load on an individual tire due to curb
weight, accessory weight, occupant
weight, and cargo weight.
Vehicle Placard
:A label permanently
attached to a vehicle showing the
vehicle's capacity weight and the
original equipment tire size and
recommended inflation pressure. See
“Tire and Loading Information Label”
under Vehicle Load Limits 0162.
Tire Pressure
Tires need the correct amount of air
pressure to operate effectively.
{Warning
Neither tire underinflation nor
overinflation is good. Underinflated
tires, or tires that do not have
enough air, can result in:
.Tire overloading and overheating,
which could lead to a blowout
.Premature or irregular wear
.Poor handling
.Reduced fuel economy for
internal combustion engine
vehicles
.Reduced range for electric vehicles
Overinflated tires, or tires that have
too much air, can result in:
.Unusual wear
.Poor handling
.Rough ride
.Needless damage from road
hazards The Tire and Loading Information label
on the vehicle indicates the original
equipment tires and the correct cold
tire inflation pressures. The
recommended pressure is the minimum
air pressure needed to support the
vehicle's maximum load carrying
capacity.
For additional information regarding
how much weight the vehicle can carry,
and an example of the Tire and Loading
Information label, see
Vehicle Load
Limits 0162. How the vehicle is loaded
affects vehicle handling and ride
comfort. Never load the vehicle with
more weight than it was designed to
carry.
When to Check
Check the pressure of the tires once a
month or more.
Do not forget the spare, if the vehicle
has one. See Full-Size Spare Tire 0311
for additional information.
Page 314 of 371
GMC Canyon/Canyon Denali Owner Manual (GMNA-Localizing-U.S./Canada/
Mexico-16510661) - 2023 - CRC - 11/29/22
Vehicle Care 313
Warning (Continued)
If you do not follow these steps exactly,
some or all of these things can hurt you.
Caution
Ignoring these steps could result in costly
damage to the vehicle that would not be
covered by the vehicle warranty. Trying
to start the vehicle by pushing or pulling
it will not work, and it could damage the
vehicle.
Caution
If the jumper cables are connected or
removed in the wrong order, electrical
shorting may occur and damage the
vehicle. The repairs would not be covered
by the vehicle warranty. Always connect
and remove the jumper cables in the
correct order, making sure that the cables
do not touch each other or other metal.
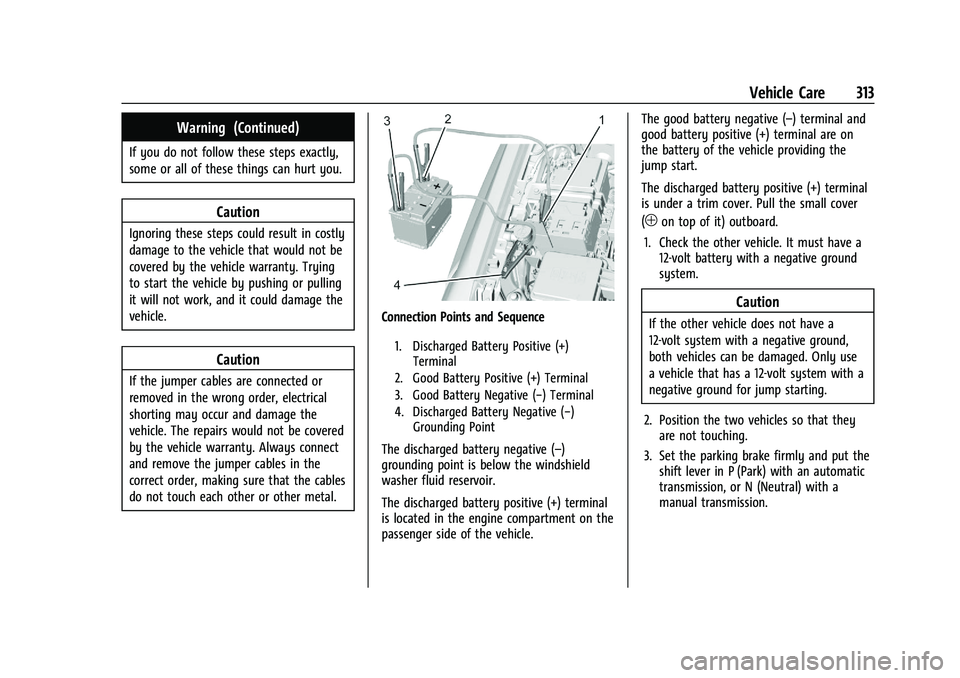
Connection Points and Sequence
1. Discharged Battery Positive (+)Terminal
2. Good Battery Positive (+) Terminal
3. Good Battery Negative (−) Terminal
4. Discharged Battery Negative (−) Grounding Point
The discharged battery negative (–)
grounding point is below the windshield
washer fluid reservoir.
The discharged battery positive (+) terminal
is located in the engine compartment on the
passenger side of the vehicle. The good battery negative (–) terminal and
good battery positive (+) terminal are on
the battery of the vehicle providing the
jump start.
The discharged battery positive (+) terminal
is under a trim cover. Pull the small cover
(
1on top of it) outboard.
1. Check the other vehicle. It must have a 12-volt battery with a negative ground
system.
Caution
If the other vehicle does not have a
12-volt system with a negative ground,
both vehicles can be damaged. Only use
a vehicle that has a 12-volt system with a
negative ground for jump starting.
2. Position the two vehicles so that they are not touching.
3. Set the parking brake firmly and put the shift lever in P (Park) with an automatic
transmission, or N (Neutral) with a
manual transmission.
Page 319 of 371
GMC Canyon/Canyon Denali Owner Manual (GMNA-Localizing-U.S./Canada/
Mexico-16510661) - 2023 - CRC - 11/29/22
318 Vehicle Care
13. Keep the remote key outside of thevehicle and manually lock the doors.
Access the vehicle by using the key in
the door lock. See Door Locks013.
Disconnecting the Towed Vehicle
Before disconnecting from the tow vehicle: 1. Park on a level surface. Secure the vehicle with wheel blocks.
2. Re-connect the negative (–) battery. See Battery - North America 0269.
3. Turn on the ignition without starting the engine. To do this, take your foot off the
brake pedal then press and hold ENGINE
START/STOP for five seconds until the
green light on the button is illuminated.
See Ignition Positions 0167.
4. Set the parking brake. See Electric
Parking Brake 0183.
5. Disconnect from the tow vehicle.
6. Start the vehicle.
7. Shift the transmission to N (Neutral).
8. Shift the transfer case to 2
m(Two-Wheel
Drive High). When the shift to 2
m
(Two-Wheel Drive High) is complete, the
light in the instrument cluster will stop
flashing and stay lit. See
Four-Wheel-Drive Light 092. 9. Check that the vehicle is in 2
m
(Two-Wheel Drive High) by starting the
engine and shifting the transmission to
D (Drive) and then to R (Reverse). There
should be movement of the vehicle while
shifting.
10. Shift the transmission to P (Park) and turn off the vehicle.
11. Release the parking brake and remove the wheel blocks.
12. Reset any lost presets. The outside temperature display will
default to 0 °C (32 °F) but will reset with
normal usage.
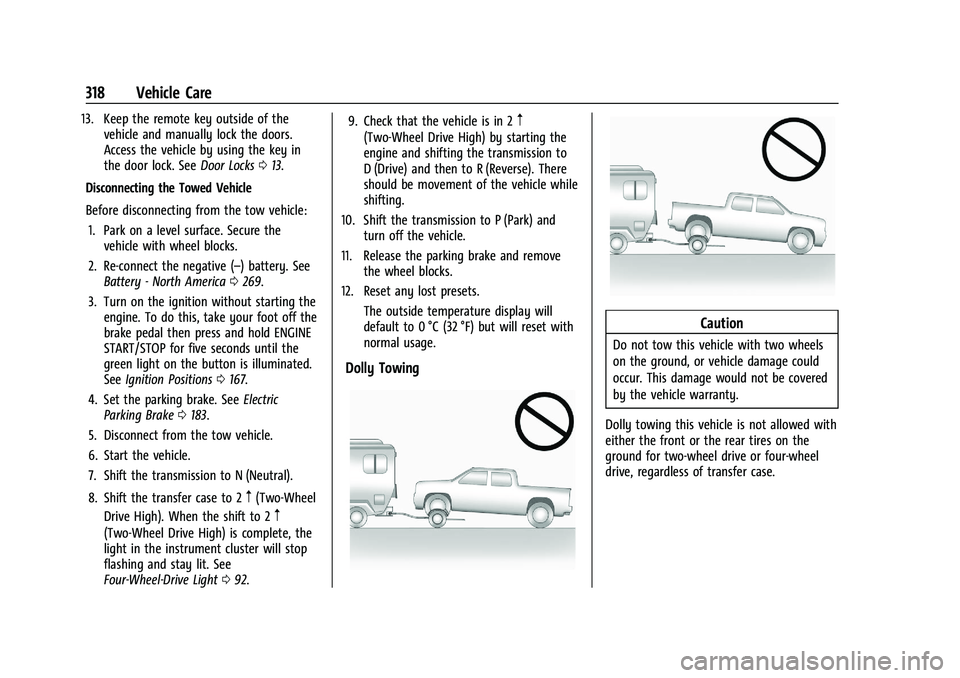
Dolly Towing
Caution
Do not tow this vehicle with two wheels
on the ground, or vehicle damage could
occur. This damage would not be covered
by the vehicle warranty.
Dolly towing this vehicle is not allowed with
either the front or the rear tires on the
ground for two-wheel drive or four-wheel
drive, regardless of transfer case.
Page 329 of 371
GMC Canyon/Canyon Denali Owner Manual (GMNA-Localizing-U.S./Canada/
Mexico-16510661) - 2023 - CRC - 11/29/22
328 Service and Maintenance
Because of the way people use vehicles,
maintenance needs vary. There may need to
be more frequent checks and services. The
Additional Required Services - Normal are for
vehicles that:
.Carry passengers and cargo within
recommended limits on the Tire and
Loading Information label. SeeVehicle
Load Limits 0162.
.Are driven on reasonable road surfaces
within legal driving limits.
.Use the recommended fuel. See
Recommended Fuel 0224.
Refer to the information in the Maintenance
Schedule Additional Required Services -
Normal Service.
The Additional Required Services - Severe are
for vehicles that are:
.Mainly driven in heavy city traffic in hot
weather.
.Mainly driven in hilly or mountainous
terrain.
.Frequently towing a trailer.
.Used for high speed or competitive
driving.
.Used for taxi, police, or delivery service. Refer to the information in the Maintenance
Schedule Additional Required Services -
Severe Service.
{Warning
Performing maintenance work can be
dangerous and can cause serious injury.
Perform maintenance work only if the
required information, proper tools, and
equipment are available. If they are not,
see your dealer to have a trained
technician do the work. See
Doing Your
Own Service Work 0254.
Maintenance Schedule
Tire Rotation and Required Services
Every 12 000 km (7,500 mi)
Tires are rotated to achieve a more uniform
wear for all tires. The first rotation is the
most important.
Anytime unusual wear is noticed, rotate the
tires as soon as possible, check for proper
tire inflation pressure, and check for
damaged tires or wheels. If the unusual
wear continues after the rotation, check the wheel alignment. See
When It Is Time for
New Tires 0297 and
Wheel Replacement 0301.
.Perform Multi-Point Vehicle Inspection.
See Multi-Point Vehicle Inspection (MPVI)
0 330.
.Lubricate body components. See Exterior
Care 0319.
Extended Idle Use
When the vehicle is used in a way that
requires extended idle time, one hour of use
shall be deemed the same as 33 miles. See
Driver Information Center (DIC) (Base Level)
098 or
Driver Information Center (DIC) (Uplevel)
0 100 for hourmeter.
Additional Required Services —Normal
Service
Every 12 000 km (7,500 mi)
.Check engine oil level and oil
life percentage. If needed, change engine
oil and filter, and reset oil life system. Or
when the CHANGE ENGINE OIL SOON
message displays, have the engine oil
and filter changed within the next
1 000 km/600 mi. If driven under the best
conditions, the engine oil life system may
Page 331 of 371
GMC Canyon/Canyon Denali Owner Manual (GMNA-Localizing-U.S./Canada/
Mexico-16510661) - 2023 - CRC - 11/29/22
330 Service and Maintenance
* Footnote: Under extreme driving
conditions listed above, it may be
necessary to replace your spark plugs at
more frequent intervals. For further
assistance in determining the most
suitable service maintenance intervals for
your vehicle, please contact your
authorized GM Dealer.
Extreme service is for vehicles mainly
driven off-road in four-wheel drive or used
in farming, mining, forestry, or snow
plowing.
Additional Required Services—Severe
Service
Every 72 000 km (45,000 mi)
.Change automatic transmission fluid and
filter.
Every 80 500 km (50,000 mi)
.Change transfer case fluid, if equipped
with 4WD. Do not directly power wash
the transfer case and/or front/rear axle
output seals. High pressure water can
overcome the seals and contaminate the
transfer case fluid. Contaminated fluid
will decrease the life of the transfer case
and/or axles and should be replaced.
Owner Checks and Services
Every Five Years
.Replace brake fluid.
Every Seven Years
.Replace Air Conditioning Desiccant every
seven years. The air conditioning system
requires maintenance every seven years.
This service requires replacement of the
desiccant to help the longevity and
efficient operation of the air conditioning
system. This service can be complex. See
your dealer.
Multi-Point Vehicle
Inspection (MPVI)
A Multi Point Vehicle Inspection (MPVI)
completed by a GM dealer technician is a
maintenance assessment of your vehicle.
The benefit of the MPVI is to identify and
inform the customer of service items that
require immediate attention and those that
may require attention in the future. The technician will perform the following
checks on your vehicle. For a complete list
of checks, inspections, and services, see your
dealer.
Some items may not apply to your vehicle
and/or region.
Diagnostics
.OnStar active, if equipped
.Service history/recall check
Engine Oil and Filter
.Engine oil
.Oil life monitor
‐
Reset oil life monitor
Exterior Lights
.Visual inspection
Windshield and Wipers
.Visual inspection
Battery
.Battery visual inspection
.Battery test results
.Battery cables and connections
Page 332 of 371
GMC Canyon/Canyon Denali Owner Manual (GMNA-Localizing-U.S./Canada/
Mexico-16510661) - 2023 - CRC - 11/29/22
Service and Maintenance 331
Systems, Fluids, and Visible Leak
Inspection
.Engine oil
.Transmission
.Drive axle
.Transfer case
.Engine cooling system
.Power steering, if equipped
.Fuel system
.Windshield washer fluid
Tire Inspection
.Tire pressure, tread depth, and wear
.Rotation, if applicable
.Alignment check, optional
.Reset tire pressure monitor
.Check tire sealant expiration date,
if equipped
.Check spare tire, if equipped
Brakes
.Check brake system
Visible and Functional Inspections
.Seat belt components
.Exhaust system
.Accelerator pedal
.Passenger compartment air filter,
if equipped
.Engine air filter
.Hoses
.Belts
.Shocks and struts
.Steering components
.Axle boots or driveshaft and u-joints
.Compartment lift struts, if equipped
.Floor mats secured, no interference with
pedals
.Horn
.Ignition lock, if equipped
.Starter switch
.Evaporative control system
Lubricate
.Chassis components
Special Application Services
.Severe Commercial Use Vehicles Only:
Lubricate chassis components every oil
change.
.Have underbody flushing service
performed. See "Underbody Maintenance"
in Exterior Care 0319.