tow GMC CANYON 2023 Owners Manual
[x] Cancel search | Manufacturer: GMC, Model Year: 2023, Model line: CANYON, Model: GMC CANYON 2023Pages: 371, PDF Size: 7.41 MB
Page 6 of 371
GMC Canyon/Canyon Denali Owner Manual (GMNA-Localizing-U.S./Canada/
Mexico-16510661) - 2023 - CRC - 11/29/22
Introduction 5
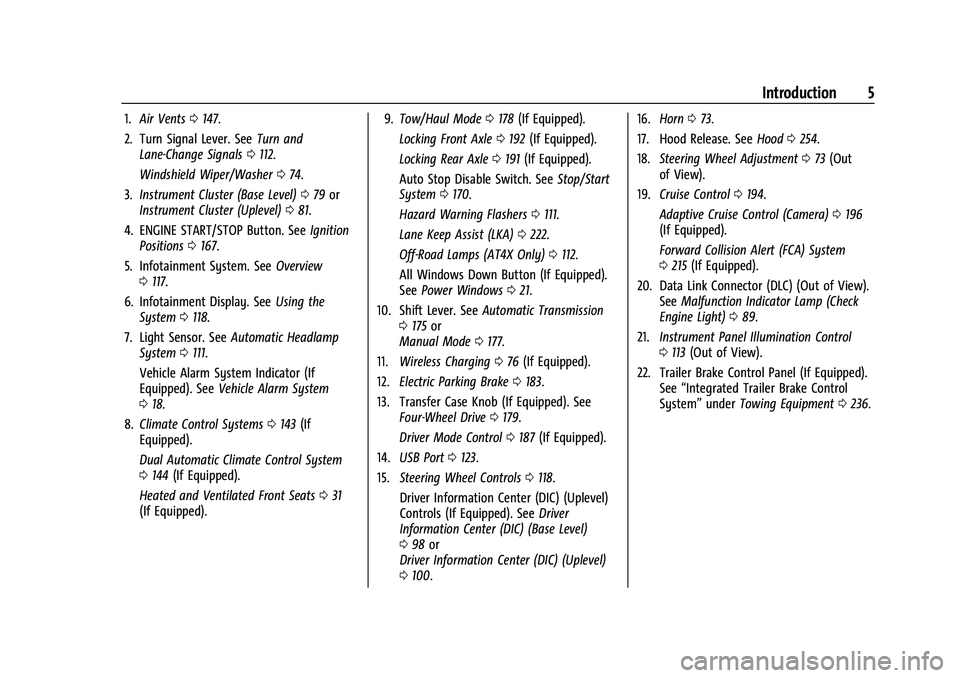
1.Air Vents 0147.
2. Turn Signal Lever. See Turn and
Lane-Change Signals 0112.
Windshield Wiper/Washer 074.
3. Instrument Cluster (Base Level) 079 or
Instrument Cluster (Uplevel) 081.
4. ENGINE START/STOP Button. See Ignition
Positions 0167.
5. Infotainment System. See Overview
0 117.
6. Infotainment Display. See Using the
System 0118.
7. Light Sensor. See Automatic Headlamp
System 0111.
Vehicle Alarm System Indicator (If
Equipped). See Vehicle Alarm System
0 18.
8. Climate Control Systems 0143 (If
Equipped).
Dual Automatic Climate Control System
0 144 (If Equipped).
Heated and Ventilated Front Seats 031
(If Equipped). 9.
Tow/Haul Mode 0178 (If Equipped).
Locking Front Axle 0192 (If Equipped).
Locking Rear Axle 0191 (If Equipped).
Auto Stop Disable Switch. See Stop/Start
System 0170.
Hazard Warning Flashers 0111.
Lane Keep Assist (LKA) 0222.
Off-Road Lamps (AT4X Only) 0112.
All Windows Down Button (If Equipped).
See Power Windows 021.
10. Shift Lever. See Automatic Transmission
0 175 or
Manual Mode 0177.
11. Wireless Charging 076 (If Equipped).
12. Electric Parking Brake 0183.
13. Transfer Case Knob (If Equipped). See Four-Wheel Drive 0179.
Driver Mode Control 0187 (If Equipped).
14. USB Port 0123.
15. Steering Wheel Controls 0118.
Driver Information Center (DIC) (Uplevel)
Controls (If Equipped). See Driver
Information Center (DIC) (Base Level)
0 98 or
Driver Information Center (DIC) (Uplevel)
0 100. 16.
Horn 073.
17. Hood Release. See Hood0254.
18. Steering Wheel Adjustment 073 (Out
of View).
19. Cruise Control 0194.
Adaptive Cruise Control (Camera) 0196
(If Equipped).
Forward Collision Alert (FCA) System
0 215 (If Equipped).
20. Data Link Connector (DLC) (Out of View). SeeMalfunction Indicator Lamp (Check
Engine Light) 089.
21. Instrument Panel Illumination Control
0113 (Out of View).
22. Trailer Brake Control Panel (If Equipped). See“Integrated Trailer Brake Control
System” underTowing Equipment 0236.
Page 21 of 371
GMC Canyon/Canyon Denali Owner Manual (GMNA-Localizing-U.S./Canada/
Mexico-16510661) - 2023 - CRC - 11/29/22
20 Keys, Doors, and Windows
Folding Mirrors
Manual Folding Mirrors
If equipped, push the mirror towards the
vehicle to fold. Push the mirror outward to
return to its original position.
Manually fold the mirrors inward to prevent
damage when going through a car wash.
Heated Mirrors
If your vehicle is equipped with heated
mirrors,
0will be present on both side
mirrors. The symbol does not illuminate
when heat is active.
If equipped, the rear window defogger also
heats the outside mirrors.
K: Press to heat the outside mirrors. See
“Rear Window Defogger” underDual
Automatic Climate Control System 0144.
Remote Vehicle Start
The rear window defogger and heated
mirrors, if equipped, turn on when the
vehicle is started using the remote key
during colder outside temperatures.
Interior Mirrors
Interior Rearview Mirrors
Adjust the rearview mirror for a clear view
of the area behind the vehicle.
Do not spray glass cleaner directly on the
mirror. Use a soft towel dampened with
water.
Manual Rearview Mirror
If equipped, push the tab forward for
daytime use and pull it rearward for
nighttime use to avoid glare from the
headlamps from behind.
Automatic Dimming Rearview
Mirror
If equipped, the mirror will automatically
reduce the glare of the headlamps from
behind. The dimming feature comes on each
time the vehicle is started.
Windows
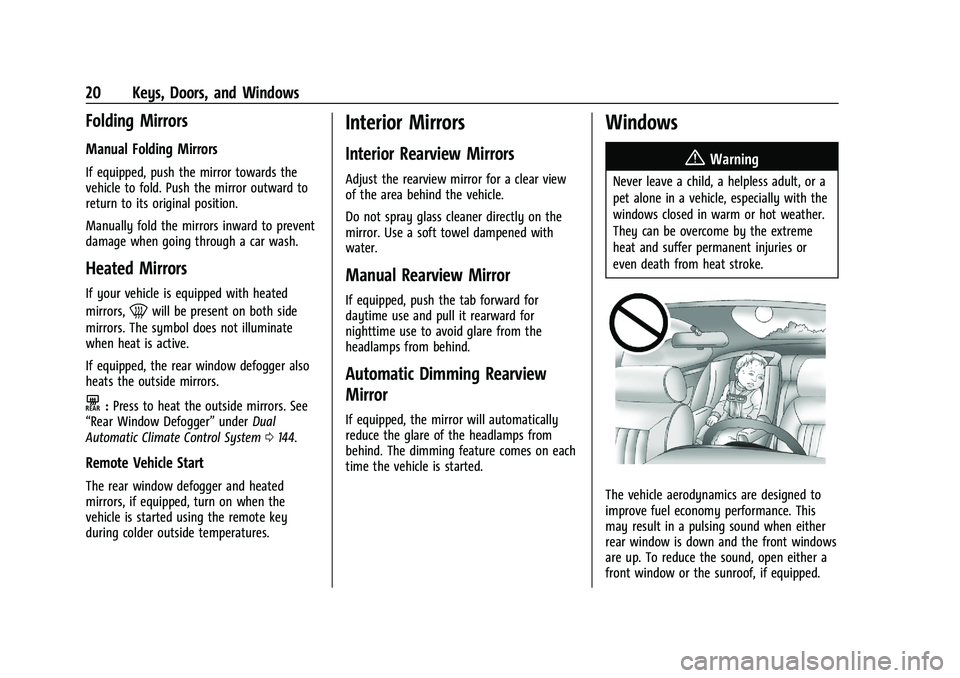
{
Warning
Never leave a child, a helpless adult, or a
pet alone in a vehicle, especially with the
windows closed in warm or hot weather.
They can be overcome by the extreme
heat and suffer permanent injuries or
even death from heat stroke.
The vehicle aerodynamics are designed to
improve fuel economy performance. This
may result in a pulsing sound when either
rear window is down and the front windows
are up. To reduce the sound, open either a
front window or the sunroof, if equipped.
Page 33 of 371
GMC Canyon/Canyon Denali Owner Manual (GMNA-Localizing-U.S./Canada/
Mexico-16510661) - 2023 - CRC - 11/29/22
32 Seats and Restraints
Remote Start Heated and Ventilated Seats
If equipped, the heated seats will turn on
automatically during a remote start if it is
cold outside and the ventilated seats will
turn on automatically if it is hot outside.
If equipped, the heated steering wheel will
turn on automatically during a remote start
if it is cold outside. The heated and
ventilated seat indicators and heated
steering wheel indicator may not come on
during this operation.
The heated and ventilated seats and heated
steering wheel may cancel when the vehicle
is started. These features can be manually
selected after the ignition is turned on.
The temperature performance of an
unoccupied seat may be reduced. This is
normal.
To enable or disable remote start heated or
ventilated seats, select Settings > Vehicle >
Remote Lock, Unlock, and Start > Remote
Start Auto Heat Seats or Remote Start Auto
Cool Seats > ON or OFF. SeeRemote Vehicle
Start 012.Rear Seats
Rear Seat Reminder
If equipped, the message REAR SEAT
REMINDER LOOK IN REAR SEAT displays
under certain conditions indicating there
may be an item or passenger in the rear
seat. Check before exiting the vehicle.
This feature will activate when a second row
door is opened while the vehicle is on or up
to 10 minutes before the vehicle is turned
on. There will be an alert when the vehicle
is turned off. The alert does not directly
detect objects in the rear seat; instead,
under certain conditions, it detects when a
rear door is opened and closed, indicating
that there may be something in the
rear seat.
The feature is active only once each time
the vehicle is turned on and off, and will
require reactivation by opening and closing
the second row doors. There may be an
alert even when there is nothing in the rear
seat; for example, if a child entered the
vehicle through the rear door and left the
vehicle without the vehicle being shut off. The feature can be turned on or off. Select
Settings > Vehicle > Rear Seat Reminder >
ON or OFF.Folding the Rear Seat Cushion
Either side of the rear seat cushion can be
folded up for added cargo space.
Caution
Folding a rear seat with the seat belts
still fastened may cause damage to the
seat or the seat belts. Always unbuckle
the seat belts and return them to their
normal stowed position before folding a
rear seat.
Make sure that nothing is on the seat
cushion.
Page 38 of 371
GMC Canyon/Canyon Denali Owner Manual (GMNA-Localizing-U.S./Canada/
Mexico-16510661) - 2023 - CRC - 11/29/22
Seats and Restraints 37
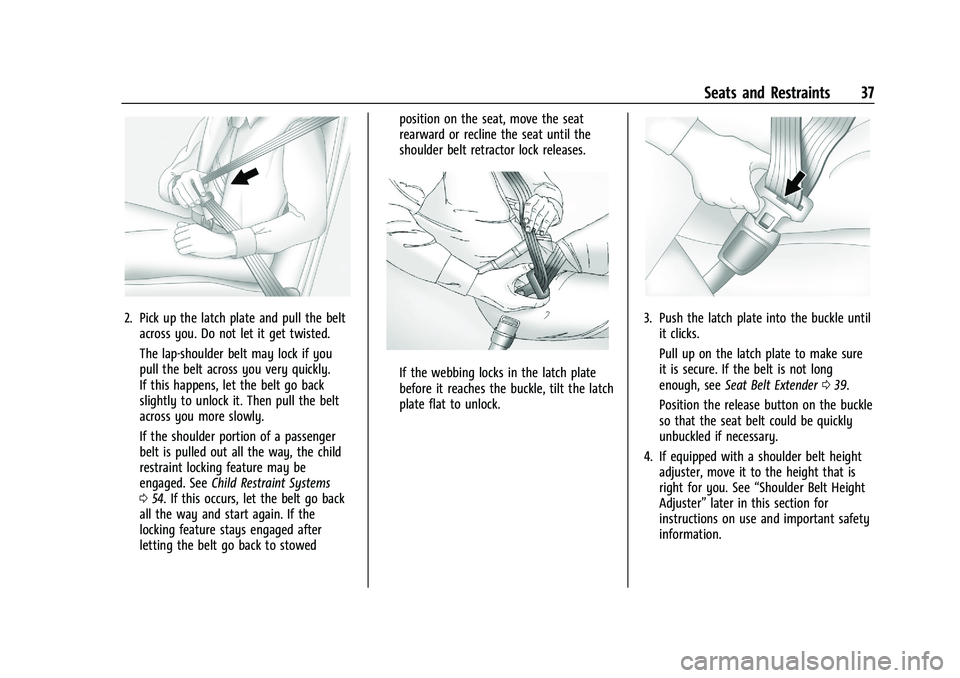
2. Pick up the latch plate and pull the beltacross you. Do not let it get twisted.
The lap-shoulder belt may lock if you
pull the belt across you very quickly.
If this happens, let the belt go back
slightly to unlock it. Then pull the belt
across you more slowly.
If the shoulder portion of a passenger
belt is pulled out all the way, the child
restraint locking feature may be
engaged. See Child Restraint Systems
0 54. If this occurs, let the belt go back
all the way and start again. If the
locking feature stays engaged after
letting the belt go back to stowed position on the seat, move the seat
rearward or recline the seat until the
shoulder belt retractor lock releases.
If the webbing locks in the latch plate
before it reaches the buckle, tilt the latch
plate flat to unlock.
3. Push the latch plate into the buckle until
it clicks.
Pull up on the latch plate to make sure
it is secure. If the belt is not long
enough, see Seat Belt Extender 039.
Position the release button on the buckle
so that the seat belt could be quickly
unbuckled if necessary.
4. If equipped with a shoulder belt height adjuster, move it to the height that is
right for you. See “Shoulder Belt Height
Adjuster” later in this section for
instructions on use and important safety
information.
Page 39 of 371
GMC Canyon/Canyon Denali Owner Manual (GMNA-Localizing-U.S./Canada/
Mexico-16510661) - 2023 - CRC - 11/29/22
38 Seats and Restraints
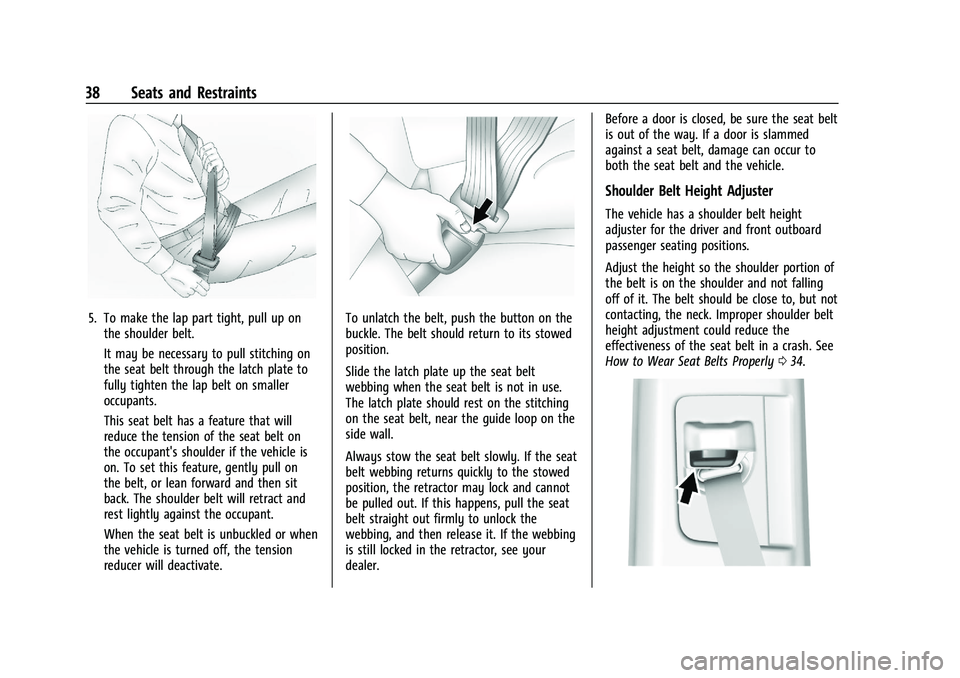
5. To make the lap part tight, pull up onthe shoulder belt.
It may be necessary to pull stitching on
the seat belt through the latch plate to
fully tighten the lap belt on smaller
occupants.
This seat belt has a feature that will
reduce the tension of the seat belt on
the occupant's shoulder if the vehicle is
on. To set this feature, gently pull on
the belt, or lean forward and then sit
back. The shoulder belt will retract and
rest lightly against the occupant.
When the seat belt is unbuckled or when
the vehicle is turned off, the tension
reducer will deactivate.To unlatch the belt, push the button on the
buckle. The belt should return to its stowed
position.
Slide the latch plate up the seat belt
webbing when the seat belt is not in use.
The latch plate should rest on the stitching
on the seat belt, near the guide loop on the
side wall.
Always stow the seat belt slowly. If the seat
belt webbing returns quickly to the stowed
position, the retractor may lock and cannot
be pulled out. If this happens, pull the seat
belt straight out firmly to unlock the
webbing, and then release it. If the webbing
is still locked in the retractor, see your
dealer. Before a door is closed, be sure the seat belt
is out of the way. If a door is slammed
against a seat belt, damage can occur to
both the seat belt and the vehicle.
Shoulder Belt Height Adjuster
The vehicle has a shoulder belt height
adjuster for the driver and front outboard
passenger seating positions.
Adjust the height so the shoulder portion of
the belt is on the shoulder and not falling
off of it. The belt should be close to, but not
contacting, the neck. Improper shoulder belt
height adjustment could reduce the
effectiveness of the seat belt in a crash. See
How to Wear Seat Belts Properly
034.
Page 45 of 371
GMC Canyon/Canyon Denali Owner Manual (GMNA-Localizing-U.S./Canada/
Mexico-16510661) - 2023 - CRC - 11/29/22
44 Seats and Restraints
Seat-mounted side impact airbags are
designed to inflate in moderate to severe
side crashes depending on the location of
the impact. These airbags may also inflate
in some moderate to severe frontal impacts.
Seat-mounted side impact airbags are not
designed to inflate in rollovers or rear
impacts. A seat-mounted side impact airbag
is designed to inflate on the side of the
vehicle that is struck.
Roof-rail airbags are designed to inflate in
moderate to severe side crashes depending
on the location of the impact. In addition,
these roof-rail airbags may inflate during a
rollover or in a severe frontal impact.
Roof-rail airbags are not designed to inflate
in rear impacts. Both roof-rail airbags may
inflate when either side of the vehicle is
struck or if the sensing system predicts that
the vehicle is about to roll over on its side,
or in a severe frontal impact.
In any particular crash, no one can say
whether an airbag should have inflated
simply because of the vehicle damage or
repair costs.What Makes an Airbag Inflate?
In a deployment event, the sensing system
sends an electrical signal triggering a release
of gas from the inflator. Gas from the
inflator fills the airbag causing the bag to
break out of the cover. The inflator, the
airbag, and related hardware are all part of
the airbag module.
For airbag locations, seeWhere Are the
Airbags? 042.
How Does an Airbag Restrain?
In moderate to severe frontal or near frontal
collisions, even belted occupants can contact
the steering wheel or the instrument panel.
In moderate to severe side collisions, even
belted occupants can contact the inside of
the vehicle.
Airbags supplement the protection provided
by seat belts by distributing the force of the
impact more evenly over the
occupant's body.
Rollover capable roof-rail airbags are
designed to help contain the head and chest
of occupants in the outboard seating
positions in the first and second rows. The
rollover capable roof-rail airbags are designed to help reduce the risk of full or
partial ejection in rollover events, although
no system can prevent all such ejections.
But airbags would not help in many types
of collisions, primarily because the
occupant's motion is not toward those
airbags. See
When Should an Airbag Inflate?
0 43.
Airbags should never be regarded as
anything more than a supplement to seat
belts.What Will You See after an
Airbag Inflates?
After frontal and seat-mounted side impact
airbags inflate, they quickly deflate, so
quickly that some people may not even
realize the airbags inflated. Roof-rail airbags
may still be at least partially inflated for
some time after they inflate. Some
components of the airbag module may be
hot for several minutes. For location of the
airbags, see Where Are the Airbags? 042.
The parts of the airbag that come into
contact with you may be warm, but not too
hot to touch. There may be some smoke
and dust coming from the vents in the
deflated airbags. Airbag inflation does not
Page 50 of 371
GMC Canyon/Canyon Denali Owner Manual (GMNA-Localizing-U.S./Canada/
Mexico-16510661) - 2023 - CRC - 11/29/22
Seats and Restraints 49
approved by GM for your specific vehicle.
SeeAdding Equipment to the
Airbag-Equipped Vehicle 049 for more
information about modifications that can
affect how the system operates.
The ON indicator may be lit if an object,
such as a briefcase, handbag, grocery bag,
laptop, or other electronic device, is put on
an unoccupied seat. If this is not desired
remove the object from the seat.
{Warning
Stowing articles under the passenger seat
or between the passenger seat cushion
and seatback may interfere with the
proper operation of the passenger
sensing system.
Servicing the Airbag-Equipped
Vehicle
Airbags affect how the vehicle should be
serviced. There are parts of the airbag
system in several places around the vehicle.
Your dealer and the service manual have
information about servicing the vehicle and
the airbag system. To purchase a service
manual, see Publication Ordering
Information 0345.
{Warning
For up to 10 seconds after the vehicle is
turned off and the battery is
disconnected, an airbag can still inflate
during improper service. You can be
injured if you are close to an airbag
when it inflates. Avoid yellow connectors.
They are probably part of the airbag
system. Be sure to follow proper service
procedures, and make sure the person
performing work for you is qualified to
do so.
Adding Equipment to the
Airbag-Equipped Vehicle
{Warning
If a snow plow or similar equipment is
installed on the vehicle, the airbag
system may not function properly. An
airbag could inflate when it is not
supposed to inflate. People riding in the
vehicle could be injured, and the vehicle
and/or snow plow could be damaged. Do
not install a snow plow or similar
equipment on the vehicle. Adding accessories that change the vehicle's
frame, bumper system, height, front end,
or side sheet metal may keep the airbag
system from working properly.
The operation of the airbag system can also
be affected by changing, including
improperly repairing or replacing, any parts
of the following:
.Airbag system, including airbag modules,
front or side impact sensors, sensing and
diagnostic module, or airbag wiring
.Front seats, including stitching, seams,
or zippers
.Seat belts
.Steering wheel, instrument panel,
overhead console, ceiling trim, or pillar
garnish trim
.Inner door seals, including speakers
Your dealer and the service manual have
information about the location of the airbag
modules and sensors, sensing and diagnostic
module, and airbag wiring along with the
proper replacement procedures.
In addition, the vehicle has a passenger
sensing system for the front outboard
passenger position, which includes sensors
that are part of the passenger seat. The
passenger sensing system may not operate
Page 62 of 371
GMC Canyon/Canyon Denali Owner Manual (GMNA-Localizing-U.S./Canada/
Mexico-16510661) - 2023 - CRC - 11/29/22
Seats and Restraints 61
Warning (Continued)
either the LATCH anchors or the vehicle
seat belt. Follow the instructions that
came with the child restraint and the
instructions in this manual.
{Warning
Do not attach more than one child
restraint to a single anchor, except for
the center top tether anchors in the crew
cab models. Attaching more than one
child restraint to a single anchor could
cause the anchor or attachment to come
loose or even break during a crash.
A child or others could be injured. To
reduce the risk of serious or fatal injuries
during a crash, attach only one child
restraint per anchor.
{Warning
Children can be seriously injured or
strangled if a shoulder belt is wrapped
around their neck. The shoulder belt can
tighten but cannot be loosened if it is(Continued)
Warning (Continued)
locked. The shoulder belt locks when it is
pulled all the way out of the retractor.
It unlocks when the shoulder belt is
allowed to go all the way back into the
retractor, but it cannot do this if it is
wrapped around a child’s neck. If the
shoulder belt is locked and tightened
around a child’s neck, the only way to
loosen the belt is to cut it.
Buckle any unused seat belts behind the
child restraint so children cannot reach
them. Pull the shoulder belt all the way
out of the retractor to set the lock, and
tighten the belt behind the child restraint
after the child restraint has been
installed.
Caution
Do not let the LATCH attachments rub
against the vehicle’s seat belts. This may
damage these parts. If necessary, move
buckled seat belts to avoid rubbing the
LATCH attachments.
(Continued)
Caution (Continued)
Do not fold the rear seat cushion when
the seat is occupied. Do not fold the
empty rear seat with a seat belt buckled.
This could damage the seat belt or the
seat. Unbuckle and return the seat belt to
its stowed position, before folding
the seat.
If you need to secure more than one child
restraint in the rear seat, see Where to Put
the Restraint 056.
1. Attach and tighten the lower attachments to the lower anchors. If the
child restraint does not have lower
attachments or the desired seating
position does not have lower anchors,
secure the child restraint with the top
tether and the seat belt. Refer to the
child restraint manufacturer instructions
and the instructions in this manual.
1.1. Find the lower anchors for the desired seating position.
1.2. Put the child restraint on the seat.
1.3. Attach and tighten the lower attachments on the child restraint
to the lower anchors.
Page 68 of 371
GMC Canyon/Canyon Denali Owner Manual (GMNA-Localizing-U.S./Canada/
Mexico-16510661) - 2023 - CRC - 11/29/22
Seats and Restraints 67
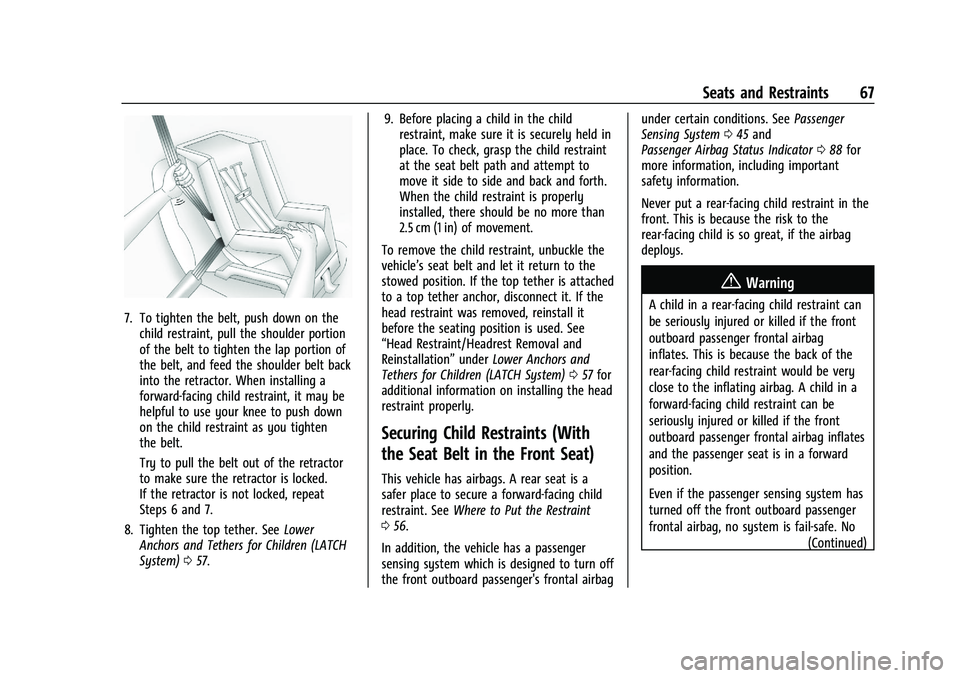
7. To tighten the belt, push down on thechild restraint, pull the shoulder portion
of the belt to tighten the lap portion of
the belt, and feed the shoulder belt back
into the retractor. When installing a
forward-facing child restraint, it may be
helpful to use your knee to push down
on the child restraint as you tighten
the belt.
Try to pull the belt out of the retractor
to make sure the retractor is locked.
If the retractor is not locked, repeat
Steps 6 and 7.
8. Tighten the top tether. See Lower
Anchors and Tethers for Children (LATCH
System) 057. 9. Before placing a child in the child
restraint, make sure it is securely held in
place. To check, grasp the child restraint
at the seat belt path and attempt to
move it side to side and back and forth.
When the child restraint is properly
installed, there should be no more than
2.5 cm (1 in) of movement.
To remove the child restraint, unbuckle the
vehicle’s seat belt and let it return to the
stowed position. If the top tether is attached
to a top tether anchor, disconnect it. If the
head restraint was removed, reinstall it
before the seating position is used. See
“Head Restraint/Headrest Removal and
Reinstallation” underLower Anchors and
Tethers for Children (LATCH System) 057 for
additional information on installing the head
restraint properly.
Securing Child Restraints (With
the Seat Belt in the Front Seat)
This vehicle has airbags. A rear seat is a
safer place to secure a forward-facing child
restraint. See Where to Put the Restraint
0 56.
In addition, the vehicle has a passenger
sensing system which is designed to turn off
the front outboard passenger's frontal airbag under certain conditions. See
Passenger
Sensing System 045 and
Passenger Airbag Status Indicator 088 for
more information, including important
safety information.
Never put a rear-facing child restraint in the
front. This is because the risk to the
rear-facing child is so great, if the airbag
deploys.
{Warning
A child in a rear-facing child restraint can
be seriously injured or killed if the front
outboard passenger frontal airbag
inflates. This is because the back of the
rear-facing child restraint would be very
close to the inflating airbag. A child in a
forward-facing child restraint can be
seriously injured or killed if the front
outboard passenger frontal airbag inflates
and the passenger seat is in a forward
position.
Even if the passenger sensing system has
turned off the front outboard passenger
frontal airbag, no system is fail-safe. No
(Continued)
Page 70 of 371
GMC Canyon/Canyon Denali Owner Manual (GMNA-Localizing-U.S./Canada/
Mexico-16510661) - 2023 - CRC - 11/29/22
Seats and Restraints 69
Position the release button on the
buckle, away from the child restraint, so
that the seat belt could be quickly
unbuckled if necessary.
5. Pull the shoulder belt all the way out ofthe retractor to set the lock. When the
retractor lock is set, the belt can be
tightened but not pulled out of the
retractor.
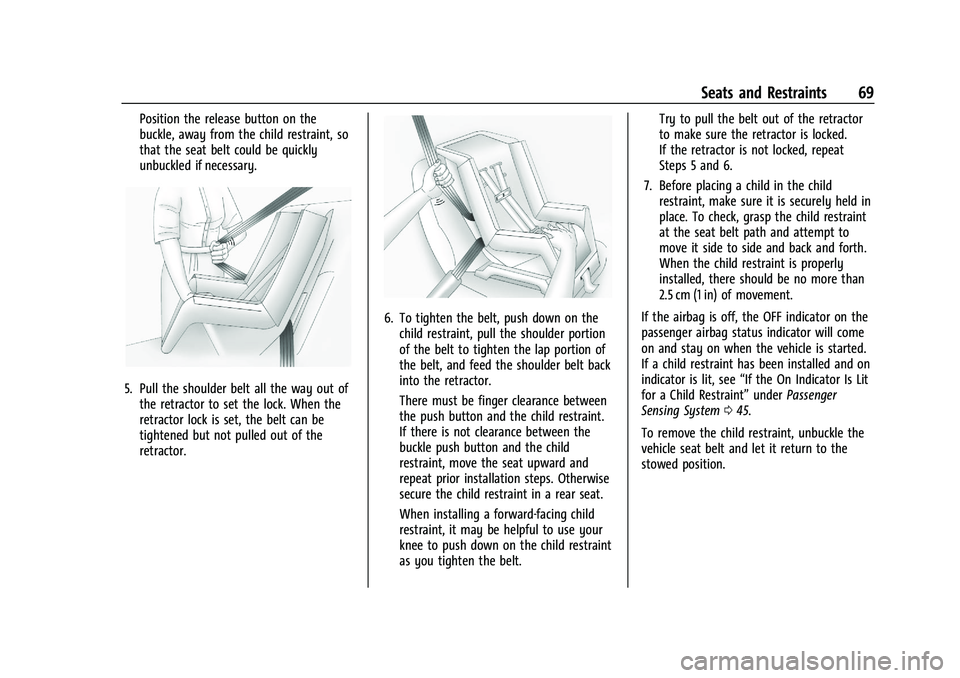
6. To tighten the belt, push down on thechild restraint, pull the shoulder portion
of the belt to tighten the lap portion of
the belt, and feed the shoulder belt back
into the retractor.
There must be finger clearance between
the push button and the child restraint.
If there is not clearance between the
buckle push button and the child
restraint, move the seat upward and
repeat prior installation steps. Otherwise
secure the child restraint in a rear seat.
When installing a forward-facing child
restraint, it may be helpful to use your
knee to push down on the child restraint
as you tighten the belt. Try to pull the belt out of the retractor
to make sure the retractor is locked.
If the retractor is not locked, repeat
Steps 5 and 6.
7. Before placing a child in the child restraint, make sure it is securely held in
place. To check, grasp the child restraint
at the seat belt path and attempt to
move it side to side and back and forth.
When the child restraint is properly
installed, there should be no more than
2.5 cm (1 in) of movement.
If the airbag is off, the OFF indicator on the
passenger airbag status indicator will come
on and stay on when the vehicle is started.
If a child restraint has been installed and on
indicator is lit, see “If the On Indicator Is Lit
for a Child Restraint” underPassenger
Sensing System 045.
To remove the child restraint, unbuckle the
vehicle seat belt and let it return to the
stowed position.