Brake system GMC ENVOY 2003 Owner's Manual
[x] Cancel search | Manufacturer: GMC, Model Year: 2003, Model line: ENVOY, Model: GMC ENVOY 2003Pages: 442, PDF Size: 3.1 MB
Page 65 of 442
CAUTION: (Continued)
breathing trouble. To avoid this, everyone in
the vehicle should get out as soon as it is safe
to do so. If you have breathing problems but
can't get out of the vehicle after an air bag
in¯ates, then get fresh air by opening a
window or a door. If you experience breathing
problems following an air bag deployment, you
should seek medical attention.
Your vehicle has a feature that will automatically unlock
the doors and turn the interior lamps on when the air
bags in¯ate (if battery power is available). You can lock
the doors again and turn the interior lamps off by
using the door lock and interior lamp controls.
In many crashes severe enough to in¯ate an air bag,
windshields are broken by vehicle deformation.
Additional windshield breakage may also occur from the
right front passenger air bag.
·Air bags are designed to in¯ate only once. After an
air bag in¯ates, you'll need some new parts for
your air bag system. If you don't get them, the air
bag system won't be there to help protect you
in another crash. A new system will include air bagmodules and possibly other parts. The service
manual for your vehicle covers the need to replace
other parts.
·Your vehicle is equipped with an electronic frontal
sensor, which helps the sensing system distinguish
between a moderate frontal impact and a more
severe frontal impact. Your vehicle is also equipped
with a crash sensing and diagnostic module,
which records information about the frontal air bag
system. The module records information about
the readiness of the system, when the system
commands air bag in¯ation and driver's safety belt
usage at deployment. The module also records
speed, engine rpm, brake and throttle data.
·Let only quali®ed technicians work on your air bag
systems. Improper service can mean that an air bag
system won't work properly. See your dealer for
service.
Notice:If you damage the covering for the driver's
or the right front passenger's air bag, or the air
bag covering on the driver's and right front
passenger's seatback, the bag may not work
properly. You may have to replace the air bag
module in the steering wheel, both the air bag
module and the instrument panel for the right front
passenger's air bag, or both the air bag module
and seatback for the driver's and right front
passenger's side impact air bag. Do not open or
break the air bag coverings.
1-59
Page 69 of 442
Keys...............................................................2-3
Remote Keyless Entry System.........................2-5
Remote Keyless Entry System Operation...........2-6
Doors and Locks.............................................2-8
Door Locks....................................................2-8
Power Door Locks..........................................2-9
Delayed Locking.............................................2-9
Programmable Automatic
Door Locks...............................................2-10
Rear Door Security Locks..............................2-12
Lockout Protection........................................2-12
Leaving Your Vehicle....................................2-12
Liftgate/Liftglass............................................2-13
Windows........................................................2-14
Power Windows............................................2-15
Sun Visors...................................................2-16
Theft-Deterrent Systems..................................2-17
Content Theft-Deterrent.................................2-17
Passlock
ž....................................................2-18
Starting and Operating Your Vehicle................2-19
New Vehicle Break-In....................................2-19
Ignition Positions..........................................2-19Starting Your Engine.....................................2-21
Engine Coolant Heater..................................2-22
Automatic Transmission Operation...................2-23
Four-Wheel Drive..........................................2-25
Parking Brake..............................................2-28
Shifting Into Park (P).....................................2-29
Shifting Out of Park (P).................................2-31
Parking Over Things That Burn.......................2-32
Engine Exhaust............................................2-33
Running Your Engine While You Are Parked. . . .2-33
Mirrors...........................................................2-35
Automatic Dimming Rearview Mirror with
OnStar
žand Compass...............................2-35
Outside Manual Mirrors..................................2-37
Outside Power Mirrors...................................2-37
Outside Convex Mirror...................................2-38
Outside Heated Mirrors..................................2-38
Outside Automatic Dimming Mirror with Curb
View Assist..............................................2-38
OnStar
žSystem.............................................2-39
HomeLinkžTransmitter...................................2-40
Programming the HomeLinkžTransmitter.........2-41
Section 2 Features and Controls
2-1
Page 91 of 442
Automatic Transmission Operation
There are several different positions for your gear
shift lever.
PARK (P):This position locks the rear wheels. It's the
best position to use when you start the engine
because your vehicle can't move easily.
{CAUTION:
It is dangerous to get out of your vehicle if the
shift lever is not fully in PARK (P) with the
parking brake ®rmly set. Your vehicle can roll.
Don't leave your vehicle when the engine is
running unless you have to. If you have left the
engine running, the vehicle can move
suddenly. You or others could be injured. To
be sure your vehicle won't move, even when
you're on fairly level ground, always set your
parking brake and move the shift lever to
PARK (P). See ªShifting Into Park (P)º in the
Index. If you're pulling a trailer, see ªTowing a
Trailerº in the Index.
{CAUTION:
If you have four-wheel drive, your vehicle will
be free to roll Ð even if your shift lever is in
PARK (P) Ð if your transfer case is in
NEUTRAL. So, be sure the transfer case is in a
drive gear Ð not in NEUTRAL. See
ªFour-Wheel Drive (Automatic Transfer Case)º
in the Index. See ªShifting Into Park (P)º in
the Index.
Ensure the shift lever is fully in PARK (P) before starting
the engine. Your vehicle has an automatic transmission
shift lock control system. You have to fully apply the
regular brakes before you can shift from PARK (P) when
the ignition key is in RUN. If you cannot shift out of
PARK (P), ease pressure on the shift lever, press the
button on the shift lever and push the shift lever all
the way into PARK (P) as you maintain brake
application. Move the shift lever into the gear you wish.
See
Shifting Out of Park (P) on page 2-31.
2-23
Page 93 of 442
FIRST (1):This position gives you even more power
but lower fuel economy than SECOND (2). You can use
it on very steep hills, or in deep snow or mud. If the
selector lever is put in FIRST (1) while the vehicle
is moving forward, the transmission won't shift into ®rst
gear until the vehicle is going slowly enough.
Notice:If your wheels won't turn, don't try to drive.
This might happen if you were stuck in very deep
sand or mud or were up against a solid object. You
could damage your transmission. Also, if you
stop when going uphill, don't hold your vehicle there
with only the accelerator pedal. This could overheat
and damage the transmission. Use your brakes
or shift into PARK (P) to hold your vehicle in
position on a hill.
Four-Wheel Drive
If your vehicle has four-wheel drive, you can send your
engine's driving power to all four wheels for extra
traction. To get the most satisfaction out of four-wheel
drive, you must be familiar with its operation. Read
the part that follows before using four-wheel drive. You
should use two-wheel drive high (2HI) for most
normal driving conditions.
Notice:Driving in the 4-WHEEL HIGH (4HI) or
4-WHEEL LOW (4LO) positions for a long time on
dry or wet pavement could shorten the life of
your vehicle's drivetrain.
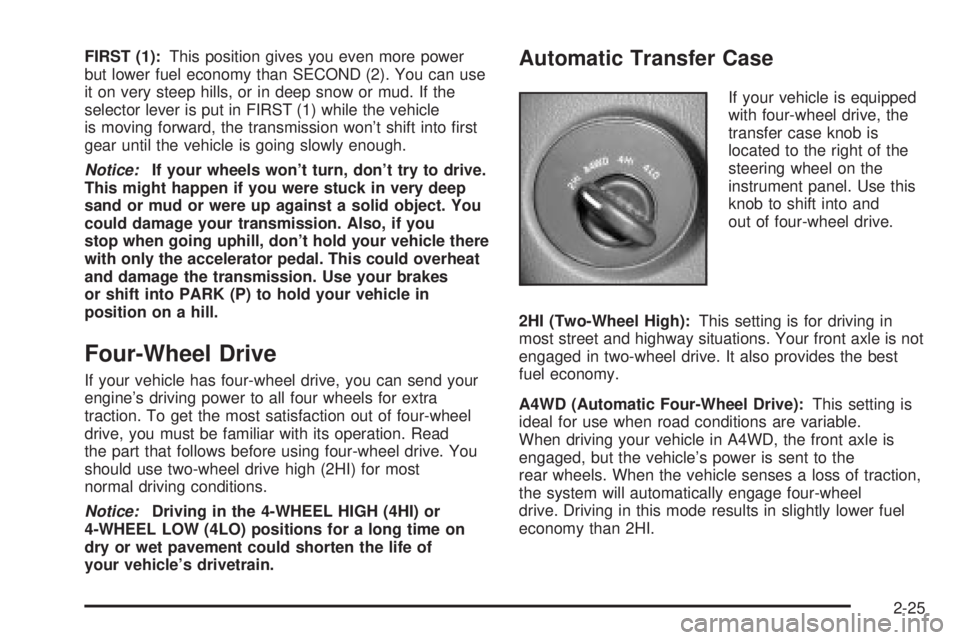
Automatic Transfer Case
If your vehicle is equipped
with four-wheel drive, the
transfer case knob is
located to the right of the
steering wheel on the
instrument panel. Use this
knob to shift into and
out of four-wheel drive.
2HI (Two-Wheel High):This setting is for driving in
most street and highway situations. Your front axle is not
engaged in two-wheel drive. It also provides the best
fuel economy.
A4WD (Automatic Four-Wheel Drive):This setting is
ideal for use when road conditions are variable.
When driving your vehicle in A4WD, the front axle is
engaged, but the vehicle's power is sent to the
rear wheels. When the vehicle senses a loss of traction,
the system will automatically engage four-wheel
drive. Driving in this mode results in slightly lower fuel
economy than 2HI.
2-25
Page 96 of 442
Shifting Out of NEUTRAL
To shift the transfer case out of NEUTRAL, do the
following:
1. Set the parking brake and apply the regular
brake pedal.
2. Start the vehicle with the transmission in PARK (P).
3. Turn the transfer case knob to the desired shift
position (2HI, 4HI or A4WD).
4. Put the transmission in NEUTRAL (N).
5. Release the parking brake.
6. After the transfer case has shifted out of NEUTRAL,
the indicator light will go out. Shift the transmission
lever to the desired position.
A re-engagement sound is normal when shifting out of
NEUTRAL.
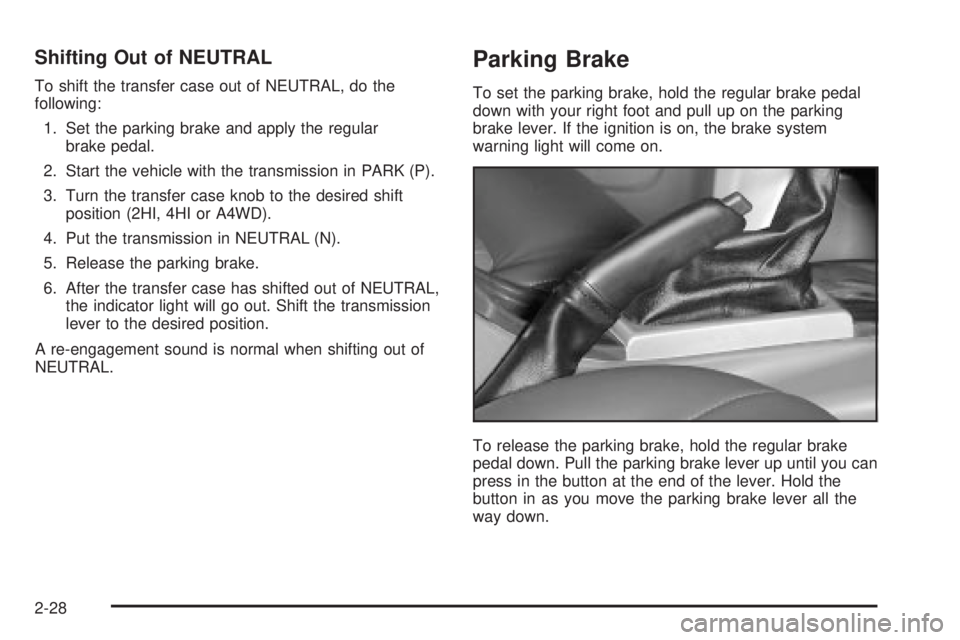
Parking Brake
To set the parking brake, hold the regular brake pedal
down with your right foot and pull up on the parking
brake lever. If the ignition is on, the brake system
warning light will come on.
To release the parking brake, hold the regular brake
pedal down. Pull the parking brake lever up until you can
press in the button at the end of the lever. Hold the
button in as you move the parking brake lever all the
way down.
2-28
Page 99 of 442

If you have to leave your vehicle with the engine
running, be sure your vehicle is in PARK (P) and your
parking brake is ®rmly set before you leave it. After
you've moved the shift lever into PARK (P), hold
the regular brake pedal down. Then, see if you can
move the shift lever away from PARK (P) without ®rst
pressing the button on the console shift lever. If you can,
it means that the shift lever wasn't fully locked into
PARK (P).
Torque Lock
If you are parking on a hill and you don't shift your
transmission into PARK (P) properly, the weight of the
vehicle may put too much force on the parking pawl
in the transmission. You may ®nd it difficult to pull the
shift lever out of PARK (P). This is called ªtorque
lock.º To prevent torque lock, set the parking brake and
then shift into PARK (P) properly before you leave
the driver's seat. To ®nd out how, see
Shifting Into
Park (P) on page 2-29.When you are ready to drive, move the shift lever out of
PARK (P)
beforeyou release the parking brake.
If torque lock does occur, you may need to have another
vehicle push yours a little uphill to take some of the
pressure from the parking pawl in the transmission, so
you can pull the shift lever out of PARK (P).
Shifting Out of Park (P)
Your vehicle has an automatic transmission shift lock
control system. You have to fully apply the regular
brakes before you can shift from PARK (P) when the
ignition is in RUN. See
Automatic Transmission
Operation on page 2-23.
2-31
Page 121 of 442
Instrument Panel Overview...............................3-4
Hazard Warning Flashers................................3-6
Other Warning Devices...................................3-6
Horn.............................................................3-7
Tilt Wheel.....................................................3-7
Turn Signal/Multifunction Lever.........................3-7
Exterior Lamps.............................................3-15
Interior Lamps..............................................3-17
Accessory Power Outlets...............................3-19
Ashtrays and Cigarette Lighter........................3-20
Climate Controls............................................3-21
Dual Climate Control System..........................3-21
Dual Automatic Climate Control System...........3-24
Rear Climate Control System.........................3-29
Steering Wheel Climate Controls.....................3-33
Climate Controls Personalization.....................3-33
Warning Lights, Gages and Indicators.............3-34
Instrument Panel Cluster................................3-35
Speedometer and Odometer...........................3-36
Tachometer.................................................3-36
Safety Belt Reminder Light.............................3-37Air Bag Readiness Light................................3-37
Charging System Light..................................3-38
Voltmeter Gage............................................3-39
Brake System Warning Light..........................3-39
Anti-Lock Brake System Warning Light.............3-41
Engine Coolant Temperature Gage..................3-41
Malfunction Indicator Lamp.............................3-42
Oil Pressure Gage........................................3-45
Change Engine Oil Light................................3-46
Security Light...............................................3-46
Cruise Control Light......................................3-47
Reduced Engine Power Light.........................3-47
Service Four-Wheel Drive Warning Light..........3-48
Check Gages Warning Light...........................3-48
Gate Ajar Light.............................................3-49
Fuel Gage...................................................3-49
Low Fuel Warning Light.................................3-50
Driver Information Center (DIC).......................3-50
DIC Operation and Displays...........................3-51
DIC Warnings and Messages.........................3-60
Section 3 Instrument Panel
3-1
Page 125 of 442
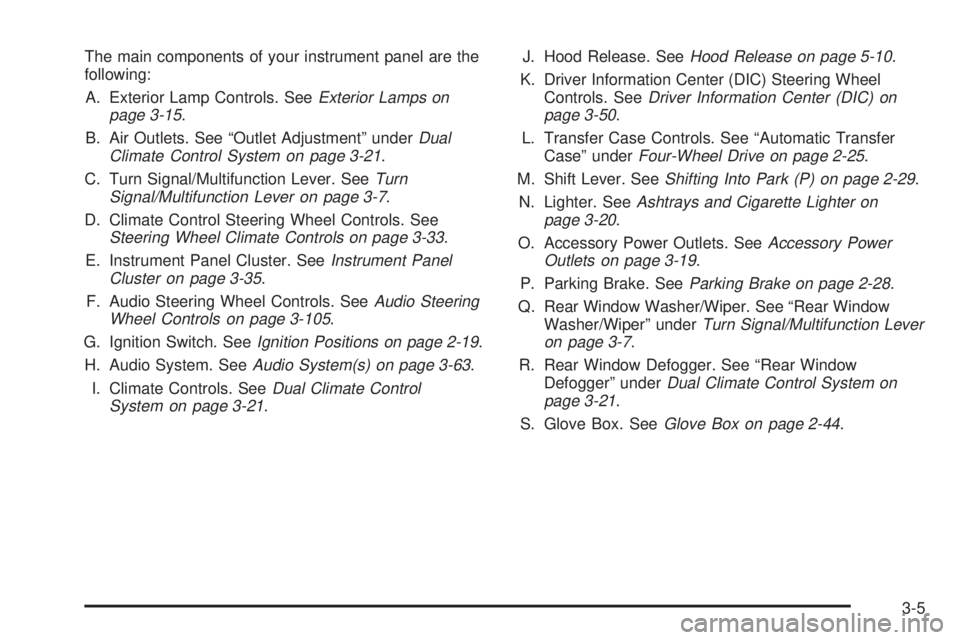
The main components of your instrument panel are the
following:
A. Exterior Lamp Controls. See
Exterior Lamps on
page 3-15.
B. Air Outlets. See ªOutlet Adjustmentº under
Dual
Climate Control System on page 3-21.
C. Turn Signal/Multifunction Lever. See
Turn
Signal/Multifunction Lever on page 3-7.
D. Climate Control Steering Wheel Controls. See
Steering Wheel Climate Controls on page 3-33.
E. Instrument Panel Cluster. See
Instrument Panel
Cluster on page 3-35.
F. Audio Steering Wheel Controls. See
Audio Steering
Wheel Controls on page 3-105.
G. Ignition Switch. See
Ignition Positions on page 2-19.
H. Audio System. See
Audio System(s) on page 3-63.
I. Climate Controls. See
Dual Climate Control
System on page 3-21.J. Hood Release. See
Hood Release on page 5-10.
K. Driver Information Center (DIC) Steering Wheel
Controls. See
Driver Information Center (DIC) on
page 3-50.
L. Transfer Case Controls. See ªAutomatic Transfer
Caseº under
Four-Wheel Drive on page 2-25.
M. Shift Lever. See
Shifting Into Park (P) on page 2-29.
N. Lighter. See
Ashtrays and Cigarette Lighter on
page 3-20.
O. Accessory Power Outlets. See
Accessory Power
Outlets on page 3-19.
P. Parking Brake. See
Parking Brake on page 2-28.
Q. Rear Window Washer/Wiper. See ªRear Window
Washer/Wiperº under
Turn Signal/Multifunction Lever
on page 3-7.
R. Rear Window Defogger. See ªRear Window
Defoggerº under
Dual Climate Control System on
page 3-21.
S. Glove Box. See
Glove Box on page 2-44.
3-5
Page 132 of 442

Cruise Control
The cruise controls are
located on the end of the
turn signal/multifunction
lever.
R(On):Move the switch to this position to turn the
cruise control system on.
S(Resume/Accelerate):Move the switch to this
position to resume a set speed or to accelerate.
T(Set):Press this button, located at the end of the
lever, to set a speed.
9(Off):This position turns the cruise control system
off and cancels memory of a set speed.With cruise control, you can maintain a speed of about
25 mph (40 km/h) or more without keeping your foot
on the accelerator. This can really help on long
trips. Cruise control does not work at speeds below
about 25 mph (40 km/h).
If you apply your brakes, the cruise control will shut off.
{CAUTION:
·Cruise control can be dangerous where
you can't drive safely at a steady speed.
So, don't use your cruise control on
winding roads or in heavy traffic.
·Cruise control can be dangerous on
slippery roads. On such roads, fast
changes in tire traction can cause
needless wheel spinning, and you could
lose control. Don't use cruise control on
slippery roads.
3-12
Page 136 of 442
There is a delay in the transition between the daytime
and nighttime operation of the Daytime Running
Lamps (DRL) and the automatic headlamp systems, so
that driving under bridges or bright overhead street
lights does not affect the system. The DRL and
automatic headlamp system will only be affected when
the light sensor sees a change in lighting lasting
longer than the delay.
If you start your vehicle in a dark garage, the automatic
headlamp system will come on immediately. Once
you leave the garage, it will take about one minute for
the automatic headlamp system to change to DRL if it is
light outside. During that delay, your instrument panel
cluster may not be as bright as usual. Make sure
your instrument panel brightness control is in the full
bright position.
To idle your vehicle with the automatic headlamp
system off, set the parking brake while the ignition is off.
Then start your vehicle. The automatic headlamp
system will stay off until you release the parking brake,
shift out of park or turn the exterior lamp control to
the off position as described in ªExterior Lampsº listed
previously.
Lamps On Reminder
A reminder tone will sound when your headlamps or
parking lamps are manually turned on, the driver's door
is open and your ignition is in LOCK or ACCESSORY.To turn the tone off, turn the knob all the way
counterclockwise. In the automatic mode, the headlamps
turn off once the ignition key is in LOCK.
Daytime Running Lamps (DRL)
Daytime Running Lamps (DRL) can make it easier for
others to see the front of your vehicle during the
day. DRL can be helpful in many different driving
conditions, but they can be especially helpful in the short
periods after dawn and before sunset. Fully functional
daytime running lamps are required on all vehicles
®rst sold in Canada.
The DRL system will make your headlamps come on
at reduced brightness when the following conditions
are met:
·The ignition is on,
·the exterior lamps knob is in automatic headlamp
mode,
·the light sensor detects daytime light, and
·the transmission is not in PARK (P).
When the DRL are on, only your headlamps will be on.
The taillamps, sidemarker and other lamps won't be
on. The instrument panel won't be lit up either.
When it begins to get dark, the headlamps will
automatically switch from DRL to the regular headlamps.
3-16