sensor GMC ENVOY 2003 Owner's Manual
[x] Cancel search | Manufacturer: GMC, Model Year: 2003, Model line: ENVOY, Model: GMC ENVOY 2003Pages: 442, PDF Size: 3.1 MB
Page 65 of 442
CAUTION: (Continued)
breathing trouble. To avoid this, everyone in
the vehicle should get out as soon as it is safe
to do so. If you have breathing problems but
can't get out of the vehicle after an air bag
in¯ates, then get fresh air by opening a
window or a door. If you experience breathing
problems following an air bag deployment, you
should seek medical attention.
Your vehicle has a feature that will automatically unlock
the doors and turn the interior lamps on when the air
bags in¯ate (if battery power is available). You can lock
the doors again and turn the interior lamps off by
using the door lock and interior lamp controls.
In many crashes severe enough to in¯ate an air bag,
windshields are broken by vehicle deformation.
Additional windshield breakage may also occur from the
right front passenger air bag.
·Air bags are designed to in¯ate only once. After an
air bag in¯ates, you'll need some new parts for
your air bag system. If you don't get them, the air
bag system won't be there to help protect you
in another crash. A new system will include air bagmodules and possibly other parts. The service
manual for your vehicle covers the need to replace
other parts.
·Your vehicle is equipped with an electronic frontal
sensor, which helps the sensing system distinguish
between a moderate frontal impact and a more
severe frontal impact. Your vehicle is also equipped
with a crash sensing and diagnostic module,
which records information about the frontal air bag
system. The module records information about
the readiness of the system, when the system
commands air bag in¯ation and driver's safety belt
usage at deployment. The module also records
speed, engine rpm, brake and throttle data.
·Let only quali®ed technicians work on your air bag
systems. Improper service can mean that an air bag
system won't work properly. See your dealer for
service.
Notice:If you damage the covering for the driver's
or the right front passenger's air bag, or the air
bag covering on the driver's and right front
passenger's seatback, the bag may not work
properly. You may have to replace the air bag
module in the steering wheel, both the air bag
module and the instrument panel for the right front
passenger's air bag, or both the air bag module
and seatback for the driver's and right front
passenger's side impact air bag. Do not open or
break the air bag coverings.
1-59
Page 130 of 442
RainsenseŸ Wipers
Your vehicle may be equipped with
RainsenseŸ windshield wipers. When active, these
wipers are able to detect moisture on the windshield and
automatically turn on the wipers.
The moisture sensor is located next to the inside
rearview mirror and is mounted on the windshield.
To turn on the RainsenseŸ feature, the wipers must be
set to one of the ®ve delay settings on the multifunction
lever. Each of the ®ve settings adjusts the sensitivity
of the rainsensor. For more wipes, select the higher
settings; for fewer wipes, select the lower settings
located closer to off on the multifunction lever.
The rainsensor will automatically control the frequency
of the wipes from off to high speed according to the
weather conditions. The wipers can be left in a
rainsense mode even when it is not raining.
Notice:Turn the windshield wiper band on the
multifunction lever to off to avoid wiper damage
when going through an automatic car wash.
Windshield Washer
L
(Windshield Washer):To spray washer ¯uid on the
windshield, press the windshield washer paddle. The
wipers will clear the window and then either stop
or return to your preset speed.
{CAUTION:
In freezing weather, don't use your washer
until the windshield is warmed. Otherwise the
washer ¯uid can form ice on the windshield,
blocking your vision.
3-10
Page 135 of 442

Exterior Lamps
Your exterior lamps knob
is located on your
instrument panel to the left
of the steering wheel.
c(Off):Turn the knob to this symbol and release it to
turn off the Daytime Running Lamps (DRL) and the
automatic headlamps. An indicator will illuminate when
the position is selected. This position is not available
for vehicles ®rst sold in Canada.
i(Automatic DRL/AHS):Turning the knob to this
symbol puts the system into automatic headlamp mode.
An indicator will illuminate when the position is
selected.
;(Parking Lamps):Turn the knob to this symbol to
manually turn on the following:
·Parking Lamps
·Sidemarker Lamps
·Taillamps
·License Plate Lamps
·Instrument Panel Lights
2(Headlamps):Turn the knob to this symbol to turn
on all the lamps listed as well as the headlamps.
Automatic Headlamp System
When it is dark enough outside, your Automatic
Headlamp System will turn on your headlamps at the
normal brightness along with other lamps such as
the taillamps, sidemarker, parking lamps and the
instrument panel lights. The radio lights will also be on.
Your vehicle is equipped with a light sensor on the
top of the instrument panel. Be sure it is not covered or
the system will be on whenever the ignition is on.
The system may also turn on your lights when driving
through a parking garage, heavy overcast weather
or a tunnel. This is normal.
3-15
Page 136 of 442
There is a delay in the transition between the daytime
and nighttime operation of the Daytime Running
Lamps (DRL) and the automatic headlamp systems, so
that driving under bridges or bright overhead street
lights does not affect the system. The DRL and
automatic headlamp system will only be affected when
the light sensor sees a change in lighting lasting
longer than the delay.
If you start your vehicle in a dark garage, the automatic
headlamp system will come on immediately. Once
you leave the garage, it will take about one minute for
the automatic headlamp system to change to DRL if it is
light outside. During that delay, your instrument panel
cluster may not be as bright as usual. Make sure
your instrument panel brightness control is in the full
bright position.
To idle your vehicle with the automatic headlamp
system off, set the parking brake while the ignition is off.
Then start your vehicle. The automatic headlamp
system will stay off until you release the parking brake,
shift out of park or turn the exterior lamp control to
the off position as described in ªExterior Lampsº listed
previously.
Lamps On Reminder
A reminder tone will sound when your headlamps or
parking lamps are manually turned on, the driver's door
is open and your ignition is in LOCK or ACCESSORY.To turn the tone off, turn the knob all the way
counterclockwise. In the automatic mode, the headlamps
turn off once the ignition key is in LOCK.
Daytime Running Lamps (DRL)
Daytime Running Lamps (DRL) can make it easier for
others to see the front of your vehicle during the
day. DRL can be helpful in many different driving
conditions, but they can be especially helpful in the short
periods after dawn and before sunset. Fully functional
daytime running lamps are required on all vehicles
®rst sold in Canada.
The DRL system will make your headlamps come on
at reduced brightness when the following conditions
are met:
·The ignition is on,
·the exterior lamps knob is in automatic headlamp
mode,
·the light sensor detects daytime light, and
·the transmission is not in PARK (P).
When the DRL are on, only your headlamps will be on.
The taillamps, sidemarker and other lamps won't be
on. The instrument panel won't be lit up either.
When it begins to get dark, the headlamps will
automatically switch from DRL to the regular headlamps.
3-16
Page 157 of 442

Safety Belt Reminder Light
When the key is turned to RUN, a chime will come on
for several seconds to remind people to fasten their
safety belts, unless the driver's safety belt is already
buckled.
The safety belt light will
also come on and stay on
for several seconds,
then it will ¯ash for
several more.
If the driver's belt is already buckled, neither the chime
nor the light will come on.
Air Bag Readiness Light
There is an air bag readiness light on the instrument
panel, which shows the air bag symbol. The system
checks the air bag's electrical system for malfunctions.
The light tells you if there is an electrical problem.
The system check includes the air bag sensors, the air
bag modules, the wiring and the crash sensing and
diagnostic module. For more information on the air bag
system, see
Air Bag Systems on page 1-51.
This light will come on
when you start your
vehicle, and it will ¯ash for
a few seconds. Then
the light should go out.
This means the system
is ready.
3-37
Page 277 of 442
Electronically Controlled Air
Suspension System
Your vehicle may be equipped with an electronically
controlled air suspension system that automatically
keeps your vehicle level as you load and unload. The
system includes a compressor, two height sensors
and two air springs supporting the rear axle.
The system also has an internal clock to prevent
overheating. If the system overheats, all leveling function
stops until the system cools down. During this time,
the indicator light on the air in¯ator system will be
¯ashing.
The ignition has to be on for the system to in¯ate, in
order to raise the vehicle to the standard ride height after
loading. The system can lower the vehicle to the
standard ride height after unloading with the ignition on
and also for up to 30 minutes after the ignition has
been turned off.
You may hear the compressor operating when you load
your vehicle, and periodically as the system adjusts
the vehicle to the standard ride height.Load leveling will not function normally with the in¯ator
hose attached to the in¯ator outlet. Remove the
in¯ator hose from the outlet during loading and
unloading.
If the vehicle is parked for an extended period of time,
some bleed down of the suspension is normal. Upon
starting the vehicle, proper height will be achieved.
Overload Protection
The air suspension system is equipped with overload
protection. Overload protection is designed to protect the
air suspension system, and it is an indicator to the
driver that the vehicle is overloaded. When the overload
protection mode is on, it will not allow damage to the
air compressor. However, do not overload the vehicle.
See
Loading Your Vehicle on page 4-47.
If the suspension remains at a low height, the rear axle
load has exceeded GAWR (Gross Axle Weight
Rating). When the overload protection mode is activated,
the compressor operates for about 30 seconds to one
minute without raising the vehicle depending on the
amount of overload. This will continue each time
the ignition is turned on until the rear axle load is
reduced below GAWR.
4-49
Page 381 of 442
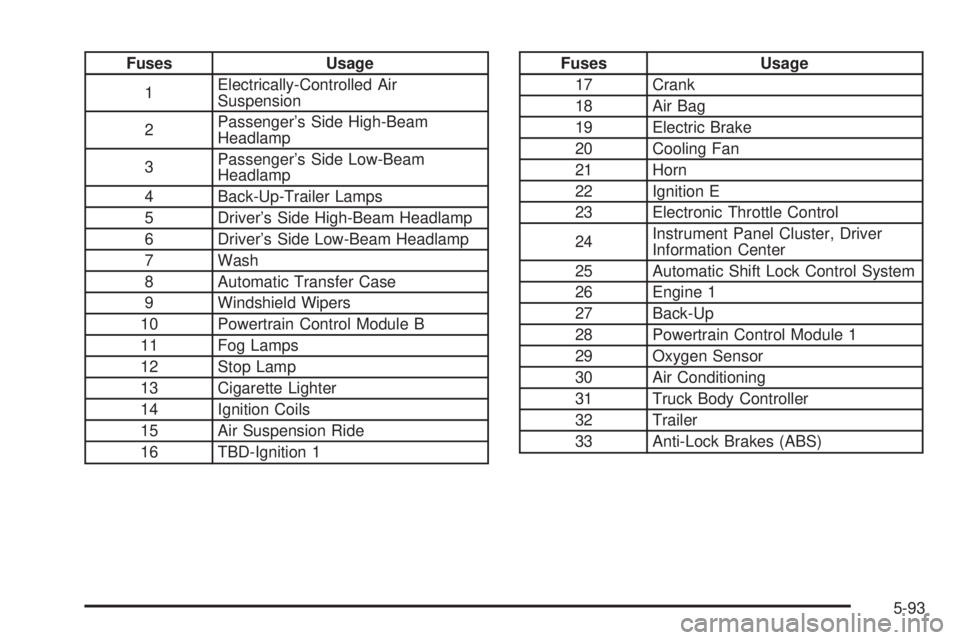
Fuses Usage
1Electrically-Controlled Air
Suspension
2Passenger's Side High-Beam
Headlamp
3Passenger's Side Low-Beam
Headlamp
4 Back-Up-Trailer Lamps
5 Driver's Side High-Beam Headlamp
6 Driver's Side Low-Beam Headlamp
7 Wash
8 Automatic Transfer Case
9 Windshield Wipers
10 Powertrain Control Module B
11 Fog Lamps
12 Stop Lamp
13 Cigarette Lighter
14 Ignition Coils
15 Air Suspension Ride
16 TBD-Ignition 1Fuses Usage
17 Crank
18 Air Bag
19 Electric Brake
20 Cooling Fan
21 Horn
22 Ignition E
23 Electronic Throttle Control
24Instrument Panel Cluster, Driver
Information Center
25 Automatic Shift Lock Control System
26 Engine 1
27 Back-Up
28 Powertrain Control Module 1
29 Oxygen Sensor
30 Air Conditioning
31 Truck Body Controller
32 Trailer
33 Anti-Lock Brakes (ABS)
5-93
Page 384 of 442
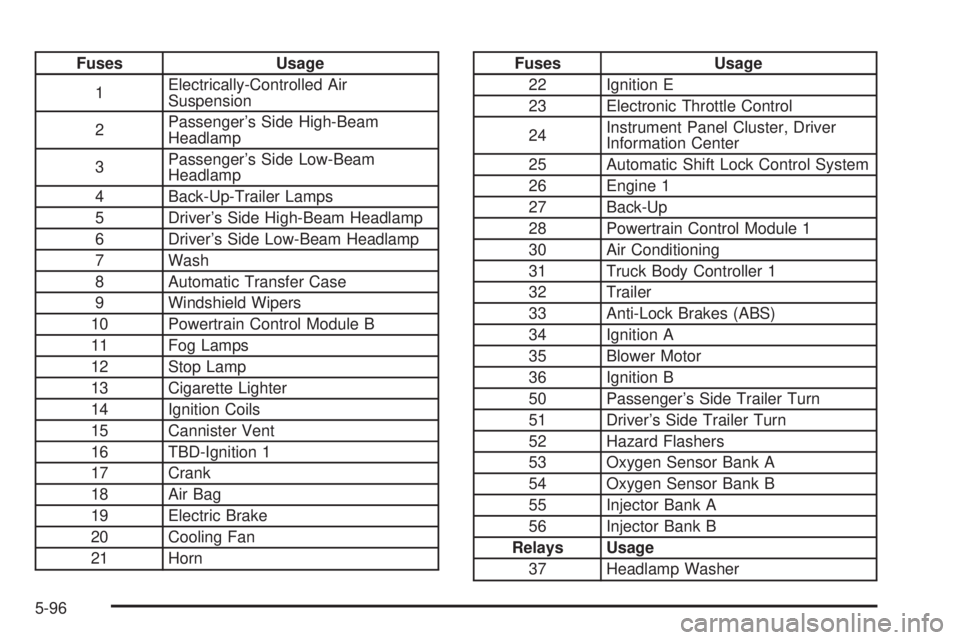
Fuses Usage
1Electrically-Controlled Air
Suspension
2Passenger's Side High-Beam
Headlamp
3Passenger's Side Low-Beam
Headlamp
4 Back-Up-Trailer Lamps
5 Driver's Side High-Beam Headlamp
6 Driver's Side Low-Beam Headlamp
7 Wash
8 Automatic Transfer Case
9 Windshield Wipers
10 Powertrain Control Module B
11 Fog Lamps
12 Stop Lamp
13 Cigarette Lighter
14 Ignition Coils
15 Cannister Vent
16 TBD-Ignition 1
17 Crank
18 Air Bag
19 Electric Brake
20 Cooling Fan
21 HornFuses Usage
22 Ignition E
23 Electronic Throttle Control
24Instrument Panel Cluster, Driver
Information Center
25 Automatic Shift Lock Control System
26 Engine 1
27 Back-Up
28 Powertrain Control Module 1
30 Air Conditioning
31 Truck Body Controller 1
32 Trailer
33 Anti-Lock Brakes (ABS)
34 Ignition A
35 Blower Motor
36 Ignition B
50 Passenger's Side Trailer Turn
51 Driver's Side Trailer Turn
52 Hazard Flashers
53 Oxygen Sensor Bank A
54 Oxygen Sensor Bank B
55 Injector Bank A
56 Injector Bank B
Relays Usage
37 Headlamp Washer
5-96